How to install Endpoint Central MSP Agents on Microsoft Azure?
Endpoint Central MSP can be used to manage machines that come under the Azure AD. To manage such machines, installing the agent is necessary. This document explains how this can be done.
The agent installation in an Azure AD environment can be done in two ways:
Prerequisites:
- Microsoft Storage Account
- Microsoft Intune Subscription
Steps:
To install the agents using the Intune service, follow the steps given below.
Create a Storage Account:
- In the Azure portal, select All services.
- In the available list, Select Storage Accounts and click on the Add option.
- Select the Subscription to create the storage account.
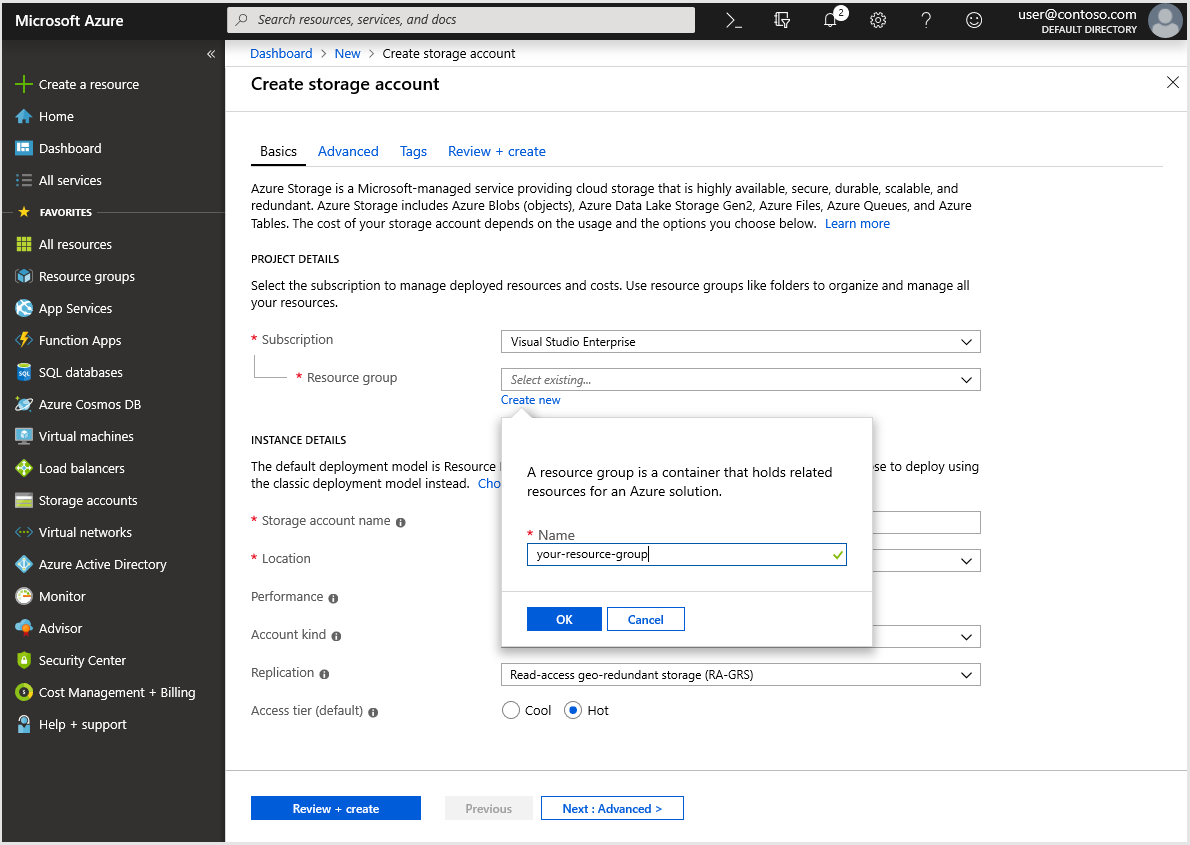
- Under the Resource group field, select Create New (If you already have resource group, then choose it from the existing resource group drop down menu). Enter a name for the new resource group, as shown in the following image.
- Select a location for your storage account, or use the default location.
- Leave the following fields set to their default values:
| Field |
Value |
| Deployment Model |
Resource Manager |
| Performance |
Standard |
| Account Kind |
StorageV2 (general-purpose v2) |
| Replication |
Read-access Geo-redundant storage (RA-GRS |
| Access Tier |
Hot |
- Select Review + Create to review your storage account settings and create the account.
Create a Blob and Upload Agent Files:
- Go to the storage account created.
- Under the Blob Services, click on Blob
- Now click the Container button.
- Provide Name and the public access level as "Blob".
- Then click the OK button to add the blob.
- Now, open the Blob created and click on the Upload button to upload the UEMSAgent.msi UEMSAgent.mst and DCAgentServerInfo.json.
- Navigate to the file location and select UEMSAgent.msi, UEMSAgent.mst and DCAgentServerInfo.json files which need to be uploaded.
- Click on Advanced Drop Down List and select the Authentication type as "Account key", select Blob type as "Block blob" and Blob size as required.
- Now, click Upload button to have the files uploaded.
Modify Script:
- Go to Storage account->Blob->container (which contains uploaded UEMSAgent.msi and UEMSAgent.mst files).
- Copy the URLs of the the above said two files.
- Then, copy and paste the given text file in a text editor and save it as AgentInstall.ps1.
If you are using Endpoint Central MSP below 11.2.2309.01
- Navigate to the text: "<DesktopCentral_Agent_Msi_URL>" , "<DesktopCentral_Agent_Mst_URL>" and "<DCAgentServerInfo_JSON_URL>" in the same file and replace it with the URL of uploaded UEMSAgent.msi, UEMSAgent.mst and DCAgentServerInfo.json files.
If you are using Endpoint Central MSP 11.2.2309.01 and above
- Navigate to the text: "<UEMS_Agent_Msi_URL>" , "<UEMS_Agent_Mst_URL>" and "<DCAgentServerInfo_JSON_URL>" in the same file and replace it with the URL of uploaded UEMSAgent.msi, UEMSAgent.mst and DCAgentServerInfo.json files.
Initiating Installation Via Intune:
- Navigate to Microsoft Intune-->Device Configuration-->Powershell scripts and then click on the Add button.
- Then, provide a Name and click on the Next button.
- In the Script Settings navigate to the AgentInstall.ps1 file location and click on the Open button.
- In Assignments, assign the script to all devices or all users or desired groups, depending on the machines that need installation.
- Then, click on the Next button and review the task.
- Click the Add button to execute the script.
You have now successfully installed the agent on devices in Microsoft Azure AD environment using Intune service.
Steps
The first step involves downloading an agent from Endpoint Central MSP. To download an agent, follow the steps given below:
- In the Endpoint Central MSP web console, navigate to Agent ---> Computers---> Download Agent
- Rename the downloaded agent as agent.exe
- Create a new folder and paste agent.exe in it. [Note: The folder should only contain this exe file]
- Use the above directory path for <output_directory> and <directory_of_agent_exe> in the following steps.
After the agent is downloaded, navigate to Intune and follow the steps given below:
Download the zip from the Git page link
Click here to download
- Extract IntuneWinAppUtil.exe from the downloaded zip folder and double-click the executable to provide the following input:
- Source folder: < directory_of_agent_exe>
- Setup file: Agent.exe
- Output folder: < output_directory >
- Do you want to specify catalog folder (Y/N)?: N
- agent.intunewin will be created in the specified output folder mentioned above.
- Use the agent.intunewin app package for deployment in Intune.
To configure the app:
- Login to EndPoint Manager Admin Center
- Click on Apps -> All Apps -> Add
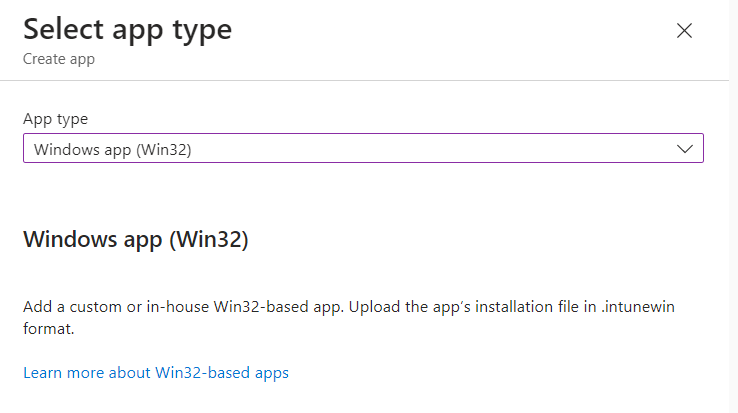
- Select App Type to Windows app (Win32)
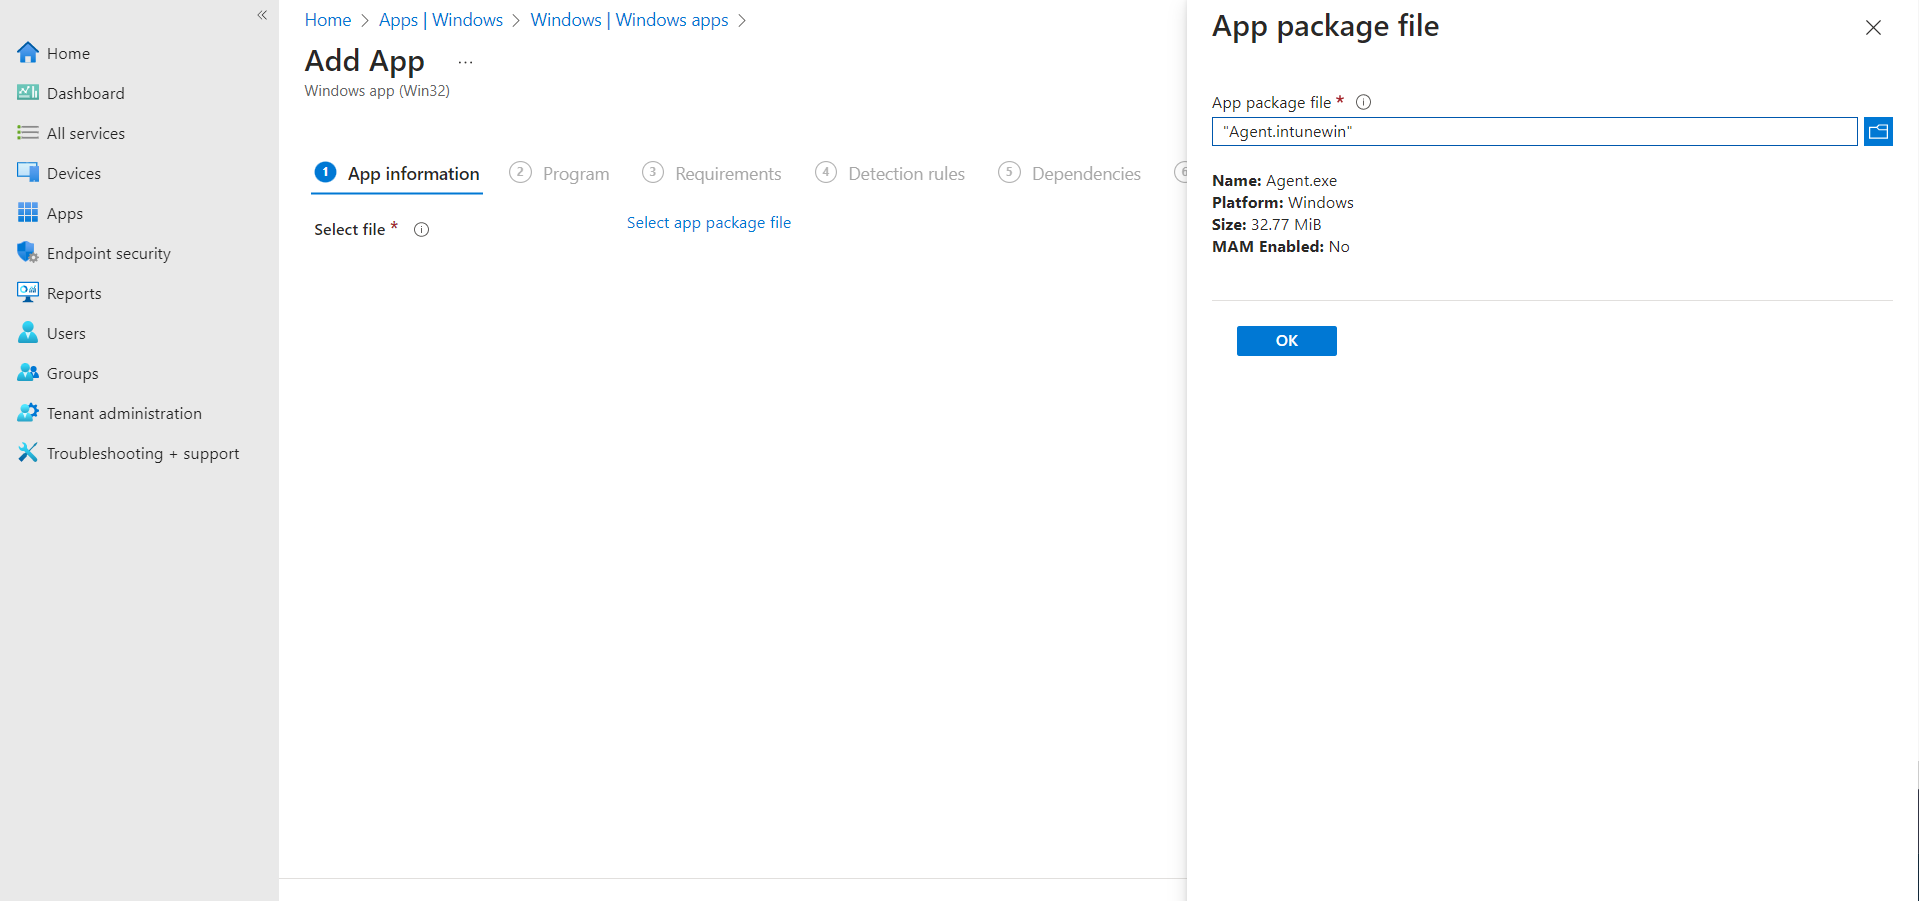
- Select package file and browse to install.intunewin
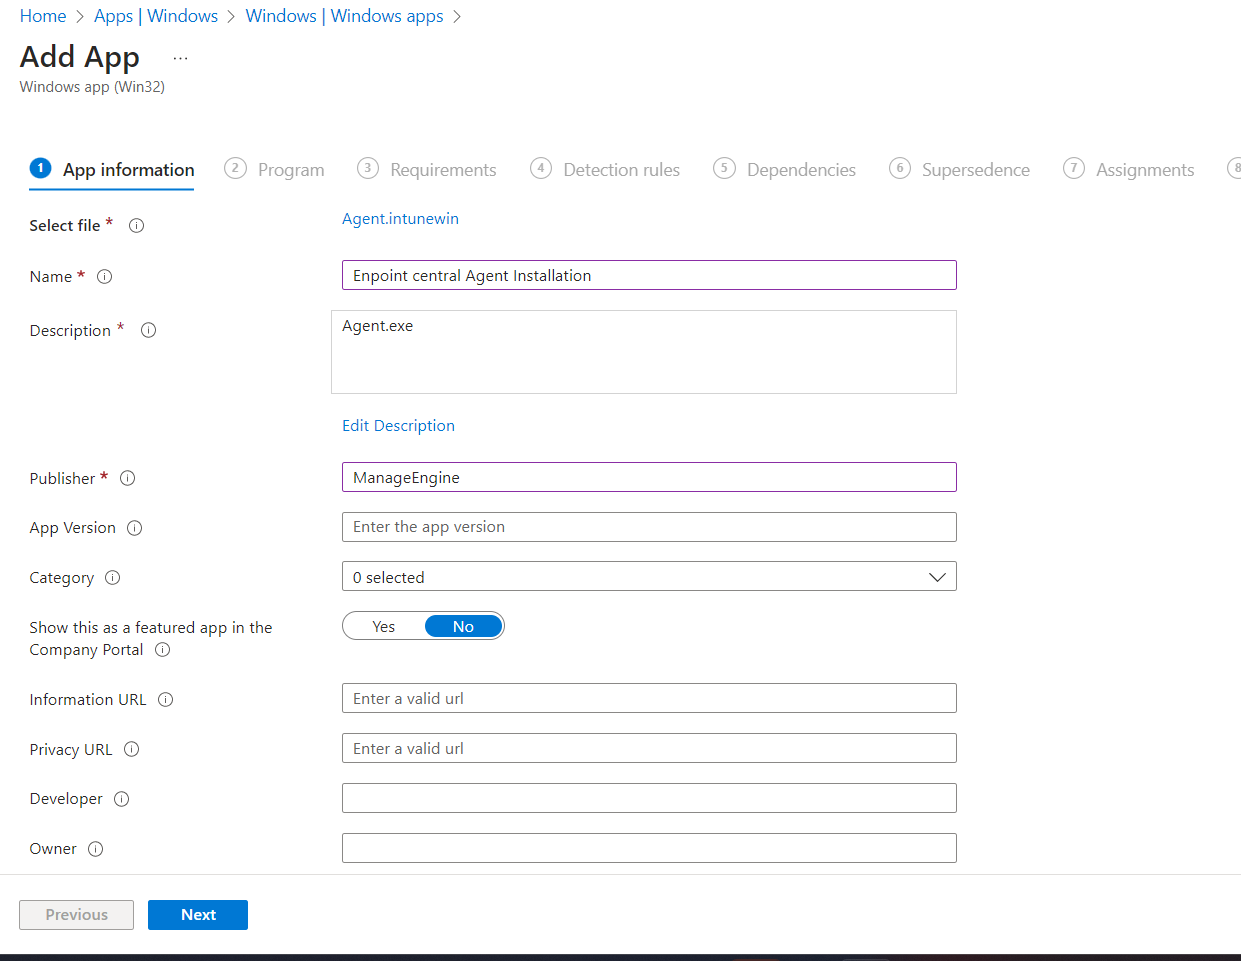
- Enter Name of the application and Publisher information and click Next.
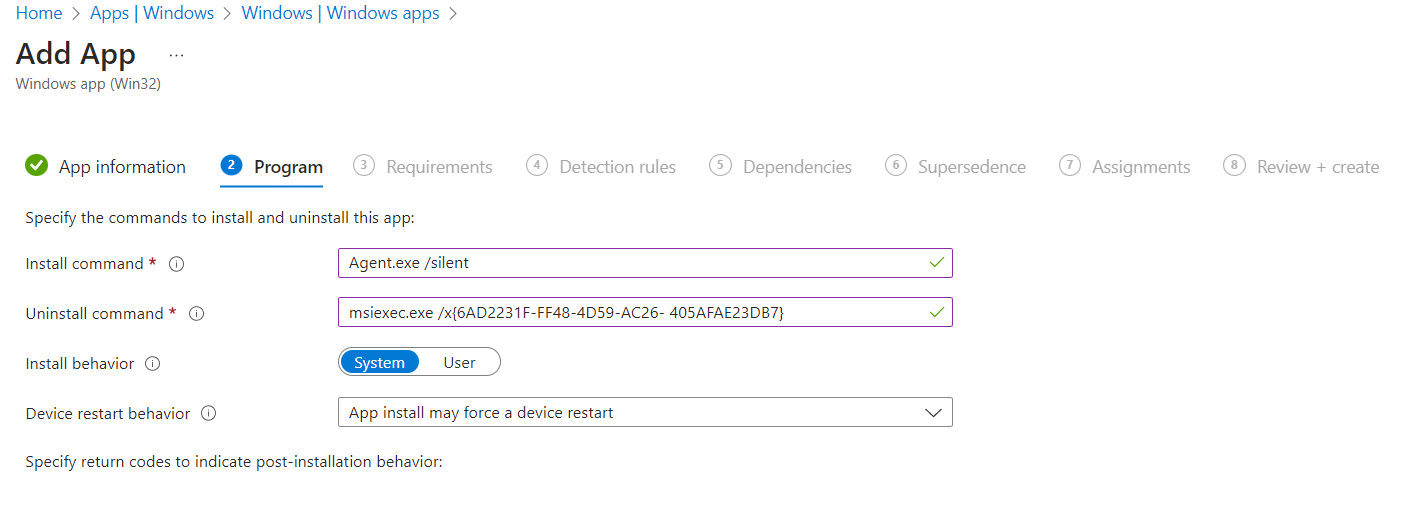
- Provide the install and uninstall command in the program tab
- Install Command: Agent.exe /silent
- Uninstall Command: msiexec.exe /x{6AD2231F-FF48-4D59-AC26-405AFAE23DB7}
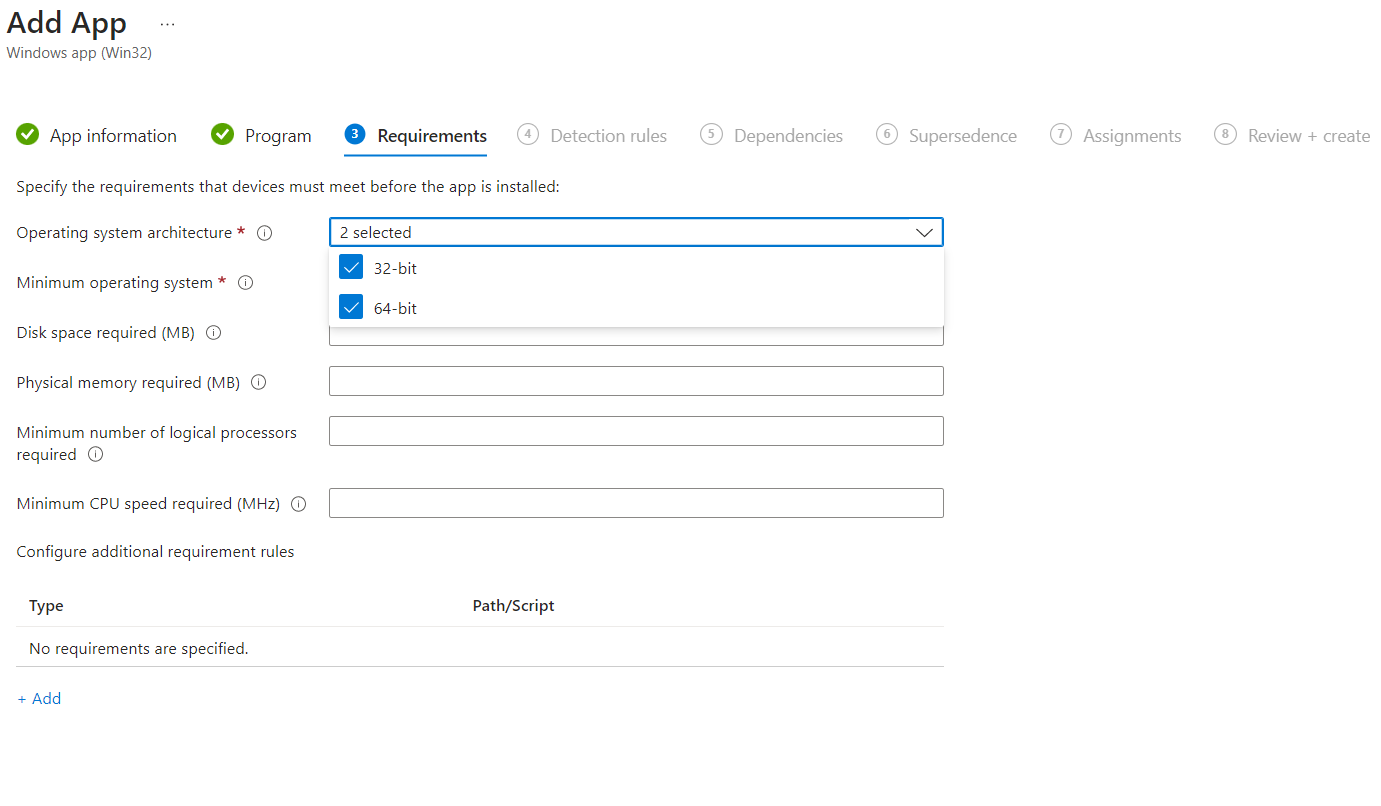
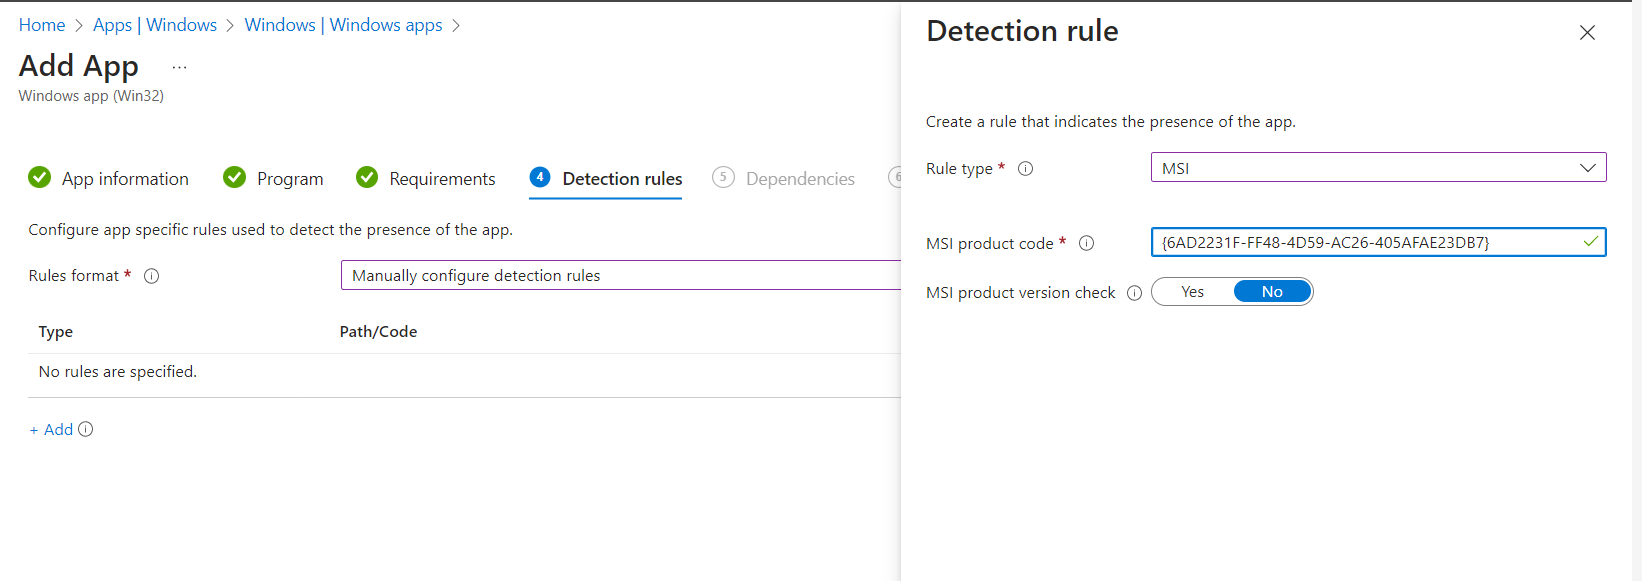
- Detection Rule - manually configure detection rule:
- Rule type: MSI
- MSI product code: {6AD2231F-FF48-4D59-AC26-405AFAE23DB7}
- MSI product version check: No
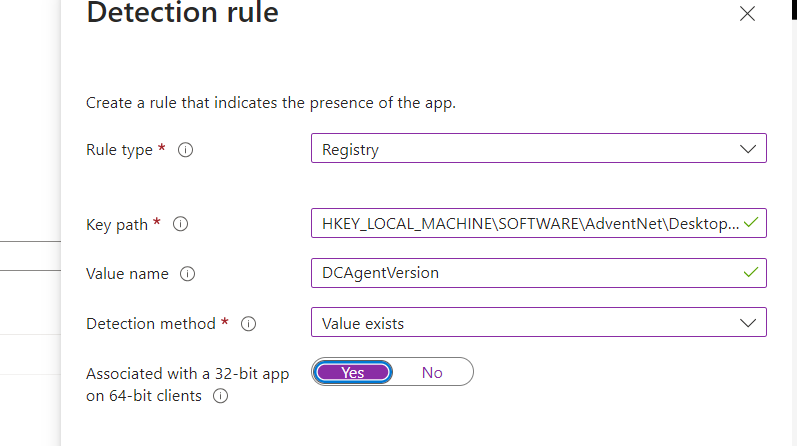
- Rule Type: Registry
- Key Path: HKEY_LOCAL_MACHINE\SOFTWARE\AdventNet\DesktopCentral\DCAgent
- Value name: DCAgentVersion.
- Associated with a 32-bit app on 64-bit clients: YES.
- Assign the application to your pilot users or all the users as per your requirement.
Prerequisites:
- An Azure subscription
- An Automation account to hold the runbook and authenticate to Azure resources
- A storage account to hold the agent binaries and script
Download The Agent Installation Files
- Open the Server web console.
- Navigate to the Agent tab
- Open Computers and download agent of respective remote office.
Storage Account Creation
- Login to the Azure portal
- select the Storage Account
- Click new and Create a new storage account
- Select the Target Subscription and Resource group
- Enter the name of the storage account. Storage account name: "ecagentbinary"
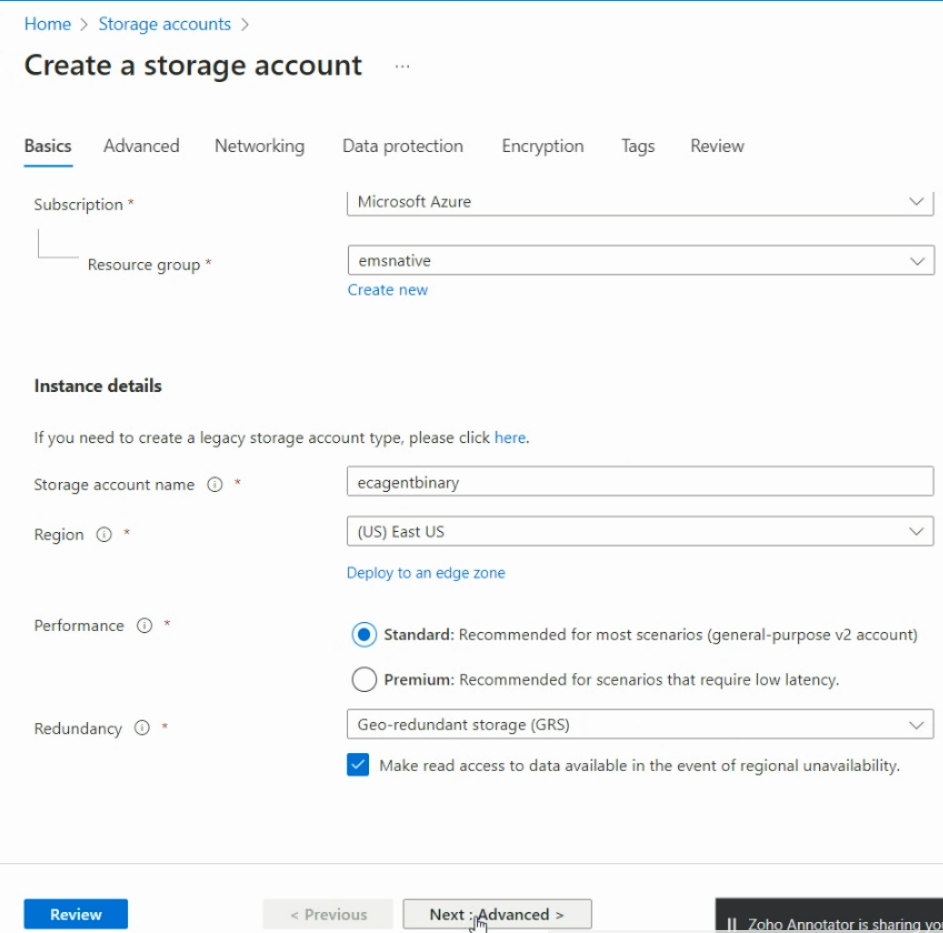
Note: Use the same name as mentioned above. If a different name is provided then it should be updated in the automation runbook script.
You can modify the default values as per your requirements
- Once done, click create and wait for the deployment to get completed
- After the deployment is successfully completed, Click on Go to resource option
- Select Overview and click Upload

- Add the following files: (LocalOffice_Agent.exe)
- Provide the container name as "scriptcontainer"
Note: Use the same name as mentioned above. If a different name is provided then it should be updated in the automation runbook script.
- Once the Upload is successfully completed, open the container tab in data storage and open the "scriptcontainer"

- Right click on LocalOffice_Agent.exe file and select the Generate SAS option

- Set the expiration date for the link and allowed protocol. Once done click Generate SAS token and URL
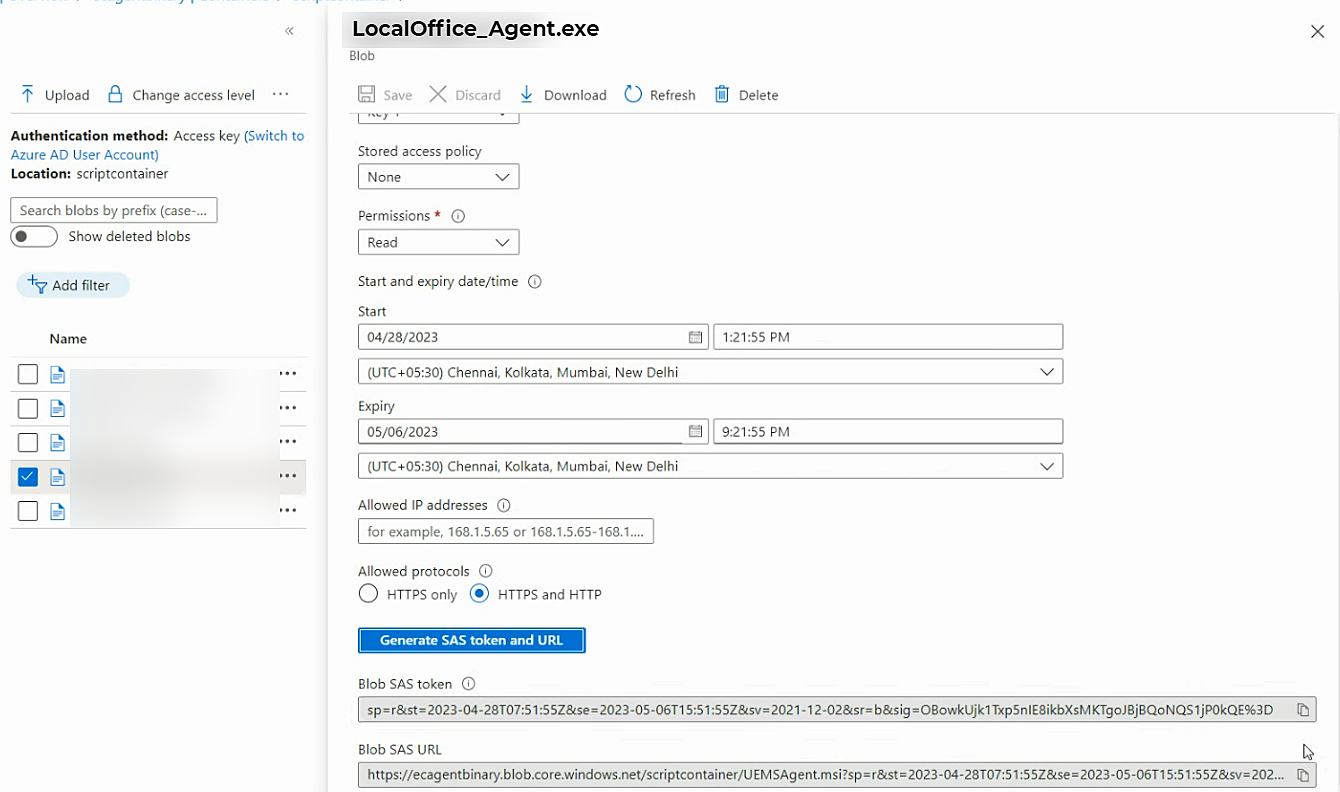
- Copy the "Blob SAS URL"
- Download the attached script and open in a text editor:
- Replace the "LocalOffice_Agent.exe Agent_MSI_URL"" with " Blob SAS URL "
- Save the file with name as InstallAgentAzure.ps1
- Upload the InstallAgentAzure.ps1 to the same "scriptcontainer"
- Finally the container should consist of the following files given below:
LocalOffice_Agent.exe and InstallAgentAzure.ps1
Azure Automation Account Creation
- Login to the Azure portal
- Select the Automation account
- Click New and Create a new Automation account
- Select the Target subscription and Resource group
- Enter the name of the Automation account. Automation account name: "agentinstallation"
- Select System Managed Identity
- Once completed, review and create the account
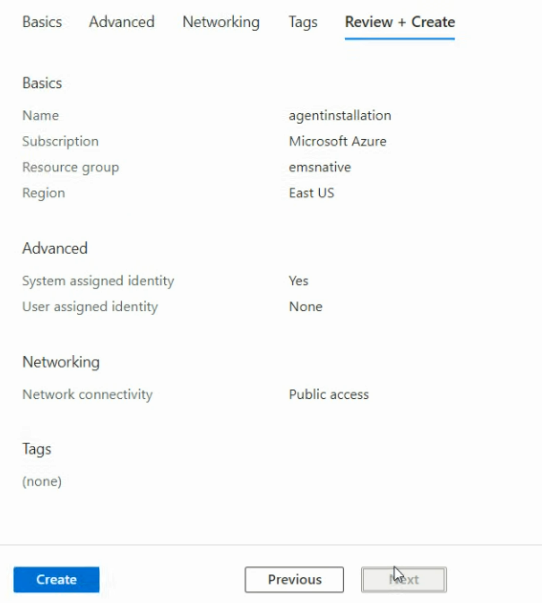
- After the deployment is successfully completed, click go to resource
- Search for identity and click "System Managed Identity"
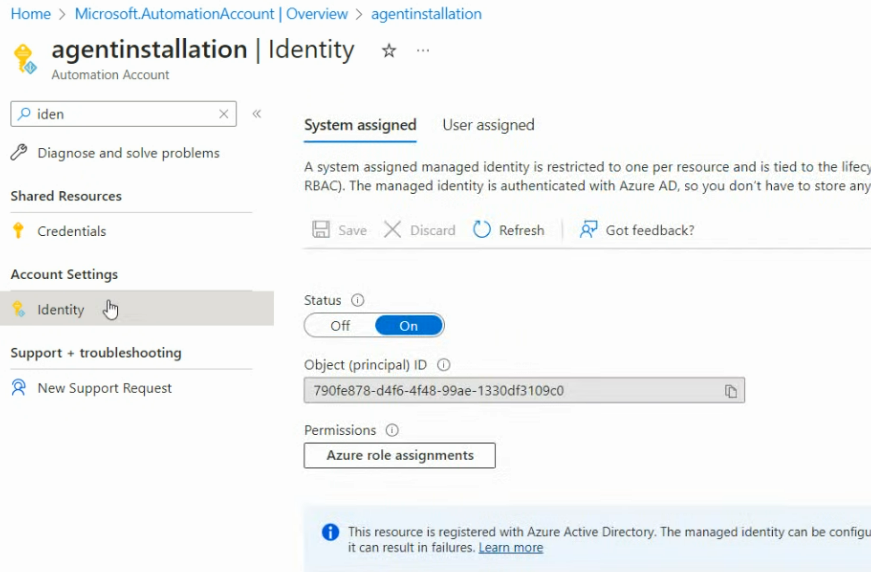
- Toggle the status to ON
- Click "Azure role assignments" and assign the following two roles with "add role assignment" option.
- Choose Scope: Resource group
- Select Subscription: Target subscription
- Choose Role: Virtual Machine Contributor
Your first role is successfully added
Enter the following details to add the second role
- Choose Scope: Storage
- Choose Subscription: Target subscription
- Select Resource: ecagentbinary
- Choose Role: Storage Blob Data Contributor
- Wait for few minutes to check whether the roles are assigned

- Once the status has been updated, go to the automation account and select the runbook option and create new runbook.
- Click overview->edit and open the editor
- Download the script below and copy the link paste it into the editor
Download script
- Save and publish the runbook
- Wait for the deployment and click start once it is available
- Open the Jobs tab once started and monitor the status of deployment from the output Tab.
- Execution status of agent installation scripts in VMs.
- Incase of any error in script execution, Make sure the below two module were imported in the module tab of the automation account.
Run time version 5.1
- az.accounts

- az. compute

Steps:
For versions below 10.1.2124.1, steps are as follows:
The following steps will help you create a single the agent installer for silent installation :-
- Download the
ZIP (SHA 256 Checksum: Loading...)
file.
- Extract the selfextractor.zip files to a folder.
- Download the agent installer files from Endpoint Central MSP Console >Admin>Scope of ManagementGet the UEMSAgent.msi and UEMSAgent.mst files.
- Copy paste the UEMSAgent.msi and UEMSAgent.mst file into the Selfextractor folder that you extracted.
- Run "Execreation.bat" from the extracted location and it will generate a file "DCAgentInstaller.exe"
- Now you can use the "DCAgentInstaller.exe"
This DCAgentinstaller.exe can be used in SCCM, Intune or in any other deployment tools. This will help you install the agent silently.
For versions 10.1.2124.1 and above, steps are as follows:
- From the product server web console, navigate to Agent --> Computers --> Download Agent.
- Silent Install Command : "<filename>.exe" /Silent, for example, "LocalOffice_Agent.exe" /Silent
This downloaded EXE can be used in SCCM, Intune or in any other deployment tools with the command mentioned above. This will help you install the agent silently.


