Steps to configure SAML SSO for ManageEngine NetFlow Analyzer
About NetFlow Analyzer
NetFlow Analyzer is a comprehensive traffic analytics tool that uses flow technologies to offer real-time visibility into network bandwidth performance. It monitors and optimizes network bandwidth and traffic patterns, performing network forensics and traffic analysis for over a million interfaces worldwide.
The following steps will help you enable single sign-on (SSO) for NetFlow Analyzer from Identity360.
Prerequisites
- The MFA and SSO license for Identity360 is required to enable SSO for enterprise applications. For more information, refer to pricing details.
- Log in to Identity360 as an Admin or Super Admin.
- Navigate to Applications > Application Integration > Create New Application, and select NetFlow Analyzer from the applications displayed.
Note: You can also find NetFlow Analyzer from the search bar located at the top.
- Under the General Settings tab, enter the Application Name and Description.
- Under Choose Capabilities tab, choose SSO and click Continue.
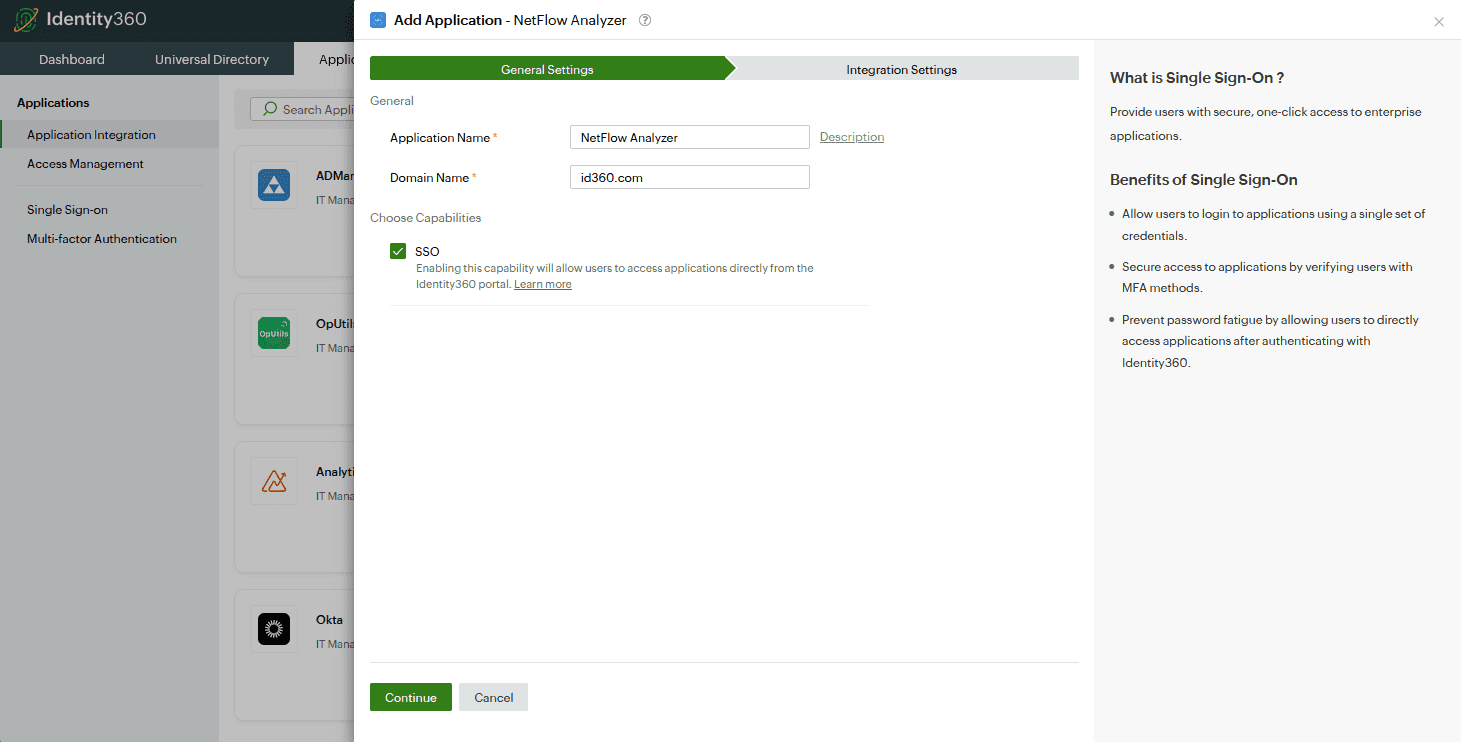 General settings of SSO configuration for NetFlow Analyzer
- Under Integration Settings, navigate to the Single Sign On tab, click on Metadata Details. You can configure NetFlow Analyzer by either uploading the metadata file or entering the details manually.
- For uploading metadata file: Download the metadata file to be uploaded during the configuration of NetFlow Analyzer in Identity360 by clicking Download from the Metadata field.
- For manual configuration:
- Copy the Login URL and Logout URL, which will be used during the configuration of NetFlow Analyzer.
- Download the SSO certificate by clicking Download from the Signing Certificate field.
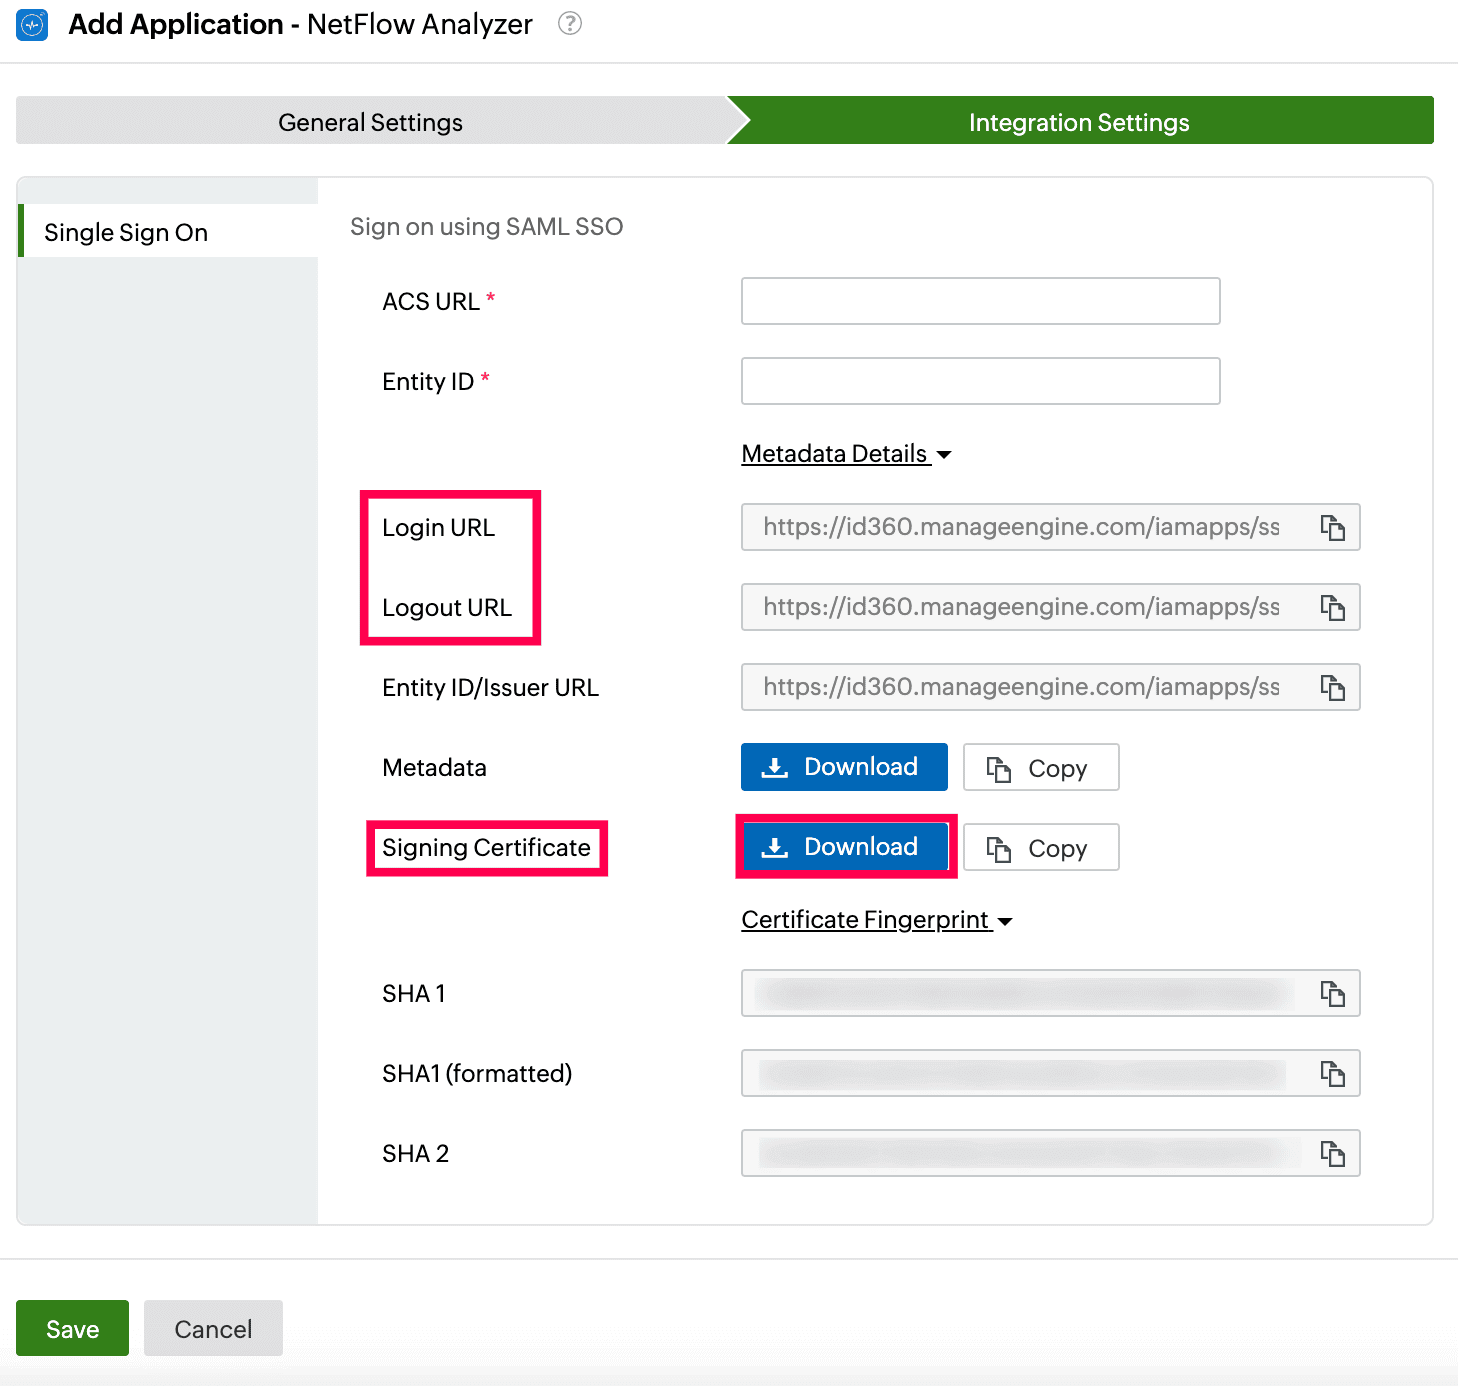 Integration Settings of SSO configuration for NetFlow Analyzer configuration
NetFlow Analyzer (service provider) configuration steps
- Log in to NetFlow Analyzer with an admin's credentials.
- In the NetFlow Analyzer portal, go to Settings > General Settings > Authentication.
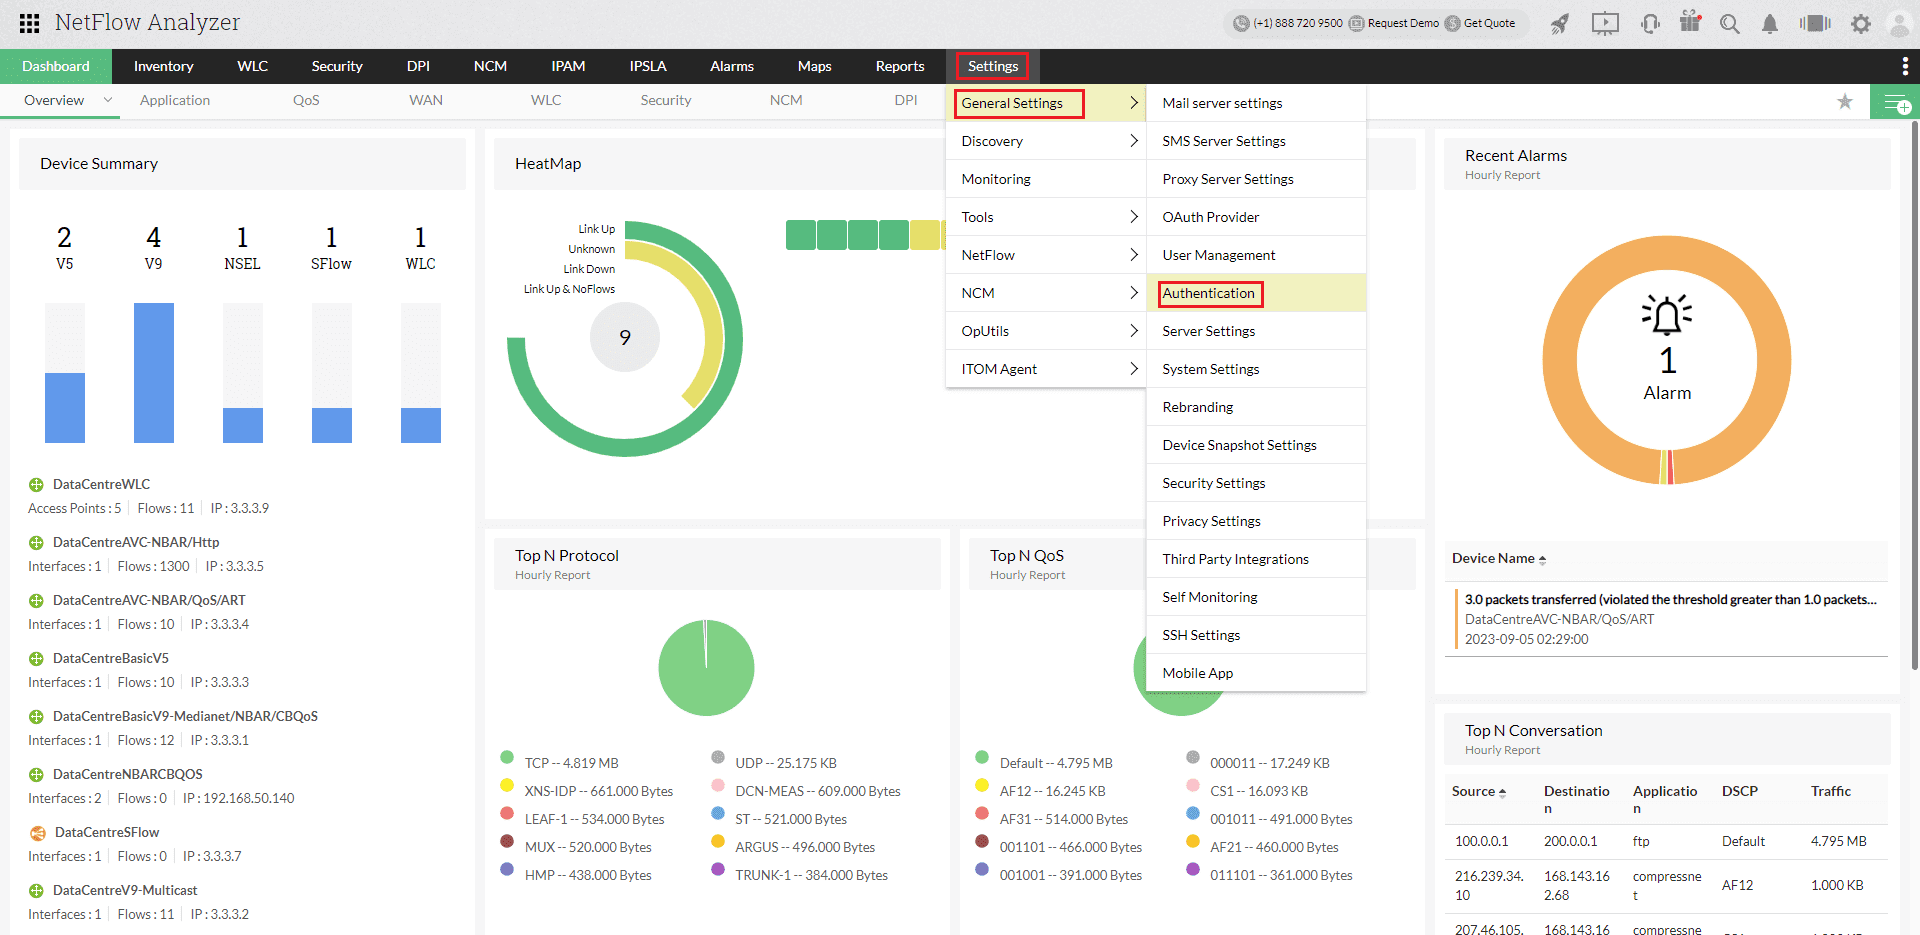 Portal view of NetFlow Analyzer
- Select the SAML tab under Authentication.
- Under the Servi ce Provider Details section, copy the Entity ID and Assertion Consumer URL. These will be used later.
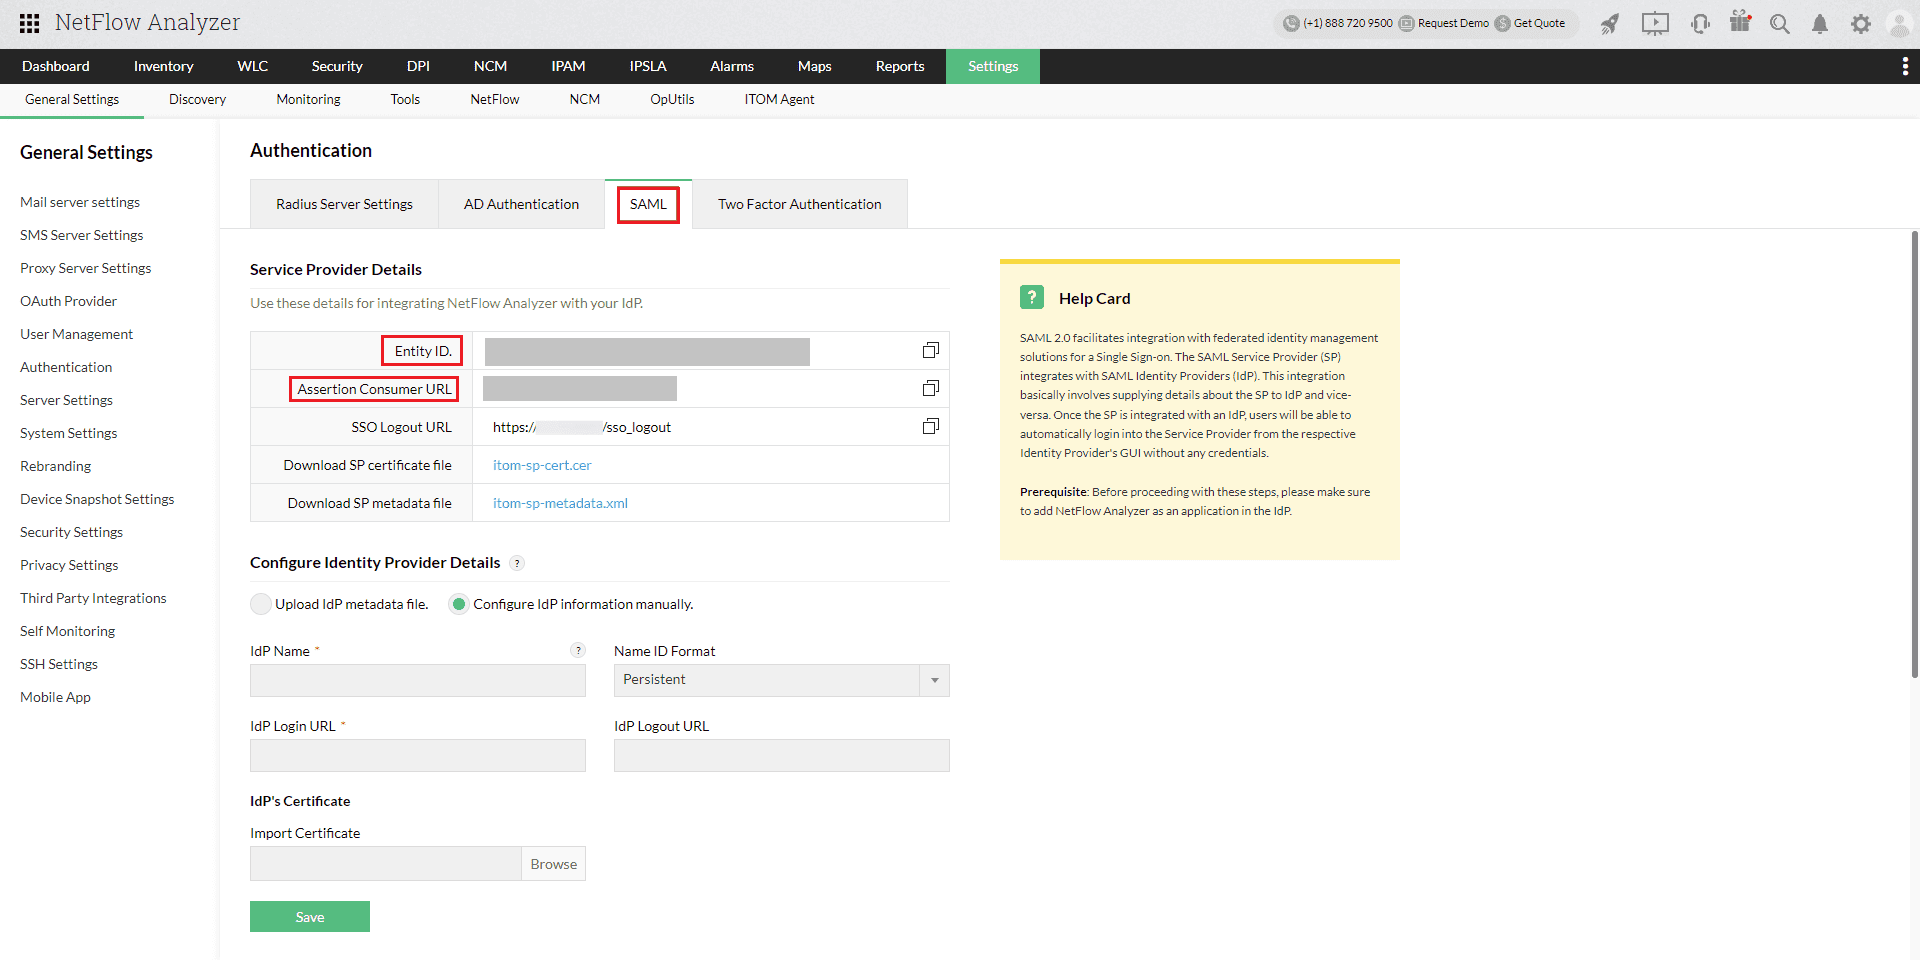 Configuration of SAML SSO from NetFlow Analyzer
- The IdP details can be entered in two ways:
- Using the metadata file
- Under the Identity Provider Details section, choose the Upload IdP metadata file radio button.
- Enter Identity360 as the Name, and select Email ID from the Name ID Format drop-down.
- Upload the metadata file downloaded in step 6a of the prerequisites section.
- Click Save.
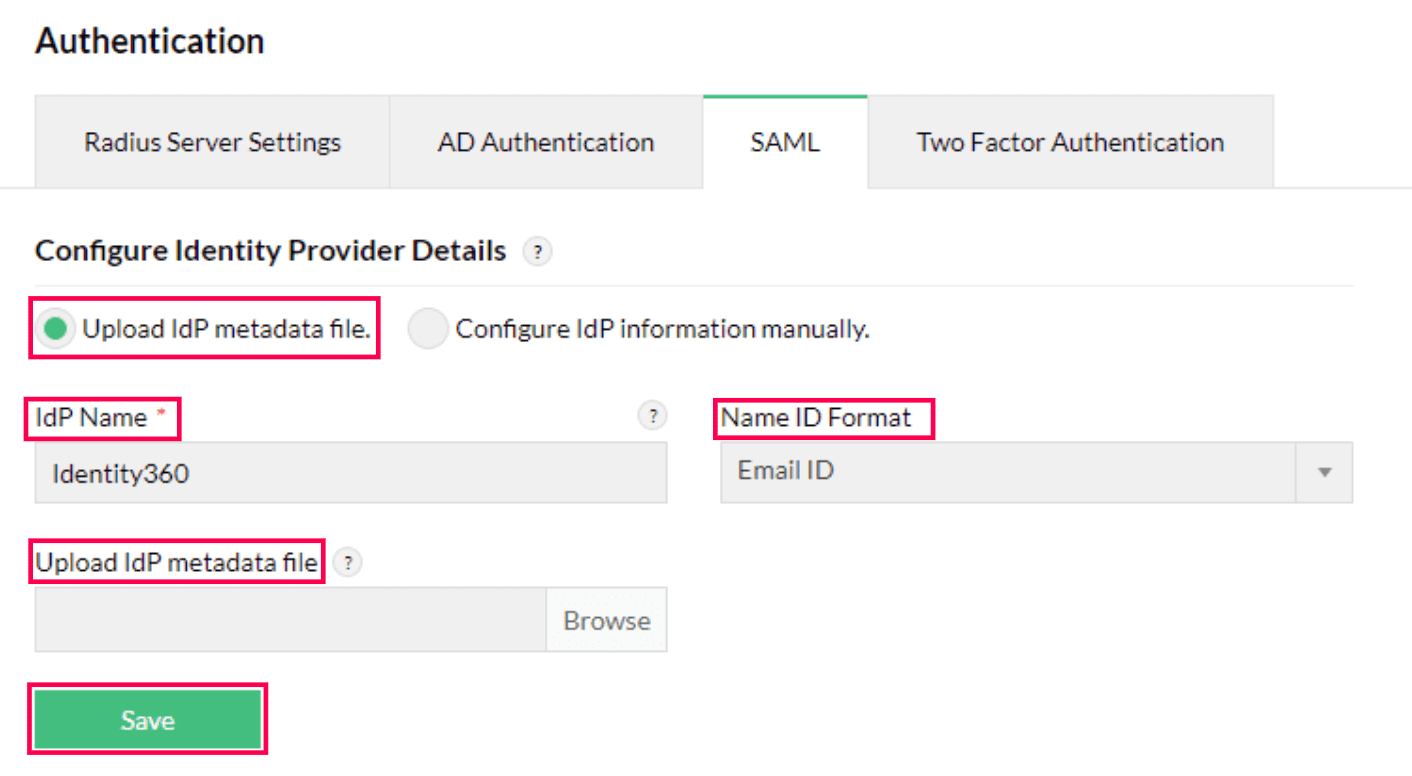 Metadata configuration from NetFlow Analyzer
- Manually entering the IdP details
- Click Test connection to test the connection.
- Click Enable SAML SSO.
 NetFlow Analyzer connection test and SSO enablement
Identity360 (identity provider) configuration steps
- Switch to Identity360's application configuration page.
- In the ACS URL field, enter the Assertion Consumer URL copied in step 4 of NetFlow Analyzer configuration.
- In the Entity ID field, enter the Issuer Entity ID value copied in step 4 of NetFlow Analyzer configuration.
- Click Save.
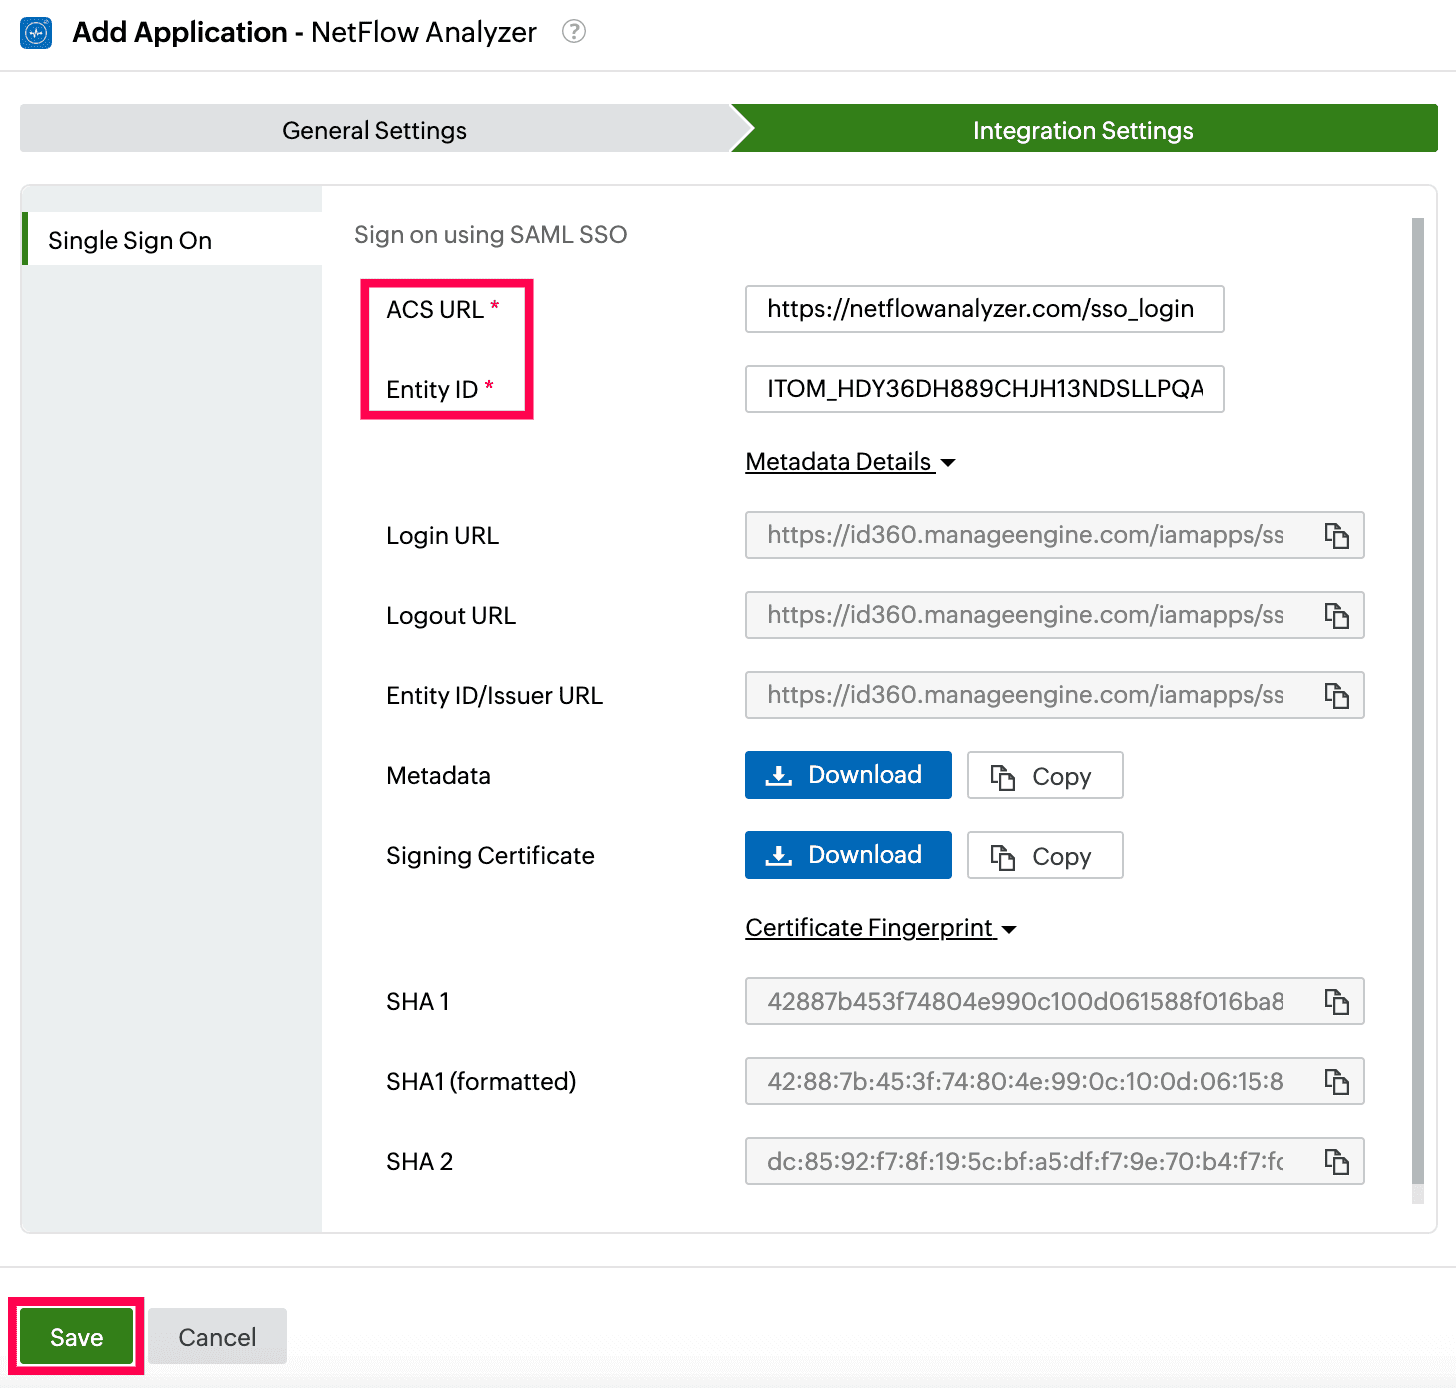 Integration Settings of SSO configuration for NetFlow Analyzer
- To learn how to assign users or groups to one or more applications, refer to this page.
Your users should now be able to sign in to NetFlow Analyzer through the Identity360 portal.
Note: For NetFlow Analyzer, both SP-initiated and IdP-initiated flows are supported.
Steps to enable MFA for NetFlow Analyzer
Setting up MFA for NetFlow Analyzer using Identity360 involves the following steps:
- Set up one or more authenticators for identity verification when users attempt to log in to NetFlow Analyzer. Identity360 supports various authenticators, including Google Authenticator, Zoho OneAuth, and email-based verification codes. Click here for steps to set up the different authenticators.
- Integrate NetFlow Analyzer with Identity360 by configuring SSO using the steps listed here.
- Now, activate MFA for NetFlow Analyzer by following the steps mentioned here.
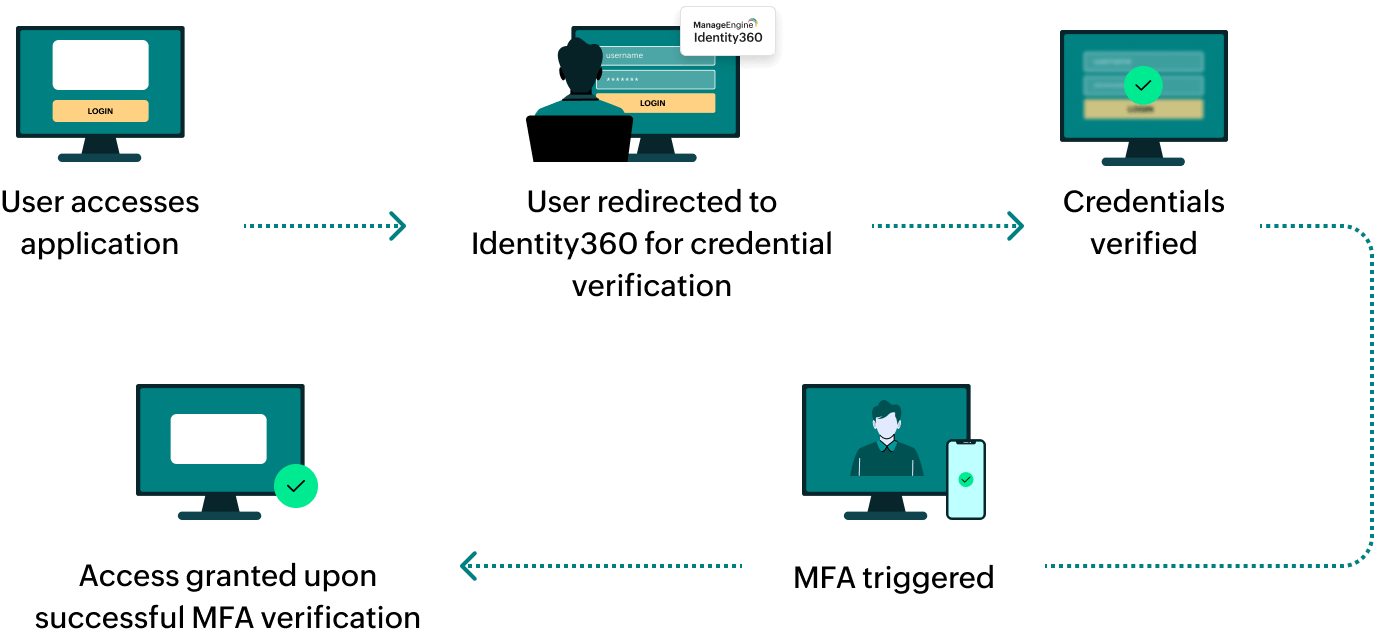
How does MFA for applications work in Identity360?
 General settings of SSO configuration for NetFlow Analyzer
 Integration Settings of SSO configuration for NetFlow Analyzer configuration
 Portal view of NetFlow Analyzer
 Configuration of SAML SSO from NetFlow Analyzer
 Metadata configuration from NetFlow Analyzer
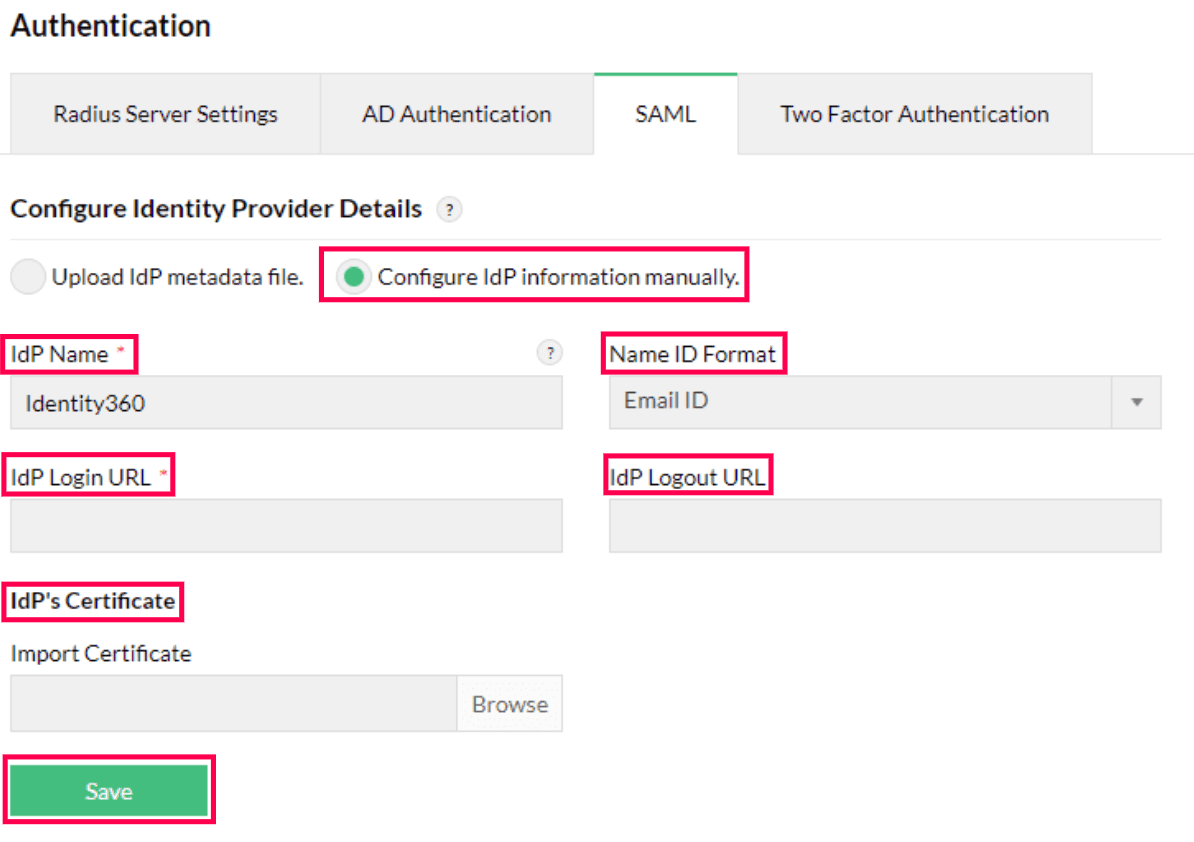 Manual configuration from NetFlow Analyzer
 NetFlow Analyzer connection test and SSO enablement
 Integration Settings of SSO configuration for NetFlow Analyzer