Application Scaling Model using Microsoft SQL Server
In general, scaling is the process of making an application bigger and better, and scalability is the inherent capacity of an application to handle growth without any hindrance. For a privileged access security solution like PAM360, it is essential to make it highly available and scalable so that even with increased complexity, the application can render the maximum overall performance, without having any significant effect on the average service level per node.
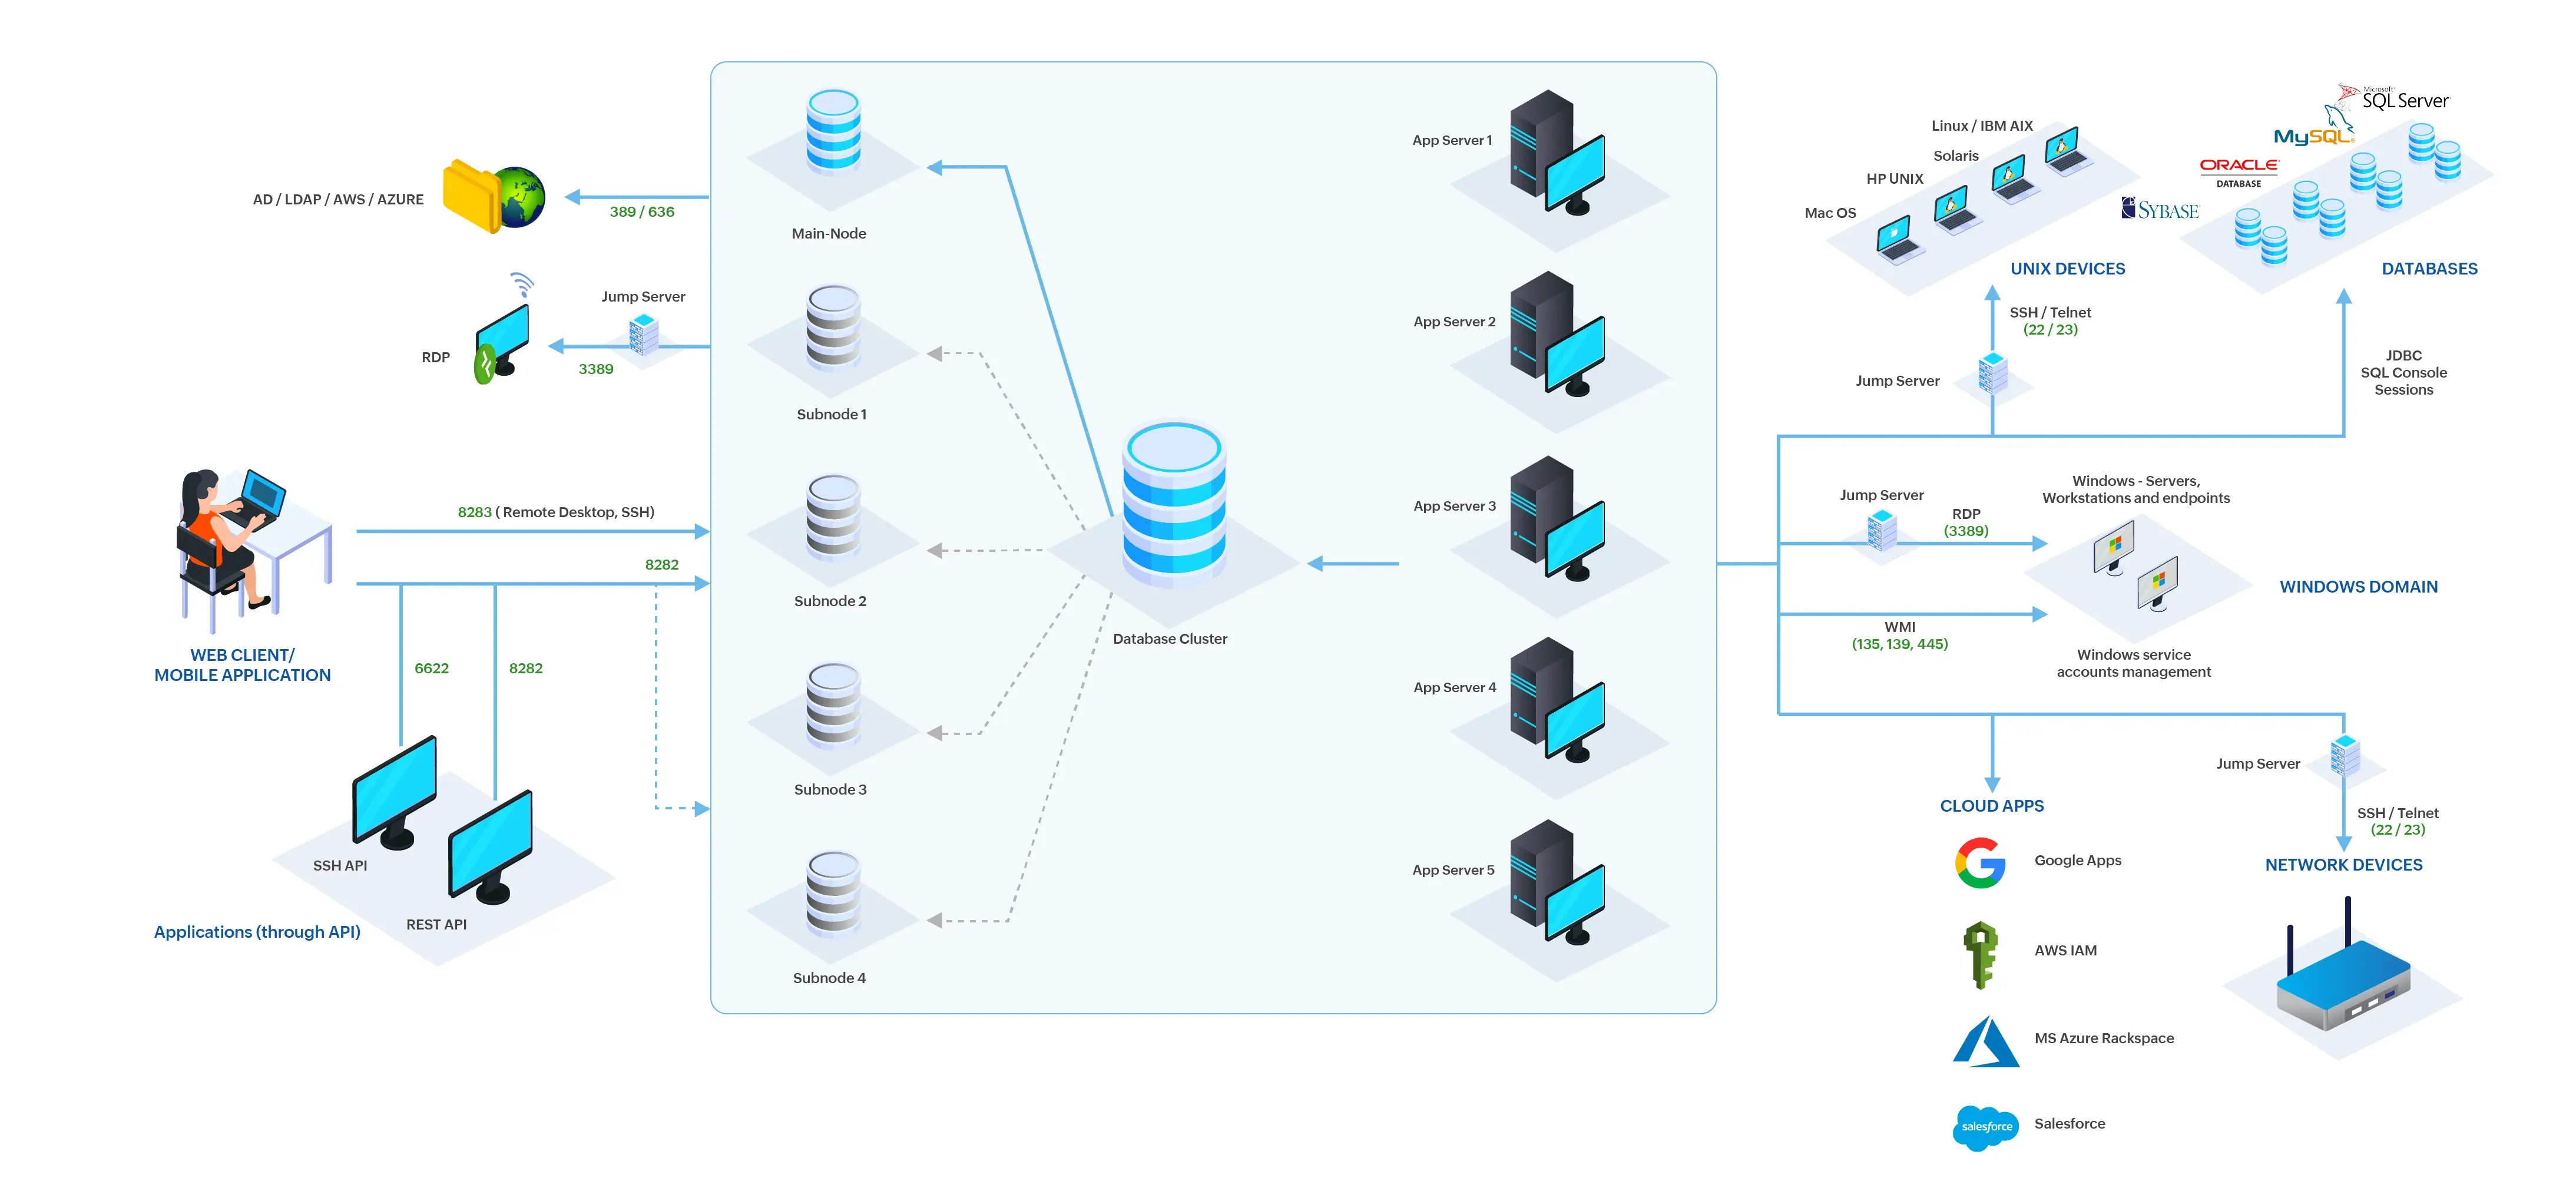
The Application Scaling model in PAM360, designed using Microsoft SQL server, is aimed at providing enhanced scalability and performance while ensuring uninterrupted access to the privileged resources and passwords stored in PAM360. The model works with one main PAM360 node and several subnodes, all of them connected to a single MS-SQL database cluster.
- How does it Work?
- Steps to Configure the Main Node and Subnodes
- Steps to Change a Subnode into a Main Node
- Steps to Rename a Node
- Steps to Enable/Disable a Subnode
- Steps to Delete and Restore a Subnode
- Node Audit Trails
1. How does it Work?
The main node for PAM360 and all its subnodes must point to the same MS-SQL cluster, though they do not have to be connected individually. However, the main node, i.e., the machine that will carry out the scheduled operations, requires to fulfill either of the following conditions:
- The main node and the target end-points, having the agentless password management capabilities enabled from PAM360, should reside in the same subnet.
- If the main node and the target end-points reside in different networks, they should be able to communicate with each other, i.e., they should not be blocked by a firewall or reside outside the range of connectivity such as demilitarized zones.

Caution
- You can assign any of the secondary nodes as the main node, provided it has proper connectivity to other machines to carry out the scheduled operations without any interference.
- The current model allows you to assign up to four machines as subnodes.
2. Steps to Configure the Main Node and Subnodes
To configure subnodes pointing to the same cluster, follow the below steps:
- Install PAM360 in the machine which you want as the main node. During the installation process, choose the server as High Availability Primary Server in the installation wizard.
- Configure an SSL certificate in your MS SQL cluster using these steps, import the certificate into PAM360, and point the application to a SQL listener IP/Host. Now, the PAM360 application operating as the main node will work using the MS SQL Cluster.
- Install PAM360 in the secondary application servers, which you want as subnodes. During the installation process, choose the server as High Availability Primary Server in the installation wizard. Once the installation is complete, PAM360 will start with the default PostgreSQL database. Stop the PAM360 service after the initial startup.
- Copy and paste the MS SQL cluster certificate into the <PAM360-Installation-Directory>\bin folder in all the subnodes. Open a command prompt and execute the following command to import the MS SQL cluster certificate into all the subnodes.
importCert.bat Your_cluster_cert.cer
- Copy the pam360_key.key file from the main node and paste it into any directory in the subnodes. Now, update the full path of the pam360_key.key file in the <PAM360-Installation-Directory>\conf\manage_key.conf file in all the subnodes. If the key is stored in a remote directory, then supply the full path of the remote location in the manage_key.conf file.
- Copy the masterkey.key file available within the <PAM360-Installation-Directory>\conf folder on the main node and paste it within the <PAM360-Installation-Directory>\conf folder in the subnodes.
- Open the services console (services.msc) in all the subnodes and update the service account of the PAM360 service. Ensure that this service account has all the necessary permissions to connect to the MS SQL cluster and to read the pam360_key.key file.
- Open command prompt as administrator in all the subnodes and navigate to the <PAM360-Installation-Directory>\bin directory and execute the command ChangeDB.bat. In the DB Change Configuration wizard, select SQL server as the backend, supply the MS SQL Cluster hostname in the format SERVER:port. For example, CLUSTER01:5432. If port number is specified in this format, the Instance name field can be left empty. If Cluster is using dynamic ports, then supply the correct hostname and the instance name separately. Provide the correct SQL database name using which the main node is working and select Windows as the authentication option. For this option to work, note that command prompt should be running with an account that has access to the SQL database. Click Test and once it is successful, click Save to save the changes.
- Edit the file named system_properties.conf present in the path <PAM360-Installation-Directory>\conf in the subnodes using Wordpad with administrator rights. Add the line ignore.scheduler=true at the end of the file and save it.
- Now, start the PAM360 service in all the subnodes. As a result of all the previous steps, all the subnodes will start using the same MS SQL Cluster as the backend database.
- The default URL of the subnodes will look like https://subnode_servername:8282/. To apply your license file in all the subnodes, open the URL of all the subnodes in a web browser and login. Click the profile icon in the top right corner and click the License option. Here, add your license XML file and apply.
- Navigate to Admin >> Server Settings >> PAM360 Server and update your SSL certificate keystore with the correct password. If required, change the port from 8282 to 443 and save the settings.
- Restart the PAM360 service in all the subnodes. Now all the subnodes will start with the correct SSL certificate and use the same MS SQL Cluster backend.
2.1 Steps to View the Configured Nodes in PAM360
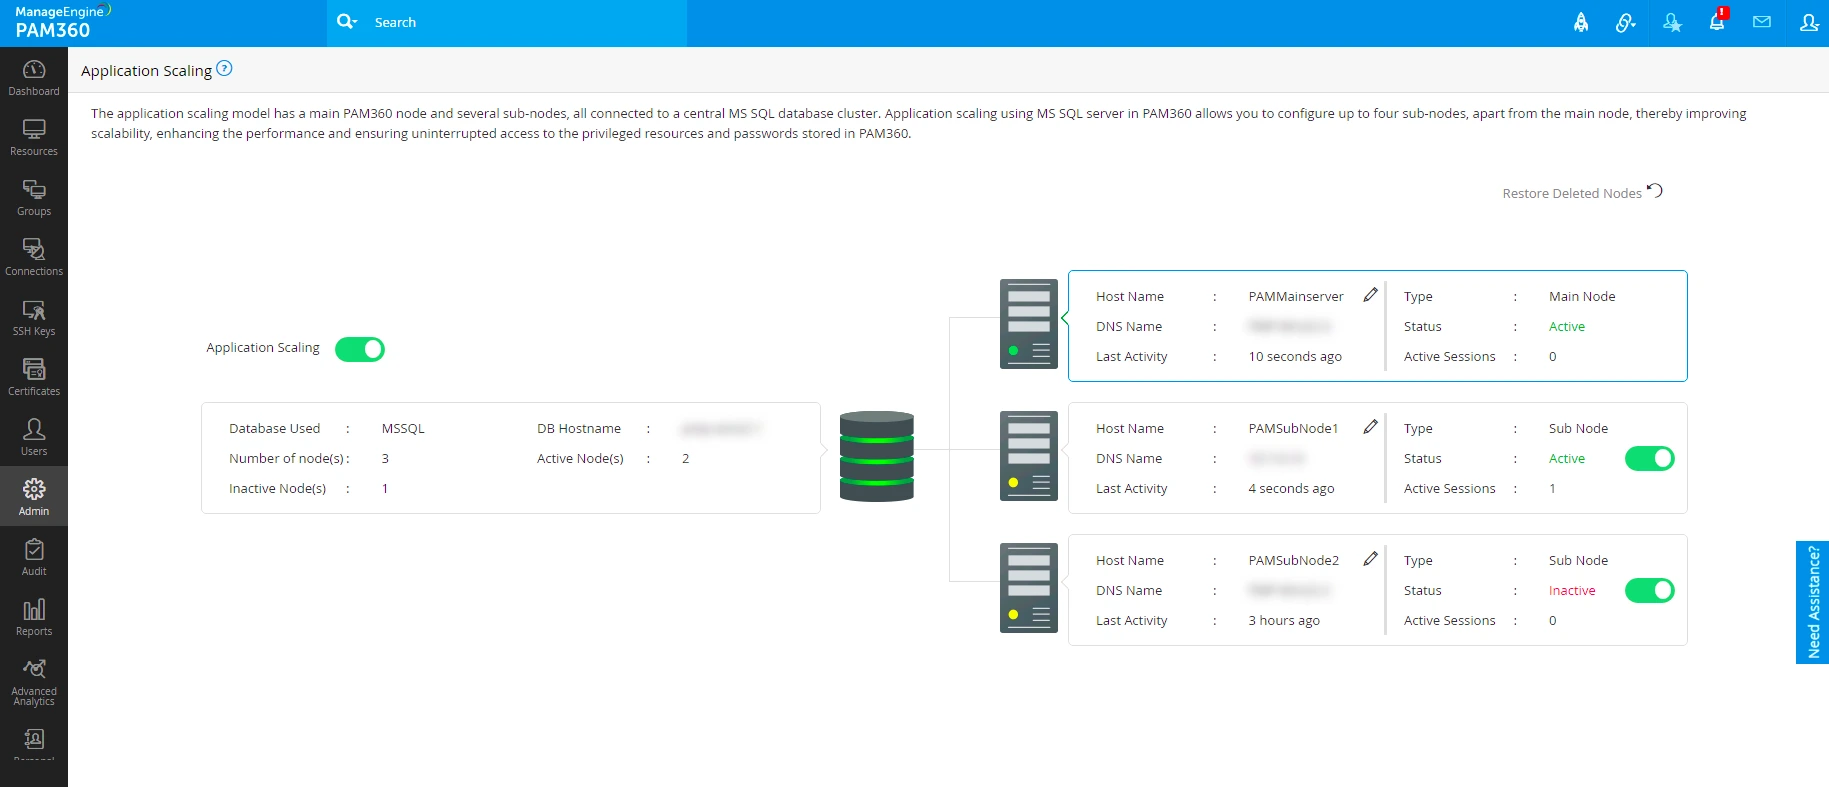
Once the main node and subnodes are configured, navigate to Admin >> Business Continuity >> Application Scaling to view them from the PAM360 interface. Here, you can enable or disable Application Scaling using the toggle button.
3. Steps to Change a Subnode into a Main Node
Follow the below steps to change any secondary node into the main node. This change can be done at any point of time from any subnodes.
- Keep the MS-SQL database running and stop all application servers including the main node.
- Navigate to the <PAM360-Installation-Directory>\bin folder and execute the script makePrimary.bat or makePrimary.sh based on your operating system.
- Current main node and the list of available servers will be displayed. Choose any server from the dropdown and click Save.

- Restart all application servers that were stopped earlier. Now, the selected server will be assigned as the main node now.
Click here for more information on how to set up a Microsoft SQL cluster.
4. Steps to Rename a Node
- Navigate to Admin >> Business Continuity >> Application Scaling.
- From the Application Scaling dashboard, click the edit icon beside the desired node.
- In the pop-up that appears, enter a name and click Confirm. You have now successfully renamed the node.
Additional Detail
Only the Administrators and users with custom roles having the Application Scaling permission can enable/disable, delete, and restore the subnodes, that too, from the Main node only.
5. Steps to Enable or Disable a Subnode
- Navigate to Admin >> Business Continuity >> Application Scaling.
- From the Application Scaling dashboard, enable or disable the toggle beside the respective Subnode to enable or disable the subnode.
6. Steps to Delete or Restore a Subnode
Navigate to Admin >> Business Continuity >> Application Scaling.
To Delete a Subnode,
- First, disable the Subnode using the toggle.
- Click the Delete icon on the top right corner of the Subnode.
- In the pop-up that appears, click Confirm. You have now successfully deleted the Subnode.
Caution
Deleting the subnode will only hide the node from the dashboard and will not remove the entry from the database. Delete the physical server and any server-specific configurations to remove the server from PAM360 entirely.
To Restore a Subnode,
- Click Restore Deleted Nodes from the UI.
- Now, select the desired Subnode and click Restore. You have now successfully restored the selected Subnode.
7. Node Audit Trails
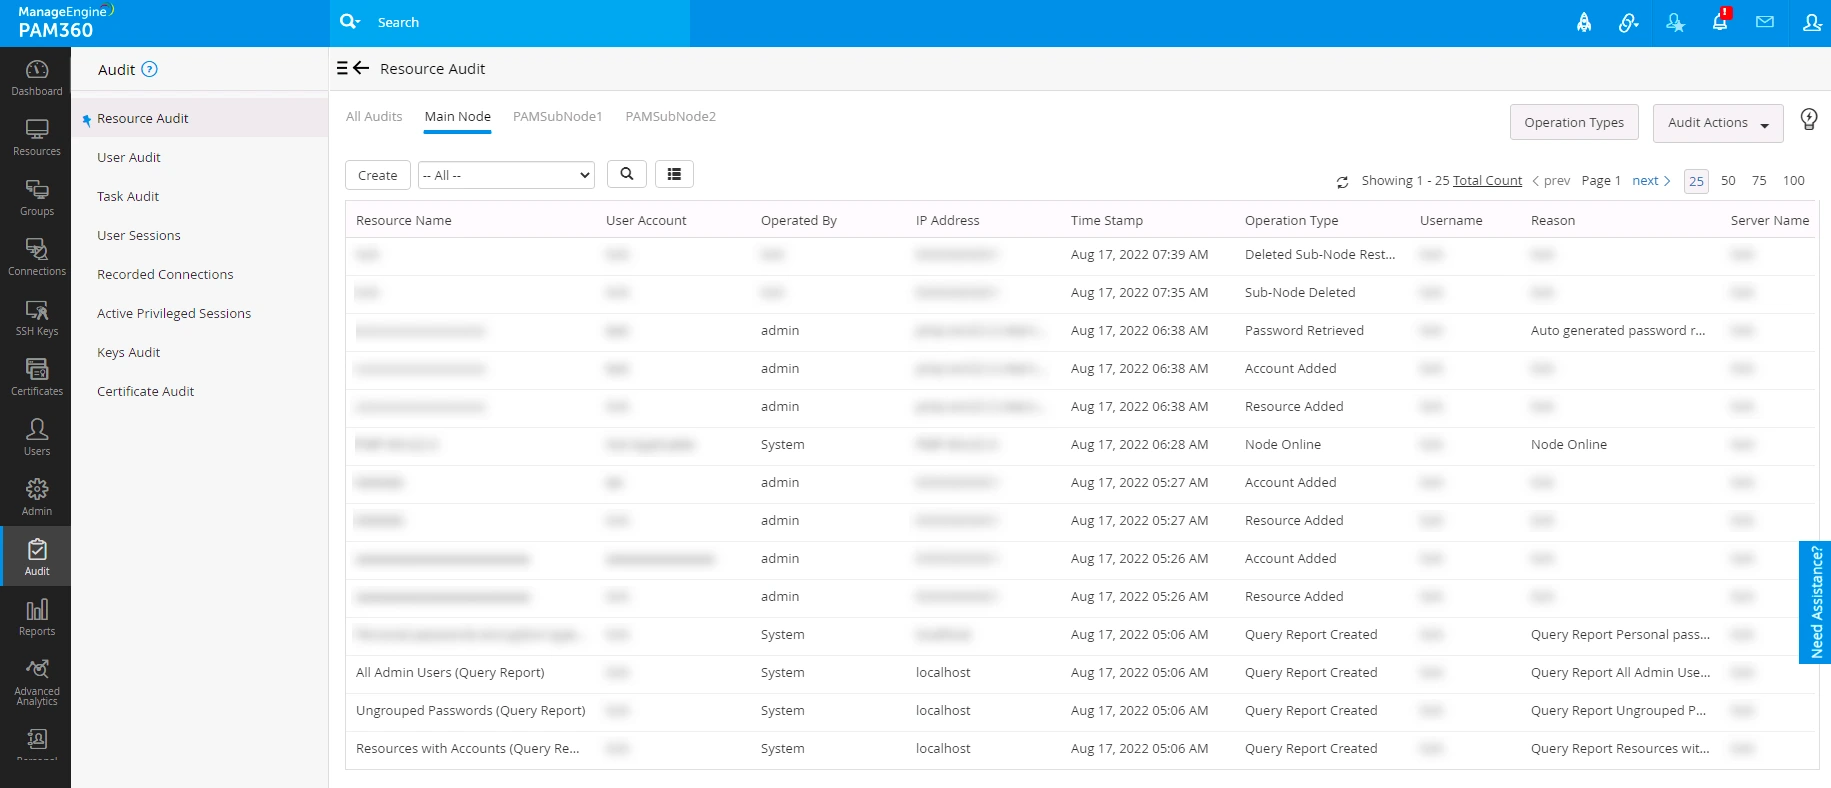
PAM360, by default, provides separate sections for Resource, User, and Task-based audits. Additionally, the product shows node-based audits for the main node and each subnode as separate columns with the complete audit trails under Resource Audit and User Audit when Application Scaling is enabled. To know more about Audits, click here.