File Management Using PAM360
Managing files on remote machines is a critical aspect of administrative operations, especially in environments where privileged access needs to be secure and efficient. PAM360 offers robust capabilities for secure file handling during remote sessions, enabling users to move files between their local devices and remote resources with ease while maintaining strict security and access controls.
PAM360 supports secure file transfer between user devices and remotely connected privileged resources via Secure Copy Protocol (SCP) during remote connections and bidirectional file transfer between two remote devices using SSH File Transfer Protocol (SFTP). Additionally, users can also transfer files between their device and remote resources via SFTP without launching a separate remote connection. Furthermore, users can execute bidirectional file transfer between their devices and remotely connected Windows resources via RDP and upload files to a remote machine during remote connections launched to Linux machines via Legacy SSH.
During file transfer via SFTP, PAM360 establishes a secure and encrypted connection to the remote resources and lists all accessible directories, allowing users to transfer files without launching a separate remote session. This ensures authenticated connections and secure transfer of large files. Users can also delete files and folders within the remote directory during an SFTP session. With these capabilities, PAM360 empowers administrators to manage files across various remote systems efficiently and securely, ensuring operational continuity and compliance with enterprise-level security standards.
This help document covers the following topics in detail:
- Transferring Files Between Local and Remote Machines via SFTP
- Bidirectional File Transfer via SFTP
- Deleting Files and Folders in Remote Machines
Caution
For a successful file transfer, it is mandatory to install the Secure File Transfer Protocol (SFTP) server in all the target remote systems that will be involved in file transfer functions.
Additional Details
- The file transfer option will be disabled for the accounts configured with SSH command control.
- The following characters are not allowed in the name of the file being transferred: angle brackets (<>), colon (:), quotation marks ("), slash (/), backslash (\), pipe (|), question mark (?), asterisk (*), and apostrophe (').
- You can modify the file transfer limit using SFTP anywhere between 50 MB to 10240 MB using the Allow a maximum data of 2048 MB per transfer in SFTP session option available under the General Settings section.
- The file transfer speed during SFTP sessions depends entirely on the network connectivity.
- The data transfer limit for file transfers during remote connections via SCP is 5 GB.
- Starting from build 7500, the maximum file transfer limit via SFTP is set at 2 GB by default. Administrators can adjust this limit on the General Settings page, with the flexibility to increase it to as high as 10 GB or reduce it to as low as 50 MB based on operational requirements. However, for optimal performance, it is recommended to maintain the transfer limit at 2 GB or lower.
- For builds released before 7500, the maximum data transfer limit through SFTP is 6 GB.
1. Transferring Files Between Local and Remote Machines via SFTP
Follow these steps to upload or download files from a remote machine directory to your device using SFTP:
- Navigate to the Connections tab, select the desired category from the Connections Tree on the left pane, and click on the desired resource on the Resource pane to which you wish to transfer files remotely from the PAM360 interface. You will see all the available connection options under the Accounts pane.
- Switch to the Local Accounts section on the Accounts pane, hover over the desired account, and click the Secure File Transfer button from the displayed options.

- Alternatively, to upload files to a specific account on the remote machine or download files from the remote machine to your device, you can go to the Resources tab and click on the desired resource on the Resources pane. In the Accounts Details window, click the Open Connection button beside the desired account, and select SFTP from the displayed options.
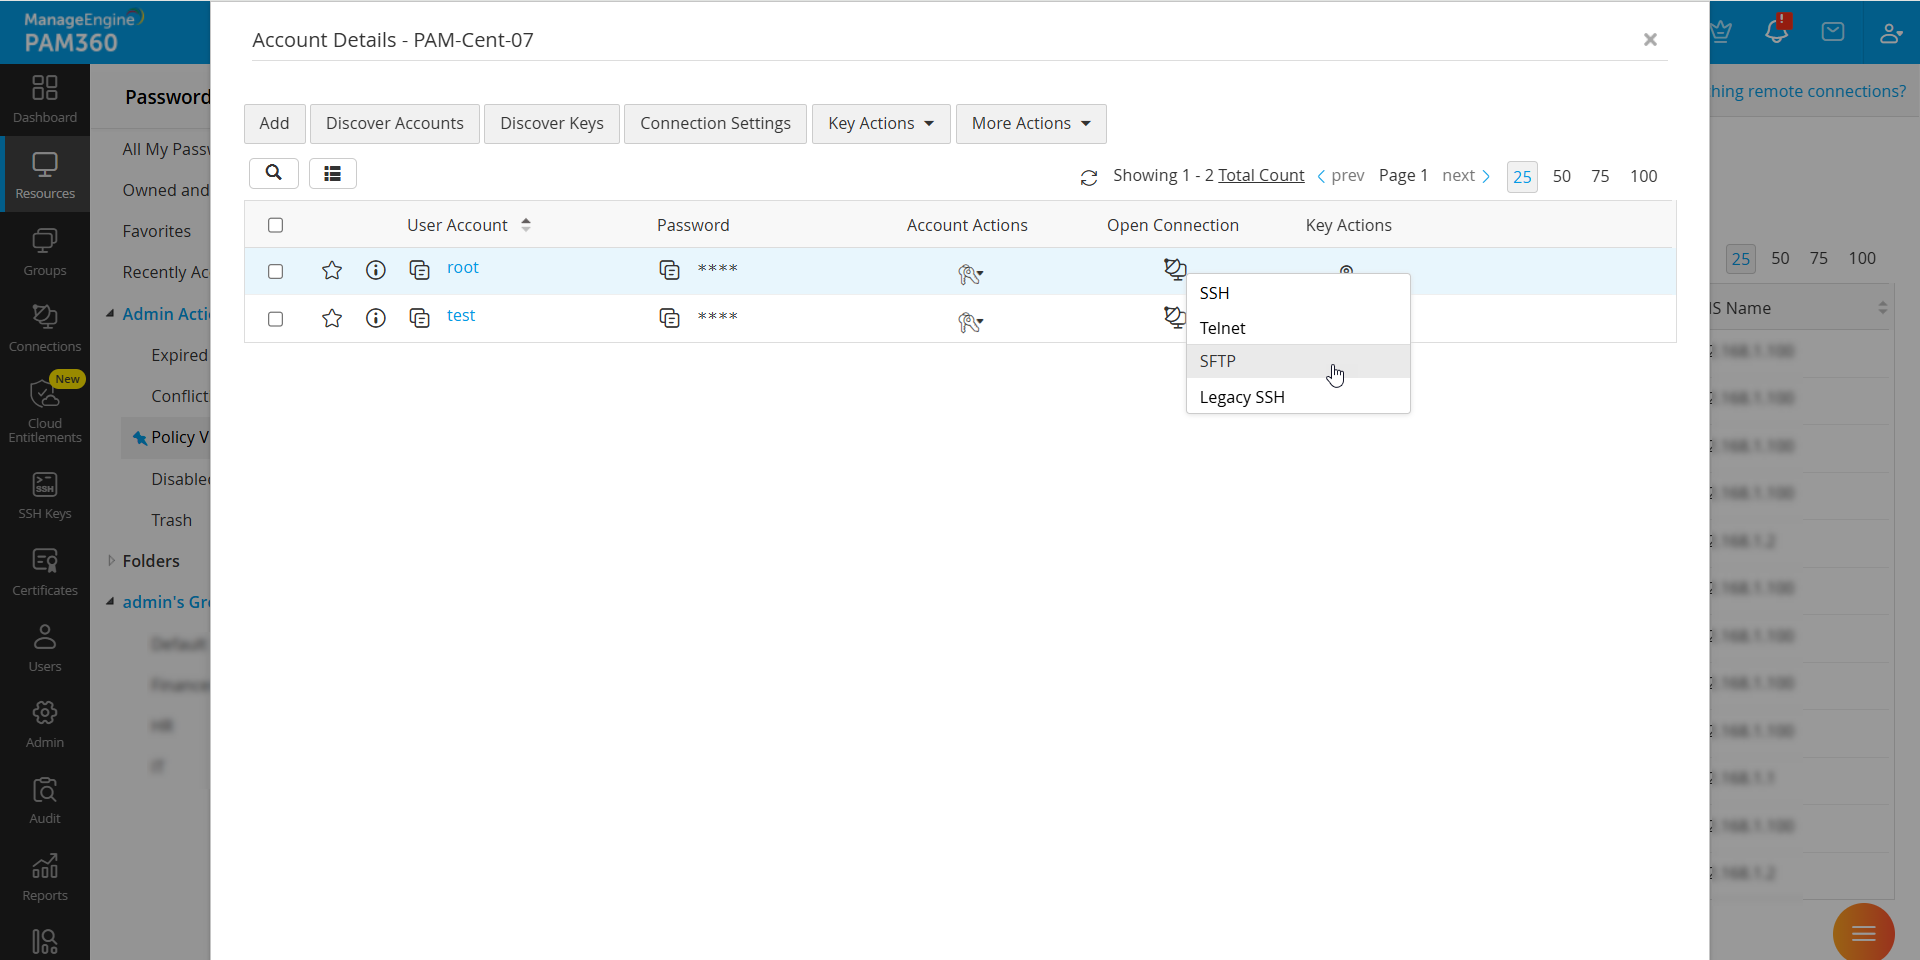
- PAM360 will authenticate the connection to the remote machine and list all the directories available on the remote machine under the remote directory section. Here, you can view all the available folders on the remote machine.
- To upload files to the remote machine from your device, click the Browse button beside the Choose File field, select the desired file from your machine, choose the destination folder on the remote directory where you wish to upload the selected file, and click the Upload button. The selected file will be uploaded to the remote machine.
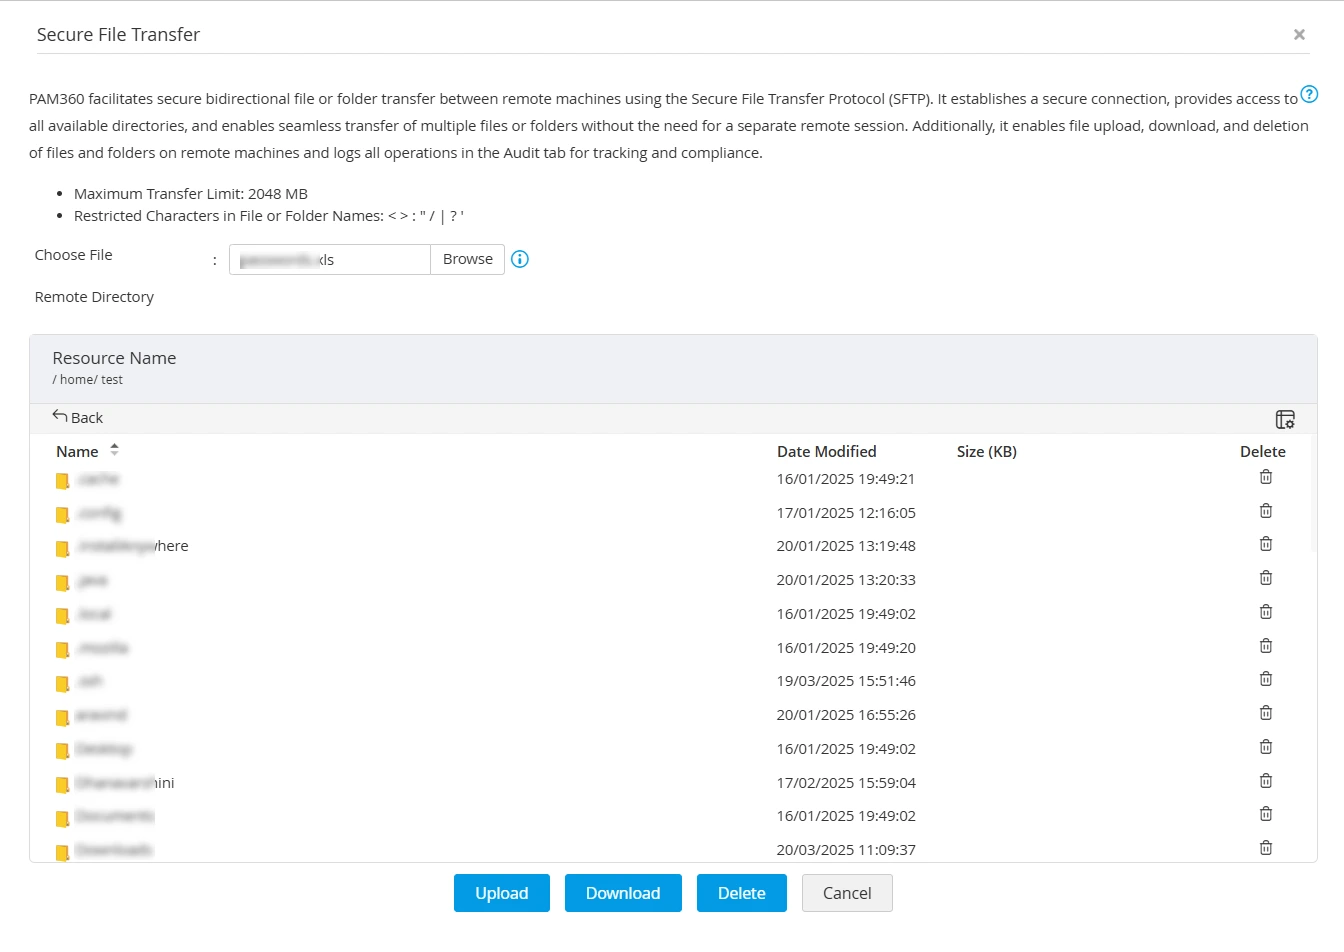
- Once the file upload is complete, you will see a confirmation message on the screen. If the file upload fails, navigate to Audit >> Resource Audit for more details about the reasons for failure.
- To download files from the remote machine, navigate to the desired folder on the remote machine, select the files you wish to download to your machine, and click the Download button. The selected files will be downloaded to your machine.
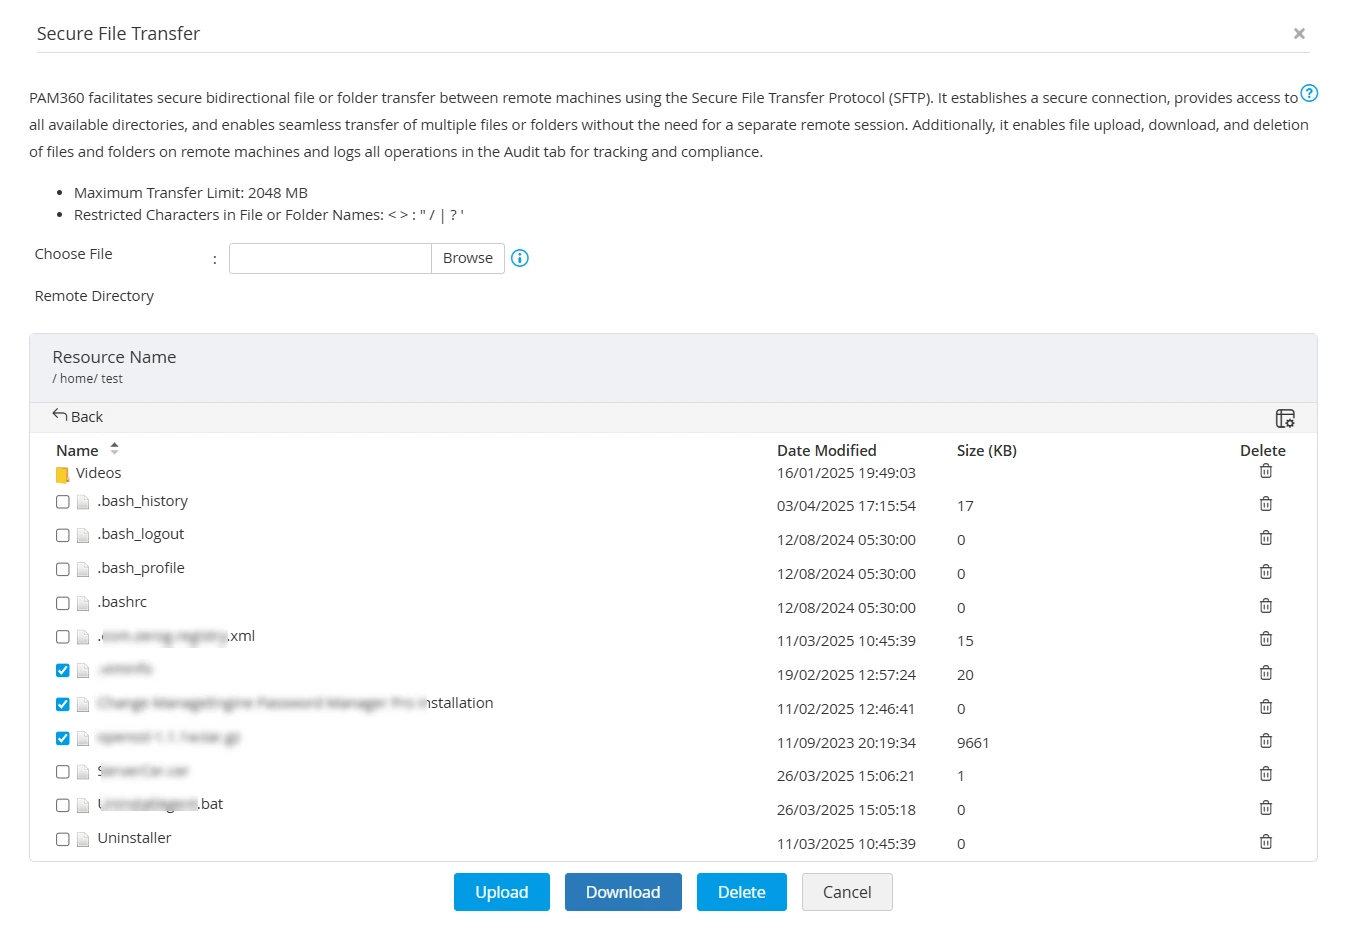
- Once the download is complete, you will see a confirmation message on the screen. If the file download fails, navigate to Audit >> Resource Audit for more details about the reasons for failure.
2. Bidirectional File Transfer via SFTP
Caution
Before using the Secure File Transfer function, ensure the following conditions are met:
- PAM360 supports Secure File Transfer between remote machines running on Windows, Windows Domain, Linux, Mac, Solaris, HP UNIX, IBM AIX, HPUX, and JunOS.
- The target resources must have a Secure File Transfer Protocol (SFTP) server installed and properly configured.
PAM360 provides a secure and efficient way to transfer files between two remote systems using the Secure File Transfer Protocol (SFTP). Through the web interface, users can establish bidirectional file transfers between folders located on different machines, leveraging either local or domain account credentials. This feature enables seamless and secure file management without manual intervention outside the PAM360 environment. This section outlines the steps required to initiate a secure file transfer, connect to remote machines using appropriate credentials, and manage transferred files directly through the PAM360 console.
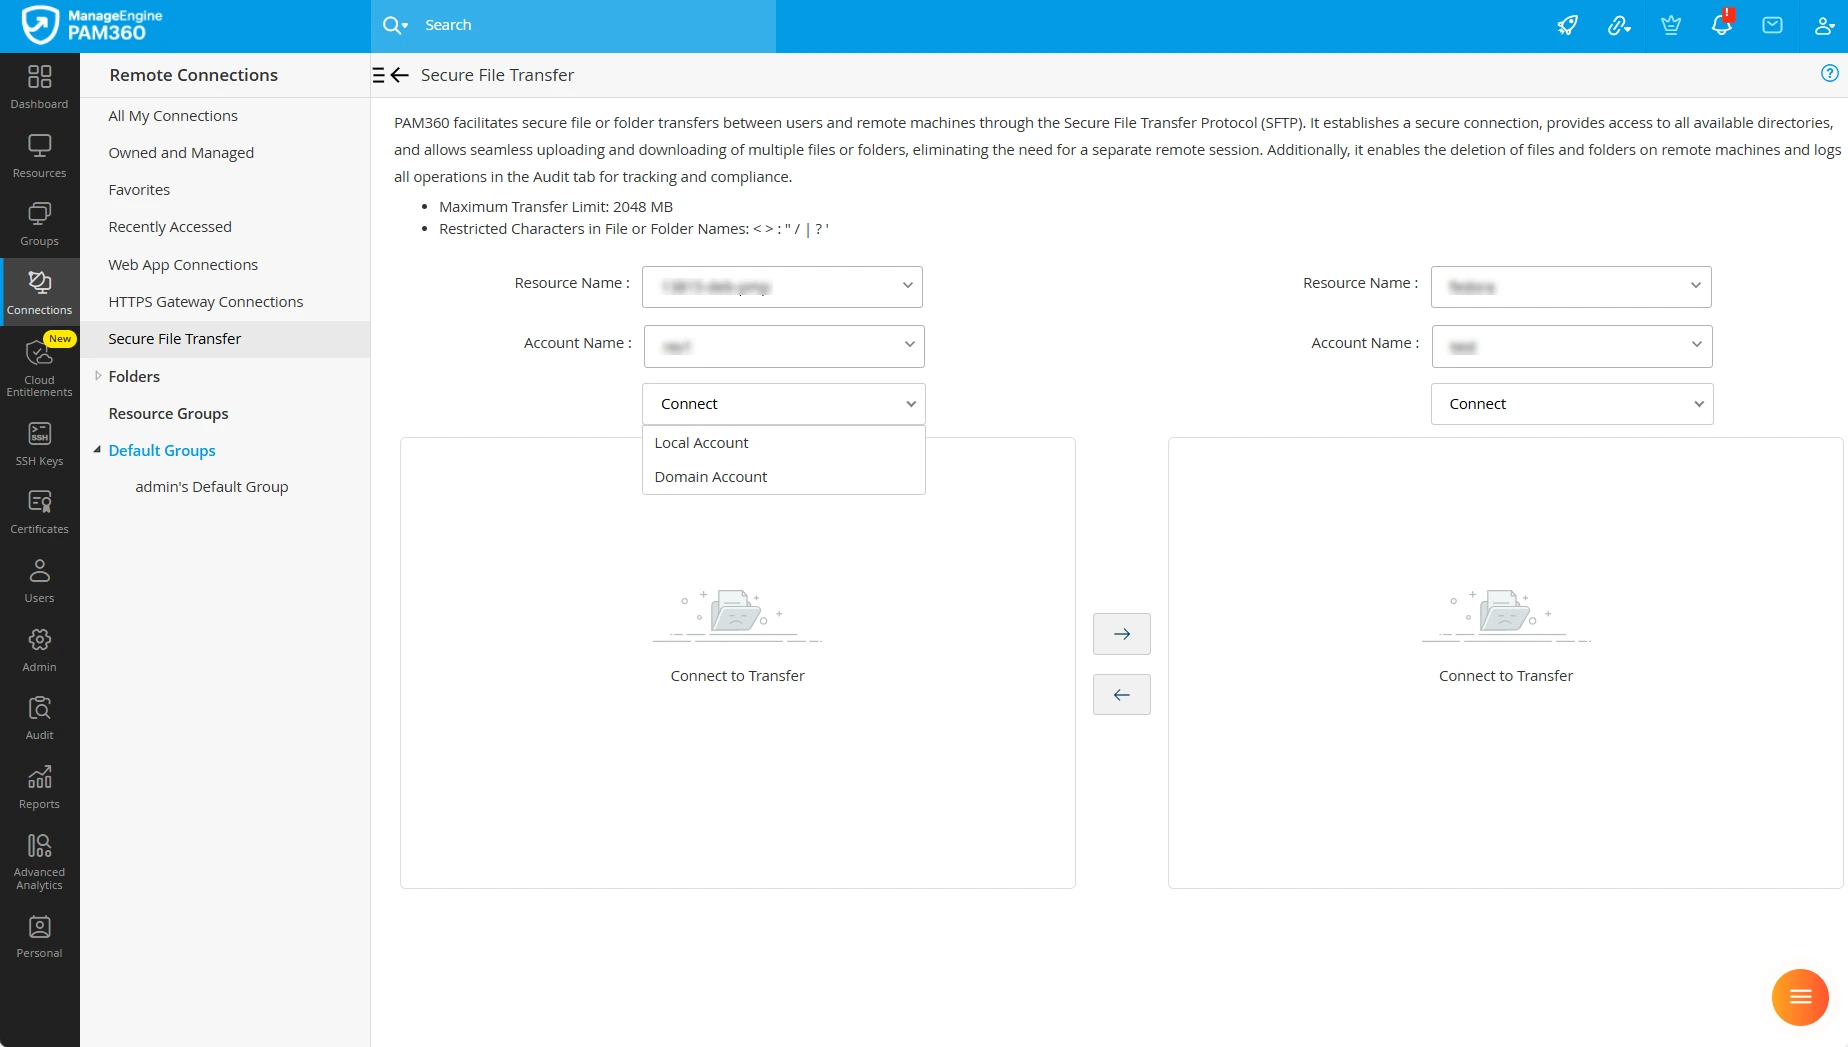
- Navigate to the Connections tab and click the Secure File Transfer option on the left pane.
- In the two available sections, select the remote machines for the bidirectional file transfer. Use the drop-down menus to choose the appropriate Resource Name and Account Name for each machine.
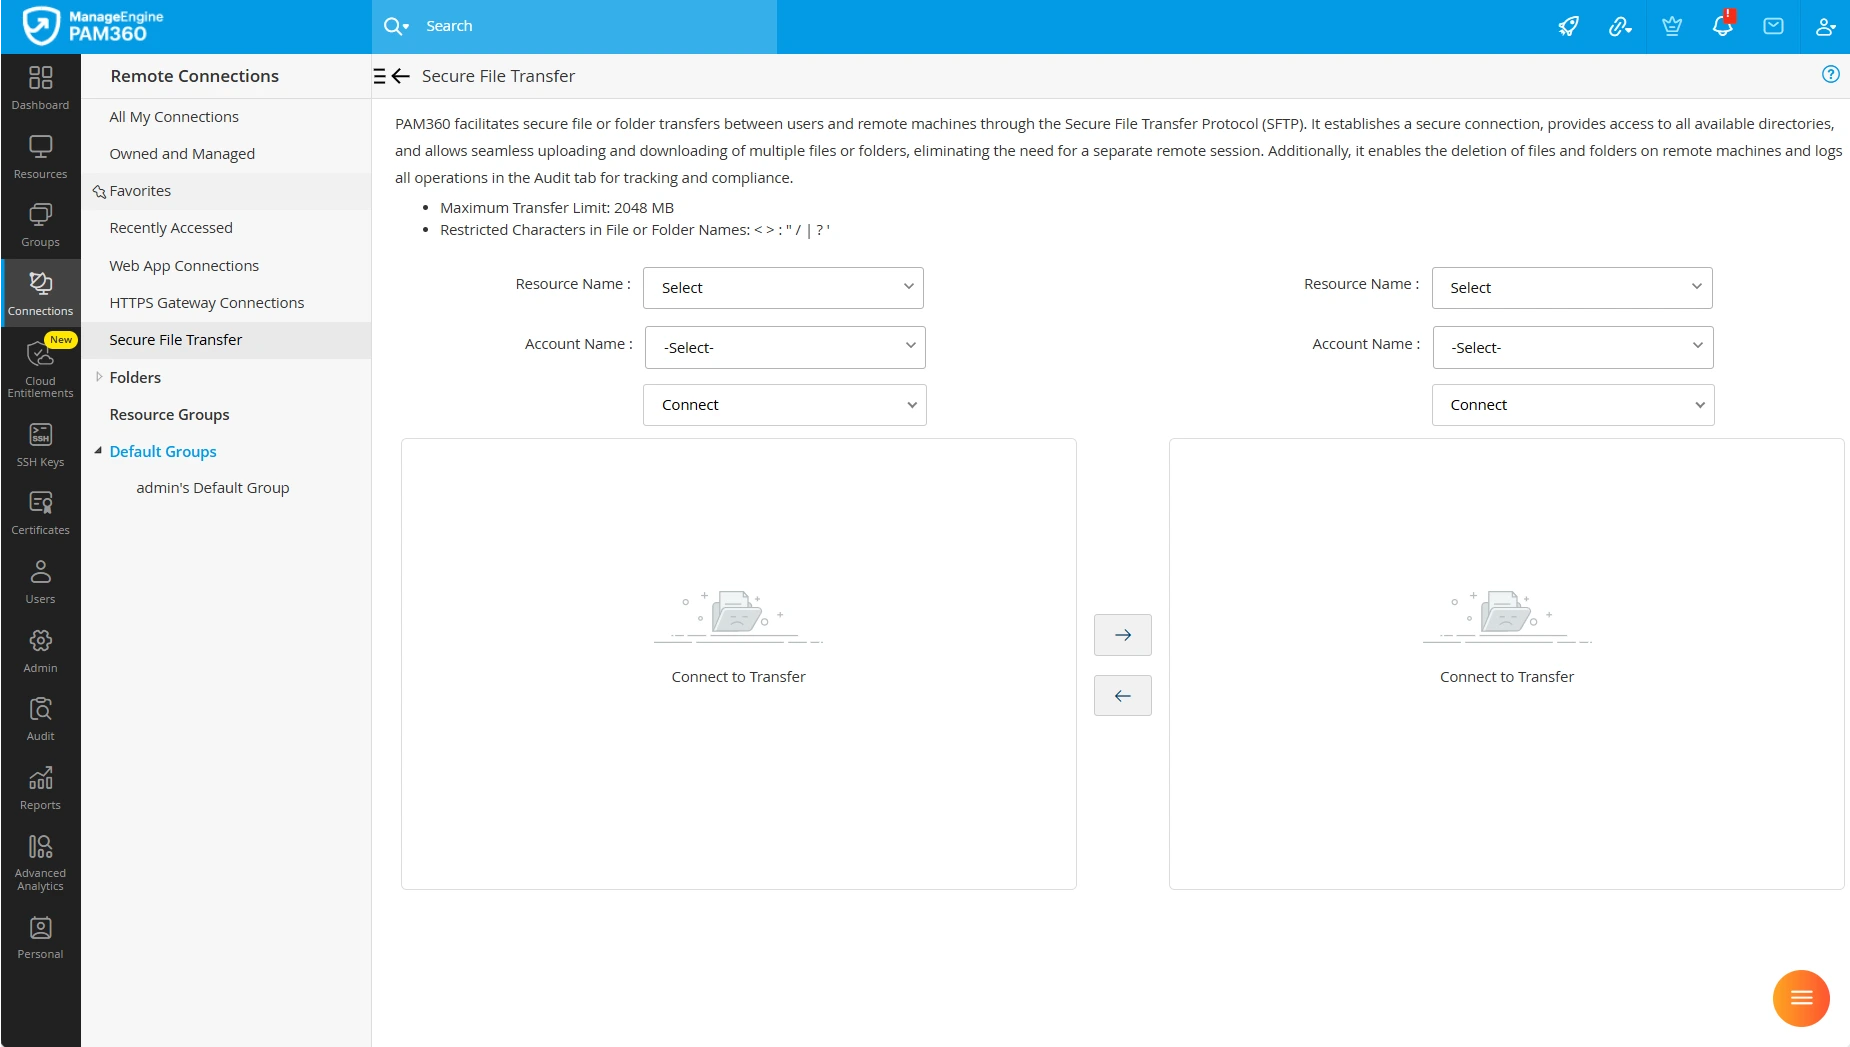
- Click the Connect drop-down and choose either Local Account or Domain Account.
- If you select the Domain Account option, you will see a pop-up box - Auto logon using other domain accounts with the Use domain account radio button enabled.
- Select the domain account credentials using which you wish to establish a connection to the selected resource by choosing the Resource Name and Account Name from the provided drop-downs.
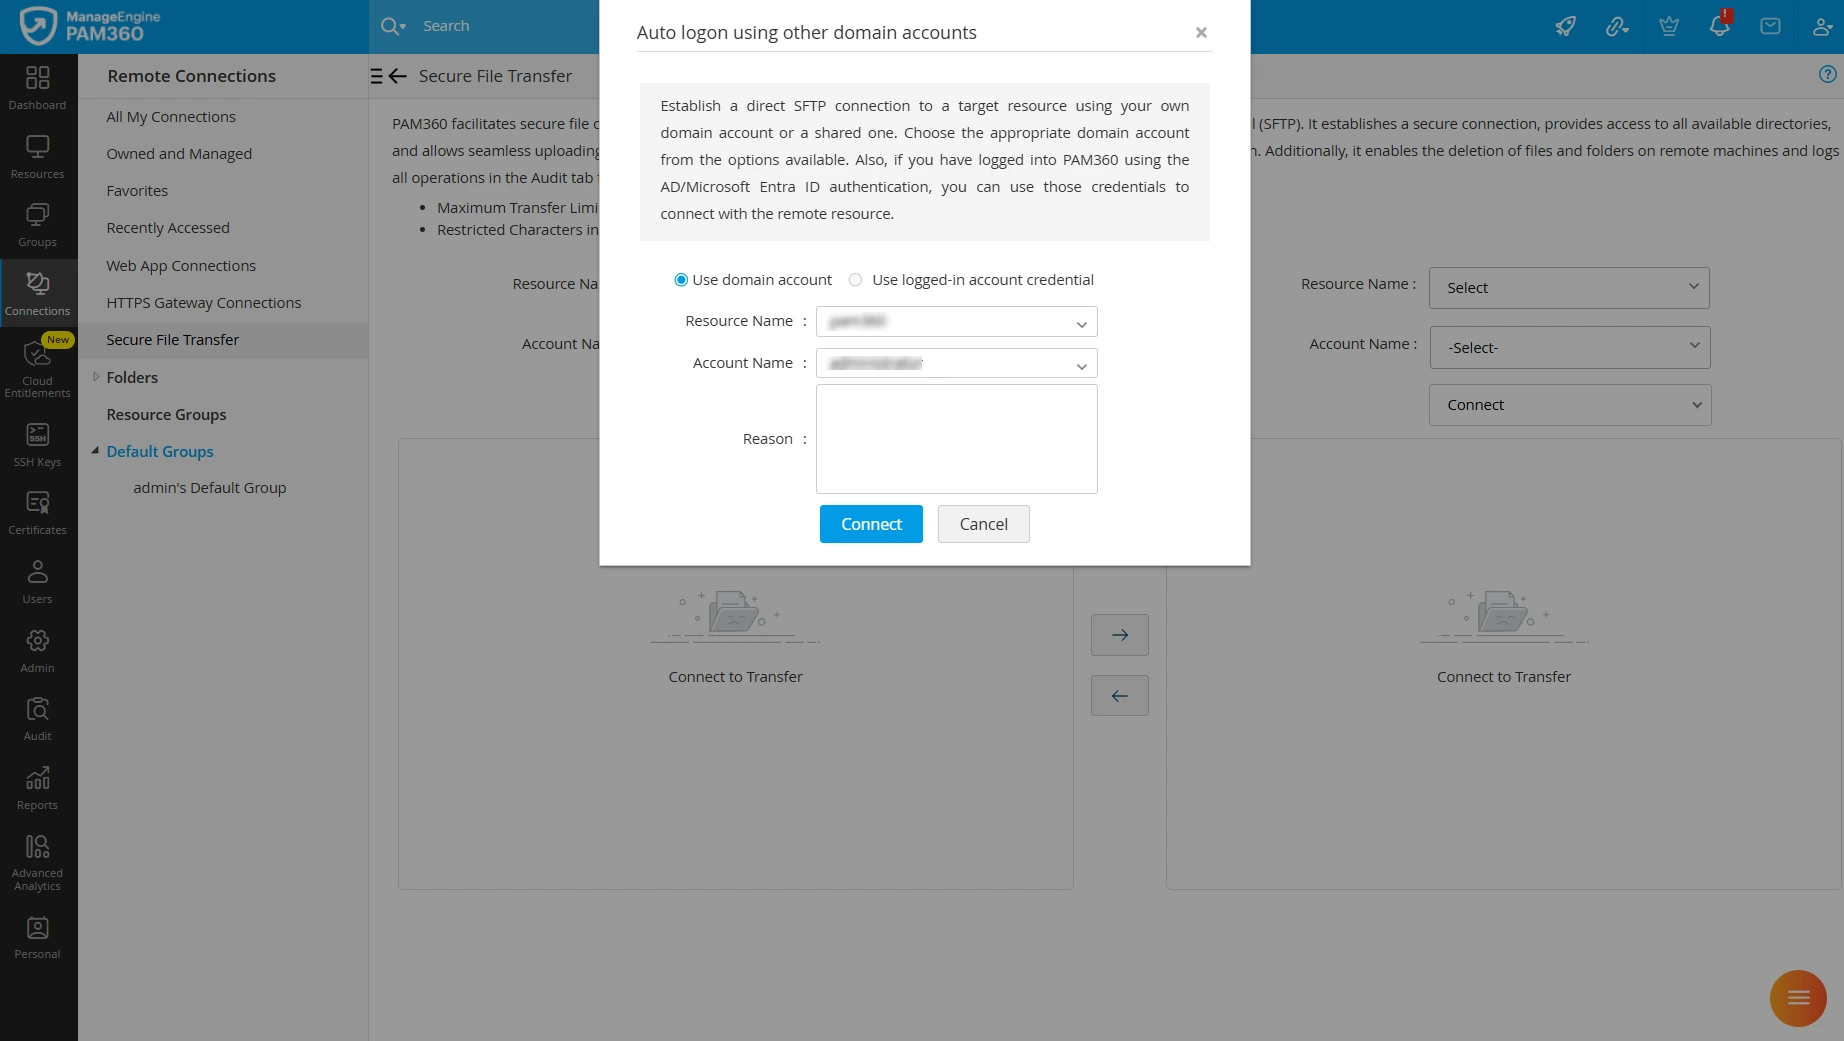
- Click Connect to establish a direct SFTP connection using the selected credentials.
- If you have logged into PAM360 using the AD/Microsoft Entra ID/LDAP authentication, you will see the option to use your logged-in account credentials to connect to the remote machine.
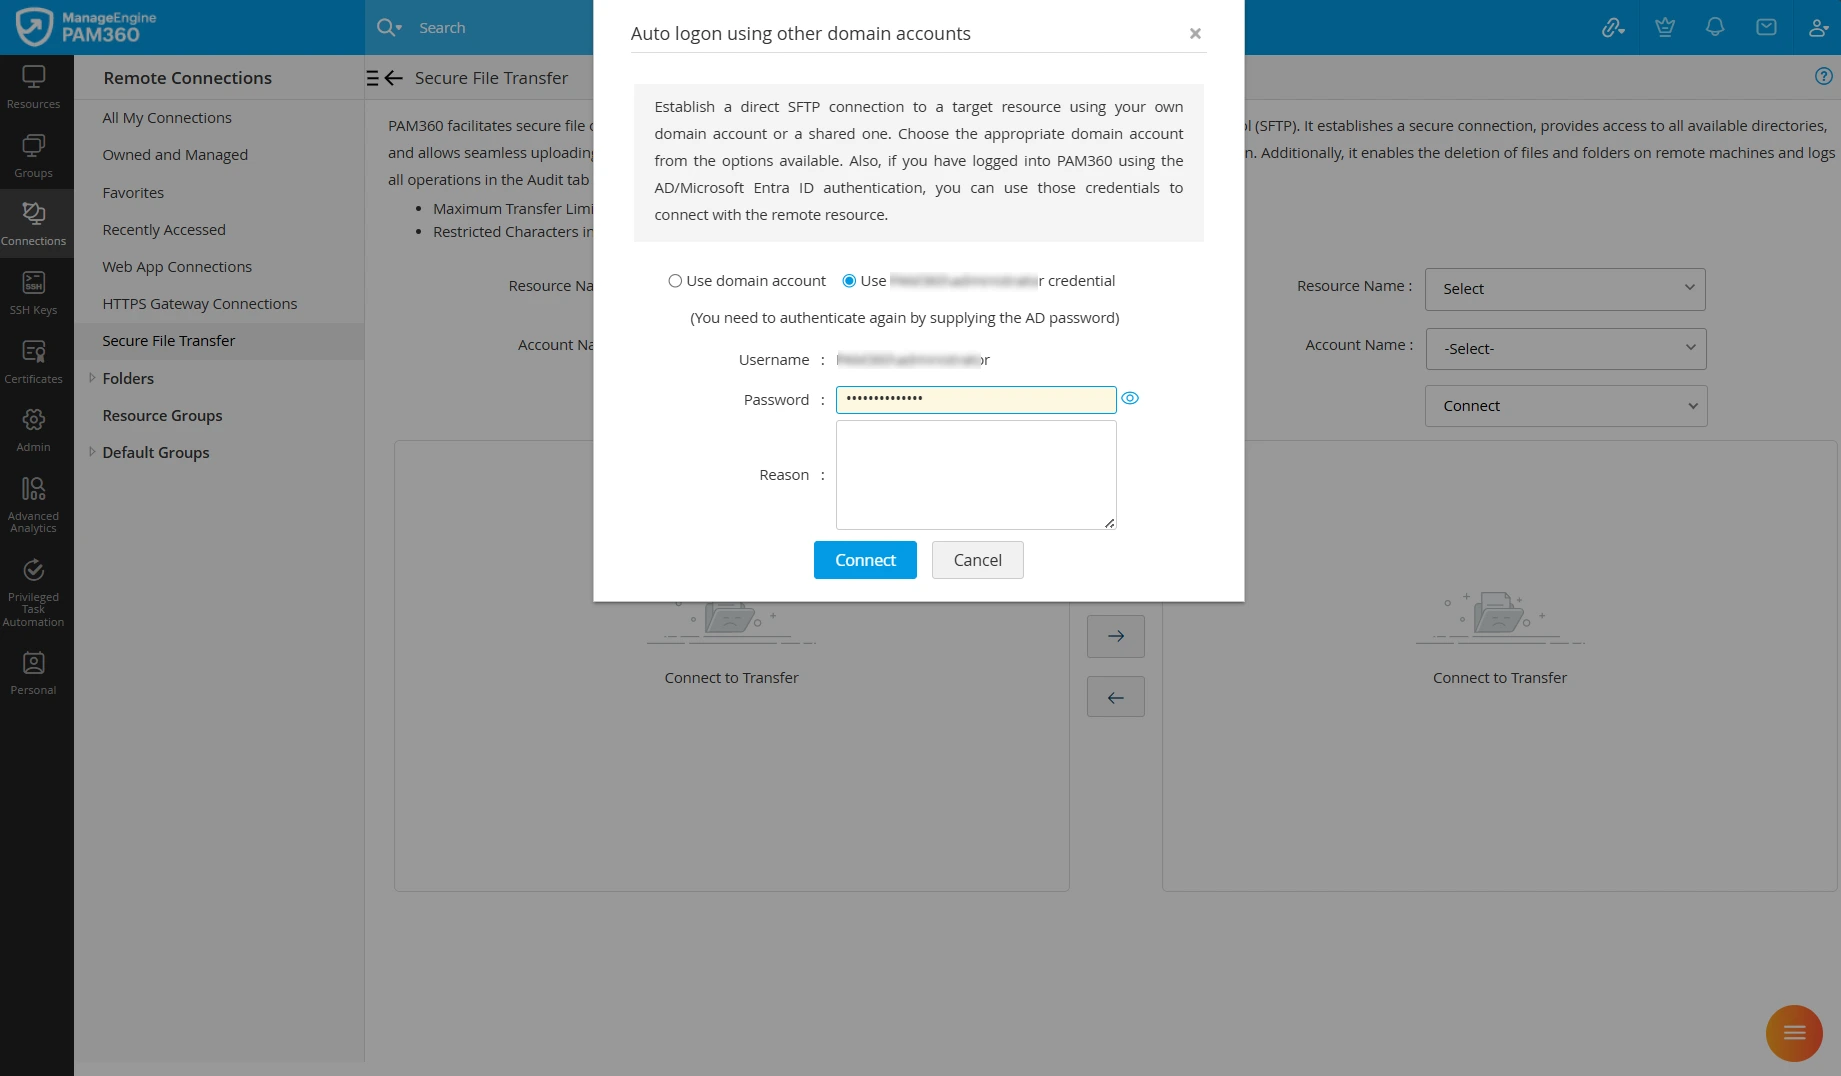
- Enter your logged-in account password in the required field and click Connect.
- PAM360 will authenticate the connection to the selected remote machines. The folders available on both remote machines will be displayed under the respective sections upon successful authentication.
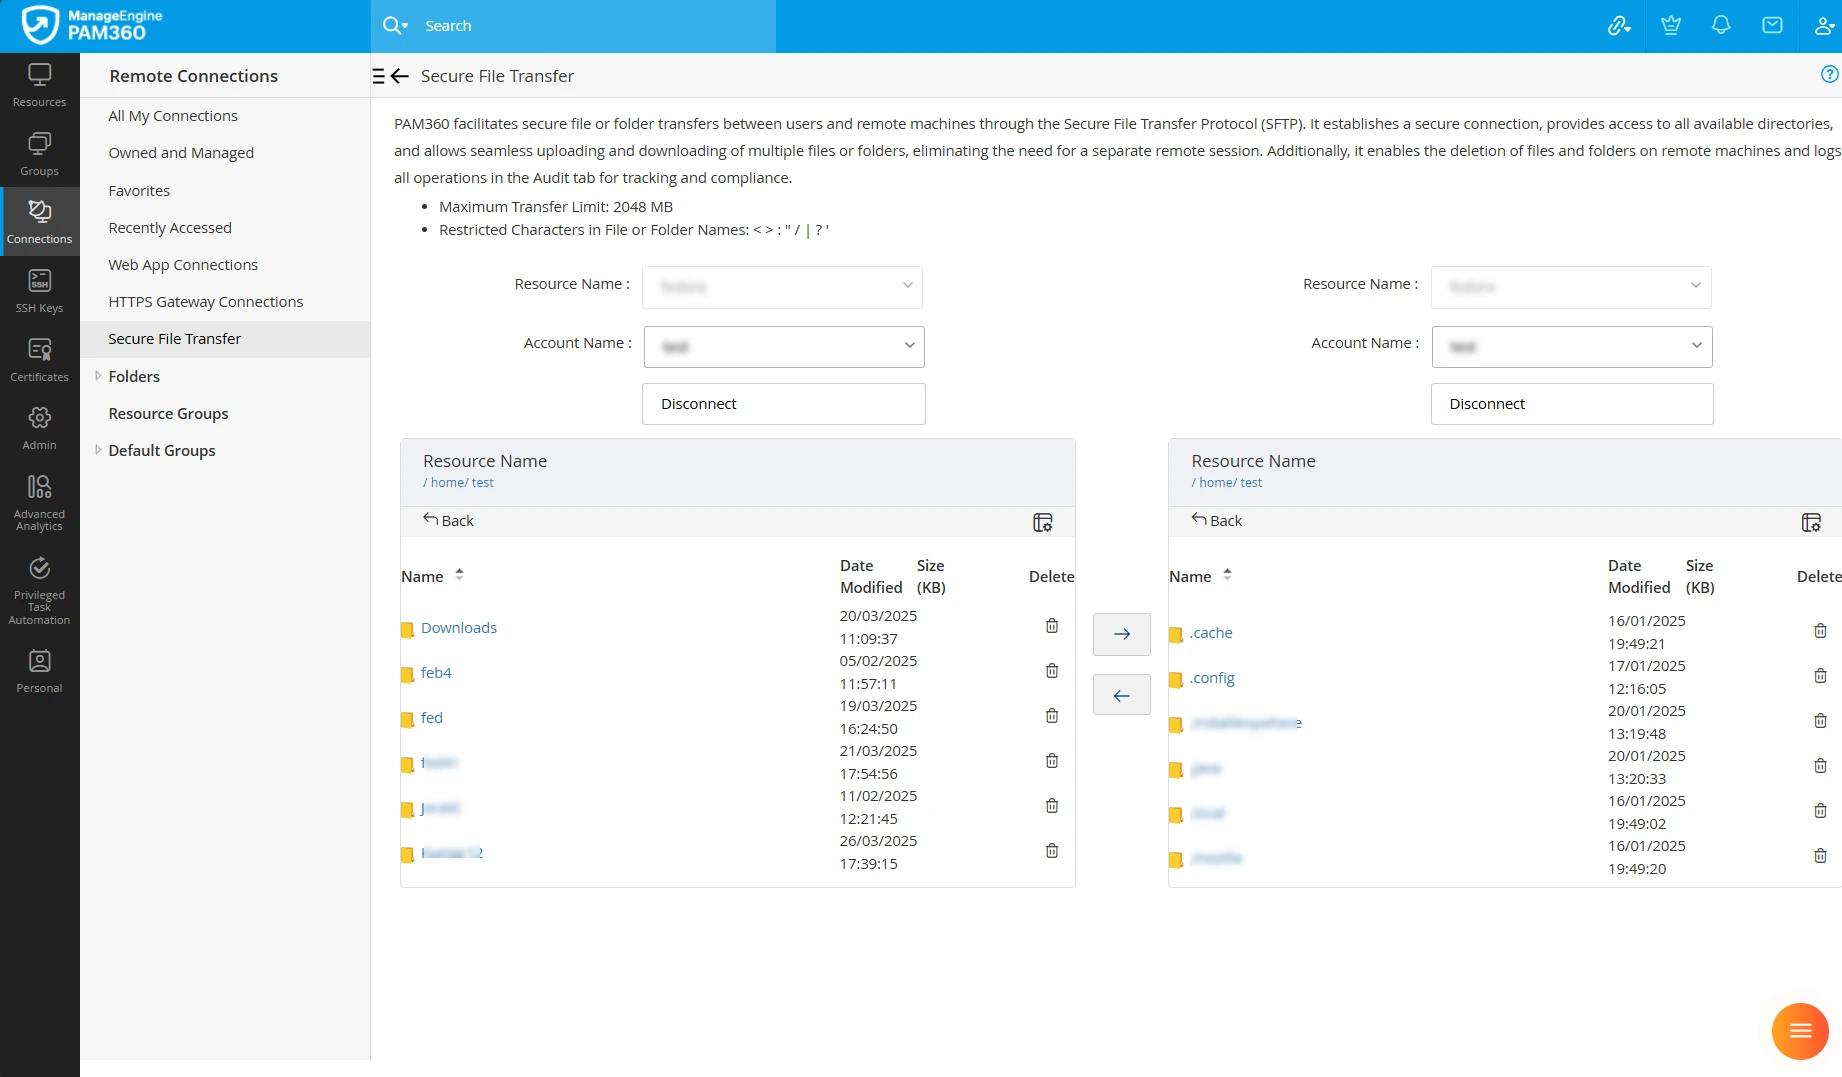
- Choose the required file from one of the machines and click the relevant arrow icon in the middle to initiate data transfer between the selected paths. Similarly, choose the file or folder you want to delete individually from the remote directories and click the Delete icon to remove the item from the remote machine directory.
- Once the file transfer is complete, you will see the selected file in the destination directory. If the file transfer fails, navigate to Audit >> Resource Audit for more details.
Additional Detail
If you have an active ticketing system integration in PAM360, provide a valid ticket ID for the SFTP session.
Additional Details
- If the access control workflow mechanism is configured in your environment for the remote resources between which you wish to transfer files bi-directionally, you must send a password access request to access the directories available on the selected remote machines. Once the password access request is approved, you can transfer files between the selected resources bi-directionally.
- Only the users with the Secure File Transfer Operations privileges in PAM360 can execute bi-directional file transfer between remote machines. By default, users with administrator roles (such as Privileged Administrator, Administrator, and Password Administrator) and Connection User roles can execute bi-directional file transfer.
- The secure file transfer is supported only on the resources that run on the operating systems supported by PAM360, such as Windows, Windows Domain, Linux, Mac, Solaris, HP UNIX, IBM AIX, HPUX, and JunOS.
3. Deleting Files and Folders in Remote Machines
You can delete files or folders in two ways; from a directory on the remote machine and from a particular account.
Best Practice
It is recommended not to delete the default system folders and virtual directories on the remote machines.
3.1 Deleting Files from Remote Machine Directory
Follow the below steps to delete files or folders from a directory on a remote machine via SFTP session:
- Navigate to the Connections tab and click the name of a resource from the left pane. Now, the display area on the right will display all the accounts that belong to the selected resource.
- Hover your mouse over the thumbnail of an account and click Secure File Transfer.
- The Secure File Transfer dialog box will appear, where PAM360 will authenticate the connection and display all the available directories on the machine in the remote directory section.
- You can either choose files individually or bulk from the remote directory. However, you can select folders individually for the deletion. Click Delete.
- In the dialog box that appears, confirm your action to delete the selected items from the remote directory.
3.2 Deleting Files from Account
Refer to the steps below to delete files or folders from an account via SFTP session.
- Navigate to the Resources tab and click the name of the respective resource. The Account Details dialog box appears.
- Beside the respective account, click the Open Connection icon and click SFTP from the drop-down.
- The Secure File Transfer window will appear, where PAM360 will authenticate the connection and display all the available directories on the machine in the remote directory section.
- You can either choose files individually or bulk from the remote directory. However, you can select folders individually for the deletion.
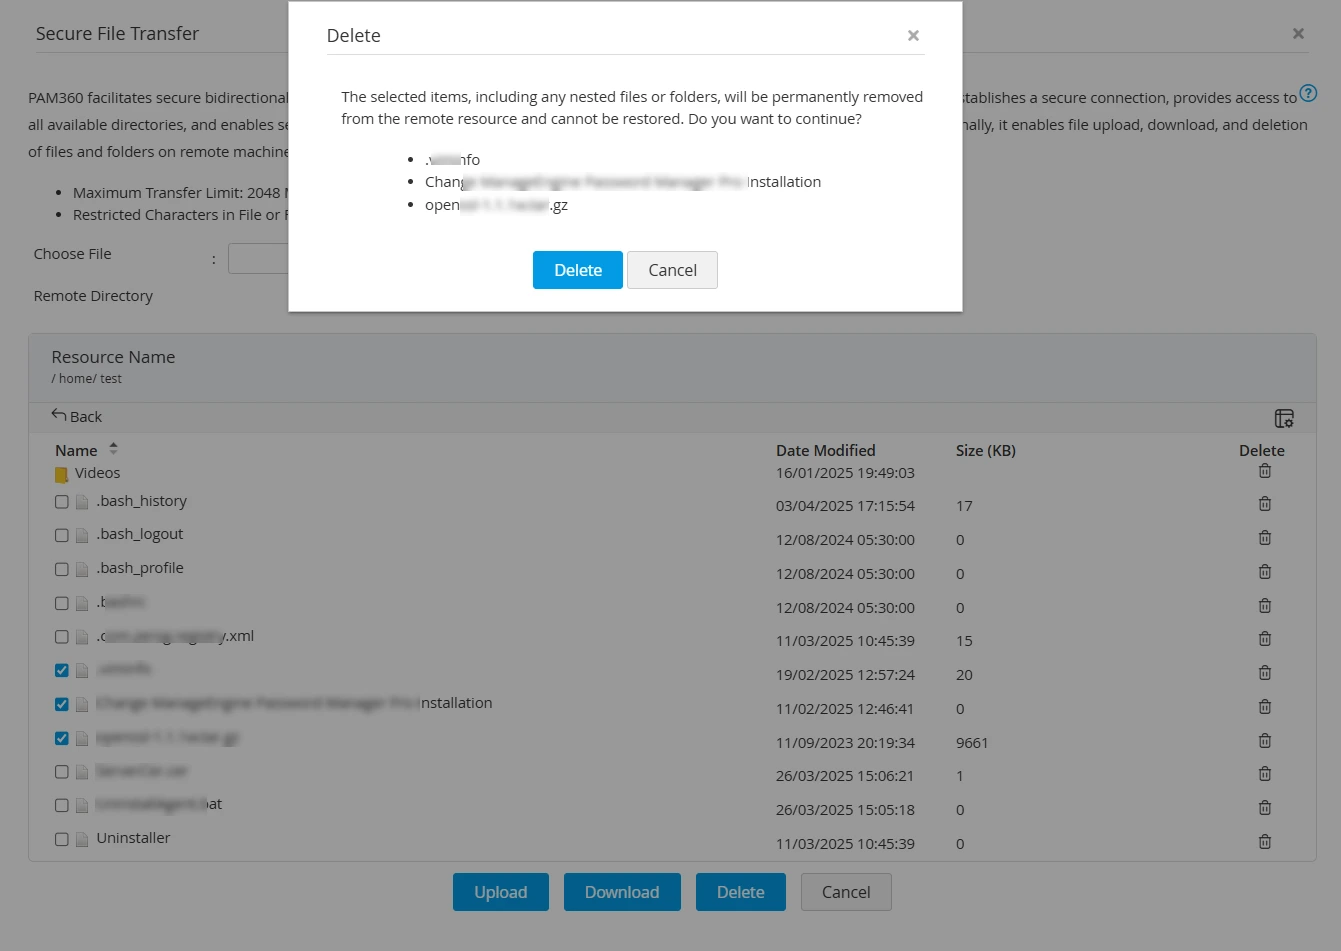
- Click Delete and confirm your action in the dialog box that appears to delete the selected items.