Exchange Reporter Plus overview
ManageEngine Exchange Reporter Plus is a reporting, change auditing, monitoring and content search tool for Exchange Server, Exchange Online, and Skype for Business Server. It features more than 450 unique reports on various Exchange entities such as mailboxes, email traffic, public folders, Outlook Web Access, and ActiveSync, along with reports featuring usage and configuration details about Skype for Business Server. Exchange Reporter also audits activities in Exchange servers and Exchange Online, and can send real-time email alerts.
For a quick look at some important aspects of Exchange Reporter Plus, refer to the product datasheet.
System requirements
Hardware requirements
| Hardware |
Minimum |
Recommended |
| Processor speed |
2.4GHz |
3GHz |
| Processor cores |
4 |
6 or more |
| RAM |
8GB |
16GB |
| Disk space |
100GB (SSD preferred) |
200GB (SSD preferred) |
| Disk throughput |
5MB/s |
20MB/s |
To calculate an appropriate estimate of the hard disk space you might need, use the table below:
| Number of users |
Number of days |
Total size |
| 1 |
1 |
37KB |
| 1,000 |
100 |
37 x 1,000 x 100 = 3,700,000KB (or 3.7GB) |
Tip: Use the Archive Settings (Settings → Configuration → Exchange Server → Archive Settings) to archive the reports and free up disk space as you prefer.
Port Requirements
| Source Hostname |
Destination Hostname |
TCP Port |
Description/Reason |
| Exchange Reporter Plus |
Exchange Servers |
135 |
RPC |
| 5985 |
Windows Powershell Default psSession Port |
| 5986 |
Windows Powershell Default psSession Port |
| 80 |
Powershell |
| 443 (SSL) |
Powershell |
| 445 |
Log collection |
| Active Directory |
389 |
LDAP |
| 636 |
LDAP SSL |
| 3268 |
LDAP GC |
| 3269 |
LDAP GC SSL |
| 53 |
DNS |
| 88 |
Kerberos |
| 139 |
Net Bios |
Exchange Report Plus console uses the port 8181 by default.
Software requirements
Supported platforms
- Windows 7
- Windows 8
- Windows 8.1
- Windows 10
- Windows 11
- Windows Server 2003
- Windows Server 2008
- Windows Server 2008 R2
- Windows Server 2012
- Windows Server 2012 R2
- Windows Server 2016
- Windows Server 2019
- Lync Server 2013
- Skype for Business Server 2015
- Skype for Business Server 2018
Supported Exchange Servers
- Exchange Server 2003
- Exchange Server 2007
- Exchange Server 2010
- Exchange Server 2013
- Exchange Server 2016
- Exchange Server 2019
Supported browsers
- Internet Explorer 9 and above
- Firefox 45 and above
- Google Chrome 45 and above
Preferred screen resolution 1024 x 768 pixels or higher
Supported databases
- MS SQL and
- PostgreSQL (comes bundled with the product)
Prerequisites for installation
For Exchange Server
- Install Windows Management Framework (which contains Windows PowerShell and Windows Remote Management).
Note: In Windows Server 2008 R2 and above, Windows Management Framework is installed by default.
- Install Microsoft .NET Framework 3.5 Service Pack 1 or above.
- Install Microsoft Exchange Web Services Managed API 2.2.
- Install MAPI to extract mailbox size and content-related data for Exchange Server versions 2003 and 2007. It can be downloaded here.
- Enable csCookie. Refer to the Appendix for instructions.
- For mailbox and public folder content reports: The user account that you use to configure the Exchange server in Exchange Reporter Plus must have a valid mailbox that's not hidden from the global address list. The user must also have logged in to the mailbox at least once.
- Ensure there's a valid mailbox for MAPI Profile (applies only for Exchange Server 2003 and 2007 versions).
For Skype for Business
Exchange Reporter Plus supports Skype for Business reporting function in the following platforms:
- Windows 7 and above
- Windows Server 2008 R2 and above
Port requirements
Exchange Reporter Plus uses port 80 for HTTP and port 443 for HTTPs communications.
Prerequisites
Before you configure a Microsoft 365 tenant, make sure that these prerequisites are satisfied:
- Make sure that you have a working internet connection and the required domains are not blocked by your firewall. Please refer to this table to know the entire list of domains to be allowed by your firewall.
- You have Microsoft .NET version 4.8 and PowerShell version 5.1 installed.
- To check if Microsoft .NET Framework is installed, open the Command Prompt from Run. Enter the following command:
reg query "HKEY_LOCAL_MACHINE\SOFTWARE\Microsoft\NET Framework Setup\NDP\v4\full" /v version
Check the displayed version. If the version is below 4.8, install Microsoft .NET Framework version 4.8 from here
- To check if PowerShell is installed, type PowerShell from Run. If PowerShell is installed, check for its version number by running the following command:
$PSVersionTable
If the version is below 5.1 or if PowerShell is not installed, install PowerShell version 5.1 from here.
Privileges required for Exchange Reporter Plus
Exchange Reporter Plus collects data from Active Directory, Exchange Server, Exchange Online, and Skype for Business Server for generating reports, alerts, etc. To collect all the necessary data without issue, you must configure Exchange Reporter Plus with a user account that has been assigned all the necessary privileges.
Refer to the table below for the exact privileges required by Exchange Reporter Plus.
| Features |
Privileges required |
| Exchange Server reporting, auditing, monitoring and content search |
The user account must be a member of the:
- Domain Admins group
- Organization Management group
|
| Exchange Online reporting and auditing |
The user account must have a:
- Global Administrator role
|
| Skype for Business Server reporting |
The user account must be a member of the:
- CsAdministrator or CsViewOnlyAdministrator group
|
Note: Click here to know about the granular permissions required if higher privilege is not allowed.
Installing Exchange Reporter Plus
- Download Exchange Reporter Plus.
- Double-click the downloaded EXE file to start the InstallShield Wizard.
- Follow the instructions displayed on the InstallShield Wizard to complete the installation.
Note: If you have already installed Exchange Reporter Plus, use the Service Pack to update to the latest version.
Installing Exchange Reporter Plus as a Windows service
- Click Start → Programs → Exchange Reporter Plus → Service → Install Exchange Reporter Plus Service.
- When you install the Exchange Reporter Plus Service, the following dialog box will appear:
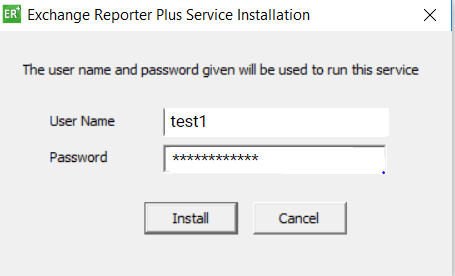
- Please provide the credentials of a user who has administrative privileges on the local machine where the product is installed.
Once the Exchange Reporter Plus Service is installed, you can start the product as a Windows service.
Starting Exchange Reporter Plus
Once Exchange Reporter Plus is successfully installed, a shortcut will be added to the desktop. To start Exchange Reporter Plus:
- Double-click the desktop icon. Exchange Reporter Plus will open in a web browser.
- It can also be started from: Start → Programs → Exchange Reporter Plus → Start Exchange Reporter Plus.
- If Exchange Reporter Plus is installed as a Windows service, then start it using the Windows Services Manager (services.msc) tool.
Accessing Exchange Reporter Plus
Note: Ensure Exchange Reporter Plus is running.
- Open a web browser and type http://<hostname>:<port number> in the address bar.
- Hostname: IP address or hostname of the machine in which Exchange Reporter Plus is installed.
- Port number: The port number used by Exchange Reporter Plus. By default, it is 8181.
- Or, double-click the desktop icon again to open Exchange Reporter Plus in a web browser.
- If the product has already been started as an application, you can launch it by right-clicking the system tray icon of Exchange Reporter Plus and selecting Start Client.
Stopping the product
- Click Start → Programs → Exchange Reporter Plus → Stop Exchange Reporter Plus.
- If the product is running as an application, you can also stop it by right-clicking the system tray icon of Exchange Reporter Plus and selecting Shutdown Server.
Logging in to Exchange Reporter Plus
- In the login screen of Exchange Reporter Plus, enter the Username and Password.
Note: If you’re logging in to Exchange Reporter Plus for the first time after installation, use admin as both the username and password.
- Click Login.
You can change the default password by following the steps below:
- Go to Settings → Admin → Utilities → User Management.
- Under the Actions column, click the edit icon next to the admin account.
- Click Edit Password.
- Enter the new password, then enter it again to confirm it.
- Click Save.
Configuring Exchange Server, Exchange Online, and Skype for Business Server for data collection
To start collecting data, you need to first add an Exchange Server, an Exchange Online tenant, or a Skype for Business Server in Exchange Reporter Plus.
Adding an Exchange Server
- Log in to Exchange Reporter Plus as an admin.
- Click the Org/Tenant Setings button at the top right corner of the web console.

- Under the Exchange Server tab, click Add New Organization.
- Enter the Global Catalog Server name.
Note: If the Exchange Server is within your forest, the Exchange organization will be added automatically.
- Enter the Username and Password of a user account with appropriate privileges.

- To establish a secure connection between the Exchange Reporter Plus server and Active Directory domains configured, select the Enable LDAPS Connection checkbox.
- Click Save.
Adding an Exchange Online tenant
- Log in to Exchange Reporter Plus as an admin.
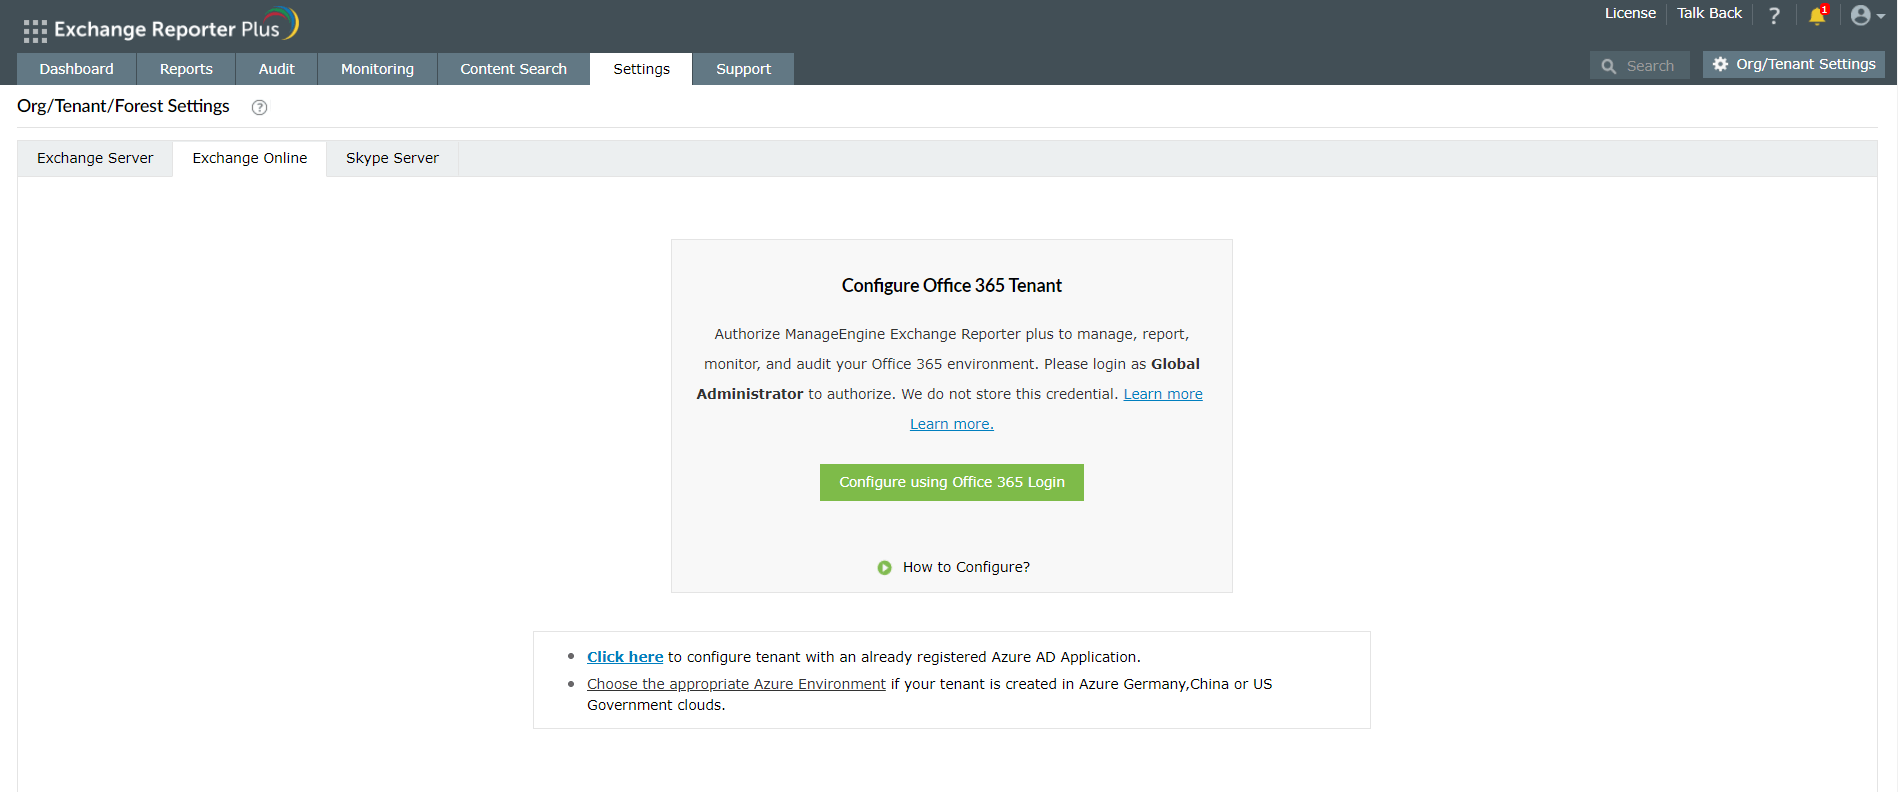
- Click the Org/Tenant Settings button in the top-right corner.
- Under the Exchange Online tab, click Add New Tenant.
- Choose Configure using Office 365 Login and click Proceed.
- Log in to the Office 365 tenant account using the account credentials.
Adding a Skype for Business Server
- Log in to Exchange Reporter Plus as an admin.
- Click the Org/Tenant Setings button at the top right corner of the web console.
- Under the Skype Server tab, click Add New Forest.
- Enter the Global Catalog Server name.
Note: If the Skype for Business Server is within your forest, the Global Catalog Server name will be updated automatically.
- Enter the Username and Password of a user account with appropriate privileges.
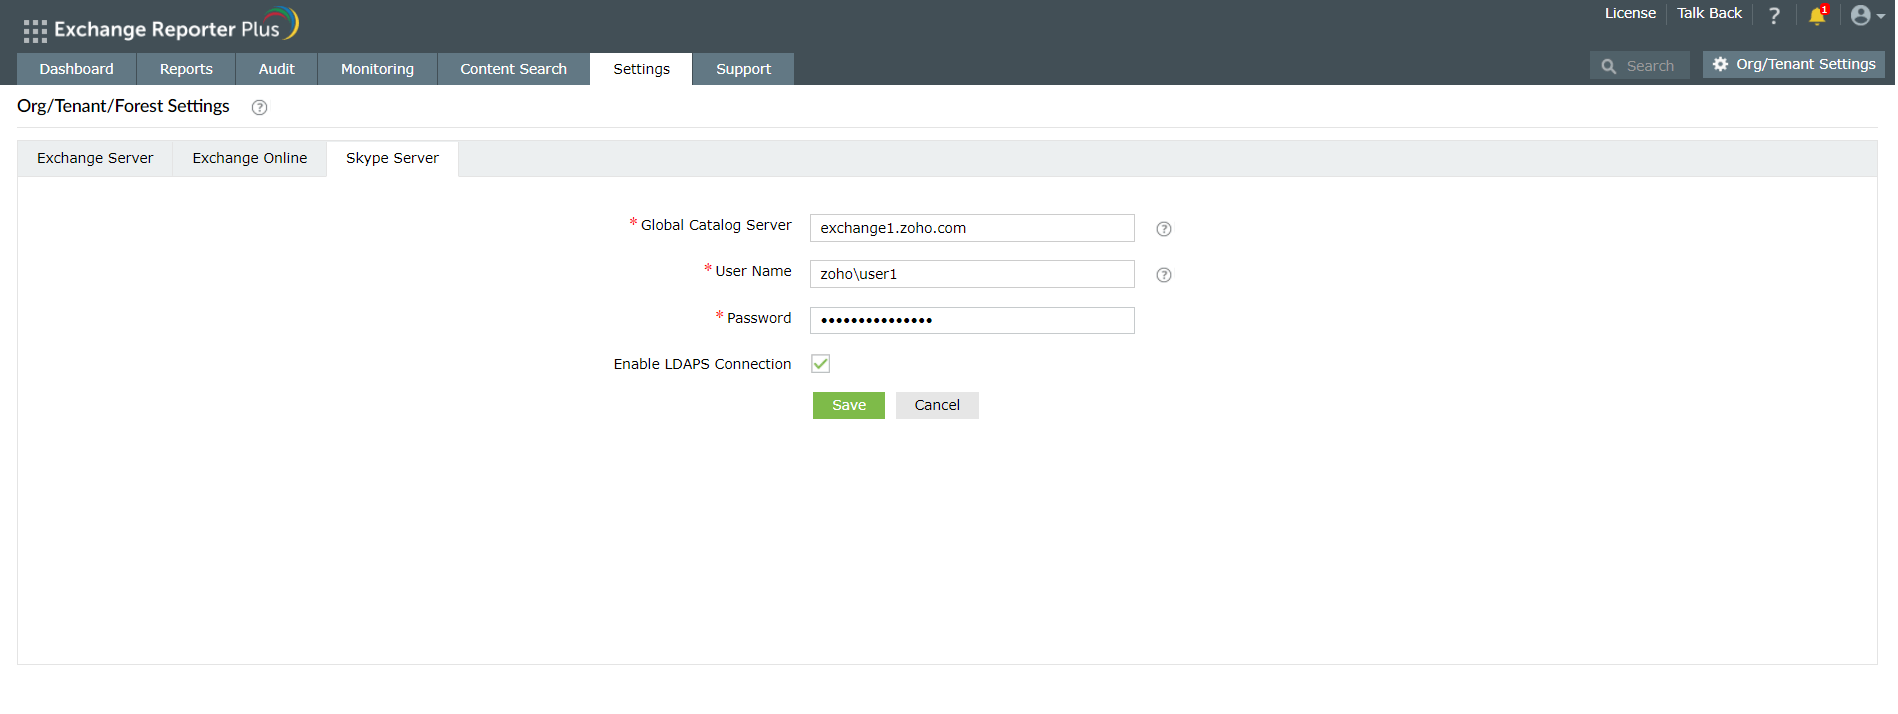
- To establish a secure connection between the Exchange Reporter Plus server and Skype for Business domains configured, select the Enable LDAPS Connection checkbox.
- Click Save.
Delegating access to technicians
Now that Exchange Reporter Plus has been configured to collect data, it will start generating reports and alerts. You can allow other users, such as help desk technicians, to access the reports by assigning them one of the two roles available in Exchange Reporter Plus.
Admin role: Users assigned this role have full control over the product. They can view and generate reports, modify audit and alert configurations, assign or modify roles of other users, and more.
Operator role: Users assigned this role can only view the reports.
The user can be either an existing Active Directory user, or you can create a new Exchange Reporter Plus user who exists only within the realm of the product. AD users can log in with their domain username and password, and Exchange Reporter Plus users need to use the username and password entered by the admin during user creation.
You can also enable, disable, delete, or change the role of users anytime you want.
To delegate access to users:
- Go to the Settings tab.
- Select Admin → Utilities → Technicians in the left pane.
- Click the Add New Technician option in the top-right corner.
- In the window that appears, select an Authentication type from the drop-down.
- For Product Authentication type, enter a Username and Password for the technician account you are about to create. Confirm the password once again.
- For Active Directory Authentication, click the add button next to the Username field to find and add the Active Directory user as the technician.
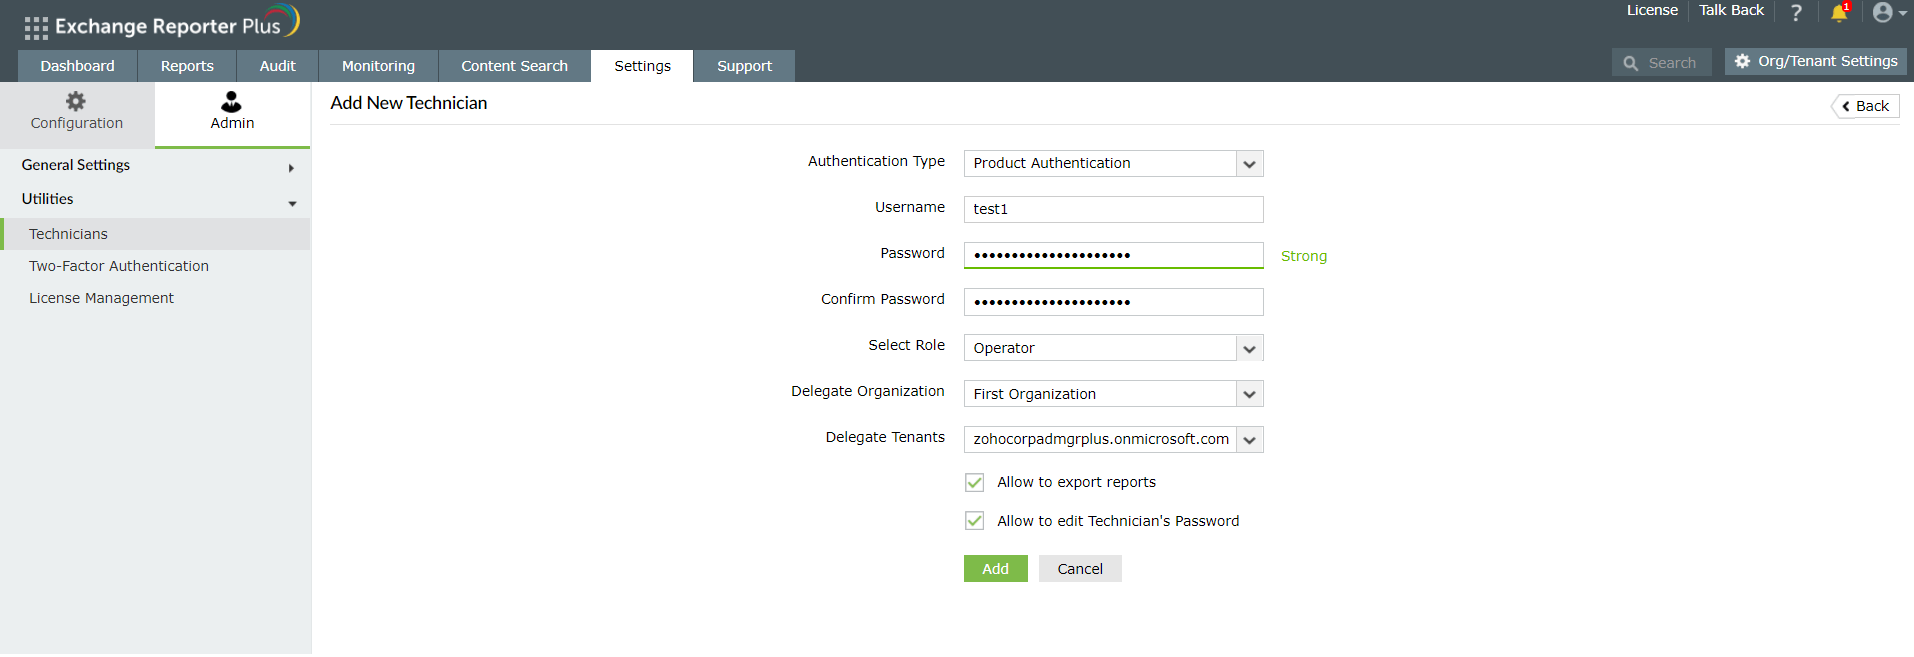
- Select a Role from the list of roles available. The drop-down menu shows both default and custom roles.
- You can also delegate suitable Organization, Tenants, and Forests to be monitored and accessed by the technician.
- Check the boxes next to Allow to export reports and Allow to edit technicians' passwords if you want to enable those options.
- Click Add.
Note: The default admin account with Exchange Reporter Plus authentication cannot be deleted or modified.
Tip: To audit the actions of users assigned the technician role, go to Settings → Admin → Utilities → Technician Activity.
Exchange Reporter Plus dashboard
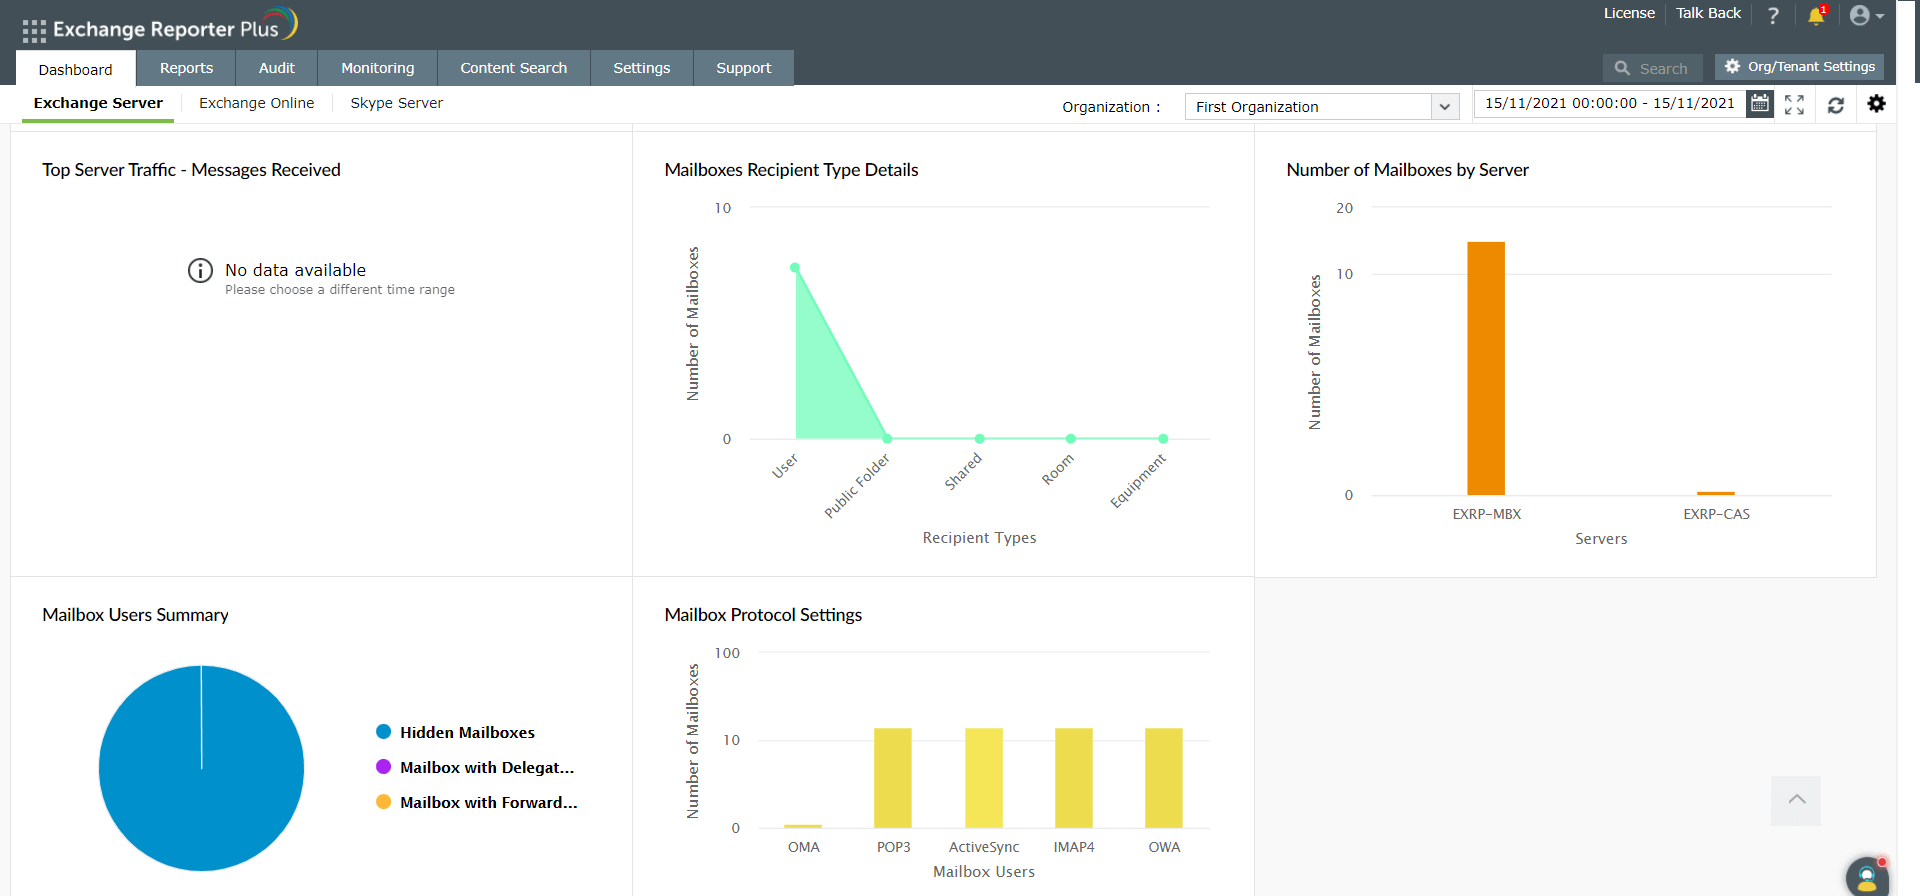
When you log in to the product, you will land on the dashboard of Exchange Reporter Plus. The dashboard provides a graphical summary of the most important aspects of your on-premises Exchange Server, Exchange Online, and Skype for Business Server environments.
Using the reports
With over 450 predefined state-in-time, audit, and monitoring reports, Exchange Reporter Plus provides you complete visibility into your Exchange on-premises, Exchange Online, and Skype for Business environments.
To access a report:
- Log in to Exchange Reporter Plus as an admin or operator.
- Go to the Reports tab.
- Choose a report category, i.e., Email Traffic.
- Click a report from the list, i.e., Number of Messages by Sender.
- Choose Exchange Organization from the drop-down, and specify the period.
- Click Generate Now.
- The Number of Messages by Sender report will show you the top 10 senders for the specified period in an easy-to-understand graph. The report will also contain a comprehensive table containing more information.
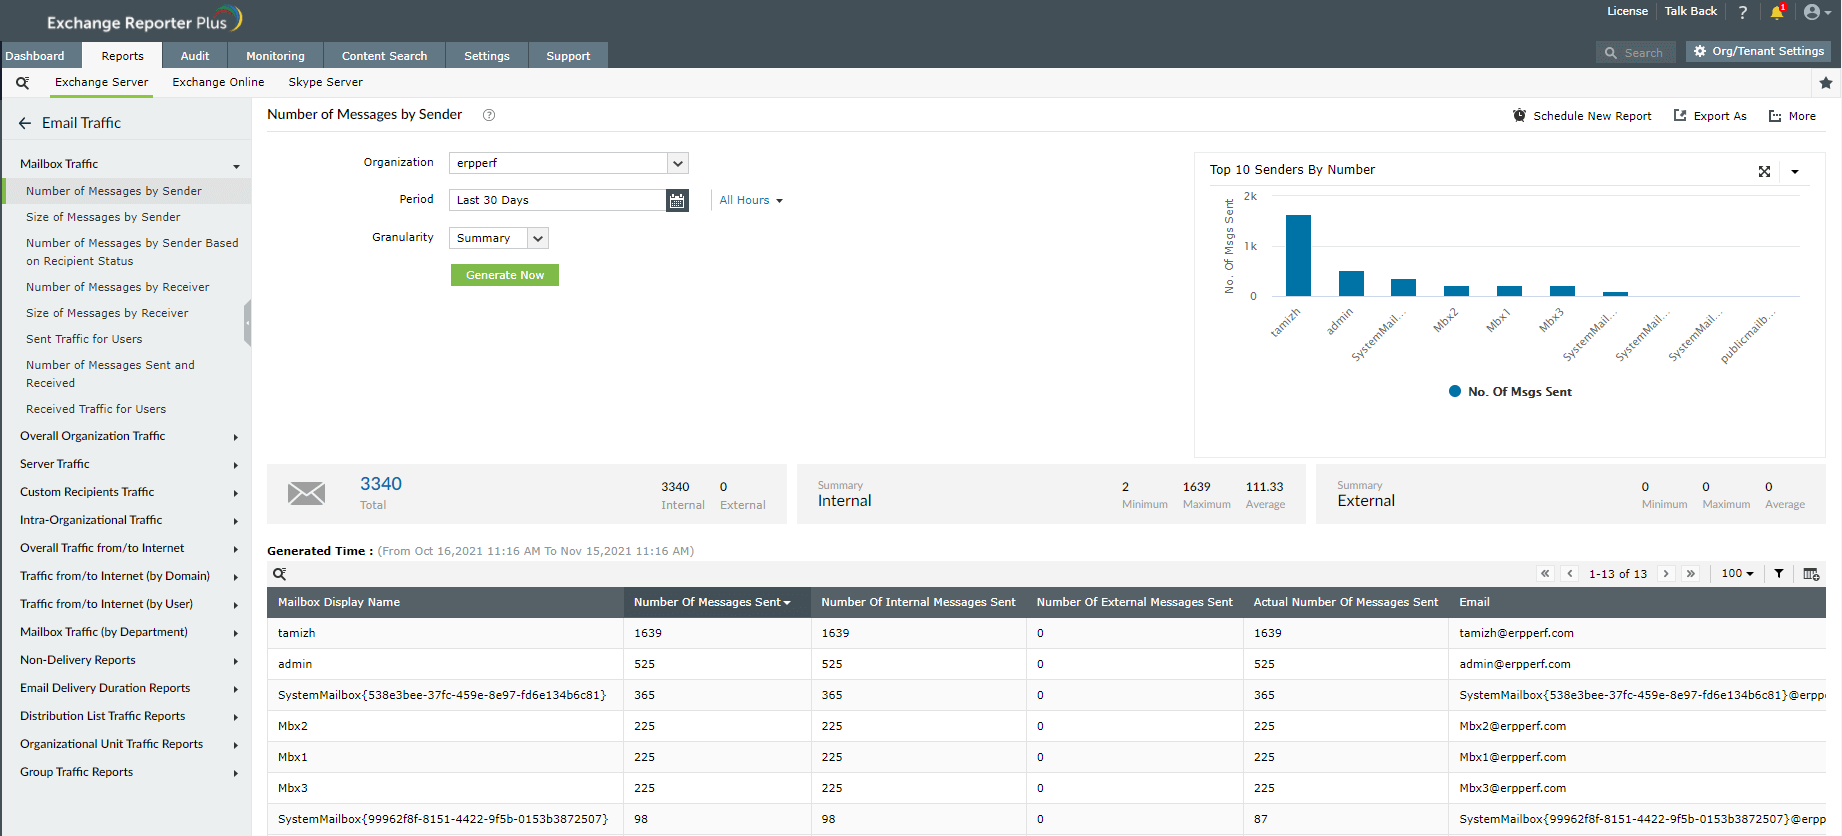
- You can apply filters to pare down the report until it shows only the information you need.

- To receive the report periodically to your inbox, use the Schedule New Report option.
- Use the Export As option to save the report in HTML, PDF, XLS, or CSV file formats.
- To print the report or add it to your favorites, use the More option.

Related documents
The table below lists some documents related to Exchange Reporter Plus that you may find useful.
| Document |
What is it about? |
| Admin guide |
This is an all-inclusive guide that covers all the aspects of the product and provides step-by-step instructions on how to configure and use the various settings it provides. |
| SSL configuration guide |
This guide provides step-by-step instruction on how to apply an SSL certificate in the product, and enable a secure connection (HTTPS) between the browser and Exchange Reporter Plus server. |
| Database maintenance guide |
This guide contains frequently asked questions about database maintenance in Exchange Reporter Plus. |
| [E-book] Securing Exchange with Exchange Reporter Plus |
This e-book lists the best practices for securing your Exchange environment. |
| Reverse proxy guide |
This guide provides step-by-step instructions on how to enable a reverse proxy for Exchange Reporter Plus |
Appendix
Steps to enable csCookie
- Open the Run dialog box and enter inetmgr.
- In the left pane, expand the machine name → Sites.
- Click Default Web Site.
- In the middle pane, double-click Logging.
- In the right pane, under Actions, click Enable.
- For IIS 7 and above:
- Under the Log File section, click Select Fields.
- Check the Cookie ( cs(Cookie) ) box.
- Click OK.
- For IIS 6:
- Click Properties and go to the Advanced tab.
- Check the Cookie ( cs(Cookie) ) box.
- Click OK.
General domains
The general domains that must be allowed through the firewall are as follows:
- *.zoho.com
- *.manageengine.com
- *.zohocorp.com
- api.bcti.brightcloud.com
- *.manageengine.jp (Only Japanese build users)
- *.manageengine.cn (Only Chinese build users)
Azure AD cloud (default)
Azure AD cloud (default) users must ensure that the following domains are allowed by their firewall. Azure Germany, China, and US cloud users can refer to the respective tables below.
Table 1: Domains to be allowed by Azure AD cloud users.
| Module |
Endpoint |
| REST API |
login.microsoftonline.com |
| graph.windows.net |
| graph.microsoft.com |
| manage.office.com |
| portal.office.com |
| aadcdn.msftauth.net (or) aadcdn.msauth.net |
| Exchange Online |
outlook.office.com |
| outlook.office365.com/powershell-liveid |
Azure Germany
Azure Germany cloud users must ensure that the following domains are allowed by their firewall.
Table 2: Domains to be allowed by Azure AD Germany cloud users.
| Module |
Endpoint |
| REST API |
login.microsoftonline.de |
| graph.cloudapi.de |
| graph.microsoft.de |
| portal.office.de |
| manage.office.de |
| Exchange Online |
outlook.office.de |
| outlook.office.de/powershell-liveid |
Azure China
Azure China cloud users must ensure that the following domains are allowed by their firewall.
Table 3: Domains to be allowed by Azure AD China cloud users
| Module |
Endpoint |
| REST API |
login.partner.microsoftonline.cn |
| graph.chinacloudapi.cn |
| microsoftgraph.chinacloudapi.cn |
| manage.office.cn |
| portal.azure.cn |
| Exchange Online |
partner.outlook.cn |
| partner.outlook.cn/PowerShell |
Azure US
The Azure US cloud users must ensure that the following domains are allowed by their firewall.
| Module |
Endpoint |
| REST API |
login.microsoftonline.us |
| graph.windows.net |
| graph.microsoft.us |
| manage.office.us |
| portal.azure.us |
| Exchange Online |
outlook.office365.us |
| outlook.office365.us/powershell-liveid |