Personal Passwords
There is provision for storing personal passwords in the Password Manager Pro web interface. For example, you can store your personal email accounts, credit card numbers, banking accounts, contact addresses, phone numbers, email addresses etc. These information can be accessed only by you and not by anyone else. This ensures complete data privacy.
Steps Required
- Encrypt personal passwords
- Store personal accounts
2.1 Web accounts
2.2 Banking accounts
- Add custom fields
- Manage passwords in bulk
4.1 Import passwords
4.2 Export passwords
- Reset Personal Passphrase
1. Encrypt Personal Passwords
To gain access to the Personal tab, you must provide an encryption passphrase. While using the Personal tab in Password Manager Pro is optional, administrators can enforce creation of an encryption passphrase for all users from the General Settings. To set a strong password policy, go to Settings >> General Settings page or navigate to Admin >> Resource Config >> Password Policies and customize password polices as per your requirement.
Follow the below steps to set an encryption passphrase for your Personal tab:
- Navigate to the Personal tab.
- Enter a complex passphrase. Click the tool-tip icon for the passphrase complexity rules.
- Enter your passphrase again to confirm it and click Save.
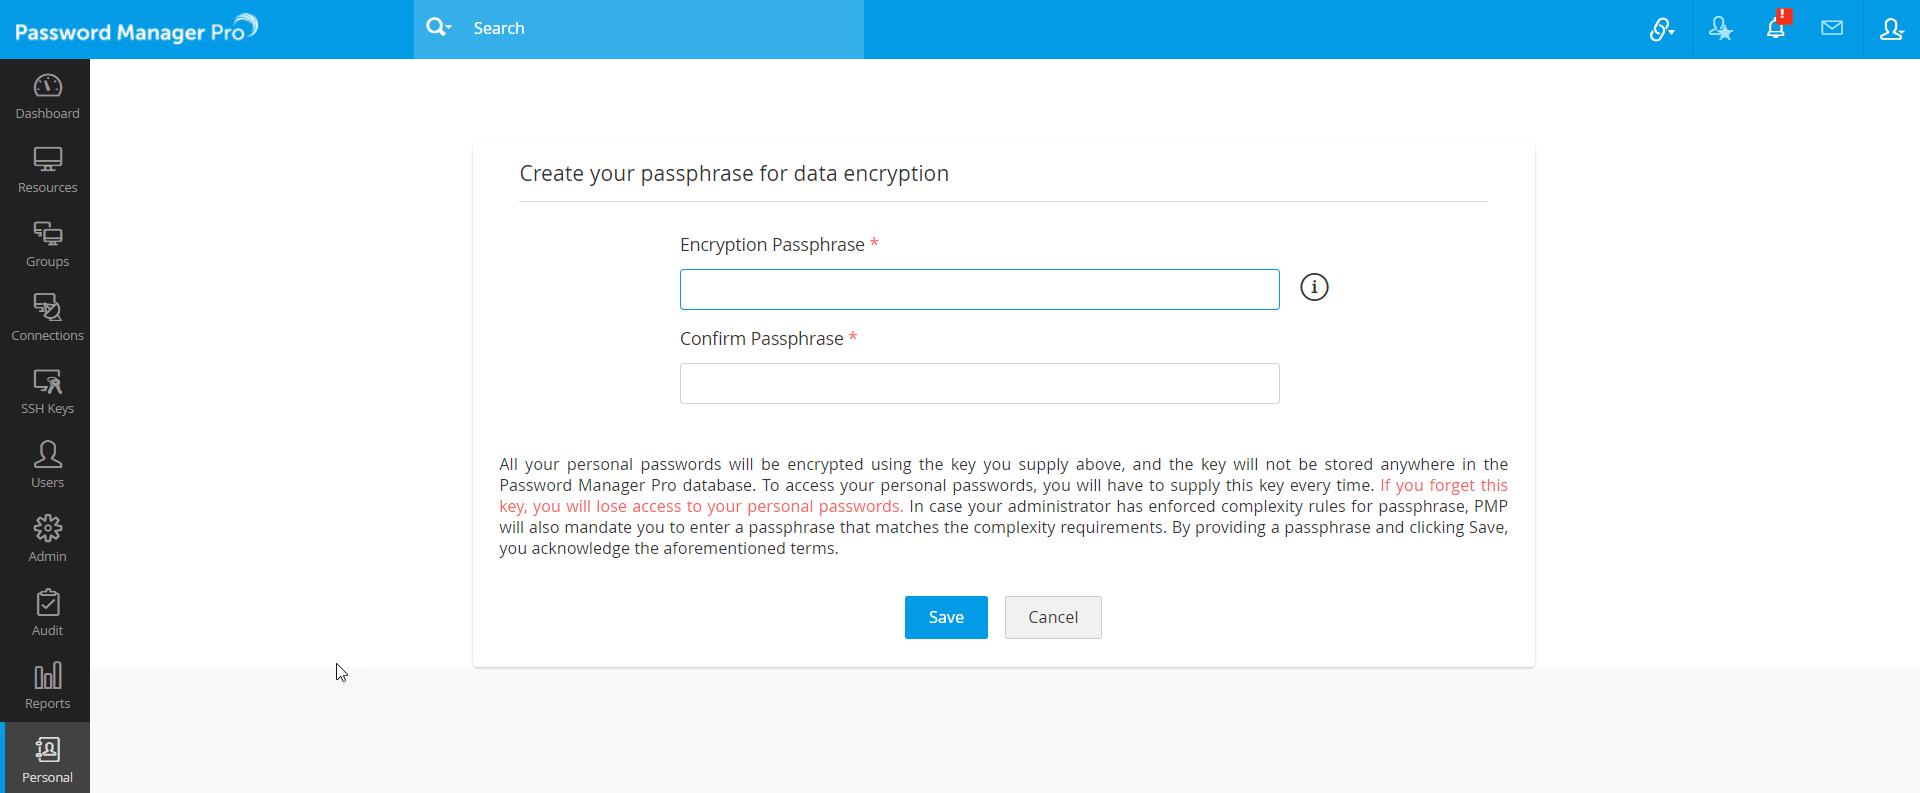
Password Manager Pro will use this passphrase to encrypt your data. Ensure that the passphrase you create is long and obeys the complexity rules for enhanced security. Whenever you need to access personal passwords in the Personal tab, you need to supply this passphrase. Remember, if you forget your passphrase, there is no way to retrieve your personal data.
If the administrator disables the option that allows user to choose their own passphrase for the personal passwords section, Password Manager Pro provides options to choose an encryption method for securing the data stored in the Personal tab. Please note that all your personal passwords will be encrypted and stored in the database. Password Manager Pro will encrypt your personal data based on the encryption key you choose to use based on the options given below:

Option 1: Use my encryption key and do not store it: If you choose this option, all your passwords will be encrypted using the encryption key you set up below. Note that this key will not be stored in the Password Manager Pro database. To access your personal passwords you will have to supply this key every time and if you forget this key you will lose all your passwords. This is the recommended option for achieving a high level of security for your sensitive personal data. In choosing not to store the encryption key, the risk of it getting exposed and compromising your passwords is significantly low.
Option 2: Use my encryption key and store it: If you choose this option, all your passwords will be encrypted using the key you supply below and the key will be stored securely in the Password Manager Pro database. During the subsequent password retrievals you need not specify the key and it is also not necessary that you remember this key.
Option 3: Use Password Manager Pro's encryption key: All your passwords will be encrypted with the same key as the enterprise passwords. You don't have to supply or remember any encryption keys.
Choose the required encryption method, enter your encryption passphrase and click Save to save the changes.
2. Store Personal Accounts
Once you have set your passphrase, proceed with adding your personal accounts in the Personal tab in the default categories provided by Password Manager Pro. The default categories cannot be deleted. However there is also provision to add your own custom categories, which is discussed in the next section of the document.
The four default categories of accounts are:
- Web accounts
- Bank accounts
- Credit card accounts
- Personal contacts list.
2.1 Web Accounts
To add a new web account, follow the below steps:
- Navigate to the Personal tab.
- Click the Web Accounts option from the left pane.
- In the Web Accounts page, click the Add Accounts.
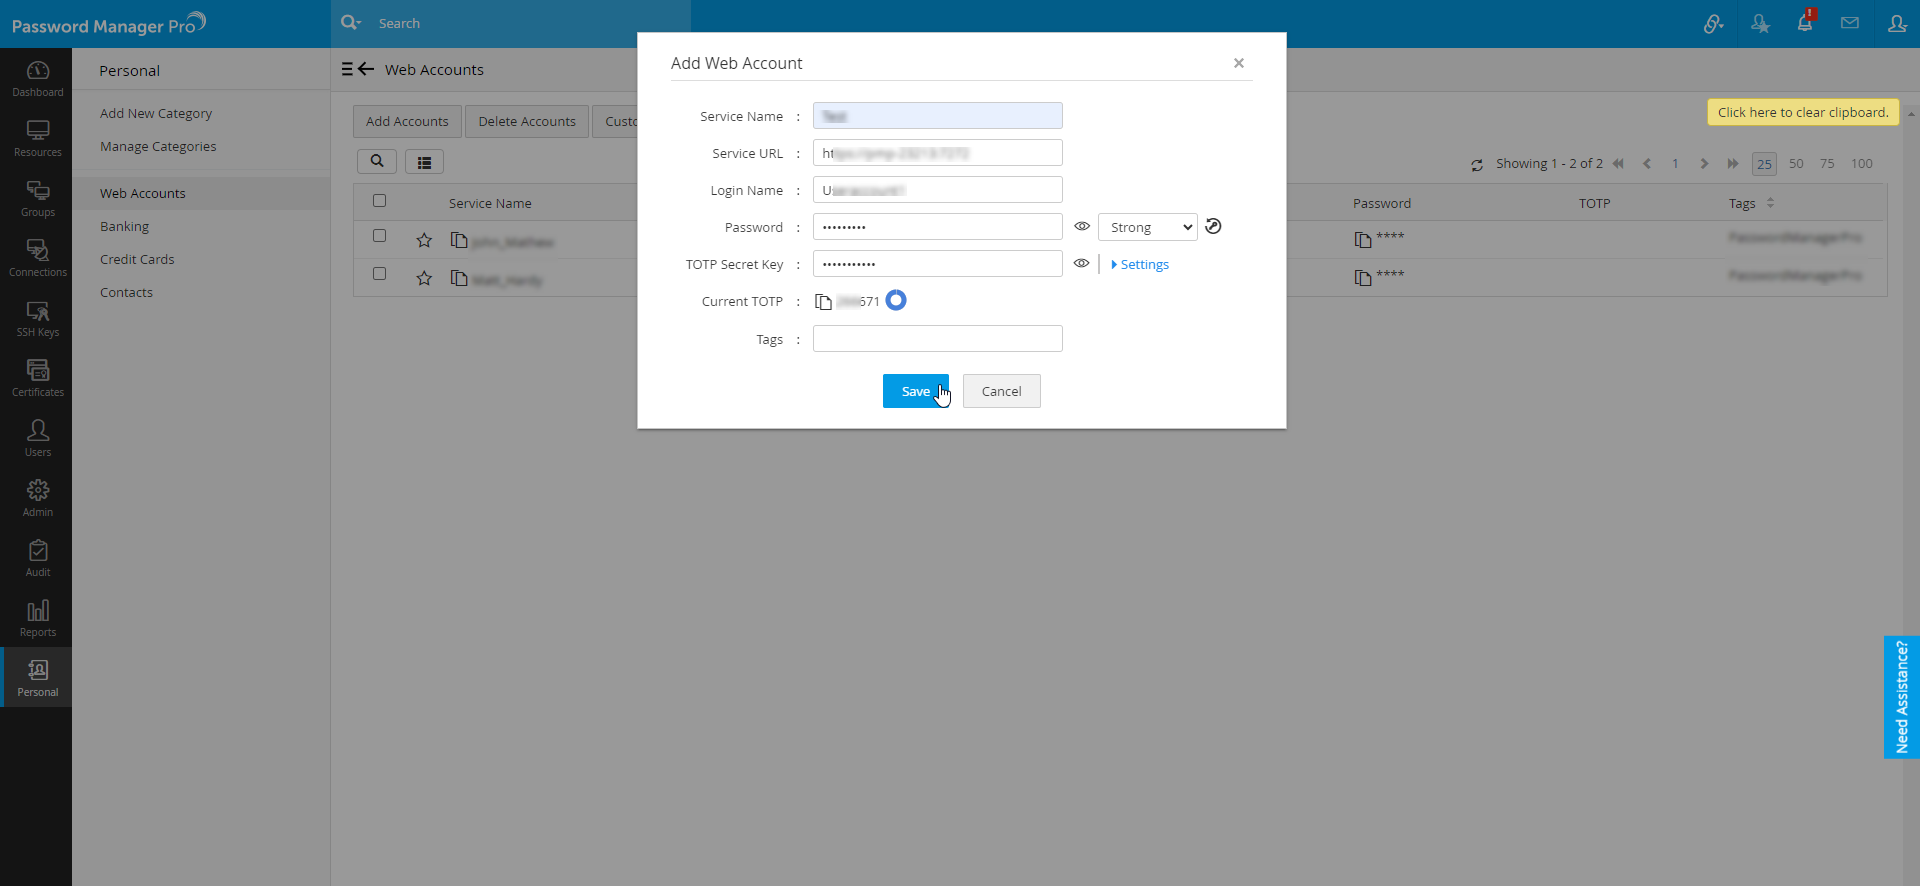
- In the Add Web Account pop-up that appears, enter the following attributes:
- Service Name: Enter the name of the web service.
- Service URL: Enter the URL.
- Login Name: Enter the login name of the web account.
- Password: Enter the password of the account. Also, choose a complexity from the drop-down.
- TOTP Secret Key: If your web account is enabled with TOTP as the Two-Factor Authentication (2FA), input the TOTP Secret Key. This allows you further to directly access the account through the Password Manager Pro interface, streamlining the generation of TOTP one-time codes alongside the added passwords.
- By default, the website accounts configured with TOTP as the 2FA supports the SHA1 Algorithm, 6-digit TOTP codes, and a validity of 30 seconds. If your account supports a different set of parameters for TOTP codes, please select the appropriate TOTP Algorithm and TOTP Digits and enter the TOTP Validity in seconds by clicking upon the Settings dropdown beside the TOTP Secret Key field.
- Tags: Enter keywords that can be used to search for the account in the Web Accounts page.
- Click Save to add the web account.
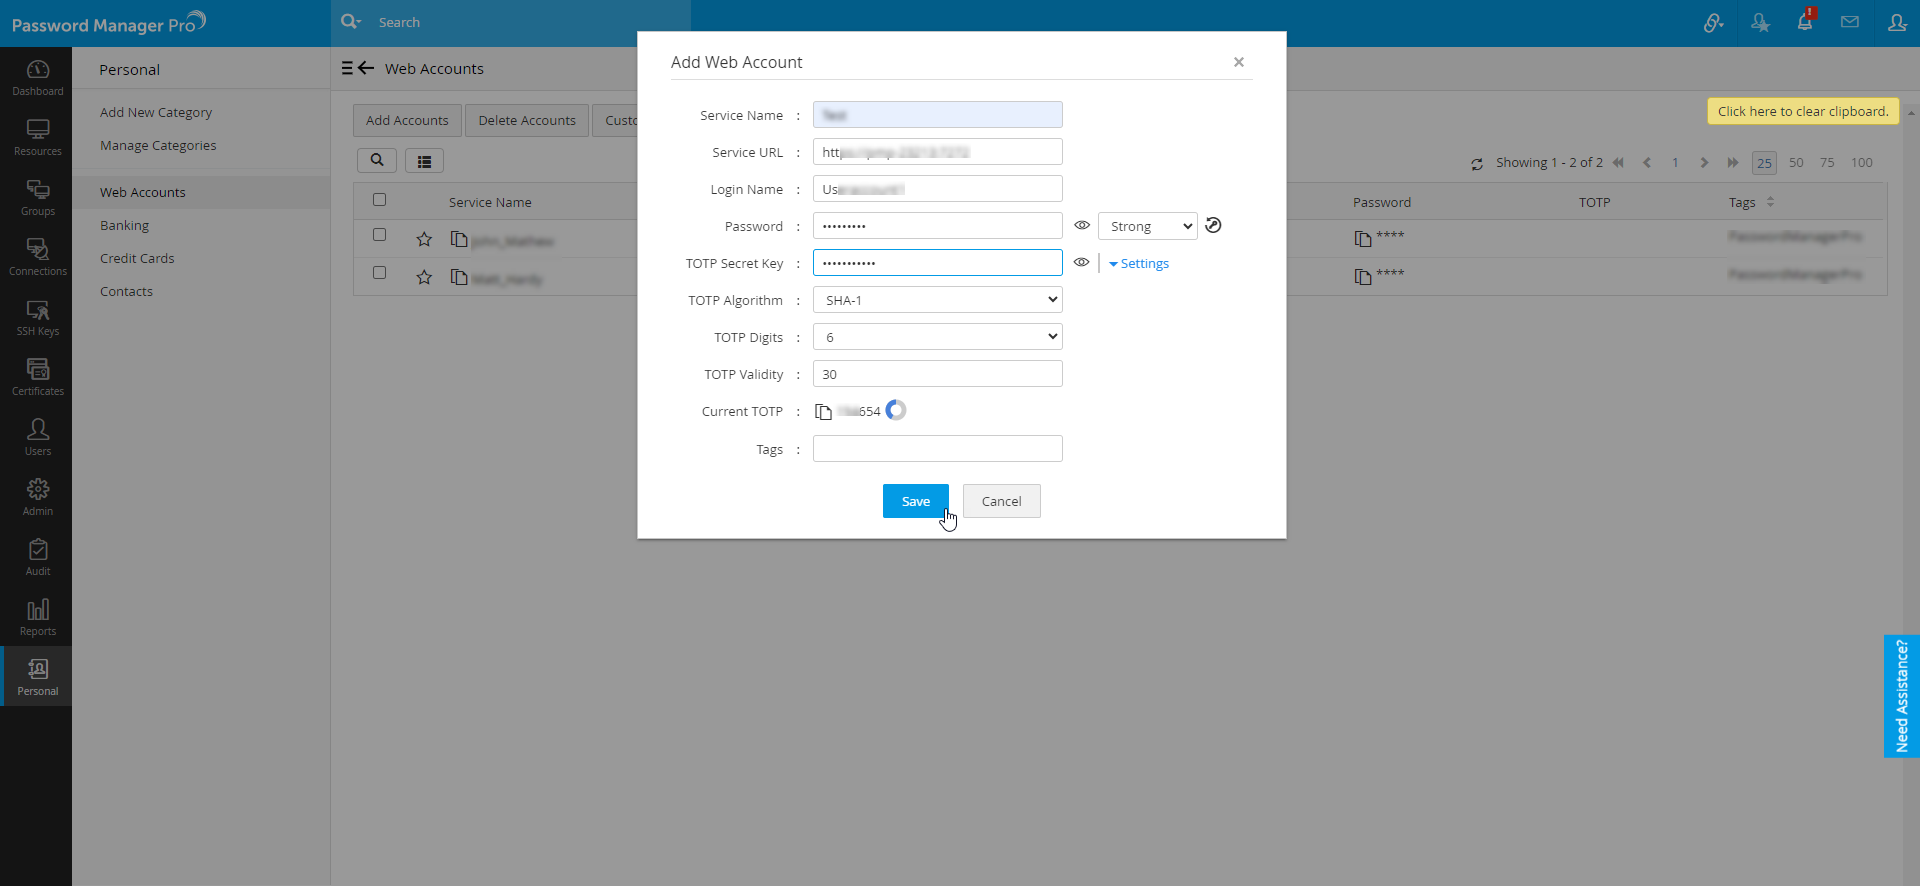
Note: If the TOTP Algorithm, TOTP Digits, and TOTP Validity differ between the account and the values entered here, the authentication mechanism will not work as expected due to generation of incorrect one-time codes. Also, once configured, the TOTP secret key cannot be retrieved again for the account. Therefore, exercise caution to ensure that the values entered or selected here match those values supported by the account.
2.2 Banking Accounts
To add a new banking account, follow the below steps:
- Navigate to the Personal tab.
- Click the Banking option from the left pane.
- In the Banking page, click the Add Accounts.
- In the Add Bank Account pop-up that appears, enter the attributes such as Bank name, Account number, Branch name, etc. Leave the unwanted fields blank.
- Click Save.
2.3 Credit Card Accounts
To add a new credit card account, follow the below steps:
- Navigate to the Personal tab.
- Click the Credit Cards option from the left pane.
- In the Credit Cards page, click the Add Accounts.
- In the Add Credit Card Account pop-up that appears, enter the attributes such as Card name, Card Number, PIN, Phone number, etc. Leave the unwanted fields blank.
- Click Save.
2.4 Personal Contacts
To add a new contact, follow the below steps:
- Navigate to the Personal tab.
- Click the Contacts option from the left pane.
- In the Contacts page, click the Add Contact.
- In the Add Contact pop-up, enter the attributes such as Contact name, Email Address, etc.
- Click Save.
2.5 Deleting Accounts
To delete any of the accounts, go to the respective accounts page,
- Navigate to the Personal tab.
- Click a category of accounts from the left pane.
- Select the required accounts using the check-boxes and click the Delete Accounts option at the top.
- Click OK in the confirmation dialog box to complete the delete operation.
Note: Once you delete accounts, they will be deleted from the database once and for all and cannot be recovered.
3. Add Custom Fields
In addition to the default categories, add any number of additional custom fields to your Personal tab to store other information. For instance, if you wish to store details about the properties owned by you, add a custom category named Properties.
3.1 Create Custom Categories
Follow the steps below to add a custom field:
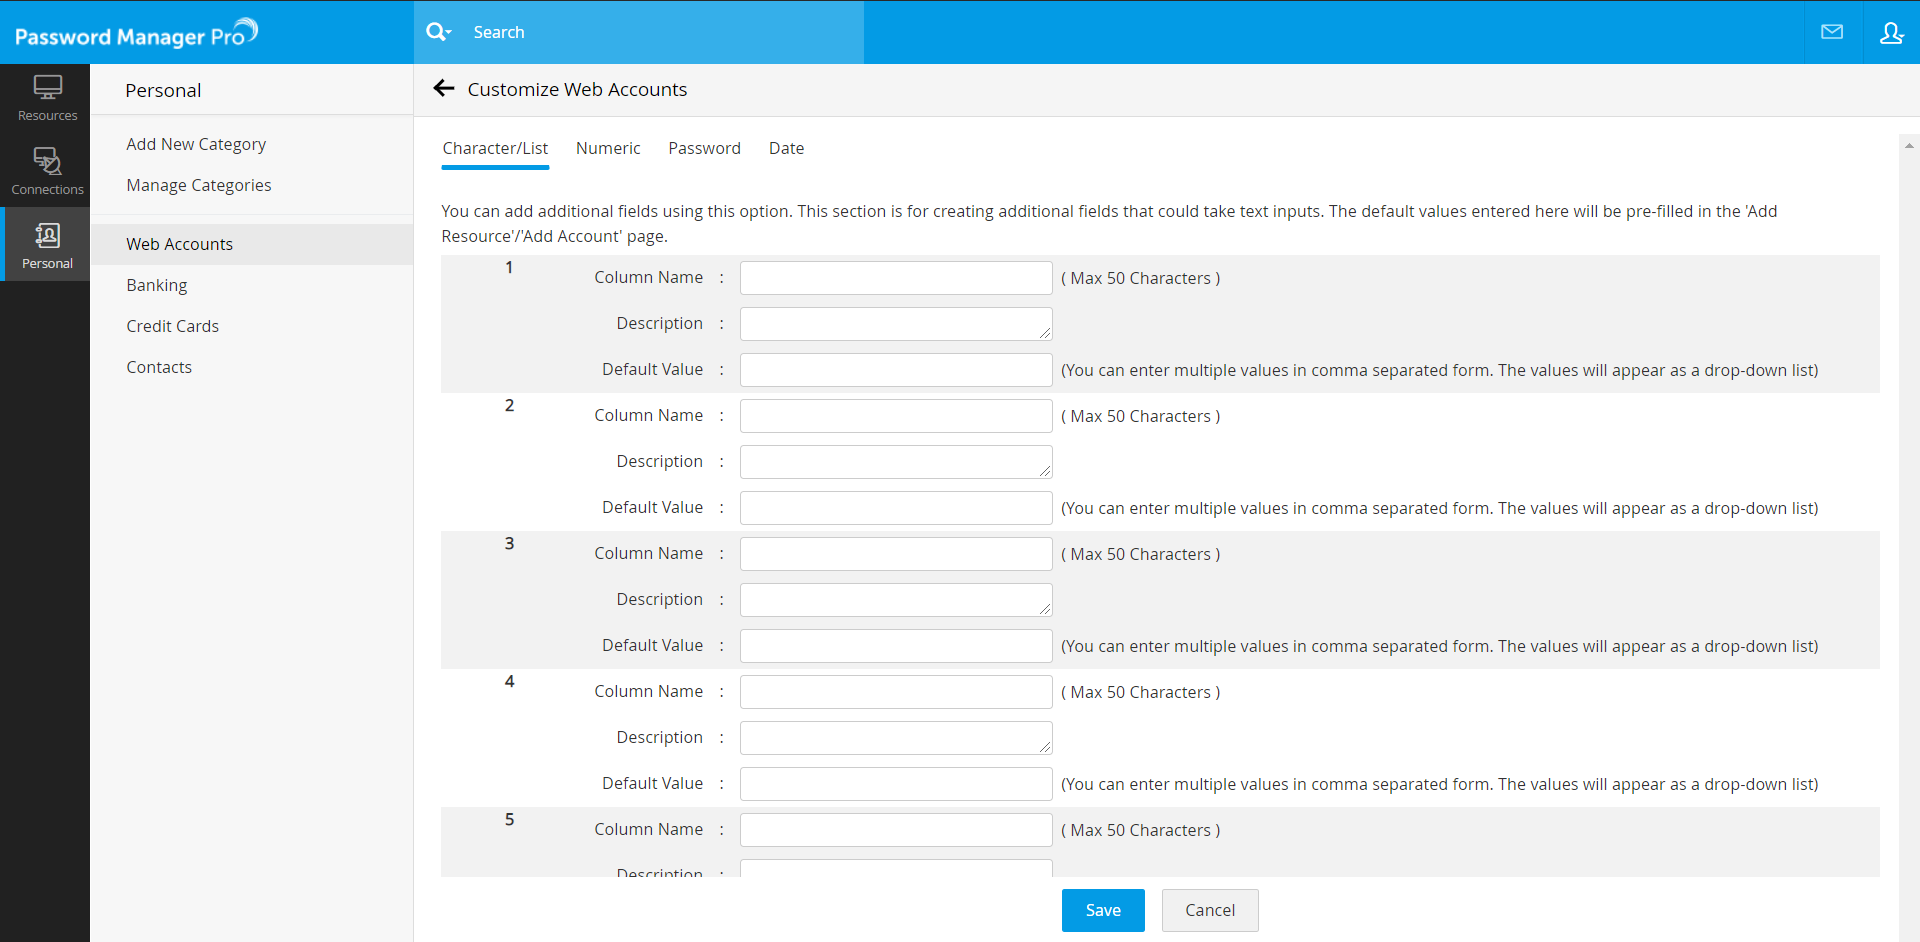
- Click Add New Category from the left pane.
- Enter a category name in the text field. Your custom fields can be in any of the following four formats - Character/List, Numeric, Password, Date. Add attributes such as column name, description, and default value.
- You can add a maximum of nine Character/List fields, four Numeric fields, three Password fields, and four Date fields. Click Save to add the custom field as a new category next to the default ones. Remember, once added, custom fields cannot be deleted.
3.2 Manage Custom Categories
If any of the custom categories are no longer required, delete them in the Manage Categories page. Once you delete the categories, they will be deleted from the database once and for all. So, exercise care before deleting. You can also edit the custom categories.
To manage a custom category,
- Go to the Personal tab.
- Click the link Manage Categories present in the left side of the web-interface.
- If you want to edit a custom category, click the Edit icon present against the required custom category.
- If you want to delete a custom category, click the Delete icon present against the required custom category.

4. Manage Passwords in Bulk
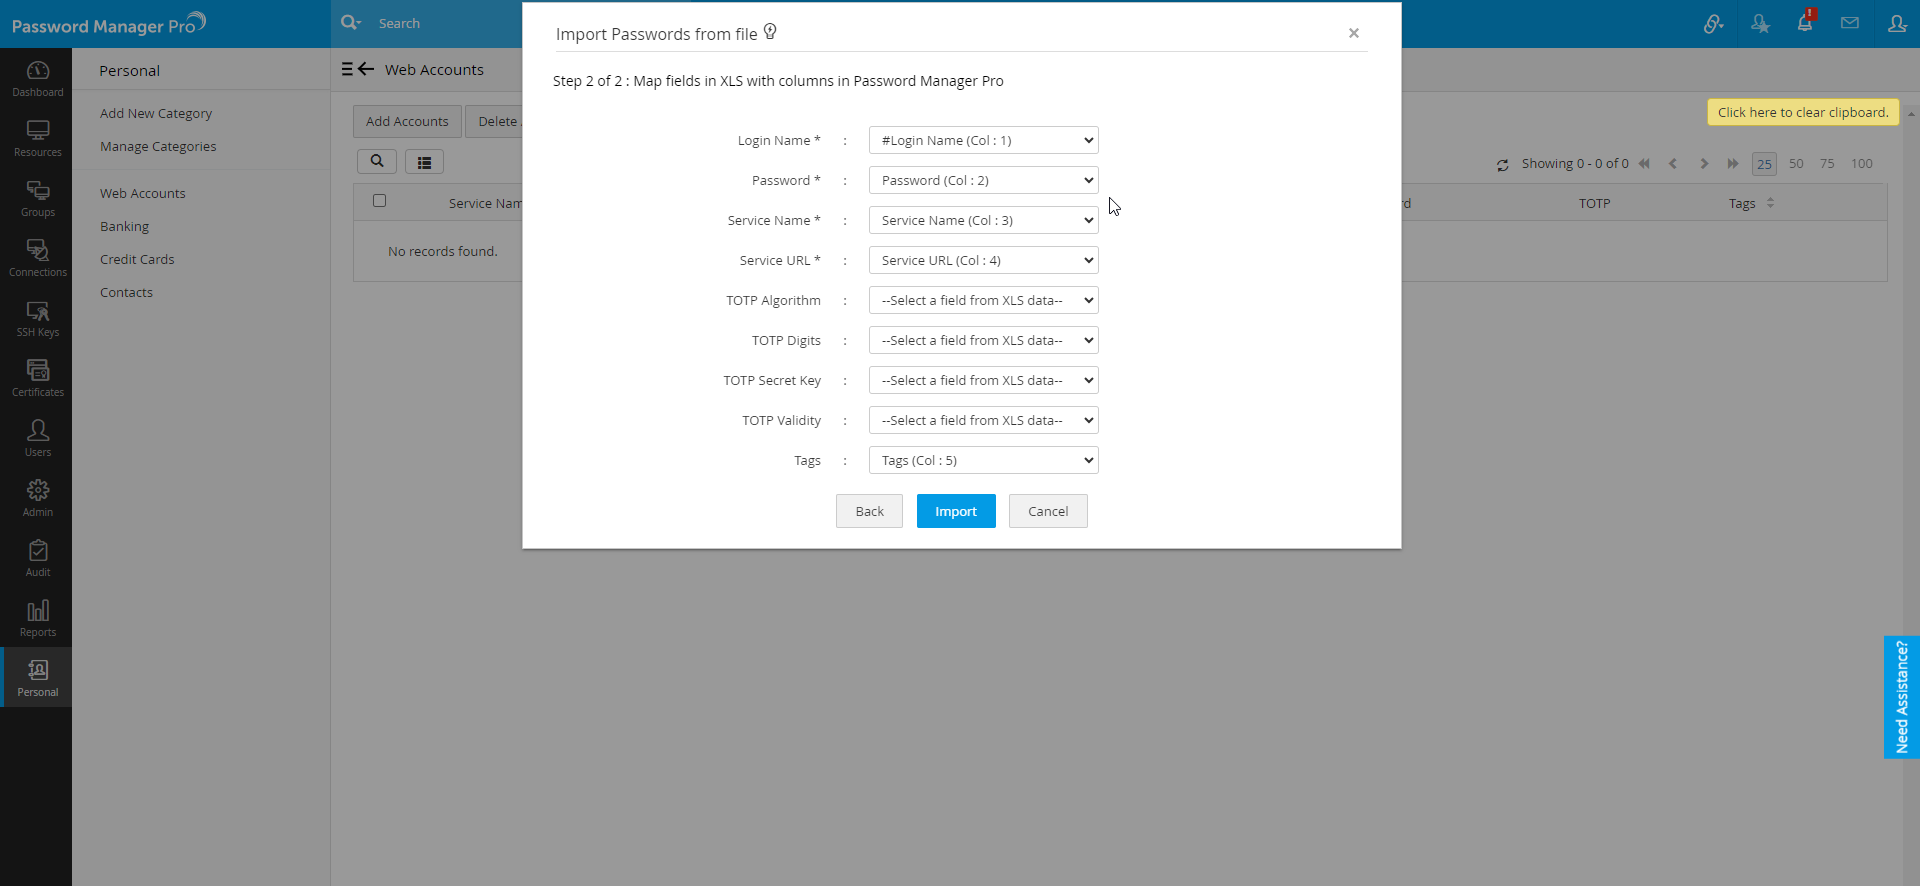
Import and export passwords added to the Personal tab in bulk. Click here to view sample files and learn more about the file formats supported for importing. The data from the imported file will autofill the fields matching the column names. You can also choose which field in the imported file should map to the attributes of the corresponding personal category.
Note: Earlier, it was possible to import a .txt file containing comma-separated data, and in step 2, the data would be listed as expected. However, from build 12330 onwards, if the entries are comma-separated, the file format must be .csv. Files with tab-separated values should be saved as .txt or .tsv for importing.
4.1 Import Passwords
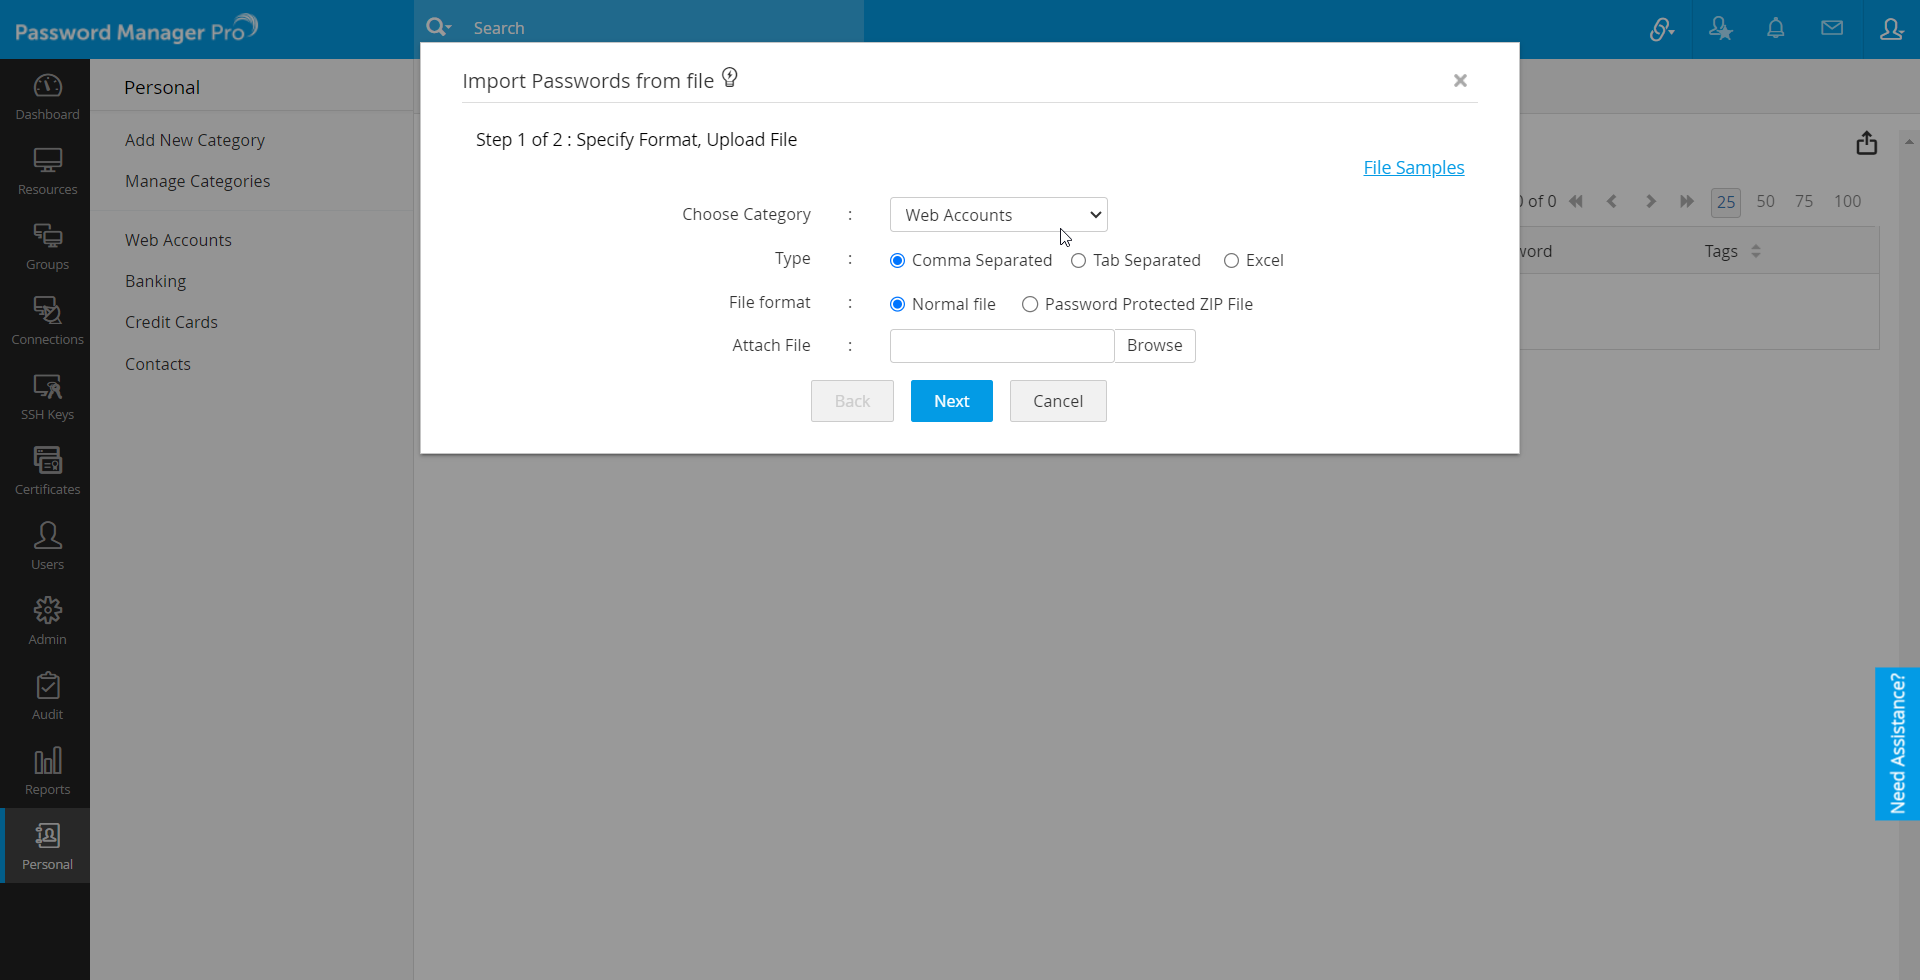
Follow the below steps to import passwords:
- Navigate to the Personal tab.
- Click the Import Accounts button.
- In the pop-up form that appears, choose the category.
- Select the file type and file format.
- Click "Browse" and select the file to import passwords.
- Click Next and map the fields accordingly with the data available in the attached file.
- Click Import to complete the import process.
4.2 Export Passwords
Export personal passwords in PDF or XLS format using the Export option.
- Navigate to the Personal tab.
- Click the Export icon (
 ) present in the top-right corner.
 - Select PDF or XLS format based on your preference. The passwords are exported in a PDF or XLS file based on your selection and saved to your local machine.

5. Reset Personal Passphrase
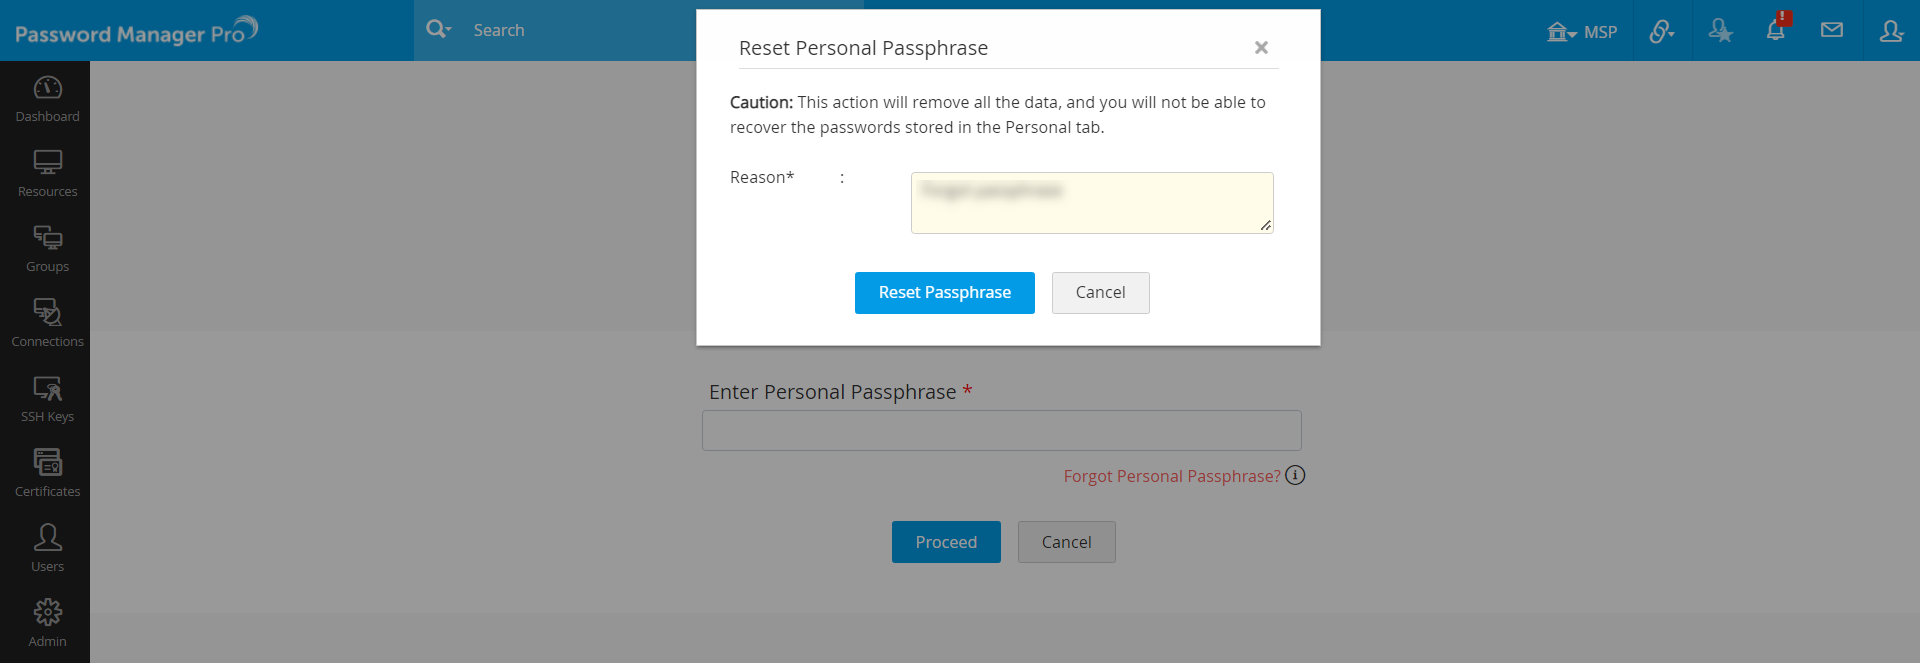
Password Manager Pro allows you to reset your Personal Passphrase. Note that resetting your personal passphrase will delete all the data stored in the Personal tab permanently.
- Navigate to the Personal tab and click on "Forgot Personal Passphrase?".
- In the pop-up that appears, enter a Reason (mandatory) and click Reset Passphrase.
You have successfully reset your Personal Passphrase.