Identity verification
Admins can use the MFA methods provided by ADSelfService Plus to protect resources in your organization. To access these resources, you must first enroll in ADSelfService Plus for the MFA methods configured by your administrator. Learn how.
Once enrolled, you can access your resources using those MFA methods. Your identity is verified using the information you provided during the enrollment process.
Here is a list of authentication techniques available in ADSelfService Plus:
- Security Questions and Answers: You must provide valid answers to security questions to verify your identity. Click here for the detailed identity verification steps.
- Verification code: You must enter a code sent via SMS (SMS Verification) or email (Email Verification) to verify your identity. Click here for the detailed steps.
- Google Authenticator: You will need to verify your identity using a time-based one time passcode (TOTP) code generated by the Google Authenticator app. Click here for the detailed steps.
- Microsoft Authenticator: You will need to verify your identity using a TOTP via the Microsoft Authenticator app. Click here for the detailed identity verification steps.
- Azure AD MFA: In this method of authentication, you will be required to authenticate your identity using any of the following Azure AD MFA methods configured by your organization:
- Verification code via Microsoft Authenticator, hardware token, or SMS.
- Push notification via Microsoft Authenticator.
Authentication phone call.
Click here for the detailed identity verification steps.
- Duo Security: You must use a Duo Security push notification, call, or code to verify your identity. Click here for the detailed steps.
- RSA SecurID: You must use a SecurID token to verify your identity. Click here for the detailed identity verification steps.
- RADIUS Authentication: If this method of authentication is enforced, you will be required to authenticate your identity using your RADIUS password and secondary authentication method, if configured by your administrator, before you can perform the requested action. Click here for the detailed steps.
- Authentication using the ADSelfService Plus app: You must use a push notification (Push Notification Authentication), your fingerprint or Face ID (Fingerprint/Face ID authentication), a QR code (QR Code Authentication), or a time-based, one-time passcode (TOTP Authentication) generated by the ADSelfService Plus mobile app to verify your identity. Click here for the detailed identity verification steps.
- SAML Authentication: You will be automatically redirected to your identity provider to verify your identity. Once you verify your identity successfully, you will be logged in.
- Active Directory Security Questions: You must enter a valid answer to an Active Directory security question to verify your identity. Set by your administrator, the Active Directory Security Questions will be from your AD profile information, such as the mobile number or email address registered in AD.
Sometimes, it might also include a secret answer provided by your administrator.
- YubiKey Authentication: You must enter a valid one-time passcode (OTP) generated by the YubiKey. Click here for the detailed steps.
- Zoho OneAuth TOTP: You must enter the TOTP generated by the Zoho OneAuth app to verify your identity. Click here for the detailed steps.
- Smart Card Authentication: You will have to place the smart card issued to you in your organization against the card reader. If configured by your admin, you will need to enter the smart card PIN. This PIN and the information on the card will be compared with your enrollment information, and your identity will be verified if they match. Click here for the detailed steps.
- Custom TOTP authentication: You must enter the code generated by your custom hardware or software TOTP authenticator to verify your identity.
- Passkeys: To verify your identity, you must either use the built-in authentication methods on your device such as Windows Hello, Android Biometrics, Apple Touch ID and Face ID, or an external security key like YubiKeys or Google Titan Security Keys. Click here for the detailed steps.
Note: Your admin might choose to enforce any or all of the authentication techniques available in ADSelfService Plus. Based on the enforced MFA, you'll need to provide certain information. For example, if your admin has enforced security questions and answers as the method of authenticating your identity. You'll then need to provide appropriate answers to the displayed questions.
How to verify your identity with ADSelfService Plus
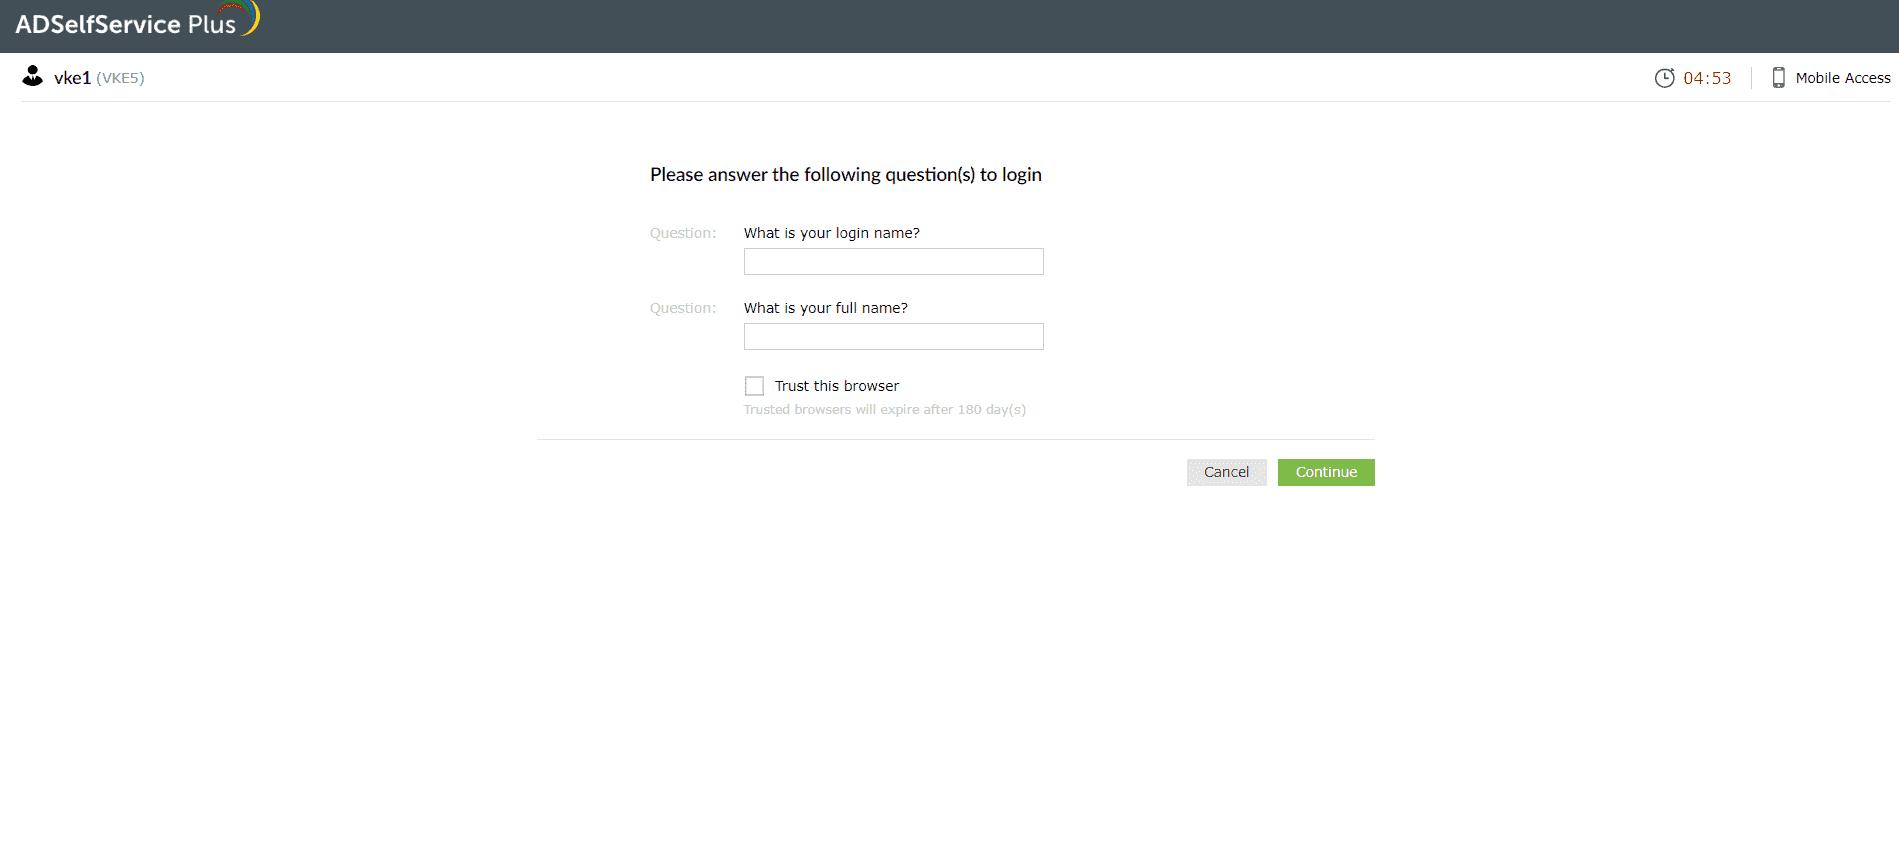
Security questions and answers
- A set of security questions defined by you or your administrator during enrollment will be displayed on the verification page.
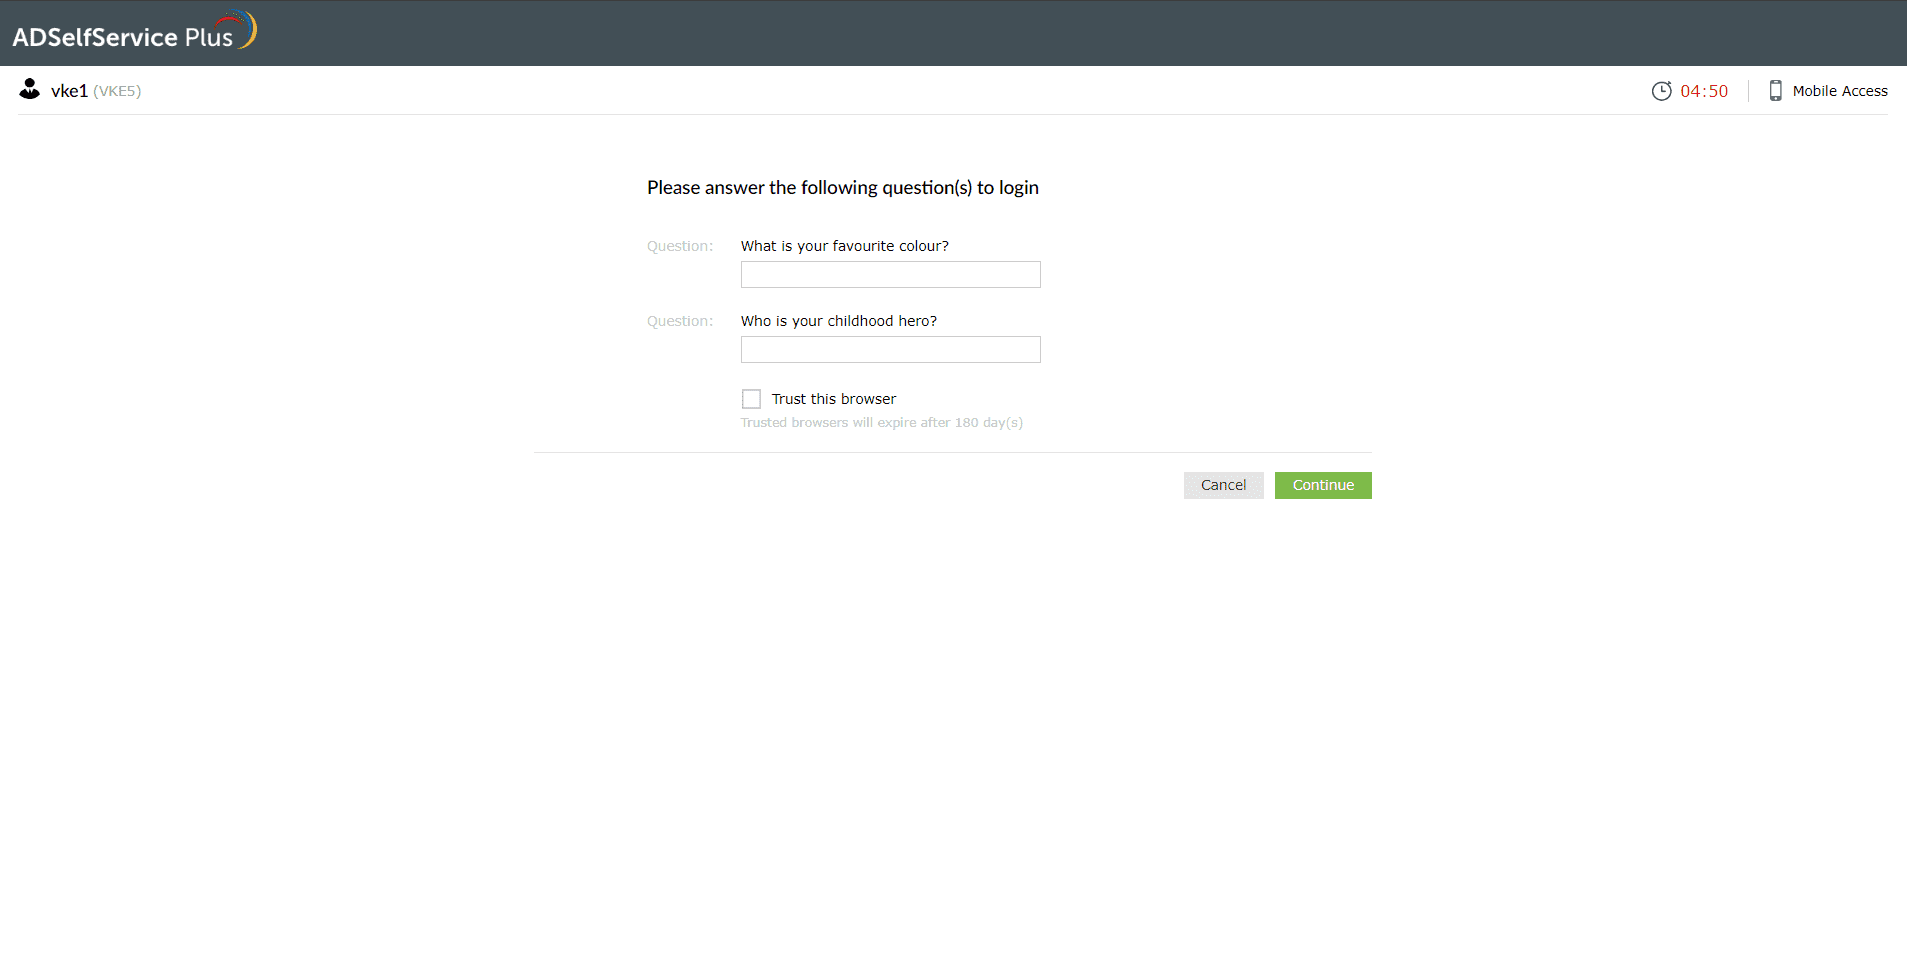
- Provide the appropriate answers and click Continue to verify your identity.
Verification codes
a. Get a verification code on your mobile (SMS verification)
- On the SMS verification page, select the number to which you want the OTP code to be sent.
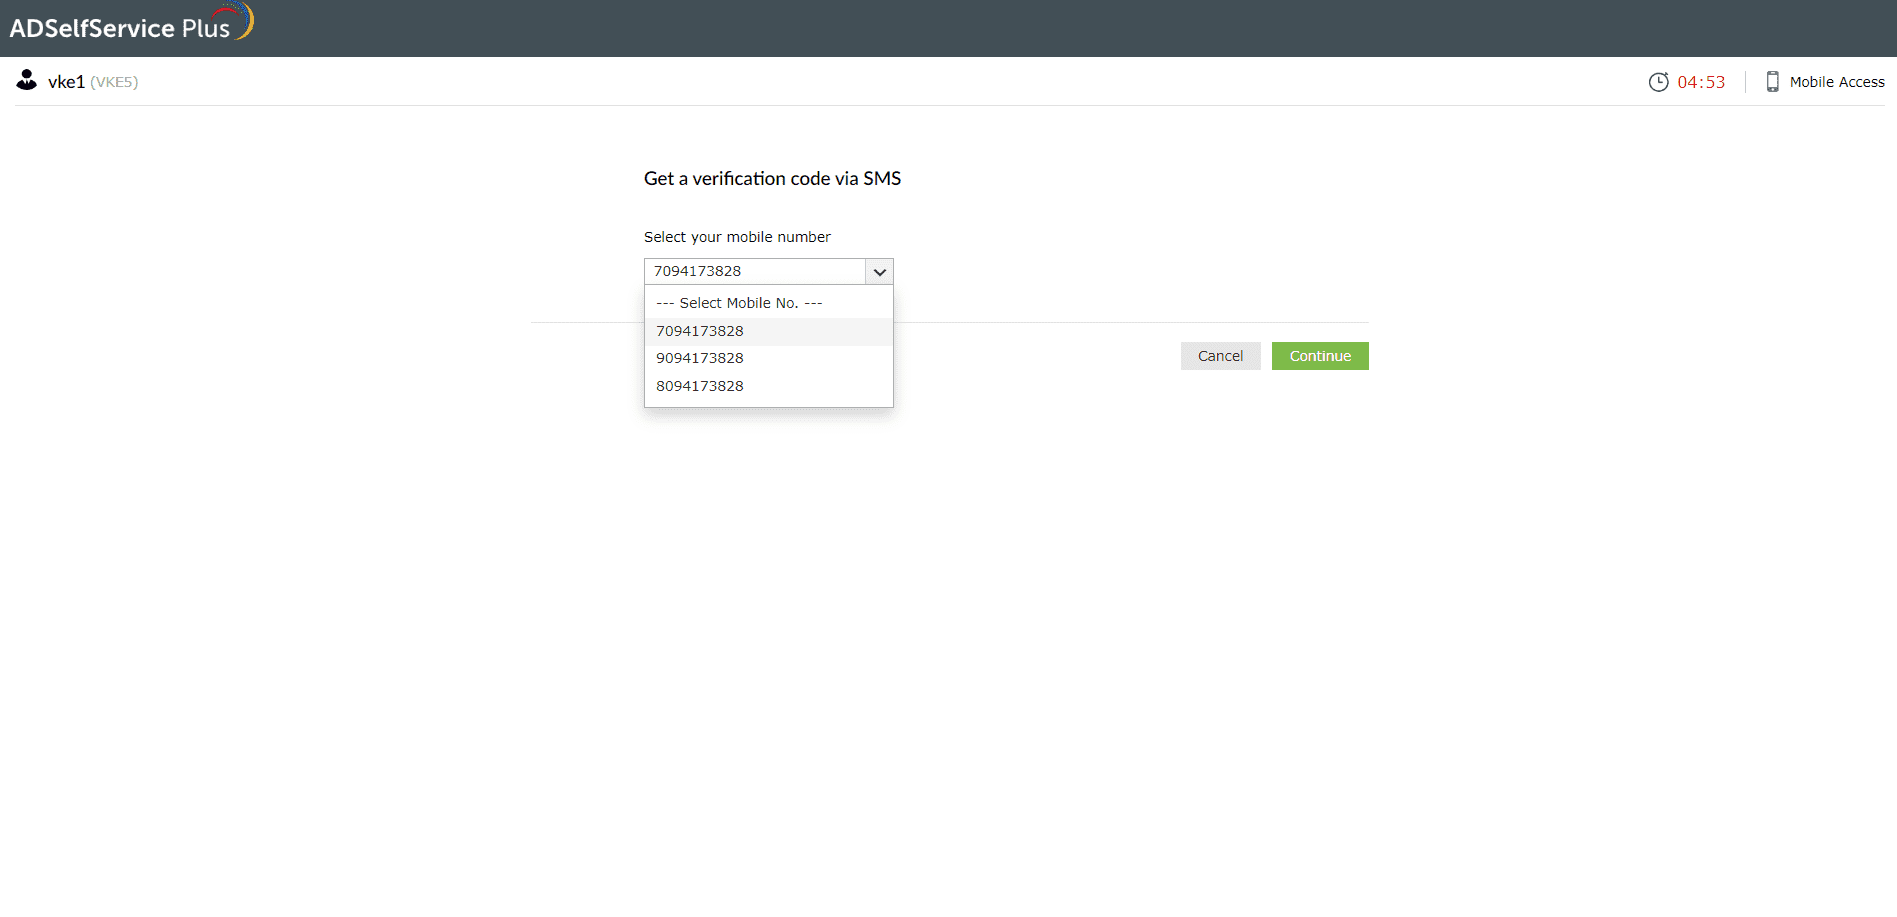
- An OTP will be sent to the number you select.
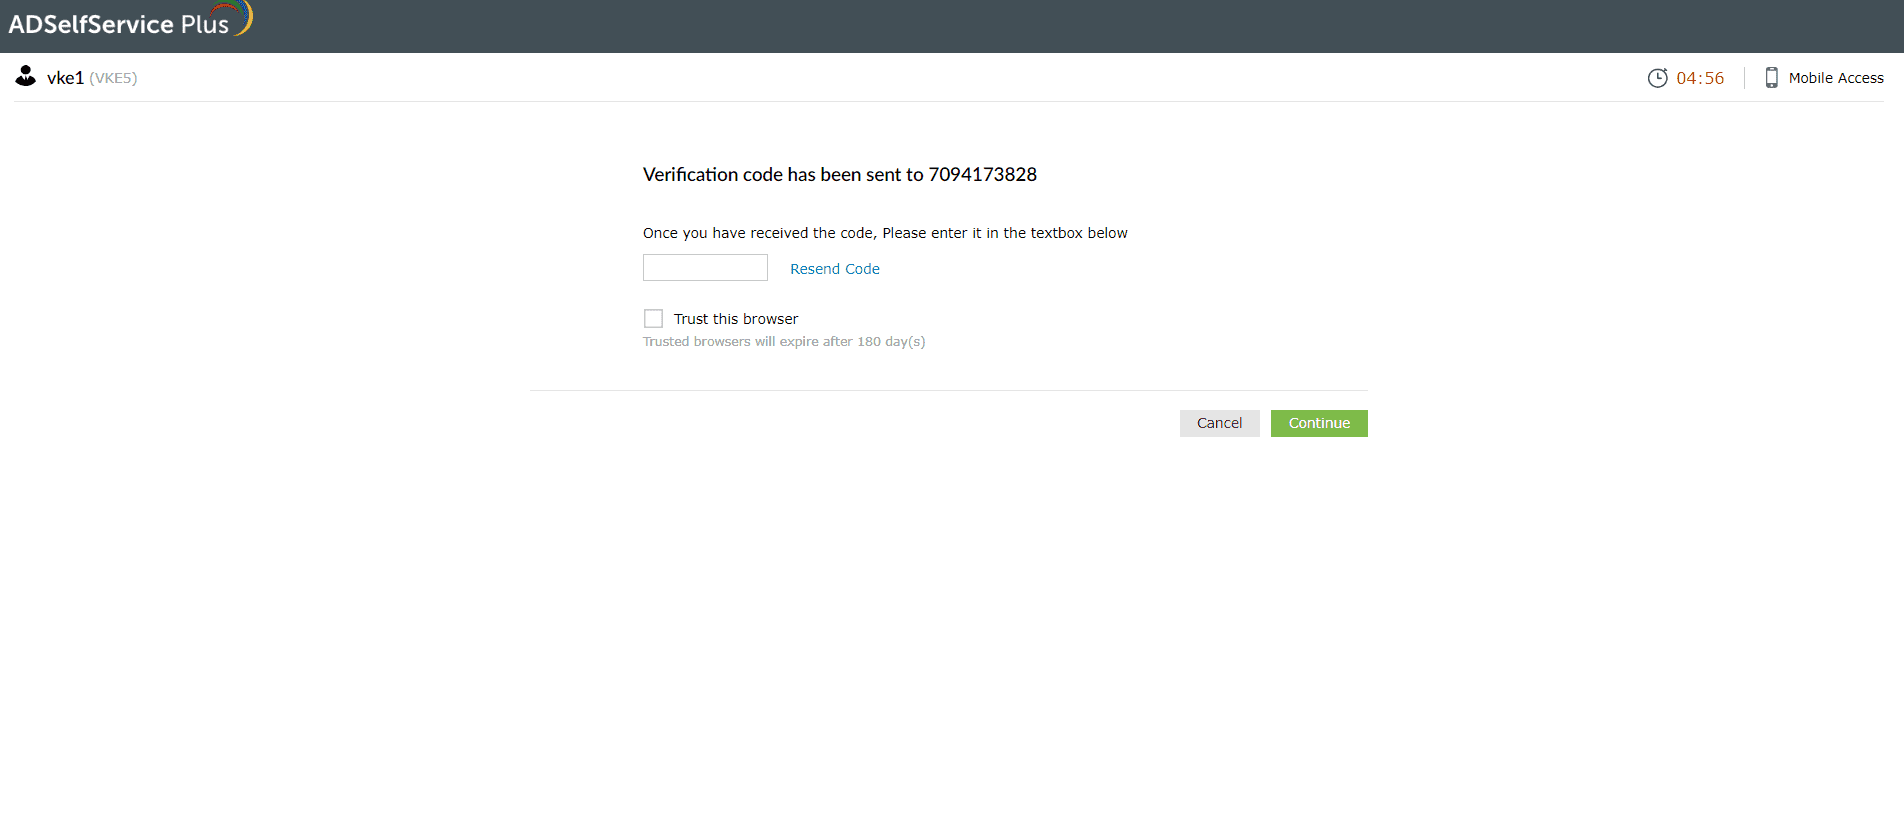
- Enter the code in the textbox displayed by ADSelfService Plus and click Continue to verify your identity.
b. Get a verification code sent to your email address (Email verification)
- On the Email verification page, select the email address to which you want the code to be sent.
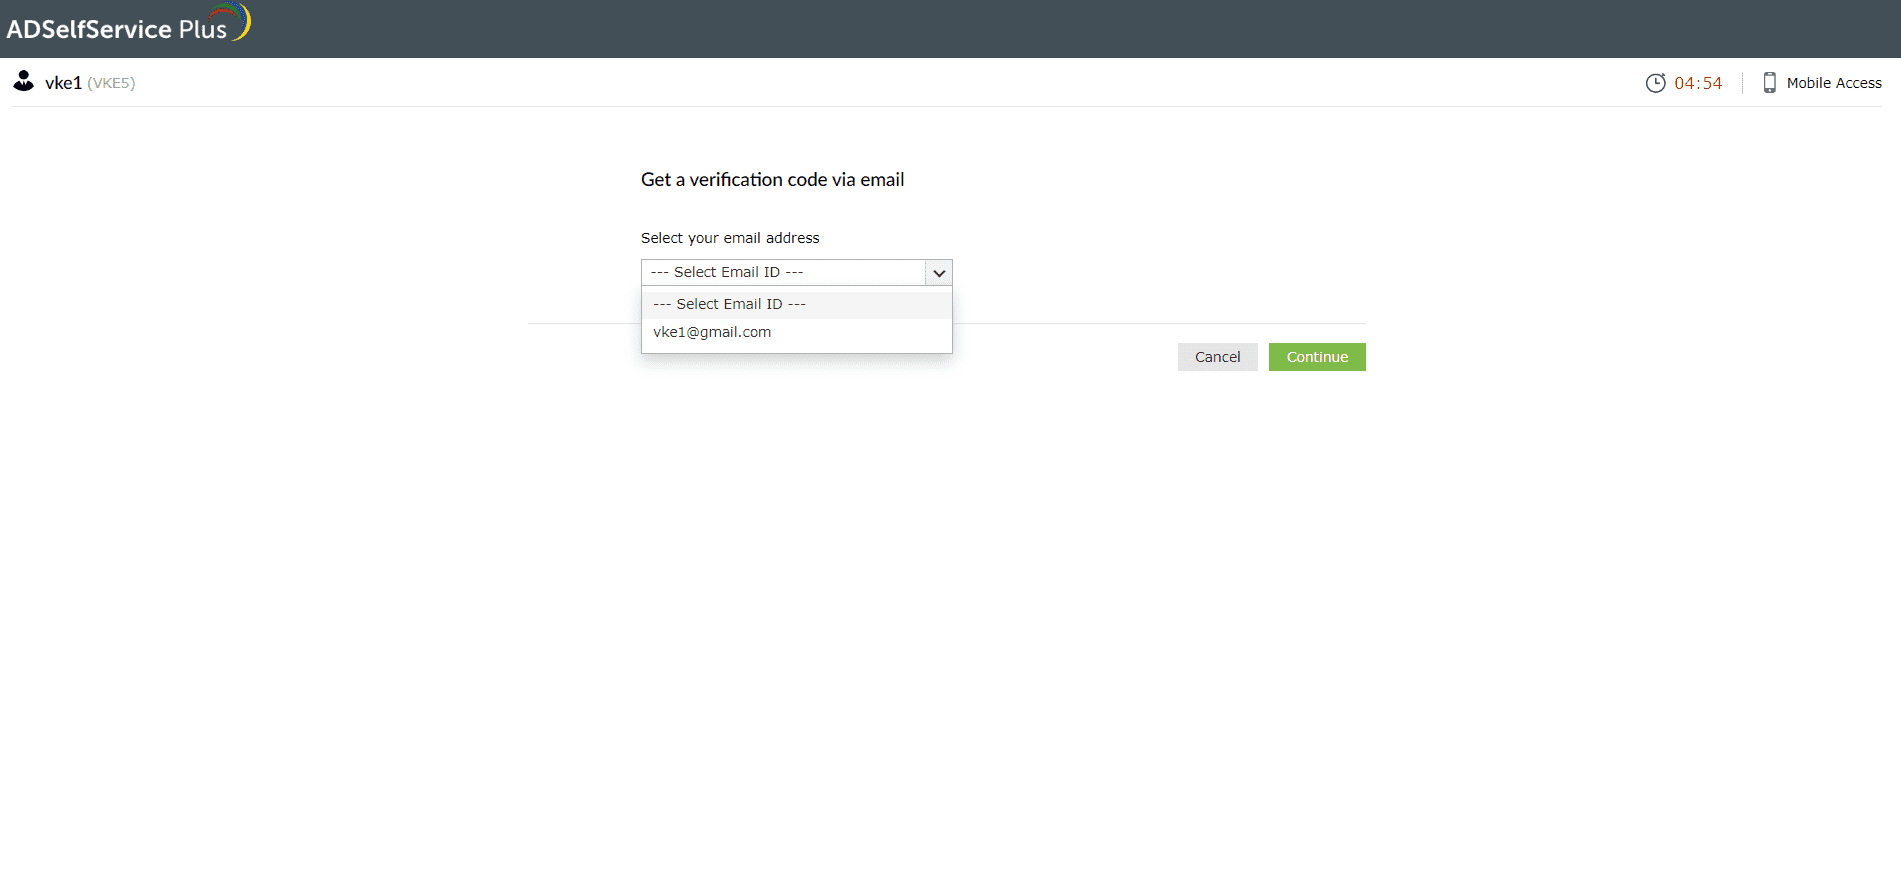
- An OTP will be sent to the email address you select.

- Enter the code in the textbox displayed by ADSelfService Plus and click Continue to verify your identity.
Google Authenticator
- Open your Google Authenticator app. It will display a six-digit TOTP generated for your account.
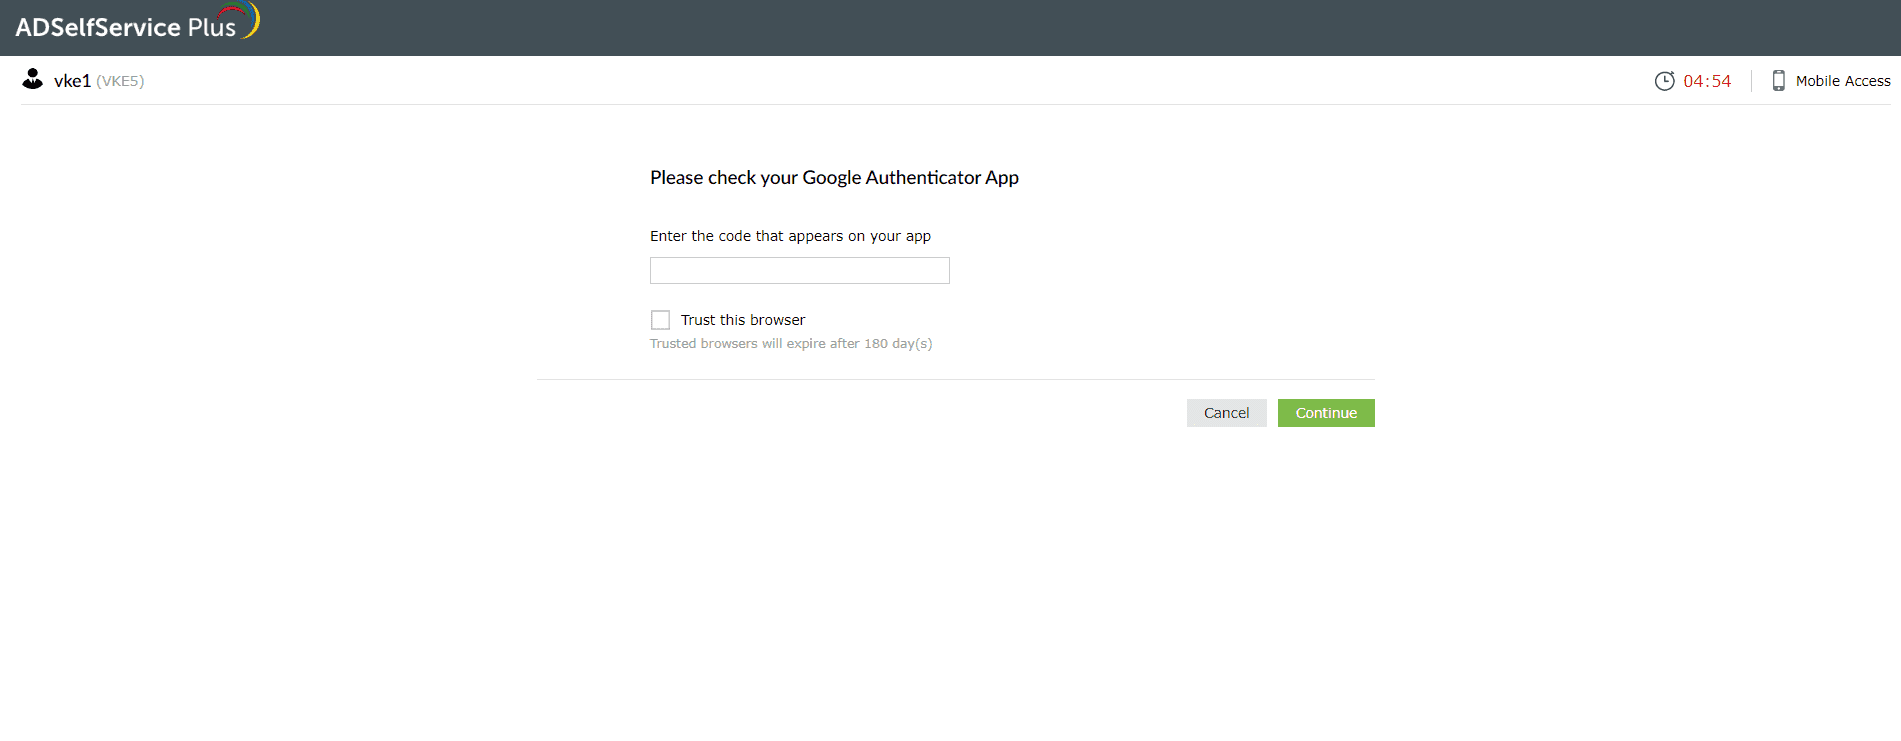
- Enter the TOTP in the Enter the code field displayed by ADSelfService Plus and click Continue to verify your identity.
Microsoft Authenticator
- Open your Microsoft Authenticator app. It will display a six-digit TOTP generated for your account.
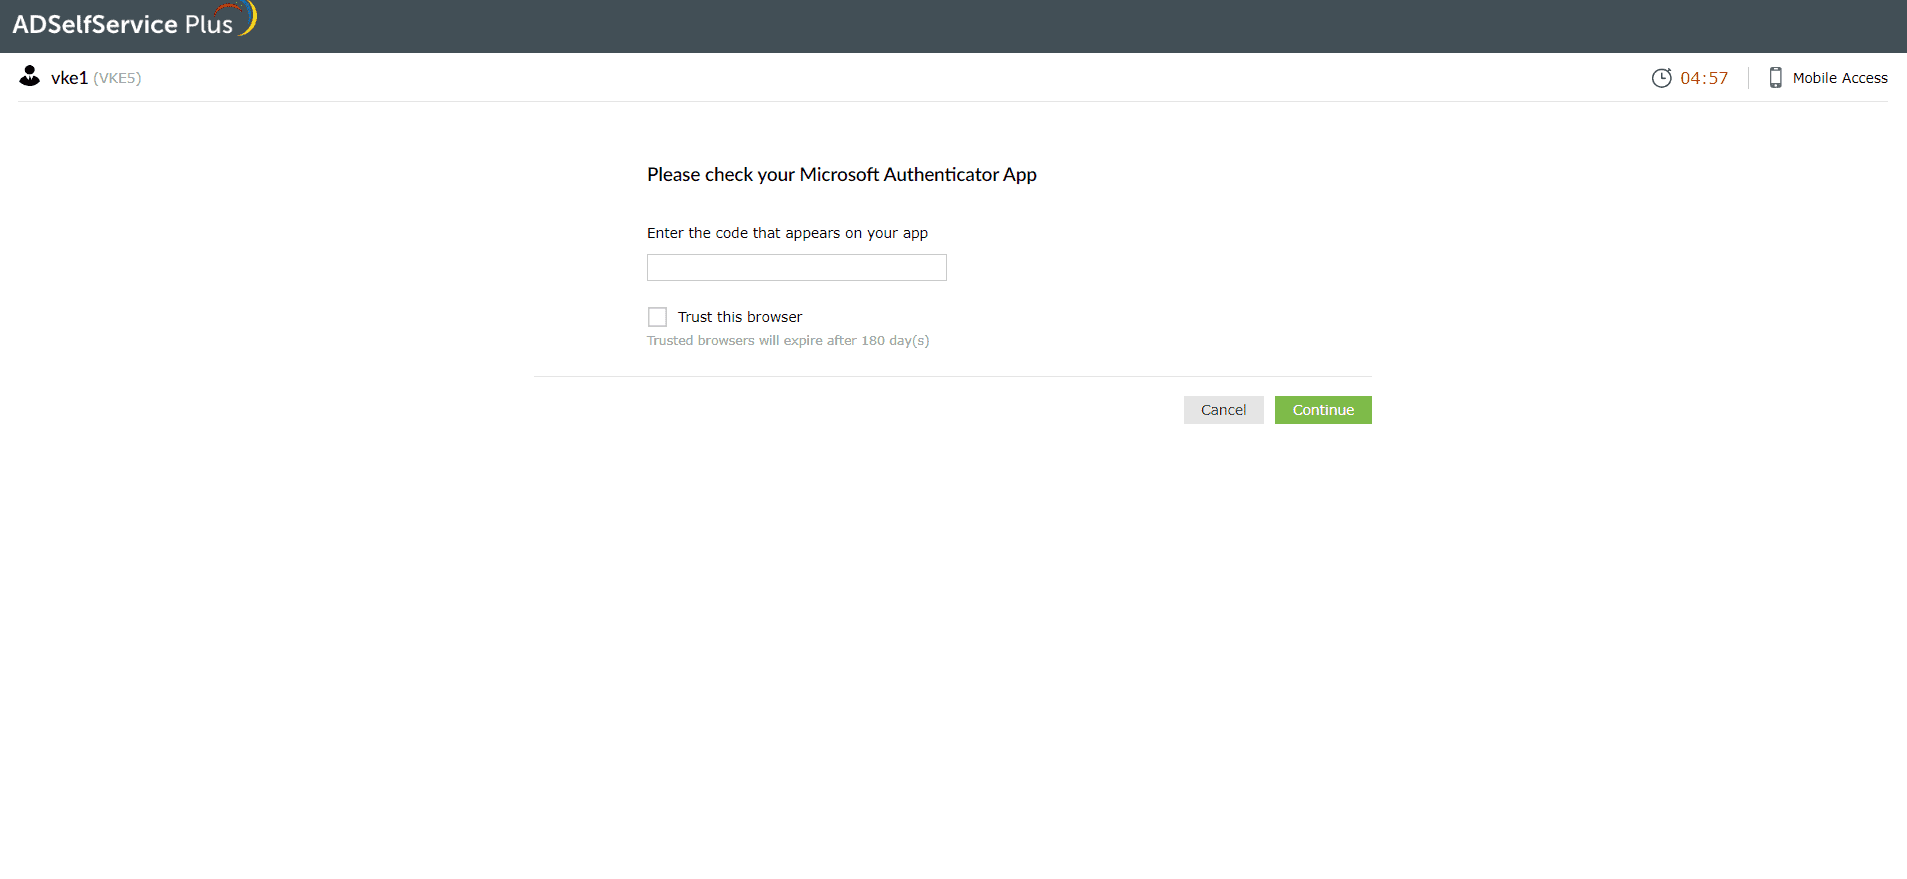
- Enter the TOTP in the Enter the code field displayed by ADSelfService Plus and click Next to verify your identity.
Azure AD MFA
- On the Azure AD MFA verification page, click Continue to proceed with verifying your identity.
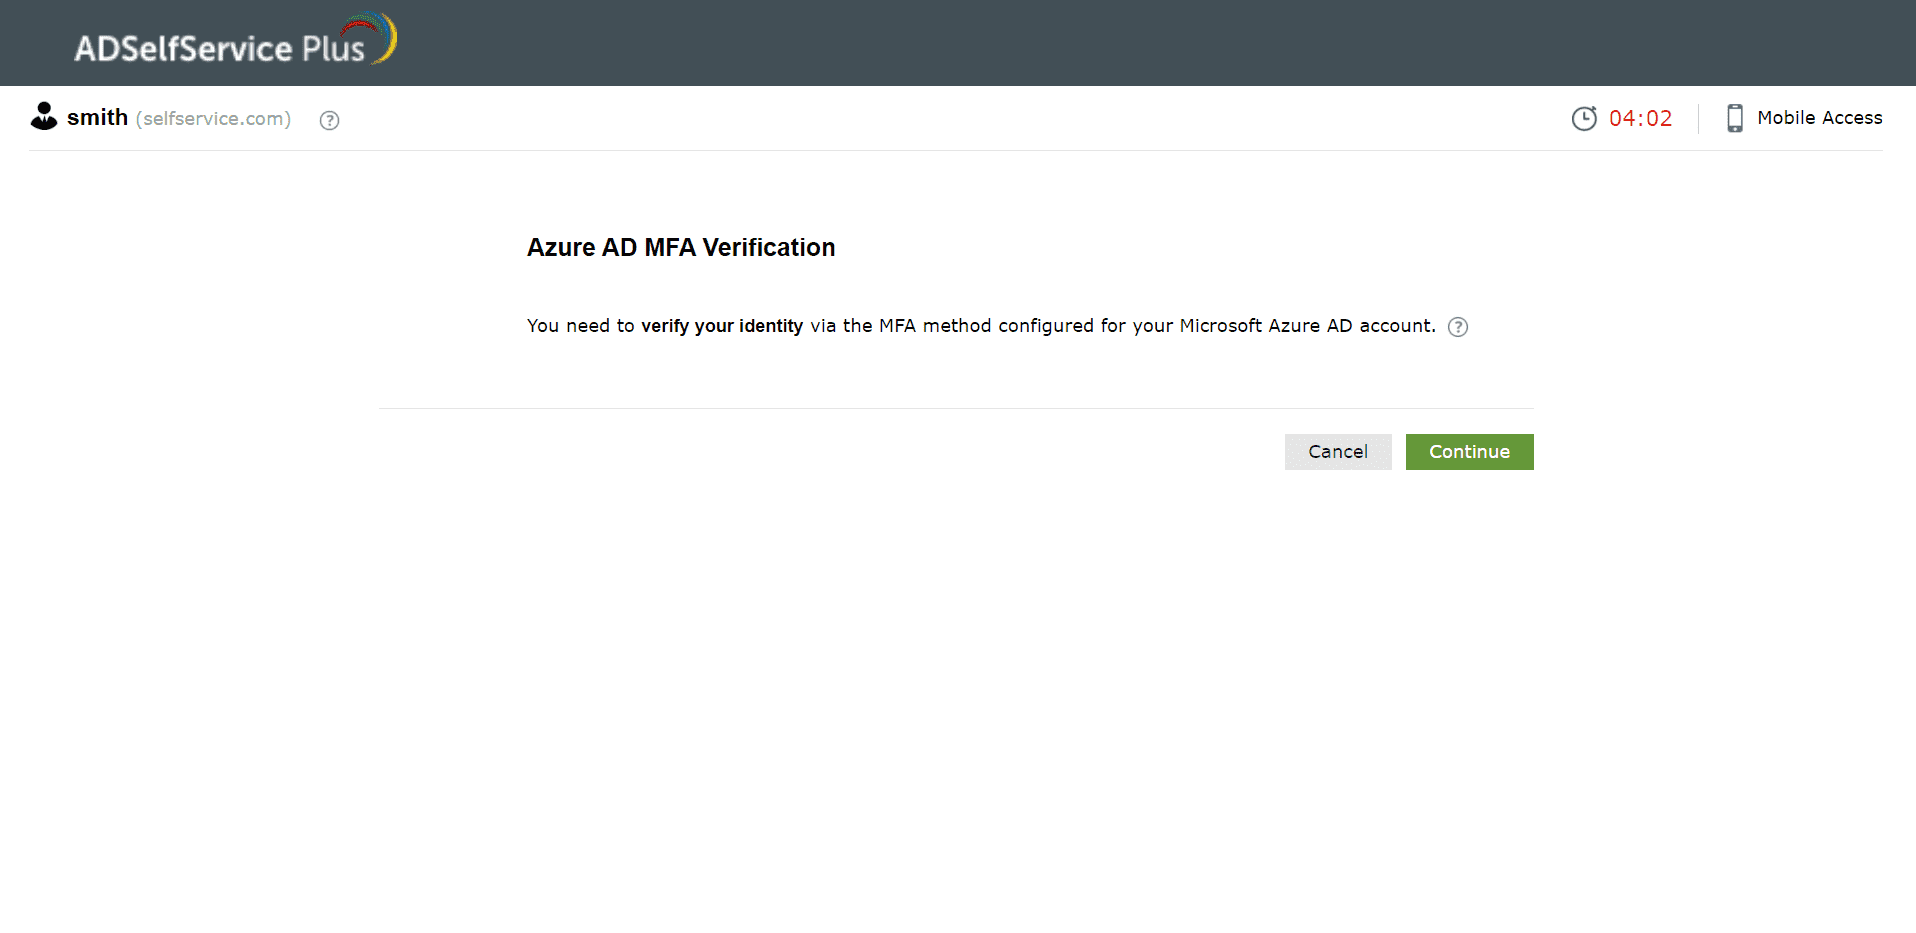
- Depending on the enrolled authentication method, you might:
- Receive the verification code via Microsoft Authenticator, hardware token, or SMS.
- Receive a push notification via Microsoft Authenticator or an authentication phone call.
- Identity verification:
- If you've enrolled in push notifications or a phone call, you'll be notified via your mobile device. Complete the verification by accepting the push notification or by following the instructions given in the call.
- If you've enrolled in a verification code-based method, enter the code in the field that appears.
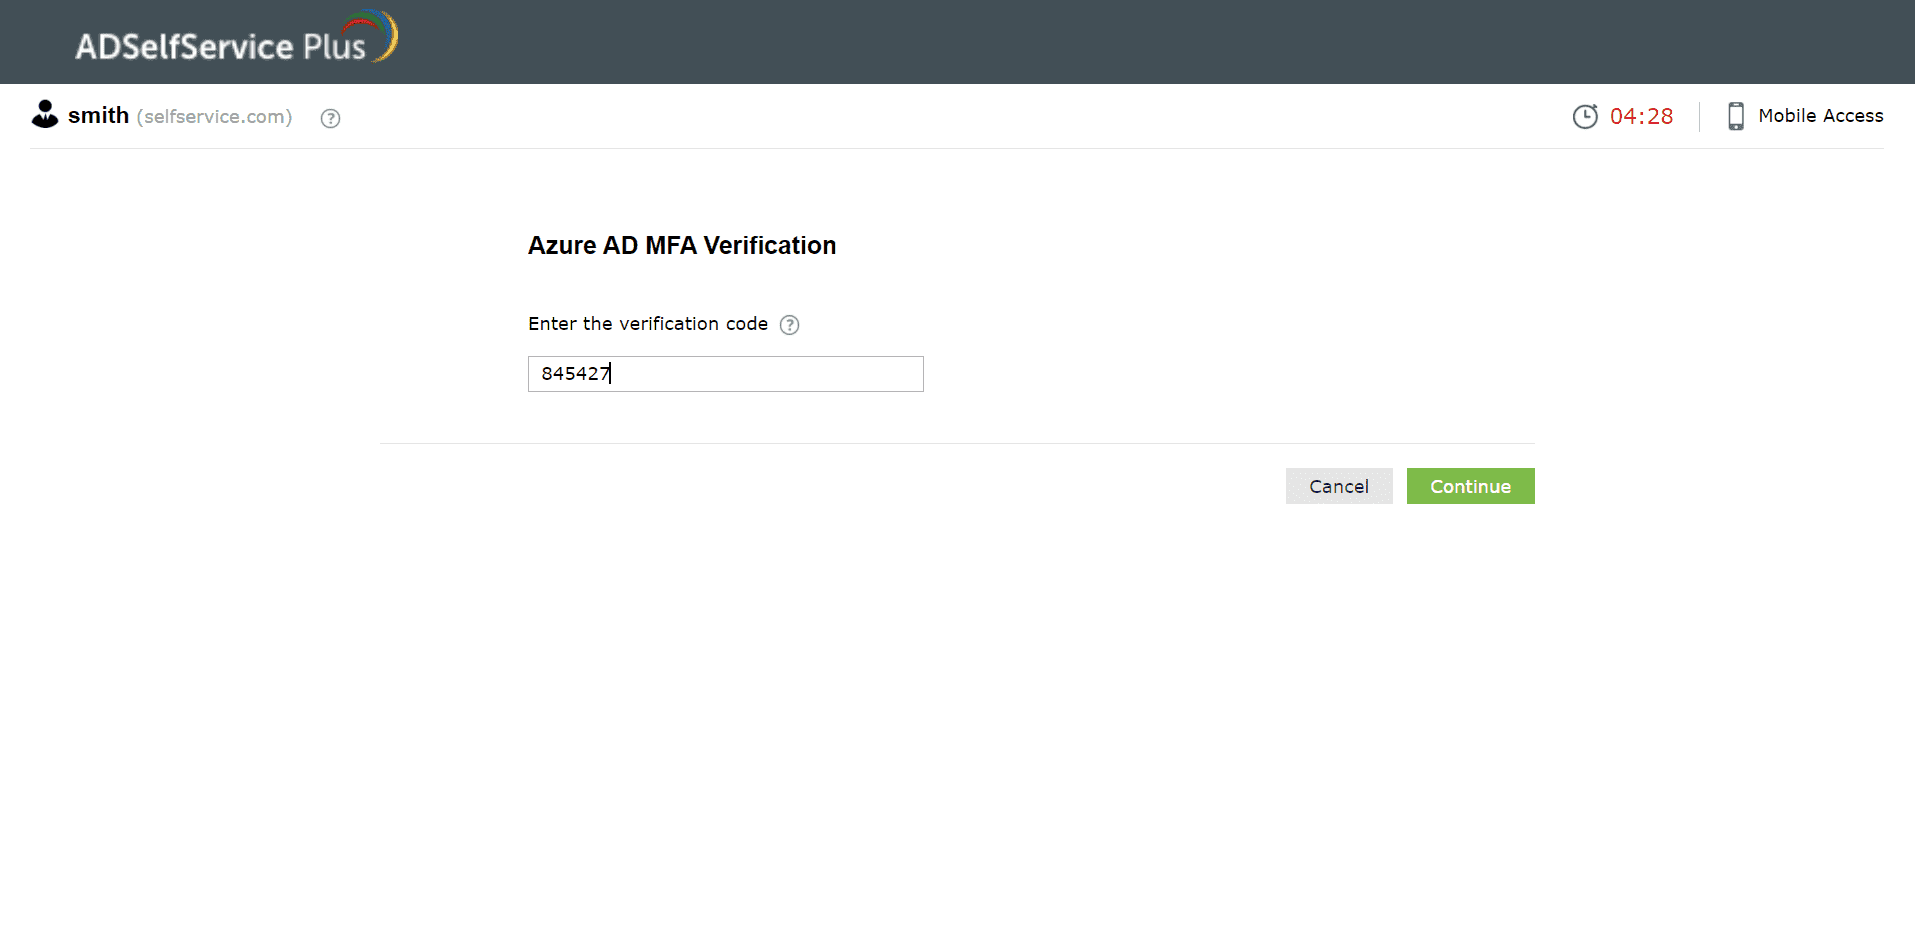
- Click Continue to verify your identity.
Duo Security
- On the Duo Security verification page, choose your preferred authentication method to proceed with verifying your identity.
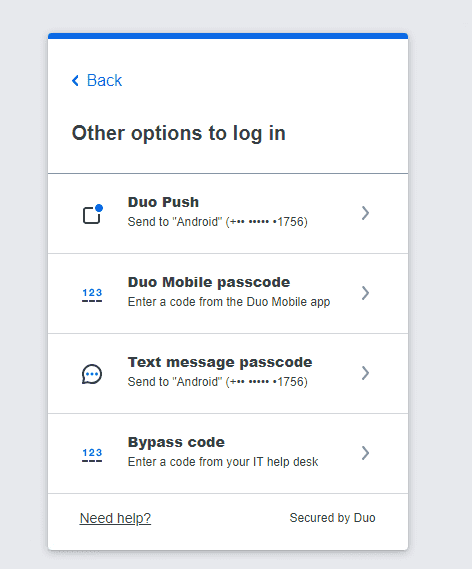
- Depending on how Duo is configured in your organization, you will either be shown a field to enter this code or TOTP, or be directed to Duo Security's site to enter the code or TOTP.
- Enter the code and click Next to verify your identity.
- On the RSA verification page, enter the passcode provided to you by your administrator.

- Depending on the configuration in your organization, you will either be verified or required to enter a security code for further authentication. This security code can be generated by your RSA SecurID mobile app, hardware tokens, or received by email or SMS.
- Enter the code in the Enter the code field displayed by ADSelfService Plus, and click Next to verify your identity.
RADIUS authentication
- Enter the RADIUS password in the text field displayed in ADSelfService Plus.
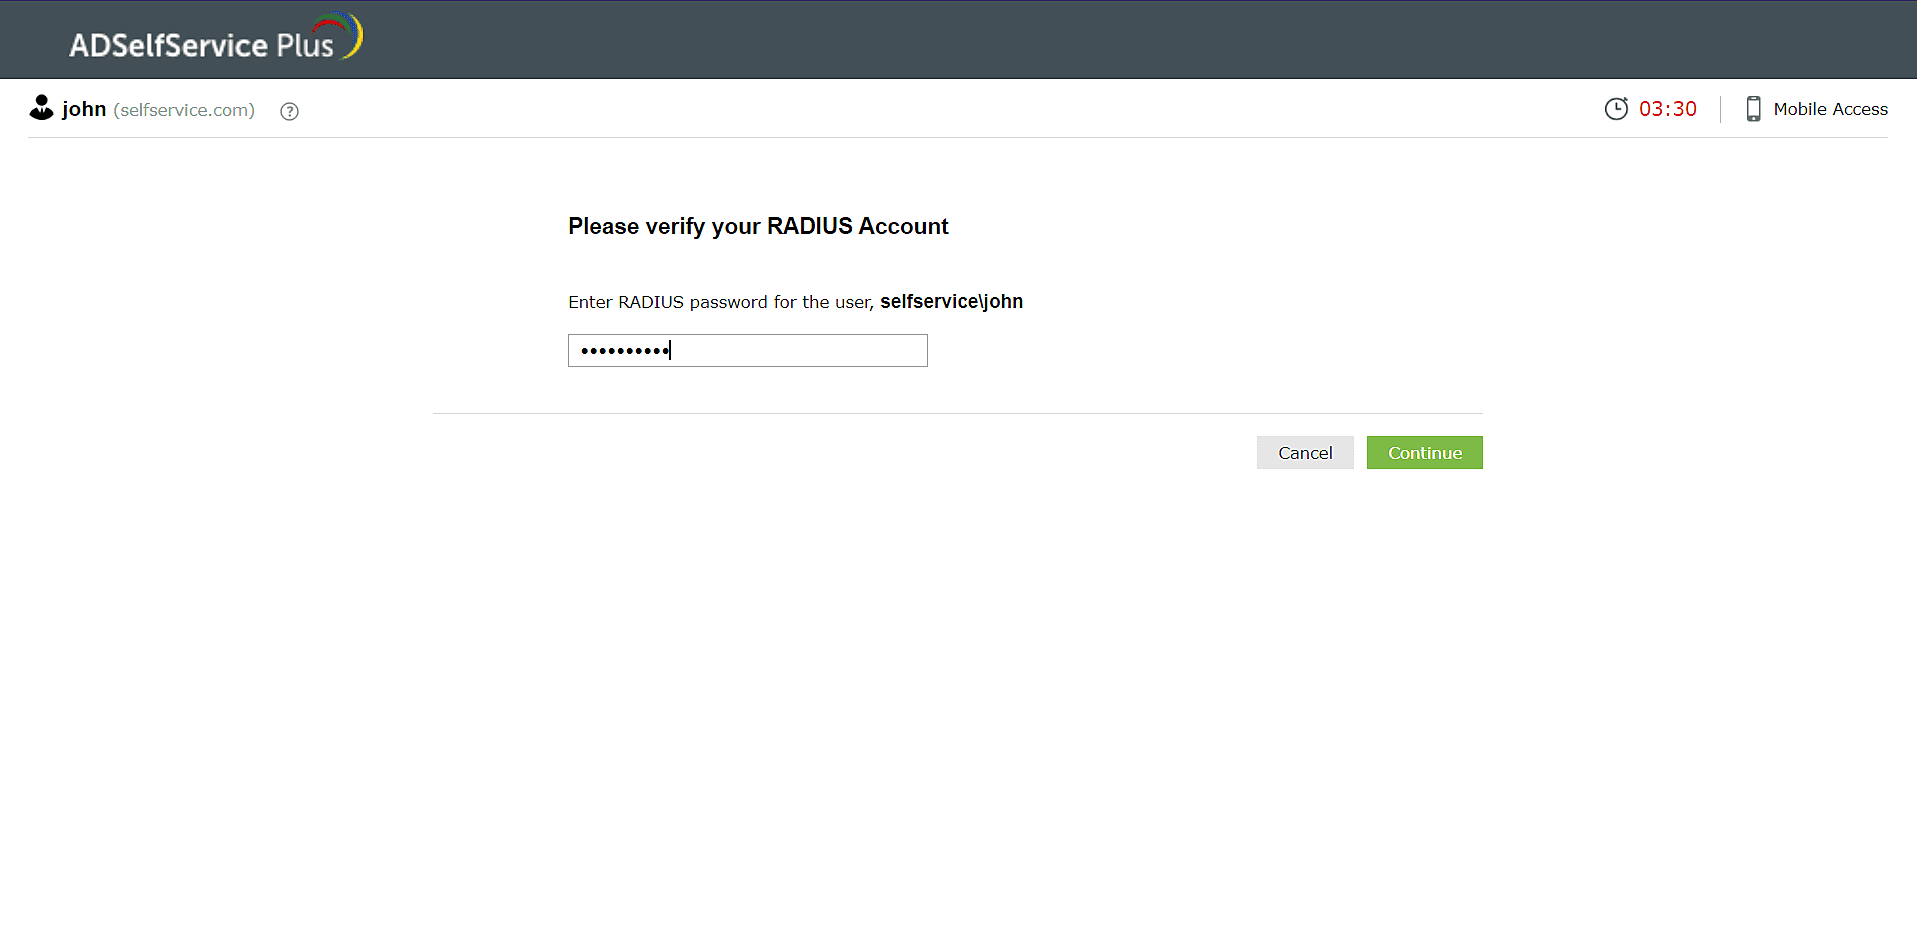
Note: Please contact your administrator for the RADIUS password linked to your account.
- If your RADIUS admin has configured challenge-based authentication, you will need to further enter a one-time passcode generated via a hardware token or the RSA SecurID mobile app, or tokens received by email or SMS to complete RADIUS authentication.
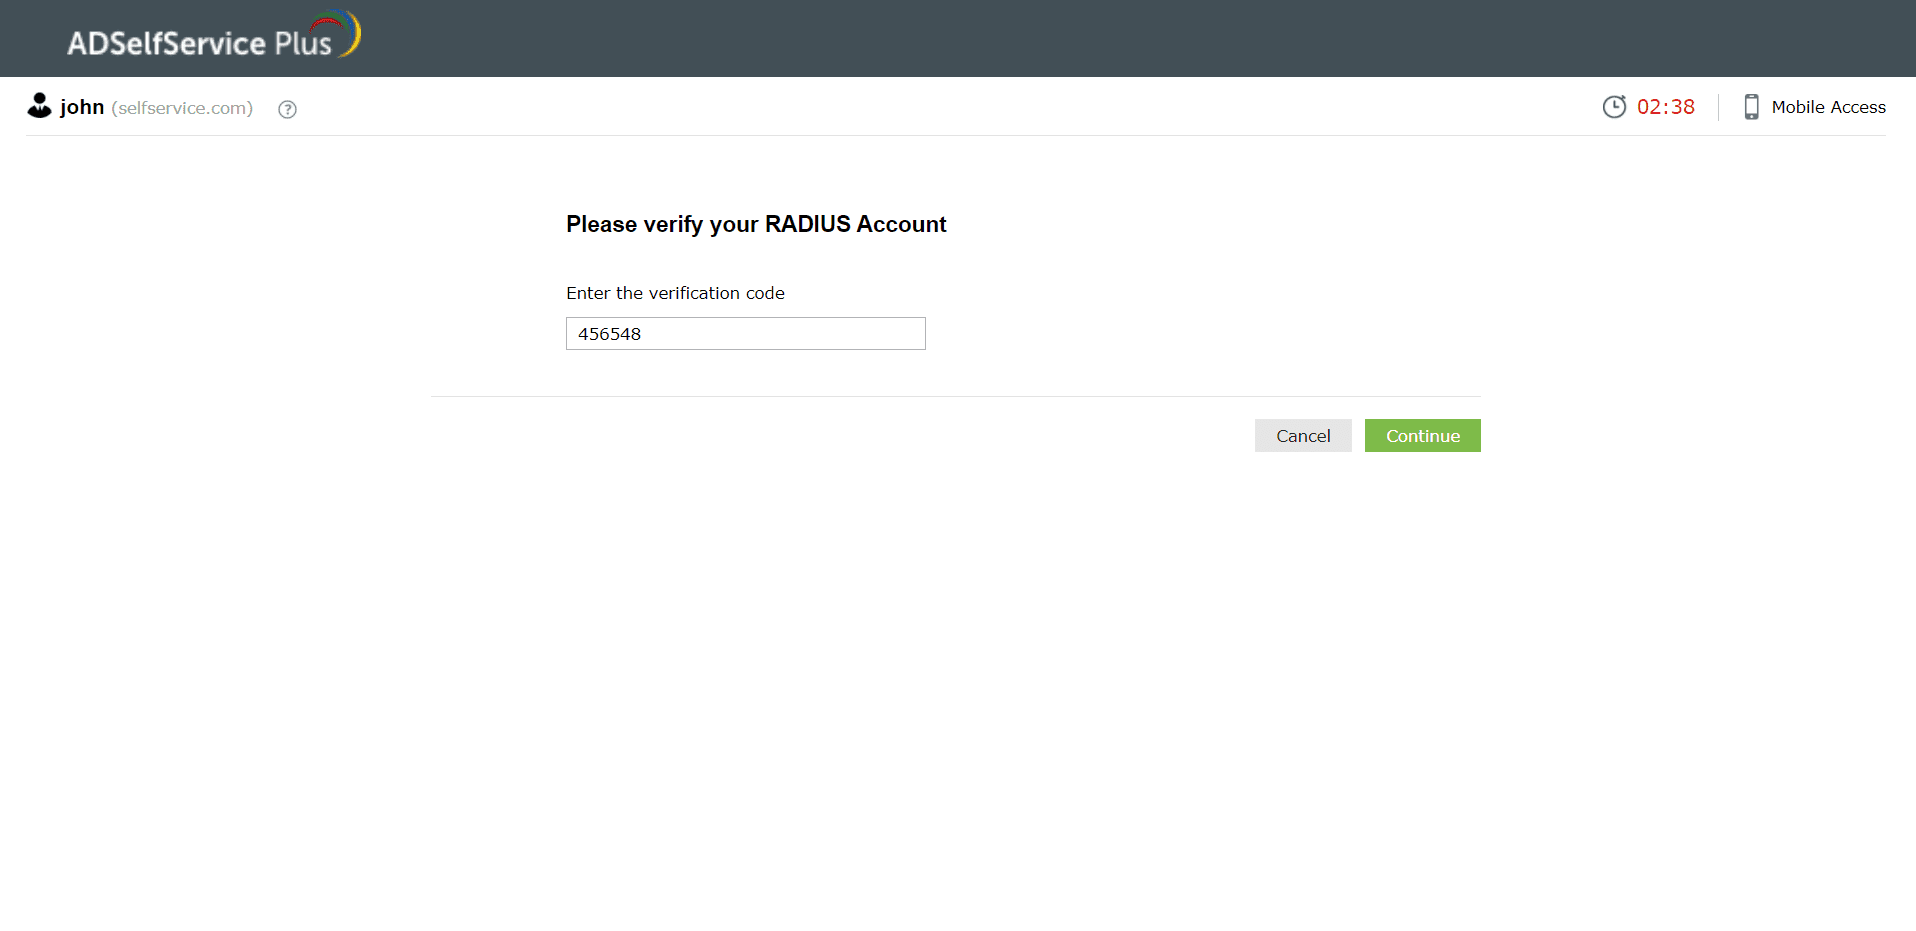
- Click Continue to verify your identity.
Authentication using the ADSelfService Plus app
Push alert authentication
- You will be sent a push notification with a request ID asking you to click Accept on the login notification to confirm your identity.
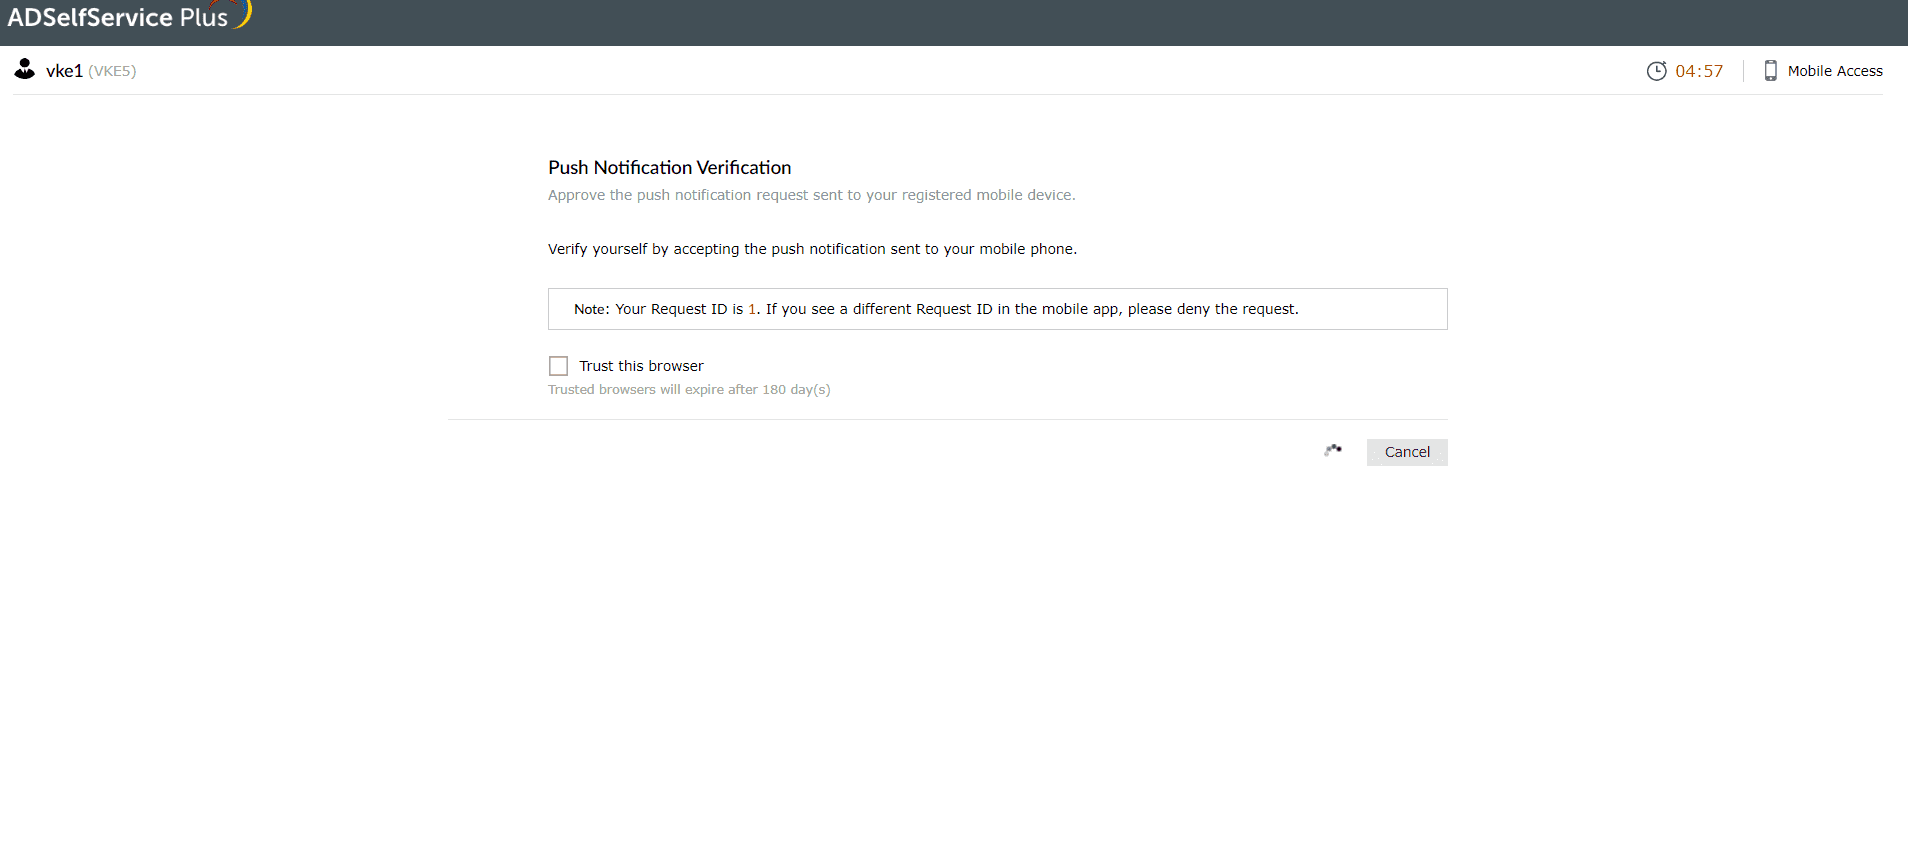
- Tap the Accept button on the notification to confirm your identity.
Biometric authentication
- Open the ADSelfService Plus mobile app.
- Follow the steps displayed on the ADSelfService Plus webpage.
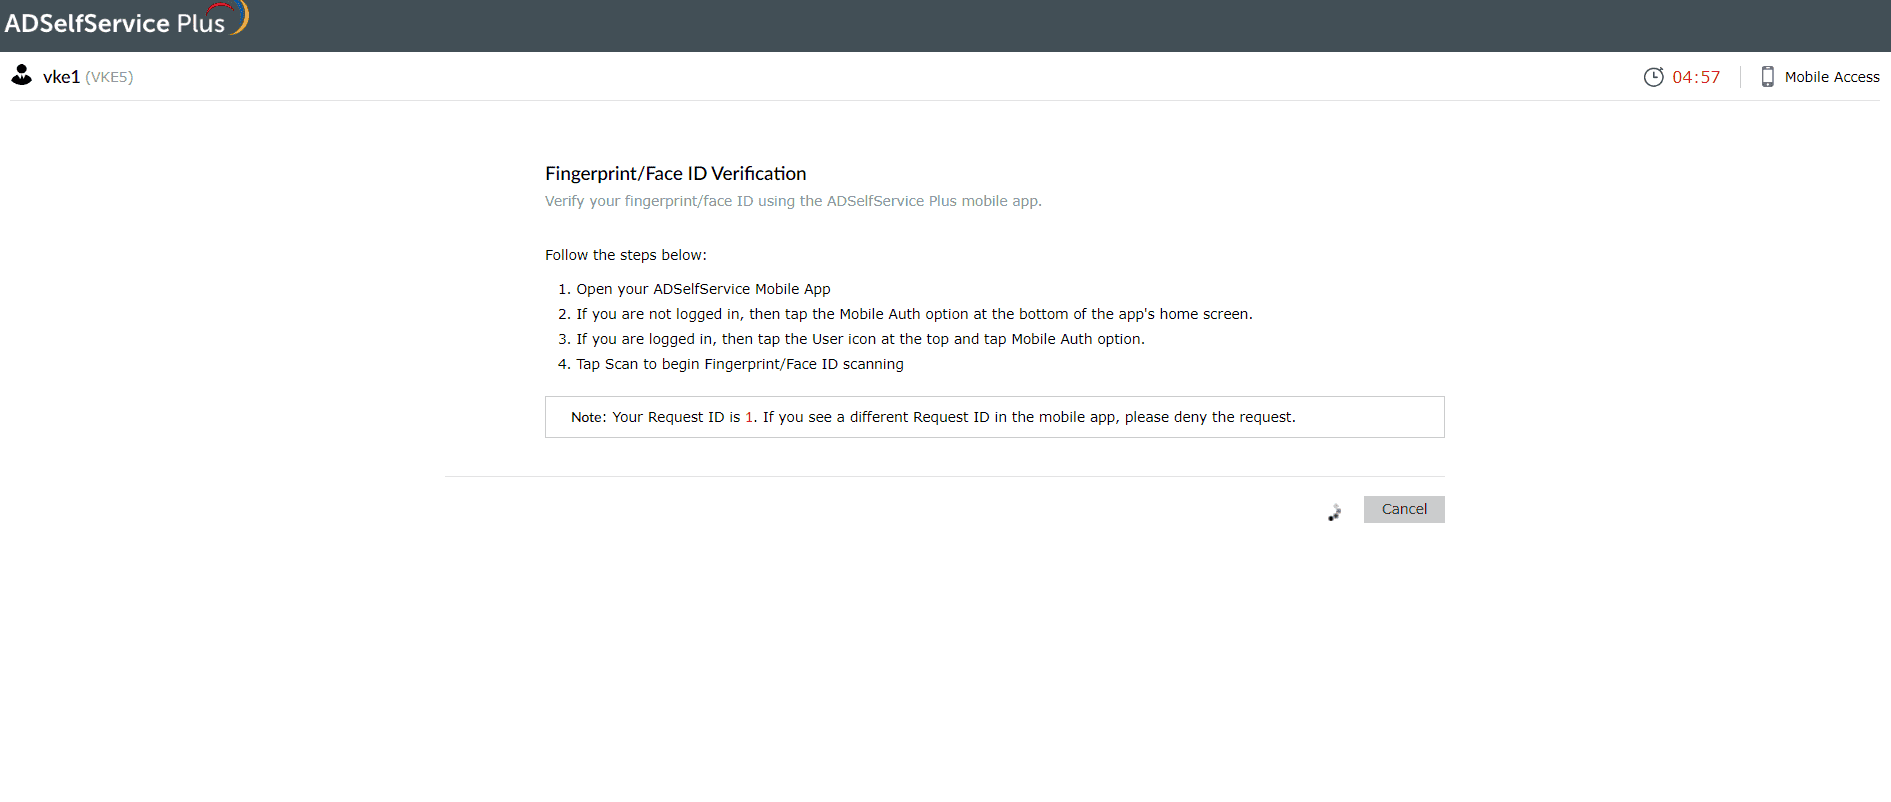
- You will be logged in once your identity is verified.
QR code authentication
- Open the ADSelfService Plus mobile app.
- Follow the steps given on the webpage.
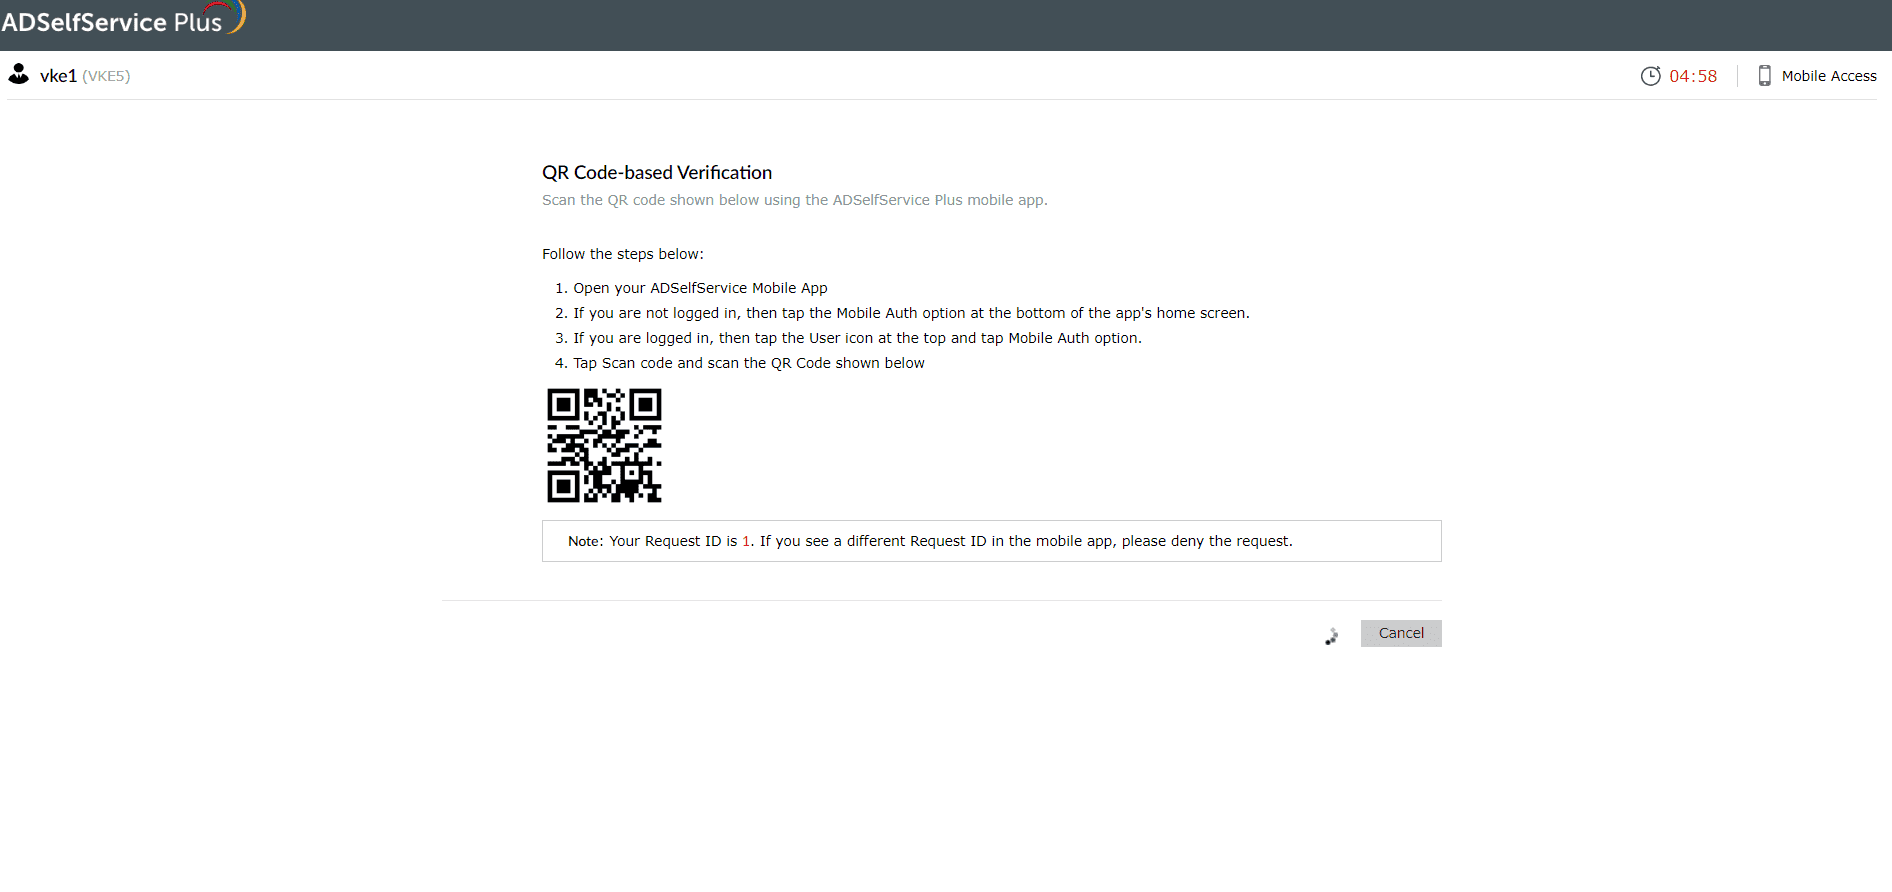
- Click Next.
TOTP authentication
- Log in to the ADSelfService Plus mobile app and click Enrollment > TOTP Authenticator.
- Follow the steps given on the webpage.
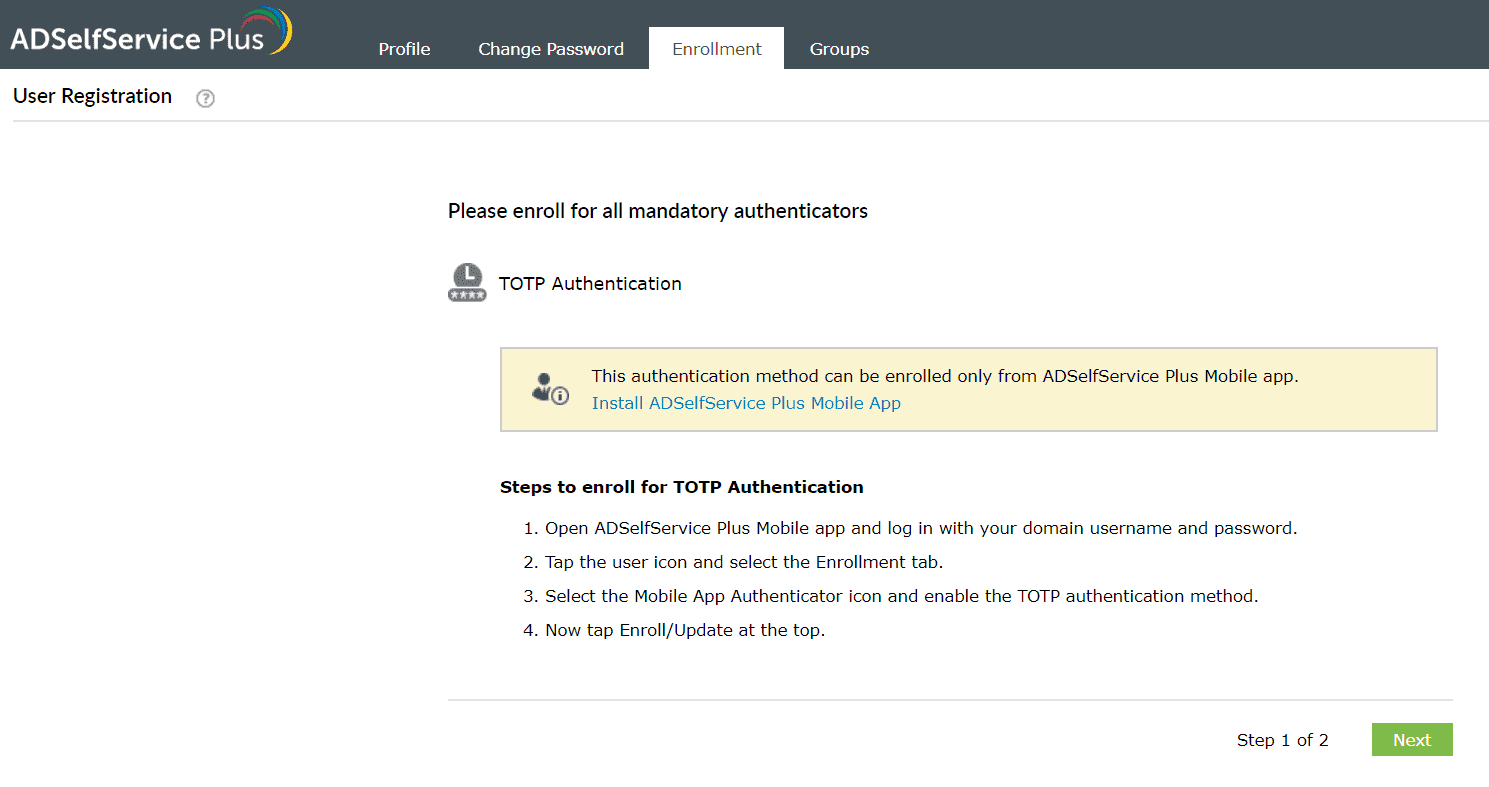
- You will be logged in once your identity is verified.
Yubikey Authenticator
- Log in to the ADSelfService Plus user portal on your workstation or open the ADSelfService Plus mobile app on your phone and go to Enrollment > Yubikey Authenticator.
- Plug in the Yubikey device to your workstation or mobile app. You can also connect using near-field communication (NFC) or Bluetooth Low Energy (BLE).
- If using a workstation, place the cursor in the field below and press/hold the button on the plugged-in Yubikey device depending on the slot configured.
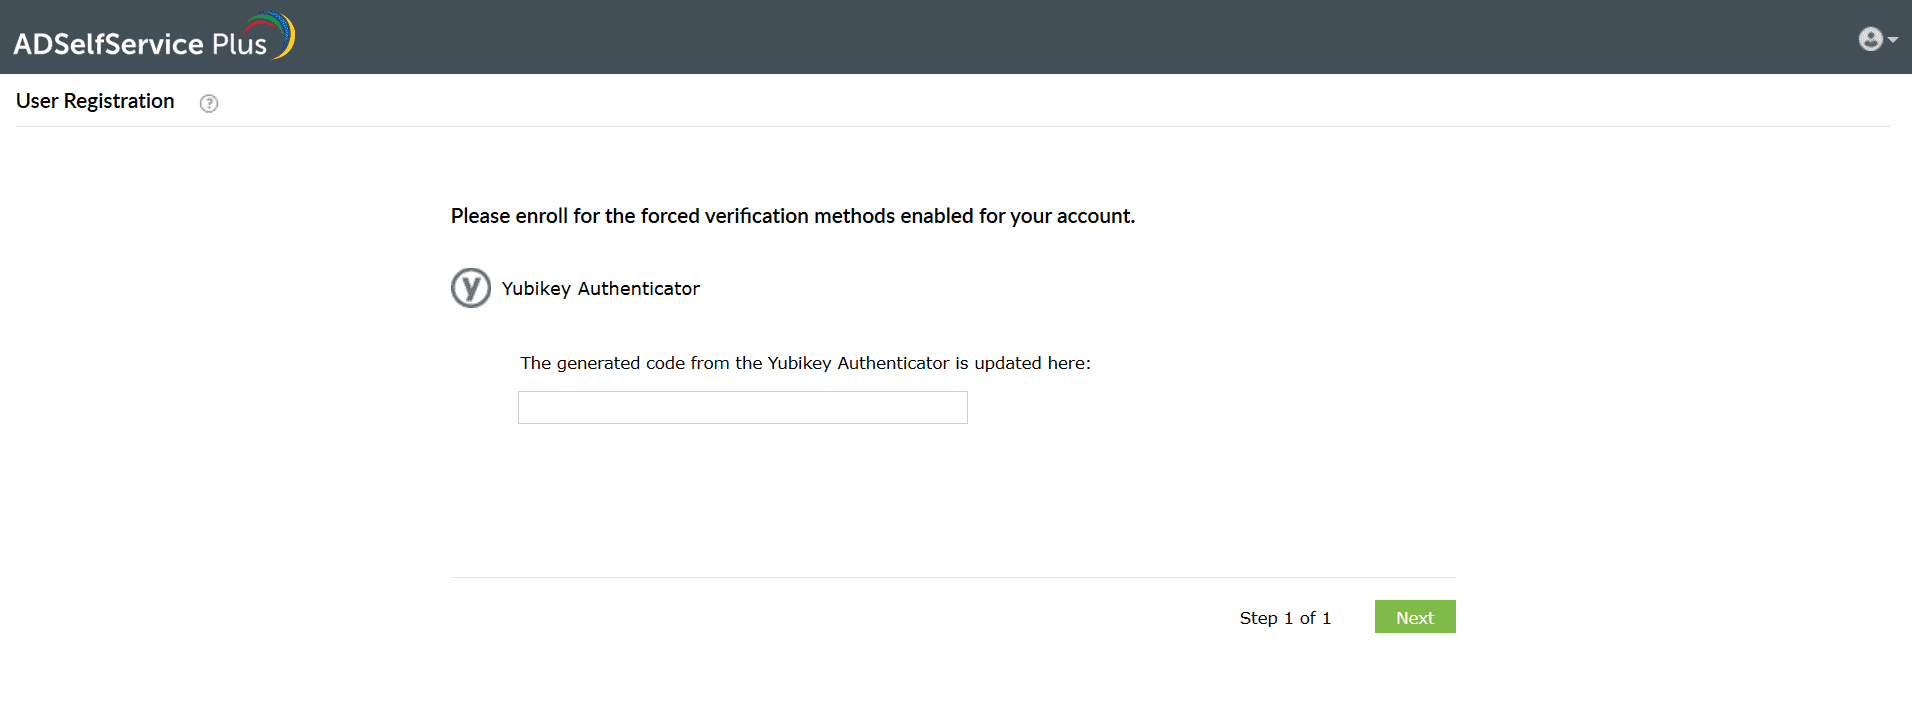
- The code is automatically updated.
- Click Next to verify your identity.
Zoho OneAuth TOTP
- In the ADSelfService Plus user portal, select the Zoho OneAuth TOTP authentication method.
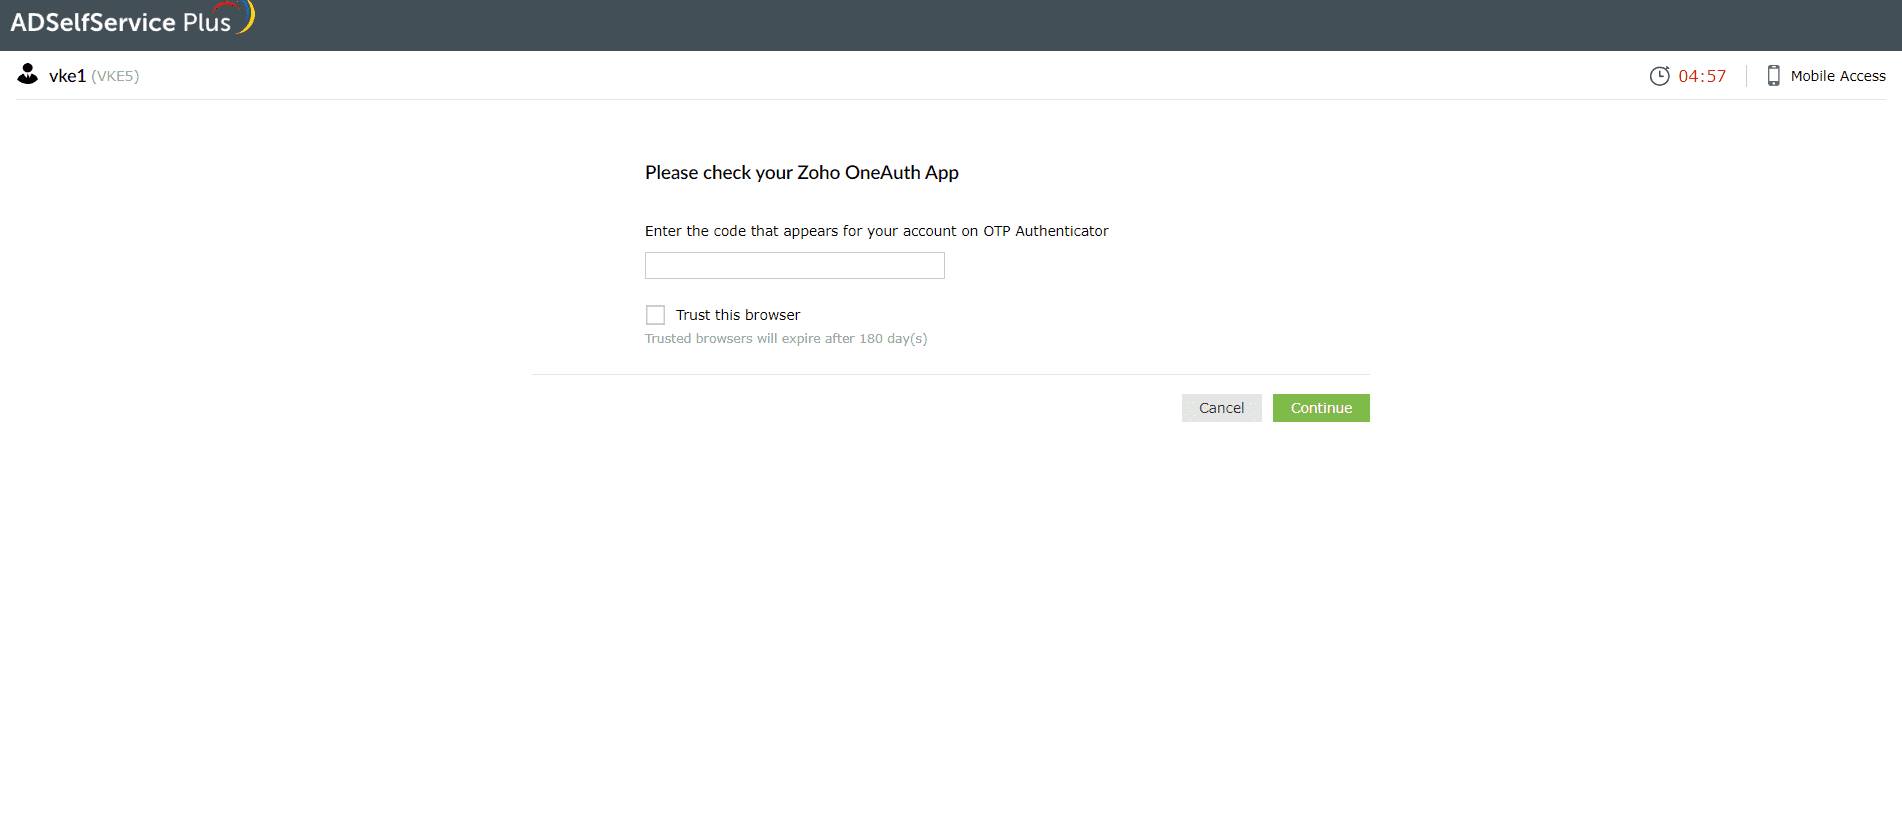
- Enter the code generated by the Zoho OneAuth app in the ADSelfService Plus user portal.
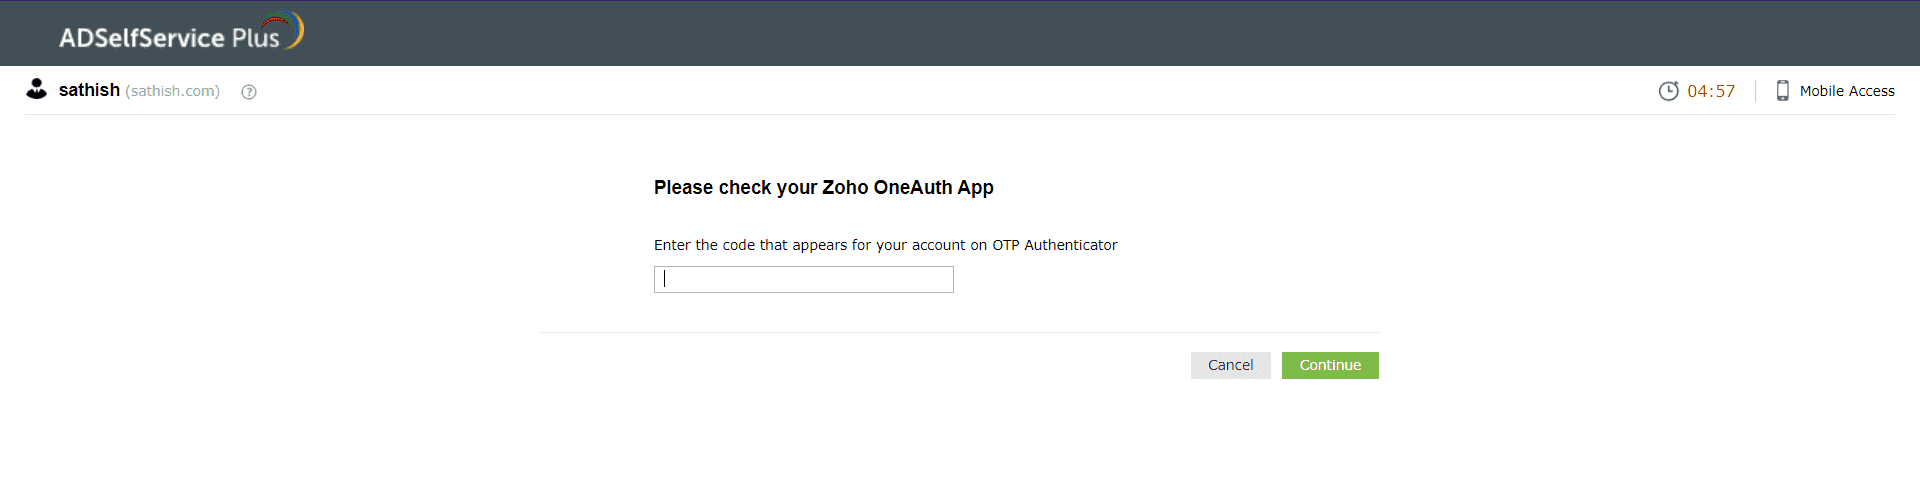
- Click Continue.
Smart Card Authentication
Smart Card Authentication in ADSelfService Plus can be used to protect resources accessed using the browser (web-based logins) as well as machine logins.
Web-based logins:
- Insert the smart card device into the machine or place it against the card reader.
- Access the URL to log into your web resource.
- The browser displays a list of all the available certificates on the smart card.
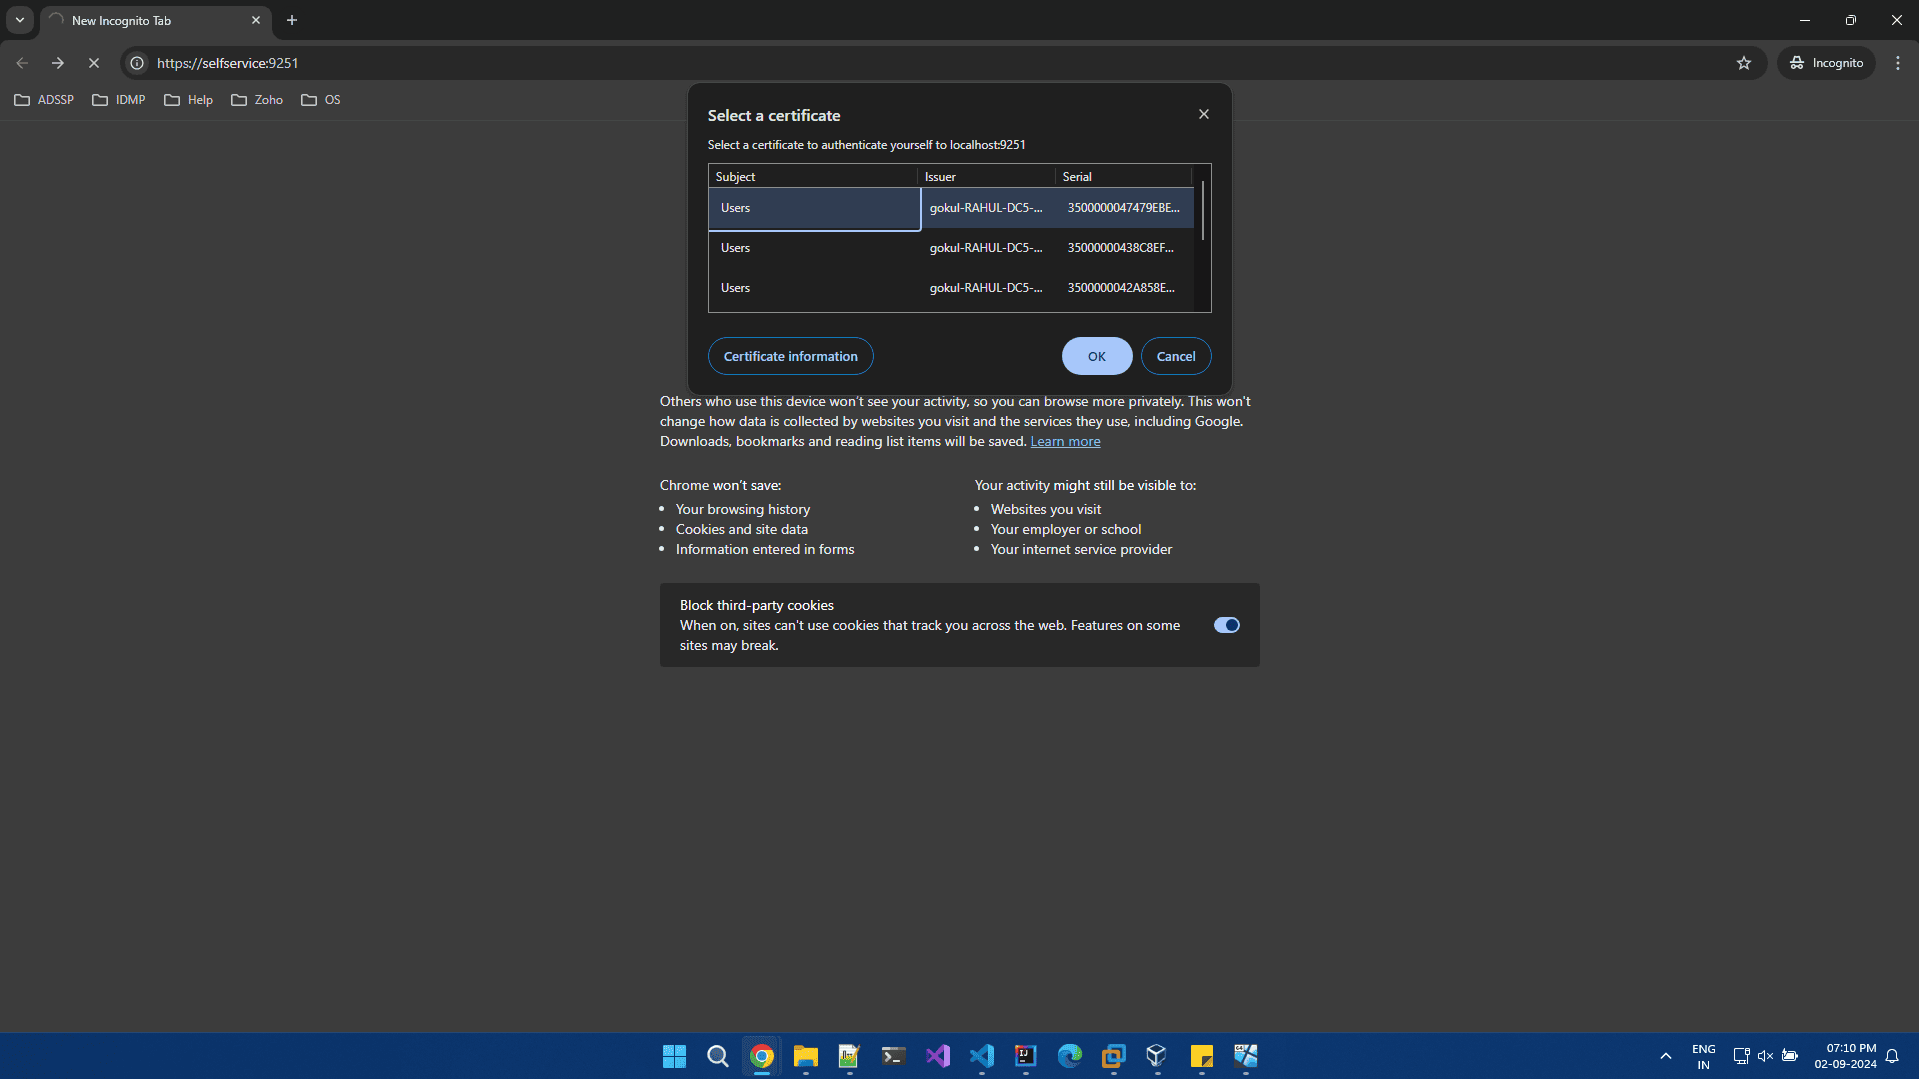
- Choose the appropriate certificate and enter the PIN, if the smart card is PIN-protected.
- Once done, the browser displays the login screen.
- Select Smart Card Authentication for MFA.
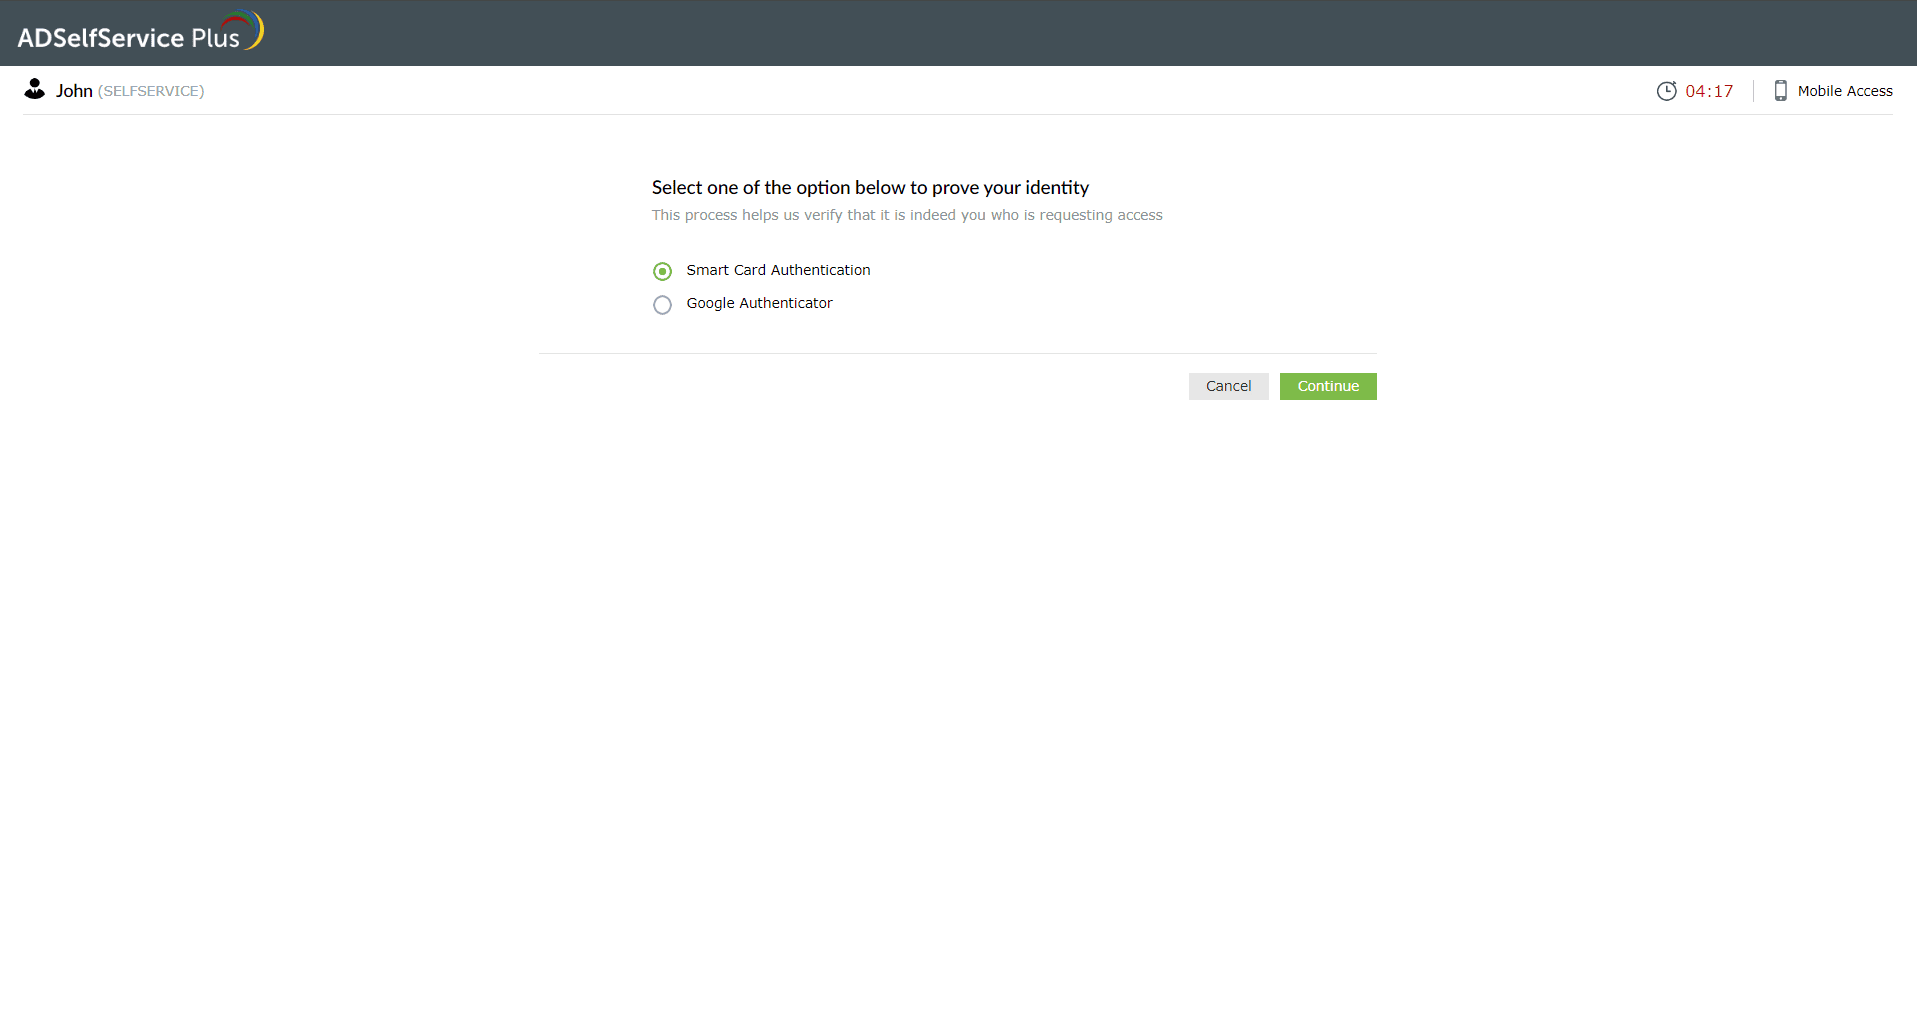
- ADSelfService Plus automatically verifies the information of the certificate you selected in step 4.
- You will be logged in upon successful verification.
Machine logins:
- Insert the smart card device into the machine or place it against the card reader.
- Initiate the machine login process.
- When prompted, choose Smart Card Authentication for MFA from the machine login screen.
- If there are multiple certificates on the smart card, you need to choose the appropriate one.
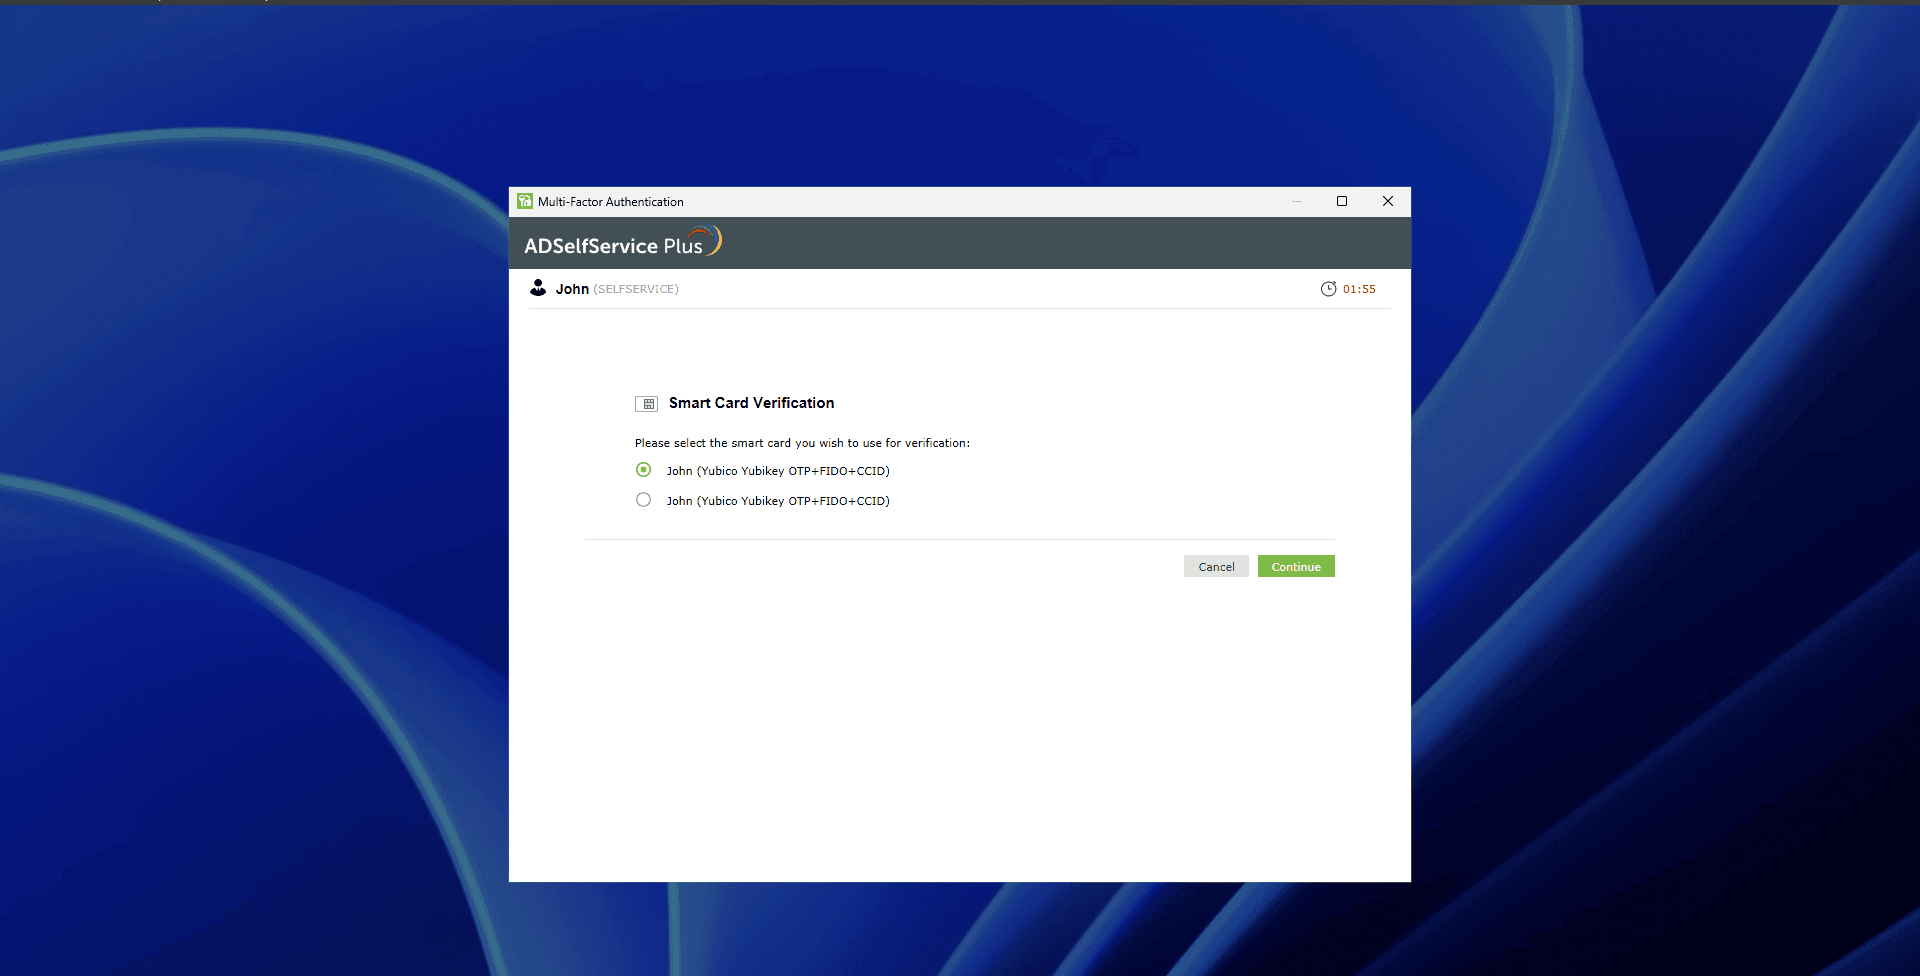
- If the smart card is PIN-protected, ADSelfService Plus will prompt for the PIN. Enter it and click Continue.
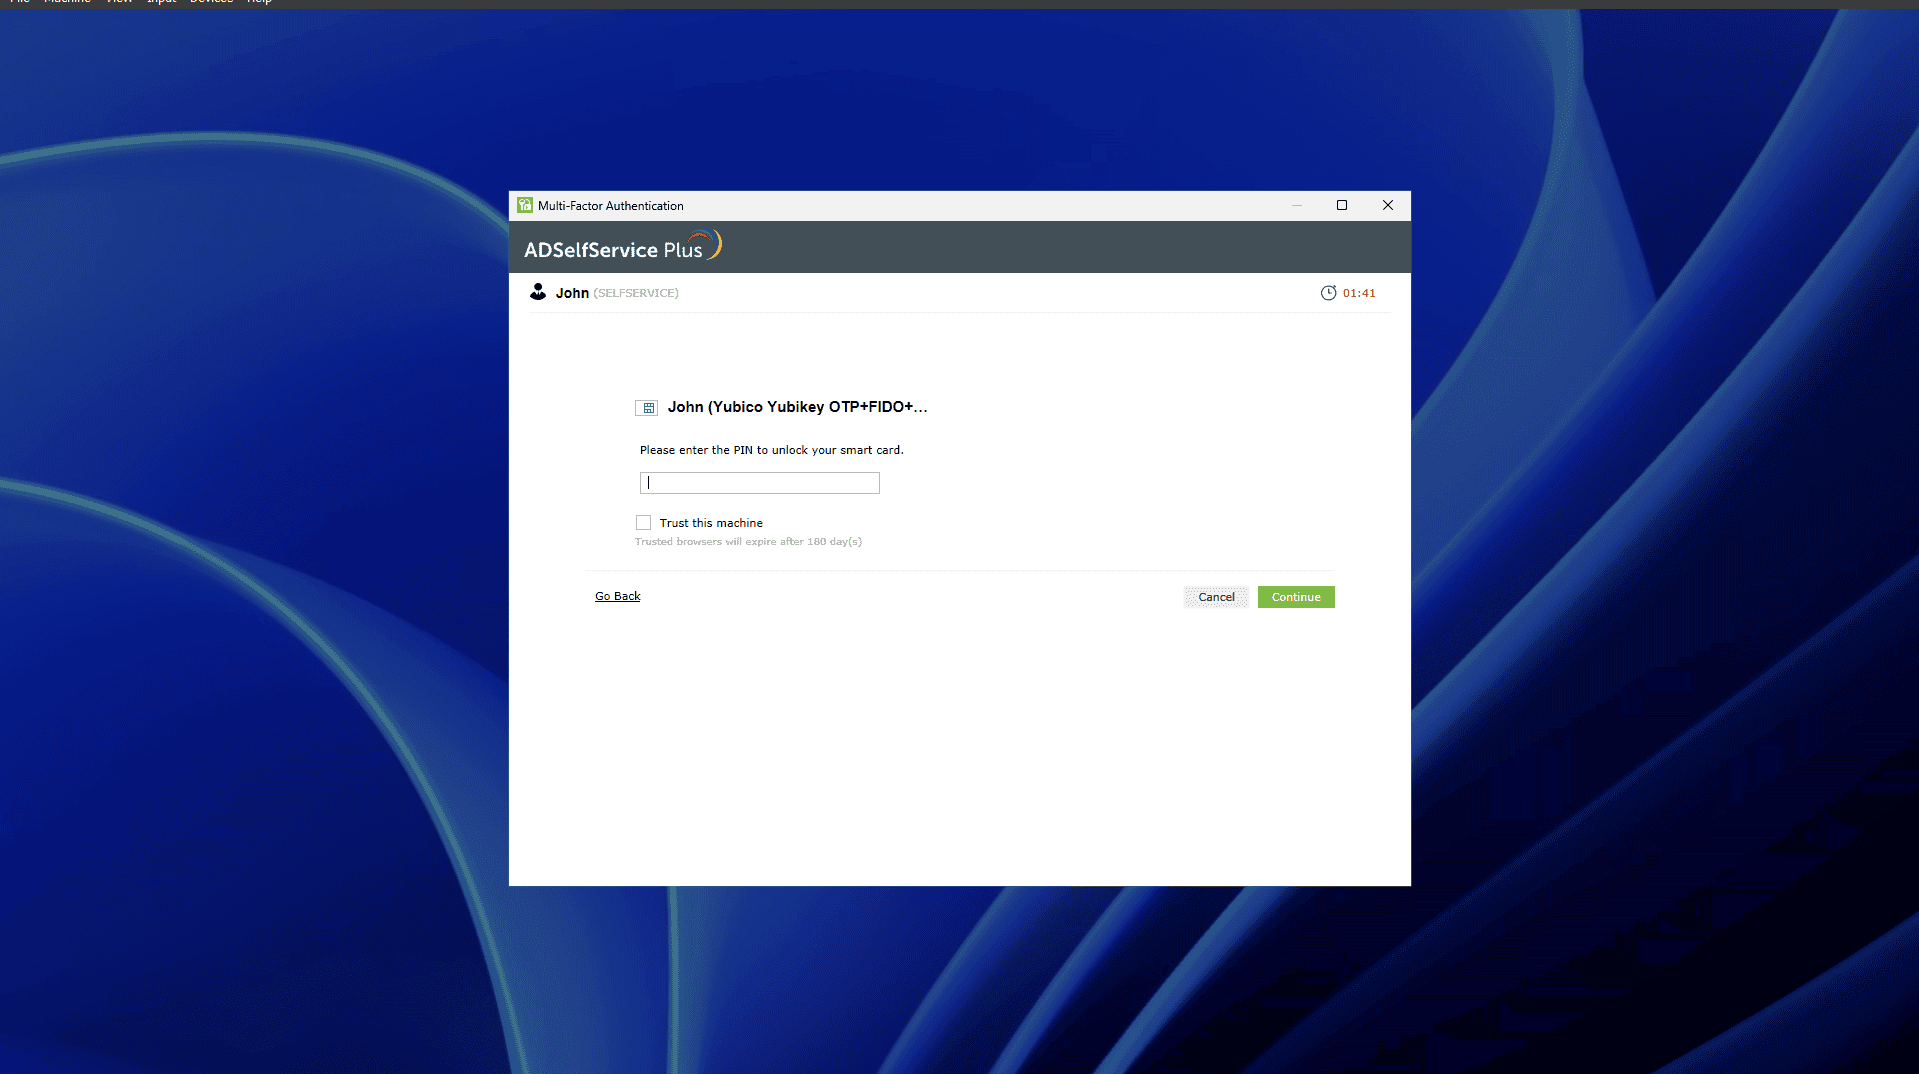
- ADSelfService Plus verifies the information of the certificate you selected and you will be logged in upon successful verification.
Passkeys
- On the MFA verification page, select Passkeys as your authentication method.
- When prompted, select the type of passkey you would like to use:
- Device's Built-in Authenticator: Use this if you're signing in from the same device you're enrolling (like your laptop or phone). You'll be prompted to verify using your device’s built-in method—such as Windows Hello, Face ID, Touch ID, or Android biometrics.
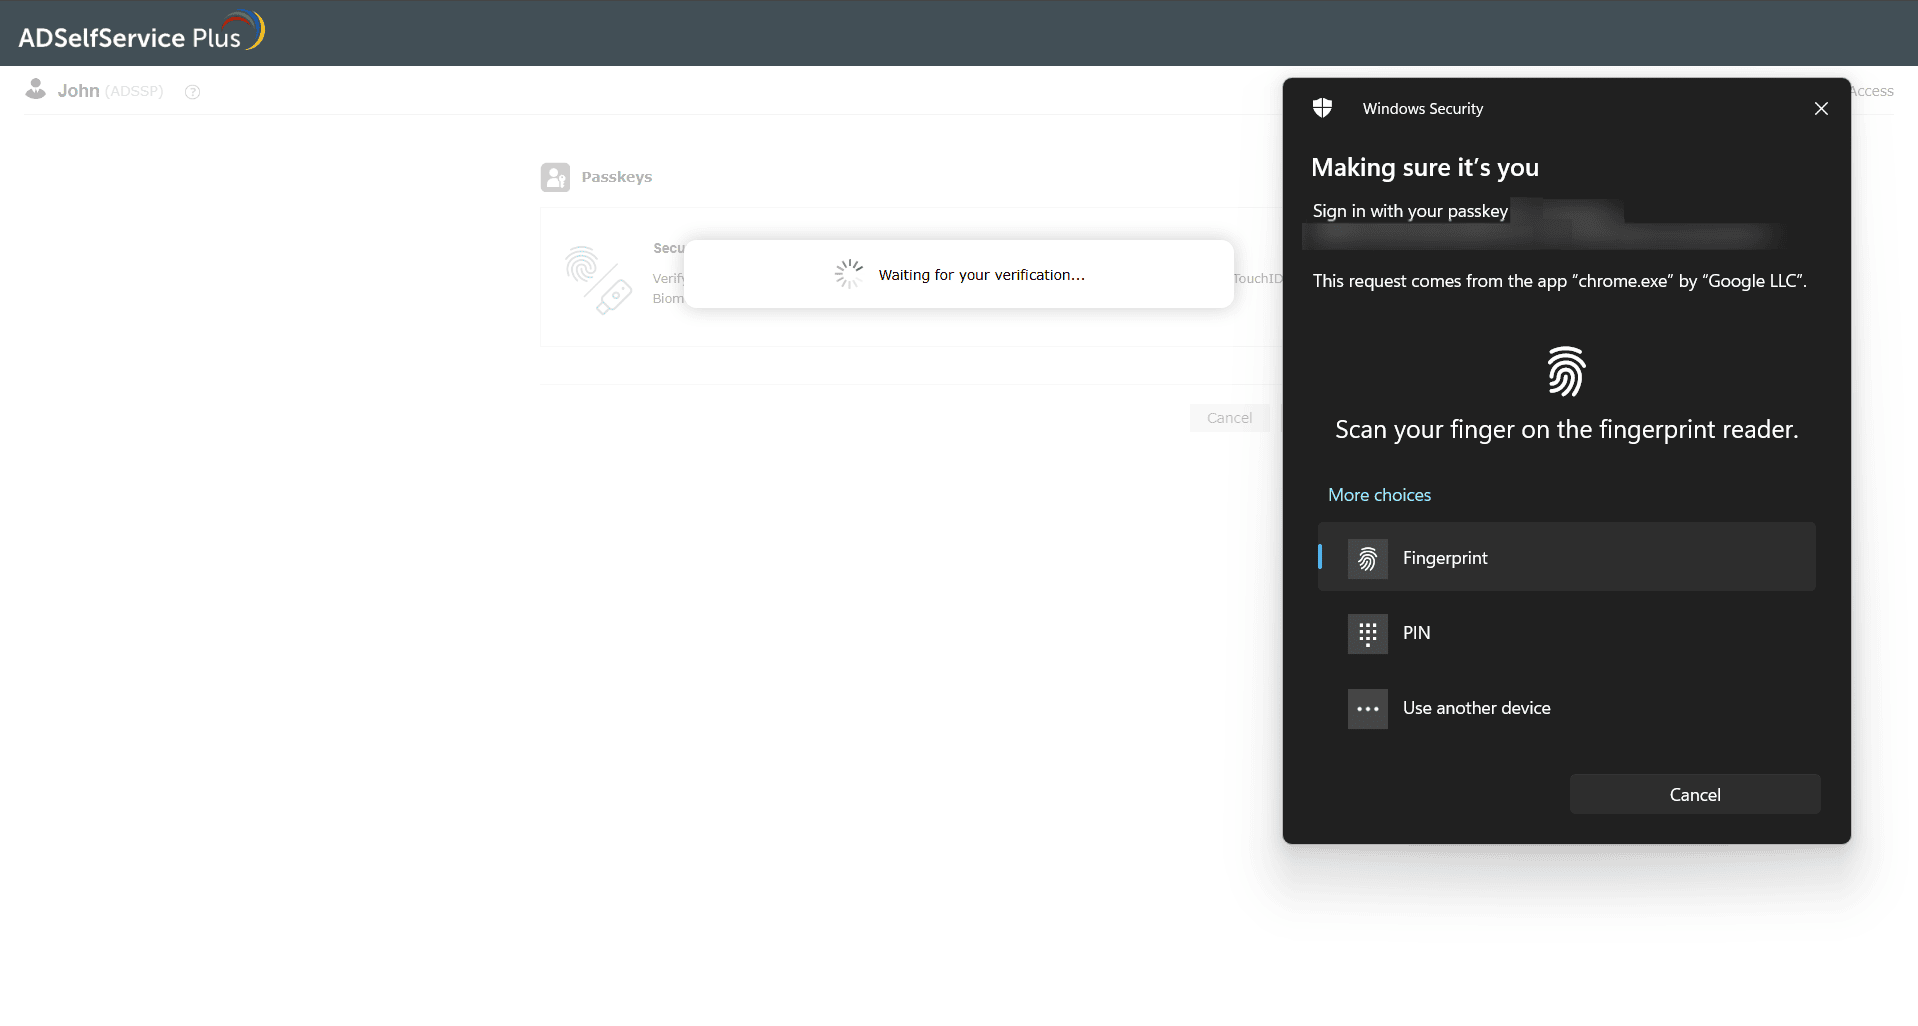
- Security Key: Choose this if you're using an external security key (like a YubiKey or Google Titan Key). Insert or tap your key to verify.
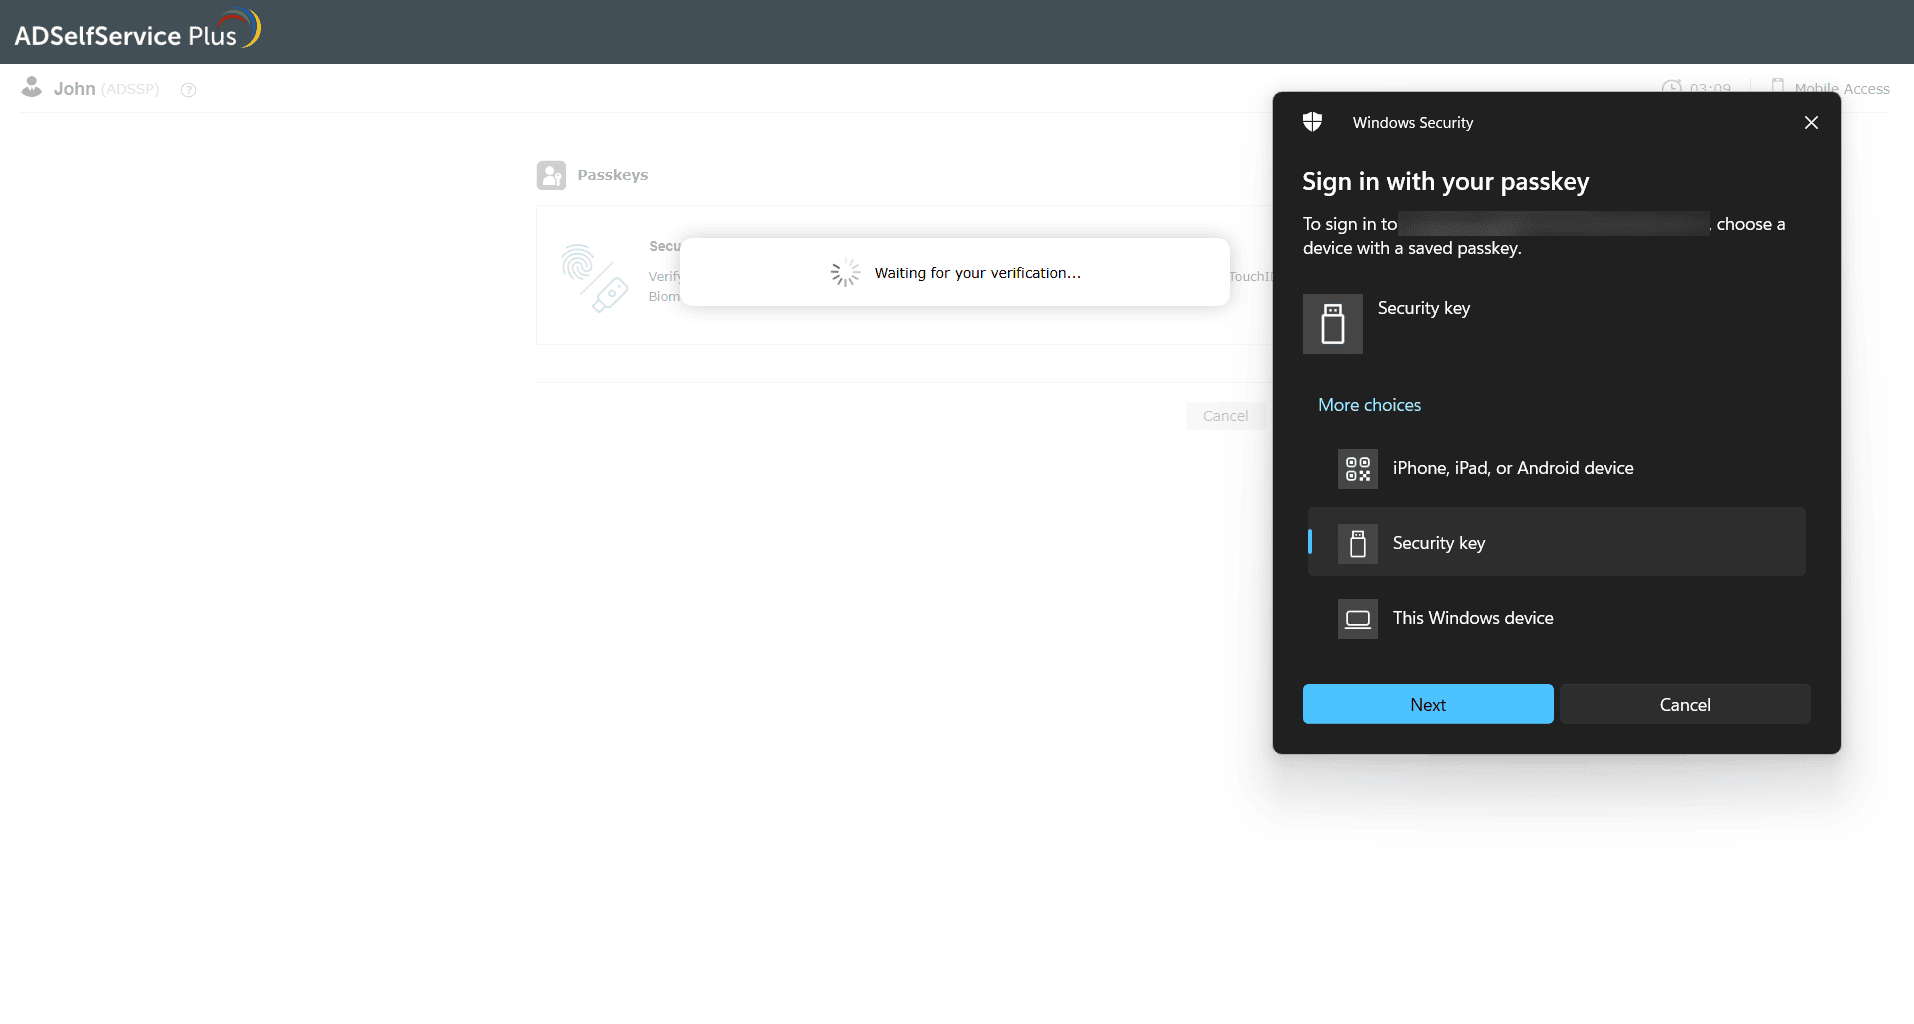
- You will be logged in upon successful identity verification.
 ADManager Plus
 ADAudit Plus
 Exchange Reporter Plus
 M365 Manager Plus