CMDB List View
The CMDB List view page organizes and displays the CIs available under each CI Type configured in the application. In addition, the page includes other functionality such as,
Option to view all the CIs available in the application
Option to view the CIs under each CI Types
Option to add CIs under a CI Type
Option to modify the CI Type for CIs.
Bulk delete of CIs from the list view.
View Relationship Map
Import CIs from CSV file
Search CIs from the list view
Customize columns to be displayed in the list view.
Click CMDB tab in the header pane. The page navigates to view the Configuration Items (CIs) under the CI Type Business Services. To view all the CIs in the CMDB irrespective of the CI Type, click View All CIs link. The CIs are listed with the Name, the CI Type and the Site to which they belong.

Viewing CIs under a CI Type
You can view CIs under a specific CI Type
by selecting the CI Type from the Configuration
Items block. Click the ![]() icon to view the Sub CI Type.
To view the Sub CI Types of all the CI Types, click
icon to view the Sub CI Type.
To view the Sub CI Types of all the CI Types, click ![]() icon.
icon.

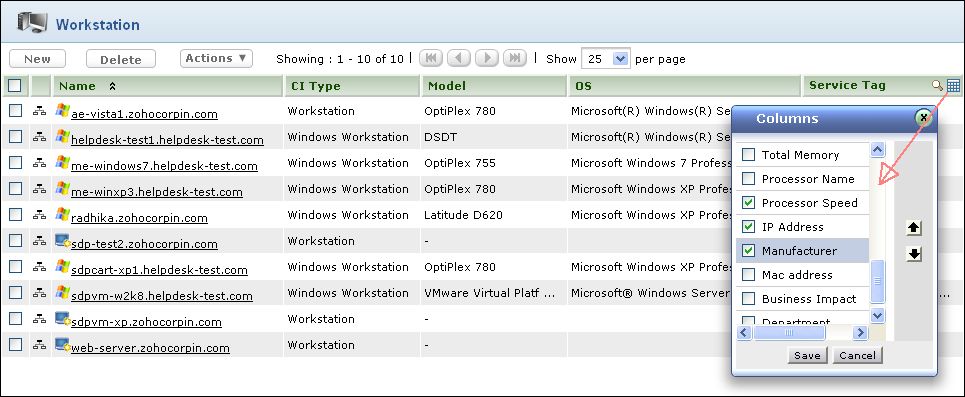
While viewing the CIs under a specific CI Type, the list view columns displays the CI attributes configured while adding the CI Type. Say, for instance, the CI Type 'Workstation' consists of attributes like Model, Service Tag, Service Pack and IP Address. So while viewing the CIs under CI Type Workstation, the configured attributes are listed in the list view column.
If you are viewing the list view column of a child CI Type, say 'Windows Workstation', the list view column would display the CI attributes configured for the parent CI Type as well as the attributes configured for the child CI Type.
If there are many attributes configured
for a CI Type, then you can select the attributes to be displayed in the
column list view using the column chooser icon ![]() .
.
|
Note |
1. While viewing CIs under a parent CI Type, the CIs under its Sub CI Type are also listed.
2. The attributes in the column list view for Sub CI Type comprises of the parent CI Type attributes and the sub CI Type attribute. |
An Actions drop-down button is visible in the list view for the CIs that are also tracked in the asset module, say, Keyboard, Access Points, Servers and so on. If you wish to track CIs under a specific CI Type in the asset module also, then enable Track as asset option while configuring the CI Type.
From the Actions drop-down, you can modify a CI Type for a CI. To do so,
Enable the check box beside the CI name.
Click Actions drop-down, select Modify CI Type option. The Modify CI Type dialog pops-up.
Select the CI Type from the drop-down.
Click Save.
Importing CIs from CSV file
If the CIs are recorded in a .csv file, then the same can be imported in the application from Import CIs from CSV file link. For importing Configuration Items from a CSV file, see Import CIs from CSV.
Viewing Relationship Map
Relationship Map gives a consolidated view of the relationship between
the CIs. To view the relationship map of a CI, click View
Relationship Map icon ![]() beside the CI. The Relationship
Map opens in a new window.
beside the CI. The Relationship
Map opens in a new window.
Adding CIs under a CI Type
To add CIs under a CI Type,
Select the CI Type from the Configuration Items block.
Click New button and enter the CI details in the Add New form.
The Add New form consists of the attributes configured while adding the CI Type. In case of Sub CI Types, the attributes configured while adding the Sub CI Type and the parent CI Type is displayed.
Search CIs
You can conduct an effective search operation using the Search field. To search for a specific CI using the search field,
Select the search parameter to All CIs from the Search field drop down.
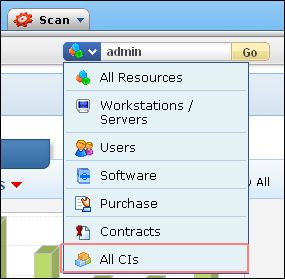
Enter the keyword in the search field.
Click Go. The search results shows the list of CIs corresponding to the specified keyword. For instance, if "admin" is specified as the search string, then the search operation would result in CIs beginning with the word admin like administrator, administration, admin.
Deleting CIs from the List View
To delete CIs,
Select the CI Type under which the CIs should be deleted (OR) Click View All CIs to view all the CIs irrespective of the CI Type.
Enable the check box beside the CI to delete.
Click Delete button. A confirmation dialog appears.
Click OK to proceed. The selected CIs are deleted from the list.
Note: In delete operation, the related financial and history details of the CI is deleted.