- Overview
- Configuration
UKG Pro
Sync HR and IT with UKG Pro and ADManager Plus Integration.
Integrating UKG Pro with AD using ADManager Plus enables IT teams to automate and streamline user identity lifecycle management, ensuring a seamless experience throughout onboarding to offboarding. Integrating UKG Pro with Active Directory not only bridges the gap between HR and IT but also enhances the efficiency and accuracy of your user lifecycle management, and reduces manual efforts and minimizing the risk of errors caused from manual intervention.
Real-time data synchronization
Keep employee data up-to-date with real-time synchronization between UKG Pro and Active Directory. Changes made in UKG Pro—like changes in job roles or personal information are instantly reflected across AD, Exchange, Microsoft 365, and other connected platforms.
Automate user onboarding and offboarding
Sync employees profiles across HR to IT systems by automating user creation in AD based on employee records in UKG Pro. Automatically synchronizes user provisioning, updates, and deprovisioning from UKG Pro to AD, ensuring real-time reflection of HR changes in your AD environment.
Increased productivity
Provide instant access to resources for new hires, and change or update group permissions.
How to configure UKG Pro integration in ADManager Plus
Prerequisites
- UKG Pro requires a valid customer API key and user API Key of a web service account.
Privileges
To import users (Inbound action): Ensure the account used for authorization has permission to read all user accounts.
To perform any action or query in UKG Pro (Outbound Action): Ensure the account used for authorization has permission to perform the desired action.
Note: ADManager Plus comes with a preconfigured set of APIs that helps perform basic actions with the integration. If the action you require is not available, please gather the necessary API details from UKG Pro API documentation to to configure inbound or outbound webhooks to perform the required actions.Authorization configuration
- Log in to ADManager Plus and navigate to Directory/Application Settings.
- Go to Application Integrations, then search and select UKG Pro CUSTOM.
- Toggle the Enable UKG Pro CUSTOM Integration button on.
- In the UKG Pro CUSTOM Configuration page, click Authorization.
- Enter the service account credentials.
- Click Configure.
Inbound webhook configuration
Inbound webhook enables you to fetch user data from UKG Pro to ADManager Plus. The attribute mapping configured in this section can be selected as the data source during automation configuration to perform the desired action on the list of users received from the API response. To configure an inbound webhook for UKG Pro:
- Under Inbound Webhook, click UKG Pro Endpoint Configuration.
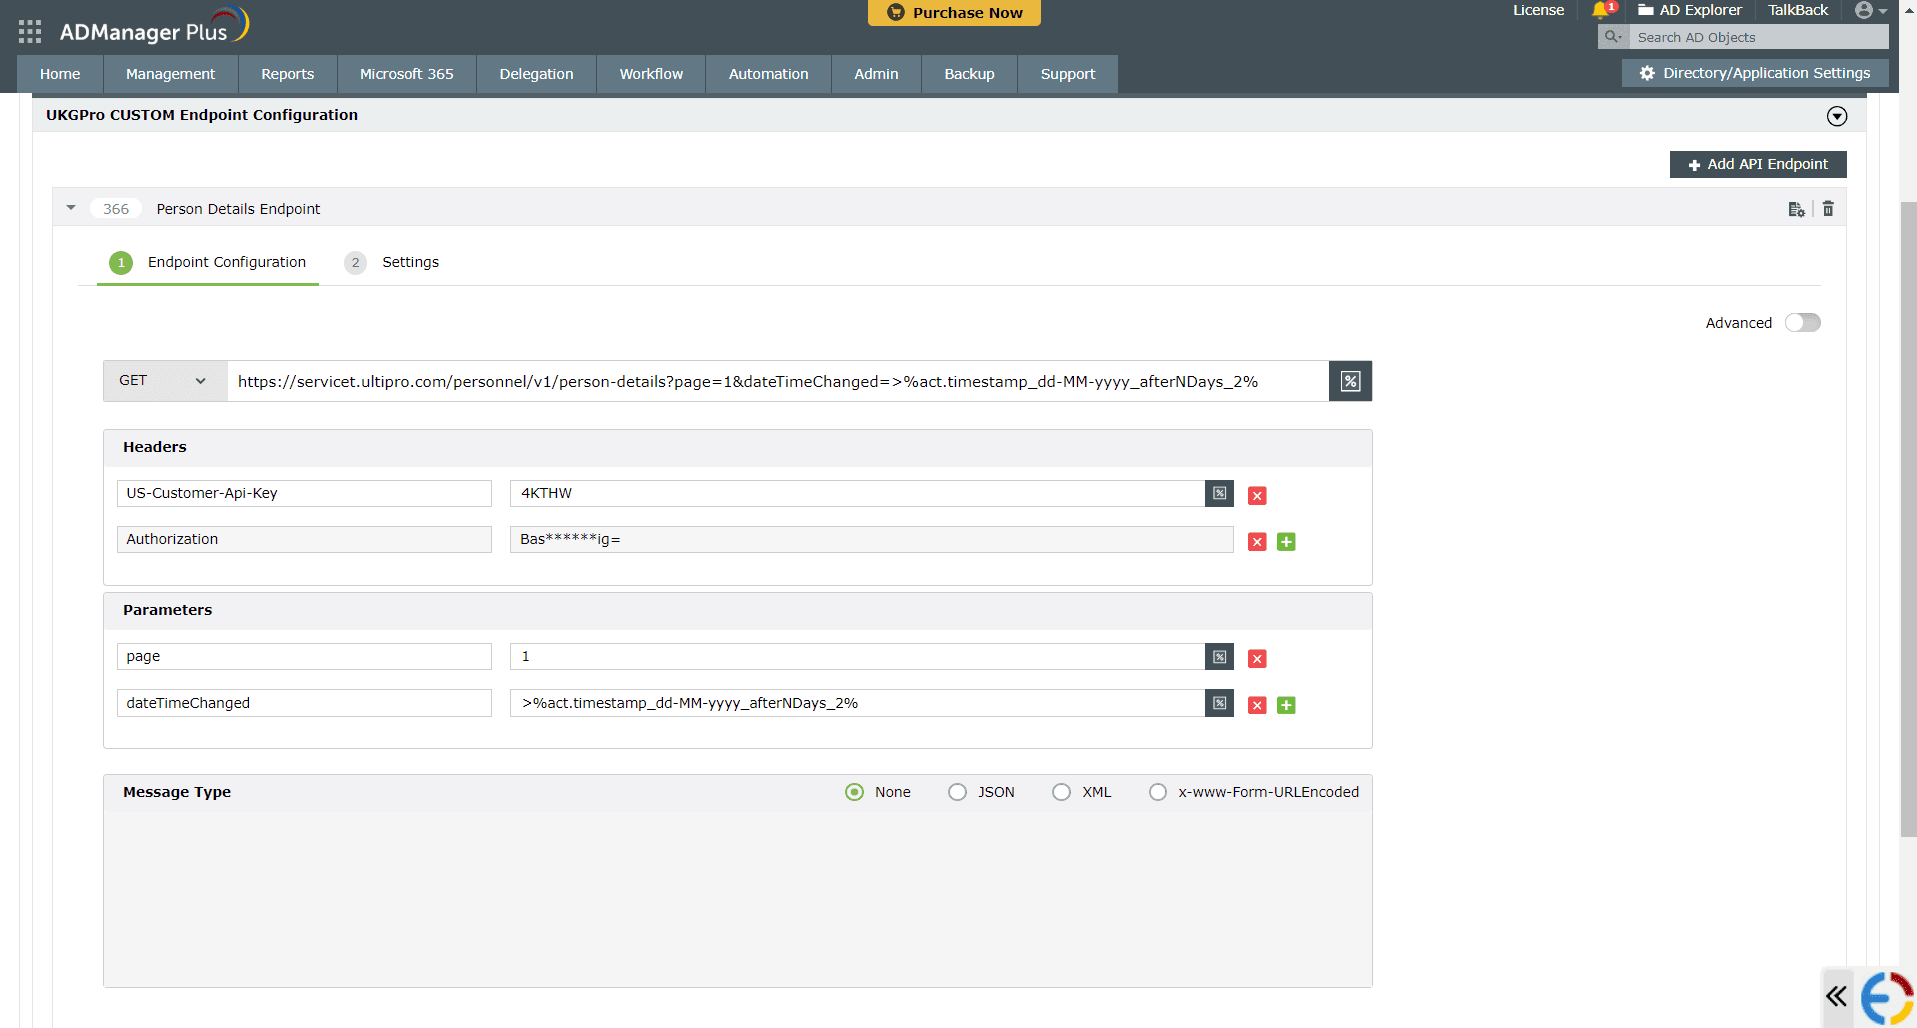
- In the Endpoint Configuration tab, an endpoint, UKG Pro USERS ENDPOINT, comes preconfigured with an Endpoint URL, API Method, Headers, and Parameters fields to fetch user accounts from UKG Pro. To use this preconfigured endpoint, replace {Ultipro_webservice_URL} with the web service URL of your UKG Pro instance and {customer_api_key} with the customer API key available on the UKG Pro settings page in the US-Customer-Api-Key field. If you would like to use a new endpoint to import users, you can configure one using the + Add API endpoint button and filling in the required fields as per UKG Pro's API references. Click here to learn how.
- The API key value pair is preconfigured as a header for authenticating API requests as configured during Authorization Configuration.
- Macros: You can add macros to your endpoint configuration to dynamically change it as per your requirement using the macro chooser component. Click here for more details
- Refer to UKG Pro's API references and configure additional headers and parameters, if required.
- Configure parameters to retrieve only the required set of users based on dateTimeChanged or dateTimeCreated. For example, add the parameter dateTimeChanged = >%act.timestamp_dd-MM-yyyy_afterNDays_2% to fetch users modified in the last two days. This helps reduce the time taken for automation iterations by minimizing the number of records processed in each iteration.
- Once done, click Test & Save. A response window will display all the requested parameters that can be fetched using the API call. Click Proceed.
- Refer to UKG Pro's API references to know the Parameters that must be configured to fetch only specific parameters.
- You can configure multiple endpoints for UKG Pro using the + Add API endpoint button. Click here to learn how.
- To retrieve a user's personal details, configure the Person Details Endpoint. For employment details, configure the Employment Details Endpoint. To obtain both details, configure both endpoints. If additional information is required, configure the respective endpoint as per UKG Pro's API references.
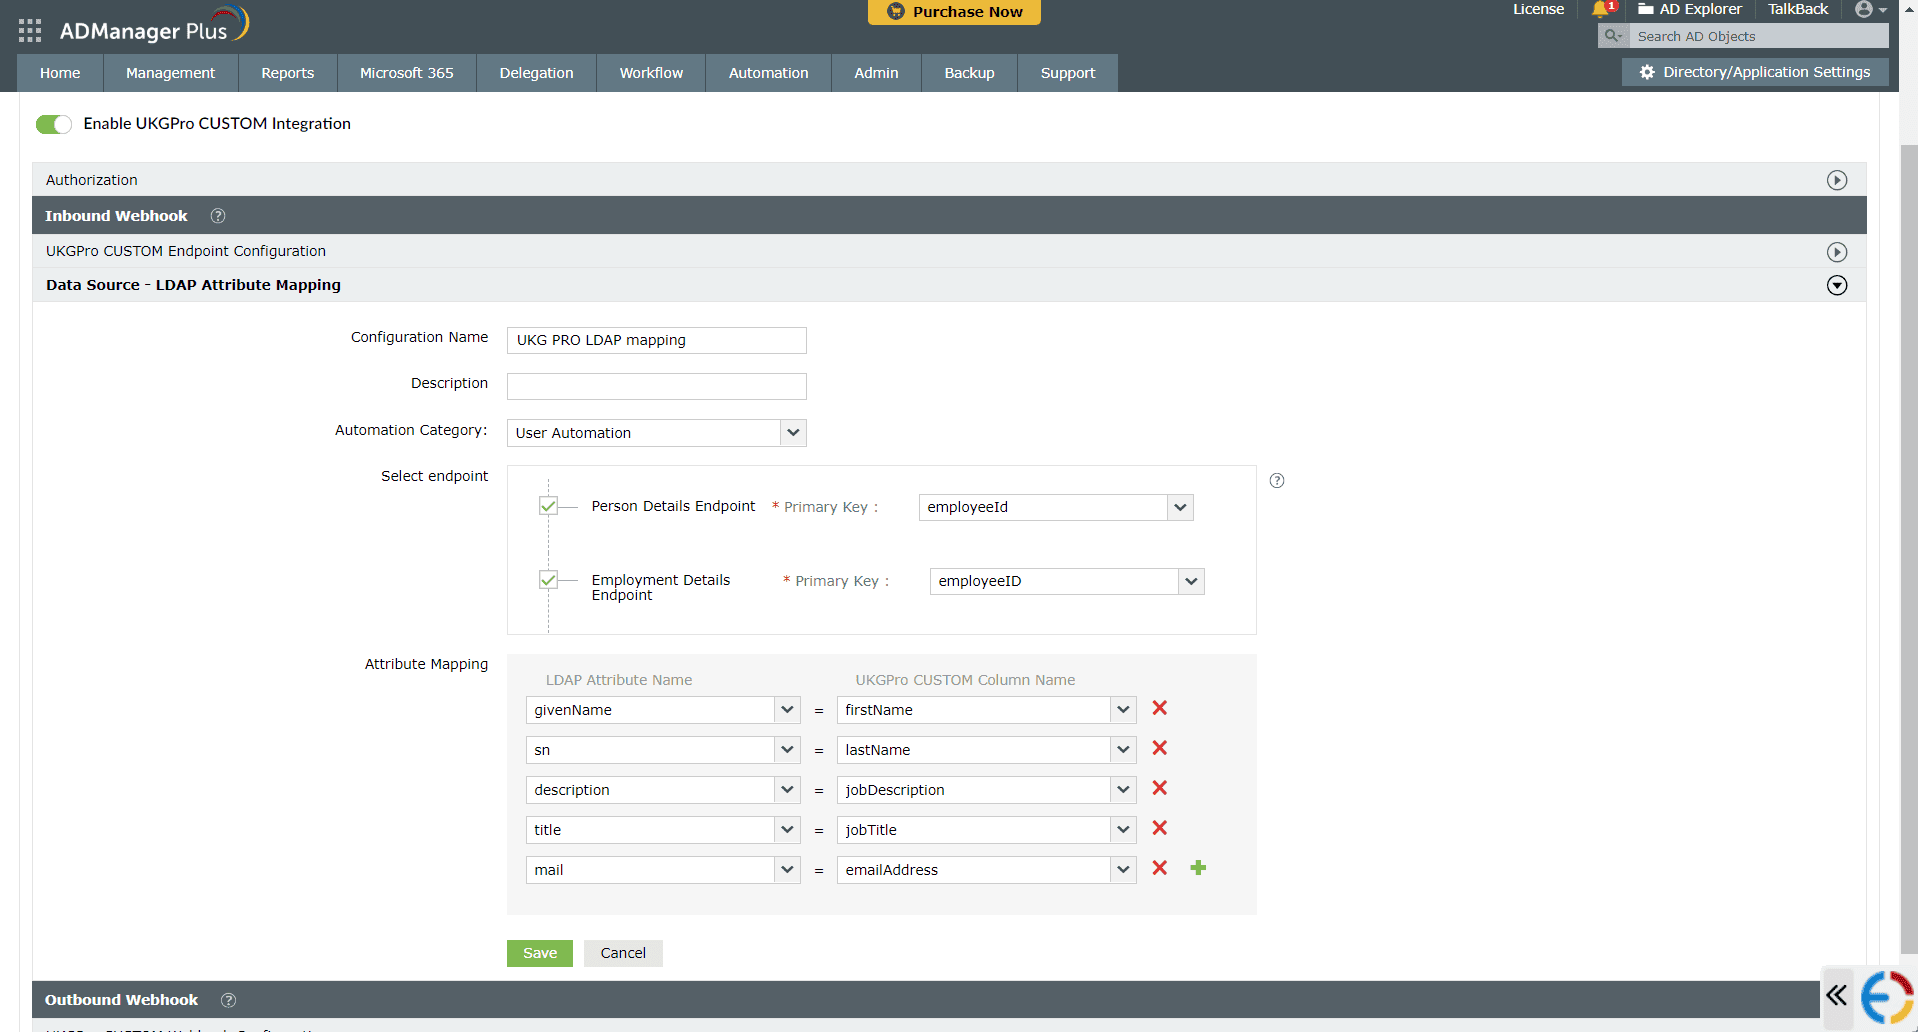
- Click Data Source - LDAP Attribute Mapping to match endpoints and to map AD LDAP attributes with the respective attributes in UKG Pro.
- Click + Add New Configuration and perform the following:
- Enter the Configuration Name and Description and select the Automation Category from the drop-down menu.
- In the Select Endpoint field, select the desired endpoint and a Primary Key that is unique to a user (e.g. employeeIdentifier). Note: When multiple endpoints are configured, this Primary key must hold the same value in all the endpoints.
- In the Attribute Mapping field, select the attribute from the LDAP Attribute Name drop-down menu and map it with the respective column in UKG Pro.
- If you would like to create a new custom format for this, click Mapping Attribute.
- Click Save.
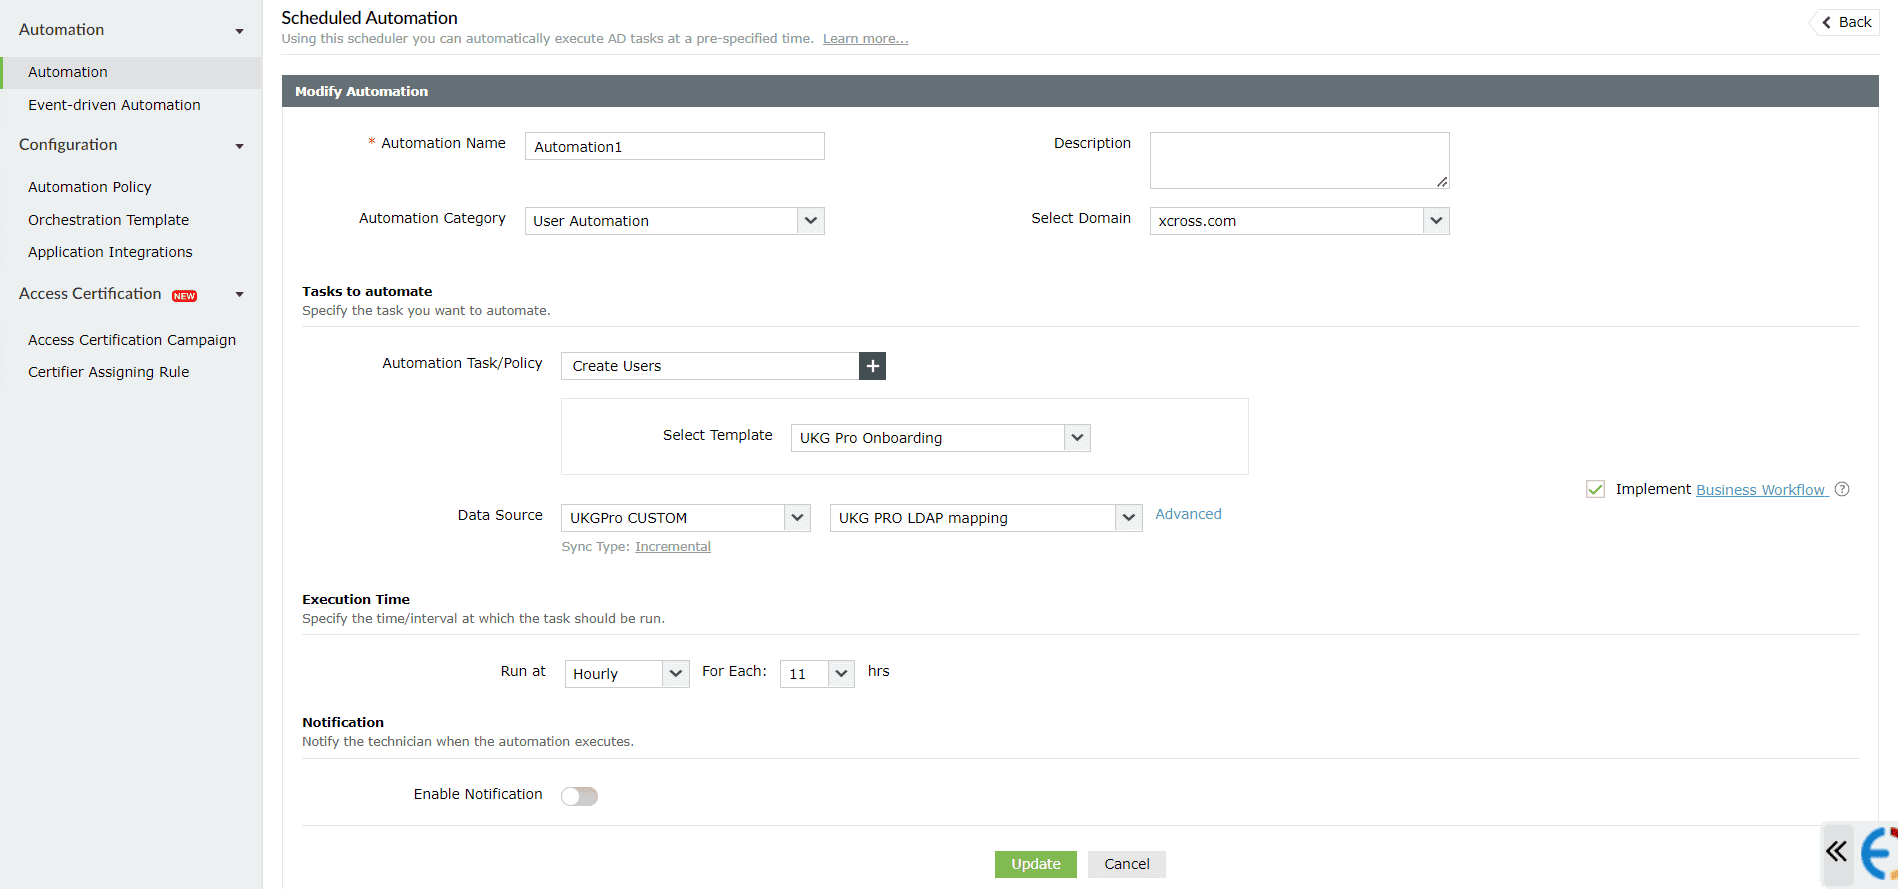
- Configure an automation with the required action, repeat frequency and the above configured attribute mapping configuration.

Note:
Note:
[ADManager Plus also lets you customize attribute format from UKG Pro]


Outbound webhook configuration
Outbound webhook enables you to update the changes made in AD using ADManager Plus to UKG Pro and synchronize them with AD. To configure an outbound webhook for UKG Pro:
- Under Outbound Webhook, click UKG Pro Webhook Configuration.
- Click + Add Webhook.
- Enter a name and description for this webhook.
- Decide on the action that has to be performed and refer to UKG Pro's API references for the API details such as the URL, headers, parameters, and other requirements that will be needed.
- Select the HTTP method that will enable you to perform the desired action on the endpoint from the drop-down menu.
- Enter the endpoint URL.
- Configure the Headers, Parameters, and Message Type in the appropriate format based on the API call that you would like to perform.
- Click Test and Save.
- A pop-up window will display a list of AD users and groups to test the configured API call. Select the desired user or group over which this API request has to be tested and click OK. This will make a real-time call to the endpoint URL, and the selected objects will be modified as per the configuration.
- The webhook response and request details will then be displayed. Verify them for the expected API behavior and click Save.
- The configured webhooks can be integrated into Orchestration Templates—enabling scheduled or event-driven automation—to consecutively perform the action configured in the outbound webhook among of actions on a group of users or on individual users.
Actions supported:
- Create user accounts
- Modify user attributes
- Modify user accounts by template
- Reset password
- Unlock users
- Disable users
- Enable users
- Delete users
- Run custom scripts
- Move users across groups
- Create mailbox
- Disable or delete mailbox
- Move home folder
- Delete home folder
- Revoke Microsoft 365 licenses
- Manage user photos
- Disable Lync accounts
- Auto reply
- Add users to groups/Remove users from groups