Understand High Availability
AppCreator’s high availability functionality provides users with the ability to mitigate server failure and application downtime. A high availability cluster typically comprises two servers. In the event that the primary server becomes unavailable, the configured standby server automatically takes over and continues to allow users to access the application.
High availability in AppCreator
In AppCreator, you can configure high availability in a peer mode to ensure business continuity in the event of application downtime. To configure high availability, two servers must be configured—one as the primary server and the other as standby server. Replication of data between primary and standby will take place periodically after configuring a high availability cluster.
When the primary server experiences a downtime, the standby server will take over as the primary server and the application will automatically begin to run, providing the same data, reports, and dashboards. This seamless transition ensures the continuity of application usage. The former primary server will start functioning as the standby server once it is fixed and AppCreator is restarted.
Prerequisites
- Primary and standby servers should run in the same time zone and on the same network.
- Primary and standby servers must have static IP addresses.
- On Windows installations, if the servers are not in the same domain or are not part of any domain, then file sharing configuration should be necessarily set up.
- Follow the installation guide for the specified operating system and hardware architecture. To view the system requirements, click here.
- To restart application, stop the standby server before restarting primary server.
- Always start primary and standby servers with administrator permissions. Only start and stop the application through the wrapper service (using the system commands).
Setting up High Availability
You can configure high availability while installing the AppCreator application. You will need two servers, one to be configured as the primary server, and the other to be installed as the standby server.
- Configuring High availability in a Windows installation
- Setting up file sharing
- Configuring High availability in a Linux installation
- Setting up file sharing
Configuring High Availability in a Windows installation
To install AppCreator in the primary server:
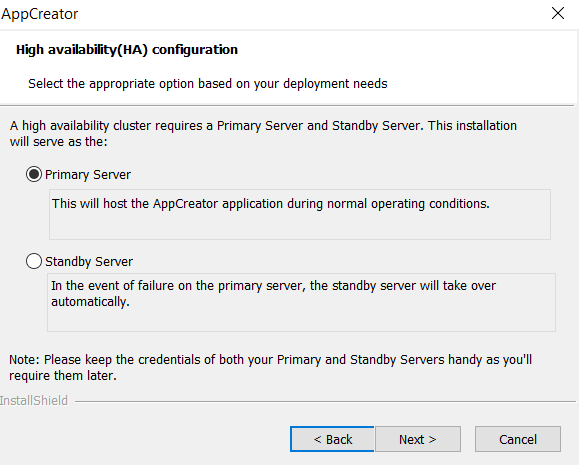
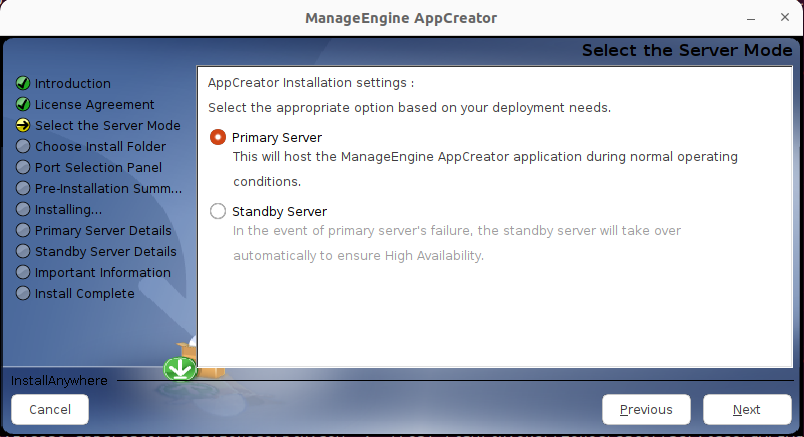
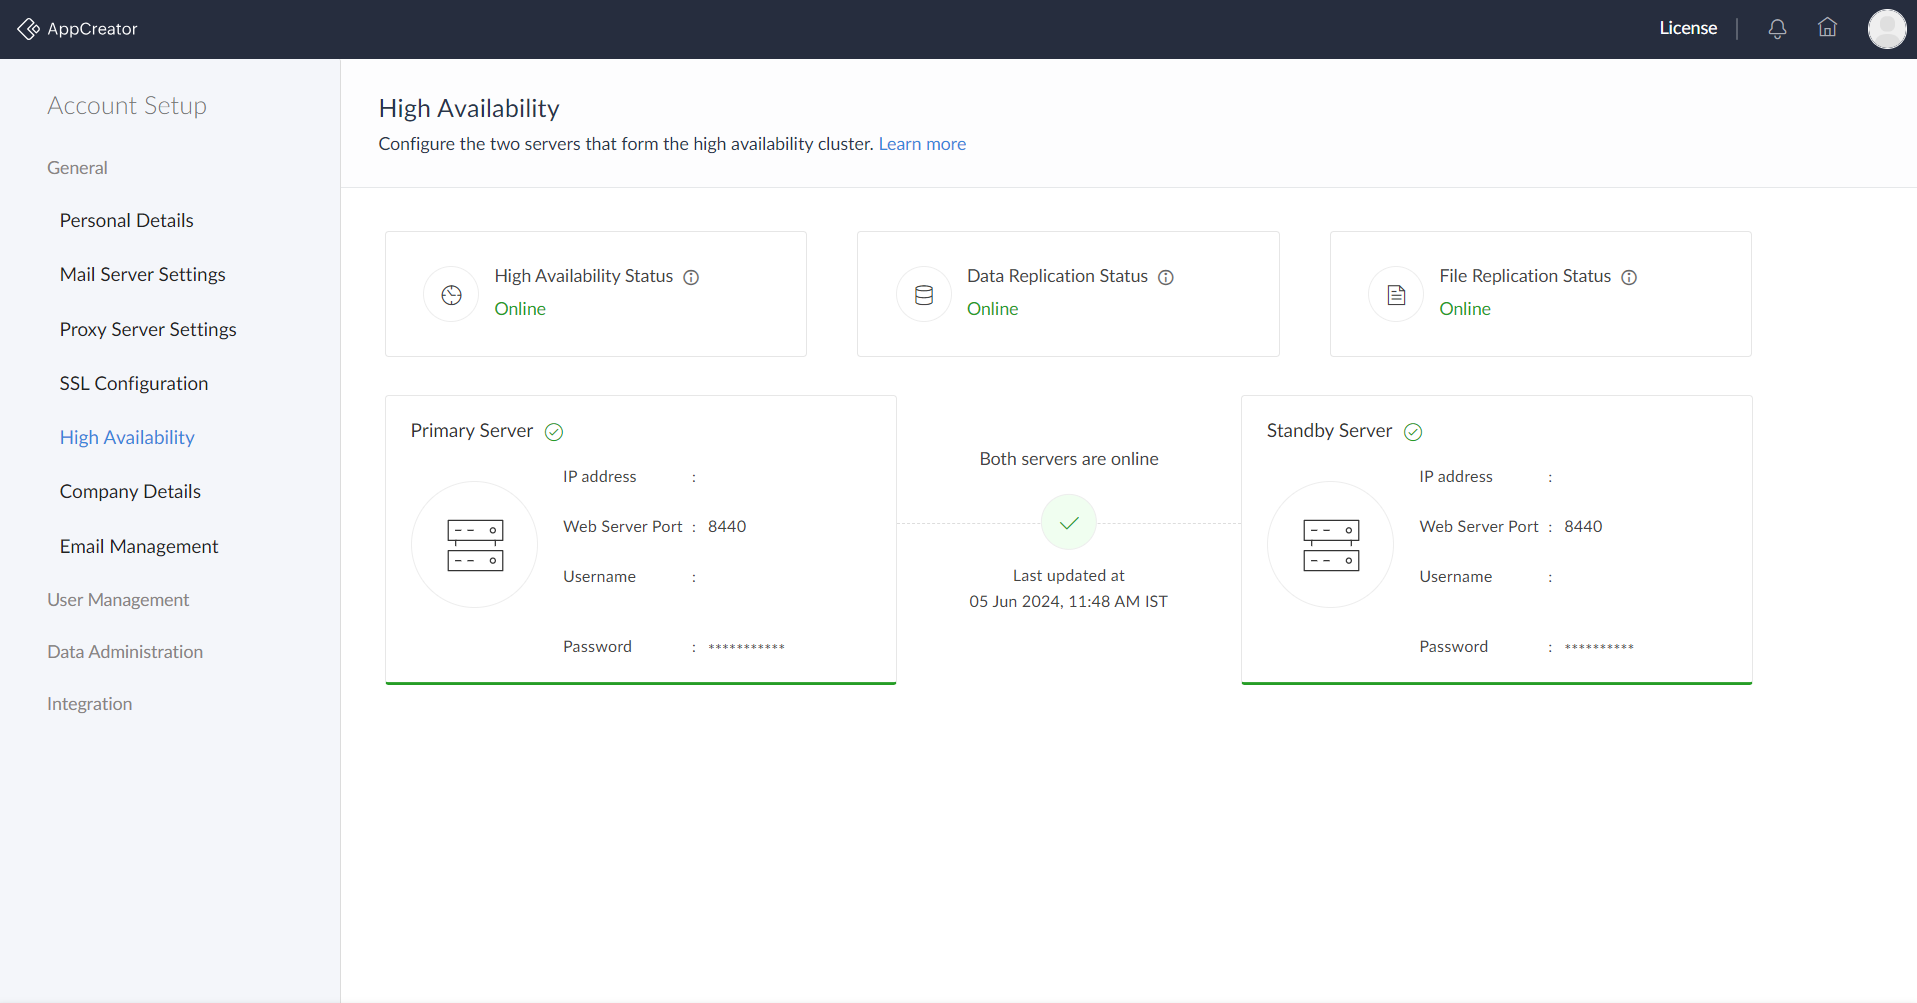
In AppCreator, open the application and navigate to High Availability in the Account Setup section. Select the Primary Server radio button and click Next to proceed with the installation process. Upon successful installation, your primary server will be configured.
To configure AppCreator in the standby server:
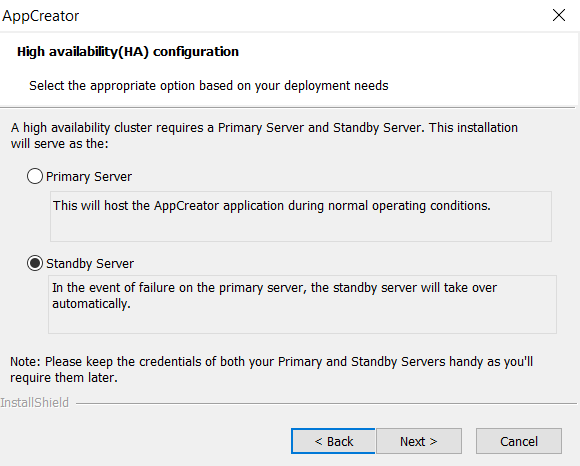
- During the installation, select the Secondary Server radio button in the High Availability configuration screen, then click Next to continue.
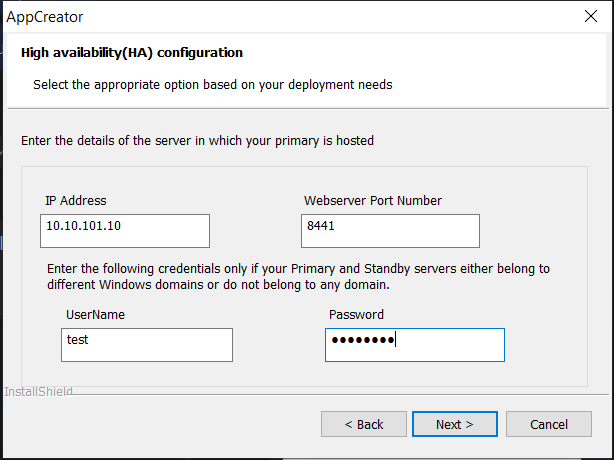
- Enter the static IP address of the primary server and the webserver port number. It is necessary to provide the remaining credentials if the primary and standby servers belong to different Windows domains. Click Next.
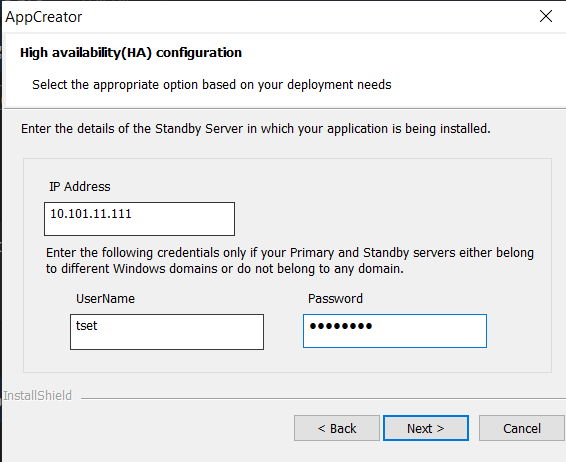
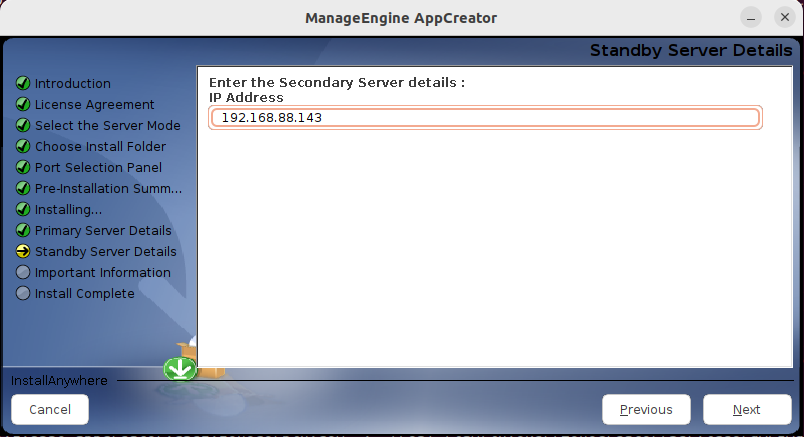
- Enter the static IP address of the standby server. It is not necessary to provide the remaining credentials if the Primary and Standby servers belong to the same Windows domain. Click Next to continue installation.
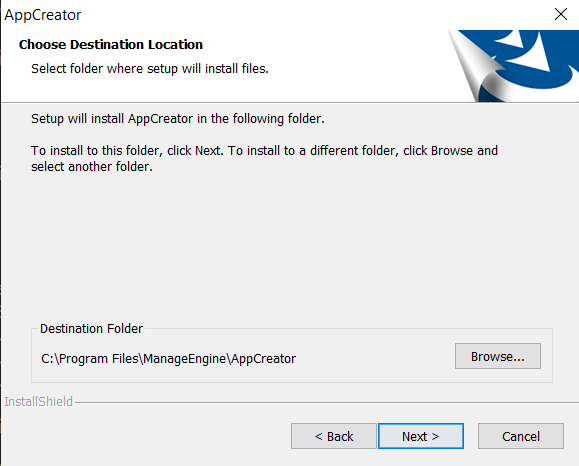
- Choose the destination folder location where your installated files will be added. Click Next to continue.
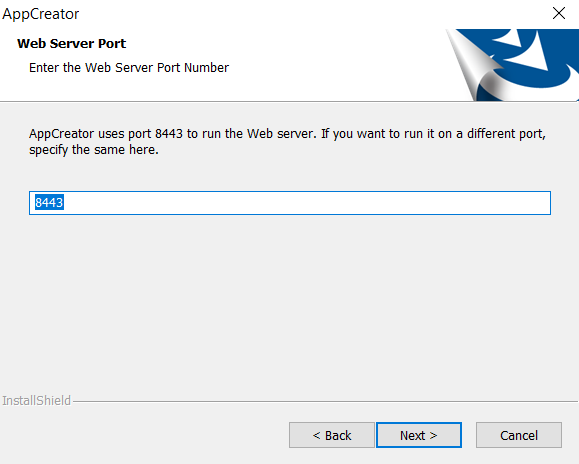
- Specify the web server port number where you want AppCreator to run. Click Next to continue.
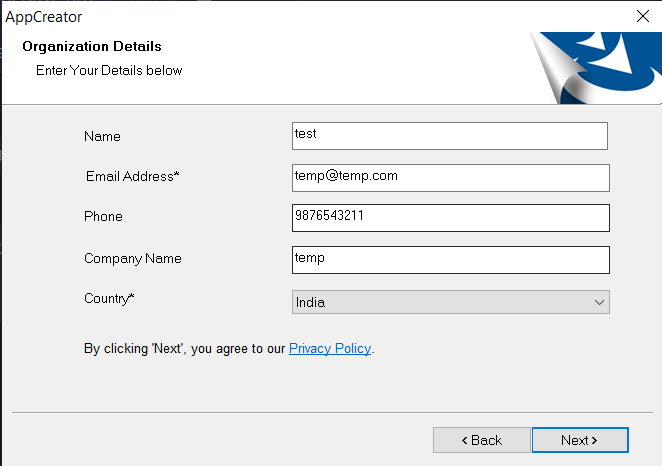
- Enter you organization's details in the next screen. Click Next to finish setting up High Availability for your application.
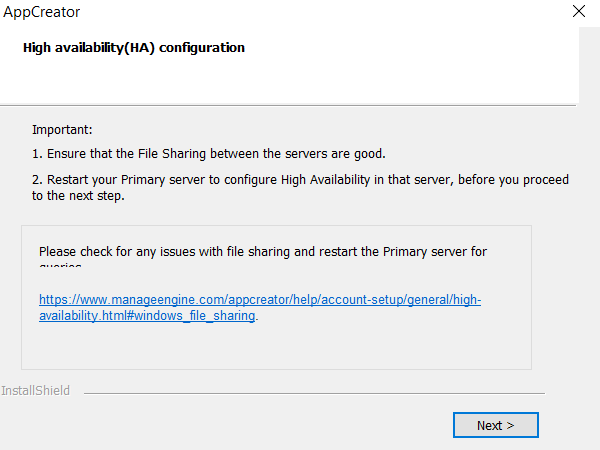
- To maintain synchronized data between your primary and standby servers, it is better to set up file sharing. Go to your primary server and follow the steps that are listed below to configure file sharing. Upon successfully configuring file sharing, restart the AppCreator application on the primary server with admin privileges. Click Next to continue.
Set up file sharing
Configure file sharing for primary and standby servers that are in the same domain, or for servers that are in different domains or a workgroup.
Note: File sharing must be configured in both the primary and standby servers. The primary server's installation directory should be shared with the standby server and vice-versa.
File sharing within the same domain
To configure file sharing between two servers that are in the same domain in a Windows installation:
- Navigate to the installed folder and right-click the <AppCreator home folder>
.Select Properties. - Go to the Sharing tab and click Advanced Sharing.
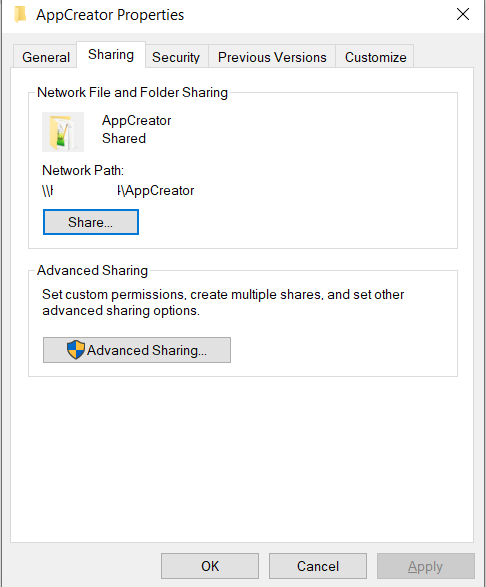
- Enable the Share this folder checkbox, then click Permissions.
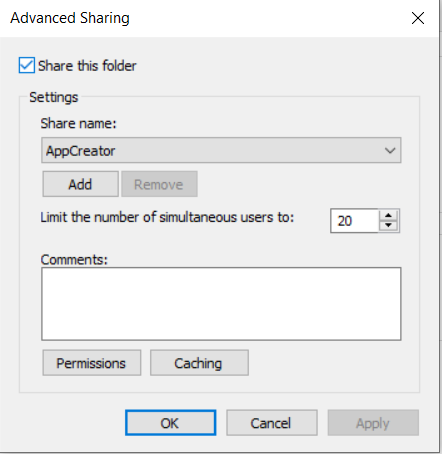
- In the pop-up box that appears, click Add. In the new popup, enter the user account name (added in the Sharing tab) of the other server and click OK.
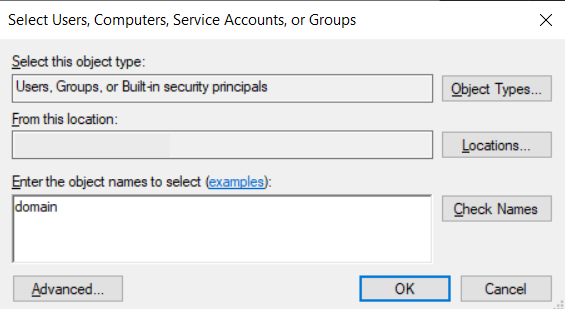
- Select the newly added server name and provide the Full Control permission and click OK.
- To verify the shared folder access, open the Run dialog and type \\<IP>
\AppCreator from another server then you will be to access the app creator folder. For example, if you are sharing the AppCreator folder present in the primary server, try accessing it from the standby server and vice versa.
File sharing across domains
To set up file sharing between two servers that are in different domains, or don't belong to any domain:
- Navigate to the <AppCreator home folder>
and select Properties. - Go to the Sharing tab and click Advanced Sharing.
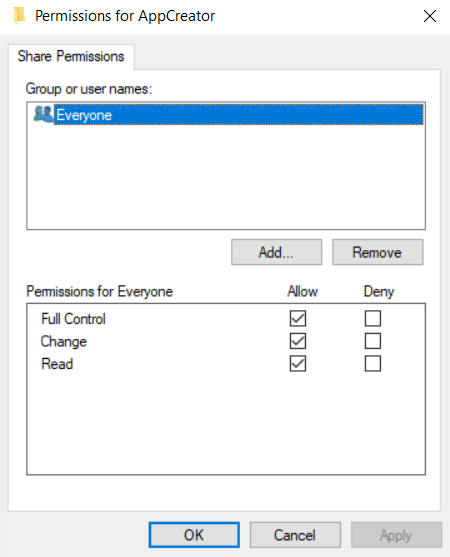
- Enable the Share this folder checkbox and click Permissions.
- Select Everyone and provide the Full Control permission and click OK.
- To verify the shared folder access, open the Run dialog and type \\<IP>
\AppCreator from another server. You will be able to access the AppCreator folder once you provide the credentials. - Restart the primary server after configuring file sharing, then start the secondary server.
Restart the application with admin privileges
To restart AppCreator with admin privileges in either of the servers:
- Open the Services window and navigate to the AppCreator listing.
- Right-click on the service name, select the Properties option, and head to the Log on tab.
- Enter your administrator credentials and click the Apply and OK buttons to restart with the privileges.
Configuring High Availability in a Linux installation
To install AppCreator in the primary server:
- Choose Yes in the dialog box to install High Availability in cluster mode. Click Next to continue.
- Select the Primary Server radio button in the following screen, and click Next to proceed with the installation process. Upon successful installation, your primary server will be configured.
To configure AppCreator in the standby server:
- Select the Standby Server radio button in the High Availability (HA) configuration screen during the installation process, and click Next to proceed.
- Enter the primary server's IP address and port number, and click Next.
- Enter the standby server's IP address and click Next to proceed with the installation process.
- To maintain synchronized data between your primary and standby servers, you need to set up file sharing. Go to your primary server and configure file sharing. Upon successfully configuring file sharing, restart the AppCreator application on the primary server with admin privileges. Once the primary server is back online, you can start the AppCreator application installed on the standby server. Upon completion of the installation, click Done in the Installation Completed screen that appears.
Set up file sharing
In Linux installations, you can configure file sharing between your primary and standby servers using Remote Synchronization (Rsync).
Note: File sharing must be configured in both the primary and standby servers.
To configure Rsync:
- Log in to the primary server, launch a terminal and execute the command. This will allow you to generate a pair of public and private keys.
- Enter the directory in which the generated keys will be stored and press the Enter key twice to generate the public and private keys.
- Copy the generated public key to the standby server using the ssh-copy-id -i <key-file-path>id_rsa.pub <standby-machine-name> command. <key-file-path>
refers to the directory where the generated public key is saved - Enter the password of the standby server in order to successfully copy the key of the primary server into the standby server.
- To verify if the key has been copied to the standby server, log in to the standby server from the primary server using the ssh <standby-machine-name>
command.
Restart the application with admin privileges
To restart AppCreator with admin privileges in Linux installations, ensure that the user is a part of the Sudo group.
Changing the server's credentials
In cases where the credentials of the primary server is modified, the high availability configuration should be updated.
Updating the primary server's credentials
- In AppCreator, open the application and navigate to High Availability in the Account Setup section.
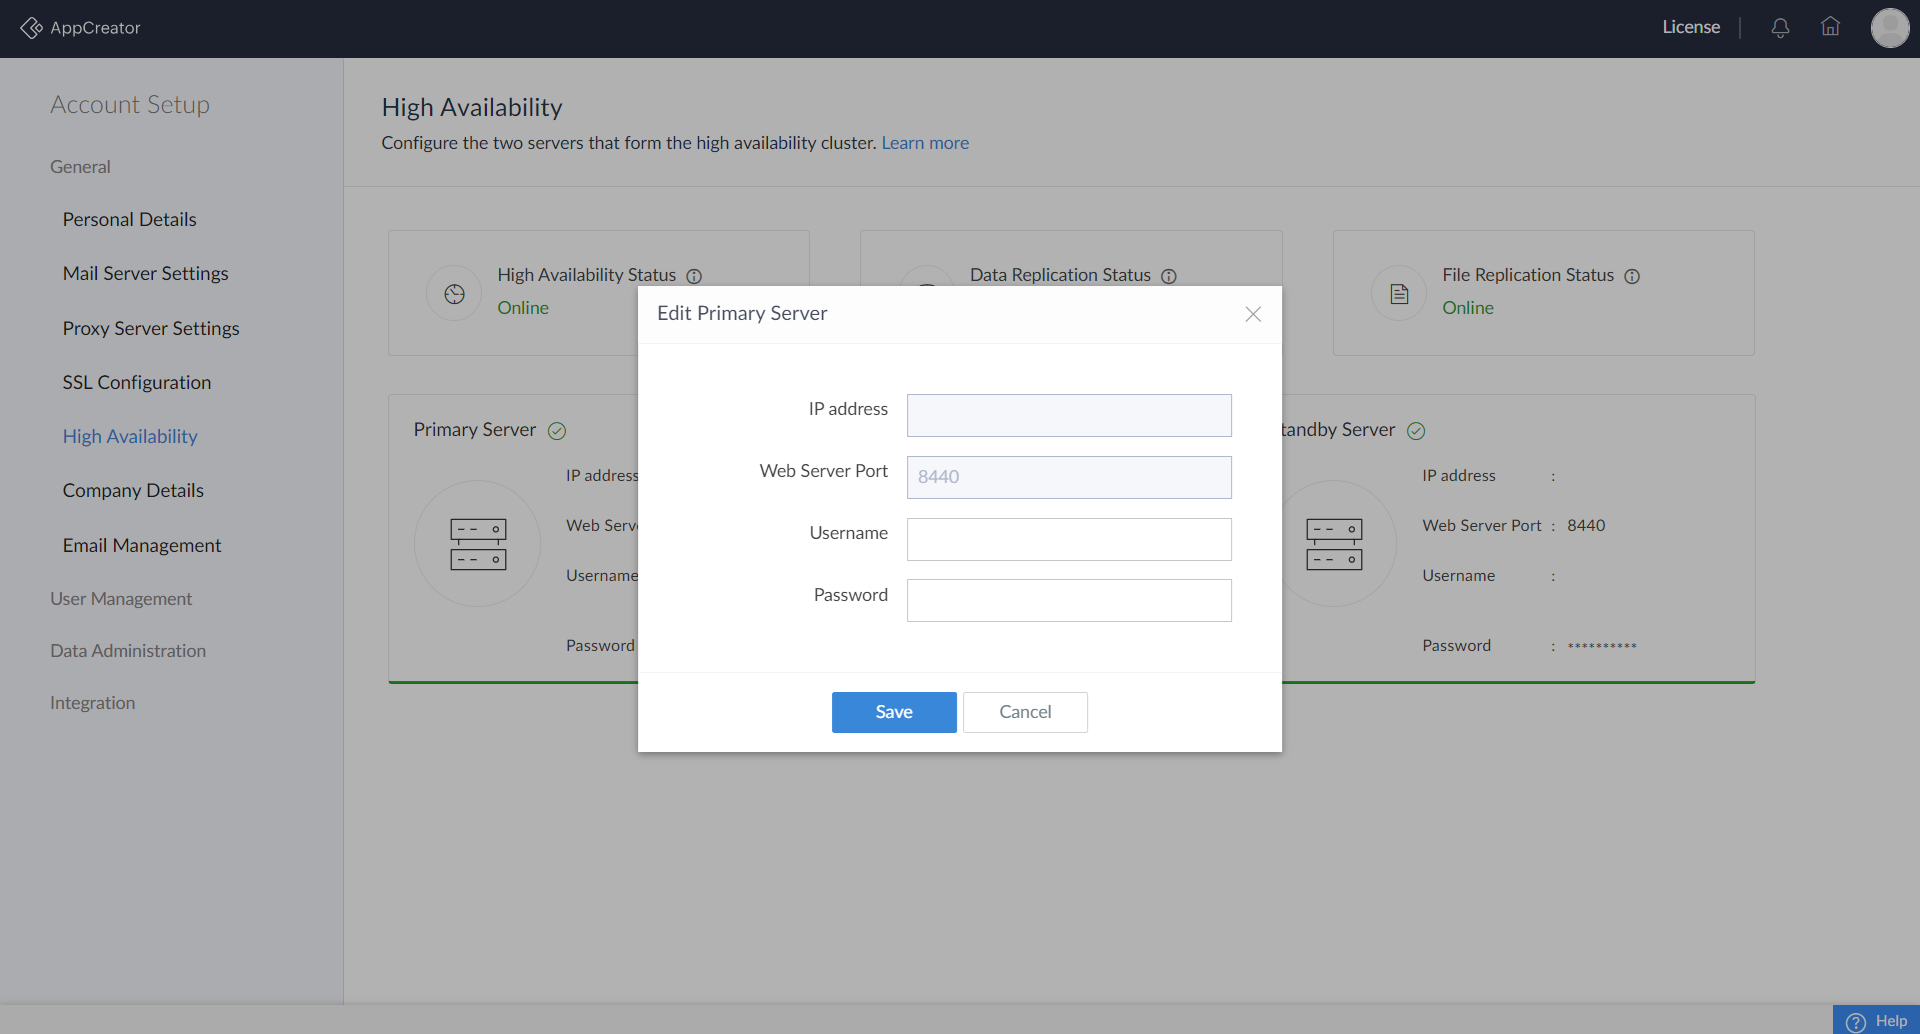
- Click the three dots menu over the primary server details, then the Edit icon to modify the user name and password.
- Click Apply to ensure the standby server is restarted to allow the changes to take effect.
Updating the standby server's credentials
Navigate to the High Availability section in the Account Setup page and click the three dots menu over the primary server details, then the Edit icon that appears. Change the username, password or port number, and click Apply.

Migrating the primary or standby server
If you want to migrate the primary server then:
- Initiate the process by disabling the high availability configuration on the current primary server.
- Once the high availability configuration is disabled, the standby server seamlessly takes over to become the new primary server.
- Configure the server intended for migration as the new standby server. Proper configuration of this server is essential to ensure its readiness to take over as the primary server.
- Trigger a downtime for the current primary server. This prepares the environment for the upcoming role transition.
- With the primary server in downtime, the configured standby server takes over the role of the primary server.
- Restart the former primary server, now reconfigured as the standby server in the updated high availability setup.
If you want to migrate the standby server then:
- Remove the current standby server and configure high availability in the specified new server.
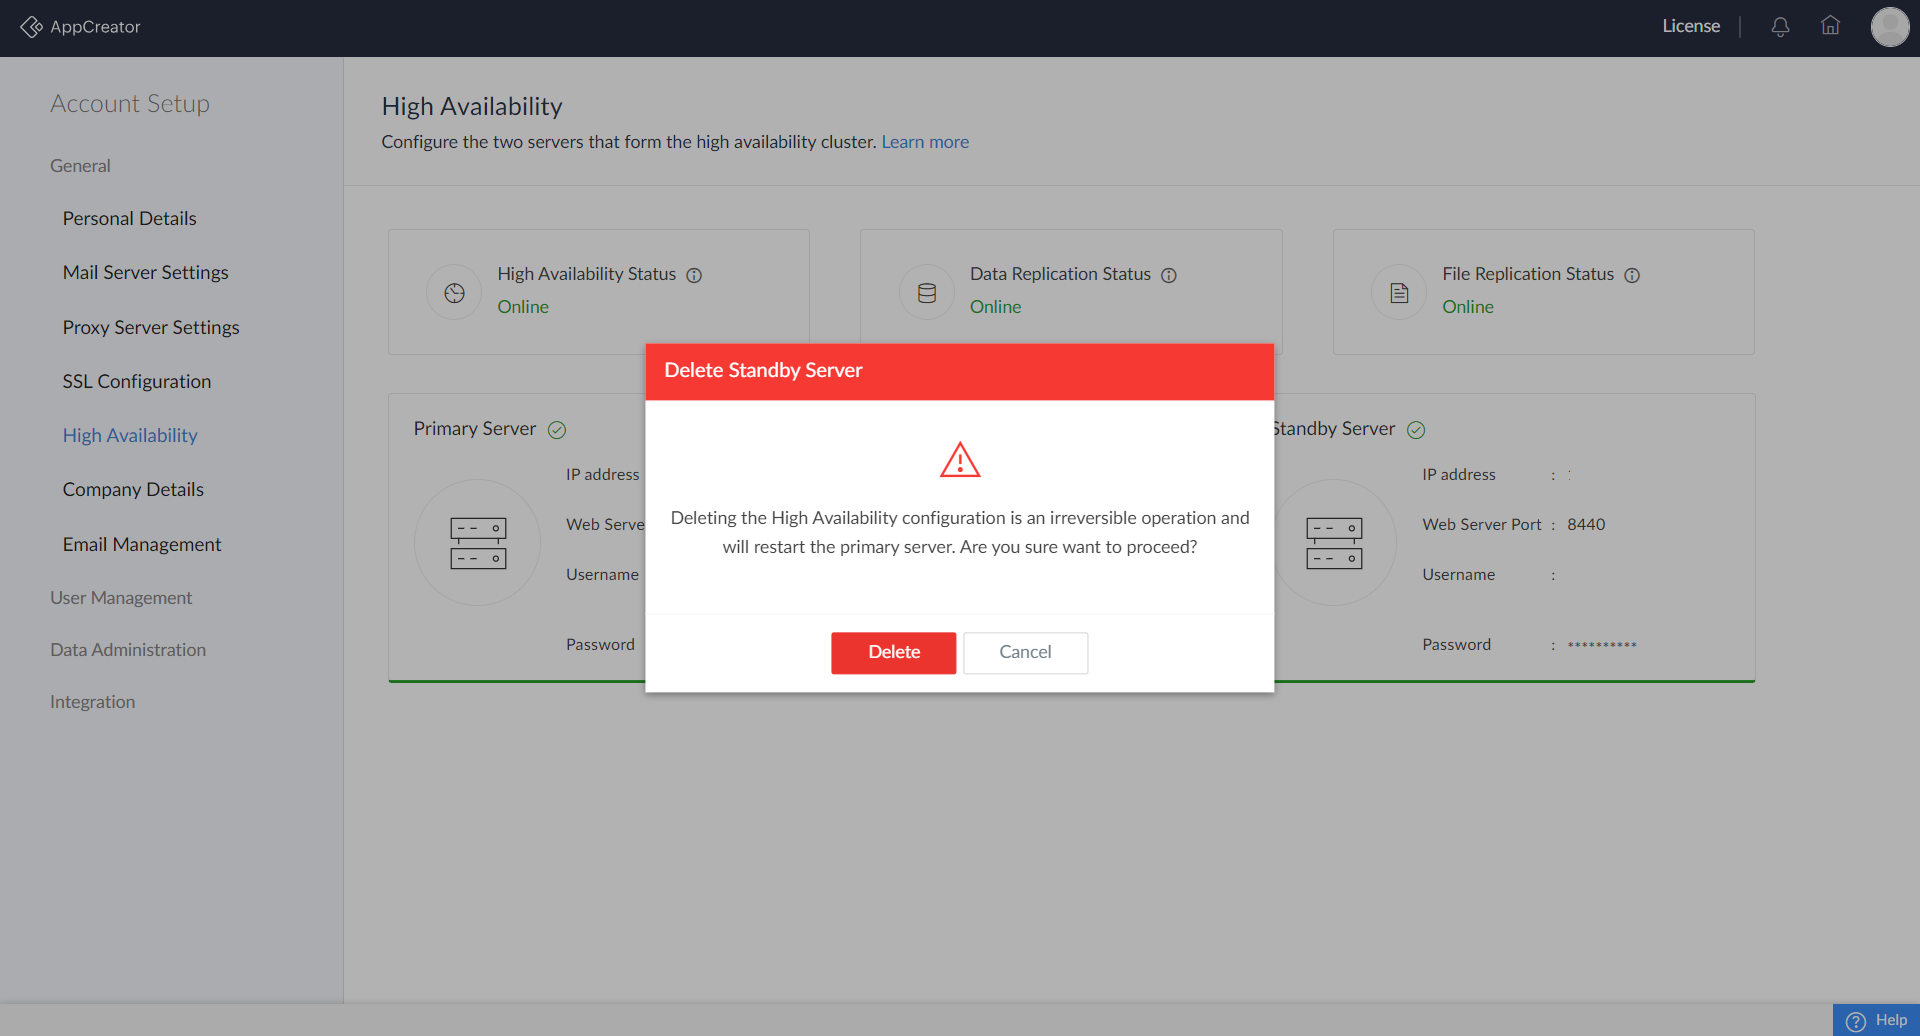
Deleting the high availability configuration
- To remove the high availability configuration, navigate to the Account Setup page and head to the High Availability tab.
- Click the three dots menu over the primary server details, then the Edit icon that appears over the standby server's details, and click Delete. Confirm your action in the popup that appear to delete the high availability configuration.
Server downtime and Troubleshooting
- Primary/standby server downtime
- Data replication failure
Primary/standby server downtime
Primary server downtime:
Note: In the event of a primary server failure you will be notified through an email titled "Service disruption: Unable to reach primary server".
When the primary server is down, the standby server assumes the role of the primary server to ensure uninterrupted data flow. Once the standby server takes over, the IP address in place of the primary changes to the new standby server's IP address as it becomes the primary server.
Standby server downtime:
Note: In the event of a standby server failure you will be notified through a mail titled "Service disruption: Standby server affected".
When the standby server is down, there will be no data replication and there is no backup for the data stored in the primary server.
The servers might be down due to one of the following reasons:
- You might have accidentally shutdown your server (in case of terminal start).
- The system might have crashed.
To make the primary/standby server run again,
- You can try restarting it and reconnecting the servers to the same environment (Internet or Intranet).
- You can check your application logs to determine the exact reason and resolve the issue.
- You can also check with your IT team to resolve the downtime issue, DNS or firewall issues.
If you have any questions or concerns about this, please do not hesitate to contact us at appcreator-support@manageengine.com. We assure you our full cooperation in this regard.
Two mail notification - both servers down
Note: In the event where two emails are triggered regarding server downtime even when the servers are working, shut down the standby server immediately.
In the rare occurrence if you receive two notification mails regarding server downtime, it means that both of the servers assume that the other is down for one of the reasons listed below :
- If the connection between the two servers has been lost.
- If the server can't access an application's published component.
- Diagnose the connectivity issue and reconnect the servers.
- Restart the standby server.
Data replication failure
Note: In the event of a data replication failure you will be notified through a mail.
It's possible that there's an interruption in the connection and no data is being replicated between the two servers, which could be due to any of the factors listed below:
- One of the servers might be disconnected from its mode of communication (internet/intranet) or might have shutdown.
- Passwords have been modified on either of the servers.
- A firewall or antivirus may be preventing access to a server.
- The primary URL access is being blocked by the DNS.
- The IP addresses of the servers might have changed.
- File sharing between the servers might have been disabled.
- Both the servers are in different time zones.
To ensure that data on both servers stays up to date, you need to perform the following:
- Diagnose the connectivity issue and reconnect the servers.
- Restart the standby server.
Once the standby server is up and running, the data and file replication process will be initiated. This in turn will sync the application data across both servers. You can also check the application logs to determine the exact reason and resolve the issue. To test if the servers can communicate:
- You can try pinging the other server.
- To check whether the primary server is running properly, you can access the URL (https://host:port/ha/statuscheck).
Setting up a Common IP Address
In AppCreator, you can create a shared virtual IP address for both the primary and the standby servers. This enables you to use a common URL to access AppCreator without service interruptions when either the primary or secondary servers are offline.
A virtual IP address is any IP address in your local network that’s not tied to a specific computer. The following are the steps to set up a virtual IP address:
Select any virtual IP address that you want the primary and standby servers to be connected to by following the below steps,
- Open your command prompt and execute the command:
ping{insert the virtual IP address}. - If you receive a request timed-out message, use that particular IP address as the virtual IP address.
- Otherwise, try again with another.
- Open your command prompt and execute the command:
Now, get the NIC address(Network Interface Card, a hardware component that is present on the computer and is used to connect different networking devices such as computers and servers to share data over the connected network) from the primary and standby servers by following the steps below:
- For Windows:
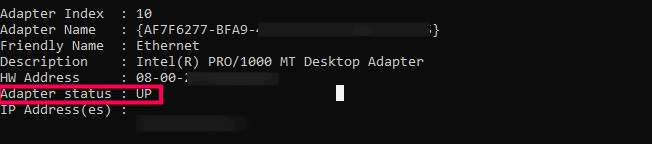
- Open your command prompt and navigate to <AppCreator home folder>\bin and execute the iflist.exe file.
- Locate the NIC card whose Adapter Status is displayed as UP. Copy and paste the Adapter Name in a separate file. This will be the NIC address of the corresponding server.
- For Linux: Open command prompt and execute the ifconfig command to get the NIC address.
Obtain the subnet mask from the primary and standby servers in the following way,
- For Windows: Open the command prompt and execute the ipconfig command.
- For Linux: Open the command prompt and execute the ifconfig command.
Now, it is necessary to shutdown both the primary and standby servers.
After switching off the respective server, navigate to <AppCreator home folder>\conf and open the ha.conf file. Add the properties mentioned below to that file.
Note: Replace the following text within "<>" with the actual values from your network. Also, public IP is only applicable for domain machines.
- publicIP.enabled=true
- publicIP.ipaddr=<Virtual IP>
- publicIP.Ifname=<NIC address of the primary server>
- publicIP.netmask=<subnet mask of the primary server>
Navigate to <AppCreator home folder>\conf in the standby server. Open the ha.conf file and add the below mentioned properties.
Note: Replace the following text within "<>" with the actual values from your network.
- publicIP.enabled=true
- publicIP.ipaddr=<Virtual IP>
- publicIP.Ifname=<NIC address of the standby server>
- publicIP.netmask=<subnet mask of the standby server>
Save the ha.conf file.
Restart both the servers to finish the setup.