Two-Factor Authentication
To strengthen user logon security, M365 Manager Plus supports two-factor authentication for default help
desk technicians and AD login help desk technicians. Once enabled, M365 Manager Plus will require them
to authenticate using one of the authentication mechanisms below whenever they log in. You can select
any of the below two-factor authentication methods for the help desk technicians and/or AD login
technicians. Once they have been enabled, the technicians will have to configure the chosen TFA during
their login process.
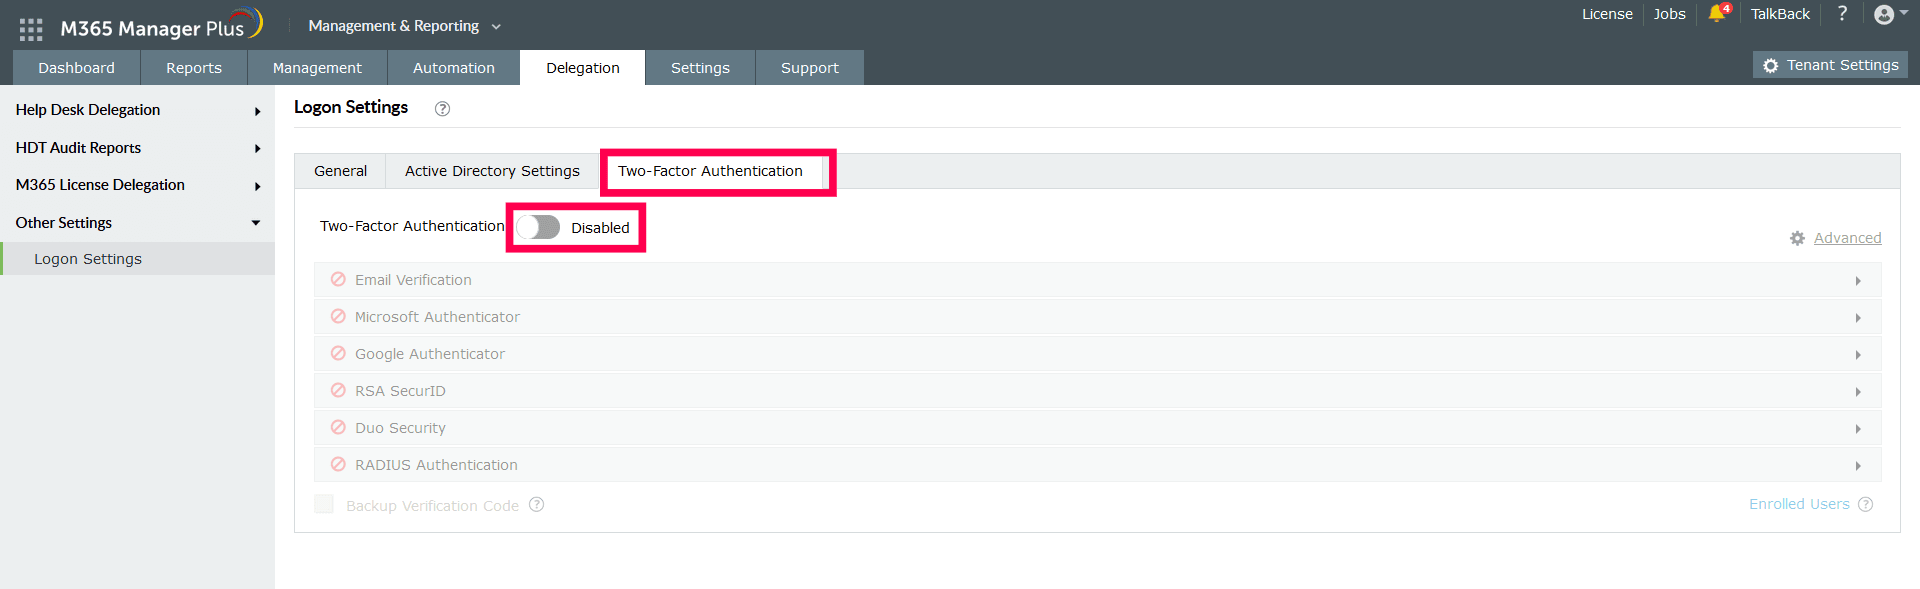
Setting up Two-Factor Authentication
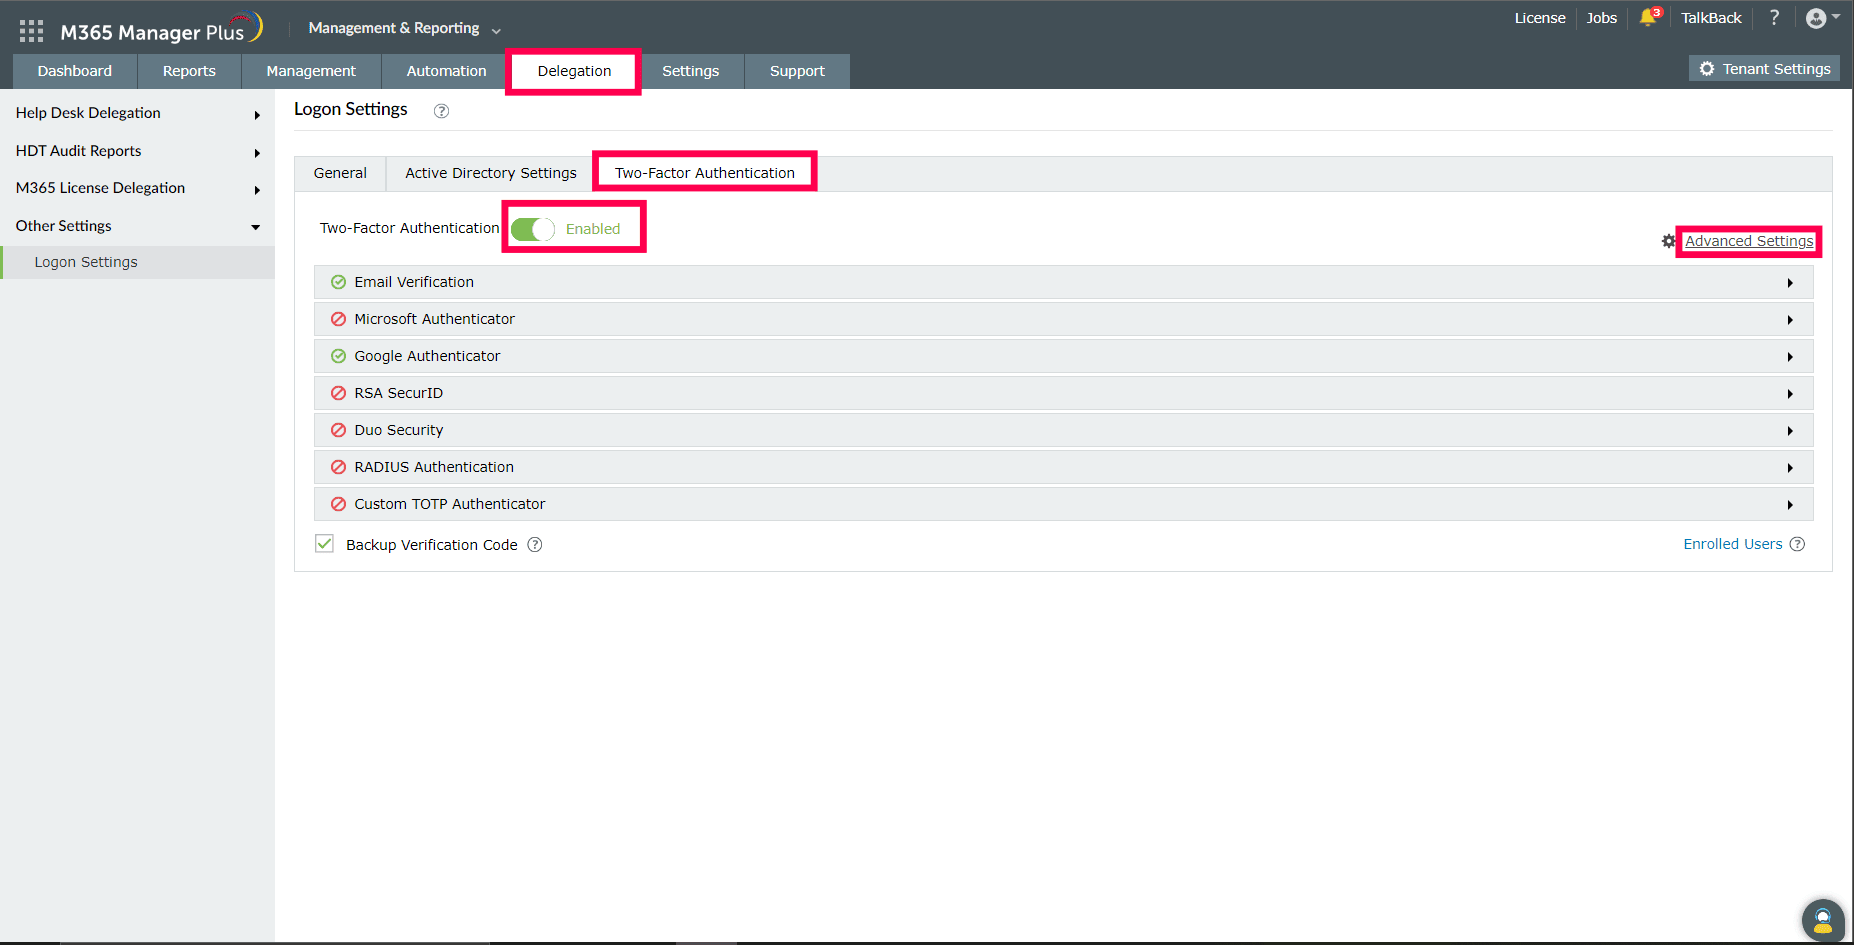
- Log in to M365 Manager Plus as an administrator.
- Navigate to Delegation → Other Settings → Logon Settings.
- Click the Two-Factor Authentication tab.
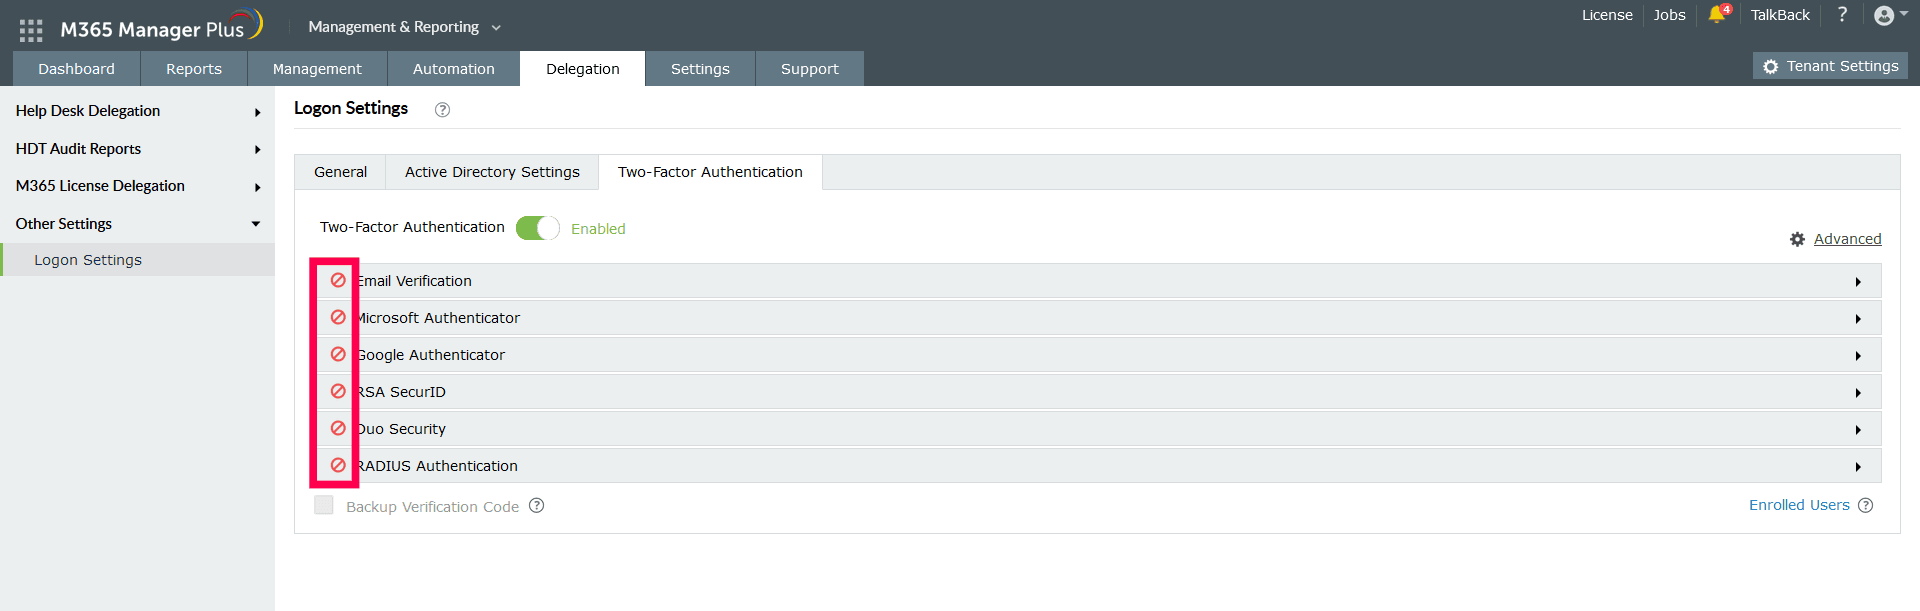
- Toggle the Two-Factor Authentication switch to Enabled.
- Select the authentication methods of your choice from the list provided.
Note:
- If multiple authentication options are enabled, then the user will be asked to choose one of
them at the time of logging in.
- Make sure you configure the authentication option you’ve chosen by entering all the required
details.
- Click Save.
Authentication methods
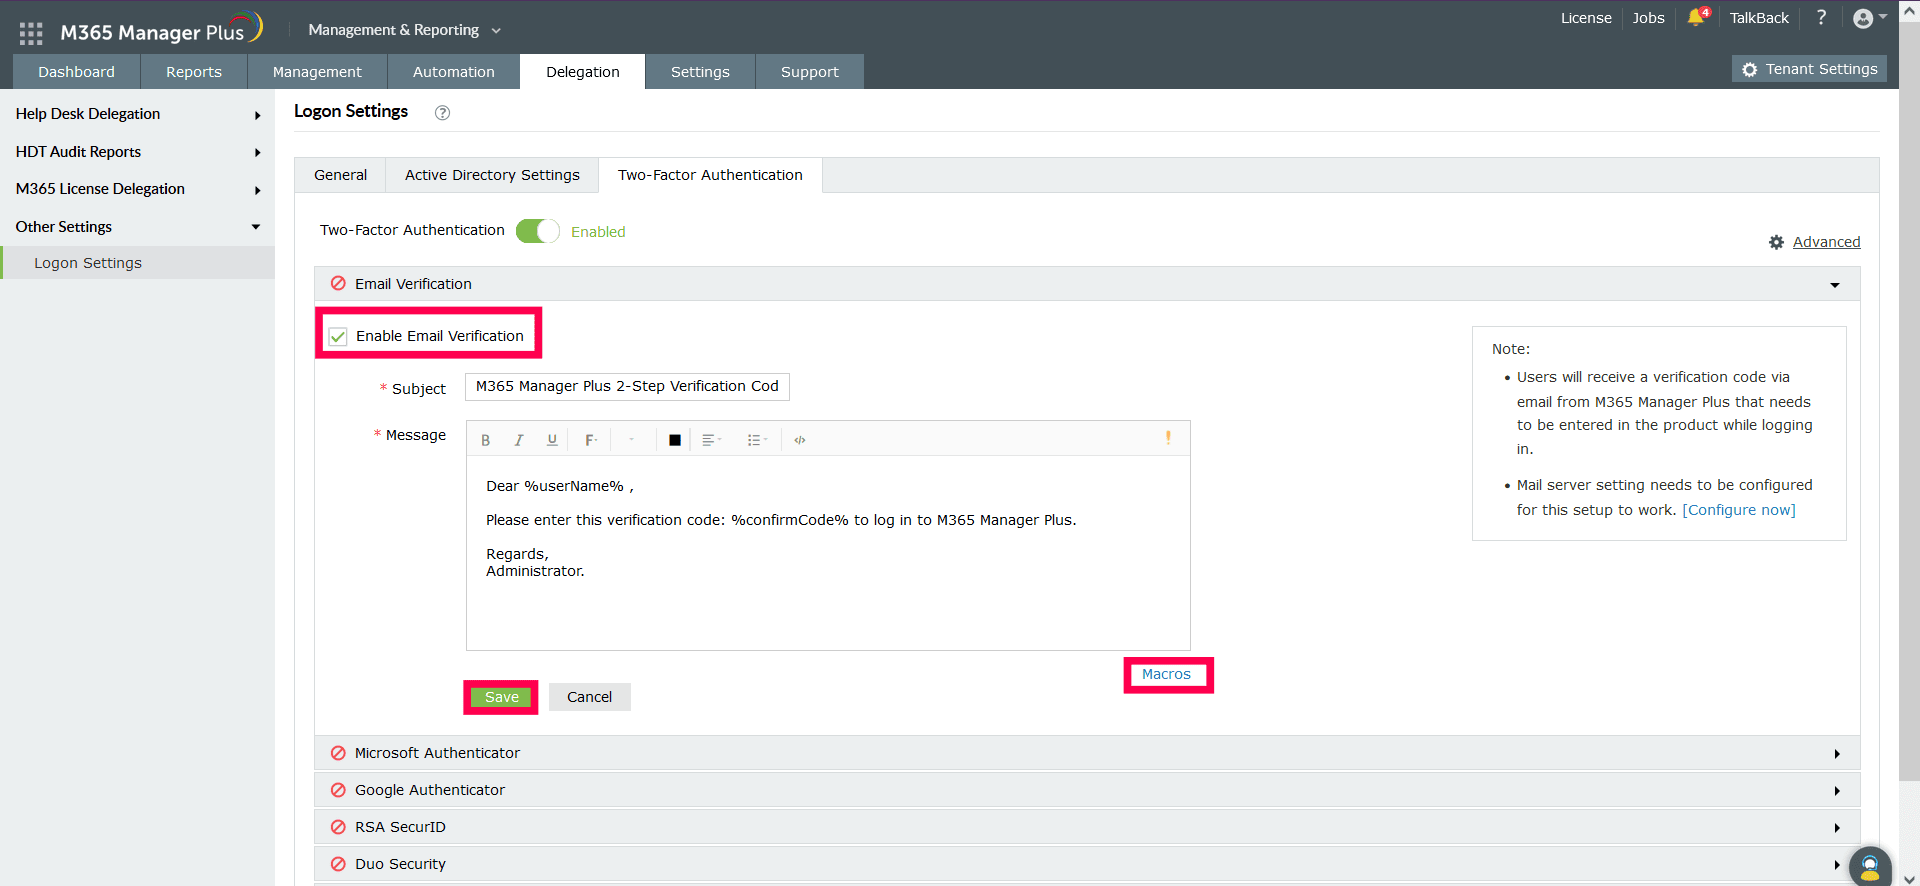
Email Verification
When this option is selected, M365 Manager Plus sends a verification code via email to the user’s email
address. The user has to enter the verification code to successfully log in.
Configuration steps:
- Configure your mail
server settings if you haven't already.
- Enter a Subject for the email.
- Enter a Message in the box provided.
- Click the exclamation point to set a priority as per your requirements.
- Click Macros at the bottom to insert macros in the email message.
- Once you are done, click Save.
Once enabled, users will be asked to enroll for two-factor authentication by entering their email address
during login.
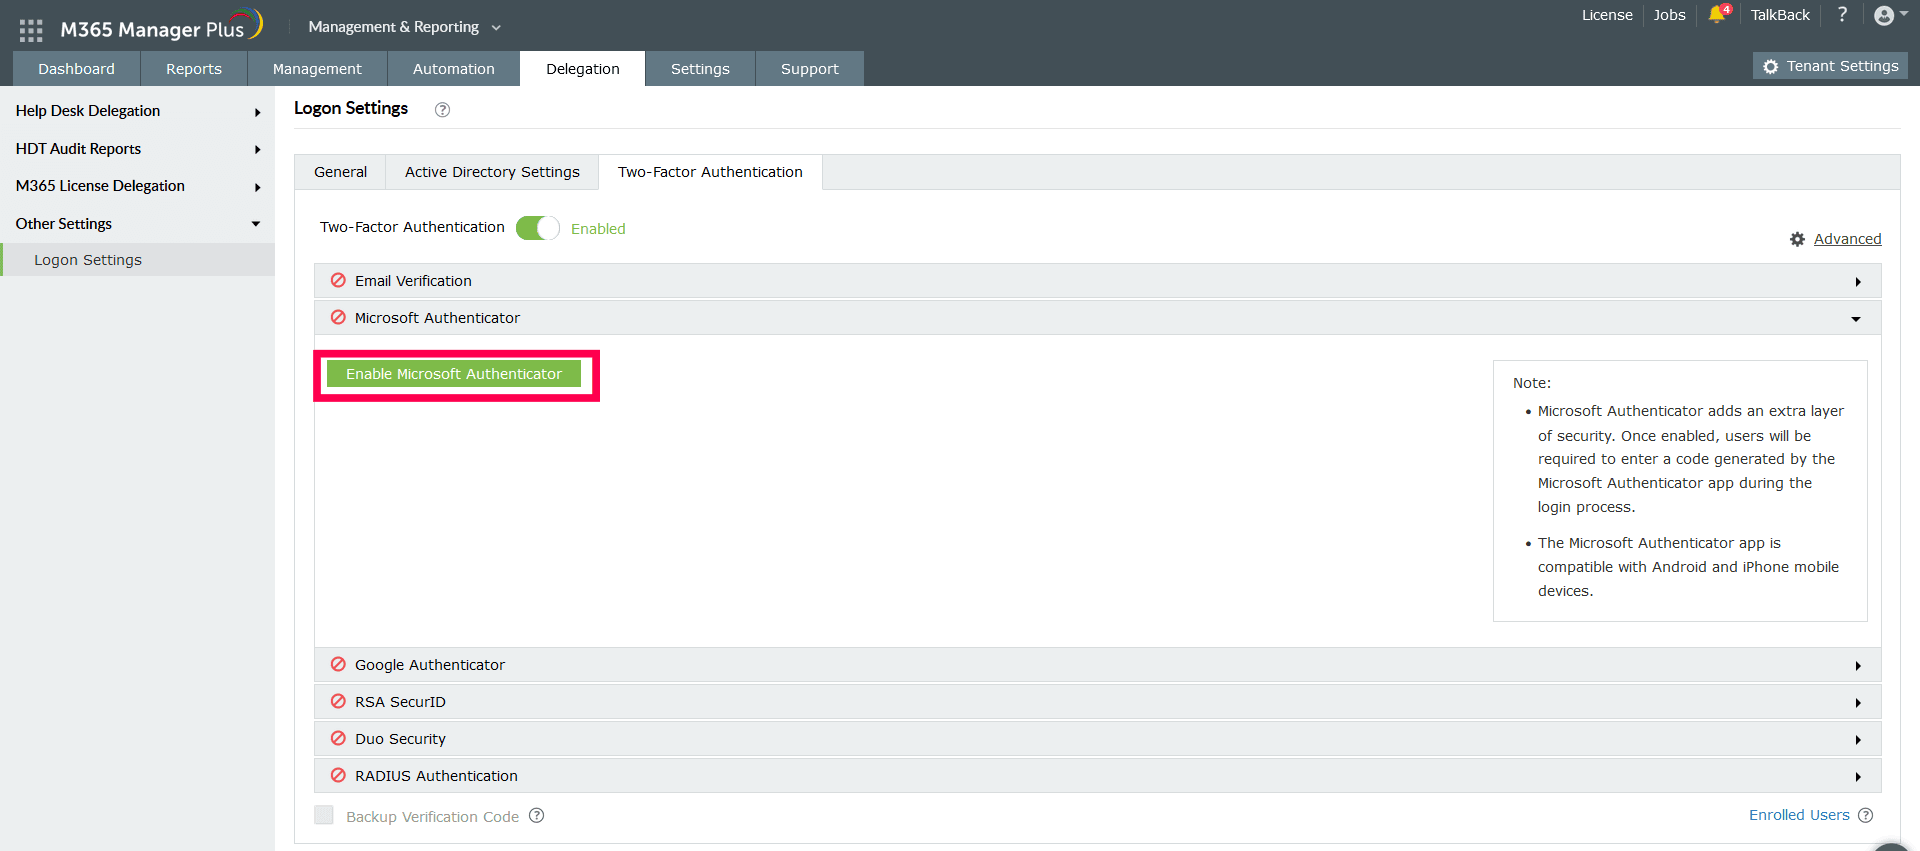
Microsoft Authenticator
Securely sign into your account using Microsoft Authenticator. Once enabled, users will be required to
enter a code generated by Microsoft Authenticator for identity verification.
Configuration steps:
- Just click Enable Microsoft Authenticator.
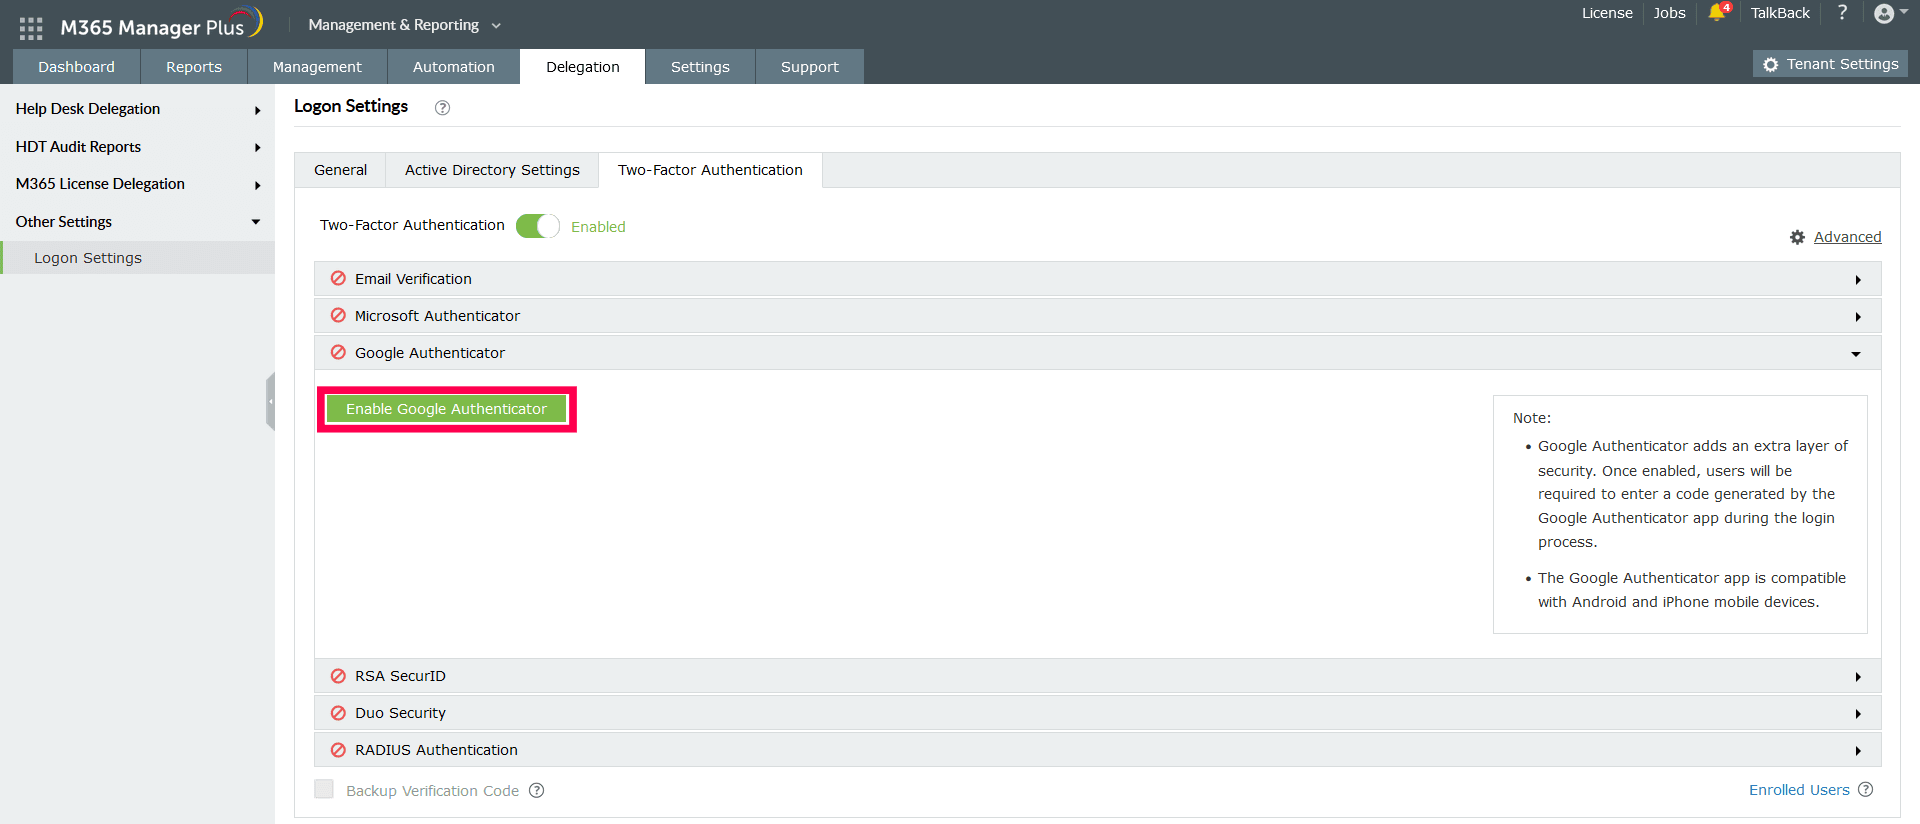
Google Authenticator
Securely sign into your account using Google Authenticator. Once enabled, users will be required to enter
a six-digit security code generated by Google Authenticator for identity verification.
Configuration steps:
- Just click Enable Google Authenticator.
Note: Once any of the two options above are enabled, the technicians
will be asked to enroll themselves for two-factor authentication using either Microsoft Authenticator or
Google Authenticator during the login process.
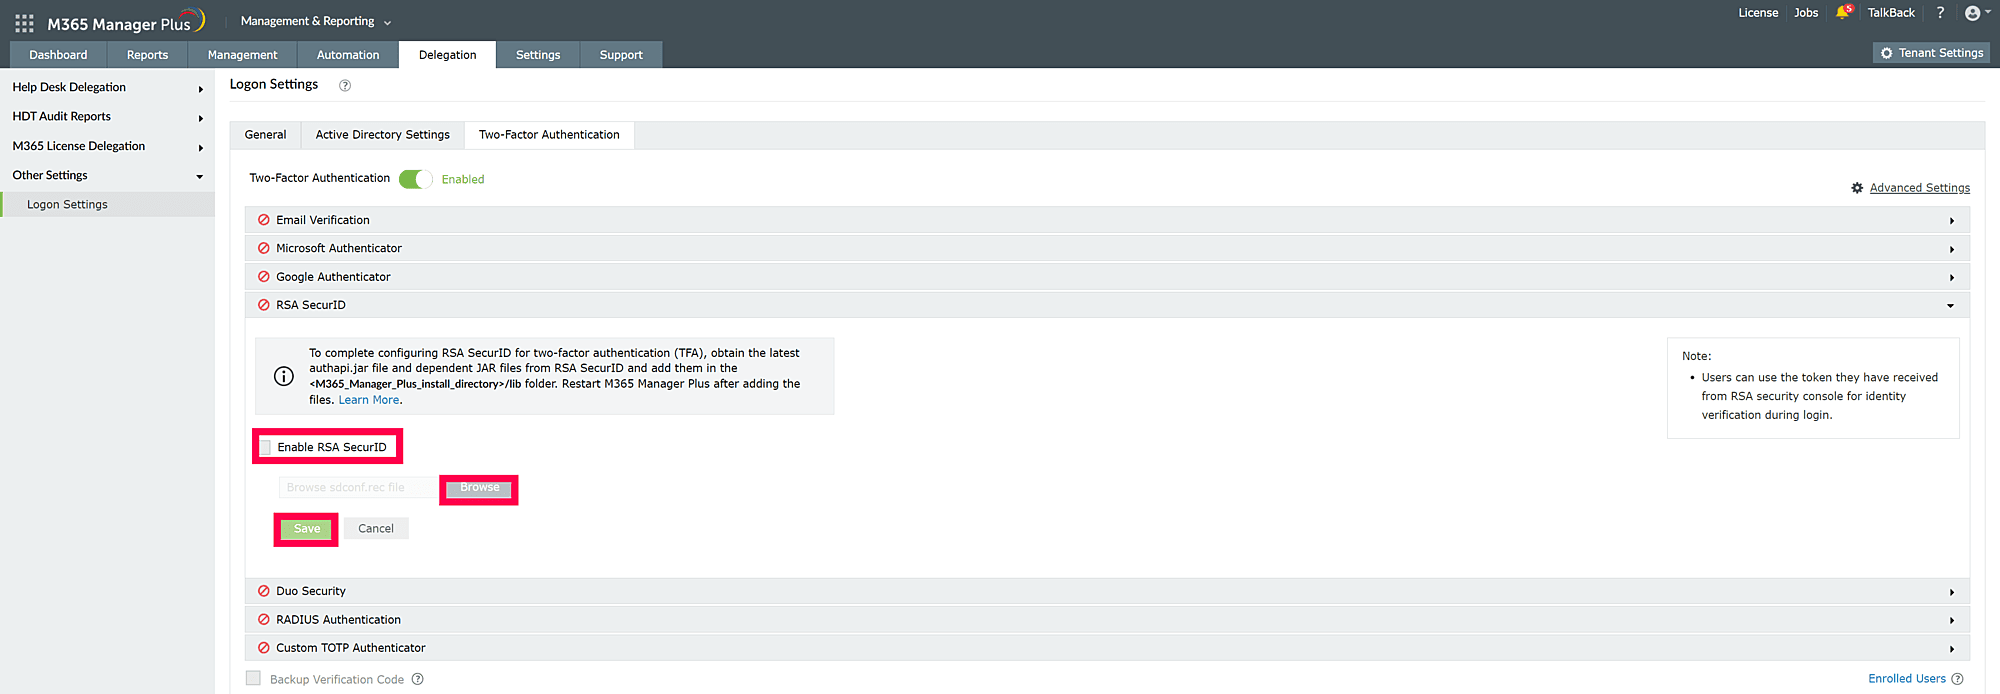
RSA SecurID
RSA SecurID is a mechanism developed for performing two-factor authentication for a user. Users can use
the security codes generated by the RSA SecurID mobile app, hardware tokens, or tokens received via
email or SMS to log in to M365 Manager Plus.
Configuration steps:
- Ensure that the required JAR files listed below are present in the <installation_directory>/lib
folder.
- authapi-8.6.jar
- log4j-1.2.12rsa-1.jar
- cryptojcommon-6.1.3.3.jar
- jcmFIPS-6.1.3.3.jar
- cryptojce-6.1.3.3.jar
Note: These JAR files pertain to the latest version of
Authentication Agent SDK for Java (version 8.6).
If the files are not present, obtain the latest JAR files from RSA SecurID and add them to the
<installation_directory>/lib folder.
- Log in to your RSA admin console (e.g., https://RSA machinename.domain DNS
name/sc).
- Go to the Access tab. Under Authentication Agents, click Add
New.
- Add the M365 Manager Plus server as an authentication agent and click Save.
- Go to the Access tab. Under Authentication Agents, click Generate
Configuration File.
- Download the AM_Config.zip (Authentication Manager configuration) file.
- Extract sdconf.rec from the ZIP file.
- In M365 Manager Plus, under RSA SecurID configuration, click Browse and
select the sdconf.rec file.
- Ensure that the required authapi.jar file and its Log4j.jar files
are present in the <installation_directory>/lib folder. If not, obtain the latest
authapi.jar file and its latest Log4j.jar files from RSA SecurID,
and add these files in the <installation_directory>/lib folder.
- Click Save.
Duo Security
If your organization uses Duo Security for two-factor authentication, it can be integrated with M365
Manager Plus to secure logins. Users can approve the M365 Manager Plus login requests using any of the
authentication methods provided by Duo Security, like push notifications or six-digit security codes
generated using the Duo Security app. Authentication via Duo Security can be configured in two ways in
M365 Manager Plus: Web v2 SDK and Web v4 SDK.
Web v2 SDK uses a traditional Duo Security prompt, which will be displayed in an iframe in M365 Manager
Plus, whereas Web v4 SDK uses Duo Security's OIDC-based universal prompt with a redesigned UI that
redirects users to Duo Security for authentication.
Note: Duo Security has phased out Web v2 SDK, so it is recommended to
switch to Web v4 SDK, which features the new Universal Prompt.
Prerequisites
- Add the API hostname and admin console (e.g., https://admin-325d33c0.duosecurity.com) as a trusted
site or intranet site in the user's machine if they are using older versions of Internet Explorer.
- Please follow these steps in the Duo Admin Panel to migrate from Web v2
SDK, which uses the traditional prompt, to Web v4 SDK, which employs the new Universal Prompt.
Web v4 SDK configuration steps
Note: It is required to have a secure connection to set up the Web v4
SDK authentication. Please make sure that you have enabled HTTPS connection.
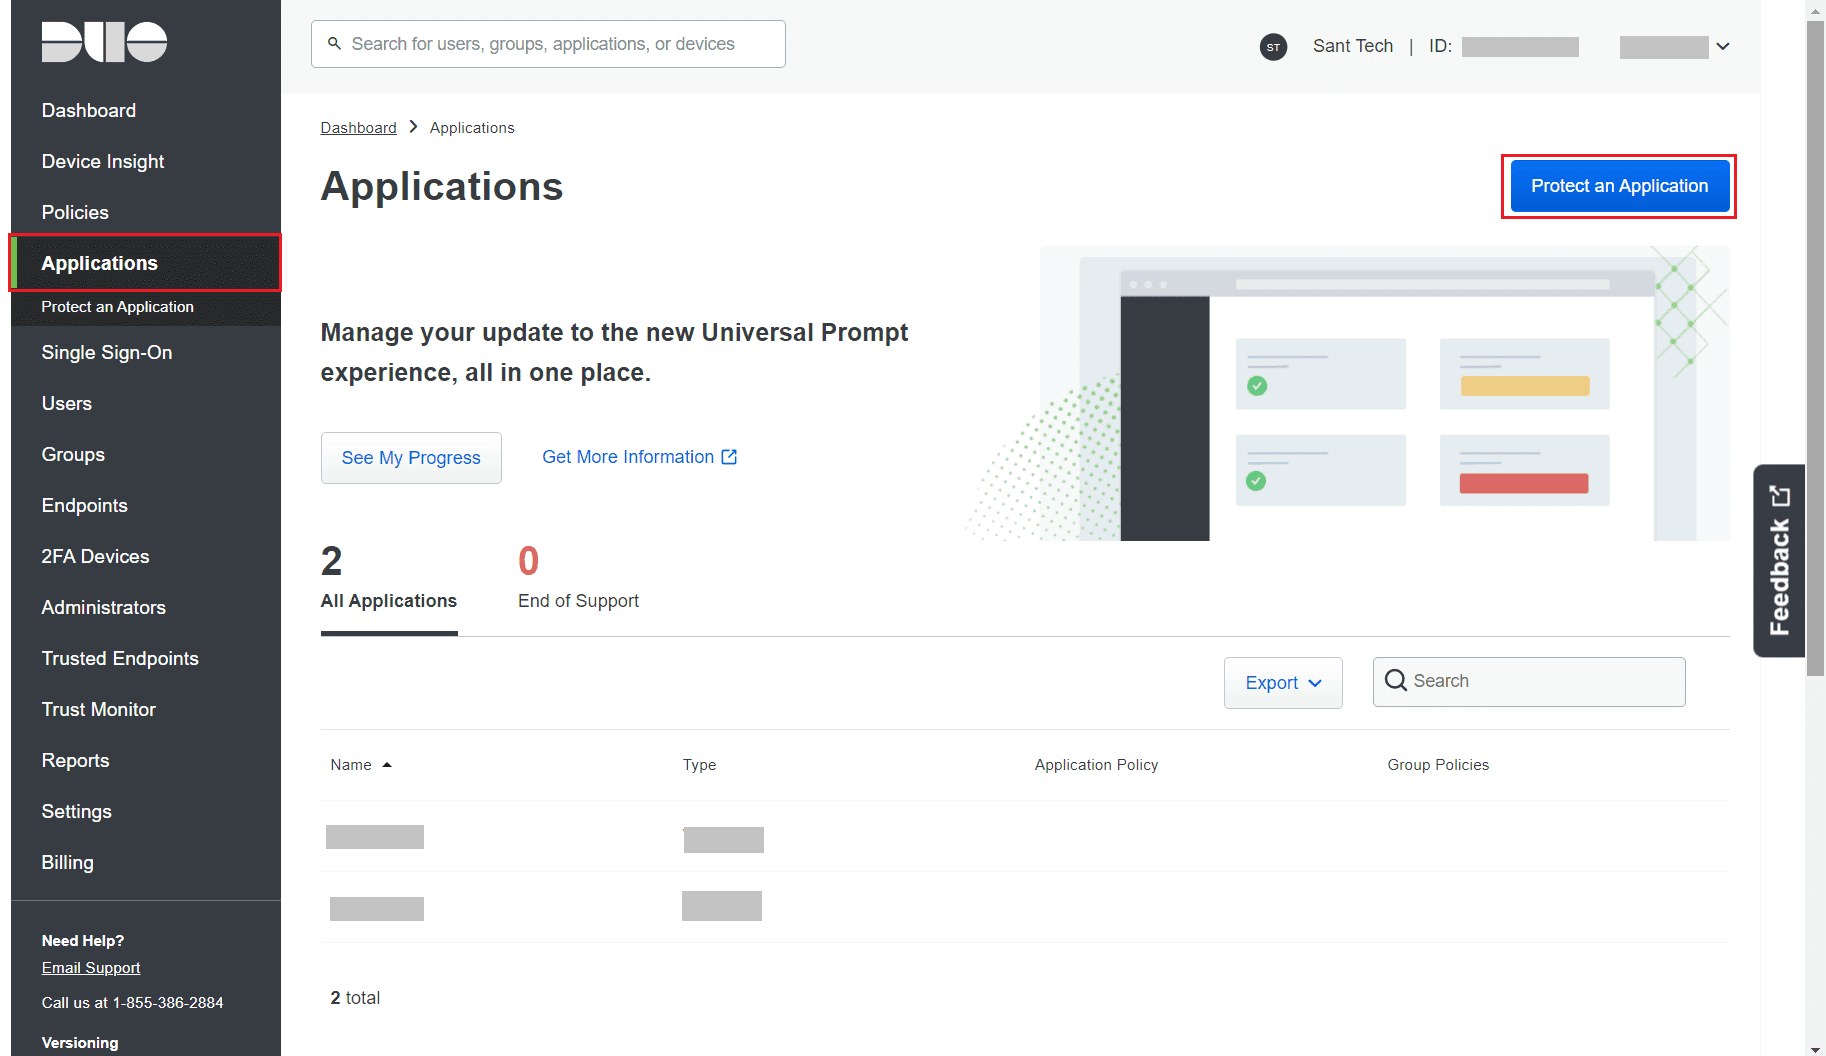
- Log in to your Duo Security account (e.g., https://admin-325d33c0.duosecurity.com ) or sign up for a new account and log in.
- Go to Applications and click Protect an Application.
- Search for Web SDK and click Protect.
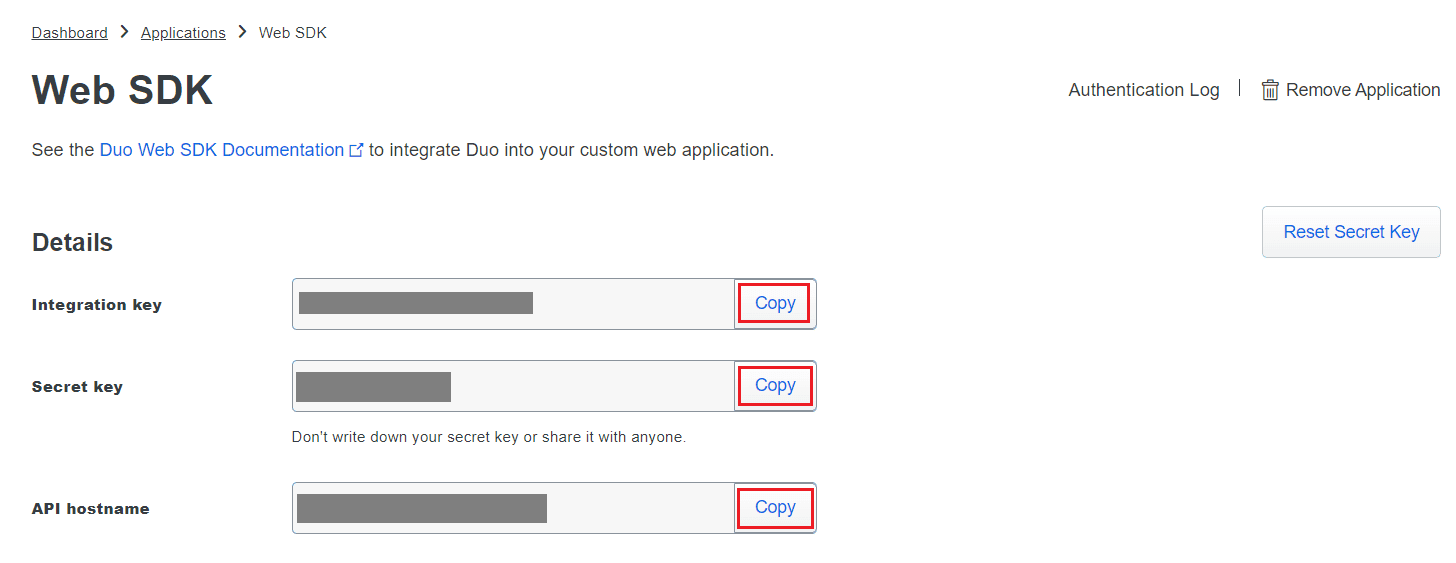
- Copy the Client ID, Client secret, and API hostname values
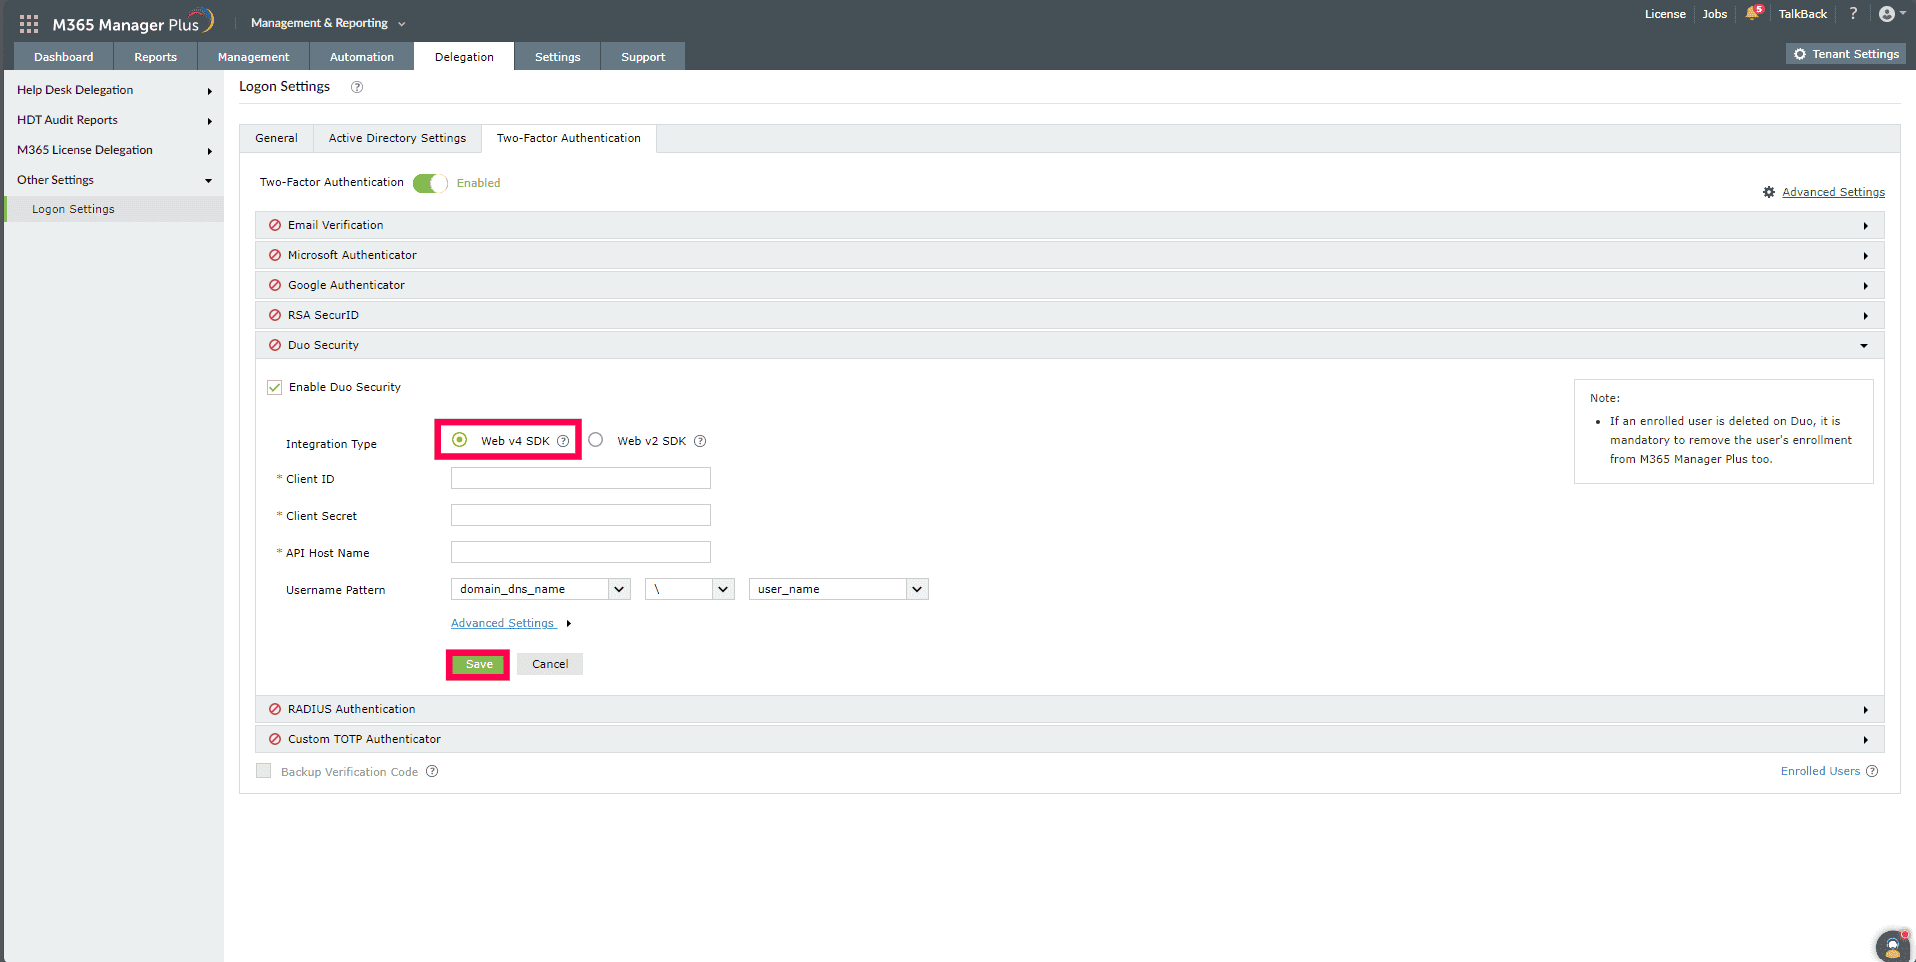
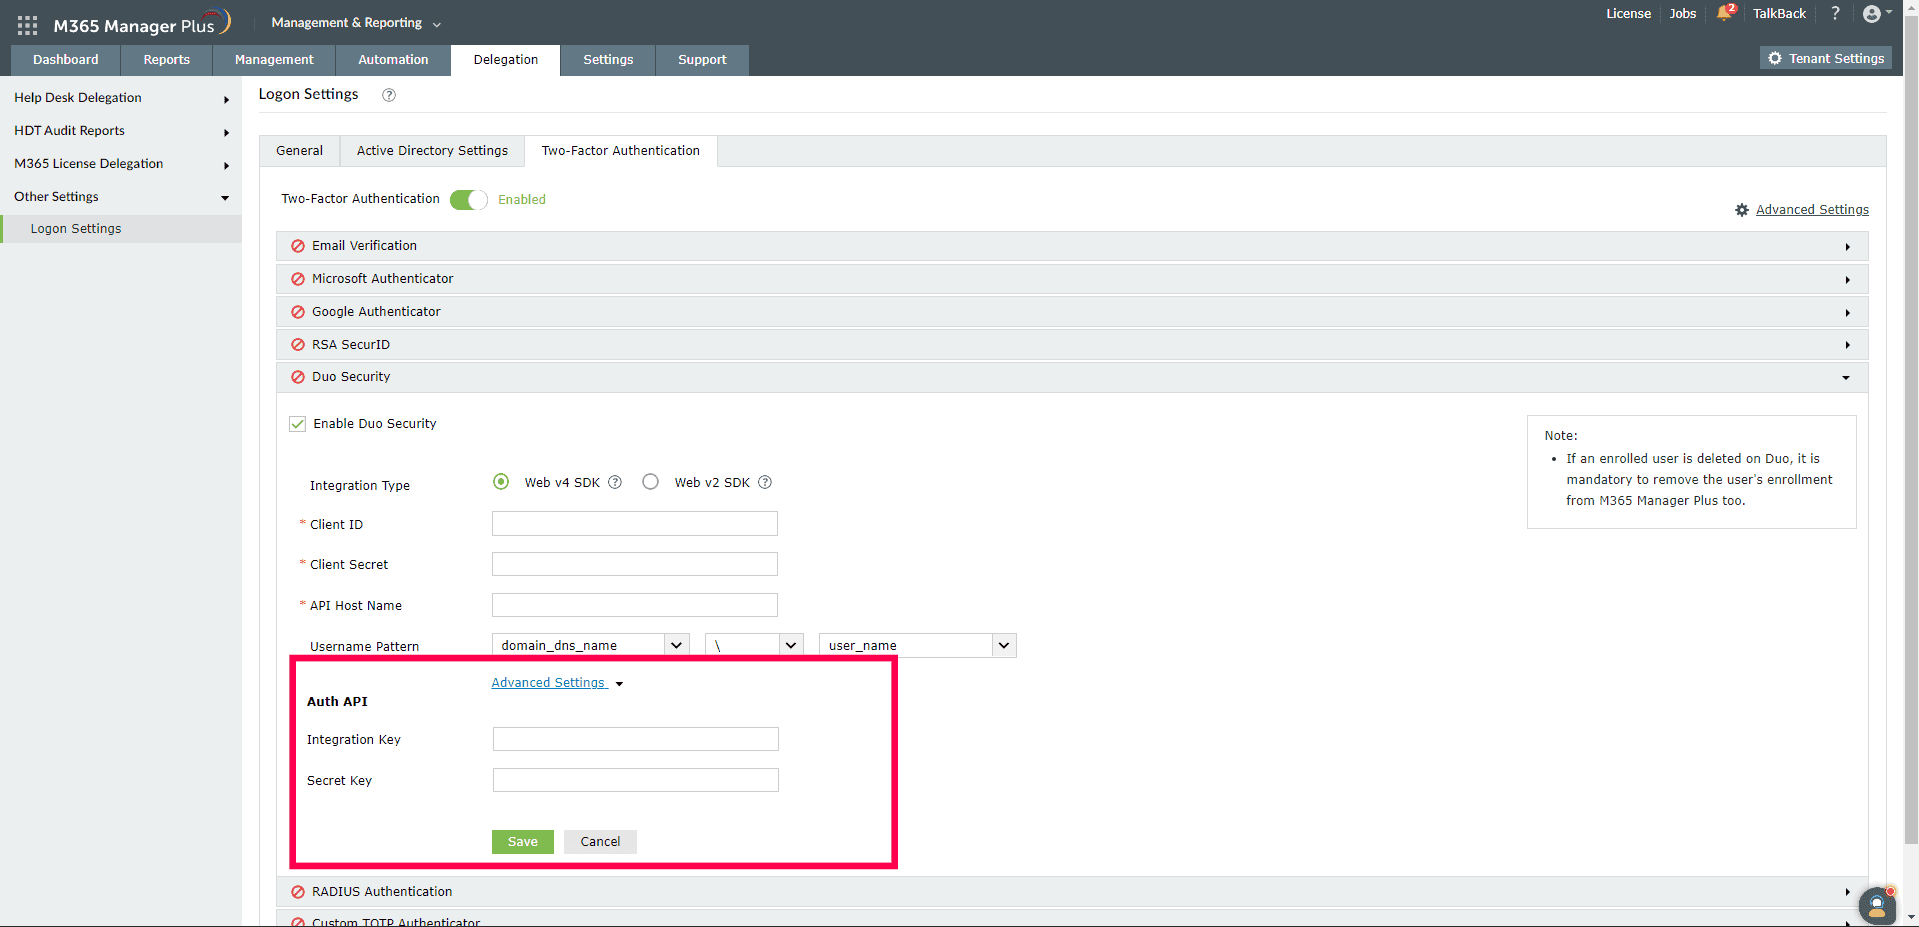
- In M365 Manager Plus, navigate to Delegation > Other Settings > Logon Settings > Two-Factor
Authentication > Duo Security.
- Check the Enable Duo Security box and select Web v4 SDK for
Integration Type.
- Paste the Client ID, Client secret, and API
hostname obtained from the Duo Admin Panel in the respective fields.
- Enter the same username pattern used in Duo Security in the Username Pattern field.
- Click Save.
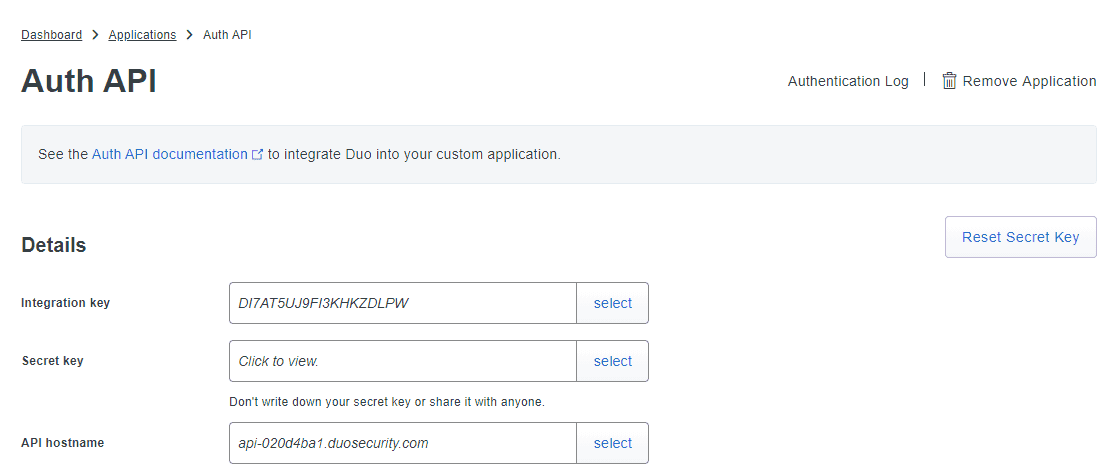
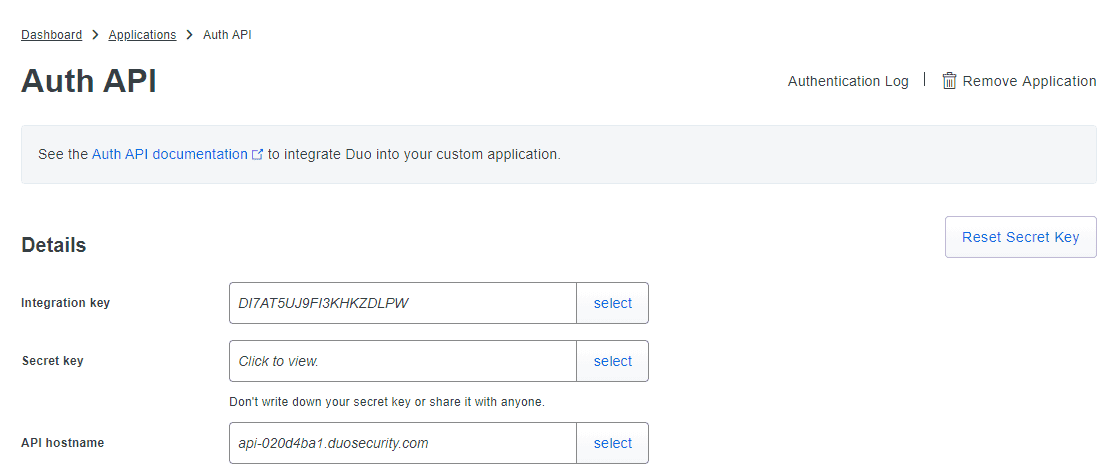
- Configuring Auth API in Duo Security is used to verify the enrollment of technicians with Duo
Security. To configure AuthAPI, login to your Duo Security account and navigate to
Applications > Protect an Application.
- Search for Auth API.
- Copy the values of the Integration key and Security key.
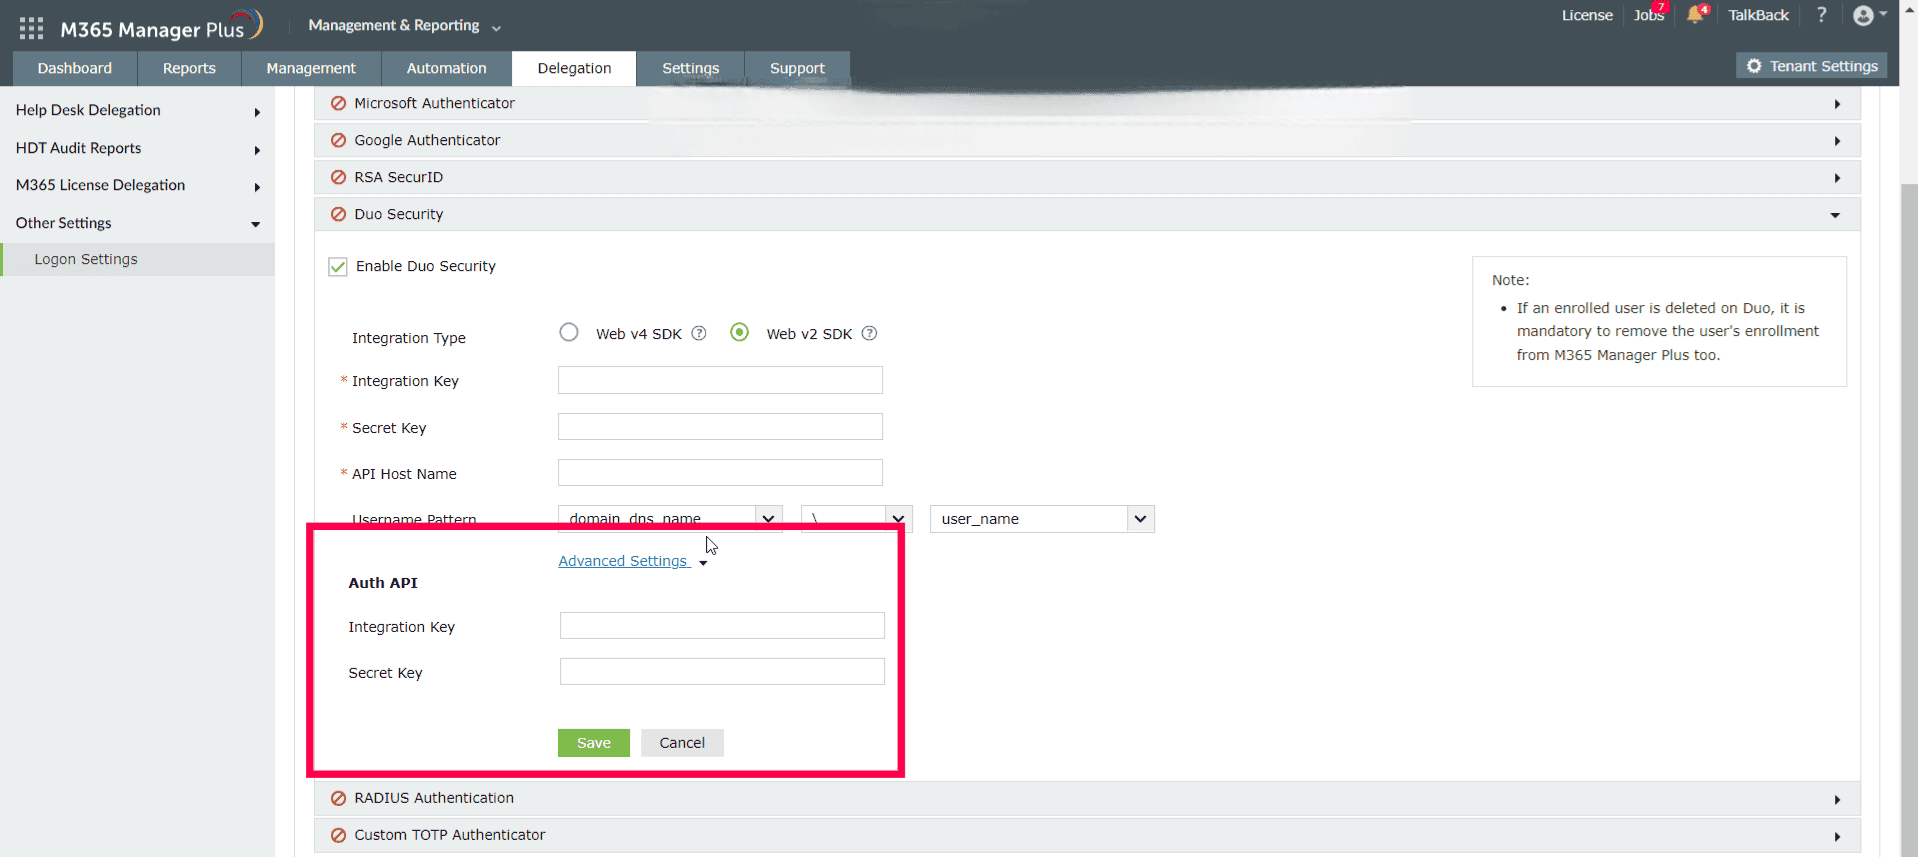
- Open M365 Manager Plus and navigate to Delegation > Other Settings > Logon Settings > Two
Factor Authentication > Duo Security.
- Select your required Integration Type and click Advanced Settings
to open the Auth API configuration settings.
- Paste the values that you copied from Duo's Auth API page in the Integration
key and Secret key fields.
Web v2 SDK configuration step
- Log in to your Duo Security account (e.g., https://admin-325d33c0.duosecurity.com ) or sign up for a new account and log in.
- Go to Applications and click Protect an Application
- Search for Web SDK and click Protect.
- Copy the Integration key, Secret key, and API hostname values.
- In M365 Manager Plus, navigate to Delegation > Other Settings > Logon Settings > Two-Factor
Authentication > Duo Security.
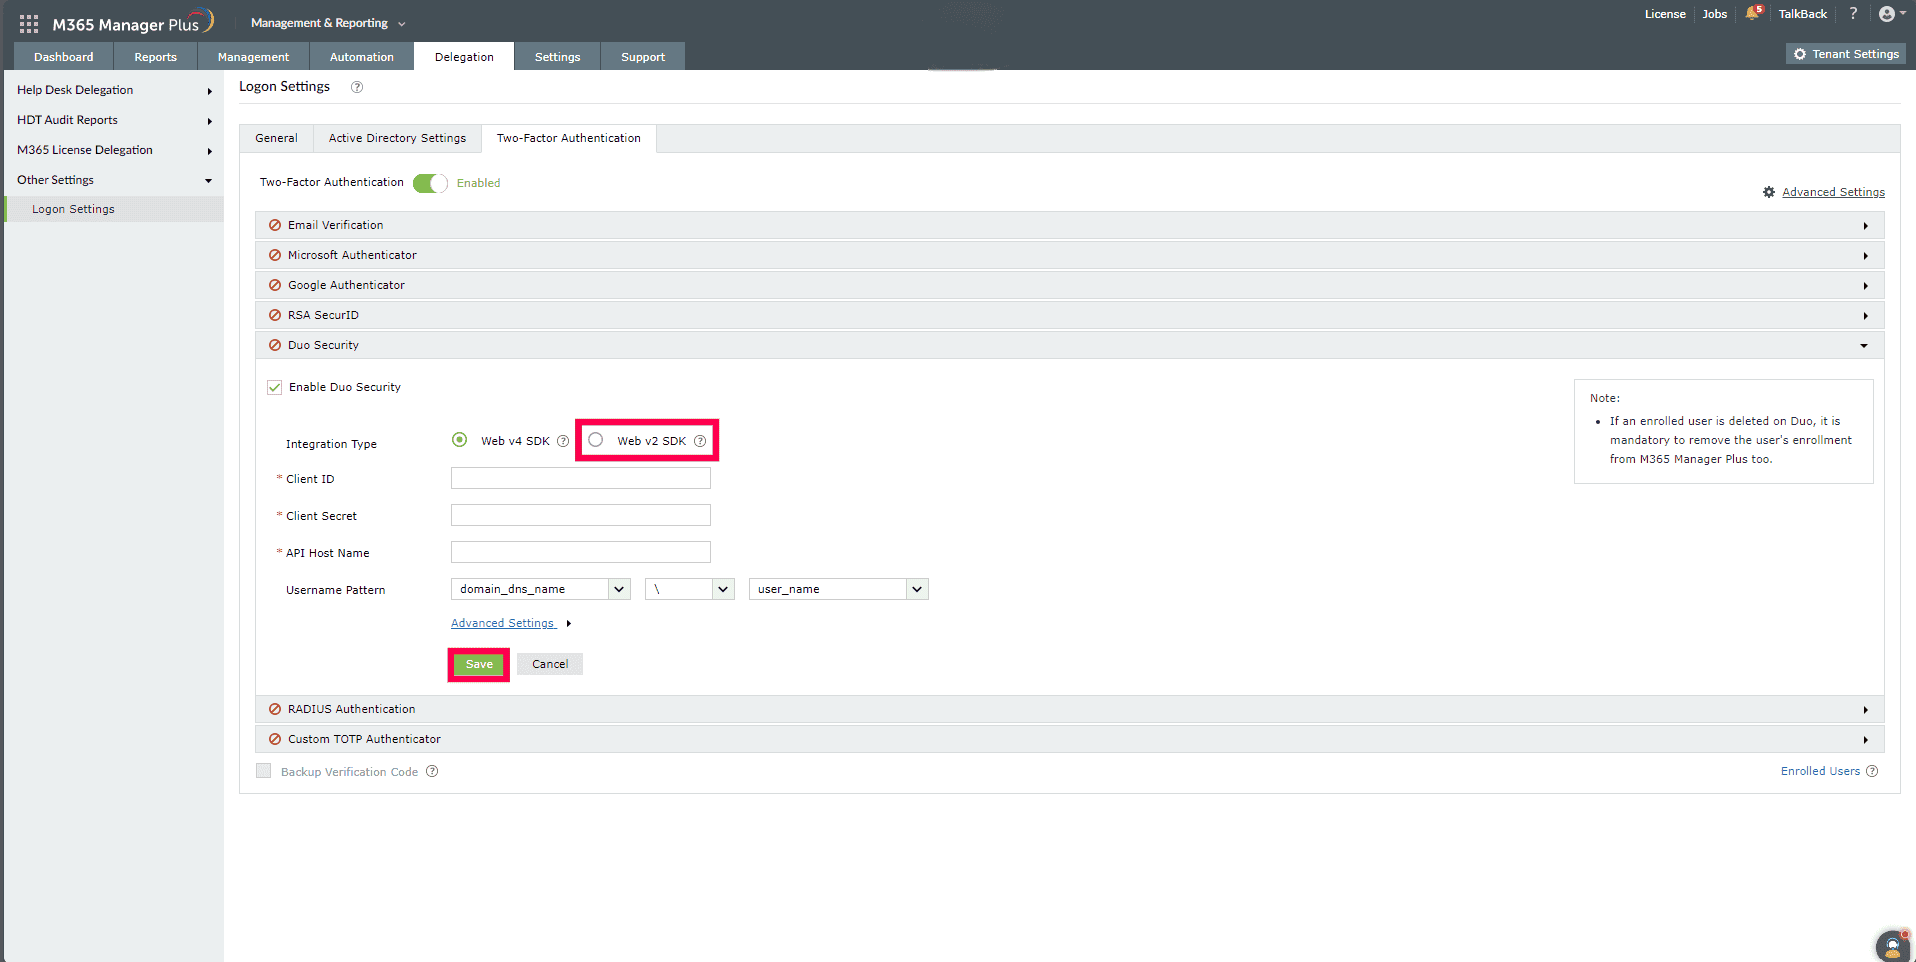
- Check the Enable Duo Security box and select Web v2 SDK for
Integration Type.
- Paste the Integration key, Secret key, and API hostname obtained
from the Duo Admin Panel in the respective fields.
- Enter the same username pattern used in Duo Security in the Username Pattern field.
- Click Save.
- Configuring Auth API in Duo Security is used to verify the enrollment of technicians with Duo
Security. To configure AuthAPI, log in to your Duo Security account and navigate to
Applications > Protect an Application.
- Search for Auth API.
- Copy the values of the Integration key and Security key.
- Open M365 Manager Plus and navigate to Delegation > Other Settings > Logon Settings > Two
Factor Authentication > Duo Security.
- Select your required Integration Type and click Advanced Settings
to open the Auth API configuration settings.
- Paste the values that you copied from Duo's Auth API page in the Integration key
and Secret key fields.
Steps to migrate to the new Universal Prompt
- In the Duo Admin Panel, select the Web SDK application, which was previously
configured for M365 Manager Plus, and copy the Integration key, Secret key, and
API hostname values.
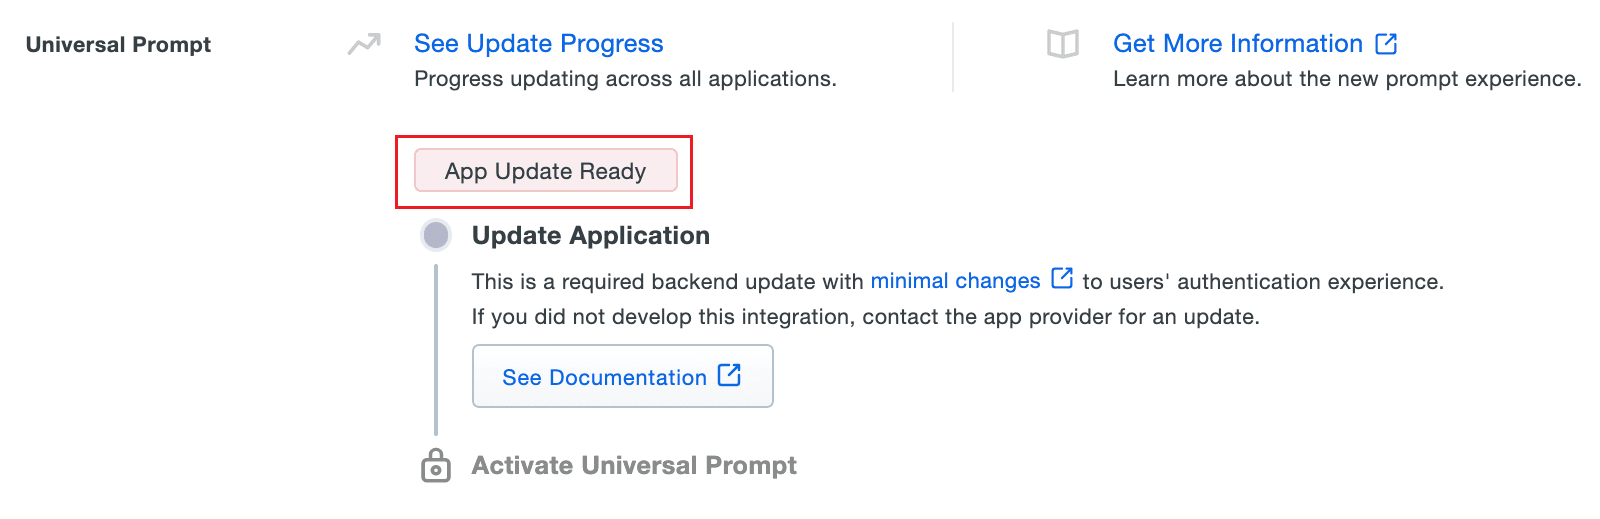
- Scroll down to the Universal Prompt section. The App Update Ready message will be
displayed, indicating that Universal Prompt can now be activated for M365 Manager Plus.
- In M365 Manager Plus, navigate to Delegation > Other Settings > Logon Settings > Two-Factor
Authentication > Duo Security.
- Click Web v4 SDK and paste the Integration key, Secret key, and
API hostname values in the Client ID, Client Secret, and API Host
name fields respectively.
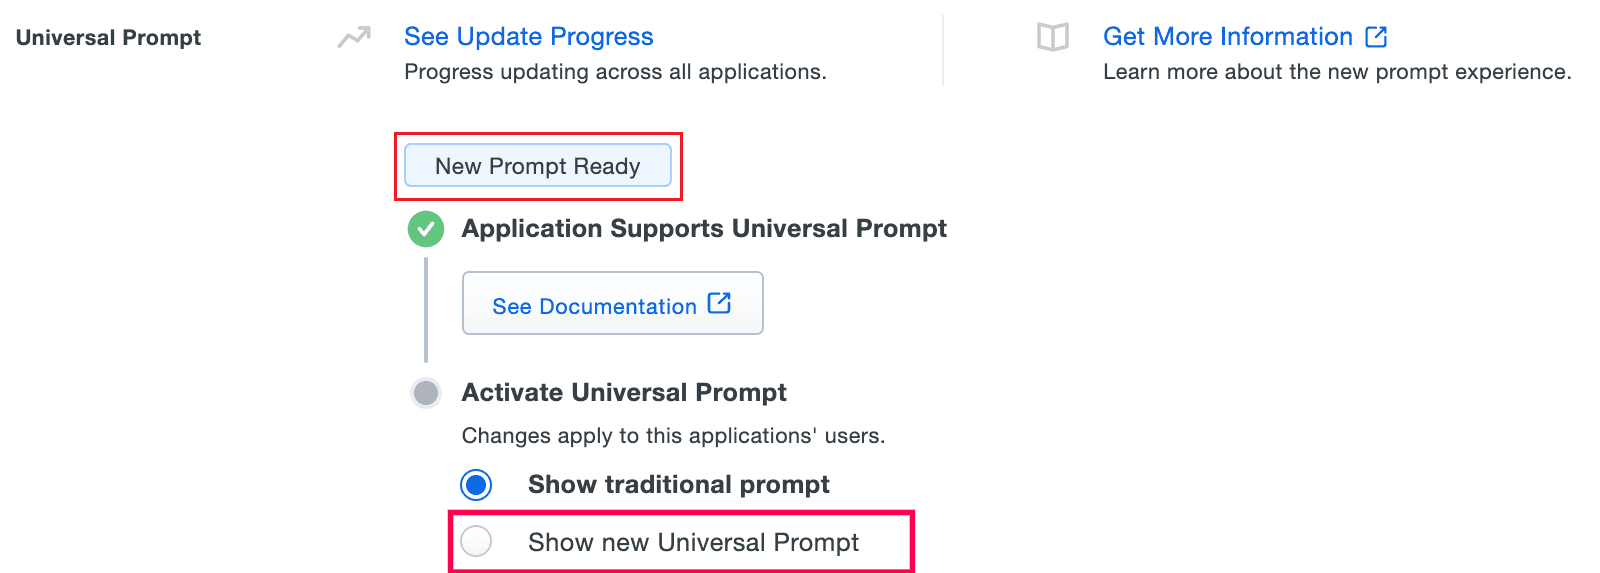
- Once Web v4 SDK is configured in M365 Manager Plus and a user authenticates through the frameless
Duo v4 SDK, the App Update Ready message in the Duo Admin Panel will be updated, and the
New Prompt Ready message will be displayed.
- Select Show new Universal Prompt to activate the universal prompt for M365 Manager
Plus.
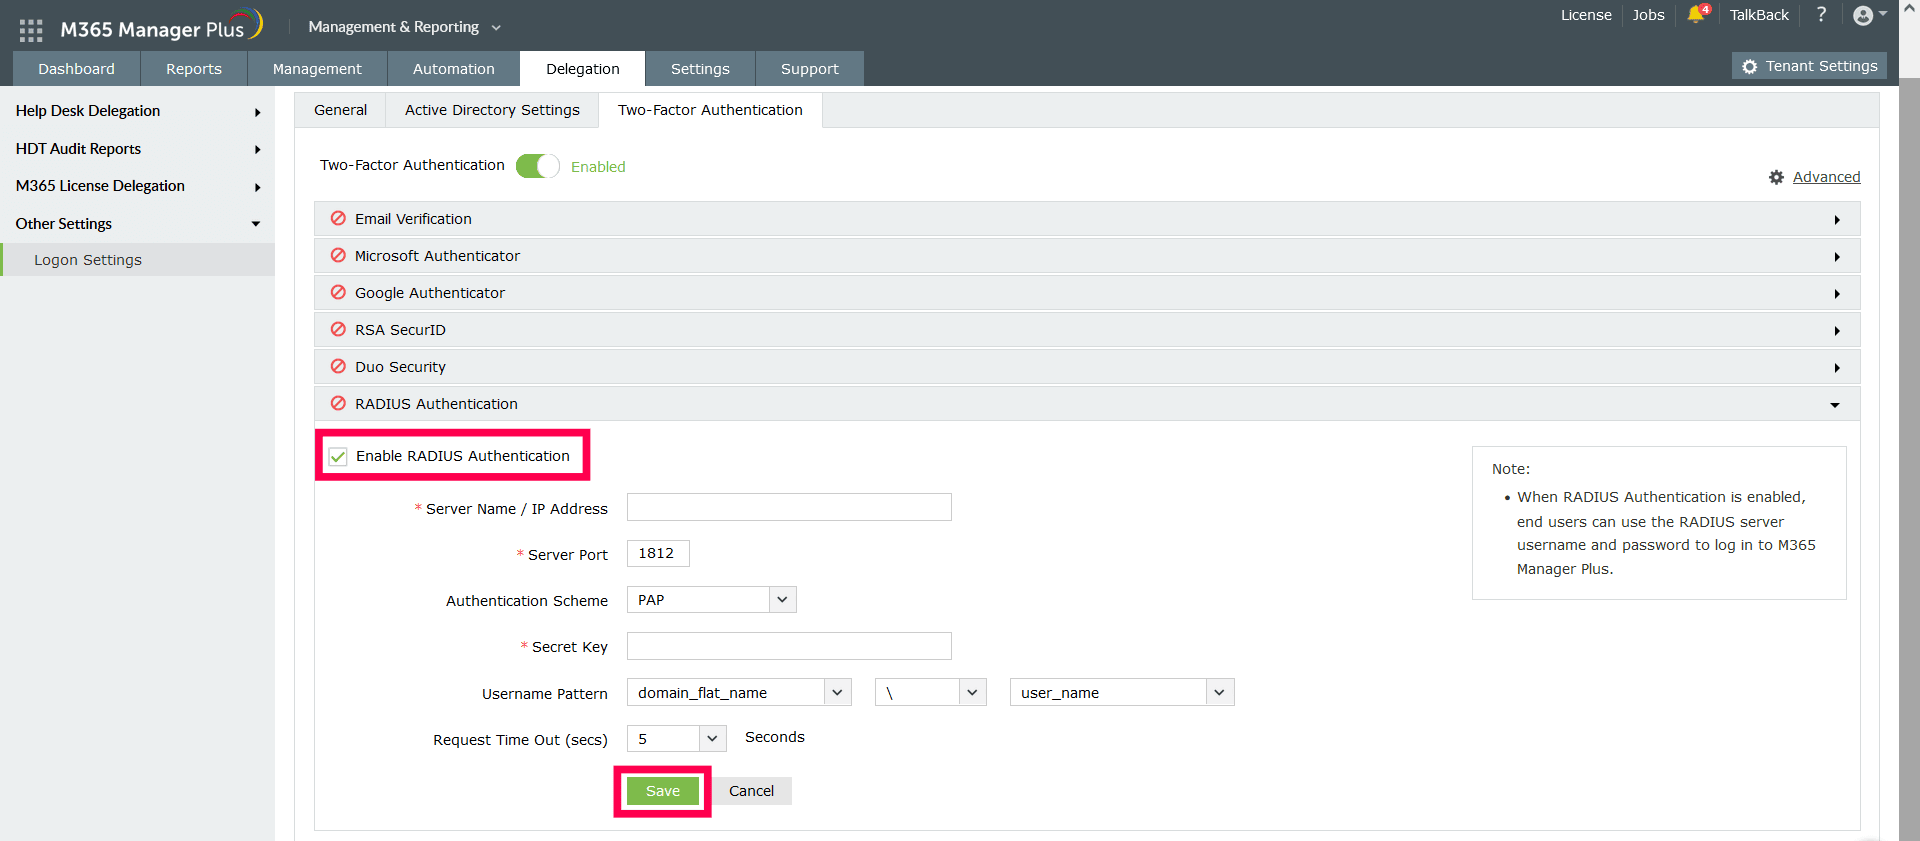
RADIUS Authentication
Remote Authentication Dial-In User Service (RADIUS) is an industry standard client/server authentication
protocol that enhances security by protecting networks from unauthorized access.
RADIUS-based two-factor authentication for M365 Manager Plus can be configured in just two simple steps.
Configuration steps
Step 1: Integrate RADIUS with M365 Manager Plus
- Log into the RADIUS server.
- Navigate to the clients.conf file (/etc/raddb/clients.conf).
- Add the following snippet in the clients.conf file:
client ProductServerName
{
ipaddr = xxx.xx.x.xxx
secret = <secretCode>
nastype = other
}
- Restart the RADIUS server.
Step 2: Configure M365 Manager Plus for RADIUS
- Select RADIUS Authentication.
- Enter the IP address or the name of the RADIUS server.
- Enter the Server Port number for RADIUS authentication.
- Select the protocol used for RADIUS authentication from the drop-down list.
- Provide the Secret Key that was added to the clients.conf file in the RADIUS
server.
- Set the Username Pattern.
- Set a duration for authentication Request Time Out duration.
- Click Save.
Note: The Username Pattern is case-sensitive. Please make sure you
select the exact pattern (uppercase or lowercase) you use in your RADIUS server.
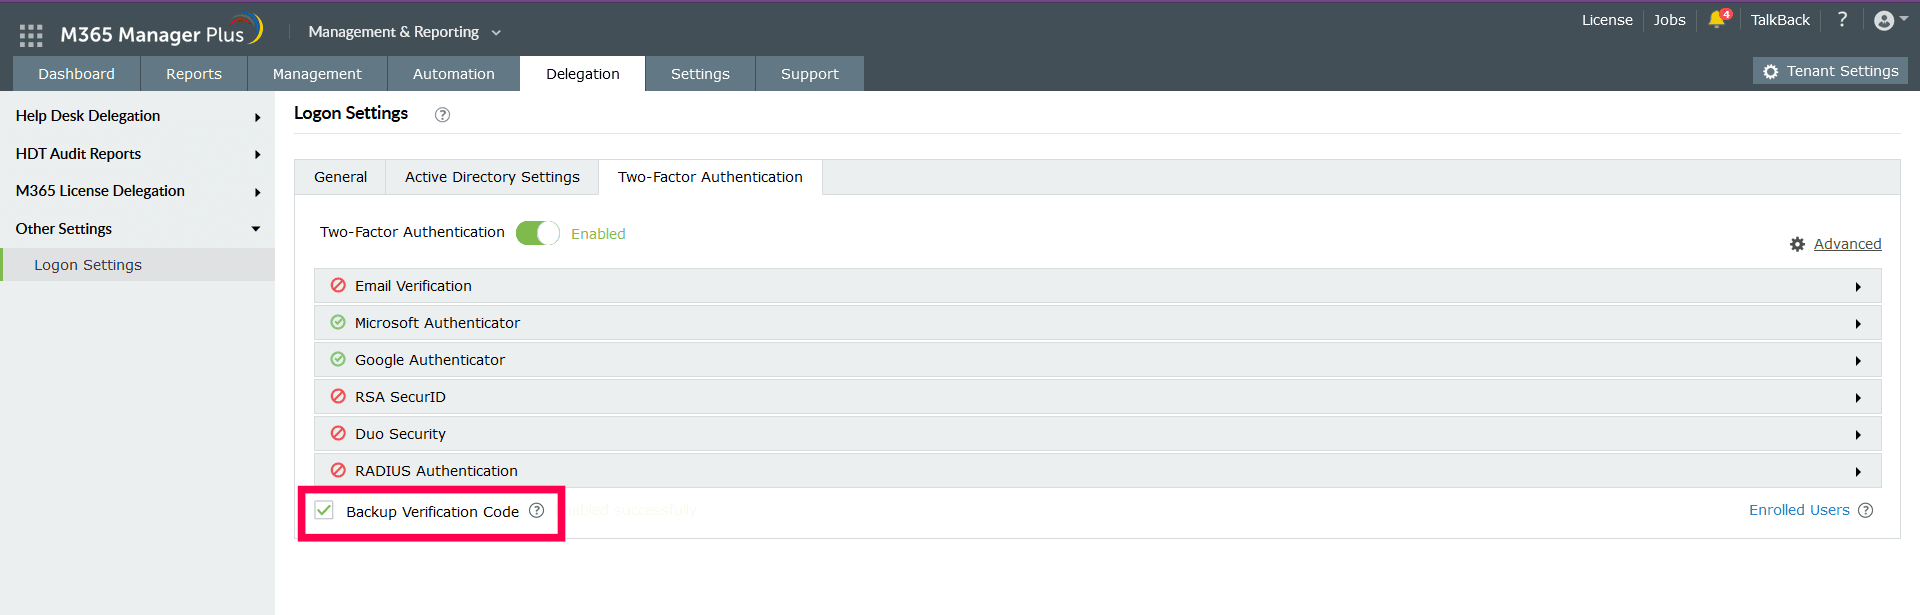
Backup verification codes
Backup verification codes allow users to log in when they don’t have access to their phone or face issues
with one of the second-factor authentication methods. When enabled, a total of five codes will be
generated. A code, once used, will become obsolete and cannot be used again. Users also have the option
to generate new codes.
Enabling the Backup Verification Code option
- To enable backup verification codes, check the Backup Verification Code box.
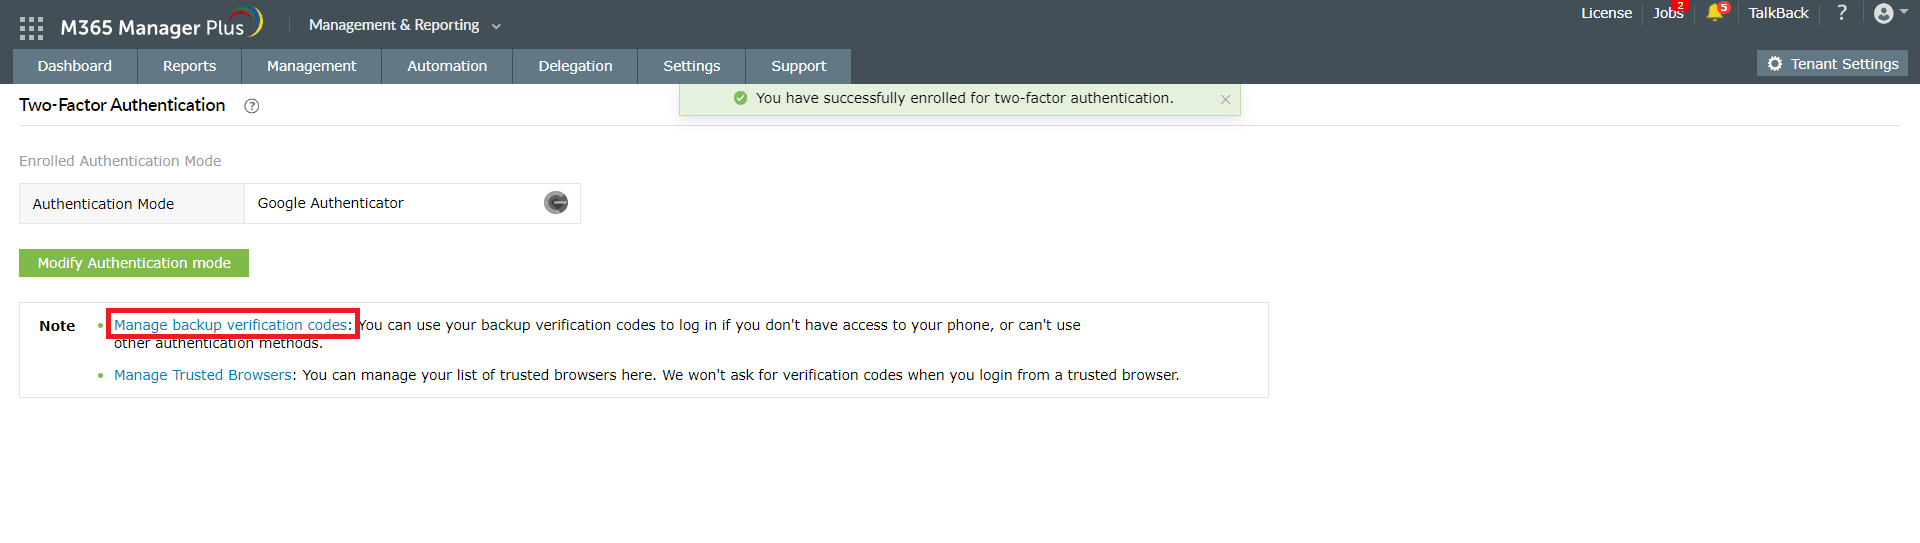
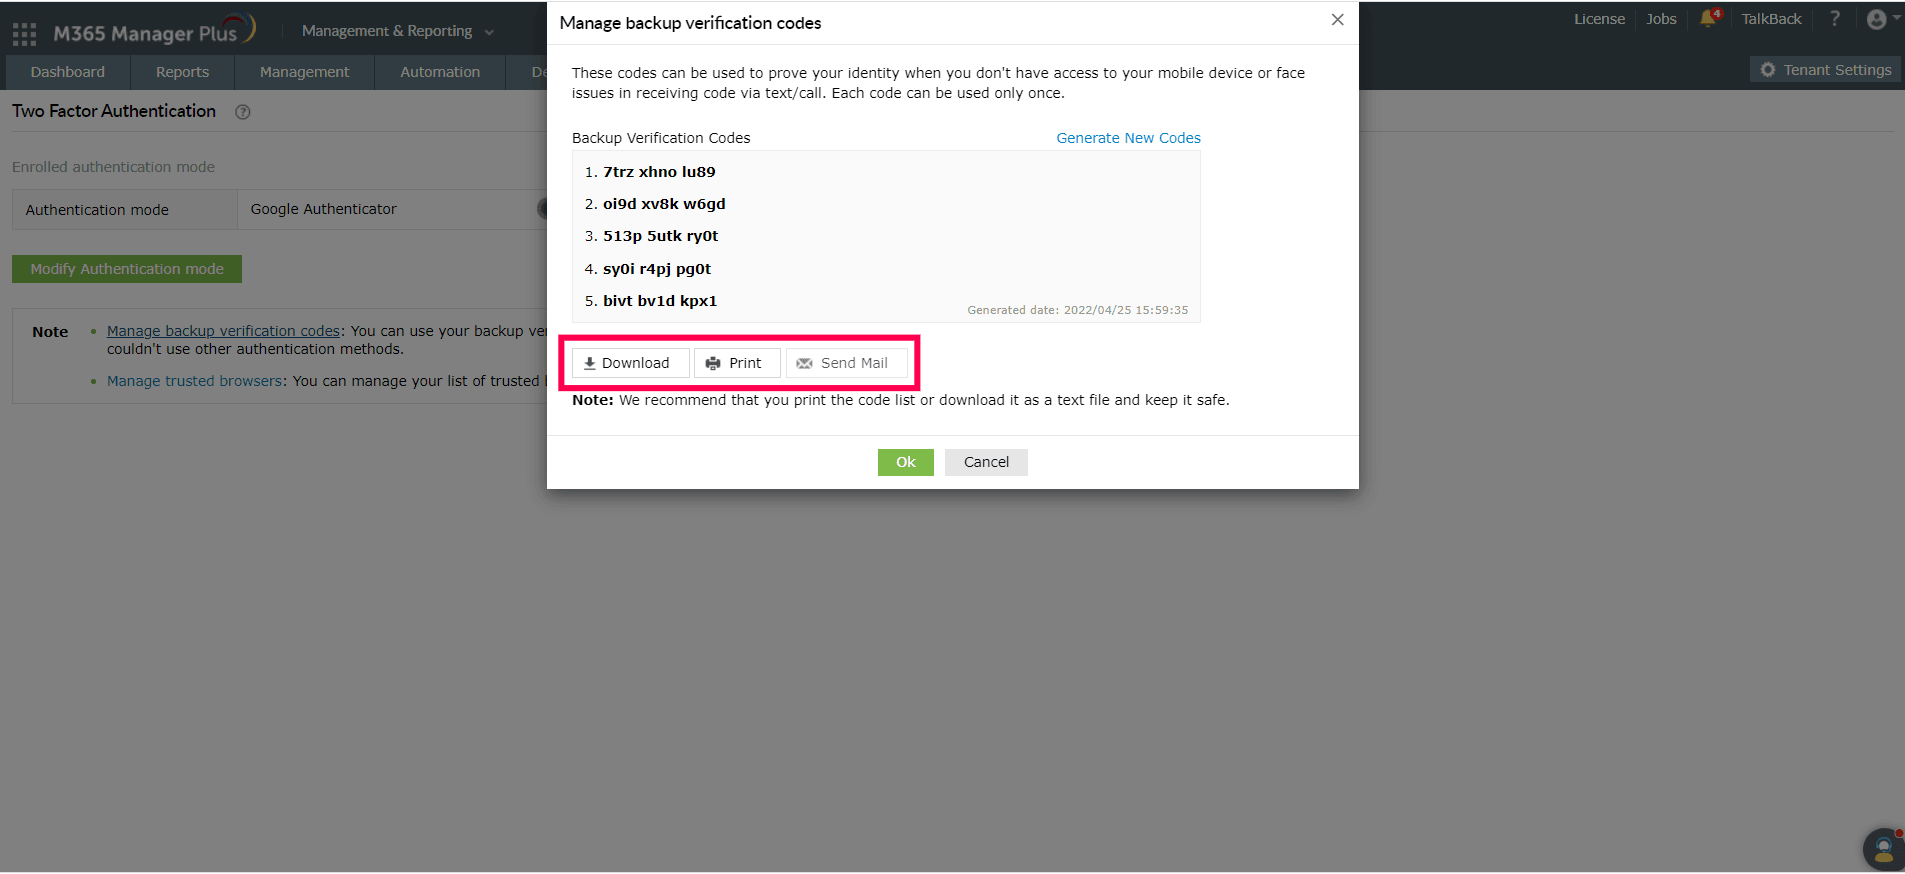
Registering for backup verification codes
- Users need to click the Manage Backup Verification Codes link to view the codes.
- Users can also download the codes as a text file, print them, and get them delivered to their
personal email address; they can also generate new codes.
- Users need to click the Manage Backup Verification Codes link to view the codes.
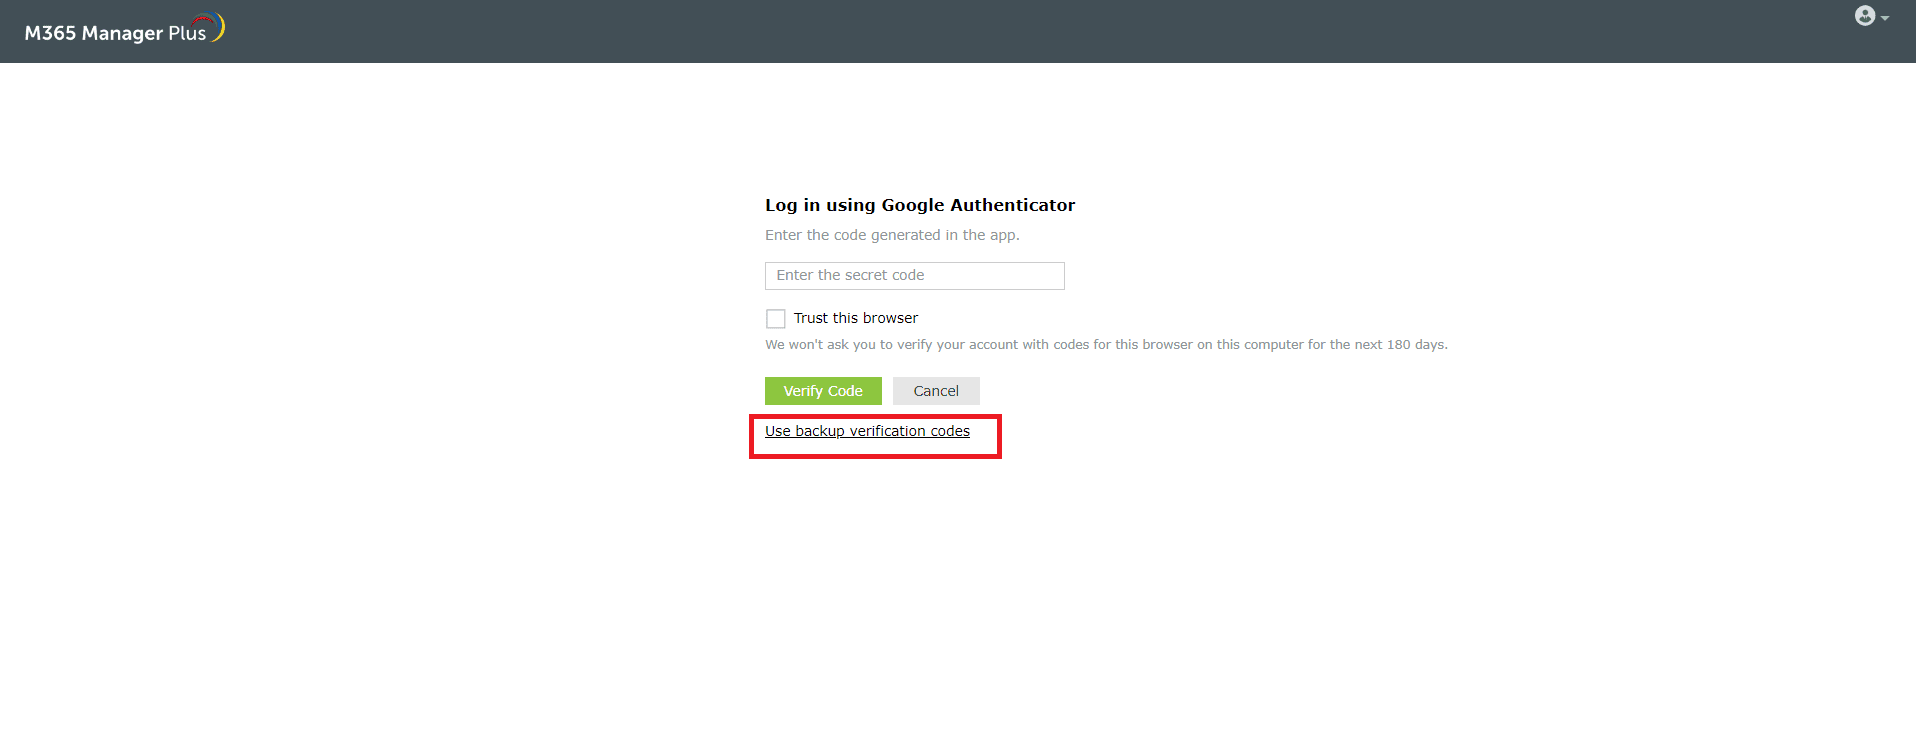
Using the backup verification code to log in
- To use backup verification codes during login, users need to click the Don't have
verification code? link in the second-factor authentication page.
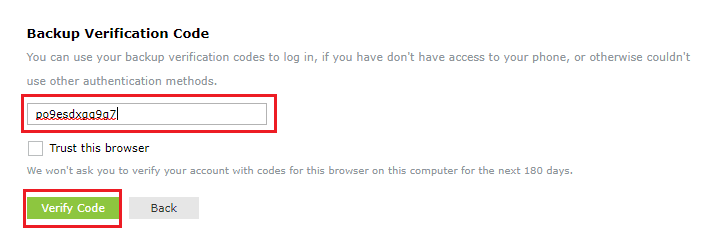
- On the backup verification code page, they need to enter one of their backup verification codes and
click Verify Code to log in.
Managing users for two-factor authentication
As an admin, you can view which authentication method users have opted for and disable their two-factor
authentication using the Manage Users option.
To do this:
- Under the Two-Factor Authentication tab, click Enrolled Users.
- In the Enrolled Users pop-up, you can view the list of users enrolled for
two-factor authentication and the authentication method they have chosen.
- To remove a user, select the user and click the
 icon.
icon.
Personalize two-factor authentication method for users
The users enrolled in two-factor authentication can modify their preferred authentication method and
manage trusted browsers by following the steps below:
- Go to the My Account
 icon in the top-right corner of M365 Manager Plus.
- Select the Two-Factor Authentication option.
- To modify the authentication mode, click Modify Authentication mode.
- To manage a trusted browser, click Manage Trusted Browsers.
Custom TOTP Authenticator
The Custom TOTP Authenticator feature helps you secure your accounts with two-factor authentication
(2FA). It can be easily configured in M365 Manager Plus to enable 2FA. Securely sign in to M365 Manager
Plus using Google Authenticator, Microsoft Authenticator, and other custom authenticator apps. Once
enabled, users will be required to enter a code generated by the authenticator for identity
verification.
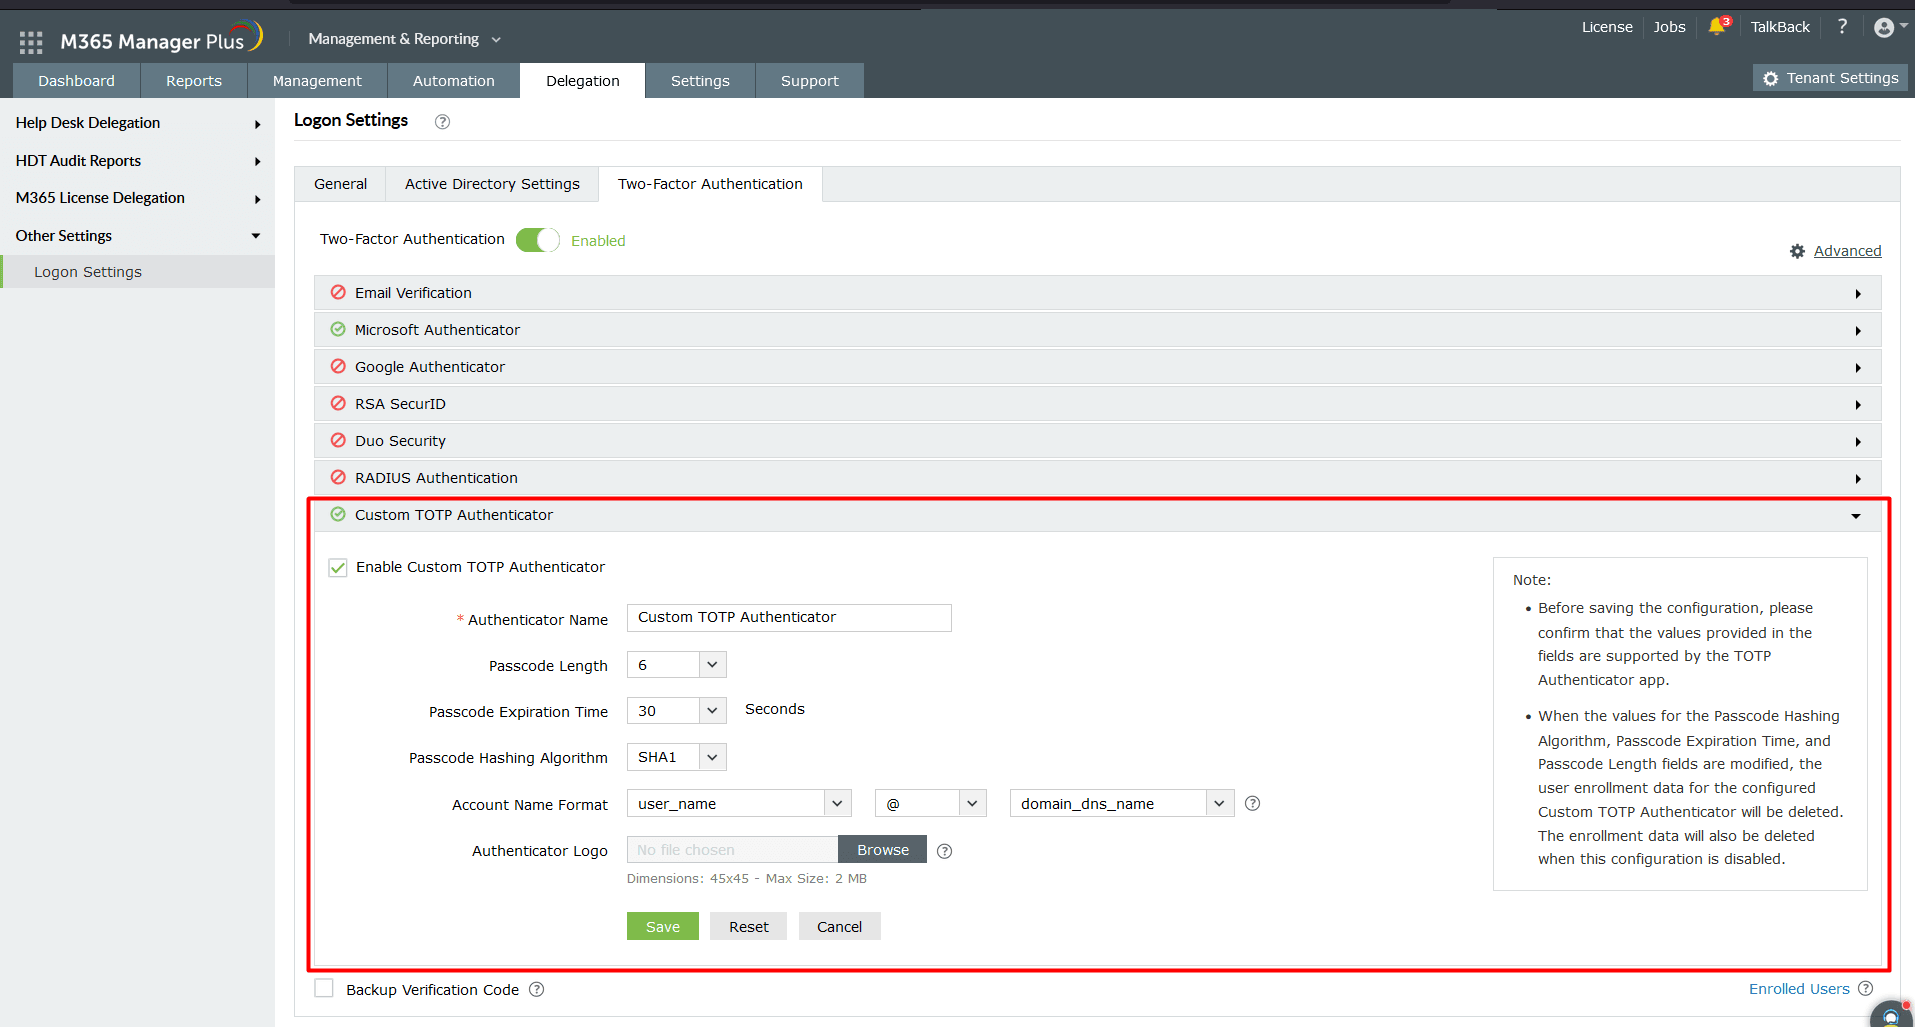
Steps to configure Custom TOTP Authenticator
- Select Custom TOTP Authenticator.
- Check the box next to Enable Custom TOTP Authenticator.
- Enter the Authenticator Name, Passcode Length, Passcode Expiration Time, and
Passcode Hashing Algorithm.
- Configure the Account Name Format and upload the Authenticator
Logo.
- Click Save.
Advanced Settings
You can fine-tune your 2FA implementation for M365 Manager Plus with the Advanced
Settings menu. This allows you to enable 2FA for help desk technicians with Microsoft 365
authentication, set up trust for browsers, and disable 2FA for a select list of help desk technicians.
To access advanced settings,
- Log in to M365 Manager Plus as a technician who can modify Two-Factor
Authentication settings.
- Navigate to Delegation → Other Settings → Logon Settings.
- Click the Two-Factor Authentication tab.
- Toggle the Two-Factor Authentication switch to Enabled.
- Click Advanced Settings.
Under Advanced Settings, you can configure the following settings:
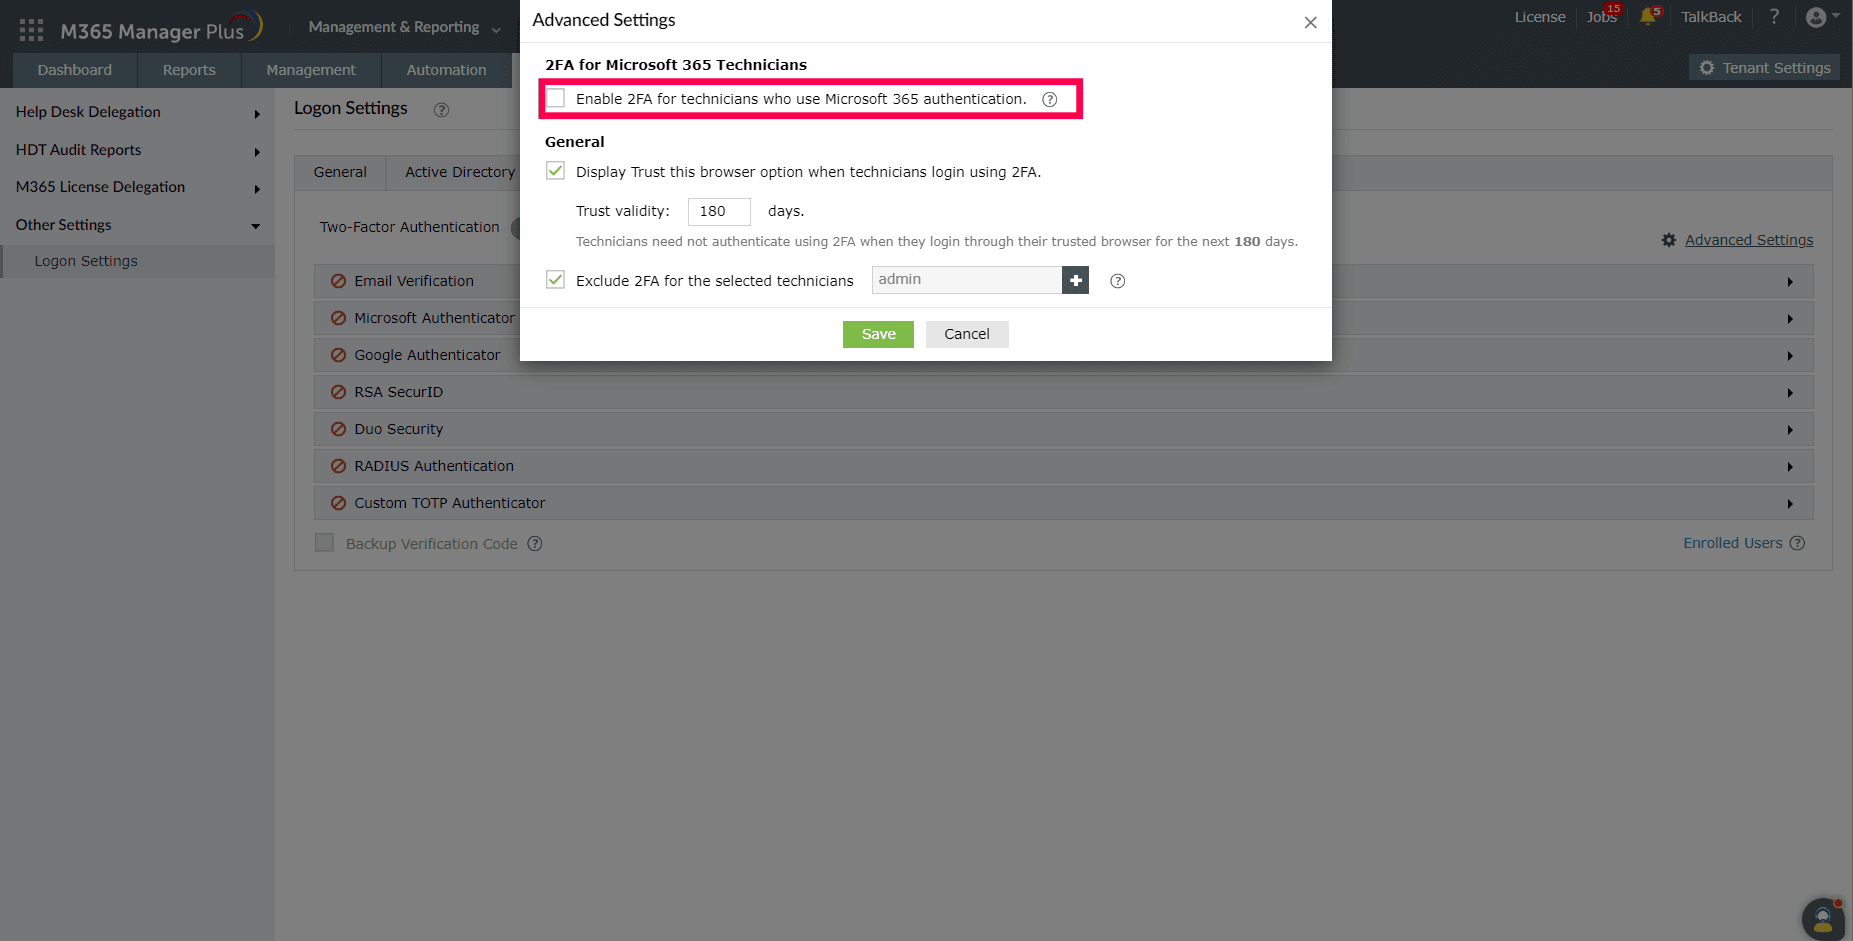
2FA for Microsoft 365 Technicians:
To allow SSO by default, 2FA is disabled for technicians who use Microsoft 365 authentication. If this
option is enabled, technicians will have to go through the product's 2FA method, even though they are
logged in using Microsoft 365 MFA.
Configuration steps:
- Select Enable 2FA for technicians who use Microsoft 365 authentication.
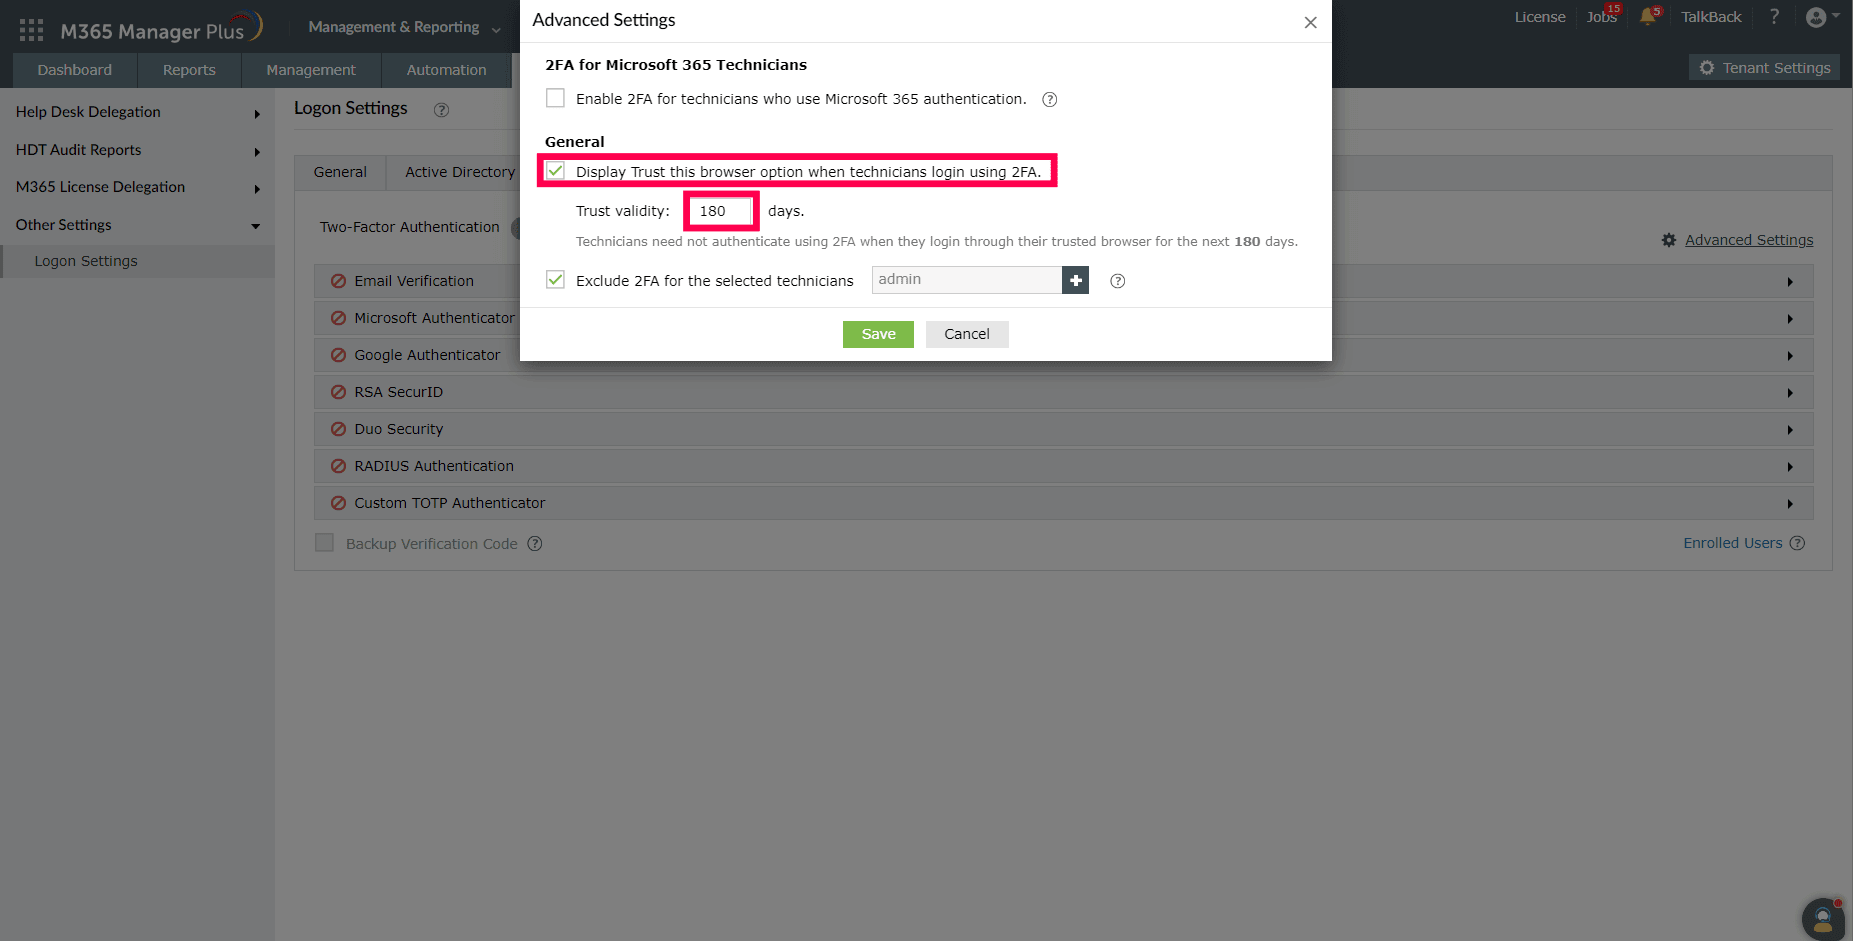
Display Trust this browser option when technicians login using 2FA.
You can now set up M365 Manager Plus to allow help desk technicians to bypass 2FA from their trusted
browser, for a chosen number of days.
Configuration steps:
- Select Display Trust this browser option when technicians login using
2FA..
- Enter the number of days for which the browser should be trusted. This option is set to 180 days by
default.
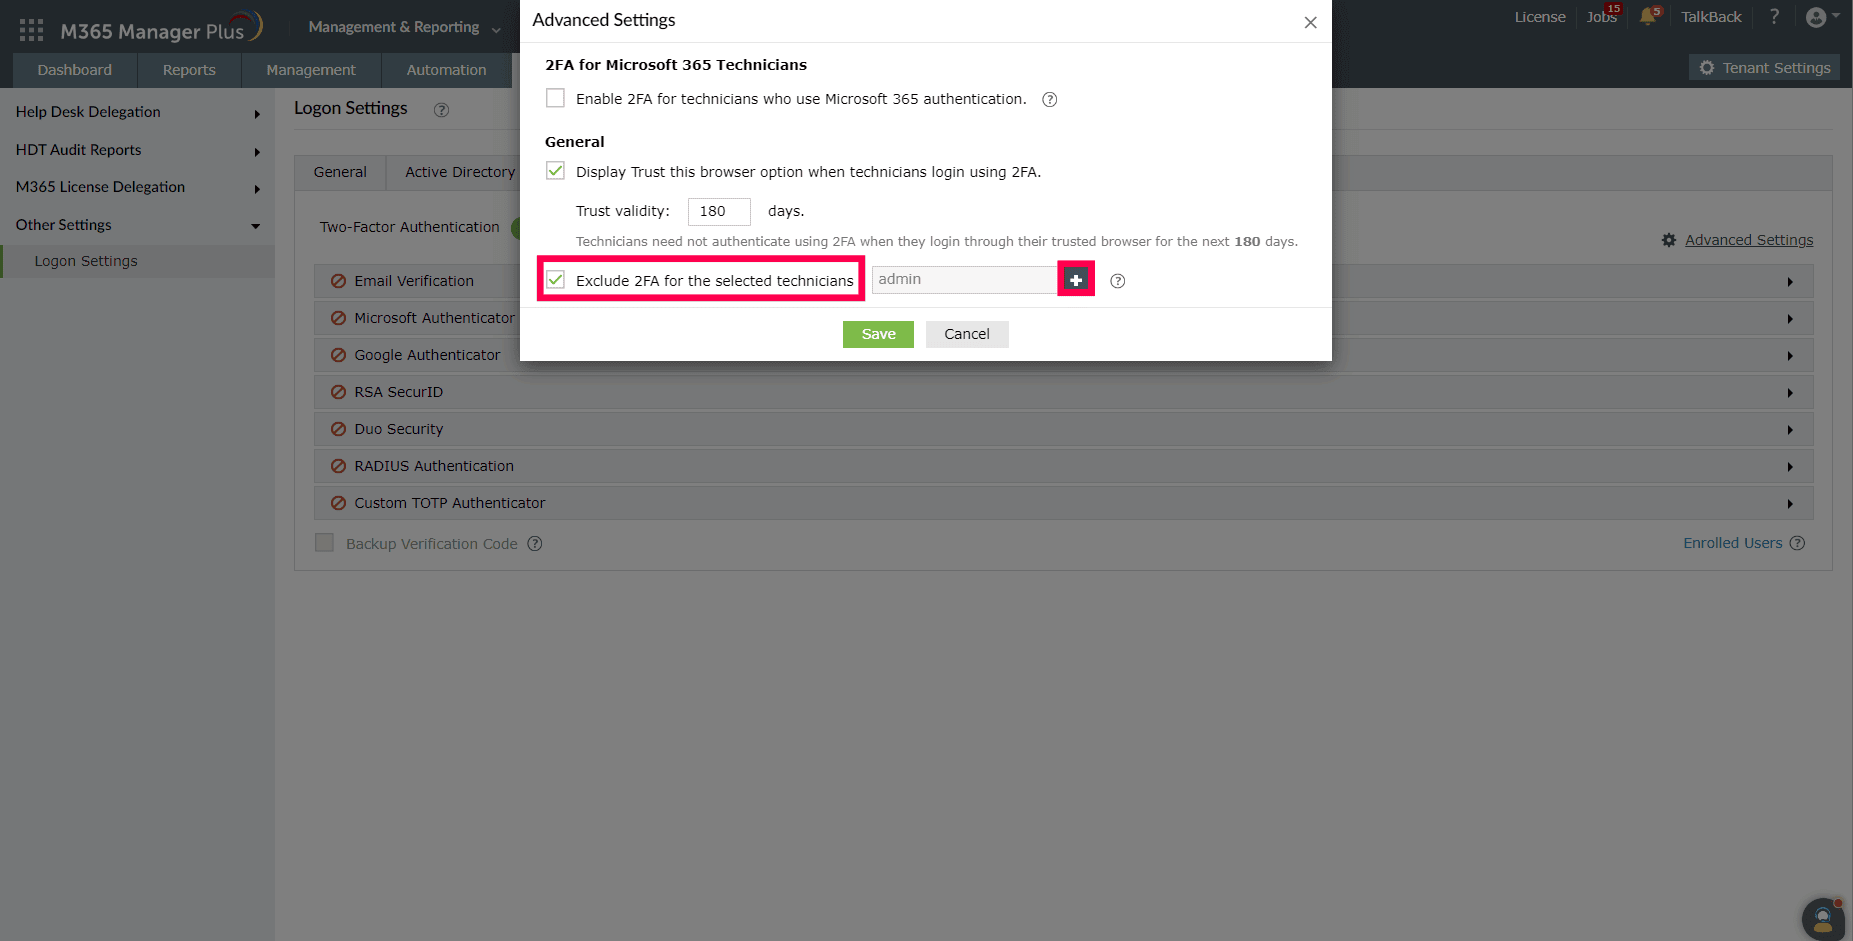
Exclude 2FA for the selected technicians:
2FA is a secure method of authentication. However, there are some scenarios where administrators can be
allowed to bypass it. For example, in environments with lower risk profiles, help desk technicians can
be given more flexibility on how they login to the product, or when they login to the product
frequently, bypassing 2FA can be convenient for them to conduct their tasks. You can now set up M365
Manager Plus to exclude 2FA for a select list of help desk technicians.
Configuration steps:
- Select Exclude 2FA for the selected technicians.
- Click on the
 icon to add technicians for whom
2FA should be excluded.
icon to add technicians for whom
2FA should be excluded.
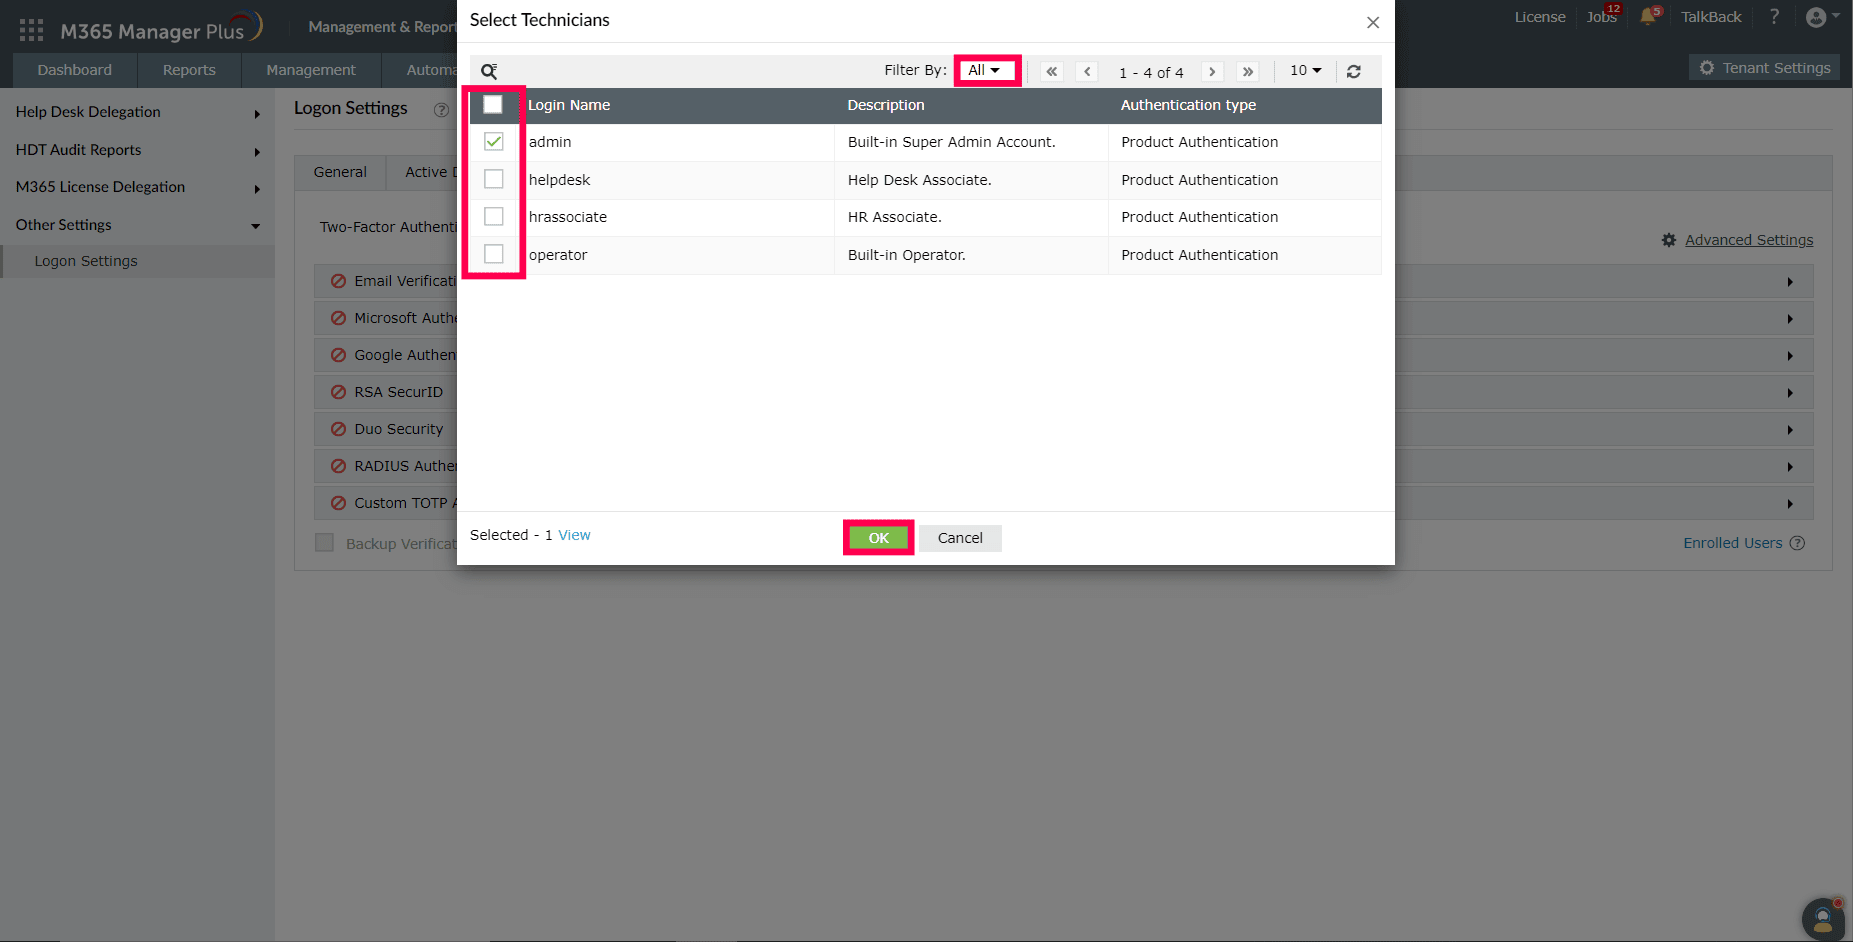
- Select the help desk technicians for whom 2FA should be excluded. You can also filter the list of
technicians by Authentication Type using the Filter By dropdown.
- Click OK to exclude 2FA for the selected help desk technicians.


 ADManager Plus
 ADAudit Plus
 ADSelfService Plus
 M365 Manager Plus