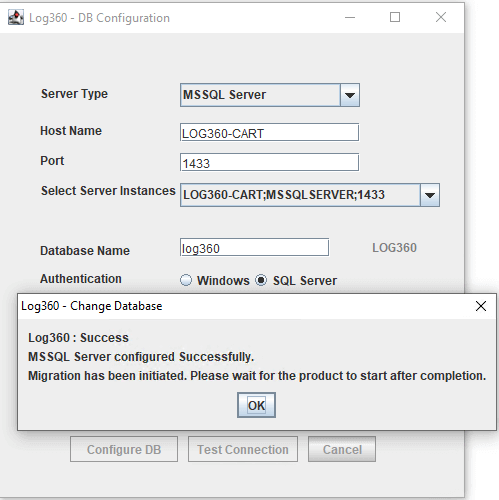
Database Migration
Using this option you can change the built-in database server (PostgreSQL) of Log360 MSSP to MS SQL Server or another instance of a PostgreSQL Server.
Important points to remember
- Supported database migrations:
- PostgreSQL Server to MS SQL Server or another instance of PostgreSQL Server.
- MS SQL Server to PostgreSQL Server or another instance of MS SQL Server.
- Supported database versions:
- PostgreSQL: 9.6 to 10.21
- MS SQL: 2008 and above
- Take a backup of the database before you proceed.
- We recommend applying the Windows service packs and cumulative updates suggested by Microsoft during your migration to MS SQL Server.
Prerequisites for MSSQL migration
- Copy the bcp.exe and bcp.rll files from the installed SQL Server directory and paste them in the Log360 MSSP bin folder (<Log360_MSSP_installed_directory/bin).
- Location of the bcp.exe file: <MSSQL_installed_folder>\Client
SDK\ODBC\...\Tools\Binn\bcp.exe. For example, C:\Program Files\Microsoft SQL
Server\Client SDK\ODBC\...\Tools\Binn\bcp.exe.
- Location of the bcp.rll file: <MSSQL_installed_folder>\Client
SDK\ODBC\...\Tools\Binn\Resources\1033\bcp.rll. For example, C:\Program
Files\Microsoft SQL Server\Client SDK\ODBC\...\Tools\Binn\Resources\1033\bcp.rll
- For migration to MS SQL, please install the corresponding SQL Native Client in the Log360 MSSP machine as per the MS SQL Server version.
Note - MS SQL server version 2022 is also supported by Log360 MSSP.
- If firewall is enabled in the MS SQL Server machine, the TCP and UDP ports must be opened.
- If the MS SQL server you wish to migrate to has Force encryption enabled, follow the steps mentioned below.
- Convert your certificate to .cer format.
- Open IIS Manager.
- In the middle pane, click Server Certificates.
- Open the certificate you want to use, and click the Details tab.
- Click Copy to file.
- Click Next in the Certificate Export Wizard that appears.
- On the Export Private Key screen, select No, do not export the private key, and click Next.
- On the Export File Format screen, select either DER encoded binary X.509 (.CER) or Bstr ase-64 encoded X.509 (.CER), and click Next.
- Enter a name for the file and click Next, and then Finish.
- Open Command Prompt and navigate to <Installation directory>\jre\bin. Use the command below to associate the certificate with the Java KeyStore.
- keytool -import -v -trustcacerts -alias myserver -file pathofthecert\certname.cer -keystore "..\lib\security\cacerts" -keypass changeit -storepass changeit -noprompt
- where pathofthecert is the location where the certificate has been stored and certname is the certificate name.
- The certificate will be added to your Java KeyStore.
Prerequisites for PostgreSQL migration
- Open the remote machine where the product is installed & navigate to Product Home\ pgsql\ data\ pg_hba.conf
- Open pg_hba.conf file and add an entry of the host IP address and its subnet mask as 0.0.0.0/0 (Refer Pic).

- Navigate to Product Home\ pgsql\ data \ postgresql.conf.
- Open postgresql.conf and change the Listen_addresses as '*' & remove the # in the start of the line. (Refer Pic)

Database backup for External PostgreSQL
- Copy all the files in <postgresql_installdir>/lib and <postgresql_installdir>/bin folders and paste them in <product_home>/pgsql/lib and <product_home>/pgsql/bin folders respectively. Here, <product_home> refers to the home directory of Log360 MSSP
- Restart the external PostgreSQL server.
Repeat the steps 1 to 3 from above whenever you update the PostgreSQL server.
Steps for Migration:
Note: Take a Backup/Snapshot of Log360 MSSP before proceeding with the steps (Important)
- Open the Command Prompt and navigate to (Here, Log360MSSP home is the location where Log360 MSSP is installed).
- Stop Log360 MSSP by running shutdown.bat.
- Run the ChangeDB.bat.
- From the Server Type menu, select the database server you plan to switch to.
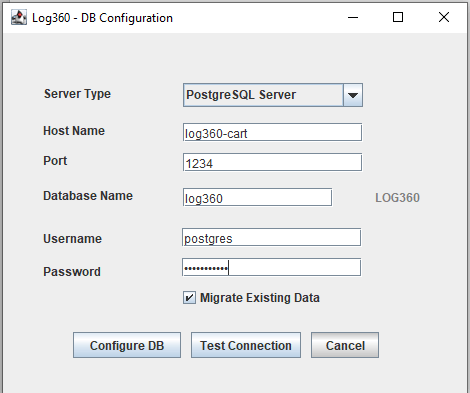
- If you select PostgreSQL Server, then:
- In the Host Name and Port field, enter the host name or IP address and the port number of the PostgreSQL database server.
- Enter the username and password of a user with the necessary permissions to create a new database.
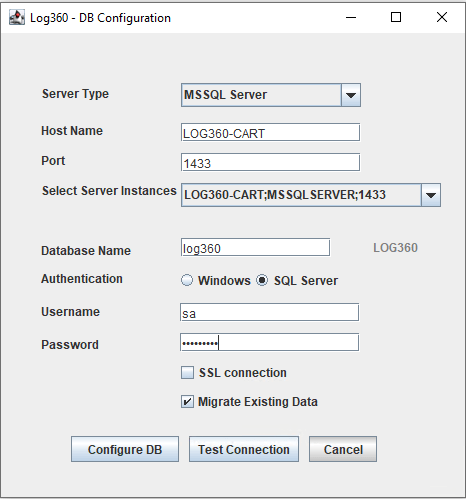
- If you select MS SQL Server, then:
- Move the bcp.exe and bcp.rll files into the bin folder manually.
- In the Host Name and Port field, enter the host name or IP address and the port number of the MS SQL database server.
- In the Select Server Instance field, select the SQL Server instance you want to use.
- For Authentication, you can use either Windows credentials or a SQL Server user account.
- If you want to use a SQL Server user account, then select SQL Authentication and enter the Username and Password.
- If you want to use Windows authentication, select Windows Authentication, and enter the username and password of a Windows domain user account.
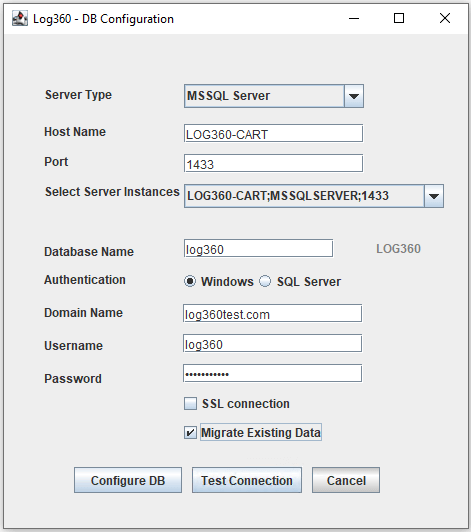
- Note: The user account used must have permission to create a database in the selected MS SQL Server.
- Check the box next to Migrate Existing Data to copy the data from your old database to the new database.
IMPORTANT: Leave this box unchecked only if you are changing the database of a fresh installation of Log360 MSSP.
- If the MS SQL server you wish to migrate to has Force encryption enabled, check the box next to SSL connection.
- Click Test Connection and wait for the connection to be established.
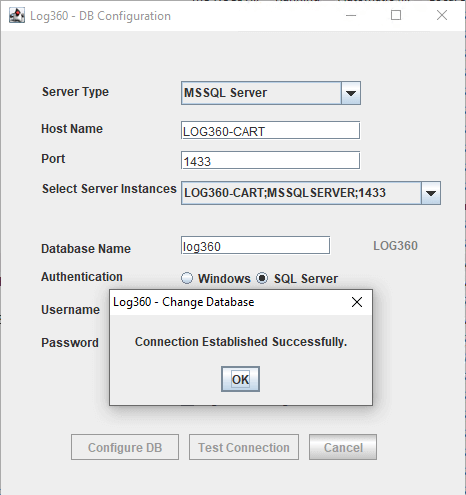
- Once Test Connection has been established successfully, click Configure DB to initiate migration.
