Domain user policy settings
Local user policy settings
General

CAPTCHA Settings
Hide CAPTCHA in: Hide the CAPTCHA on second-factor authentication pages by selecting it from the drop-down.
MFA Recovery
Enable MFA Backup Verification Codes: Select this setting to enable the generation of the MFA backup codes that let end users prove their identity when their MFA device or authenticator is unavailable.
About backup codes
These one-time-use backup codes allow users to prove their identities in case their MFA device is not reachable or they are unable to use their enrolled MFA methods of authentication. Once the Enable MFA Backup Verification Codes setting is enabled, the backup codes can be generated and end-users can enter them to authenticate themselves during machine or VPN logon, ADSelfService Plus portal login, or self-service actions. Backup codes can be generated in two ways:
- By the user: Users can generate backup codes in the ADSelfService Plus end-user portal. A total of five codes are generated every time the option is used. Each code cannot be used more than once.
- By the admin: Admins can also generate backup codes for users who have enrolled for MFA using the Enrolled Users Report. This comes in handy when users have not generated their own backup codes and cannot use the enrolled MFA methods. Learn more.
Note:
- Users can deploy backup codes during VPN logins only when RADIUS-challenge response-based authentication methods are used for VPN MFA login.
- During VPN MFA, the generated backup code can be entered in the field provided for one-time passcodes at the VPN client.
- When identity verification is performed using backup codes, the Trust this browser and Trust this machine options will not be considered.
Reset/Unlock MFA

MFA for password resets
MFA for account unlocks
Endpoint MFA
Machine Login MFA
Note: MFA for machine logins requires the
Professional
edition of ADSelfService Plus with endpoint MFA.
These are policy-based settings and will be enforced when a user under the policy attempts to log into a
machine on the domain. Based on this configuration, MFA might be bypassed on machines if the user is not
enrolled. To enforce MFA on machines irrespective of the enrollment status of the user, please configure
machine-based
MFA.
The Machine Login MFA section gives admins granular control over MFA prompts for machines on the
network.

- Enable MFA for <drop-down>: This setting allows you to enable MFA for interactive
logins, User Account Control (UAC), and machine unlocks.
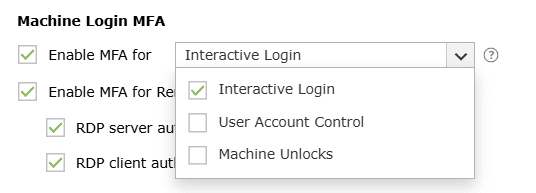
- Interactive login: When enabled, MFA will be required during interactive or GUI-based
logins on Windows machines. Users will be able to perform subsequent actions only upon
successful identity verification.
- User Account Control: When this setting is enabled, MFA will be required for all User
Account Control (UAC) credential prompts, and the user will be able to perform the desired
action only upon successful identity verification. This setting is compatible with Windows 7
and above and Windows Server 2008 and above. This setting is supported in version 5.10 and
above of the ADSelfService Plus Windows login agent.
- Machine unlocks: Enabling this setting will enforce MFA when unlocking Windows
machines.
Note: The
Enable MFA for User Account Control option is available only for Windows UAC
prompts that require user credentials.
MFA for Windows machine unlocks requires the
Professional
edition of ADSelfService Plus with Endpoint MFA.
- Enable MFA for Remote Desktop access during: Using this setting, the admin can configure MFA
to be required when establishing connections with machines through the RDP, ensuring that RDP
connections to machines are secured with an additional layer of authentication.

- There are two ways in which MFA can be configured for Remote Desktop access:
- RDP server authentication: When this setting is enabled, all incoming Remote Desktop
connections to Windows machines where the ADSelfService Plus login agent is installed will
be authenticated and protected using MFA.
- RDP client authentication: This setting can be enabled to require MFA for all
outgoing Remote Desktop connections via the Windows Remote Desktop application (mstsc.exe)
on machines where the ADSelfService Plus login agent is installed. This setting is supported
by version 5.10 and above of the ADSelfService Plus Windows login agent. This setting is
applicable for Windows 7 and above and Windows Server 2008 R2 and above.
To enable MFA for RDP client authentication, the following prerequisites need to be
satisfied:
- Network-level authentication needs to be enabled. You can enable network-level
authentication via Group Policy by navigating to Windows Components > Remote
Desktop Services > Remote Desktop Session Host > Security.
- To require MFA for Remote Desktop connections in a multi-forest AD environment,
there must be a trust relationship between the two domains. Domain trusts can be
added between forests either through a forest trust (a trust relationship at the
forest level) or through an external trust (a trust relationship at the domain
level). For steps to configure a trust relationship, please refer to this
document.
Note: Enabling both options might lead to double MFA verification
if the Windows login agent is installed on both the server and client machines. For example,
if Google Authenticator is the configured MFA authenticator, and both RDP server and client
authentication are enabled, then the user will be required to perform identity verification
using the code both before establishing a connection with the remote machine and again after
establishing the connection.
With RDP client authentication, you can protect remote access using MFA only for users
accessing the machine from the internet or other public IP addresses via Remote Desktop
Gateway (RD Gateway), by configuring a conditional access rule with IP restrictions. Learn
more about
conditional access.
- The Machine login MFA process can be idle for __ min: Enabling this setting will set a time
limit for users to complete the MFA process for logging into their machines.
- Skip MFA when the ADSelfService Plus server is down or unreachable: This option ensures users
aren't left stranded on their machine login screens during the MFA process when the ADSelfService
Plus server is down or unreachable. However, this also means renouncing the advanced security layer
of MFA, which is not recommended. To avoid such circumstances, deploy offline MFA. This setting is
not applicable when:
- Offline MFA is configured and the user is enrolled with offline MFA on their device.
- Machine-based MFA is enforced in the device.
- Keep a machine trusted for __ day(s): When this setting is enabled, users who have logged in
once using MFA for machine login can skip going through MFA authentication during subsequent logins.
Enabling this setting helps users avoid going through the MFA process every time they lock and
unlock their machines. The trusted machine's status is revoked after the specified number of days.
- Keep the 'Trust this machine' option selected by default: By enabling this setting, you can
keep the box next to Trust this machine checked on the MFA authentication screen by default.
- __ if the user is not enrolled in MFA: This setting determines the authentication flow for
the user when they have not enrolled for any of the authenticators for Machine login MFA. The admin
can configure one of the following actions to occur:
- Allow logins: The user will be permitted to bypass machine login MFA and gain access
to the machine.
- Deny logins: The user will be restricted from access.
- Force enrollment:
- The user will be forced to enroll with the authenticators for online MFA and offline
MFA only after successful primary authentication.
- This option can be applied for only Windows and macOS machines. If a user is not
enrolled and this option is selected, the user is denied access to their Linux
machine.
Important:
- Authenticators required for both online and offline MFA will be considered
collectively, so if the user isn't enrolled for any of the authenticators required
for both online and offline MFA, they will be considered not enrolled.
Alternatively, if they are enrolled for at least one authenticator required for
either of these login methods, they're considered partially enrolled.
- This setting applies only for users that are not enrolled. It does not apply to
partially enrolled users; partially enrolled users will instead be forced to enroll
for the remaining authenticators after completing MFA using the enrolled
authenticators.
- If authenticators that users cannot enroll themselves for—such as custom hardware
TOTP tokens and AD security questions—are selected, they will be denied access even
if force enrollment is enabled as only the admin can enroll them.
- When machine-based
MFA is enforced, this setting is overridden and users who haven't enrolled
for any of the authenticators will be denied access to the machine, and partially
enrolled users will be forced to enroll for the remaining authenticators required.
- Restrict users from performing offline MFA after _ days/attempts: When this setting is
enabled, offline MFA is restricted to a certain number of days or attempts, and users are mandated
to connect back to ADSelfService Plus once this limit is exhausted.
Note: Offline MFA requires the
Professional
edition of ADSelfService Plus with Endpoint MFA.
- It is recommended that a value appropriate to your organizational requirements is set.
Setting lower values than required could leave users stranded without access to the
machine.
- It is recommended that you enable this setting, as any change made to the self-service
policy, MFA configurations, advanced settings, and modifications related to Offline MFA
enrollment will reflect in the machines for the enrolled users only after they complete
MFA when online.
- This limit will be reset when the particular user performs online authentication on the
specific machine.
- Force the user to enroll their device for offline MFA after successful online authentication:
When this setting is enabled, once a user completes online MFA in a machine, it is automatically
enrolled for offline MFA without notifying the user. If not enabled, the user can choose to enroll
their machine for offline MFA or skip it.
OWA Login MFA
Note: MFA for OWA logins requires the Professional
edition of ADSelfService Plus with Endpoint MFA.

- Restrict the MFA idle time during OWA logins to <text_field> min: When this setting is
enabled, the user session will expire if the user is idle for the specified time interval.
- Skip MFA when the ADSelfService Plus server is down or unreachable: Enable this option if you
want to avoid situations where users can't access OWA or Exchange admin center when the
ADSelfService Plus server is down or unreachable. However, be aware that enabling this option means
renouncing the advanced security layer of MFA when the ADSelfService Plus server is down or
unreachable, which is not recommended. To avoid such circumstances, deploy ADSelfService Plus with
high availability or load balancing.
Note: While enabling or disabling
the
Skip MFA when the ADSelfService Plus server is down or unreachable option for OWA
MFA, you must also change the corresponding registry key on the machine on which the
ADSelfService Plus OWA Connector is installed for the settings to take effect.
To do so:
Step 1: Open the Registry Editor (type regedit in the Run dialog box) on the
machine on which the OWA Connector is installed.
Step 2: Navigate to Computer\HKEY_LOCAL_MACHINE\SOFTWARE\ZOHO Corp\ADSelfService Plus
IIS MFA Module.
Step 3: Set the BypassMFAOnConnectionError property to TRUE or FALSE, depending
on whether you want MFA to be bypassed if any connection issues are present during
authentication.
It is recommended to take a backup of the registry key before editing it. Only members of the
built-in local administrator group on the computer will have the privilege to edit this key.
- Expire trust for a browser after __ days: When this setting is enabled, users who have logged in once using MFA for OWA can skip going through MFA authentication during subsequent logins. Enabling this setting will help users avoid going through the MFA process every time they log in to OWA or the Exchange admin center from the same browser. The trusted browser's status will be revoked after the specified number of days.
- Keep the "Trust this browser" option selected by default: By enabling this setting, you can keep the box next to "Trust this browser" checked on the MFA authentication screen by default.
- Skip MFA when the user is not enrolled for the required authenticators: If this option is
disabled, non-enrolled users will not be able to log into their OWA portal. Partially enrolled users
will be considered non-enrolled. If this option is enabled, MFA will be skipped for non-enrolled users. If the user is partially enrolled, MFA verification will be required using the authenticators they have enrolled for, following which they will be forced to complete enrollment for the authenticators to be used for MFA for OWA logins.
Enable this option if you want to avoid situations where the users can't access OWA or the
Exchange admin center when the user is not enrolled for the required authenticators. However, be
aware that enabling this option enables logins without satisfying the mandated authenticators
configured in the policy. So, it is recommended to disable this option once all the users in
this policy are enrolled for MFA.
VPN Login MFA
Note: MFA for VPN logins requires the Professional Edition of ADSelfService Plus with Endpoint MFA.
-
Keep the VPN MFA session valid for <number> minutes: Enabling this setting will set a
time limit for the second factor of authentication during VPN login. For instance, if you set this
to two minutes, users have to enter the code or approve the notification, as per the authentication
method enabled, within two minutes.

Note: If your VPN server allows you to configure the RADIUS timeout
limit, set it to a value that is greater than the session time limit you configure in this
setting.
- The VPN login MFA process can be idle for <number> minutes: This idle time cannot be
greater than the secure link's expiration time, which is 30 minutes by default.

- Skip MFA when the ADSelfService Plus server is down or unreachable: Enable this option if you
do not want users to be left stranded at the login screen during VPN logins when the ADSelfService
Plus server is offline or unreachable. This configuration is enforced across all policies.
Note: While enabling or disabling the
Skip MFA when the ADSelfService Plus server is
down or unreachable option for VPN MFA, you must also change the corresponding registry
key on the machine on which the ADSelfService Plus NPS Extension is installed for the settings
to take effect.
To do so:
Step 1: Open the Registry Editor (type regedit in the Run dialog box) on the
machine on which the NPS Extension is installed.
Step 2: Navigate to HKEY_LOCAL_MACHINE\SOFTWARE\ZOHO Corp\ADSelfService Plus NPS
Extension.
Step 3: Set the BypassMFAOnConnectionError property to TRUE or FALSE, depending
on whether you want MFA to be bypassed if any connection issues are present during
authentication.
It is recommended to take a backup of the registry key before editing it. Only members of the
built-in local administrator group on the computer will have the privilege to edit this key.
- Skip MFA when the user is not enrolled for the required authenticators:
VPN Client Verification:
- If this option is enabled, MFA will be skipped for non-enrolled users.
- If this option is disabled, non-enrolled users will not be able to log into their VPN.
Note: Partially enrolled users are considered non-enrolled and will be allowed to skip MFA.
SecureLink Email Verification:
- If this option is enabled, MFA will be skipped for non-enrolled users. If the user is partially enrolled, MFA verification will be required using the authenticators the user has enrolled for, and upon successful MFA verification with the authenticator(s) they're enrolled for, they will be forced to complete enrollment for the authenticators to be used for MFA via SecureLink Email Verification.
Note: A user with a valid primary or secondary email address is automatically considered partially enrolled for MFA via SecureLink Email Verification.
A user without a valid primary or secondary email address is considered not enrolled.
- Enable this option if you want to avoid situations where the users can't access their VPN when the user is not enrolled for the required authenticators. However, be aware that enabling this option enables logins without satisfying the mandated authenticators configured in the policy. So, it is recommended to disable this option once all the users in this policy are enrolled for MFA.
- If this option is disabled, non-enrolled users will not be able to log into their VPN. Partially enrolled users will be considered non-enrolled.
- Send additional attributes as a response to the VPN server after successful MFA: Enable this
option if you wish to send additional attributes to the VPN server or other RADIUS endpoints. These
attributes will only be sent to the VPN provider after successful MFA and will be utilized by the
VPN server to determine the level of access each user should have for other purposes. You will be
able to find the full list of supported attributes with the documentation received from your VPN
vendor.
Note: Please update the NPS Extension to version 2.3 or higher
to use this feature.
Configuring additional attributes
- If you try to enable this feature before configuring the attributes, you will be shown a pop-up to
configure them. Click OK. You can also click the Configure Attributes link.
- You can configure RADIUS's Standard or Vendor-specific attributes and corresponding
values to be sent to the VPN providers (other RADIUS endpoints).

- Enter the Vendor ID by clicking on the Edit [
 ] button. The Vendor ID is the unique number that denotes your VPN provider. For
example, if using Fortigate, the Vendor ID is 12356.
- Choose the Type of attribute and enter the Attribute Number, Format, and
Value in the fields displayed.
For attributes in the string format, the values should be in characters, and for the
attributes in the int format, the values should be in integers.
For enum attributes, which contain multiple predefined values, provide the desired value
in terms of their associated integers. For example, if you wish to use Login as
the service-type attribute, enter 1 in the Value field.
In case attributes are in the IPv4 or IPv6 address formats, please provide a valid IP address in
the Value field.
For example, your IPv4 address can look like 10.1.1.1, and your IPv6 address can look like
2001:0db8:85a3::8a2e:0370:7334.
- Click OK after configuring all the attributes you require.
- Once successfully configured, the Send additional attributes as a response to the VPN server
after successful completion of MFA setting will be enabled.
Cloud Applications Login MFA

- Enable passwordless logins: This setting allows users to access applications and the
self-service portal without a password. Please refer to this page for more information.
Note: Passwordless logins to cloud applications require the
Professional
edition of ADSelfService Plus with Endpoint MFA.
Please note that the Trust this browser setting will be disabled for the users for
whom passwordless login is enabled to avoid security loopholes. When passwordless logins are
enforced, the user has to authenticate each time they attempt to access the application.
- Restrict the MFA idle time during logins to cloud apps to <text_field> min: Enabling
this setting will set a time limit for users to finish the MFA process.
- Force enrollment for not enrolled users after successful password verification: When this
setting is enabled, users will not be forced to go through MFA when they log in for the first time.
Instead, they will be asked to go through enrollment after successful password verification.
- Force enrollment post successful MFA for authenticators selected for other endpoints:
Enabling this setting ensures users enroll with all the authenticators required not only for cloud
application logins, but also for MFA during reset password and account unlock as well as machines,
VPN, OWA, and ADSelfService Plus logins. Enrollment is also enforced for authenticators set as
mandatory in the MFA Enrollment tab.
- Keep the 'Trust this browser' option selected by default: When this option is enabled, the
Trust this browser checkbox will be selected by default in the MFA verification screen. This setting
is not applicable when passwordless logins are enabled.
- Expire trust for a browser after ___ day(s): When this option is enabled, users will not be
asked to go through MFA for the specified number of days when they log in to ADSelfService Plus
using trusted browsers. This setting is not applicable when passwordless logins are enabled.
Applications MFA
ADSelfService Plus Login MFA

Q&A Settings
Question Settings

- Display __ Security Questions out of <no_of_available_questions> at random: With this
option, you can define the number of questions to be displayed to the end user. The questions will
be randomly selected by ADSelfService Plus from the available list of security questions configured
under Security Question and Answer Settings.
- Display __ AD Security Questions out of <no_of_available_questions> at random: Select
this option to specify the number of AD security questions to be asked during the identity
verification process. The questions will be randomly selected by ADSelfService Plus from the
available list of security questions configured under AD Security Questions (Configuration
> Multi-factor Authentication > Authenticators Setup > AD Security Questions).
- Display the security questions one by one: Checking this option will display the security
questions one by one (i.e., one question per page).
- Display all the security questions simultaneously: Selecting this option will display all the
security questions on a single page.
Answer Settings
- Verify the users' identities with case-sensitive answers to security questions: Selecting
this option forces the answer provided by users to be case-sensitive.
- Hide security answers during authentication: Selecting this option will hide security answers
by default.
Answer Strengtheners (for Security Q&A only)

- Prevent users from providing their usernames as answers: This will prevent users from using
their username as an answer.
- Prevent users from providing the same answer to multiple questions: This will prevent users
from providing the same answer to multiple
questions.
- Prevent users from using any word in the security question in their answers: This will
prevent users from copying words in the
questions as answers.
- Force users to use only English characters (a-z), numbers (0-9), and symbols: This will make
sure that users use only alphanumeric
characters and symbols in their answers.
- Store security answers using reversible encryption: Selecting this option will store the
security answers as plain text in the
ADSelfService Plus database. The answers can be viewed using the Security Questions and Answers
report.
- Store security answers using the ___ algorithm: Select this option to encrypt and store the
answers to security questions using MD5 or
SHA-512 algorithm.
Verification Code Settings
Mail/Mobile Attributes

- Select the type of attribute (Mail or Mobile) you want to view from the
Select Type
drop-down.
- Click Add Attribute to add a new attribute that contains the users' email addresses or mobile
numbers.
Secondary Email/ Mobile Number

- Prevent enrolling already enrolled <drop-down>: Use this option to prevent multiple
users from enrolling with the same secondary email address and/or mobile number across the product.
- Allow or Block email addresses from the following domains <domain_dropdown>: Use
this option to block or allow particular email domains. If you choose Block, users will be able to
add email addresses from any domain apart from the listed domain(s). Choosing Allow will ensure that
only trusted email service providers are utilized by the users to receive verification codes. You
can leave this field empty to allow any domain after choosing Allow.
- Allow or Block the following mobile number formats __: Use this option to block or
allow particular mobile number formats. If you choose Block, users will be able to add mobile
numbers in any format apart from the listed format(s). Choosing Allow will ensure that users enter
mobile numbers only in the particular format(s) configured. You can leave this field empty to allow
any format after choosing Allow.
Note: If you do not want users to
register secondary email addresses or mobile numbers, disable these settings:
- Allow or Block email addresses from the following domains __
- Allow or Block the following mobile number formats __
- Choose enforcement: Use this setting to configure whether adding secondary email addresses and
mobile numbers is mandatory or optional for the users. The available options are:
- Make this registration optional.
- Force users to register an email address.
- Force users to register a mobile number.
- Force users to register both an email address and a mobile number.
- Limit the number of secondary email enrollments to __: Use this setting to specify the
maximum number of secondary email address enrollments allowed per user. You can permit between one
and 10 secondary email addresses.
- Limit the number of secondary mobile number enrollments to __: Use this setting to specify
the maximum number of secondary mobile number enrollments allowed per user. You can permit between
one and 10 secondary mobile numbers.
Others

- Set verification code length to ___ digits: Use this setting to set the number of digits in
the verification code.
- Show 'Select Email ID/Mobile No.' as the default value in the mail/mobile drop-down list:
Enabling this option will show Select Email ID/Mobile No. as the default value in the
email/mobile drop-down during identity verification.
- Partially hide the email ID and mobile number on MFA pages: This option will partially hide
the email address and mobile number of the user during the identity verification process.
- Skip the 'Choose Email Address/Mobile Number' step and auto-trigger the verification code: In
some cases, the user might have enrolled in ADSelfService Plus with multiple email addresses or
mobile numbers. By default, the product shows the user a drop-down to select the email address or
mobile number to send the verification code to. However, when the Choose Email Address/Mobile Number
step and auto-trigger the verification code option is checked, this drop-down is not displayed, and
the code is sent directly to the user's primary email address, which is determined based on:
- Email address or mobile number specified by the end user during self-enrollment or by the
admin during auto-enrollment via CSV or external databases (whichever is the latest).
- Email addresses or mobile numbers linked to the Active Directory user object. Admins can
configure the mail or mobile attributes to be used for the policy using the Advanced section of the MFA
settings as shown in the screenshot below. To find these settings in the product GUI, log in
to the ADSelfService Plus admin portal and go to Configuration > Self-Service >
Multi-Factor Authentication (MFA) > Advanced > Verification Code > Mail/Mobile
Attributes.

- CC the admin/manager in the identity verification email sent to users: Use this setting to
include the user's manager or admin's email address in the CC line of the verification code email
sent to the user. To do this:
- Check the box next to this setting.
- Enter the admin's email address in the Email ID field.
- Click Add Manager to include the email address of the user's manager.
General
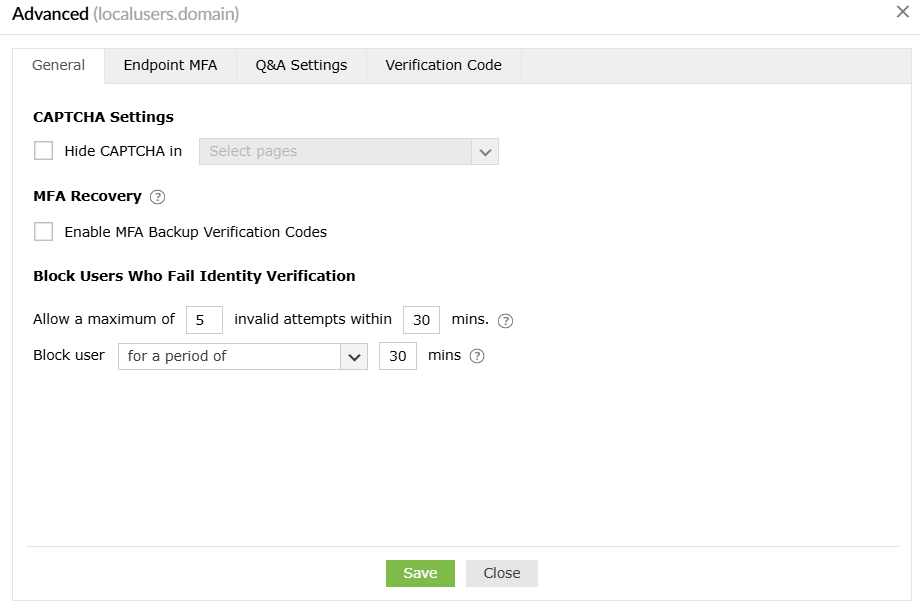
CAPTCHA settings
Hide CAPTCHA in: Hide the CAPTCHA on second-factor authentication pages by selecting it from the drop-down.
MFA recovery
Enable MFA backup verification codes: Select this setting to enable local users to prove their identity with a backup code when their MFA device or authenticator is unavailable. Local users will need to contact their admin for a backup code, which can be generated from the MFA Enrolled Users Report.
About backup codes
These one-time-use backup codes allow users to prove their identities in case their MFA device is not reachable or they are unable to use their enrolled MFA methods of authentication. Once the Enable MFA Backup Verification Codes setting is enabled, the backup codes can be generated by the admin from the MFA Enrolled Users Report, and end users can enter them to authenticate themselves during machine logins and Windows login peripheral actions.
Note: When identity verification is performed using backup codes, the Trust this machine options will not be considered. Backup codes for local users cannot be generated by themselves and must be provided by the admin.
Block Users Who Fail Identity Verification
- In the Block Users Who Fail Identity Verification section, specify the maximum number of invalid MFA attempts allowed within a set time interval. Use the Allow a maximum of __ invalid attempts within __ mins option to define the limit after which the user will be blocked.
Note: Each identity verification attempt failure, whether during password entry, backup code entry, OTP submission, or MFA verification, will count toward the maximum verification attempts limit before the account is blocked. Blocked users cannot log in to endpoint devices.
MFA failures while using Duo Security will not be counted towards identity verification failures, as Duo has its own blocking mechanism.
- Using the Block users for a period of __ min option, specify:
- The number of minutes for which the user will remain blocked.
Example: For instance, say you have set the maximum invalid attempts to be five, defined the time interval as 10 minutes, and specified the period for which the user will remain blocked as 30 minutes. This means that when users fail to verify their identity five times in a 10-minute interval, their account will be blocked for 30 minutes.
- Choose Forever (until unblocked by admin) to configure user accounts to remain blocked until manually unblocked by an admin.
A local Windows user blocked while trying to access a protected machine endpoint will be restricted from accessing every other machine endpoint protected by ADSelfService Plus, until their account is unblocked.
Endpoint MFA
Machine Login MFA
Note: MFA for machine logins requires the Professional edition of ADSelfService Plus with Endpoint MFA.
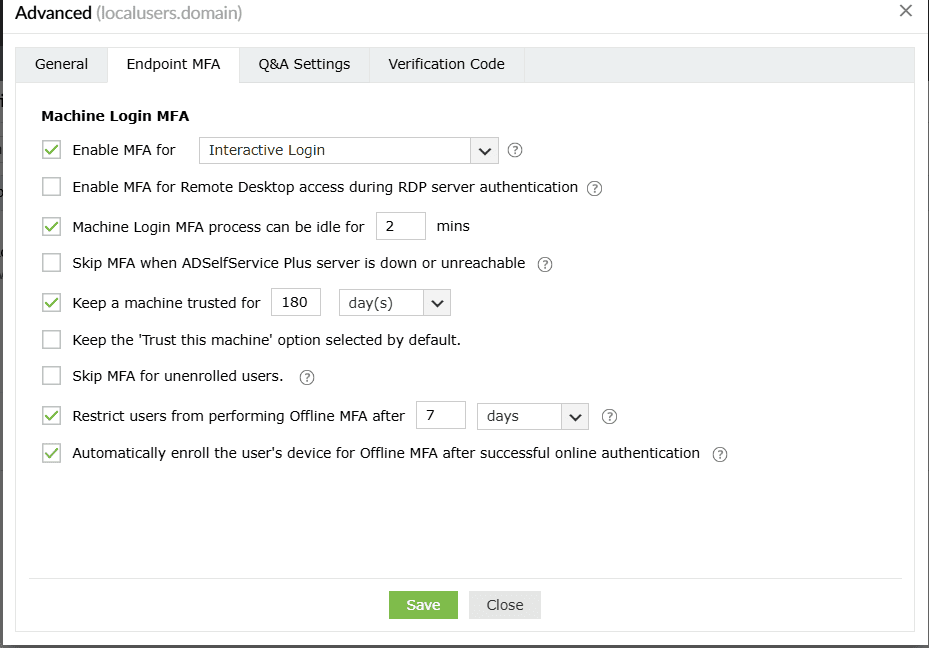
These are policy-based settings and will be enforced when a local user under the policy attempts to log into their Workgroup or domain-joined machine. Based on this configuration, MFA might be bypassed on machines if the user is not enrolled. To enforce MFA on machines irrespective of the enrollment status of the user, please configure machine-based MFA.
The Machine Login MFA section gives admins granular control over MFA prompts on local machines.
Q&A Settings
Question Settings
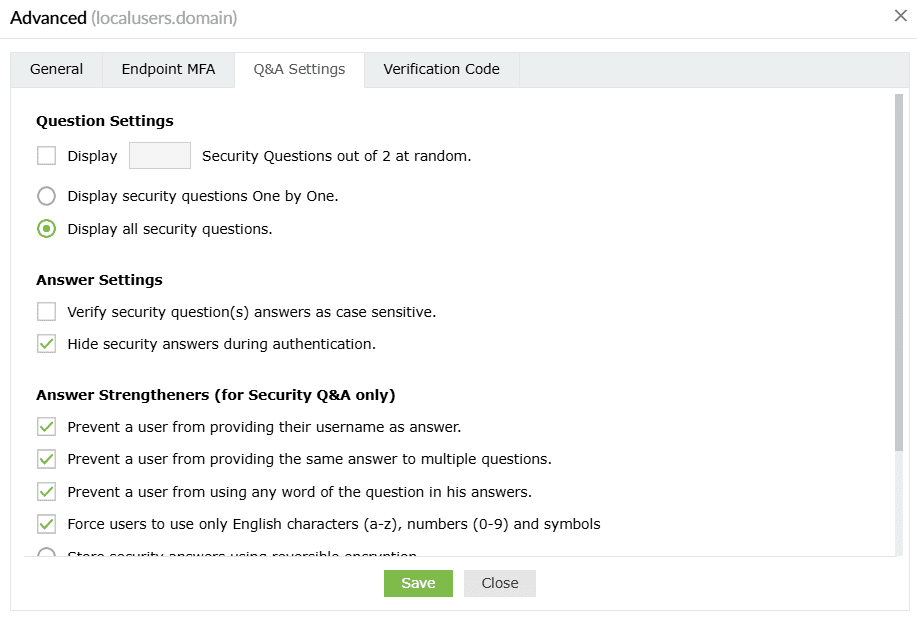
- Display __ Security Questions out of <no_of_available_questions> at random: With this option, you can define the number of questions to be displayed to the end user. The questions will be randomly selected by ADSelfService Plus from the available list of security questions configured under Security Question and Answer Settings.
- Display the security questions one by one: Checking this option will display the security questions one by one (i.e., one question per page).
- Display all the security questions: Selecting this option will display all the security questions simultaneously on a single page.
Answer Settings
- Verify the users' identities with case-sensitive answers to security questions: Selecting this option forces the answer provided by users to be case-sensitive.
- Hide security answers during authentication: Selecting this option will hide security answers by default.
Answer Strengtheners (for Security Q&A only)
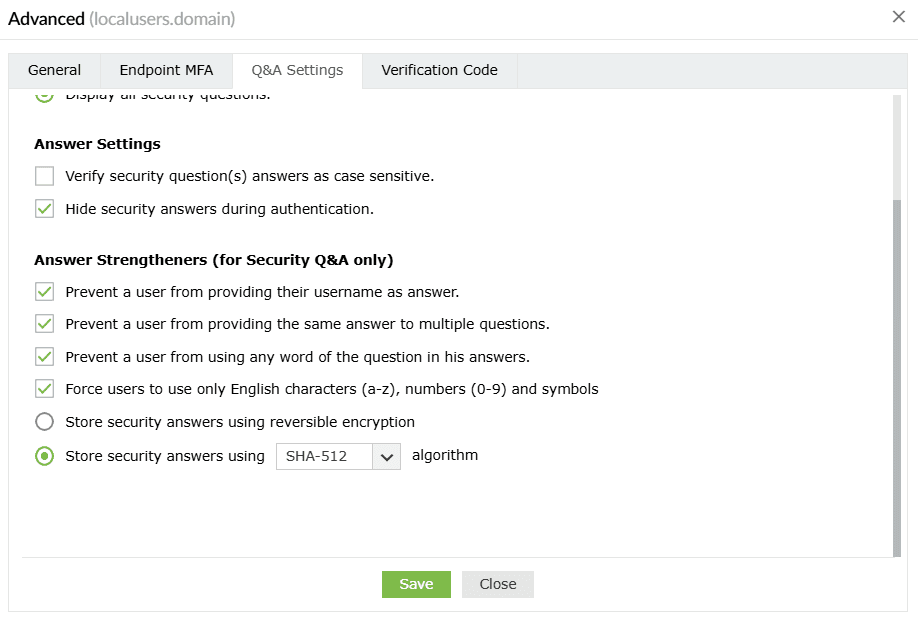
- Prevent users from providing their usernames as answers: This will prevent users from using their username as an answer.
- Prevent users from providing the same answer to multiple questions: This will prevent users from providing the same answer to multiple questions.
- Prevent users from using any word in the security question in their answers: This will prevent users from copying words in the questions as answers.
- Force users to use only English characters (a-z), numbers (0-9), and symbols: This will make sure that users use only alphanumeric characters and symbols in their answers.
- Store security answers using reversible encryption: Selecting this option will store the security answers as plain text in the ADSelfService Plus database. The answers can be viewed using the Security Questions and Answers report.
- Store security answers using the ___ algorithm: Select this option to encrypt and store the answers to security questions using MD5 or SHA-512 algorithm.
Verification Code settings
Email and mobile device attributes
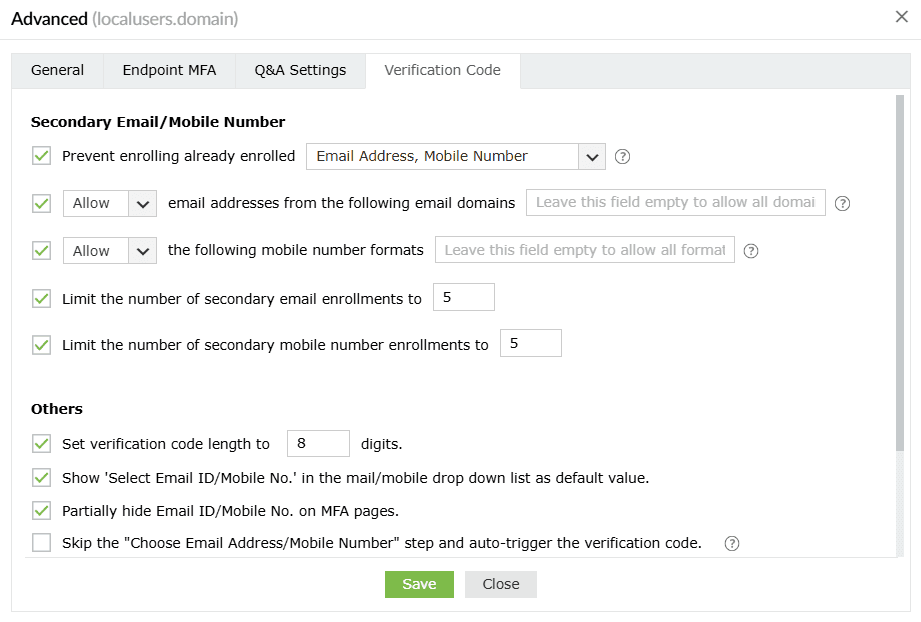
Secondary Email/Mobile Number
- Prevent enrolling already enrolled <drop-down>: Use this option to prevent enrolling multiple users with the same secondary email address and/or mobile number.
- Allow/Block email addresses from the following email domains <domain_dropdown>: Use this option to block or allow particular email domains. If you choose Block, users will be able to add email addresses from any domain apart from the listed domain(s). Choosing Allow will ensure that only trusted email service providers are utilized by the users to receive verification codes. You can leave this field empty to allow any domain after choosing Allow.
- Allow/Block the following mobile number formats __ : Use this option to block or allow particular mobile number formats. If you choose Block, only user mobile numbers in the listed format(s) can be enrolled. You can leave this field empty to allow any format after choosing Allow.
- Limit the number of secondary email enrollments to __ : Use this setting to specify the maximum number of secondary email address enrollments allowed per user. You can permit between one and 10 secondary email addresses.
- Limit the number of secondary mobile number enrollments to __ : Use this setting to specify the maximum number of secondary mobile number enrollments allowed per user. You can permit between one and 10 secondary mobile numbers.
Others
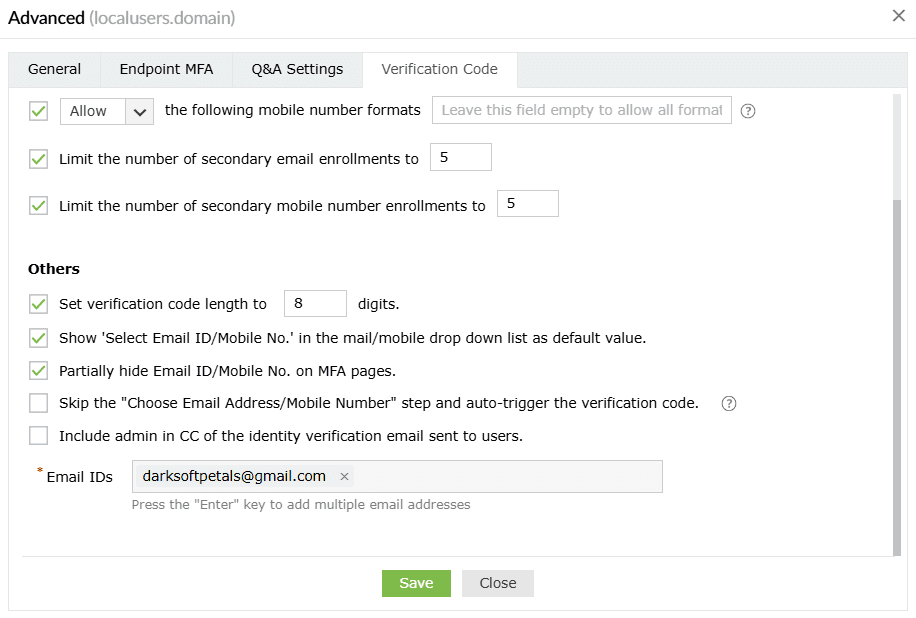
- Set verification code length to ___ digits: Use this setting to set the number of digits in the verification code.
- Show 'Select Email ID/Mobile No.' as the default value in the mail/mobile drop-down list as default value: Enabling this option will show Select Email ID/Mobile No. as the default value in the email/mobile drop-down during identity verification.
- Partially hide Email ID/Mobile No. on MFA pages: This option will partially hide the email address and mobile number of the user during the identity verification process.
- Skip the "Choose Email Address/Mobile Number" step and auto-trigger the verification code: In some cases, the user might have enrolled in ADSelfService Plus with multiple email addresses or mobile numbers. By default, the product shows the user a drop-down to select the email address or mobile number to send the verification code to. However, when the Choose Email Address/Mobile Number step and auto-trigger the verification code option is checked, this drop-down is not displayed, and the code is sent directly to the user's secondary email address.
- Include the admin in CC of the identity verification email sent to users: Use this setting to include the admin's email address in the CC line of the verification code email sent to the user. To do this:
- Check the box next to this setting.
- Enter the admin's email address in the Email ID field.
Click Save to apply these settings to local users enrolled in ADSelfService Plus.


