MFA for OWA Login
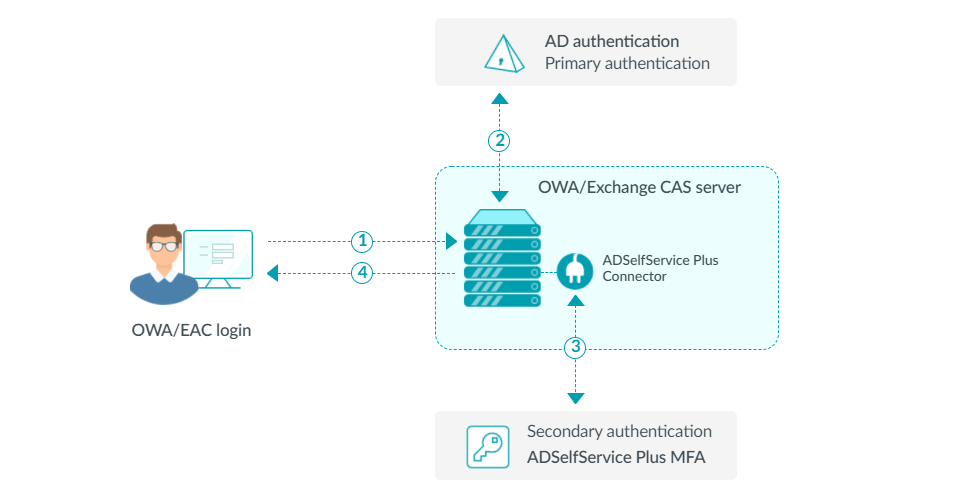
With this setting, you can enable MFA for Outlook on the Web (OWA) and Exchange admin center logins to add an additional layer of security to your Exchange environment. Let's see how you can enable MFA with ADSelfService Plus:

- The user attempts to log in to OWA or the Exchange admin center.
- They are asked to complete the primary authentication in OWA.
- If this is successful, OWA passes a request to the ADSelfService Plus MFA Connector, which informs ADSelfService Plus to go ahead with the rest of the authentication factors.
- If the user completes all the required authentication factors successfully, they are logged in to OWA or the Exchange admin center.
Note: MFA for OWA logins is supported for the following Exchange versions:
- Exchange Server 2013
- Exchange Server 2016
- Exchange Server 2019
Enabling MFA for OWA
Before you start:
- Ensure that the product is using only HTTPS protocol.
- The ADSelfService Plus SSL certificate should be installed in Exchange Server.
Step 1: Configuring MFA for OWA
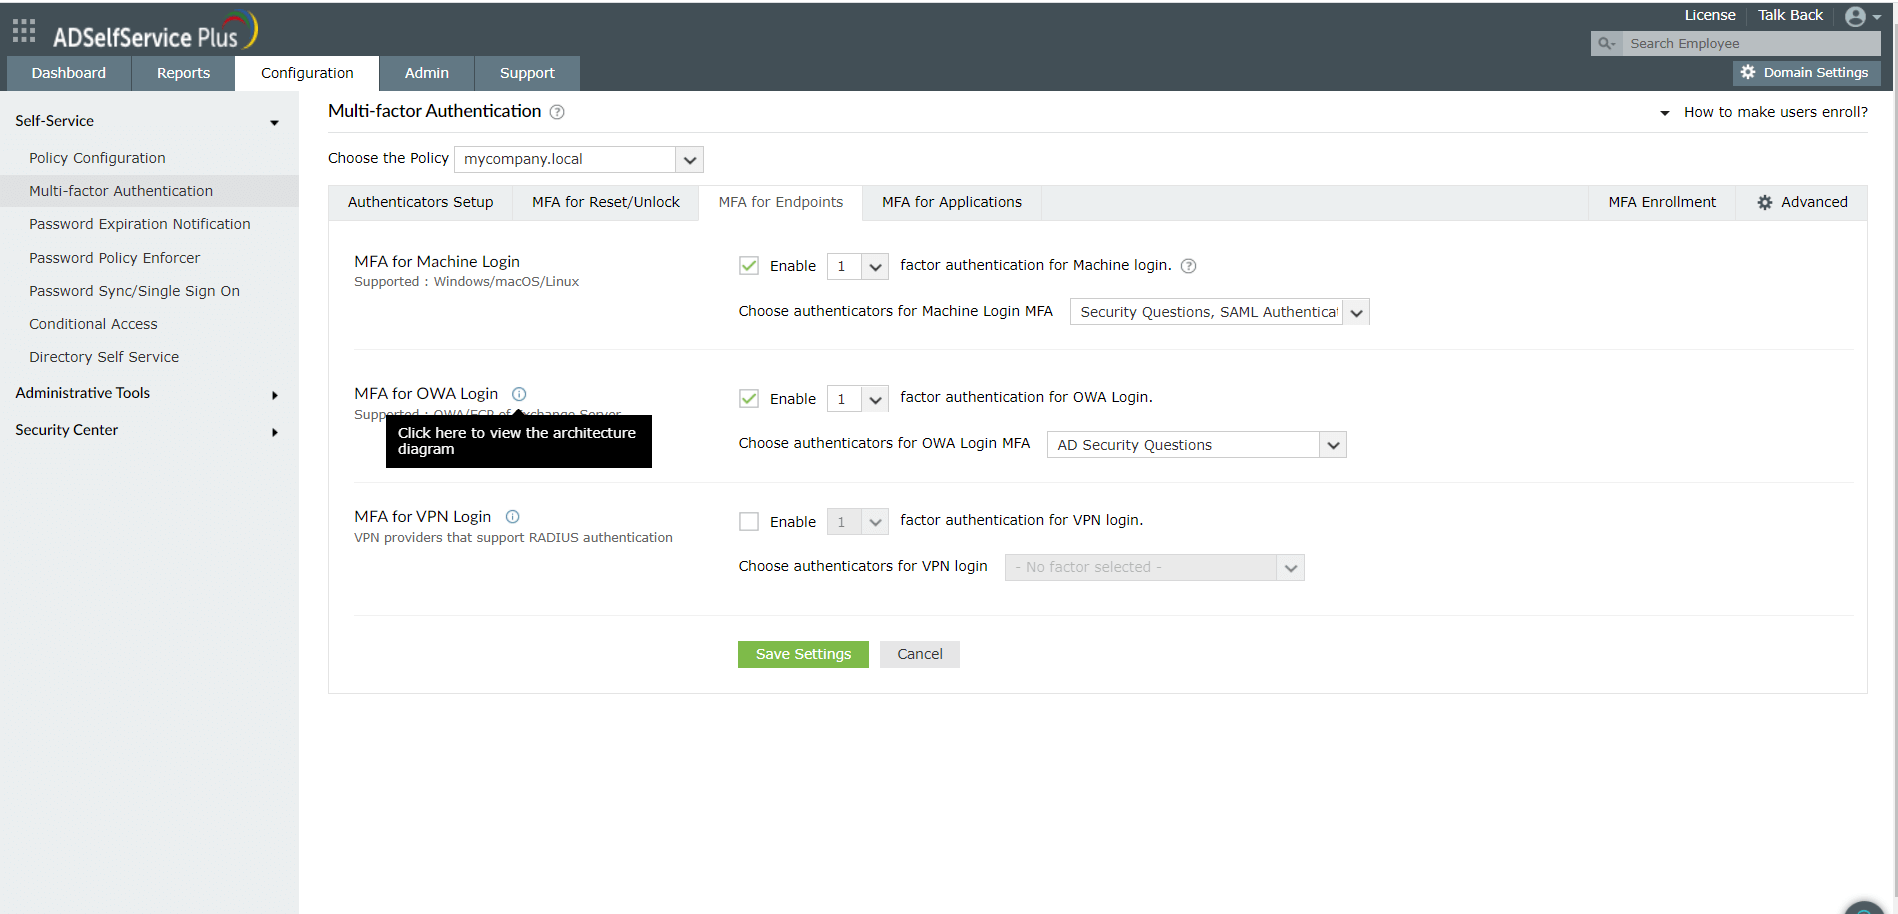
- Go to Configuration > Self-Service > Multi-factor Authentication > MFA for OWA Login.
- Click the Choose the Policy drop-down and select a policy. This will determine which authentication methods are enabled for which sets of users.
Note: ADSelfService Plus allows you to create OU- and group-based policies. If you have not created a policy yet, go to Configuration > Self-Service > Policy Configuration > Add New Policy. Click Select OUs/Groups and make a selection based on your requirements. You need to select at least one self-service feature. Finally, click Save Policy.
- In the MFA for OWA Login section, check the Enable __ authentication factor box, select the number of authentication methods, and specify which ones you'd like to use from the drop-down.
Note:
- The OWA site must utilize HTTPS for FIDO Passkeys to work.
- Authentication using SAML is not supported by MFA in OWA.
- Click Save Settings.
Step 2: Installing the ADSelfService Plus MFA Connector
The IIS MFA extension must be installed in Exchanger Server to enable MFA for OWA and Exchange admin center logins. The extension triggers the request for the completion of other authentication factors after the primary password authentication is successful.
- Go to Configuration > Self-Service > Multi-factor Authentication > MFA for Endpoint.
- Navigate to MFA for OWA and click the help
 icon.
icon.
- Download the ADSelfService Plus MFA Connector from the pop-up that appears.
- Copy the downloaded connector file (AdsspOWAIISModule.zip) to the Windows server that you have configured as the Exchange server. Extract the ZIP file’s content and save it in a location.
- Open PowerShell (x64) as an administrator and navigate to the folder where the content of the extension files is located.
- Execute the following command: PS C:\> .\setupIISMFAModule.ps1 Install
Customizing the virtual directory for ADSelfService Plus Connector
By default, the ADSelfService Plus IIS MFA Connector files are created in a virtual directory under the default web site in IIS Manager. If you want to modify your default web site to redirect to any particular site (for example: If your default web site is selfservice.com and you have configured a redirect URL to selfservice.com/owa) you can change the virtual directory to owa using the command below
C:\>setupIISMFAModule.ps1 install -virtualDirectory "owa"
Uninstalling and updating the ADSelfService Plus MFA Connector
- Open PowerShell (x64) as an administrator and navigate to the folder where the content of the extension files content is located (by default, it is stored in C:\Program Files\ManageEngine\ADSelfService Plus MFA Connector).
- To uninstall the extension, execute the following command:
PS C:\> .\setupIISMFAModule.ps1 Uninstall
- To update the extension, execute the following command:
PS C:\> .\setupIISMFAModule.ps1 Update

Note: If ADSelfService Plus is down or unreachable, users will not be able to access their email, as they won't be unable to complete authentication. You can allow users to bypass MFA in such situations. Refer to the
Advanced settings for more information.
Don't see what you're looking for?
-
Visit our community
Post your questions in the forum.
-
Request additional resources
Send us your requirements.
-
Need implementation assistance?
Try OnboardPro

