Getting Started with Password Manager Pro - MSP Edition
ManageEngine Password Manager Pro is also available in MSP edition, which has been specially designed taking into consideration the requirements of the Managed Service Providers. If you are an MSP wishing to manage the administrative passwords of your clients separately from a single management console or offer password management services to them, you can leverage to the MSP edition.
Passwords can be securely shared between MSP administrators and their respective customers, making sure that users only get access to the passwords they own or ones that are shared with them. The solution offers the flexibility to entrust the control of the password vault to the MSP administrator, the end user or both, as desired.
The MSP edition also follows the basic password entitlement model of Password Manager Pro – that means, at any time, one will be able to view only the passwords that are owned and shared. As MSP admin, while you will be able to view the names of the organizations you manage, you will be able to view the data pertaining to all your customers only if you add their resources or if they share the resources with you. Your customers will be able to view the data belonging to their organization only.
Note: As of now, Password Manager Pro is equipped to support up to 900 client organizations.
Steps Required
- Prerequisites
- Installation Steps
- Silent Install
3.1 In Windows
3.2 In Linux
- Adding Users
- Adding Organizations
5.1 Adding Client Organizations
5.2 Adding Organizations Manually
- Granting Privilege to Access the Client Organization
- MSPOrg
1. Prerequisites
- For testing the MSP edition, you need to deploy a separate machine. If you try to install the MSP edition in the same machine where Password Manager Pro is running, it will uninstall the existing Password Manager Pro instance.
- Download and install the ManageEngine_PMP_MSP.exe
2. Installation Steps
Click here for detailed steps.
3. Silent Install
A silent install is used to install an application without the need to interact with the UI. This type of installation is helpful for applications with limited installation steps. Before commencing the silent install, certain parameters such as Name, Email Id, Path, etc., are automatically set or manually entered. Execute the commands as instructed below to install the application automatically.
3.1 Steps to Silent Install Password Manager Pro in Windows Server
3.1.1 Primary Server
- Download the file ManageEngine_PMP_MSP_64bit.exe.
- Download the installation file WindowsPrimaryMSP.iss.
- Open the WindowsPrimaryMSP.iss file in Notepad and edit Name, MailId, Phone, Company, and Country.
- Update the directory path 'szDir' to the desired path and save the file.
- Now, move the WindowsPrimaryMSP.iss file to the directory as updated above.
- If you opt to create your own .iss file for the installation, execute the command: <.exe file name> -a -r -f1"<iis installation directory path>\WindowsPrimaryMSP.iss" -f2"<iis installation directory path>\WindowsPrimaryMSP.log"
- Open the command prompt as an administrator and navigate to the ManageEngine_PMP_MSP_64bit.exe file location.
- Execute the command: ManageEngine_PMP_MSP_64bit.exe -a -s -f1"<iis installation directory path>\WindowsPrimaryMSP.iss" -f2"<iis installation directory path>\WindowsPrimaryMSP.log"
Password Manager Pro will get installed, and the service will start automatically.
3.1.2 Secondary Server
- Download the file ManageEngine_PMP_MSP_64bit.exe.
- Download the installation file WindowsSecondaryMSP.iss.
- Open the WindowsSecondaryMSP.iss file in Notepad and edit Name, MailId, Phone, Company, and Country.
- Update the directory path 'szDir' to the desired path and save the file.
- Now, move the WindowsSecondaryMSP.iss file to the directory as updated above.
- If you opt to create your own .iss file for the installation, execute the command: <.exe file name> -a -r -f1"<iis installation directory path>\WindowsSecondaryMSP.iss" -f2"<iis installation directory path>\WindowsSecondaryMSP.log"
- Open the command prompt as administrator and navigate to the ManageEngine_PMP_MSP_64bit.exe file location.
- Execute the command: ManageEngine_PMP_MSP_64bit.exe -a -s -f1"<iis installation directory path>\WindowsSecondaryMSP.iss" -f2"<iis installation directory path>\WindowsSecondaryMSP.log"
Password Manager Pro will get installed, and the service will start automatically.
3.1.3 Steps to Uninstall Password Manager Pro in Windows Server
- Download the uninstallation file WindowsUninstallMSP.iss.
- Move the WindowsUninstallMSP.iss file to a desired directory path.
- If you opt to create your own .iss file, execute the command: <.exe file name> -a -r -f1"<iis installation directory path>\WindowsUninstallMSP.iss" -f2"<iis installation directory path>\WindowsUninstallMSP.log"
- Open the command prompt as administrator and navigate to the ManageEngine_PMP_MSP_64bit.exe file location.
- Execute the command: ManageEngine_PMP_MSP_64bit.exe -a -s -f1"<iis installation directory path>\WindowsUninstallMSP.iss" -f2"<iis installation directory path>\WindowsUninstallMSP.log"
Upon execution, the Password Manager Pro will get uninstalled.
3.2 Steps to Silent Install Password Manager Pro in Linux Server
3.2.1 Primary Server
- Download the file ManageEngine_PMP_MSP_64bit.bin for Linux.
- Download the installation file LinuxPrimaryMSP.txt.
- Open the LinuxPrimaryMSP.txt file in Notepad.
- Mention the user installation directory's path (USER_INSTALL_DIR) and file overwrite's (-fileOverwrite_) path.
- Save and move LinuxPrimaryMSP.txt to the directory path mentioned above.
- If you opt to create your own .txt file for the installation, execute the below commands:
- chmod a+x ManageEngine_PMP_64bit.bin
- ./ManageEngine_PMP_64bit.bin -r LinuxPrimaryMSP.txt
- chmod a+x ManageEngine_PMP_64bit.bin
- Open the console and navigate to ManageEngine_PMP_MSP_64bit.bin file location
- Execute the command: chmod a+x ManageEngine_PMP_MSP_64bit.bin
- Execute the command:./ManageEngine_PMP_MSP_64bit.bin -i silent -f /<.txt file installation directory>/LinuxPrimaryMSP.txt
Upon execution, the Password Manager Pro will get installed.
3.2.2 Secondary Server
- Download the file ManageEngine_PMP_MSP_64bit.bin for Linux.
- Download the installation file LinuxSecondaryMSP.txt.
- Open LinuxSecondaryMSP.txt in Notepad.
- Mention the user installation directory's path (USER_INSTALL_DIR) and file overwrite's (-fileOverwrite_) path.
- Save and move LinuxSecondaryMSP.txt to the directory path mentioned above.
- If you opt to create your own .txts file for the installation, execute the below commands:
- chmod a+x ManageEngine_PMP_64bit.bin
- ./ManageEngine_PMP_64bit.bin -r LinuxSecondaryMSP.txt
- chmod a+x ManageEngine_PMP_64bit.bin
- Open the console and navigate to ManageEngine_PMP_MSP_64bit.bin file location.
- Execute the command: chmod a+x ManageEngine_PMP_MSP_64bit.bin
- Execute the command: ./ManageEngine_PMP_MSP_64bit.bin -i silent -f /<.txt file installation directory>/LinuxSecondaryMSP.txt
Upon execution the Password Manager Pro will get installed.
4. Adding Users (MSP org)
The MSP administration process starts with the User Management. The first step is to add users to your MSP organization. You should designate one administrator as Account Manager for each of your client organizations. Click on this link to add users for your client organizations.
5. Adding Organizations
5.1 Adding Client Organizations
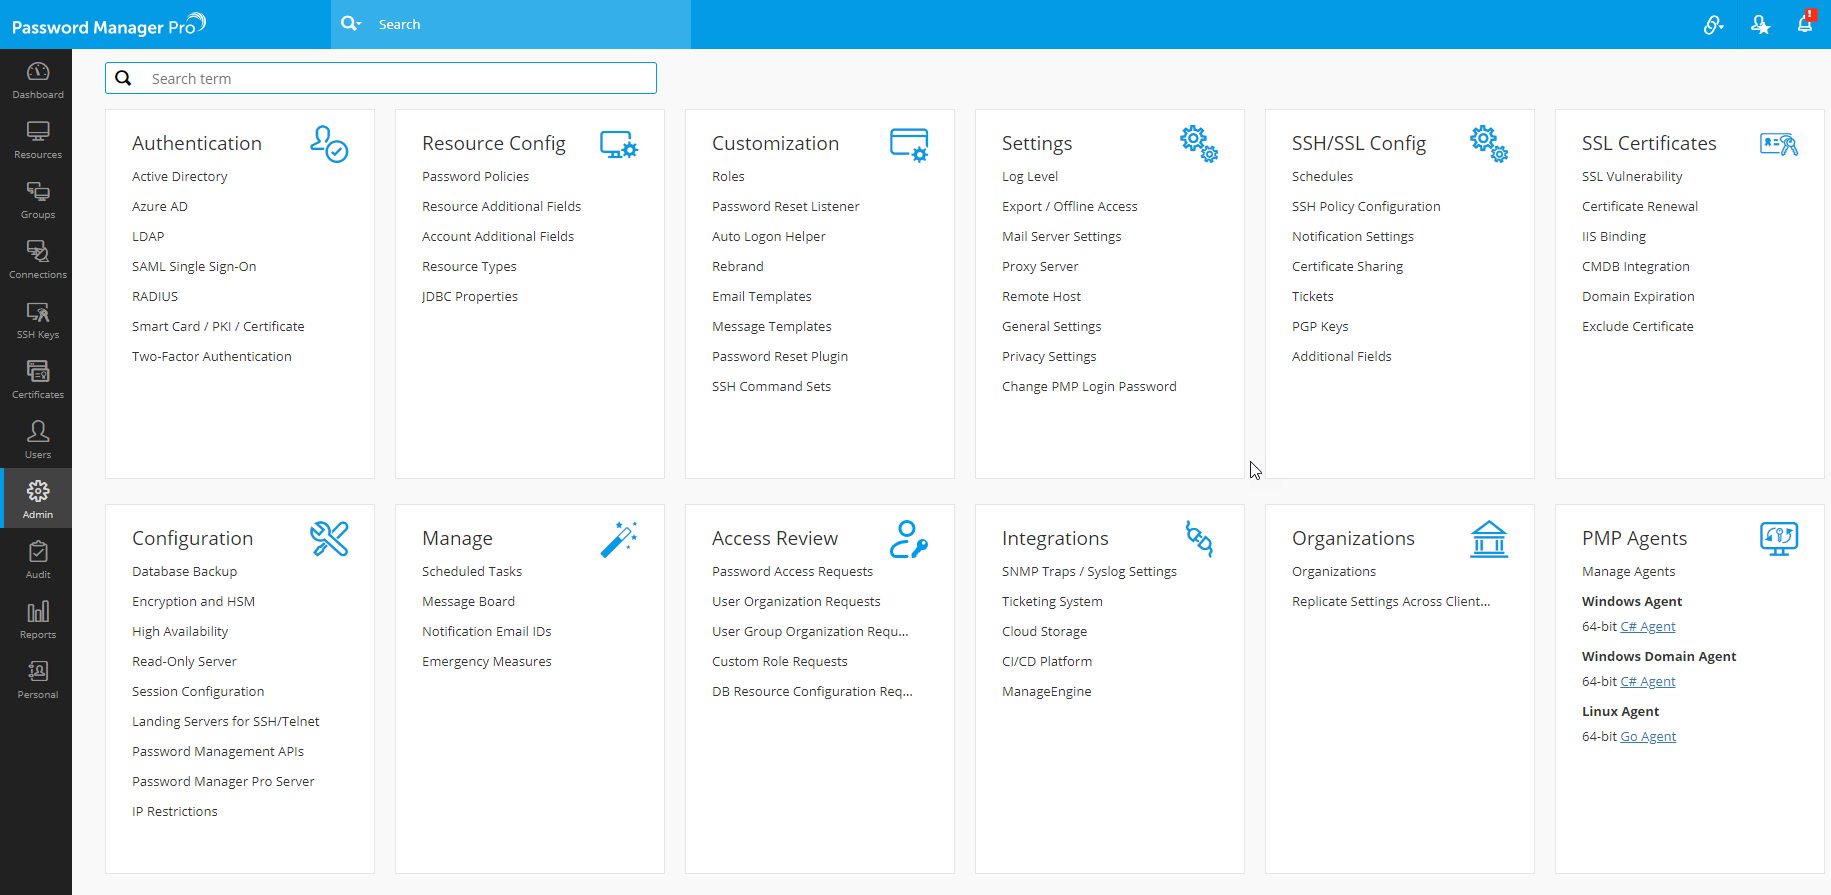
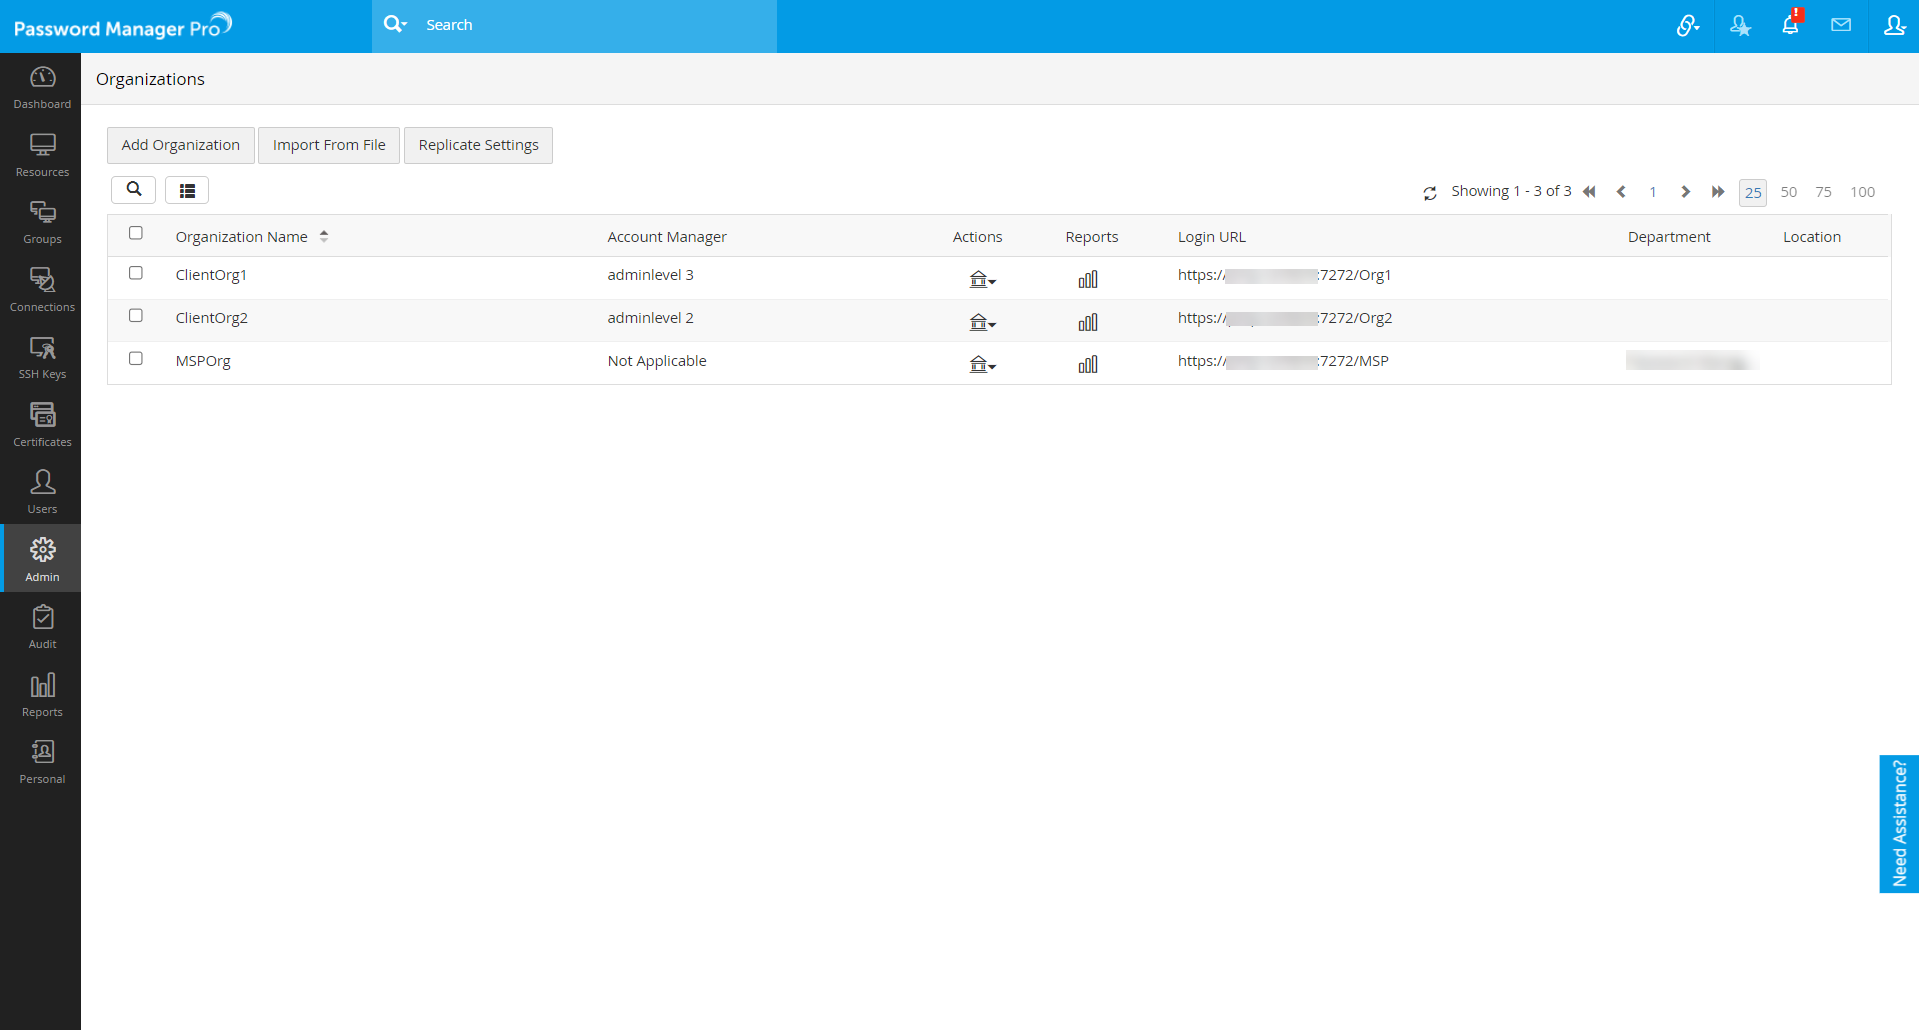
After adding users, you need to add your client organizations. Navigate to Admin >> Organizations >> Organizations to add your client organizations. The organizations to be managed by the MSP should be registered with Password Manager Pro here.
You can manually add the client organizations one-by-one or import all the organizations in bulk from a file.
5.2 Adding Organizations Manually
- Navigate to Admin >> Organizations >> Organizations.
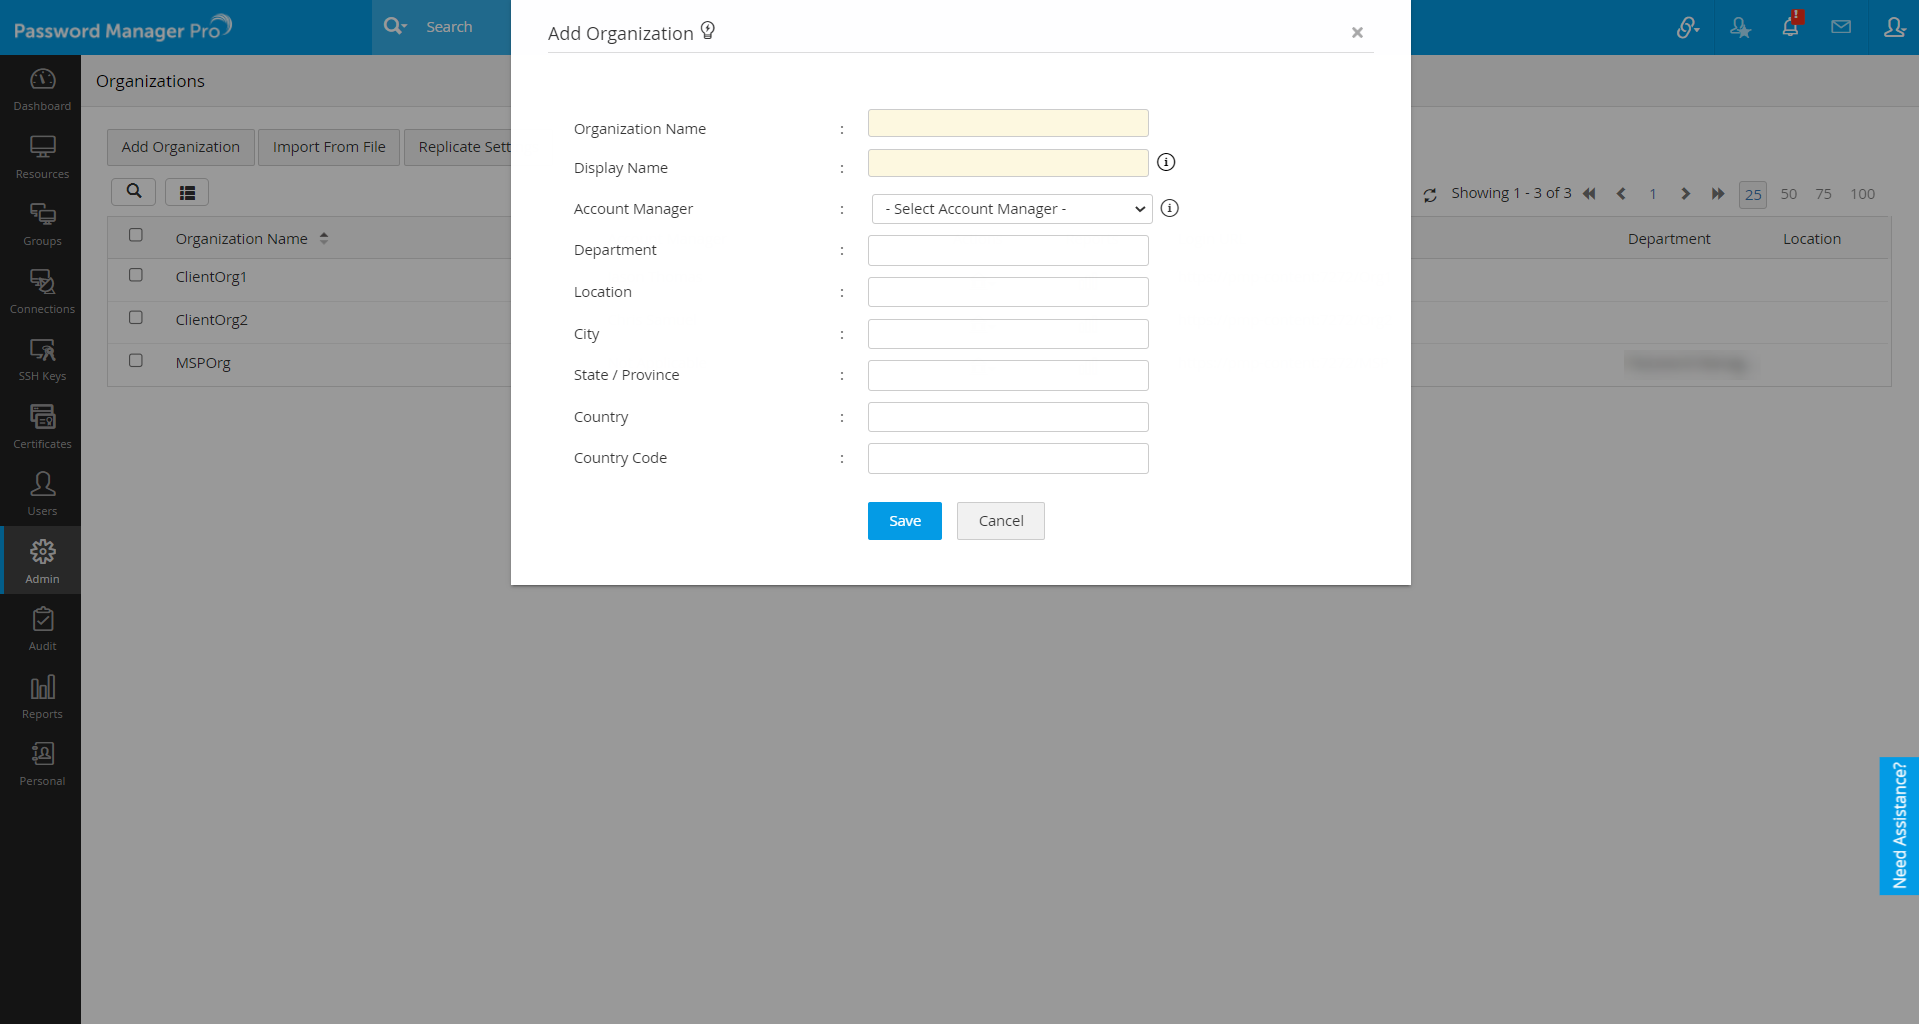
- Click Add Organization.
- In the pop-up that opens, specify a name for the organization being added.
- Display Name:The name with which you wish to identify the organization being added.
- Only alphanumeric characters without empty spaces are allowed here.
- The name should be a single word.
- The name that you enter here will appear in the drop-down at the top right hand side of Password Manager Pro GUI.
- In addition, the display name will appear in Password Manager Pro login URL.
(For example, if you assign 'xyz' as the display name, the login URL for the organization will be https://:/xyz).
- Account Manager: You can designate any administrator at your end (MSP) as the Account Manager for the organization being added. As the name indicates, the account manager will be the point of contact for the organization being managed and will have privileges to add and manage resources on behalf of the organization. The Account Manager with the role Admin in Password Manager Pro will be able to manage the users of the organization too. You can designate only one account manager per organization being managed. The same administrator can be made the account manager for multiple client organizations.
- Fill-in other details like Department, Location etc., as required.
5.3 Importing Organizations from a File
You can import multiple organizations from a file using the import wizard. Click here to view sample files and learn more about the file formats supported for importing. Ensure that the entry for each organization is in a new line.
Note: Earlier, it was possible to import a .txt file containing comma-separated data, and in step 2, the data would be listed as expected. However, from build 12330 onwards, if the entries are comma-separated, the file format must be .csv. Files with tab-separated values should be saved as .txt or .tsv for importing.
To import organizations,
- Navigate to Admin >> Organizations >> Organizations >> Import From File.
- In the pop-up that opens,
- Choose the file type and file format.
- Browse and select the file containing the organizations details.
- Click Next.
- In the pop-up that appears, check if the fields are auto-filled with respect to the column names in the imported file. You can also map the fields with the corresponding attributes of the client organizations.
- Click Finish.


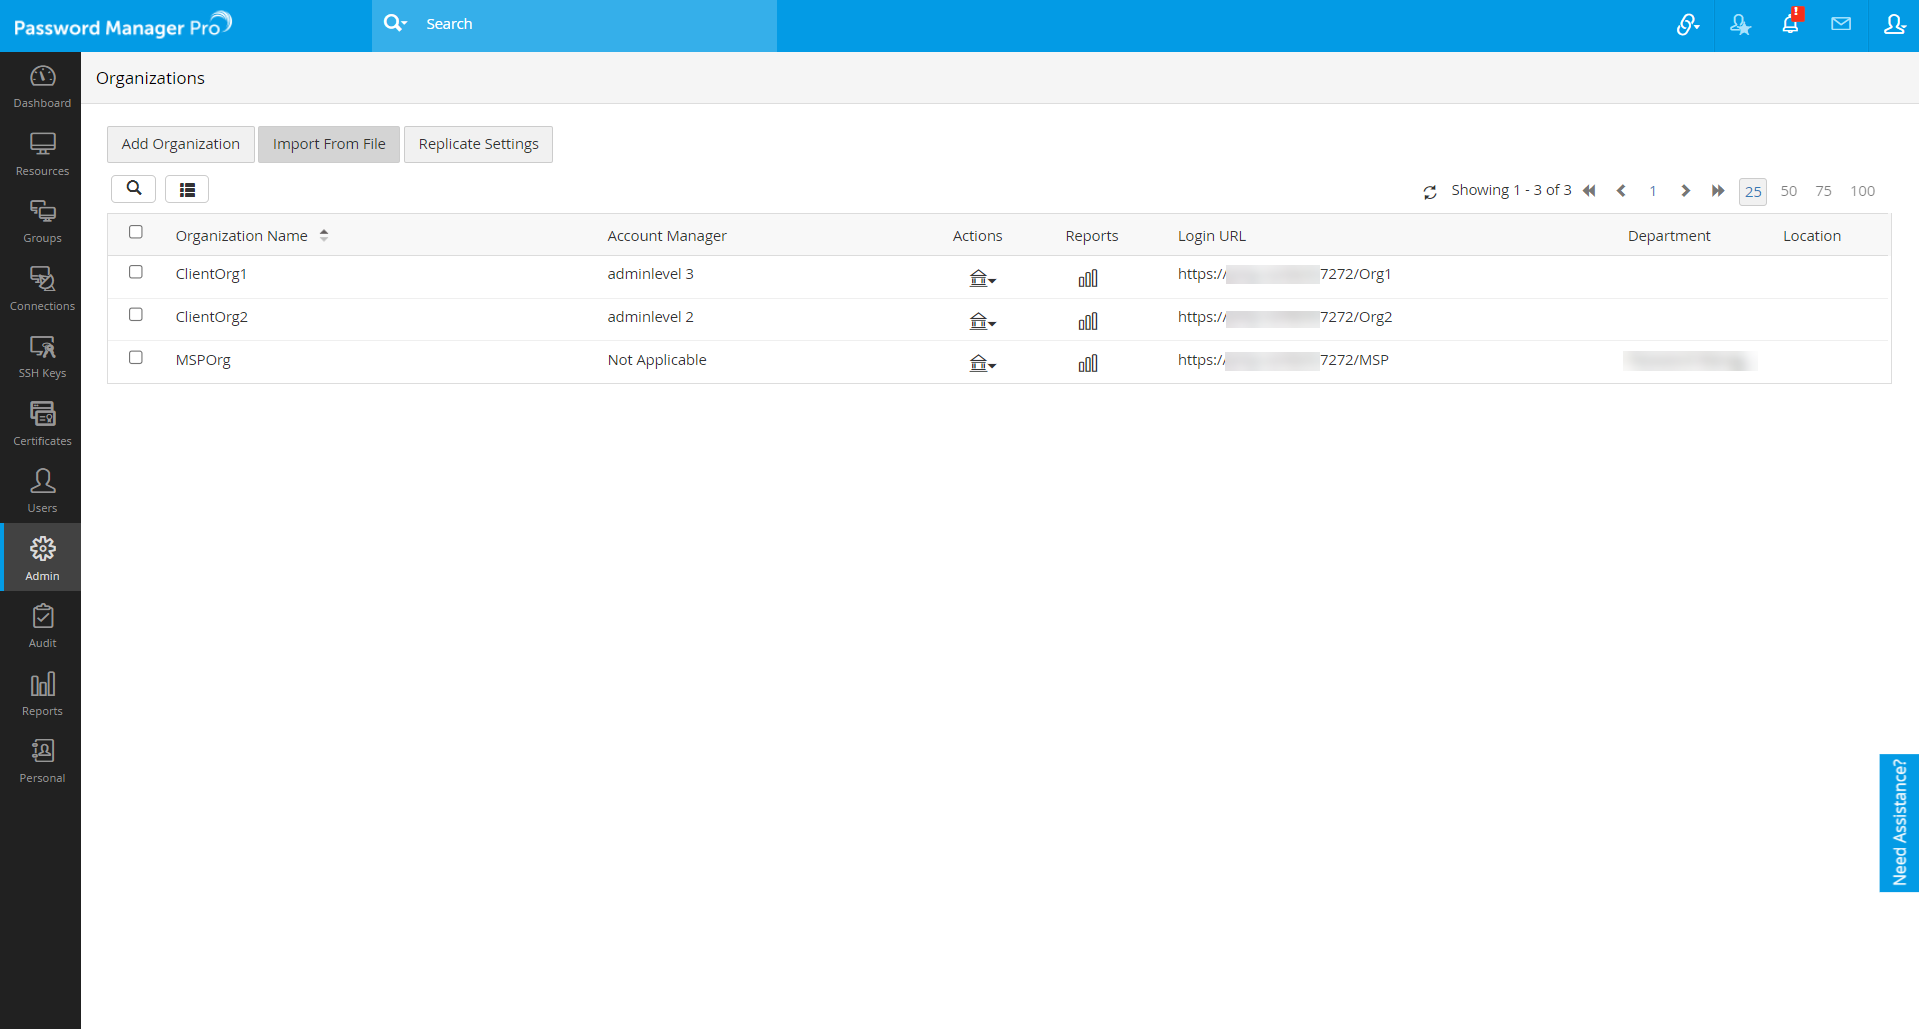
The result of each imported client organization will be logged in as an audit trail in the Audit tab.
5.4 Replicating Settings Across Client Orgs
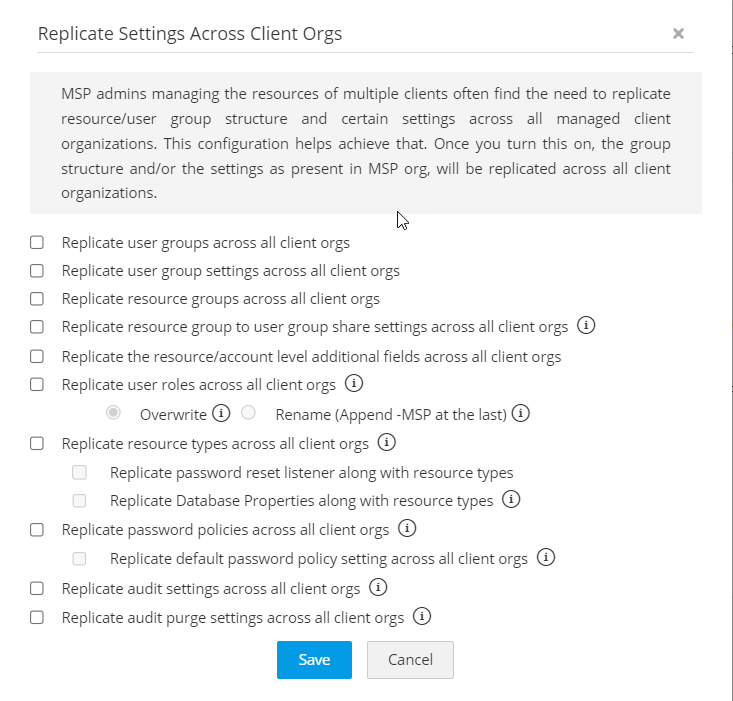
Password Manager Pro allows MSP admins to replicate resource/user group structure and the settings across all managed client organizations.
Note: Please note that the option to replicate settings across client orgs is applicable only for the Enterprise edition of Password Manager Pro.
To set this up, follow the steps:
- Navigate to Admin >> Organizations >> Replicate Settings Across Client Orgs.
- Select the required options using the checkboxes.
- Click Save to apply the changes.
Listed below are a few replication settings that can be applied to all the client organizations from the MSP organization.
- Replicate user groups across all client orgs - Replicates the user groups of the MSP organization across all client organizations.
- Replicate user group settings across all client orgs - Replicates the user group permission and privileges of MSP organization across all client organizations.
- Replicate resource groups across all client orgs - Replicates the resource groups of the MSP organization across all client organizations.
- Replicate resource group to user group share settings across all client orgs - Replicates the resource group to user group share configuration of MSP organization across all client organizations.
- Replicate the resource/account level additional fields across all client orgs - Replicates the MSP organization's resources' and accounts' additional fields across all client organizations.
- Replicate user roles across all client orgs - Replicates the available user roles of the MSP organization across all client organizations.
- Overwrite
- Rename (Append - MSP at the last)
- Replicate resource types across all client orgs - Replicates the resource types of MSP organization across all client organizations with the password reset listeners and database properties as required.
- Replicate password reset listener along with resource types
- Replicate Database Properties along with resource types
- Replicate password policies across all client orgs - Replicates the available password policies of the MSP organization across all client organizations with the default password policy setting as required.
- Replicate default password policy setting across all client orgs
- Replicate audit operation type settings across all client orgs - Replicates the available operation types of the MSP organization across all client organizations.
- Replicate audit purge settings across all client orgs - Replicates the configured audit purge settings of the MSP organization across all client organizations.
6. Granting Privilege to Access the Client Organization
In addition to designating an administrator as Account Manager, you can grant access privileges to the client organization to any other member of your MSP organization. An administrator with this permission will be granted admin privileges within the client organization. Similarly, if permission is granted to a password administrator or a password user, they will have their respective privileges.
Password Manager Pro requires approval before managing a client organization to ensure greater security. An administrator at the MSP can initiate organization access for a client organization, but they need to be approved by some other administrator at the MSP. It is not possible to approve the request by the one who initiates it or the one for whom it is being initiated. This is to ensure that no administrator can acquire manage permission for themselves or grant that privilege to anyone else without the approval of another administrator. This essentially means that the MSP organization should have a minimum of three administrators to carry out this process.
For example, assume the scenario when Admin A wants to provide access to Admin B for organization ABC. In this case, both Admin A (the proposer) and Admin B (the admin designate) cannot approve the access permission. Another admin, say Admin C, will have to approve the client organization request.
To mange client organizations at user/user group level, do the steps that follow:
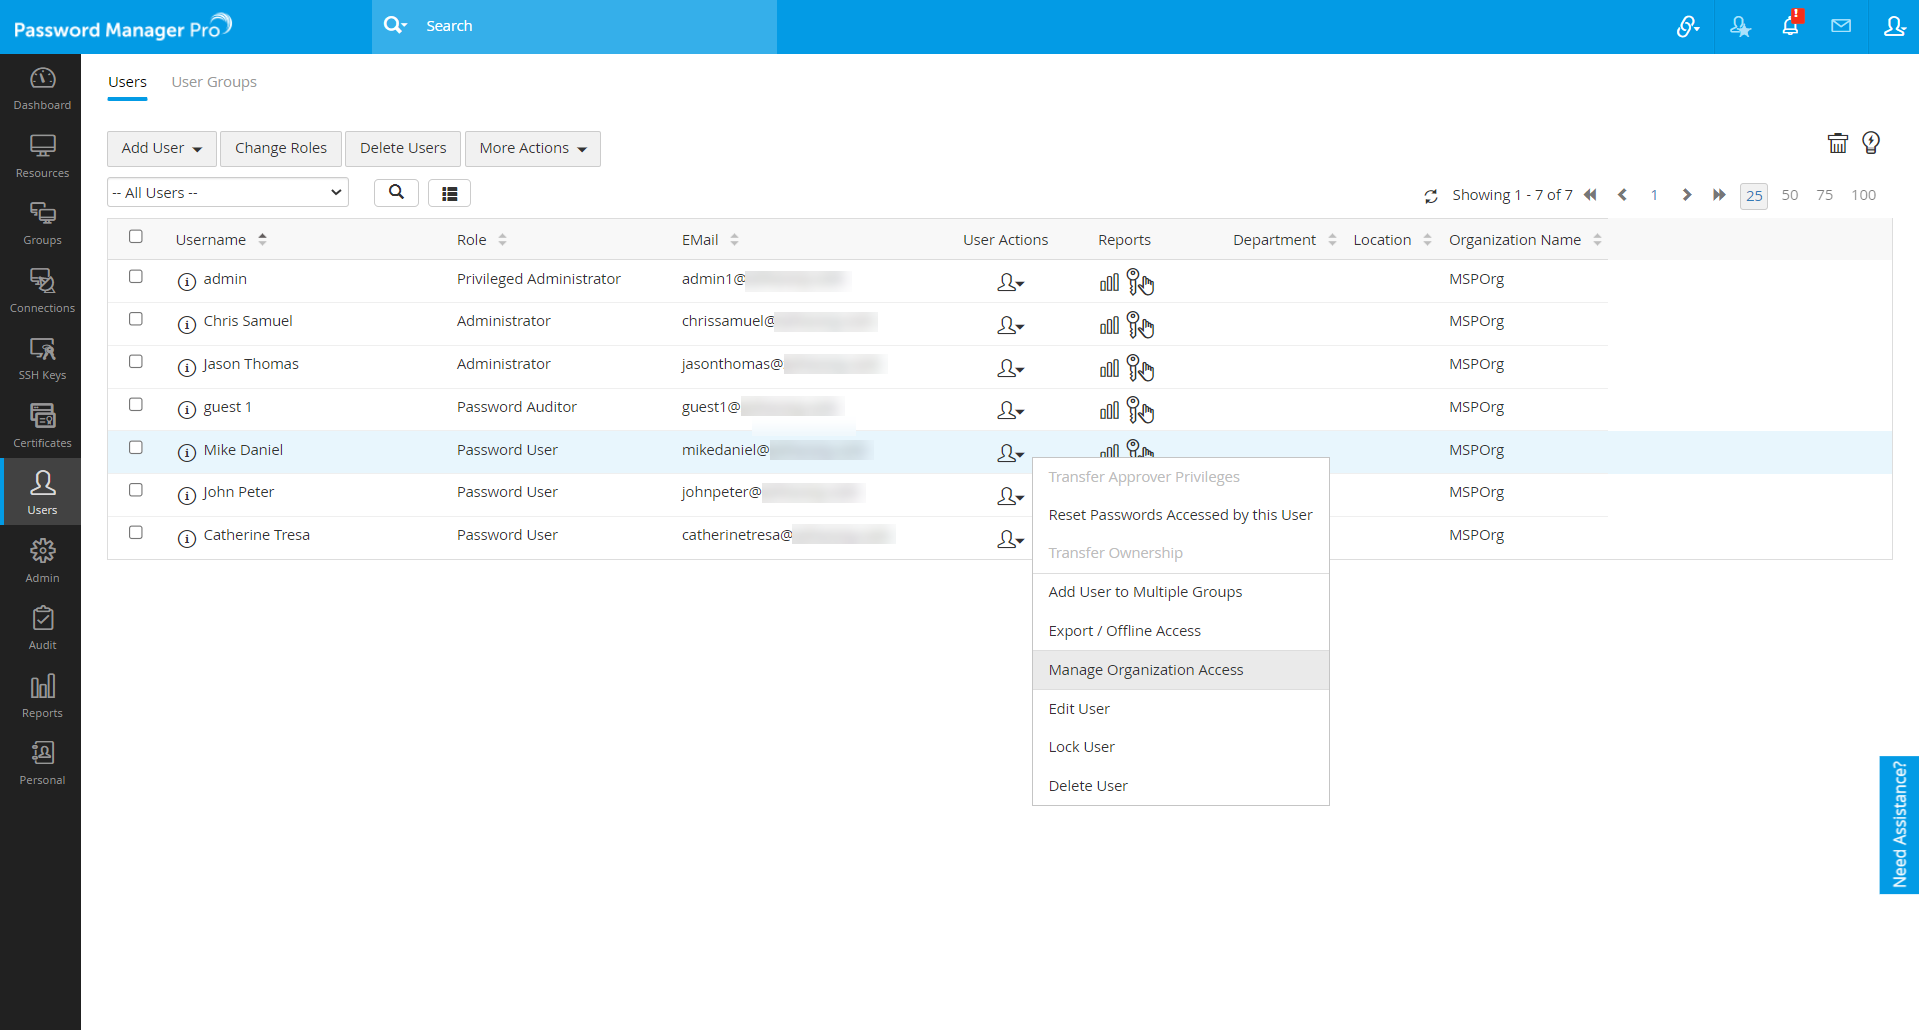
- Log in to your MSP account and navigate to the Users/User Groups tab.
- Click the User Actions/Actions drop-down icon beside the desired user/user group and select Manage Organization Access or Manage User Organization Access.
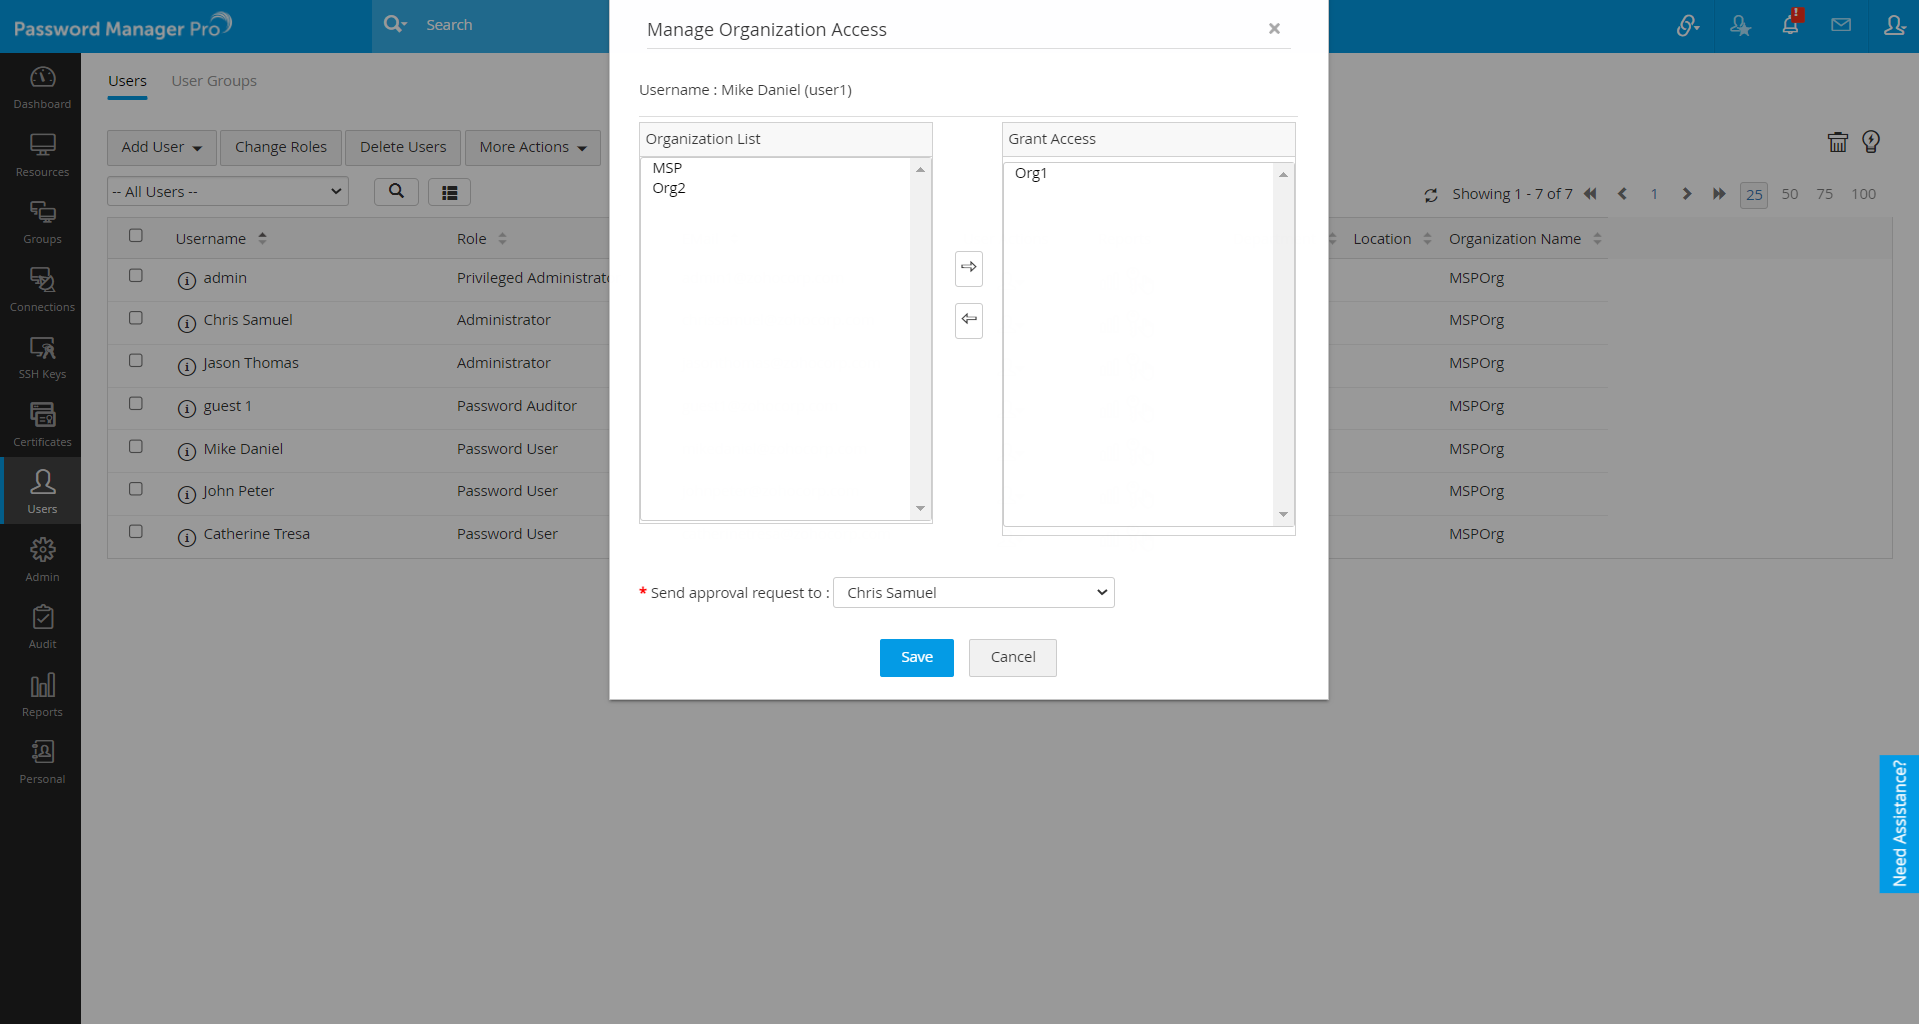
- In the pop-up that opens, select the required client organizations from the Organization List for which the user/user group to provided with access and move it right to the Grant Access section.
- Select the name of the request approver and click Save.
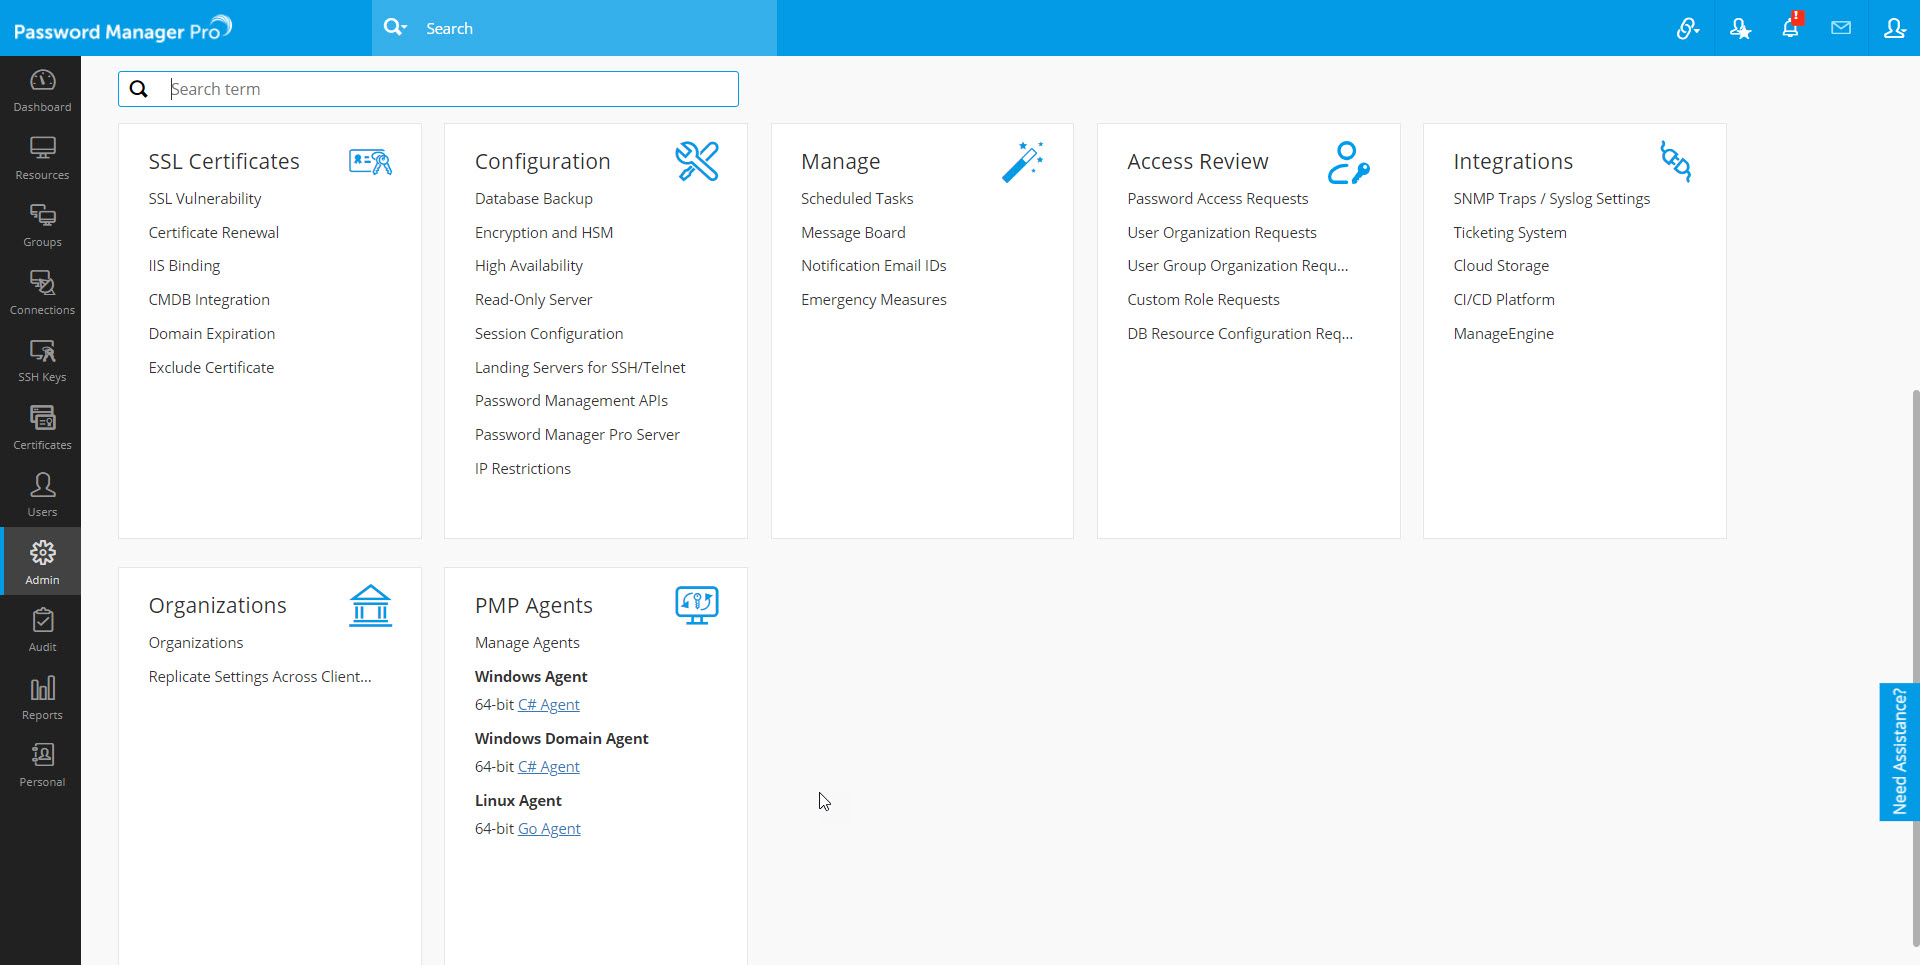
The administrator approves the request by navigating to Admin >> Access Review and selecting User Organization Requests or User Group Organization Requests.
Note: The administrator can also perform the approval directly from the notification list at the top pane of the user interface.
You can also perform the following operations from the Organization page by clicking the Actions icon beside the desired organization:
- Manage user organization access
- Manage user group organization access
- Grant permission to the user organization access requests
- Grant permission to the user groups organization access requests

You can also generate report for a client organization to know more about the users and user groups managed in it. To do this, navigate to Admin >> Organizations >> Organizations and click the report icon beside the desired client organization. In the window that opens, you will get the list of users and user groups managed at different levels.

7. MSPOrg (The default org)
By default, one organization named MSPOrg will be available. This default org is basically your organization (MSP’s organization). The passwords that you add here will pertain to your own organization and not that of your clients.
7.1 How to Manage Password for Client Organizations?
Once the organization is added, you will see the list of organizations being managed by you (i.e. for which you have manage permission or for which you are the account manager) on the top band of the Password Manager Pro GUI Select Organization.
Select the required organization and proceed with resource addition. You can then share the passwords with your clients. On the other hand, if you are providing Password Management Service, you will ask your client to add passwords themselves.
7.2 How to access any specific client org?
You can access your MSP org as usual by accessing the URL https://<PMP-Host-Name>:7272/. You can select the required client organization from the top band of the Password Manager Pro GUI.
7.3 How do your clients access Password Manager Pro?
After creating an organization, you clients can connect to their organization and view/manage passwords by typing the URL as explained below:
https://<Host Name:<port>/<Name of the org>
For instance, assume that the name of the organization of your client is ‘abc’ and Password Manager Pro is running on the host “pmphost”, then the URL to connect to an organization will be: https://pmphost:7272/abc
For information on how to perform various password management features, refer to the respective sections of the help documentation.
7.4 How to delete a client organization?
You can be eligible to delete a client organization in Password Manager Pro only if you are an MSPOrg administrator. Additionally, you should also have any of the following privileges:
- Be the Account Manager of the client organization you want to delete.
- Hold Manage Organization permission for the client organization you want to delete.
To delete an organization,
- Navigate to Admin >> Organizations >> Organizations.
- Locate the client organization that you want to delete, click on Actions icons beside it, and select Delete Organization from the drop-down menu.
- Click OK to confirm deletion.
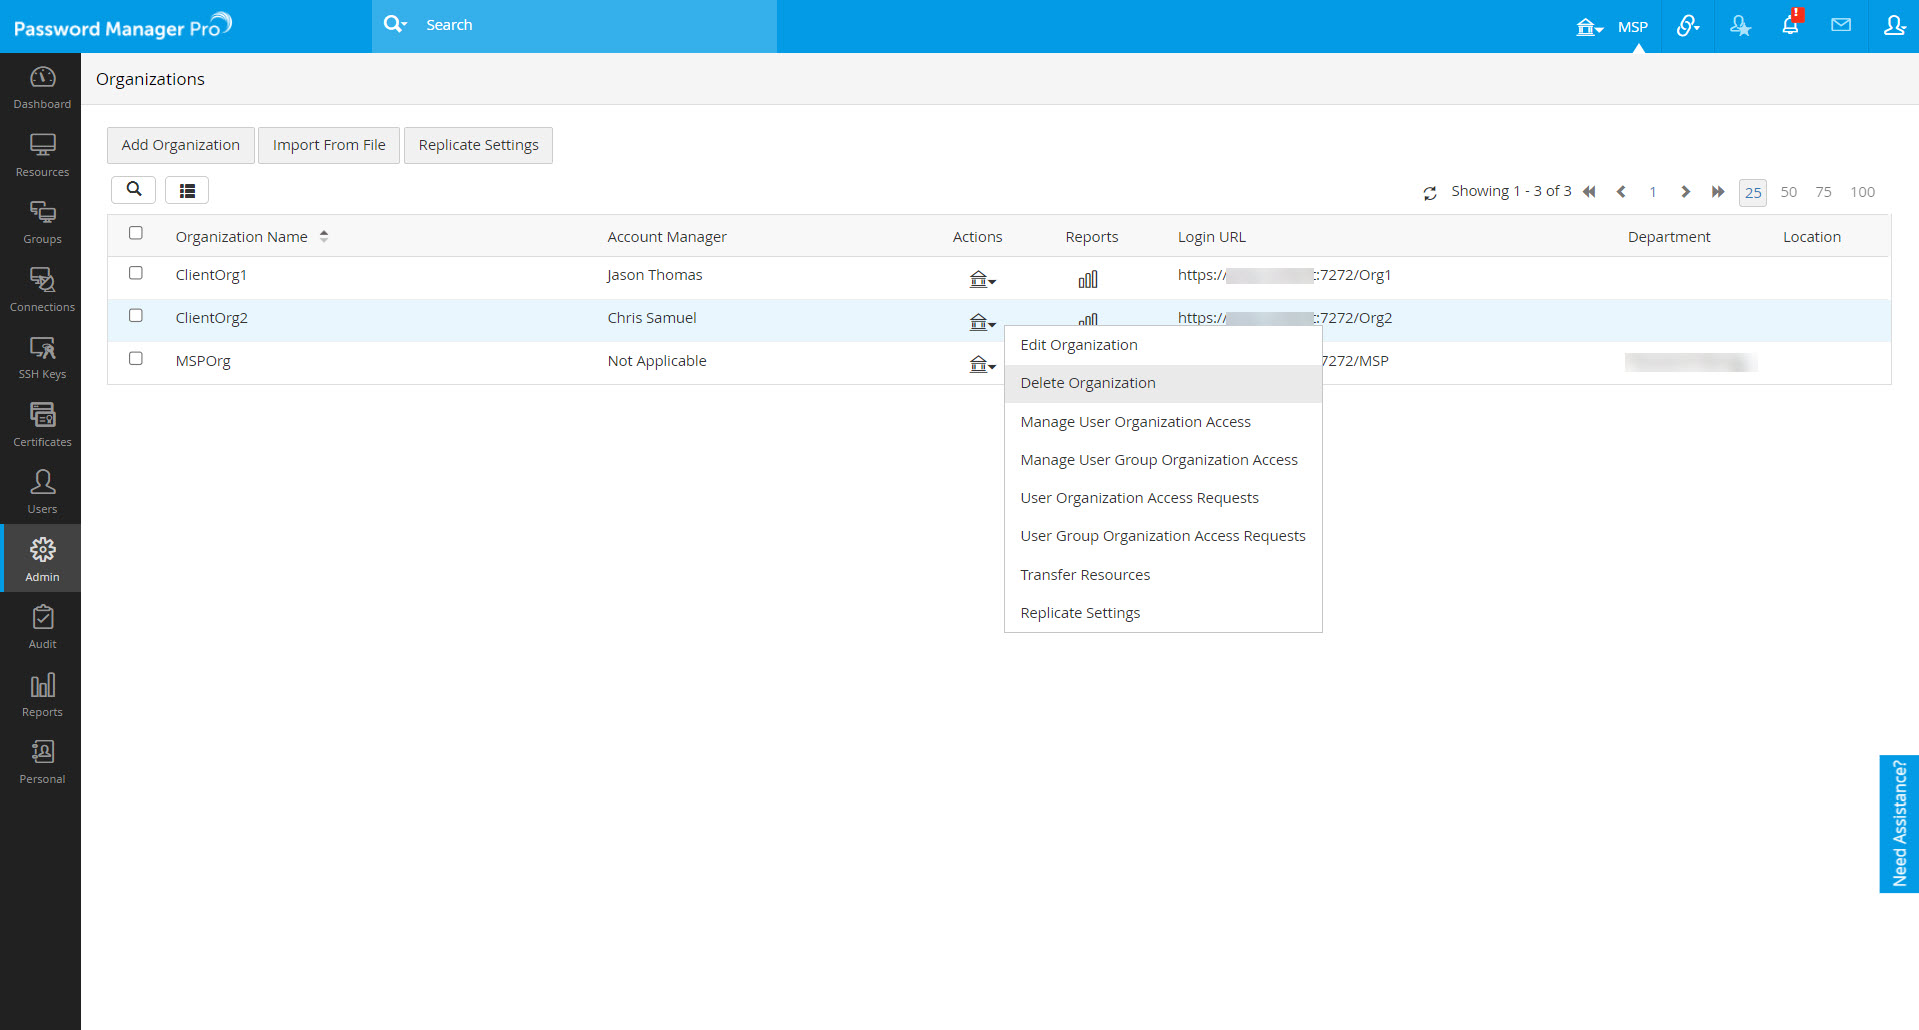
Note that deleting a client organization will also delete all resources and users added under it.