ManageEngine® Password Manager Pro Upgrade Packs Download
The latest PMP version is (). If you are using an earlier version, you need to apply upgrade pack. (Steps to upgrade | How do I find my build number?).
Click
here to know about migrating Password Manager Pro from 32-bit to the 64-bit architecture
To learn more about our release lifecycle and the EOS (end of support) dates for our older versions, refer to
this page.
Download Upgrade Pack | Minor release ()
Note: We strongly recommend you to take backups before upgrading. This helps you prevent accidental loss of data.
Looking for a comprehensive solution that can do much more than privileged password management? Here is our complete suite of privileged access management,
ManageEngine PAM360. Click
here to migrate.
From 13100 / 13110 / 13111 / 13120 / 13130 / 13140 to 13200
SHA256 Checksum:
947136713bf8979bc49d1346ab32372bbcddd591448a7d201d1873d1fdba9561
The .ppm file can be applied to the secondary Pasword Manager Pro server without reconfiguring high availability - as per the below-tabulated scenarios only:
| HA Architecture Type |
Support to apply the .ppm file on the secondary Password Manager Pro server without reconfiguring high availability |
| PGSQL |
MS SQL |
| Failover Service (FOS) |
NA |
|
| High Availability (HA) |
|
|
| Read-Only Server (RO) |
|
NA |
Note:
Users upgrading from build 13140 to 13200 are not required to reconfigure the PGSQL High Availability.
From 13000 to 13100
SHA256 Checksum:
589b5fc7abb0cc939977d50d19c760084e31af5c5fc27d94c8e37ce5326d9a75
The .ppm file can be applied to the secondary Pasword Manager Pro server without reconfiguring high availability - as per the below-tabulated scenarios only:
| HA Architecture Type |
Support to apply the .ppm file on the secondary Password Manager Pro server without reconfiguring high availability |
| PGSQL |
MS SQL |
| Failover Service (FOS) |
NA |
|
| High Availability (HA) |
|
|
| Read-Only Server (RO) |
|
NA |
13100 Upgrade Prerequisite:
Starting from this version, Password Manager Pro no longer supports the jTDS driver. Instead, the JDBC driver will be the default driver for database connections. Users previously using jTDC as the database driver should
consider the following operations for a successful upgrade:
- Before starting the upgrade process, it is essential to complete the operation outlined here. If you have configured
High Availability - MS SQL in your environment, ensure to perform the prerequisite on both the primary and secondary servers and verify that your existing High Availability setup is functioning properly before proceeding
with the upgrade.
- Upon successful primary server upgrade, perform the following operations before proceeding with the secondary server upgrade:
- Execute the HAlib_13100.bat file located in the /bin folder. This will create a file named HAlib_13100.zip in the bin folder.
- Copy and extract the HAlib_13100.zip file in the secondary server installation directory. i.e ManageEngine/PMP.
- Upon successful extraction, proceed with the upgrade pack process on the secondary server.
From 12400 / 12401 / 12410 / 12420 / 12430 / 12431 / 12432 / 12440 / 12450 / 12460 to 13000
SHA256 Checksum:
68098755fefd478bd642aac54a3e7aeca72bd66e63ca129fef06e1005fc2ceb8
The .ppm file can be applied to the secondary Pasword Manager Pro server without reconfiguring high availability - as per the below-tabulated scenarios only:
| HA Architecture Type |
Support to apply the .ppm file on the secondary Password Manager Pro server without reconfiguring high availability |
| PGSQL |
MS SQL |
| Failover Service (FOS) |
NA |
|
| High Availability (HA) |
|
|
| Read-Only Server (RO) |
|
NA |
From 12300 / 12310 / 12320 / 12330 / 12340 / 12350 to 12400
SHA256 Checksum:
de16baf5ab29196c4d0eec255a3264aad200952211f17e50d1b8bbe3fed25e04
The .ppm file can be applied to the secondary Pasword Manager Pro server without reconfiguring high availability - as per the below-tabulated scenarios only:
| HA Architecture Type |
Support to apply the .ppm file on the secondary Password Manager Pro server without reconfiguring high availability |
| PGSQL |
MS SQL |
| Failover Service (FOS) |
NA |
|
| High Availability (HA) |
|
|
| Read-Only Server (RO) |
|
NA |
From 12200 / 12210 / 12211 / 12220 / 12230 to 12300
SHA256 Checksum:
b3fb9ed99e5dc4f81f152d042b71915c05e838f609c1b34e5fdb0a361f649090
Note:
If you have configured HA for your Password Manager Pro instance, your primary and secondary servers should be of similar versions. For example, if you are upgrading to 12300, you should concurrently reconfigure HA and
set up a fresh secondary instance that runs on 12300. Also, the software architectures of the primary and secondary servers should be the same, i.e., either both 32-bit or both 64-bit.
From 12100 / 12101 / 12110 / 12120 / 12121 / 12122 / 12123 / 12124 to 12200
SHA256 Checksum:
999cb95fef6542f31ac37d1000f9851cf2f00d73ee82876c0c56072dbcc42dce
Note:
- If you have configured HA for your Password Manager Pro instance, your primary and secondary servers should be of similar versions. For example, if you are upgrading to 12200, you should concurrently reconfigure HA
and set up a fresh secondary instance that runs on 12200. Also, the software architectures of the primary and secondary servers should be the same, i.e., either both 32-bit or both 64-bit.
- If you are using Jira Service Desk as the Ticketing System, this upgrade pack will disable the integration and completely delete the integration data. You will have to reconfigure the ticketing system all again. Hence,
please do not forget to back up the advanced configurations in the form of screenshots for future reference.
- Also, if you are using Microsoft NTLM SSO as the primary authentication method, it will no longer work after this update. From now on, Active Directory authentication will be your primary authentication method.
From 12000 / 12001 / 12002 / 12003 / 12004 / 12005 / 12006 / 12007 to 12100
SHA256 Checksum:
1314306f2e66927593bbc9fb6047ab32fa2ec1fa41f1c25360341c5ace5b1822
Note:
- If you have configured HA for your Password Manager Pro instance, your primary and secondary servers should be of similar versions. For example, if you are upgrading to 12100, you should concurrently reconfigure HA
and set up a fresh secondary instance that runs on 12100. Also, the software architectures of the primary and secondary servers should be the same, i.e., either both 32-bit or both 64-bit.
- If you are using Dropbox for cloud storage, this upgrade will delete auth tokens, and you will have to reconfigure PMP storage in Dropbox.
From 11300 / 11301 to 12000
SHA256 Checksum:
7353149502119b6dd6905895e9f0e69cef65b1730d1b39de1b40150280608ce2
Note: If you have configured HA for your Password Manager Pro instance, your primary and secondary servers should be of similar versions. For example, if you are upgrading to 12000, you should concurrently
reconfigure HA and set up a fresh secondary instance that runs on 12000. Also, the software architectures of the primary and secondary servers should be the same, i.e., either both 32-bit or both 64-bit.
From 11200 / 11201 to 11300
SHA256 Checksum:
2d0837e54c37c6ff5547151cec7c85eb5614bd6f8f99b74cf14f033408c936b1
From 11100 / 11101 / 11102 / 11103 / 11104 to 11200
SHA256 Checksum:
9a4a4902d449fed06ef6435f122444ef34cddac70cdbb0bb7fd9d40faf331dd2
Note: If your current Ticketing System is ServiceDesk Plus On-Premises or ServiceDesk Plus Cloud, this upgrade pack will disable the integration and delete the complete integration data. You will have to
reconfigure the ticketing system again. So, make sure you have a backup of the advanced configurations in the form of screenshots for reference purposes.
From 11000/11001/11002/11003/11004 to 11100
SHA256 Checksum:
2a16f9e8ed325d77d8fa12727dd031fdb13d365bbf2e15fdf5f4d1088a57f5d2
From 10500/10501 to 11000
SHA256 Checksum:
bbe312d053fcf5ea5e6b15f73725e40272dbe40e1f1f1dc6e4bd0d5ec3fc4a9f
From 10400/10401/10402/10403/10404/10405/10406 to 10500
SHA256 Checksum:
9772fc552cd59263b4d15a062005dd63f211770112bb62de18cdad6358354d78
Note: Please note that the 10500 upgrade pack does not support the MySQL database.
From 10300/10301/10302 to 10400
SHA256 Checksum:
43ac604f95d603d2b2817a347235990c39b2872bc33bd6d56ff8d765788eea05
From 10200 to 10300
SHA256 Checksum:
b32d869a8bddbb947f3500820a4338b220eda02f4876a4f941ab0416c0d22ab2
From 10100/10101/10102/10103/10104 to 10200
SHA256 Checksum:
4b07bcaba648d3321e3b257e54439d3815318e4e32854d6cd74c2418e8b3193d
From 10000/10001 to 10100
SHA256 Checksum:
8b62023350288428fbe03e77e597811e7204b5711b6f9ee7e80dc8d338974779
From 9900/9901 to 10000
SHA256 Checksum:
933f364f677aa4d49dad3d0c107c824a48770f5e4654cd1c8d285dd93a90df85
From 9800/9801/9802/9803 to 9900
SHA256 Checksum:
bdfbbf7e3f7446daef61ad58ff62958162f3ffe4f826b2f172913f66125973c9
From 9700/9701/9702 to 9800
SHA256 Checksum:
895625038fa0ba49cfa98a495d433e7a7e588391d43fa031d8c8734f4806b802
From 9600/9601 to 9700
SHA256 Checksum:
56967818db49c75fad206030c4feac1f086a567ec12f42ee6387a89f80e9f3fd
Note: If you're using PostgreSQL as backend, note that upgrading to 9700 will remove the currently used PostgreSQL credentials from the database configuration file. Upon removing this superuser account,
Password Manager Pro will automatically create another database account with minimal privileges, add the credentials to the file, and use them to launch database connections henceforth. As a precaution, it is therefore
recommended to note down the current PostgreSQL credentials from the database_params.conf before upgrading since the credentials will be completely erased from the file. However, this action will not deactivate or delete
the superuser database account in any way.
From 9500/9501/9502 to 9600
SHA256 Checksum:
59300868ee3fe52cb1fad428c66b168c1d9bd9f895b8f96720e0d9d392f41663
From 9400/9401/9402 to 9500
SHA256 Checksum:
005505632550207b813c968732fb15b08b02073e319a94b4affbae8d54f66823
From 9300 to 9400
SHA256 Checksum:
4966d0be77e949e76d9e5de5c6d9da5483fa260f8f1ac0218620e11e2c67a600
From 9200 to 9300
SHA256 Checksum:
d36805f83e970c76e7b8b1593b34ceafa6b0f18e1f326c66dd16823a2e4b25c3
From 9100/9101 to 9200
SHA256 Checksum:
a571123d0e002db9fb5b38a7cad1a8a8ca673e2117347522b82228166cc68058
From 9000/9001/9002/9003 to 9100
SHA256 Checksum:
29d9653e42545849e2f049d1e5e8d4344c30199131304addd1a820a70f99769d
From 8700/8701/8702/8703/8704 to 9000
From 8600/8601/8602/8603/8604 to 8700
From 8500/8501/8502/8503/8504/8505 to 8600
MD5SUM:
a03fc341ca346b1a578a7076230dae65
Note: Upgrading to 8600 will take a little longer than usual, since the upgrade pack includes PostgreSQL migration from v9.2.4 to v9.5.3
From 8400/8401/8402/8403/8404 to 8500
From 8300/8301/8302/8303 to 8400
From 8100/8101/8102 to 8200
From 8000 and all earlier versions contact support
Upgrade Pack Instructions based on Operating Systems
If you have Password Manager Pro configured in the secondary server(s) of your environment, refer to this section before proceeding with the upgrade pack steps given below.
1. Windows
Prerequisites
- Stop the Password Manager Pro service and exit the tray icon.
Note: If you store the 'database_params.conf' file in a different location, copy the file back to the original location, i.e., '<Password Manager Pro Installation Folder>/conf/',
before performing the upgrade.
- Shutdown the Password Manager Pro service - both primary and secondary, if running (Not applicable for Read-Only servers).
Notes:
• If you are using PostgreSQL as the database, ensure that the Postgres process is not running in the task manager.
• If you are using MS SQL as the database, ensure that the OpenJDK/Zulu platform process is not running in the task manager.
- Perform a backup of the entire Password Manager Pro installation folder, and store it someplace safe. You can revert to this copy in case of an upgrade failure with your settings intact. Additionally, take a backup of the Password
Manager Pro database.
Note: If you are using MS SQL as the database, perform a database backup using the SQL studio.
Steps Required
- To start with, right-click the Command Prompt and select 'run as administrator'.
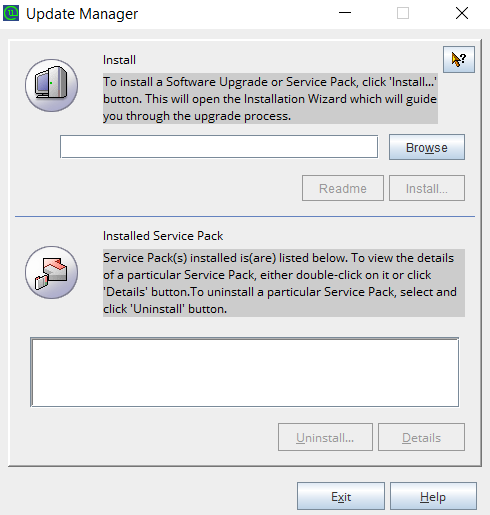
- Navigate to the '<Password Manager Pro Installation Folder>/bin' directory and execute 'UpdateManager.bat'.
- During MS SQL server configuration for the Password Manager Pro database, if you have opted for 'Windows Authentication,' start the command prompt using the service account with which the Password Manager
Pro service has been configured to connect to the SQL server (i.e., instead of running as administrator, run as the service account).
- To identify whether a service account is used or an SQL account is used, navigate to <Password Manager Pro Installation Folder>/conf directory and open the database_params.conf file.
If you do not find a username and password in the file, then Password Manager Pro is using Windows Authentication, and therefore you need to run the command prompt with service account
privilege.
- Click Browse and select the .ppm file that you downloaded from the ManageEngine Password Manager Pro Upgrade Pack section.
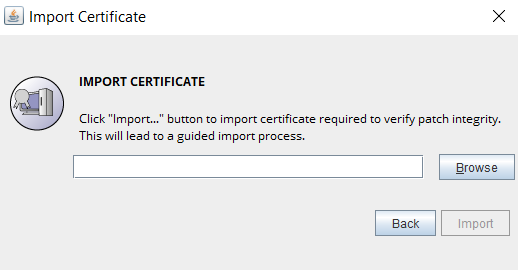
- As a part of patch integrity verification from Password Manager Pro build 12000 onwards, Password Manager Pro requires an SSL certificate to complete the upgrade process. Password Manager Pro will automatically import this certificate during the upgrade. In case, if the automatic import does not happen, you will be prompted to manually add the SSL certificate. Click here to download the SSL certificate to be imported during the version upgrade.
- In this case, when the Import Certificate pop-up opens, click Browse and Import the SSL certificate you downloaded from the above step.
- Click Install in the Update Manager window to begin the upgrade process. Please note that importing the SSL certificate is mandatory while upgrading Password Manager Pro from version 11.3 to 12.0 However, this
is a one-time operation and you need not repeat the process during the next version upgrade.
- To apply multiple upgrade packs, do the following for each upgrade; exit the Update Manager, start & stop the Password Manager Pro service once, and execute the above steps 1, 2, and 3.
- Once you have finished applying the upgrade packs, start the Password Manager Pro service.
2. Linux
Prerequisites
- Stop the Password Manager Pro service using the command /etc/init.d/pmp-service stop.
Note: In case you store the 'database_params.conf' file at a different location, copy the file back to the original location (i.e., <Password Manager Pro Installation Folder>/conf/ ) before performing the upgrade.
- Shutdown the Password Manager Pro service - both primary and secondary, if running (Not applicable for Read-Only servers).
Note: If you are using PostgreSQL as the database, ensure that the Postgres process is not running in the task manager.
- Perform a backup of the entire Password Manager Pro installation folder and store it in some other location. In case something goes wrong with the upgrade, you can revert to this copy with your settings intact. Additionally,
take a backup of the Password Manager Pro database.
Note: If you are using MS SQL as the database, perform a database backup using the SQL studio.
Steps Required
- Navigate to <Password Manager Pro Installation Folder>/bin directory using the terminal.
- Execute the command sh UpdateManager.sh -c (This will run the Update Manager in CLI mode)
- Now, press i to install and supply the full path of the upgrade package that you have downloaded from ManageEngine Password Manager Pro Upgrade Pack section.
- As a part of patch integrity verification from Password Manager Pro build 12000 onwards, Password Manager Pro requires an SSL certificate to complete the upgrade process. Password Manager Pro will automatically import this certificate during the upgrade. In case, if the automatic import does not happen, you will be prompted to manually add the SSL certificate. Click here to download the SSL certificate to be imported during the version upgrade.
- Enter the SSL certificate's absolute path when prompted. Once the certificate is imported successfully, wait for the upgrade to complete until the message "Service Pack applied successfully" is displayed.
Please note that
the SSL certificate import is a one-time operation, and you need not repeat the process during the next version upgrade.
- To apply multiple upgrade packs, do the following for each upgrade; exit the Update Manager, start & stop the Password Manager Pro service once, and execute the above steps 1, 2, and 3.
- After applying the upgrade packs, start the Password Manager Pro service.
Applying the Password Manager Pro Upgrade Packs Based on Secondary Server Configurations
1. Read-Only Server - PostgreSQL
- Ensure that the Read-Only servers are up and running.
- Apply the PPM file in the primary server using the above instructions based on your operating system.
- Post applying the PPM in the primary server, log in to the Read-Only server(s) and verify for the updated build version in the About to ensure a proper database update.
Note: The above steps only update the Read-Only server database and do not have any changes in the Password Manager Pro application setup. To upgrade the Password Manager Pro application in the Read-Only server
to the recent version, apply the PPM in all available Read-Only servers.
- Now, stop all the Read-Only server(s) and start the primary server.
- Apply the PPM file one by one in all the available Read-Only server(s) using the above instructions based on your operating system and start all the Read-Only server(s).
- Now, you have successfully upgraded to the latest version of Password Manager Pro configured with the Read-Only server(s) setup.
2. Failover Service - MS SQL
For the secondary instance configured as a failover service, check if the existing .ppm file can be applied to your newer version from the ManageEngine Password Manager Pro Upgrade Pack section. If the secondary .ppm file is applicable, please follow the instruction and proceed. Else, you will have to reconfigure a fresh failover service in the secondary instance by following the deactivation steps given below
the upgrade steps.
- Stop the secondary server as it needs to be in an inactive state and the primary server.
- Apply the PPM file to the primary server and then to the secondary using the above instructions based on your operating system.
- Now, start the Password Manager Pro primary and secondary servers.
Deactivating the Failover Service
You can deactivate the failover service either from the primary or the secondary server by following the below steps:
- Open a command prompt in any of the servers.
- Navigate to <Password Manager Pro Installation Folder>\bin directory.
- Execute the command: UninstallFOS.bat.
- Now, uninstall the Password Manager Pro application entirely from the other servers.
To reconfigure a failover service and set up a fresh secondary instance of Password Manager Pro, follow the steps given in the help guide: FOS.
3. High Availability - MS SQL
For the secondary instance, check if the existing .ppm file can be applied to your newer version from the ManageEngine Password Manager Pro Upgrade Pack section. If the secondary .ppm file is applicable, please follow the instruction and proceed. Else, you will have to reconfigure or reinstall High Availability in the secondary instance by following the prerequisites given below the upgrade instructions.
- Apply the PPM file in the primary server and the secondary server using the above instructions based on your operating system.
- Now, check the replication status in the primary server in (local publication >> view synchronization status), and it should be shown as below.
- Now, start the Password Manager Pro secondary and the primary servers.
Prerequisites for Reconfiguring High Availability
To reconfigure a new High Availability instance, delete the replication data related to 'Subscriptions' and Publications', and disable 'Publishing and Distribution'. To do so, log
in to MS SQL Server Management Studio and delete the following files/folders as explained below: (Skip these steps if High Availability is not configured).
- Deleting Subscription
Navigate to Replication >> Local Publications >> <Name of Password Manager Pro database:PMP-HA>. You will see a file with <Password Manager Pro server name>:<Name of Password Manager Pro database>.
Right-click the file and press 'Delete' in the menu.
- Deleting Publication
Navigate to Replication >> Local Publications >> <Name of Password Manager Pro database:PMP-HA>. Right-click the folder <Name of Password Manager Pro database: Password Manager Pro-HA> and press 'Delete' in the menu.
- Disabling Publishing Distribution
Now, right-click the 'Replication' folder and click the option 'Disable Publishing and Distribution'. Further, proceed with the configuration
steps given in the help guide to reconfigure the High Availability.
4. High Availability - PostgreSQL
For the secondary instance, check if the existing .ppm file can be applied to your newer version from the ManageEngine Password Manager Pro Upgrade Pack section. If the secondary .ppm file is applicable, apply the PPM file in the primary server and the secondary server using the above instructions based on your operating system. Else, you will have to
reconfigure or reinstall High Availability in the secondary instance.
To reconfigure High Availability and set up a fresh secondary instance of Password Manager Pro, follow the steps given in the help guide: PostgreSQL.
For more assistance, please get in touch with our Support team @ Password Manager Pro-support@manageengine.com.
 Upgrade Pack