Privileged Remote Connections
PAM360 offers a comprehensive solution for establishing and managing remote connections to privileged resources, accessing web applications, and handling file transfers from a centralized platform. With support for RDP, SSH, VNC, SQL, and Telnet, remote sessions can be launched directly from the PAM360 interface via HTML-5 compatible browsers. These sessions are securely tunneled through PAM360’s server, creating encrypted communication channels that safeguard against third-party interceptions. The credentials needed to access remote resources are securely stored in PAM360’s vault, preventing unauthorized exposure.
Additionally, PAM360 streamlines website and HTTPS gateway connections for secure access to web-based applications and internal portals. With autofill support, PAM360 can automatically populate stored credentials on login pages, ensuring a seamless login experience. Furthermore, PAM360 facilitates secure file management during remote sessions. It supports bi-directional file transfers between remote devices without initiating a remote connection and allows files to be uploaded or downloaded securely during remote connections. This ensures that all file exchanges remain encrypted and protected against unauthorized access. This help document covers the following topics in detail:
- Connection Scenarios
- Remote Connections
- Website Connections
- HTTPS Gateway Connections
- Working With Files
- Accessing Remote Applications
1. Connection Scenarios
The Connections tab offers a centralized view of all the managed and shared connections within your environment. After you choose the desired category from the Connections Tree on the left pane, you can click on the desired resource on the Resource pane to view the available/accessible connections. The Accounts pane will display the various available connection options, using which you can launch a remote session to the selected resource.
- When you click on a Windows Domain resource on the Resource pane, you will see the following sections within the Accounts pane.
- Domain Accounts - PAM360 displays a list of all the available connection options to access the domain controller.
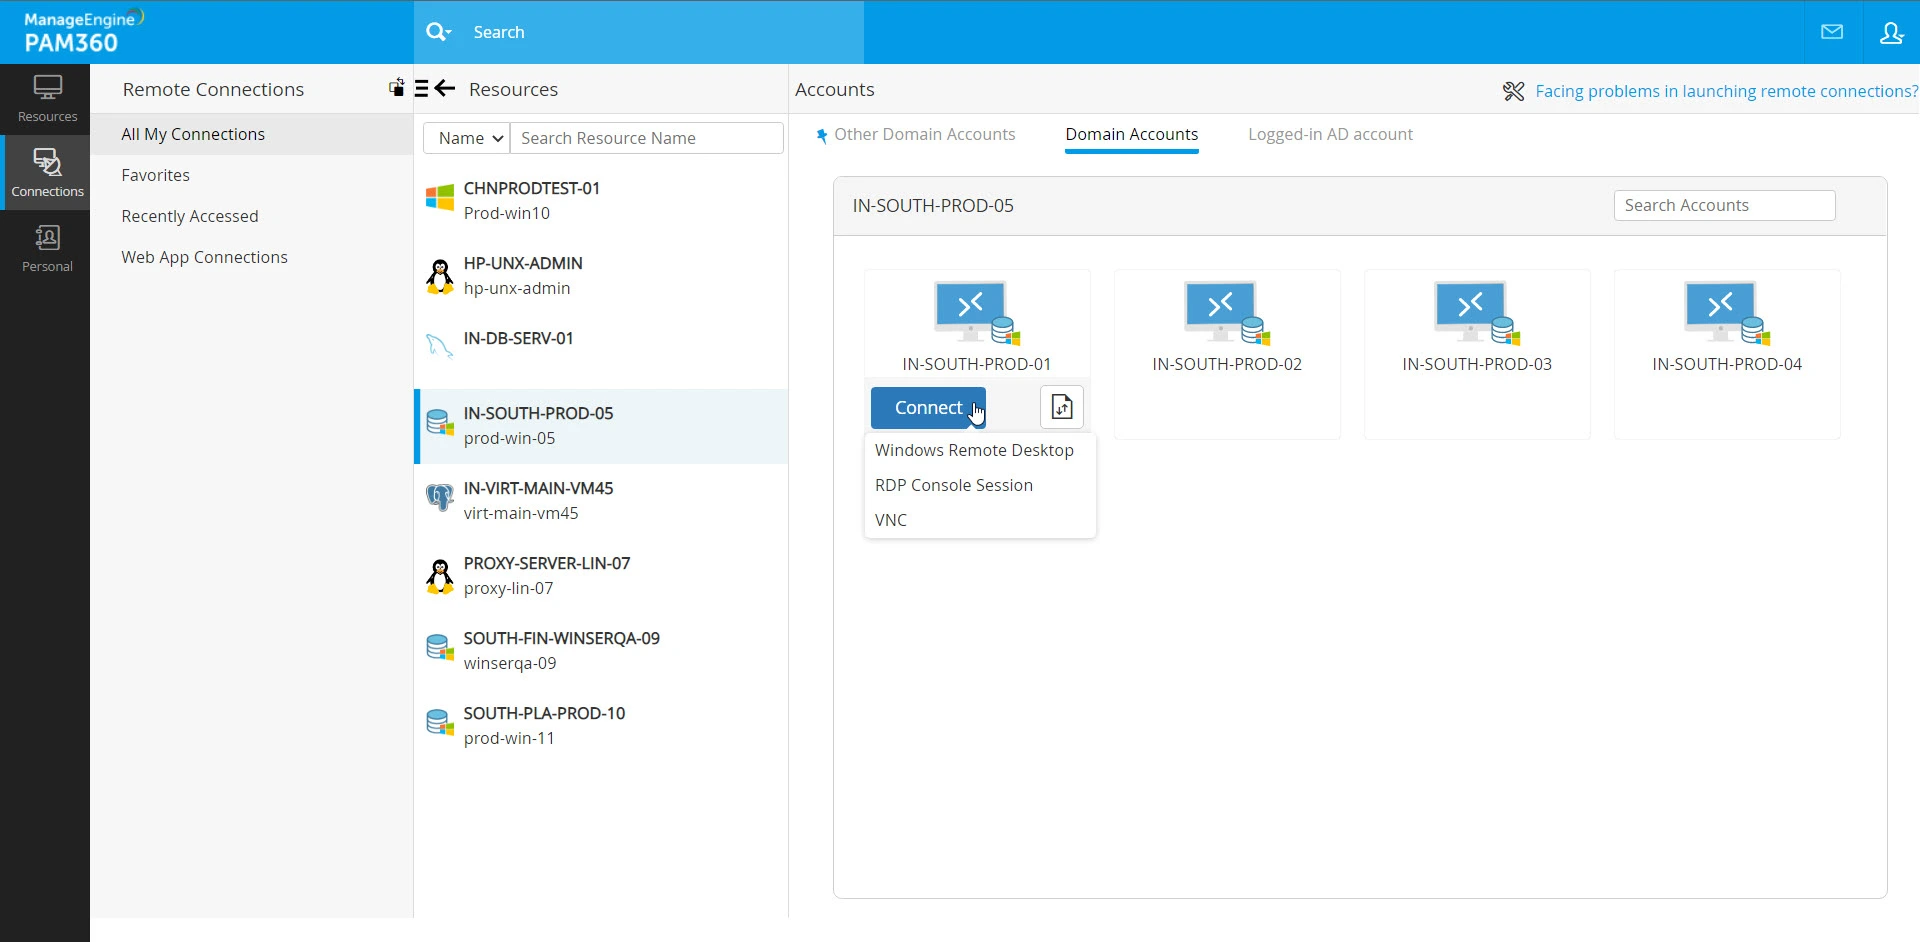
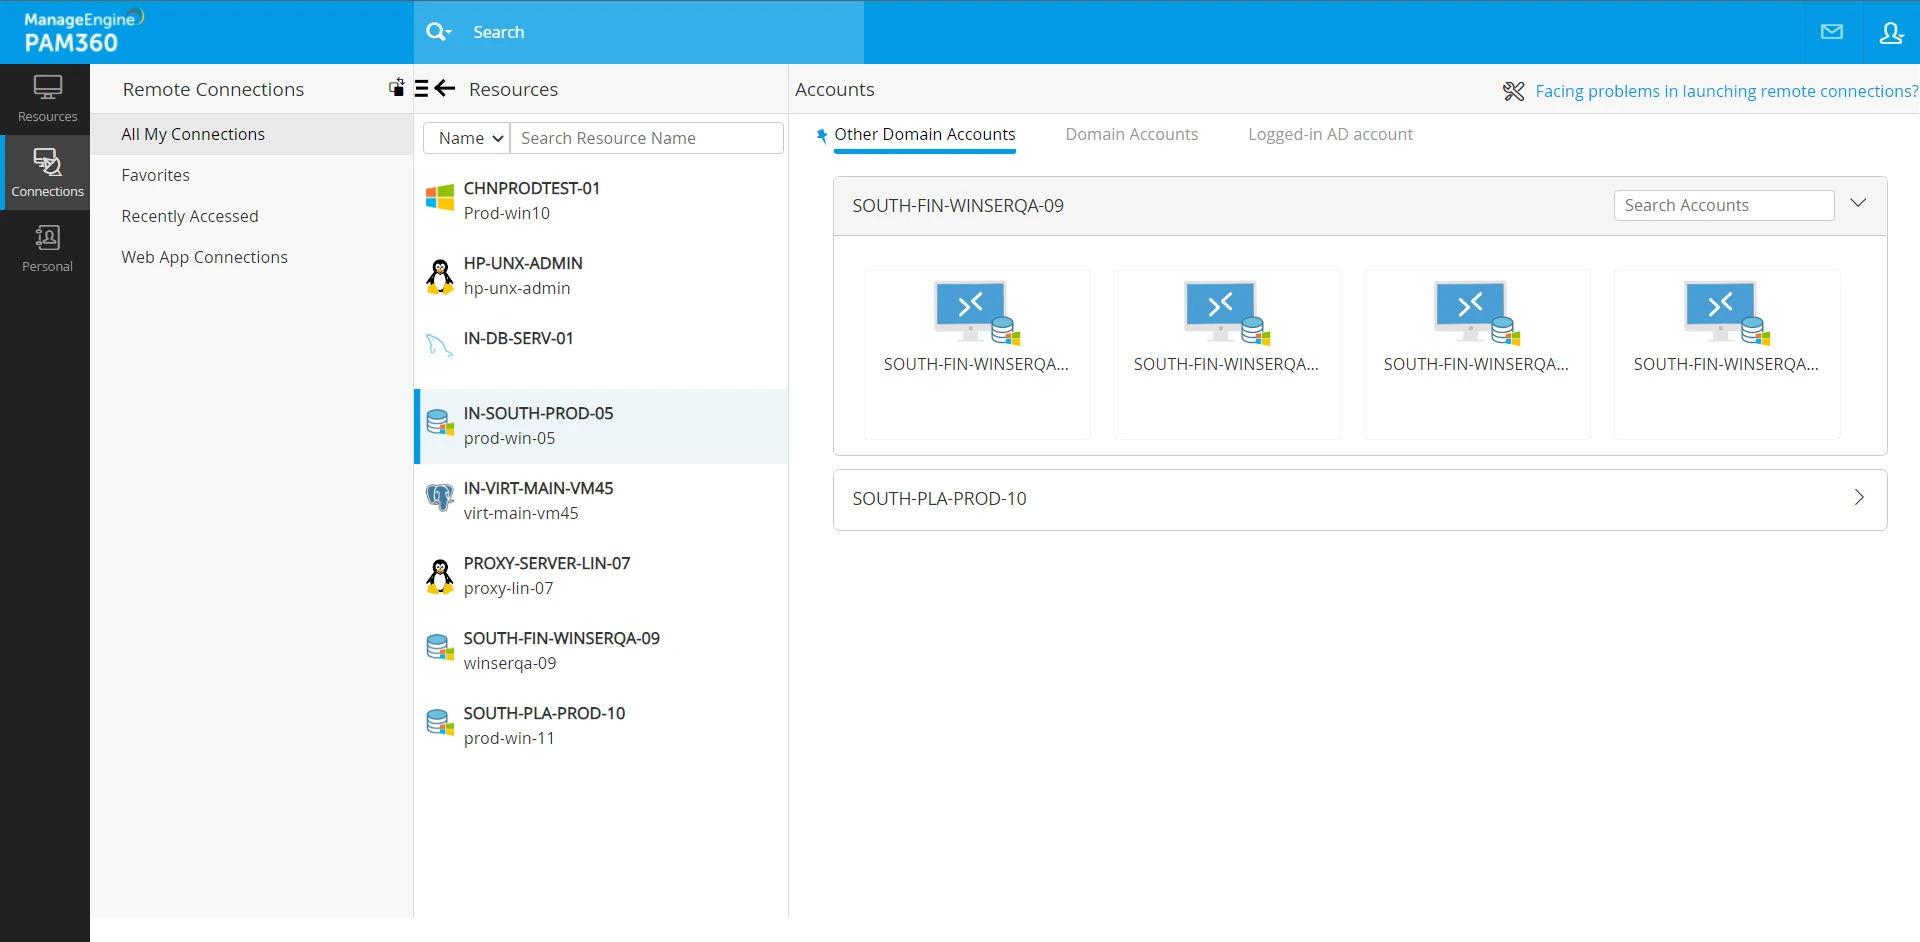
- Other Domain Accounts - In environments with multiple domain controllers and established trust relationships, PAM360 displays a list of available connection options for the selected domain controller under this section. The domain accounts are organized into sub-sections, each representing a domain controller. These sub-sections include a search option, allowing you to locate specific domain accounts within the respective domain controller.
- Domain Accounts - PAM360 displays a list of all the available connection options to access the domain controller.
- When you click on a Windows or a Linux-type resource on the resource pane, you will see the following sections within the Accounts pane.
- Local Accounts - List of all the local accounts available within the selected resource.
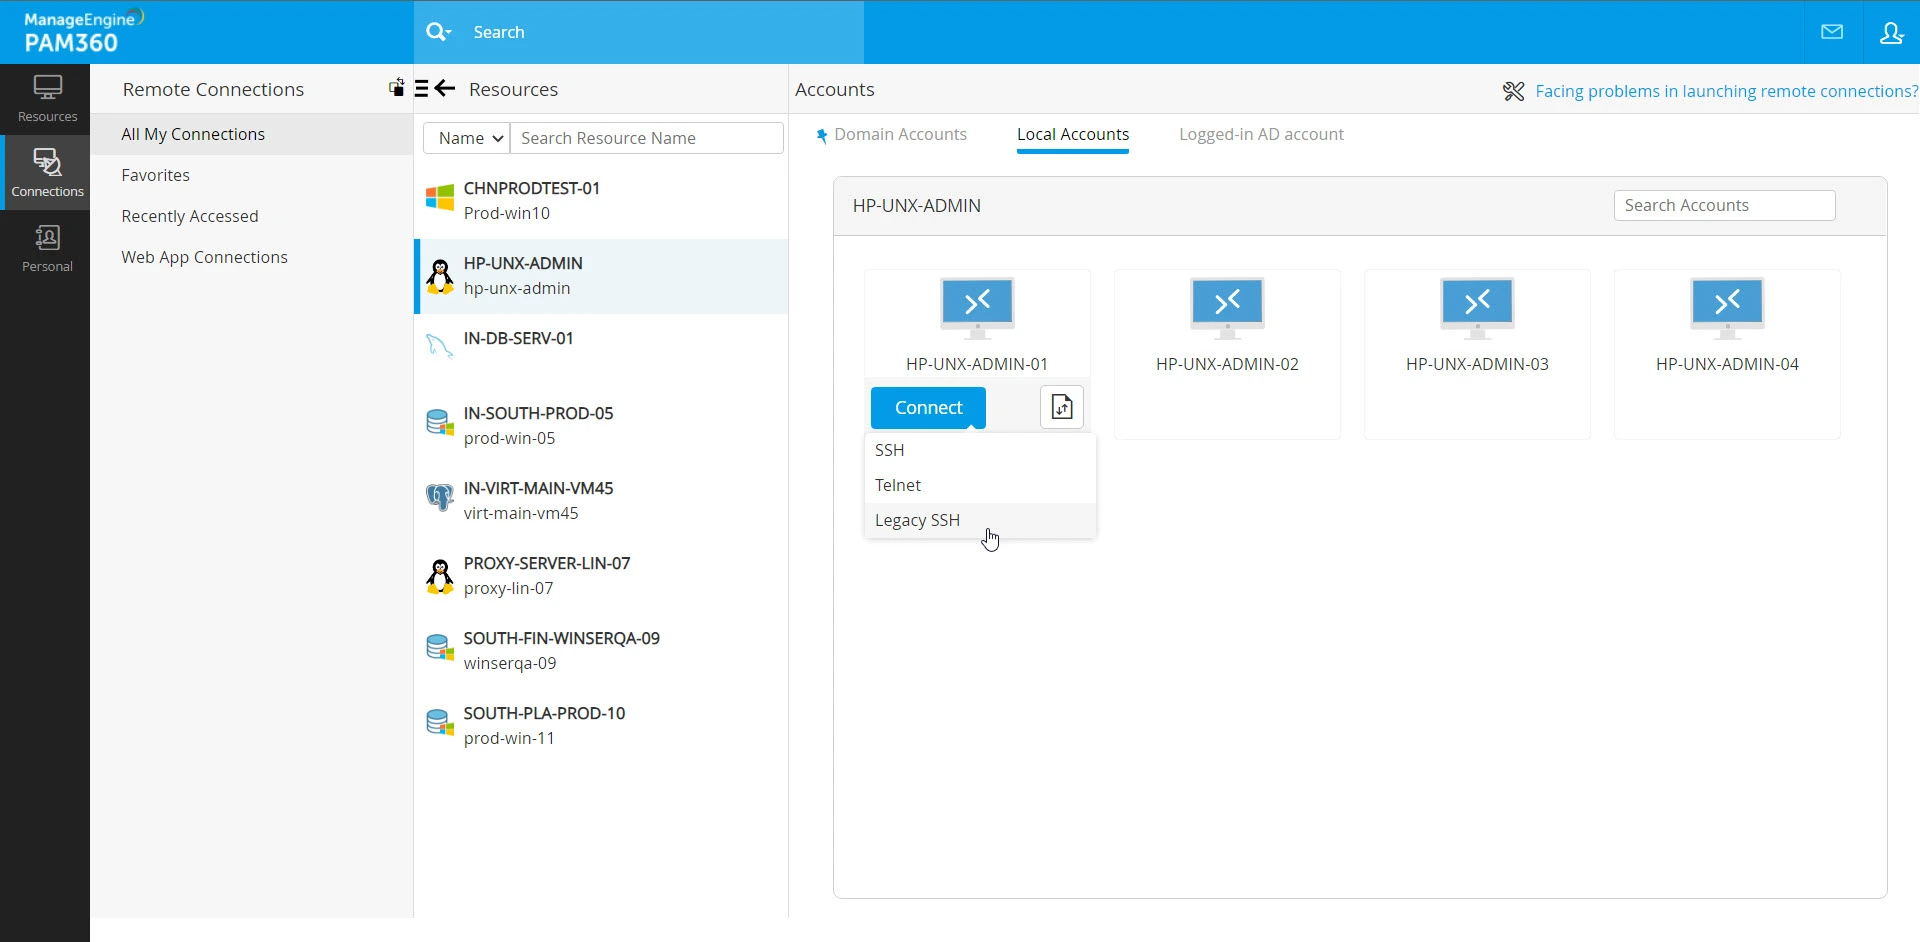
- Domain Accounts - The list of all the domain accounts using which you can access the selected resource.

Additional Detail
Apart from the SSH protocol, Telnet, Legacy SSH, and other auto logon helpers will be disabled for the accounts configured with SSH command control (filtering).
- Local Accounts - List of all the local accounts available within the selected resource.
- If you log into PAM360 with you AD/LDAP/Entra ID credentials, you will see the following sections within the Accounts pane along with the above-mentioned options:
- Logged in AD/LDAP/Entra ID Account - PAM360 displays the currently logged in AD/LDAP/Entra ID account as a connection option for the selected resource. This option is available only for resource types that support domain authentication.
Additional Detail
The logon options available for remote connections initiated using Logged in AD/Microsoft Entra ID/LDAP Account will be Windows Remote Desktop for Windows and SSH for Linux systems.
- Logged in AD/LDAP/Entra ID Account - PAM360 displays the currently logged in AD/LDAP/Entra ID account as a connection option for the selected resource. This option is available only for resource types that support domain authentication.
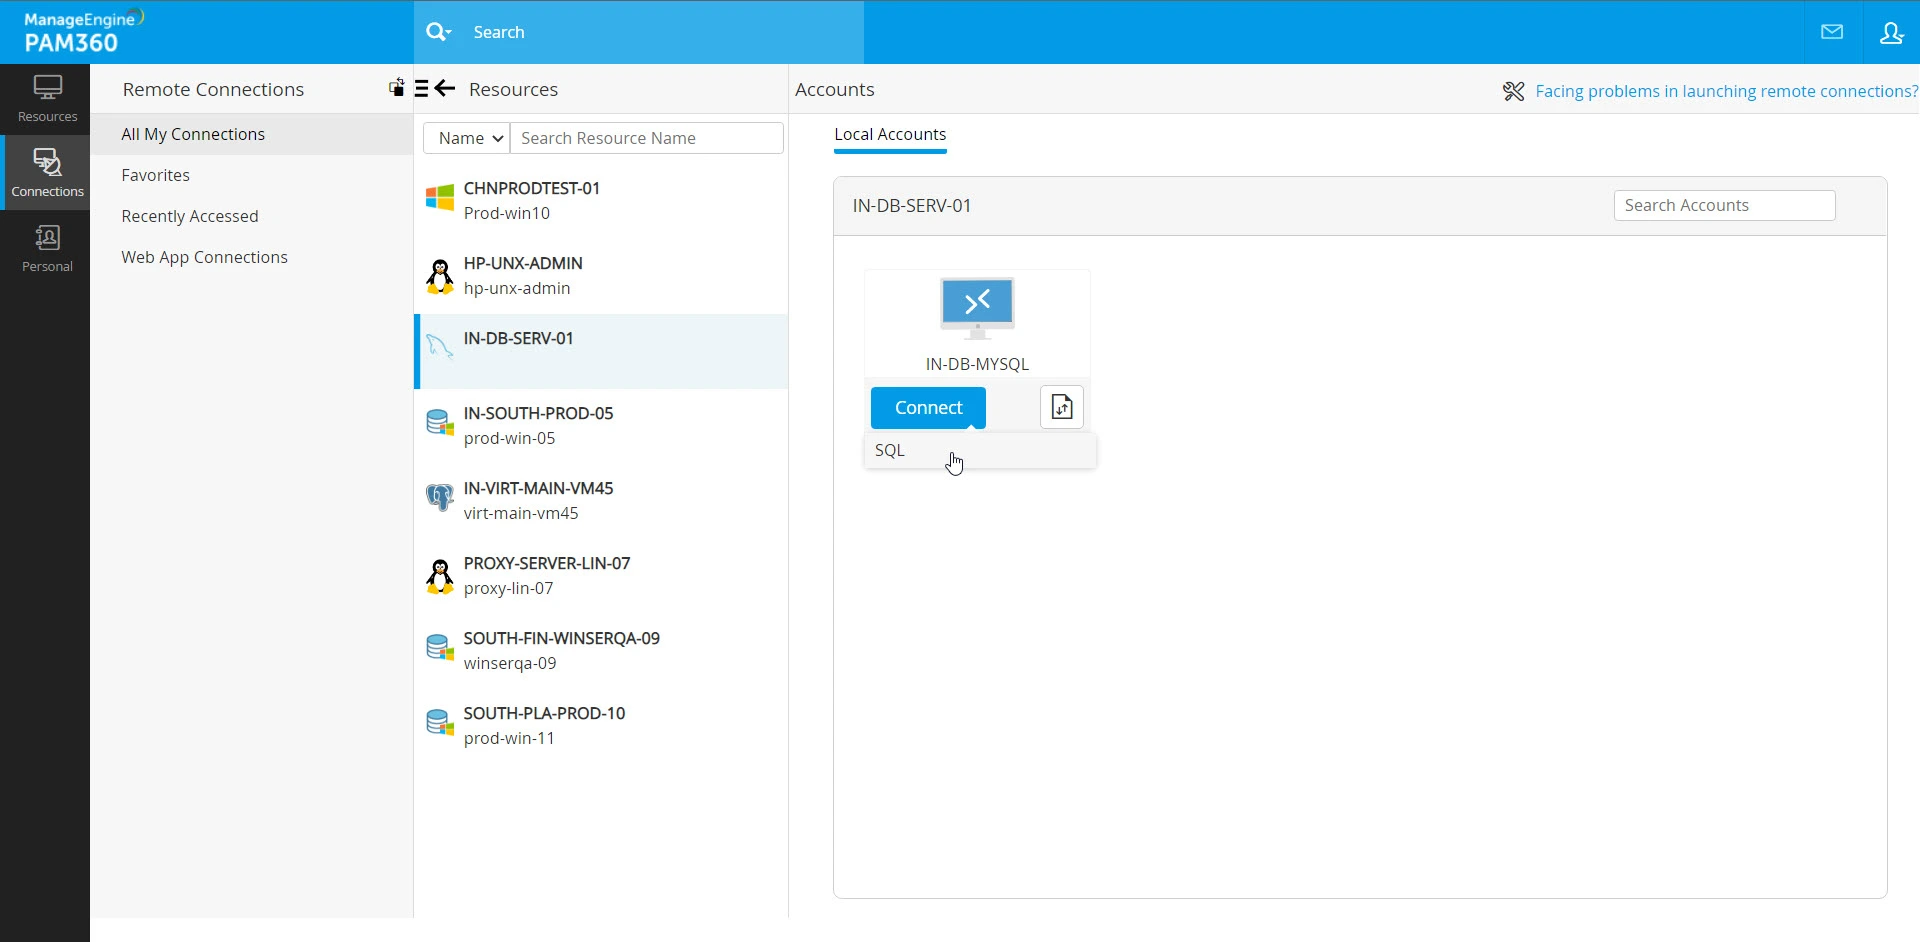
- When you click on database type resources such as PostgreSQL, MySQL, and Oracle DB Servers, only the Local Accounts section is displayed within the Accounts pane.
Additional Detail
In the Accounts pane, you can pin a specific tab for quick access and reference. For example, if you pin the Local Accounts tab, whenever you choose a resource, the local accounts of the resource will be displayed first. This operation is user-specific and does not affect the view of other users accessing the same installation.
2. Remote Connections
PAM360 allows you to establish privileged remote sessions to supported systems directly through HTML5-compatible browsers. The credentials required to establish these remote sessions are securely stored in the PAM360 vault. Additionally, PAM360 allows you to enforce password access control for the resources, ensuring only authorized users can initiate remote sessions. These safety measures ensure that the sensitive data is securely stored in PAM360 and the integrity of all remote sessions launched from the platform is protected.
Every time you click on a resource on the Resource pane within the Connections tab, the various accessible connection options are displayed on the Accounts pane categorized into various sections depending on the resource you choose. PAM360 supports three different ways of establishing a secure remote connection to a privileged resource. When you click on a resource on the Resources pane, you can launch a remote connection to the selected resource using any of the following options:
- Local Account - Remotely login to the privileged resource using the local account credentials shared with you and carry out the assigned duties.
- Domain Account - Access the selected resource using one of the available domain account credentials shared with you and perform the assigned duties.
- Logged-in AD/LDAP/Entra-ID Account - Remotely login to the selected resource using the AD, LDAP, or Entra ID credentials with which you are currently logged into PAM360. This option is only available for resource types that support domain authentication, allowing you to access the resource without manually entering the credentials again.
Additional Details
- The available connection options to launch a remote session to a privileged resource differ based on the selected resource type.
- When a privileged remote connection is active, administrators can view the details from the Notifications panel, the Password Dashboard, and under Audit >> Active Privileged Sessions. All the privileged remote connections can be recorded and archived. Click here to learn about privileged session recording in detail.
The procedure to launch a remote connection depends on various factors, such as the resource type of the selected resource, whether the access control workflow is enabled in your environment, and the account using which you wish to access the selected resource. As mentioned above, the available connection options vary depending on the selected resource type.
2.1 Launching Secure Remote Connections
Follow these steps to launch a remote connection to a privileged resource from the Connections tab:
- Navigate to the Connections tab, select the desired category from the Connections Tree on the left pane, and click on the desired resource on the Resource pane you wish to access remotely from the PAM360 interface.
- Depending on the resource you choose, the Accounts pane will be split into different sections, displaying the various available connection options, using which you can launch a remote connection to the selected resource. Switch to the desired section within the Accounts pane, hover over the desired account using which you wish to access the selected resource, and click the Connect button. You will see multiple options as a drop-down menu depending on the selected resource.
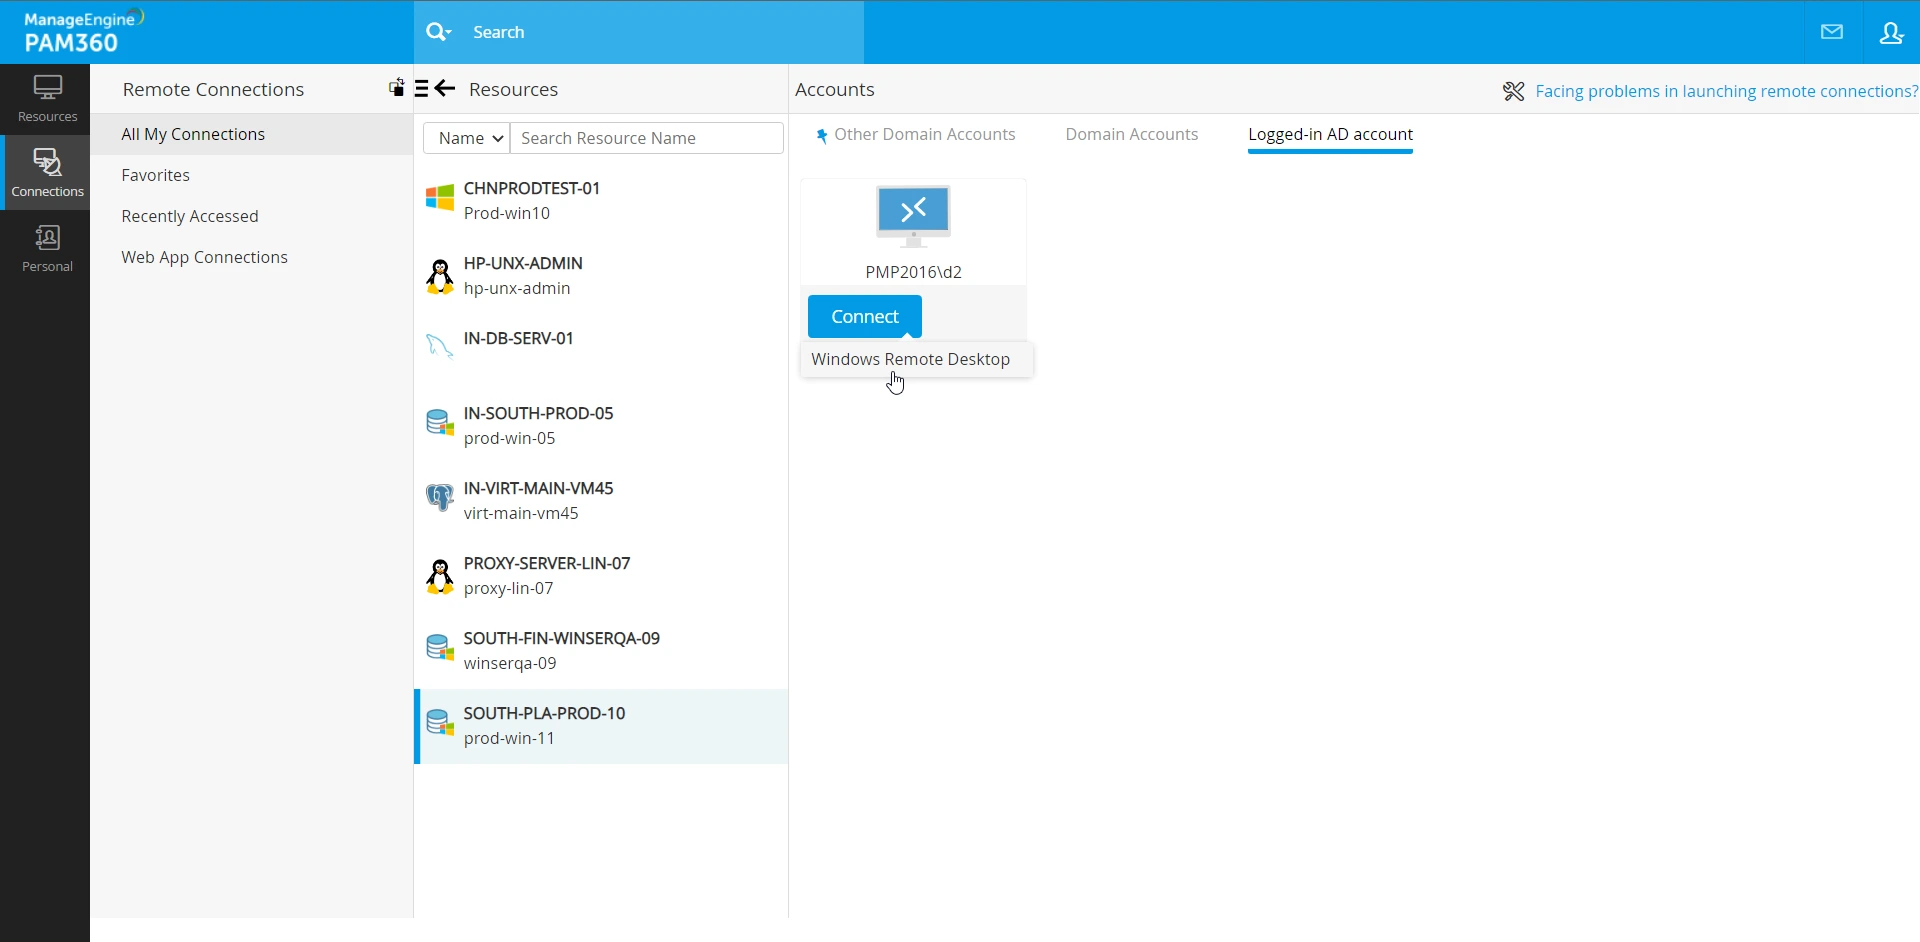
- Select the desired remote login procedure from the displayed options. This action will open the remote session in a new tab in the browser window, and the session will begin as soon as PAM360 authenticates the connection using the password stored in the repository.
- If you choose to access the selected resource remotely using your currently logged-in AD/Entra ID/LDAP account, you should enter your AD/LDAP/Entra ID password along with the reason in the Auto Logon window that appears and click Connect.
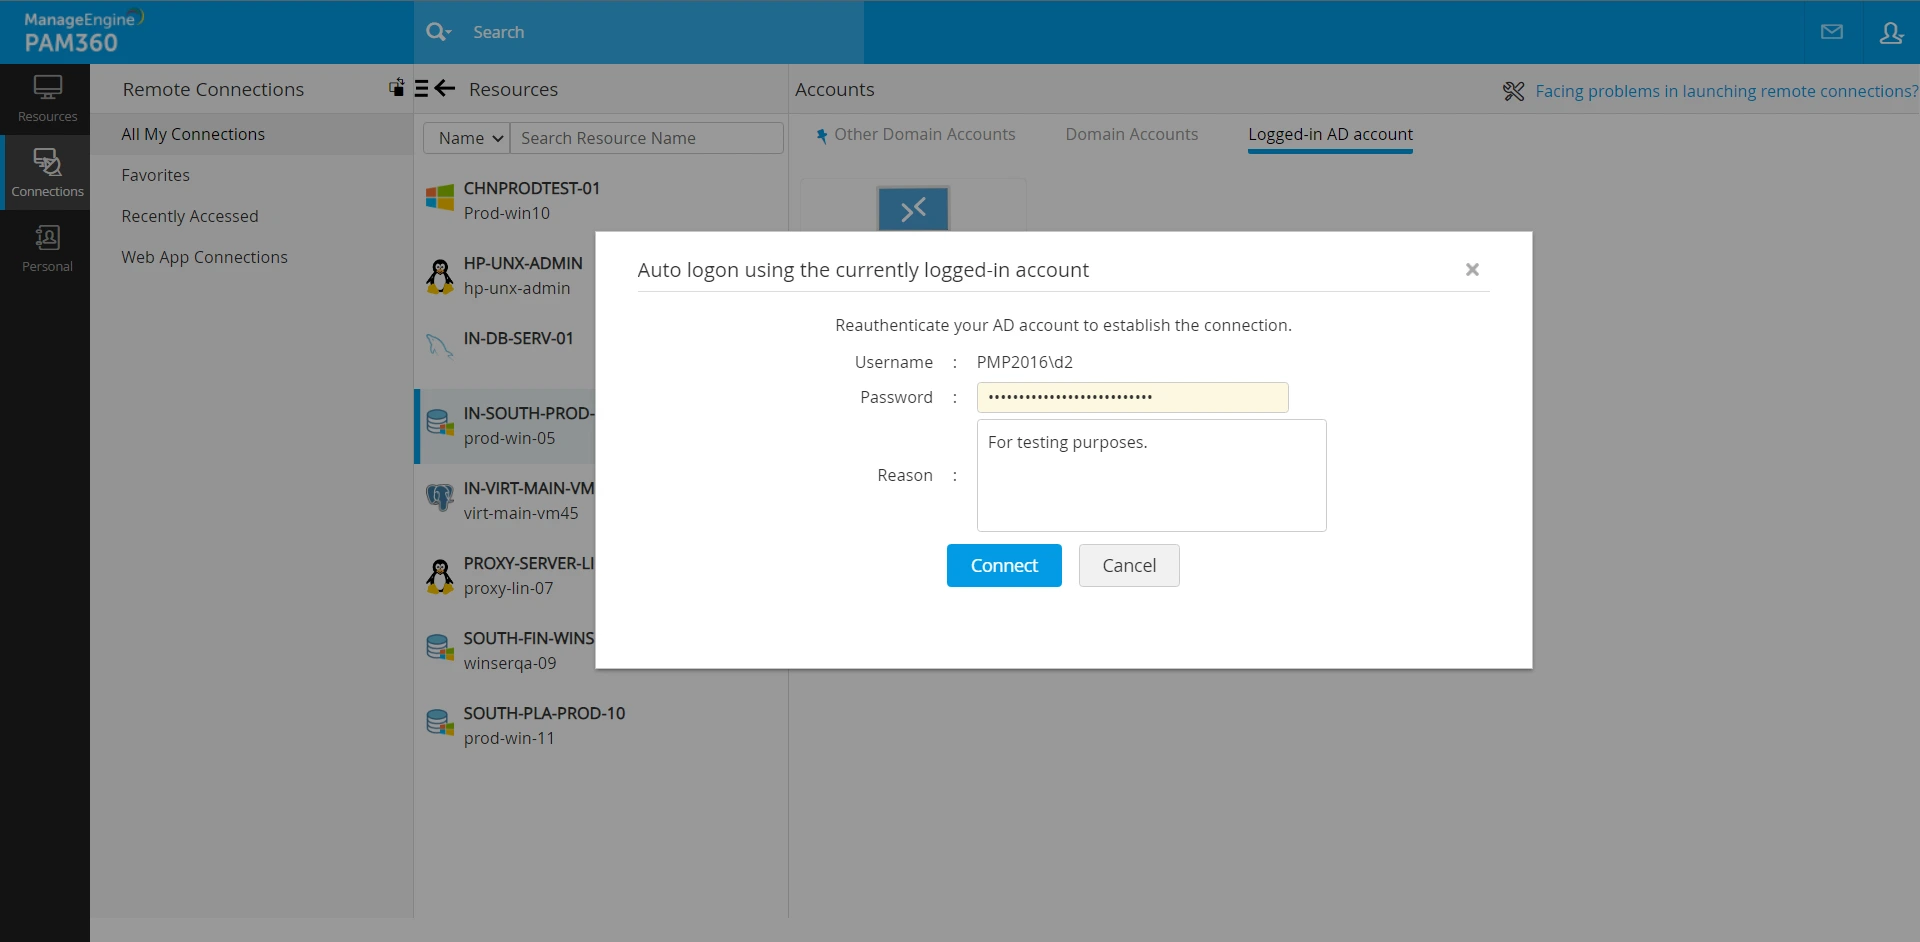
- You have successfully established a remote connection to the desired resource.
To launch a privileged remote session to resources configured with access control workflow, you must follow the request-release workflow to gain access to the privileged password of the account using which you wish to establish the remote connection. You can perform all the actions related to the password access control workflow from the Connections tab itself. There are various stages involved in this process: requesting access to a password, checking out the password after approval, and returning the password to the vault after use.
2.2 Launching Remote Connections to Access Control Configured Resources
Follow these steps to gain access to the password by following the request-release workflow to launch a remote connection.
- Navigate to the Connections tab, select the desired category from the Connections Tree on the left pane, and click on the desired resource on the Resource pane you wish to access remotely from the PAM360 interface.
- Depending on the resource you choose, the Accounts pane will be split into different sections, displaying the various available connection options, using which you can launch a remote connection to the selected resource. Switch to the desired section within the Accounts pane, hover over the desired account using which you wish to access the selected resource, and click the Request button.
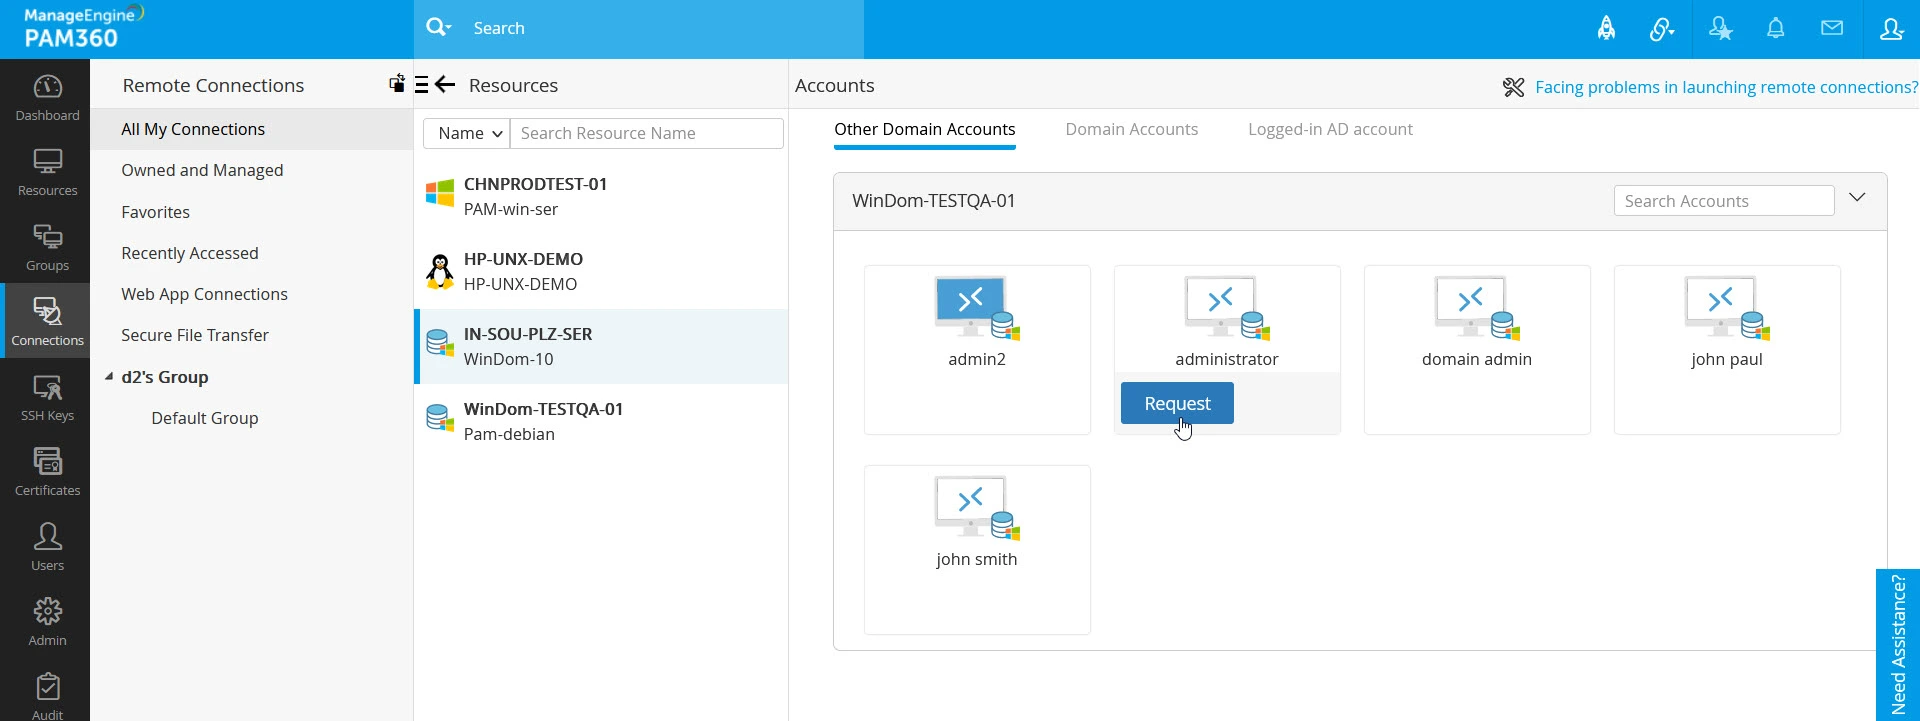
- In the Password Request window, perform the following action depending on the password you are requesting:
- Domain Account - If you are requesting access to a domain account password to access the selected resource, then choose the resources you wish to access using the selected domain account from the available options, pick an access time slot, and enter your reason for requesting access to the selected resource in the Comments field.
- Local Account - If you are requesting access to a local account password to access the selected resource, pick a time slot during which you wish to access the selected resource using the calendar option and enter your reason for requesting access to the selected resource in the Comments field.
- After entering the required details, click the Send button at the bottom of the Password Request window to make a password access request for the selected account. The request will be sent to the administrators designated as authorized administrators in the access control workflow. The password status will change to Waiting, which is visible when you hover over that selected resource.
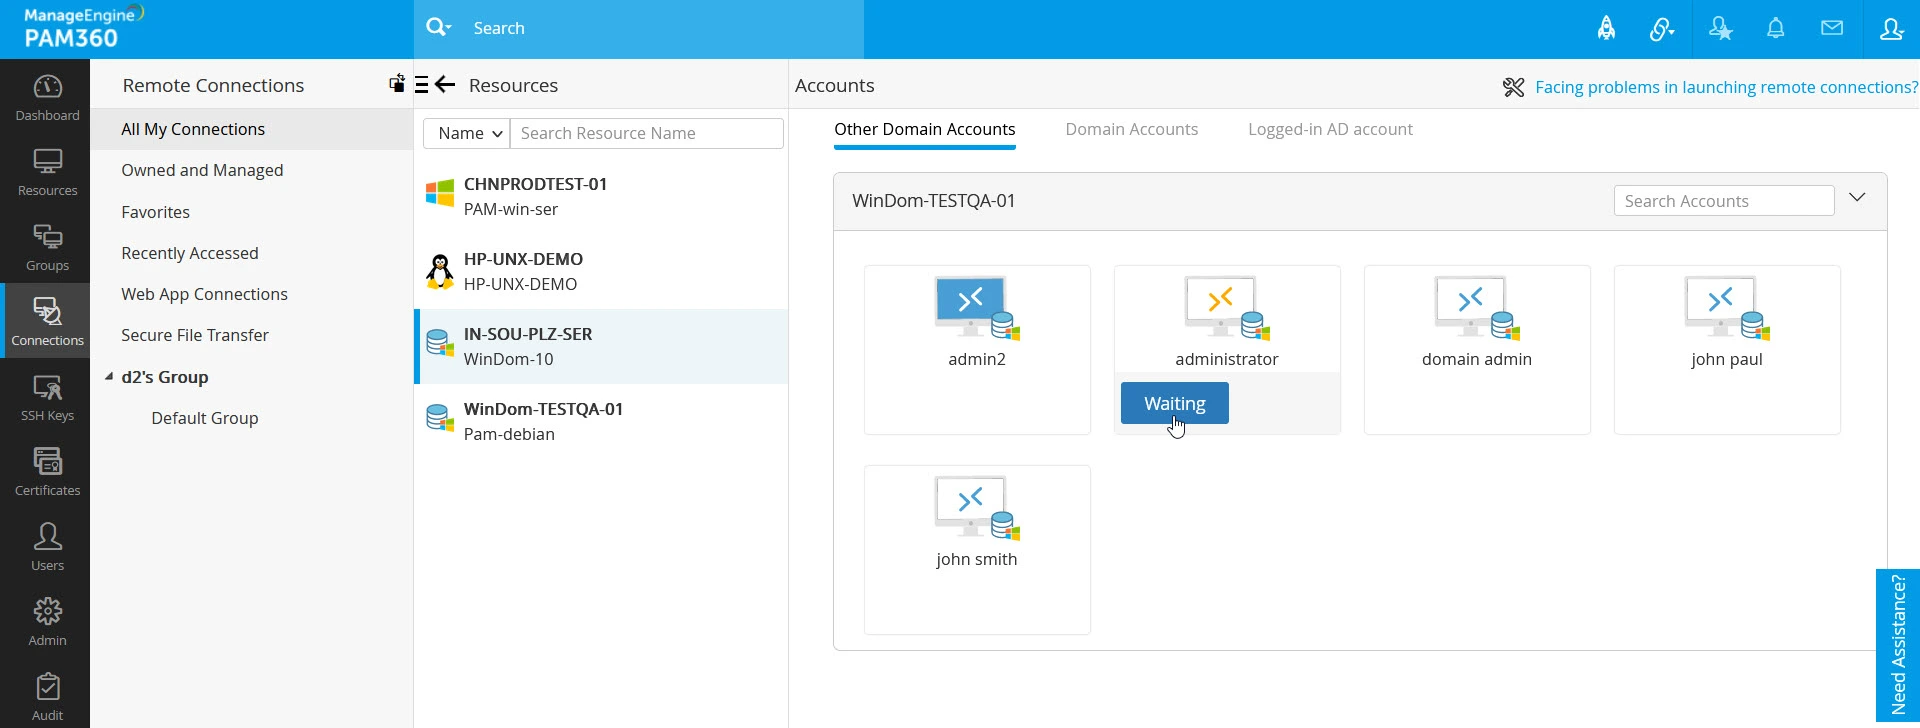
- Once the administrators approve your request, you can check out the password from the vault and launch a remote connection. When the password is available for checkout, the connection icon will turn green from blue. Hover over the account and click the Check Out button.
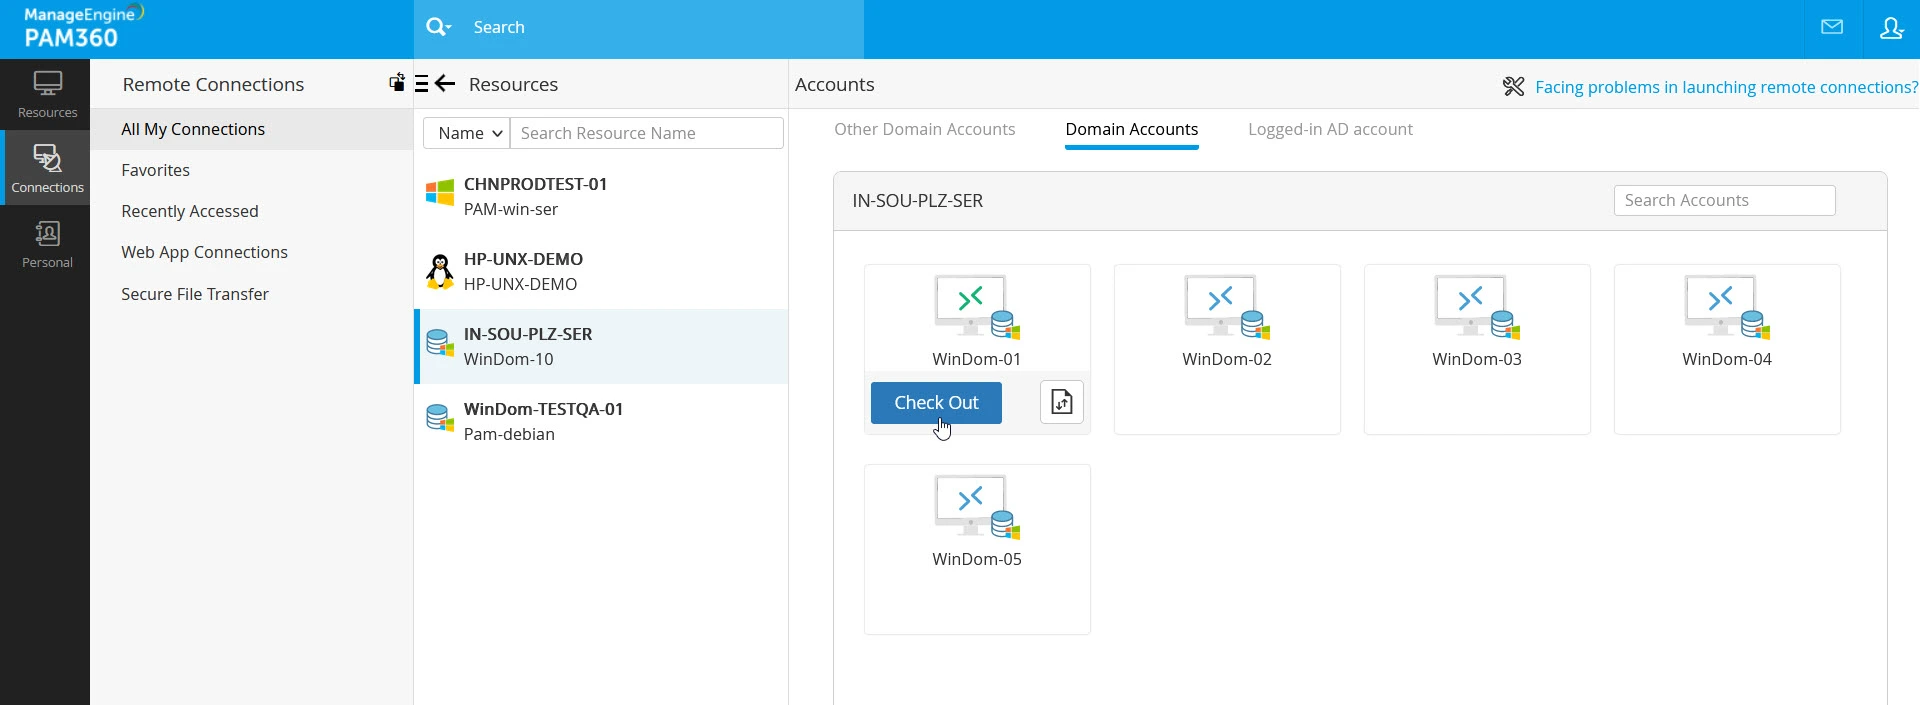
- In the Password Checkout window, you will see the access details, such as the resource name, account name, and access duration. Click the Check Out button to access the password. You will maintain exclusive access to the password for 30 minutes, after which the password will be automatically returned to the vault, and your access to the password will be revoked.
- Once you gain access to the password, you can launch the remote connection. On the Accounts pane, click the Connect button under the respective account. You will see multiple options as a drop-down menu depending on the selected resource.
- Select the desired remote login procedure from the displayed options. This action will open the remote session in a new tab in the browser window, and the session will begin as soon as PAM360 authenticates the connection using the password stored in the repository.
- To return the password to the vault after using it, hover over the account and click the Check In button. In the Password Check In Confirmation popup, you will see the resource and account details. Click Check In to relinquish access to the password.
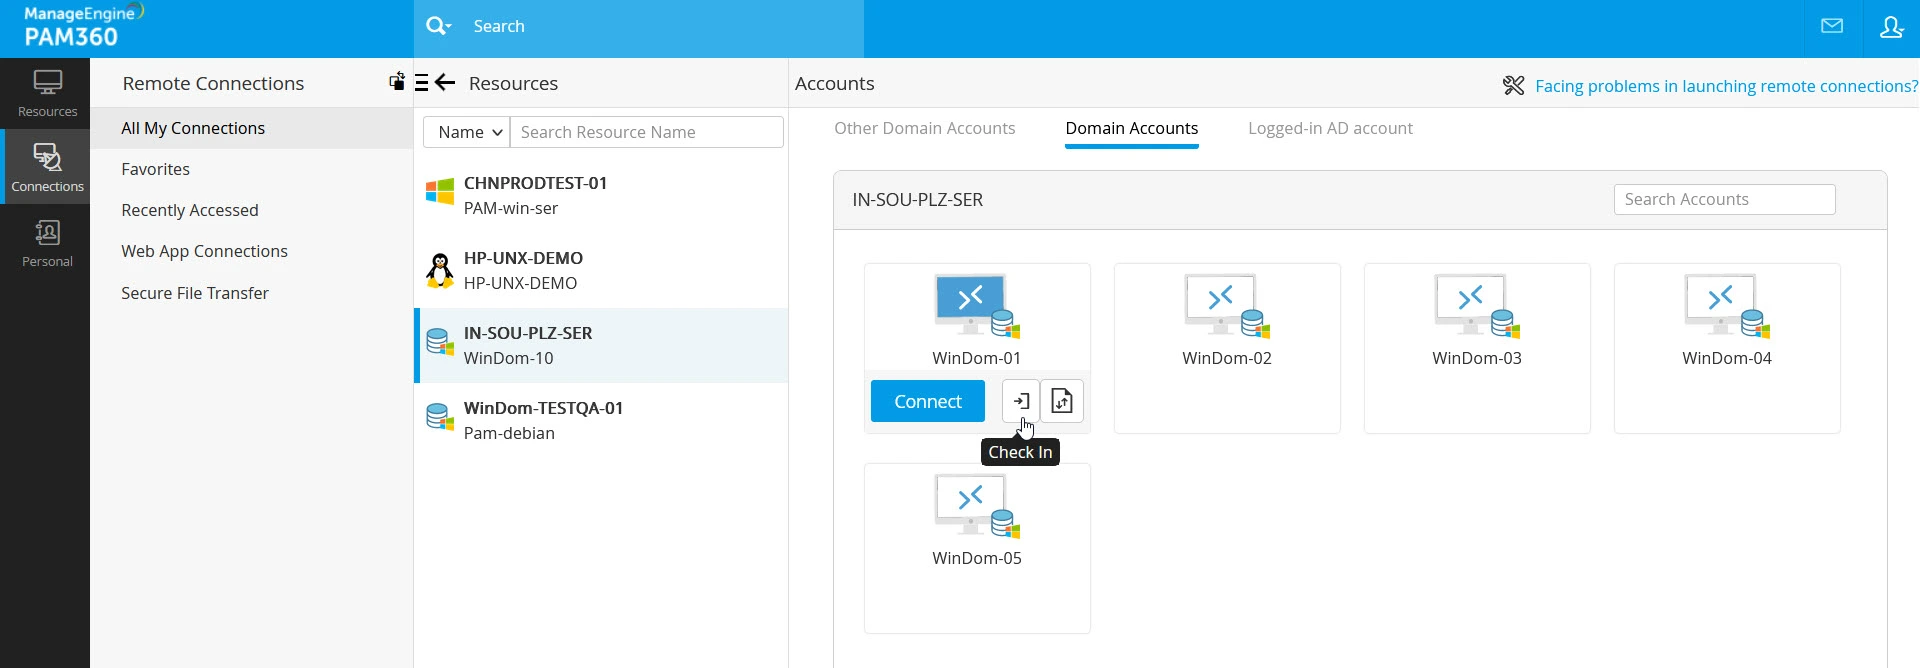
When a user has checked out the password from the vault and is currently using it, others cannot request access to the password, and the status will be displayed as In Use with a thumbnail in red color.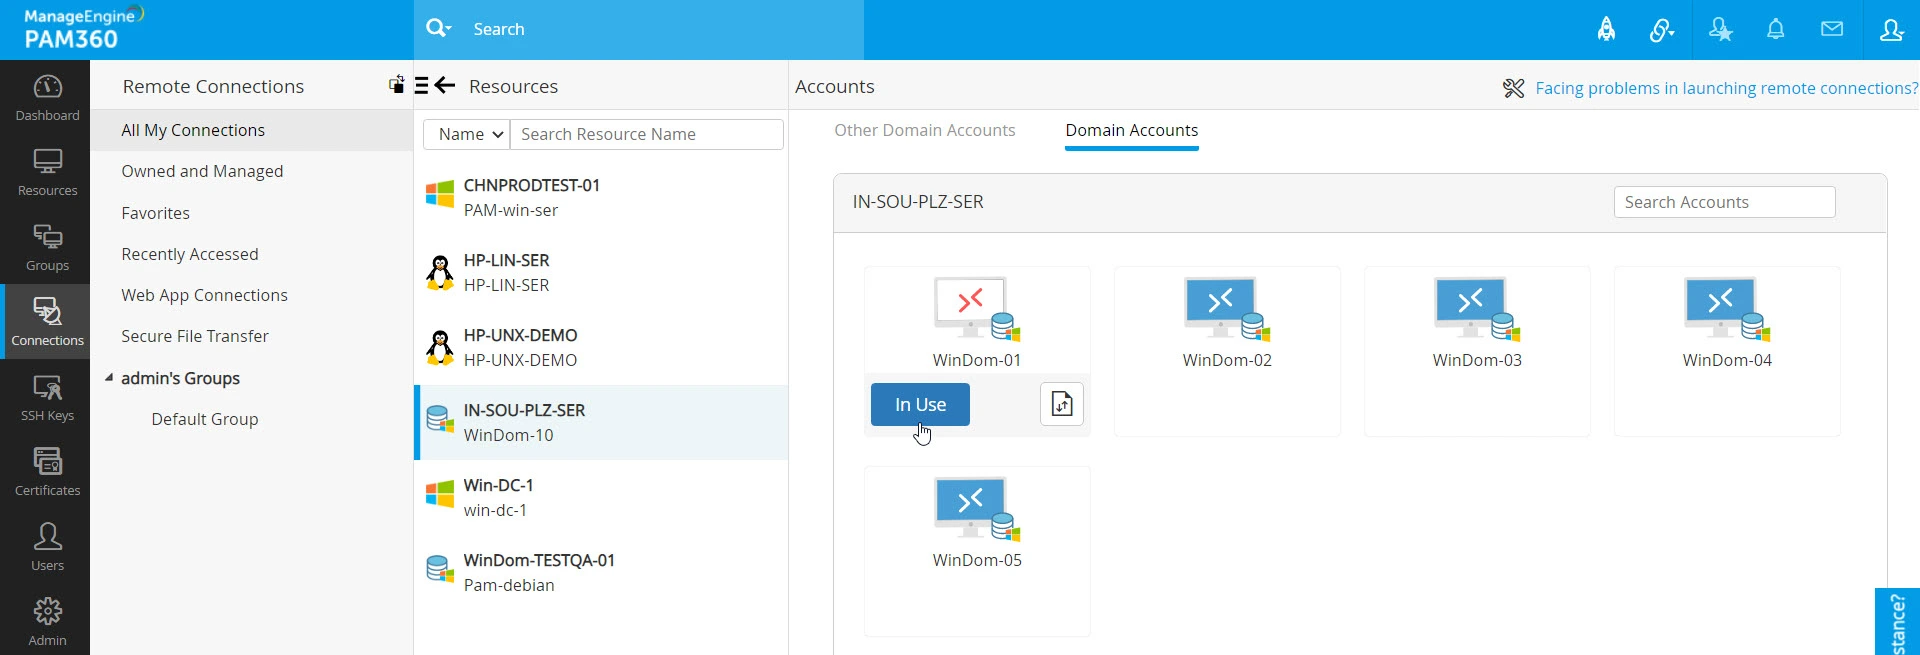
Additional Detail
Once you check in the password to the vault, you will no longer have access to it. If you need to access the password again to launch a remote connection, you must submit a new password access request by following the request-approval workflow.
3. Website Connections
3.1 Launching Secure Website Connections
PAM360 allows users to initiate secure website sessions for sensitive web applications and services directly from the application. Users can utilize this feature to access privileged web applications and services seamlessly from the PAM360 interface. To launch a website session:
- Navigate to the Connections tab and select Web App Connections from the left pane.
- You will see a list of all the web app resources shared with you on the Web App Connections page.

- Hover over the desired resource and click the Connect button to launch a website session.
Caution
- If session recording is enabled for website connections, users should be logged into the PAM360 extension to ensure the sessions are recorded.
- The website connections are recorded only for 30 minutes.
3.2 Autofill Support for Websites and Applications
PAM360 supports autofill for website sessions launched from the PAM360 web interface via an active browser extension. The credentials must be stored within a resource in PAM360 to autofill them on a website or application. When you attempt to log into a website, click the PAM360 extension icon that appears beside the credentials field on the target site and choose an account. The corresponding username and password will be auto-filled, and you can manually hit enter to log into the website.
Additional Details
- When you enter a new login credential while accessing a website or application, the extension will prompt you to save it rather than asking you to select an account for autofill. Upon saving, you can add the credential as an enterprise or personal account to the PAM360 server directly from the browser extension.
- The autofill functionality will work only if the PAM360 browser extension is installed.
4. HTTPS Gateway Connections
4.1 Launching HTTPS Gateway Sessions
Users with the HTTPS Gateway Connection privilege (administrators, connection users, users with custom roles) can launch HTTPS gateway sessions to the configured resource URLs using any of the following methods:
- From Connections >> Remote Connections >> HTTPS Gateway Connections.
- You will see a list of all the available HTTPS gateway connection options on the HTTPS Gateway Connections page.

- Hover over the desired connection option and click the Connect button to launch an HTTPS Gateway connection.
- Click the HTTPS Gateway Session option under the Remote Connection column beside the configured resources on the Resources tab.
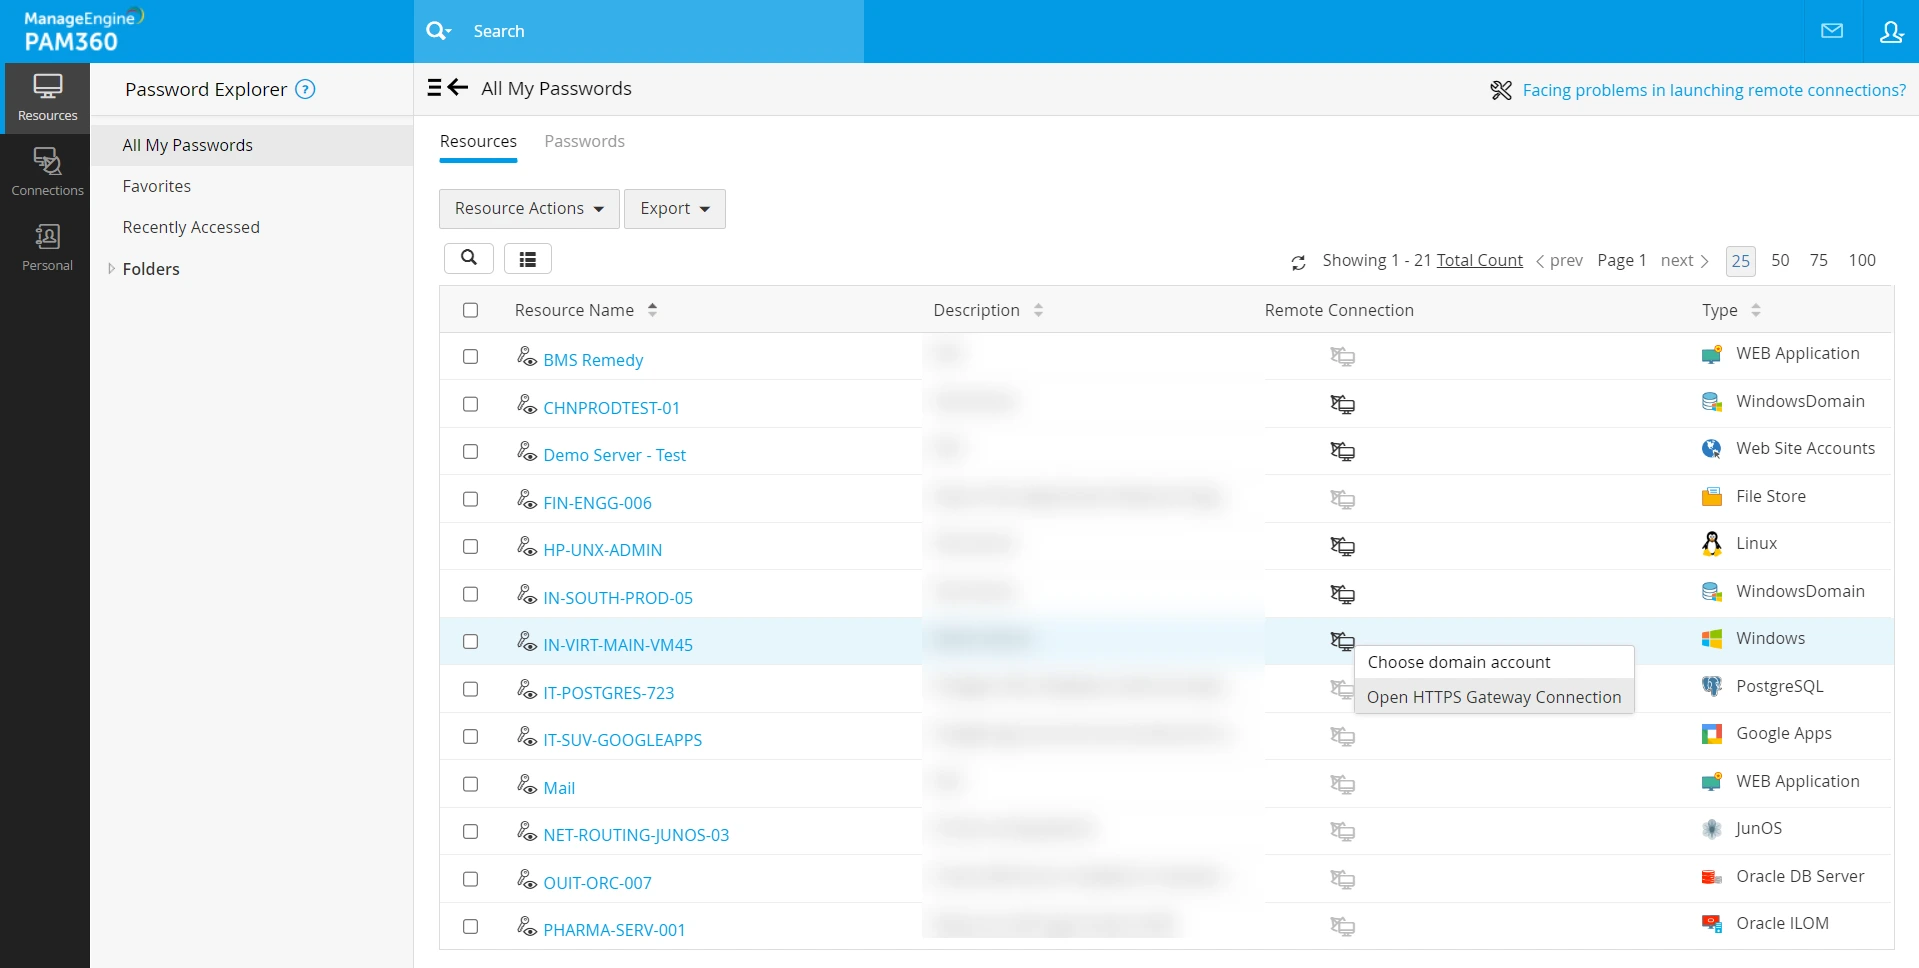
Once the session to the target URL is launched from the respective page, the web page will open in a new tab with the server URL and the custom port as provided. (E.g., https://server-name:8285/{uri}). Explore this link to learn in detail about the HTTPS Gateway Server in PAM360.
Additional Details
- From build 7400 onwards, PAM360 provides autofill support for HTTPS gateway sessions launched from the PAM360 web interface and extension.
- If session recording is enabled for HTTPS gateway connections, then an active PAM360 Extension session is required to launch an HTTPS Gateway connection.
4.2 Autofill Support for Websites and Applications
PAM360 supports autofill for website sessions launched via an HTTPS gateway from the PAM360 web interface. The credentials must be stored within a resource in PAM360 to autofill them on a website or application. When you attempt to log into a website, click the PAM360 extension icon that appears beside the credentials field on the target site and choose an account. The corresponding username and password will be auto-filled, and you can manually hit enter to log into the website.
Additional Details
- When you enter a new login credential while accessing a website or application, the extension will prompt you to save it rather than asking you to select an account for autofill. Upon saving, you can add the credential as an enterprise or personal account to the PAM360 server directly from the browser extension.
- The autofill functionality will work only if the PAM360 browser extension is installed.
5. Working With Files
PAM360 allows you to transfer files to and from a remote machine directory via the Secure File Transfer Protocol (SFTP) without launching a separate remote connection. Additionally, PAM360 supports bi-directional file transfer between two remote devices. During the bi-directional file transfer, PAM360 establishes a secure and encrypted connection between the remote devices and displays all the accessible directories, facilitating secure file transfer without launching a remote connection. Click here to learn more about various file transfer mechanisms in PAM360 and the detailed steps to leverage those functionalities.
Furthermore, you can transfer files to and from a remote machine during remote connections established to a Windows resource via RDP and upload files to a remote machine during remote connections launched to Linux machines via Legacy SSH. Explore this link for the detailed steps to transfer files during an RDP session. The file transfer limit using SFTP is 6GB, whereas file transfer performed during remote sessions is limited to 5 GB.
Additional Detail
Starting from build 7500, the maximum file transfer limit via SFTP is set at 2 GB by default. Administrators can adjust this limit within the general settings, increasing it to 10 GB or reducing it to 50 MB, depending on operational needs. However, for optimal performance, it is recommended to maintain the transfer limit at 2 GB or lower. Additionally, PAM360 allows users to delete files and folders within the remote directory during an SFTP session.
6. Accessing Remote Apps
PAM360 allows administrators to streamline user access to specific applications on the remote machines during RDP connections. Users launching RDP connections to remote devices can access only the applications configured as RemoteApp. Explore this link for the detailed steps to add, discover, and configure RemoteApp in a resource.
6.1 Launching RemoteApp Connections
Follow these steps to launch a RemoteApp connection:
- Navigate to the Connections tab, select the desired category from the Connections Tree on the left pane, and click on the respective resource on the Resource pane configured with RemoteApp.
- Switch to the desired section within the Accounts pane, hover over the desired account using which you wish to access the selected resource, and click the Connect button. You will see multiple options as a drop-down menu depending on the selected resource.
- Select Windows Remote Desktop as the desired remote login procedure from the displayed options. A list of applications configure as RemoteApp in this resource will be displayed below the Connect button.
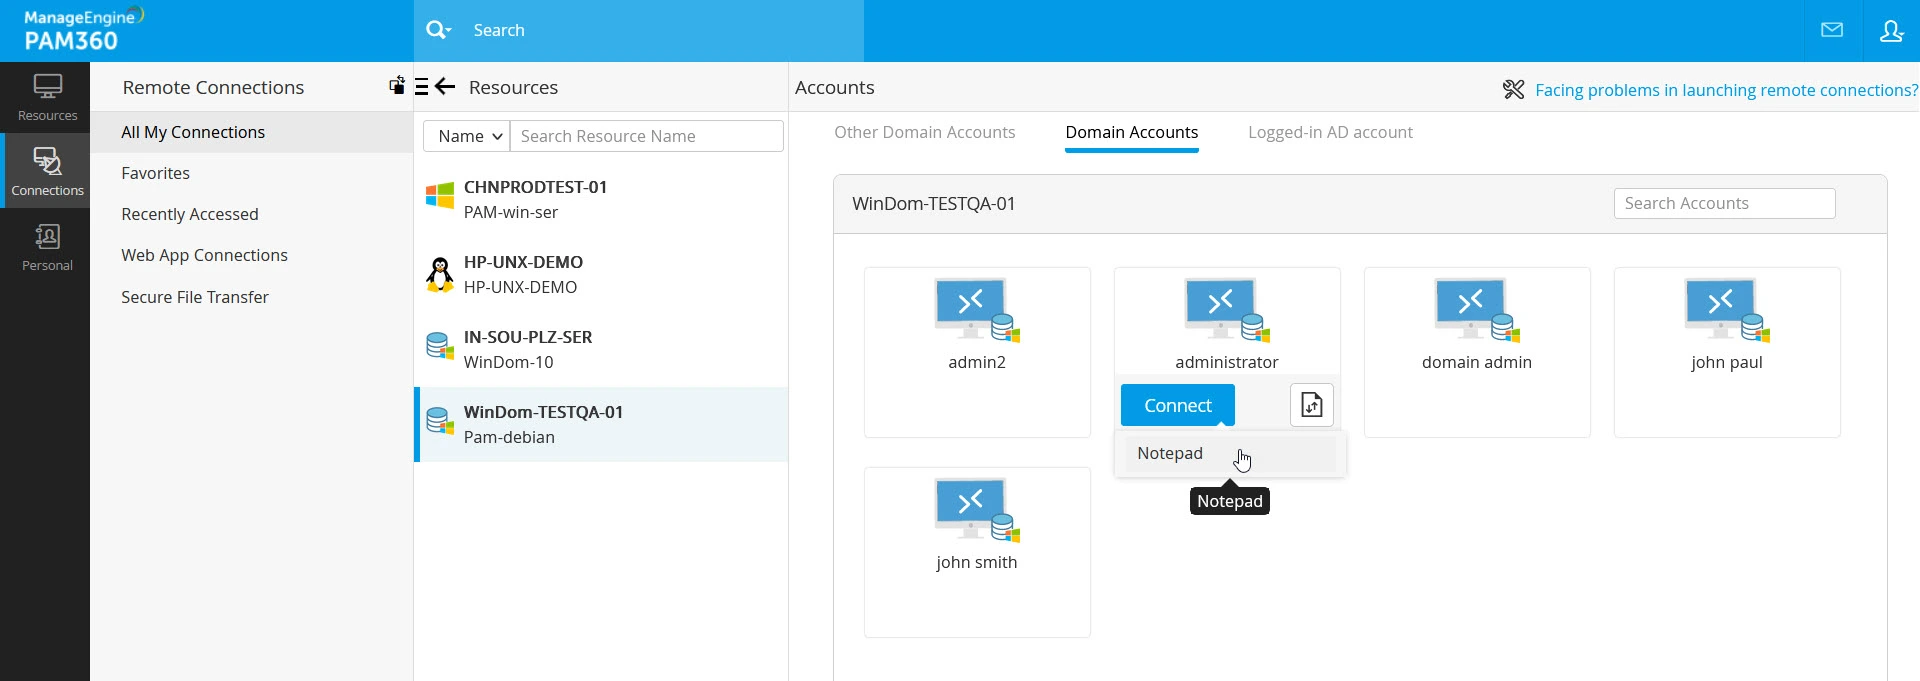
- Select the desired application from the list to launch a remote connection to the selected resource.
Additional Detail
The RemoteApp configuration overrides the access level permission provided to a user while sharing the resource.
6.2 RemoteApp Access Scenarios
PAM360 offers flexible RemoteApp configurations that determine how users can access specific applications on Windows and Windows Domain resources. The access behavior depends on where the RemoteApp is configured, i.e., at the Windows resource level, the Windows Domain resource level, or both. The following scenarios illustrate how PAM360 handles RemoteApp access based on different configurations. Consider the following resources for this exercise: CHNPROD-WIN10, a Windows resource, and CHNWinDom-01, a Windows Domain resource.
- RemoteApp configured at the Windows resource level
- Configuration - The Windows resource CHNPROD-WIN10 is shared with User A with the RemoteApp Only access permissions, while the Windows Domain resource CHNWinDom-01 is shared with View access. The MS SQL Studio application is configured as the RemoteApp on CHNPROD-WIN10.
- Outcome - When user A accesses the Windows resource CHNPROD-WIN10 using one of the domain accounts of the Windows Domain resource CHNWinDom-01, PAM360 restricts their access to the MS SQL Studio application, regardless of the domain account used. As the RemoteApp configuration is applied at the Windows resource level, it takes precedence over domain-level access, limiting the user's access to the specified application.
- RemoteApp configured at the Windows Domain resource level
- Configuration - The Windows Domain resource CHNWinDom-01 is shared with User A with the RemoteApp Only access permissions for MS SQL Studio, while the Windows resource does not have any RemoteApp configuration.
- Outcome - When User A logs into CHNPROD-WIN10 using one of the domain accounts of CHNWinDom-01, PAM360 grants unrestricted access to CHNPROD-WIN10. This is because CHNPROD-WIN10 is the target resource, and it lacks a RemoteApp configuration to enforce application-level restrictions. As a result, User A's View-level access is applied, allowing them View access to the resource.
- Windows and Windows Domain resources configured with different RemoteApps
- Configuration - In this scenario, both resources have distinct RemoteApp configurations. The Windows resource CHNPROD-WIN10 is configured with MS SQL Studio as the RemoteApp, while the Windows Domain resource CHNWinDom-01 is configured with DBeaver.
- Outcome - When User A logs into the Windows resource CHNPROD-WIN10 using one of the domain accounts of CHNWinDom-01, they can access only the MS SQL Studio application due to the Remoteapp configuration enforced at the resource level. Alternatively, if the user logs into the windows Domain resource CHNWinDom-01 using one of the domain accounts, they can access only the DBeaver application.