Session Recording Configuration and Management
Organizations depend on privileged accounts to manage critical resources, perform administrative tasks, and access sensitive systems, but this elevated access also introduces significant risks. Additionally, they often rely on web-based applications and services for critical operations. Unmonitored privileged sessions can result in unauthorized actions and security breaches. Additionally, many regulatory frameworks require proactive monitoring and auditing of privileged access to ensure compliance. In the event of security breaches, the absence of detailed session logs hampers effective investigation and remediation.
To address these issues, PAM360 offers the Privileged Session Recording feature, enabling organizations to view, record, and monitor user activities on privileged resources and sensitive web applications/services accessed from PAM360 via remote sessions. This feature ensures accountability and enhances security by maintaining a detailed audit trail of all interactions. Recorded sessions are stored securely and can be reviewed later for compliance, identifying potential security risks.
By providing a clear, auditable trail of privileged actions, the privileged session recording helps organizations mitigate security risks and meet compliance requirements efficiently. This help document covers the following topics in detail:
- How Secure is Session Recording?
- Configuring Privileged Session Recording
- Viewing Recorded Sessions
- Splitting Recorded Sessions
- Shadowing Active Privileged Sessions
- Deleting Recorded Sessions
- Configuring FFmpeg for Session Recording
- Session Summary for Recorded Privileged Sessions
1. How Secure is Session Recording?
PAM360 ensures the security of session recording by employing an advanced, browser-based remote login mechanism, which allows users to initiate secure, reliable, and fully emulated Windows RDP, SSH, Telnet, and website sessions directly from any HTML5-compatible browser. With a single click, users can establish privileged sessions without requiring additional plug-ins or agent software, reducing dependency on external components that could introduce vulnerabilities.
All remote connections are tunneled through the PAM360 server, eliminating the need for direct connectivity between the user’s device and the remote host. This architecture enhances security by ensuring that privileged credentials, such as passwords, are never exposed at the browser level. By isolating user access from direct host connections, PAM360 significantly reduces the attack surface while maintaining reliable session performance.
PAM360 comes bundled with RDP, SSH, and Telnet session gateways. These gateways enable users to initiate remote terminal sessions directly within their browser, eliminating the need to install additional software on endpoints. The only prerequisite is an HTML5-compatible browser, such as Internet Explorer 9 or later, Firefox 3.5 or later, Safari 4 or later, or Chrome.
2. Configuring Privileged Session Recording
Additional Details
The recordings will be stored by default in the directory path <PAM360_Installation_Folder\PAM360\recorded_files>. This can be changed to an any directory or UNC path at any time from the Session Configuration window. To access the session configuration window, navigate to Admin >> Connections >> Session Configuration.
Caution
- To ensure smooth and uninterrupted website session recording in your environment, ensure the following prerequisites are met:
- The users initiating the website/HTTPS gateway session should have the PAM360 browser extension of version 2.1.0.0 or higher installed and logged in. Explore this link for the detailed steps to add the PAM360 extension to your browser.
- The FFmpeg should be properly installed and configured in your environment. Explore this section for the detailed steps to configure FFmpeg in your environment. Without FFmpeg,
- The recordings played in Chromium-based browsers will not include a seek bar and duration indicator.
- The recordings cannot be played in Firefox.
- Website sessions are recorded only if the user has an active PAM360 extension session while launching a website session to the configured URL.
- Users must be logged into the PAM360 extension to initiate an HTTPS gateway session from the PAM360 web interface if session recording is enabled.
- Even if the website and HTTPS gateway session recordings are enabled globally in the Session Configuration window, they must also be enabled at the resource level to record these sessions.
- Activities, such as copy-pasting will not be captured in the recording.
- We currently support website and HTTPS gateway connection recording only in the PAM360 primary server and connections launched using Google Chrome and Microsoft Edge browsers. We are yet to offer website and HTTPS gateway connection recording support for connections launched from the secondary server and connections launched via Firefox.
- When a user launches a website or an HTTPS Gateway connection to a configured URL, they must select the appropriate session tab in the session consent window to record the connection. If the user selects the 'Entire Screen' option, the recording will capture not only the configured URL launched from PAM360 but the entire screen that may include personal information.
- The Record website sessions and Record HTTPS gateway sessions fields are available only in PAM360 builds 7400 and above. If the Record Configured Resource URL option is not enabled at the resource-level configuration, only the website and HTTPS gateway connections launched to configured URLs using autofill and auto logon will be recorded. For a more granular level configuration, configure session recording at the resource level while adding the resource or editing the resource.
Privileged session recording in PAM360 can be configured at two different levels:
2.1 Configuring Session Recording for Specific Resources
Administrators can enable session recording for selected resources or accounts that require closer monitoring. It is ideal for tracking privileged actions on critical systems, sensitive databases, or high-risk applications. By enabling session recording at the resource level, organizations can maintain precise control over what activities are captured, ensuring that only essential sessions are monitored. This granular approach minimizes unnecessary data collection while aligning with compliance and security policies. Follow these steps to configure privileged session recording for specific resources:
- Navigate to the Resources tab.
- Select the resources for which you want to configure session recording and click Resource Actions >> Manage >> Edit.
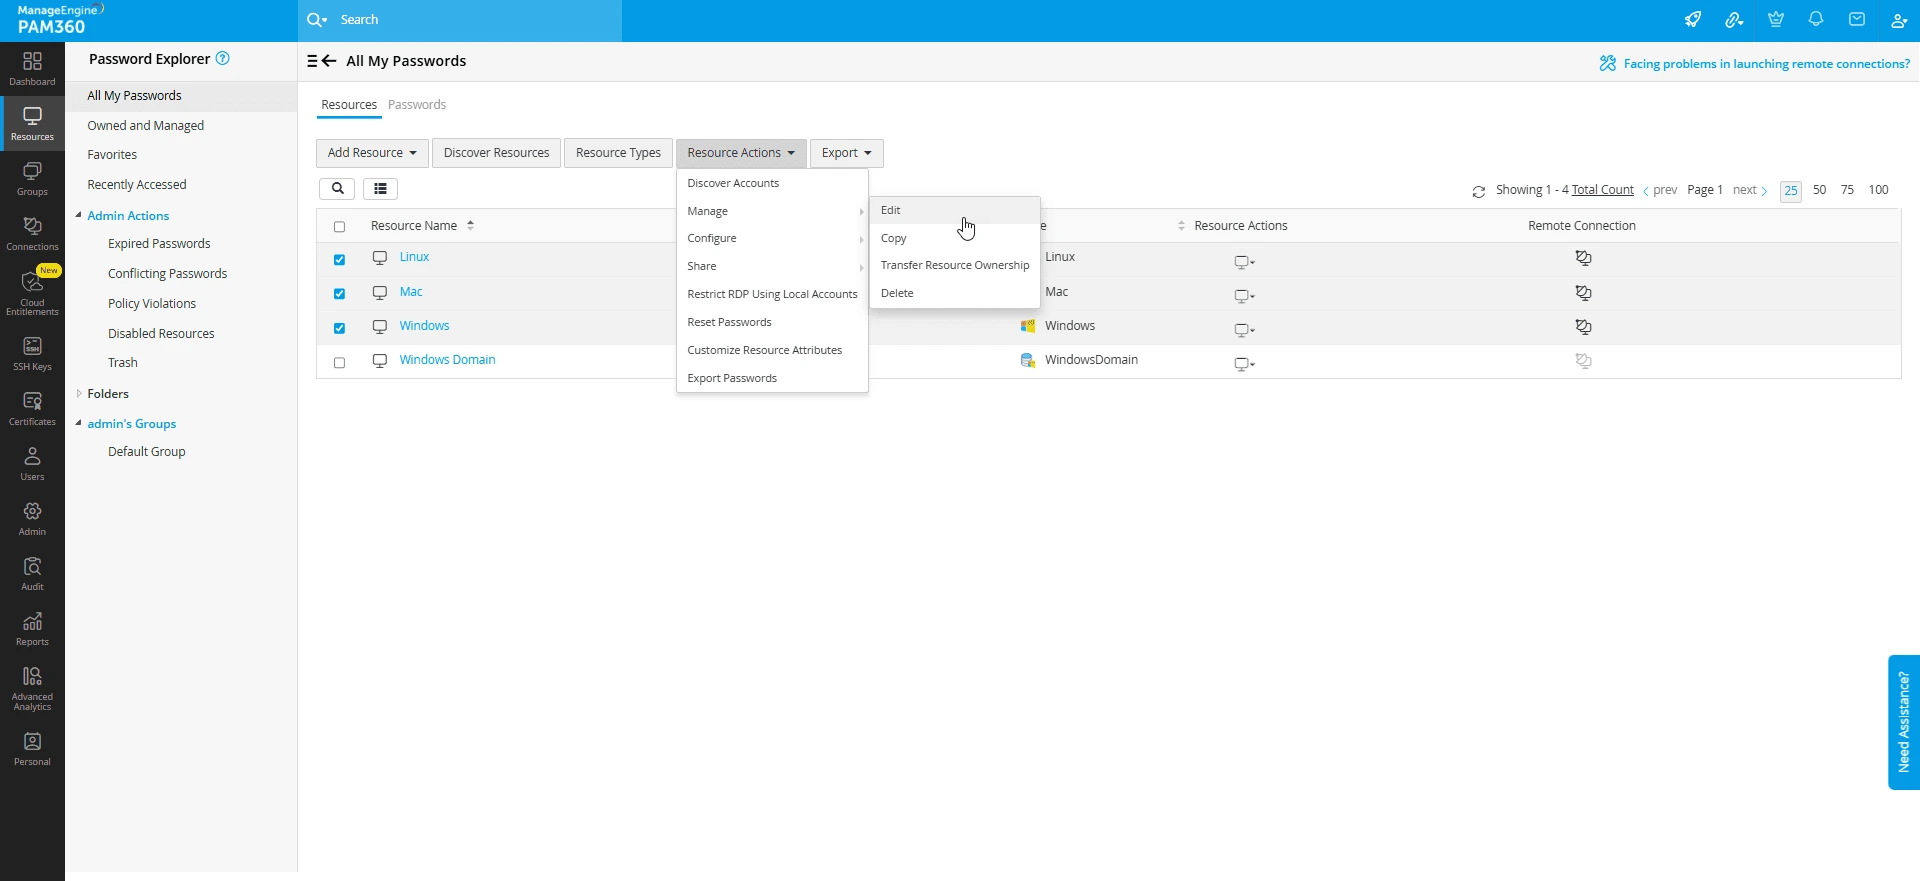
- In the Edit Resources window, switch to Account Attributes tab, and modify the following drop-down fields as required: Record RDP sessions, Record SSH/Telnet sessions, Record website sessions, and Record HTTPS Gateway Session.

- Click Preview and Save to save the configured changes.
2.2 Configuring Session Recording Globally
PAM360 allows administrators to configure session recording settings globally to ensure uniform oversight of RDP, VNC, web, HTTPS gateway, SSH, Telnet, and SQL sessions. These settings can be customized to suit organizational needs, providing flexibility, enhanced security, and compliance with regulatory requirements. Follow these steps to configure privileged session recording globally:
- Navigate to Admin >> Privileged Session >> Session Configuration.
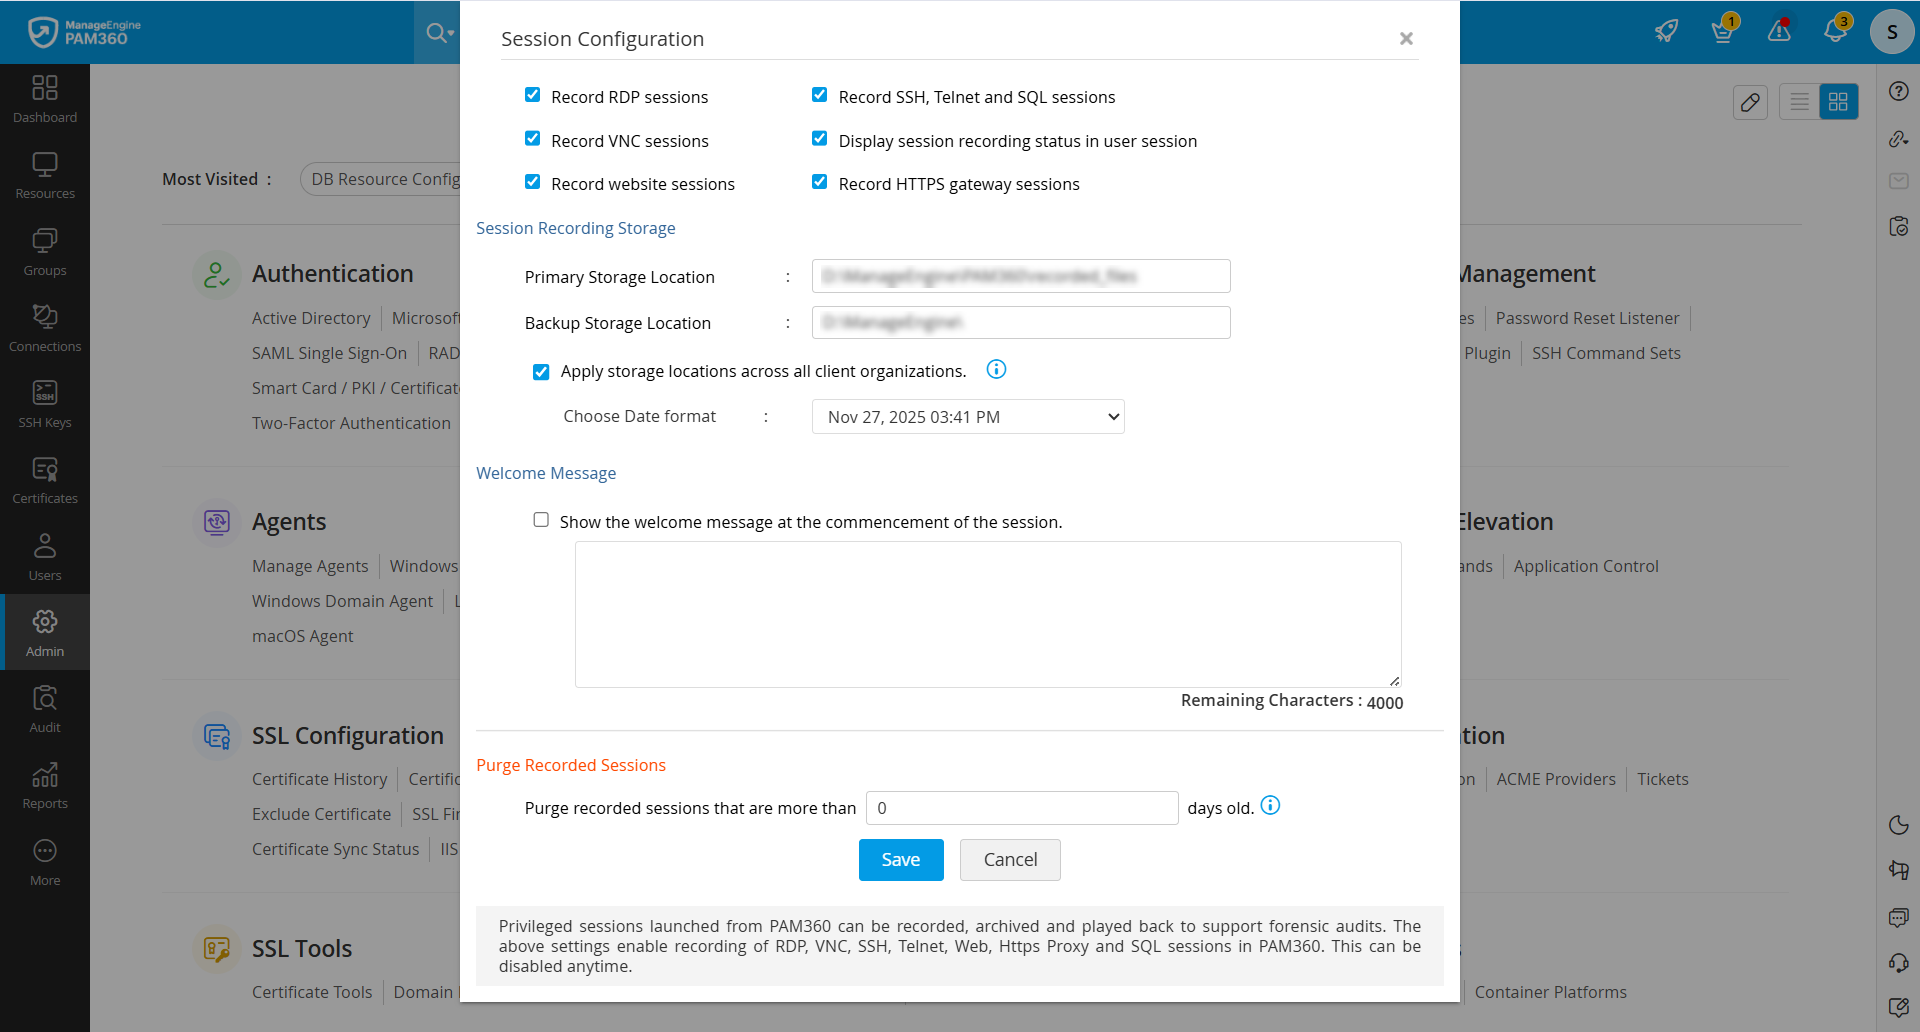
- On the Session Configuration window, you will find the following options you can configure as required:
- Record RDP sessions - Tick this checkbox to enable session recording for all remote desktop protocol sessions launched from PAM360.
- Record VNC sessions - Tick this checkbox to enable session recording for all VNC sessions launched from PAM360.
- Record website sessions - Tick this checkbox to enable session recording for all website sessions initiated using configured URLs.
- Record HTTPS gateway sessions - Tick this checkbox to enable session recording for all the HTTPS gateway sessions launched using the configured URLs.
- Record SSH, Telnet, and SQL sessions - Tick this checkbox to enable session recording for all the SSH, Telnet, and SQL sessions launched from PAM360.
- Display session recording status - Tick this checkbox to notify users that the remote session is being recorded.
- Record Remote Connect sessions - Tick this checkbox to enable session recording for the PAM360 Remote Connect sessions.
Caution
Session recording is supported only on Windows 11 machines where PAM360 Remote Connect is installed and a hardware GPU is available.
- Under the External Location for Recorded Sessions section, you will find the following options:
- Directory for storing recorded sessions - Enter a valid path to store the privileged session recordings.
- Backup Directory for storing recorded sessions - Specify an additional directory to create a backup of the recordings, ensuring redundancy.
- Choose Date Format - Select your preferred date format for recorded session logs.
- Welcome Message - Enable the Show the welcome message at the commencement of the session checkbox to display a custom message at the start of every session. Enter the custom message (up to 4000 characters) you wish to display to the users in the provided text field. Inline CSS styles are supported to customize the appearance of the message.
- Purge Recorded Sessions - You can automatically delete session recordings after a specified period. Specify the duration (in days) for which you wish to retain the session recordings in the Purge recorded sessions that are more than __ days old field. For example, entering 30 will automatically purge session recordings older than 90 days. Leave the field blank or set it to 0 to disable purging.
- Click Save to save the configured changes.
Additional Details
For MSP, you should apply the above settings for each client ORG account individually.
3. Viewing Recorded Sessions
You can view the recorded privileged sessions from the Audit tab. To access the session recordings:
- Navigate to the Audit tab and select Recorded Server Connections to view the recorded RDP/SSH/Telnet/VNC/SQL sessions and Recorded Website Connections to view the recorded website connections.

- On the Recorded Server Connections page, you can view the list of all the privileged remote sessions launched from PAM360.
- By default, all the privileged sessions will be displayed on this page, which includes RDP, SSH, Telnet, VNC, and SQL sessions.
- Use the Filter drop-down in the top pane to view the sessions that belong to a particular category.
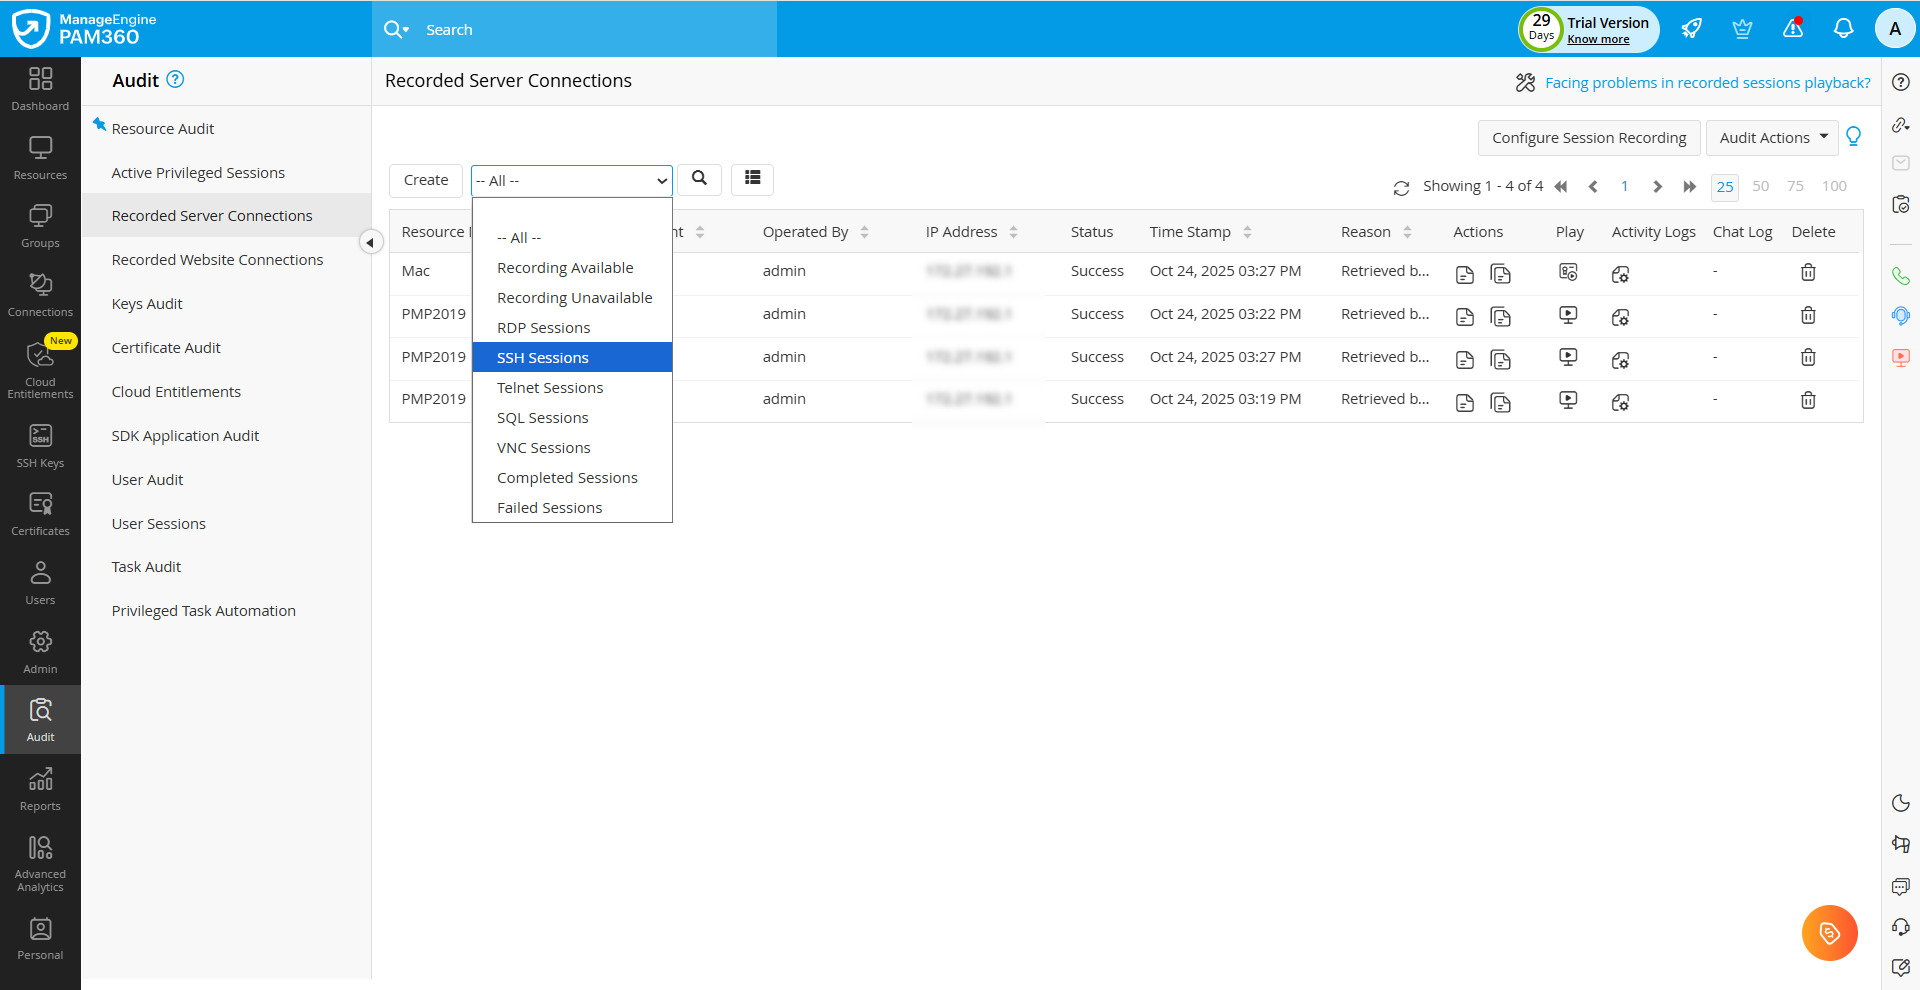
- Click the Activity Logs icon to view the list of actions performed by the user during the remote session, and the Chat Log icon to view the remote session chat history.
- You can view the audit summary and related audits for a specific recorded server connection. The Audit Summary option provides a overview of all the details associated with that specific audit. The Related Audits option provides detailed insights into all audit events linked to that specific connection, helping you trace activities more effectively and maintain a complete audit trail. Follow these steps to view the audit summary for a specific recorded server connection:
- Click the Audit Summary icon under the Actions column beside the desired recorded server connection.
- On the Audit Summary page, you have options for exporting the resource audit summary. Click the Email Audit Summary icon to receive the audit summary in your email, and the Export as PDF icon to download the audit summary as a PDF file to your machine.

- Follow these steps to view the related audits associated with a recorded server connection:
- Click the Related Audits icon under the Actions column beside the desired recorded server connection.
- On the Related Audits page, all audits associated with the selected server connection are displayed.
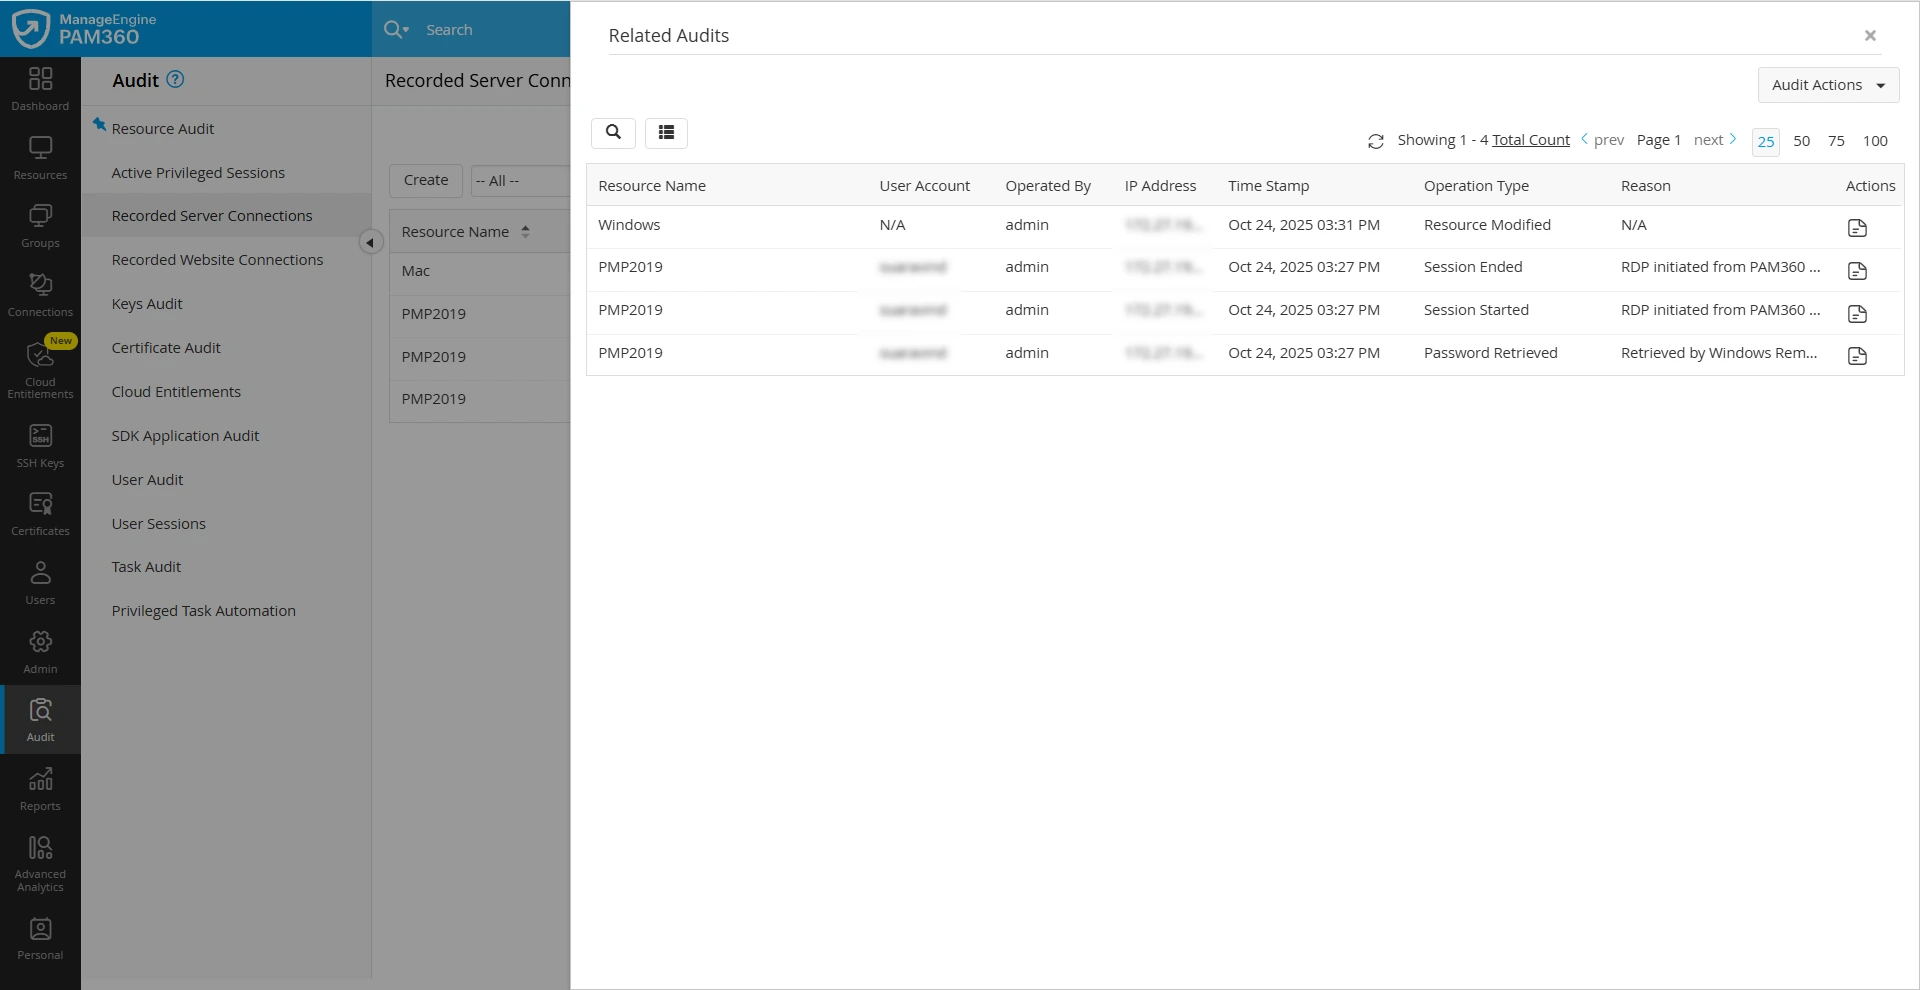
- Click Audit Actions and choose Export as CSV to download the related audit details as an Excel file, Export as PDF to download the related audit details as a PDF file, and Email Related Audits to receive the related audit details in your email.
- On the Recorded Website Connections page, you can view the list of all the website connections launched from PAM360.
- By default, all the privileged sessions will be displayed on this page, which includes the website sessions launched directly from the PAM360 server and those via the HTTPS gateway server.
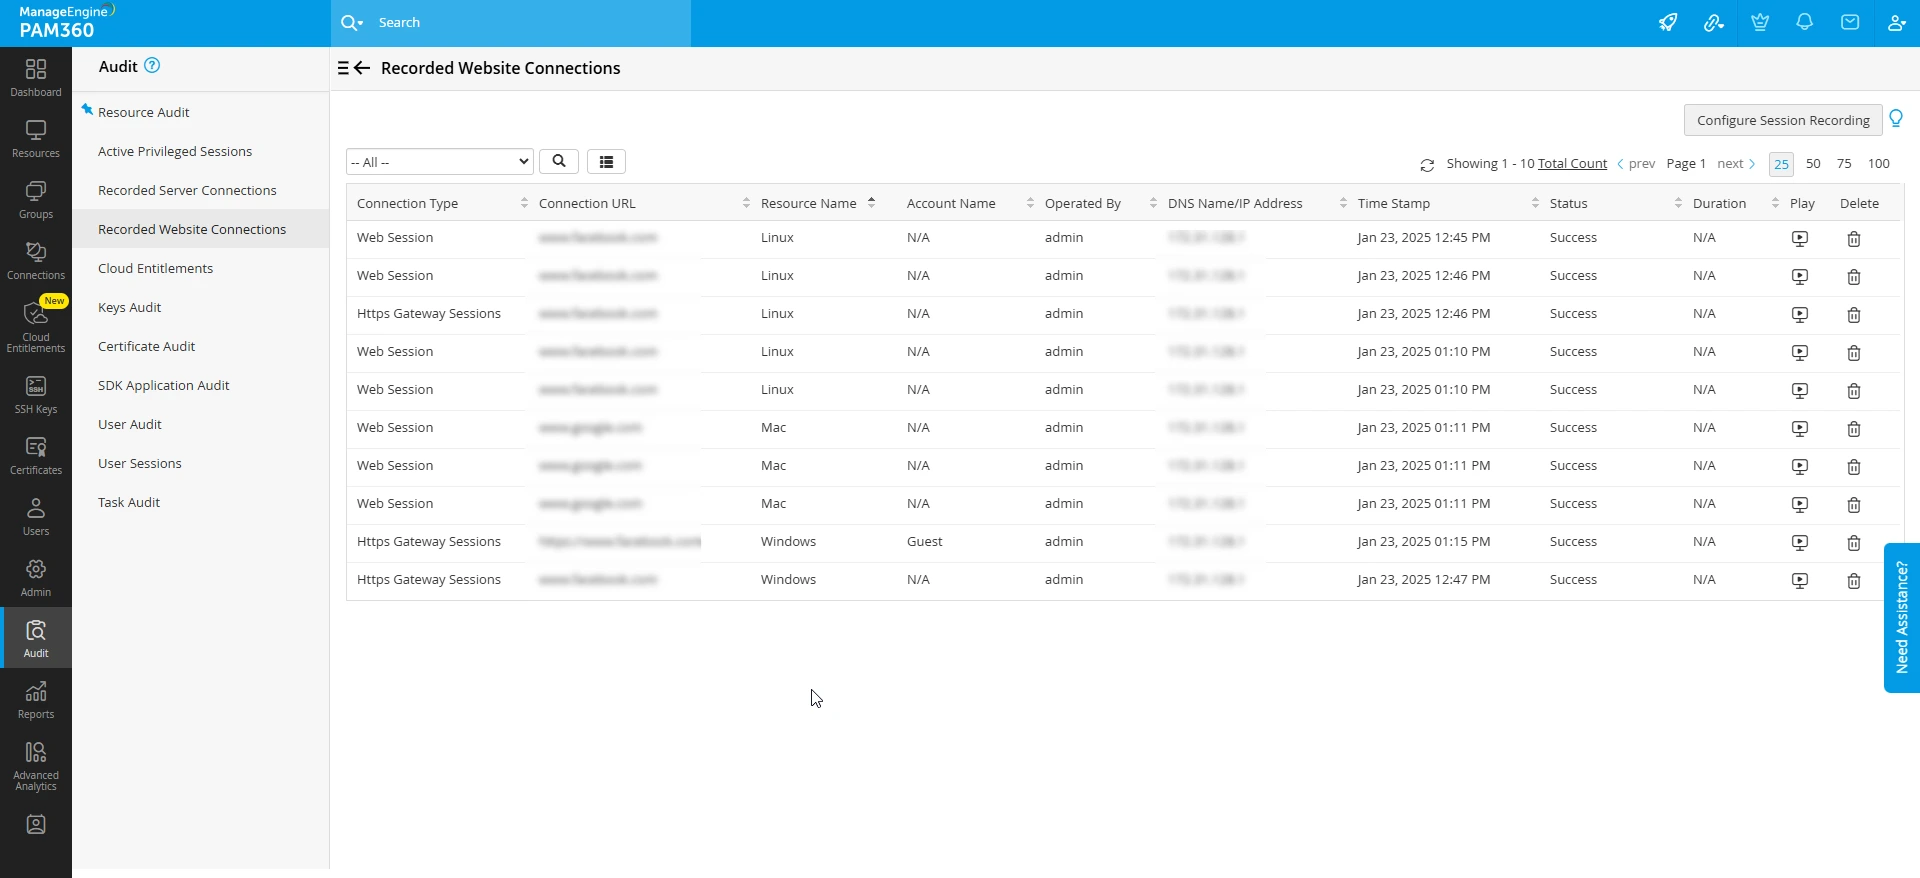
- Use the Filter drop-down in the top pane to switch between the Website and HTTPS gateway sessions.
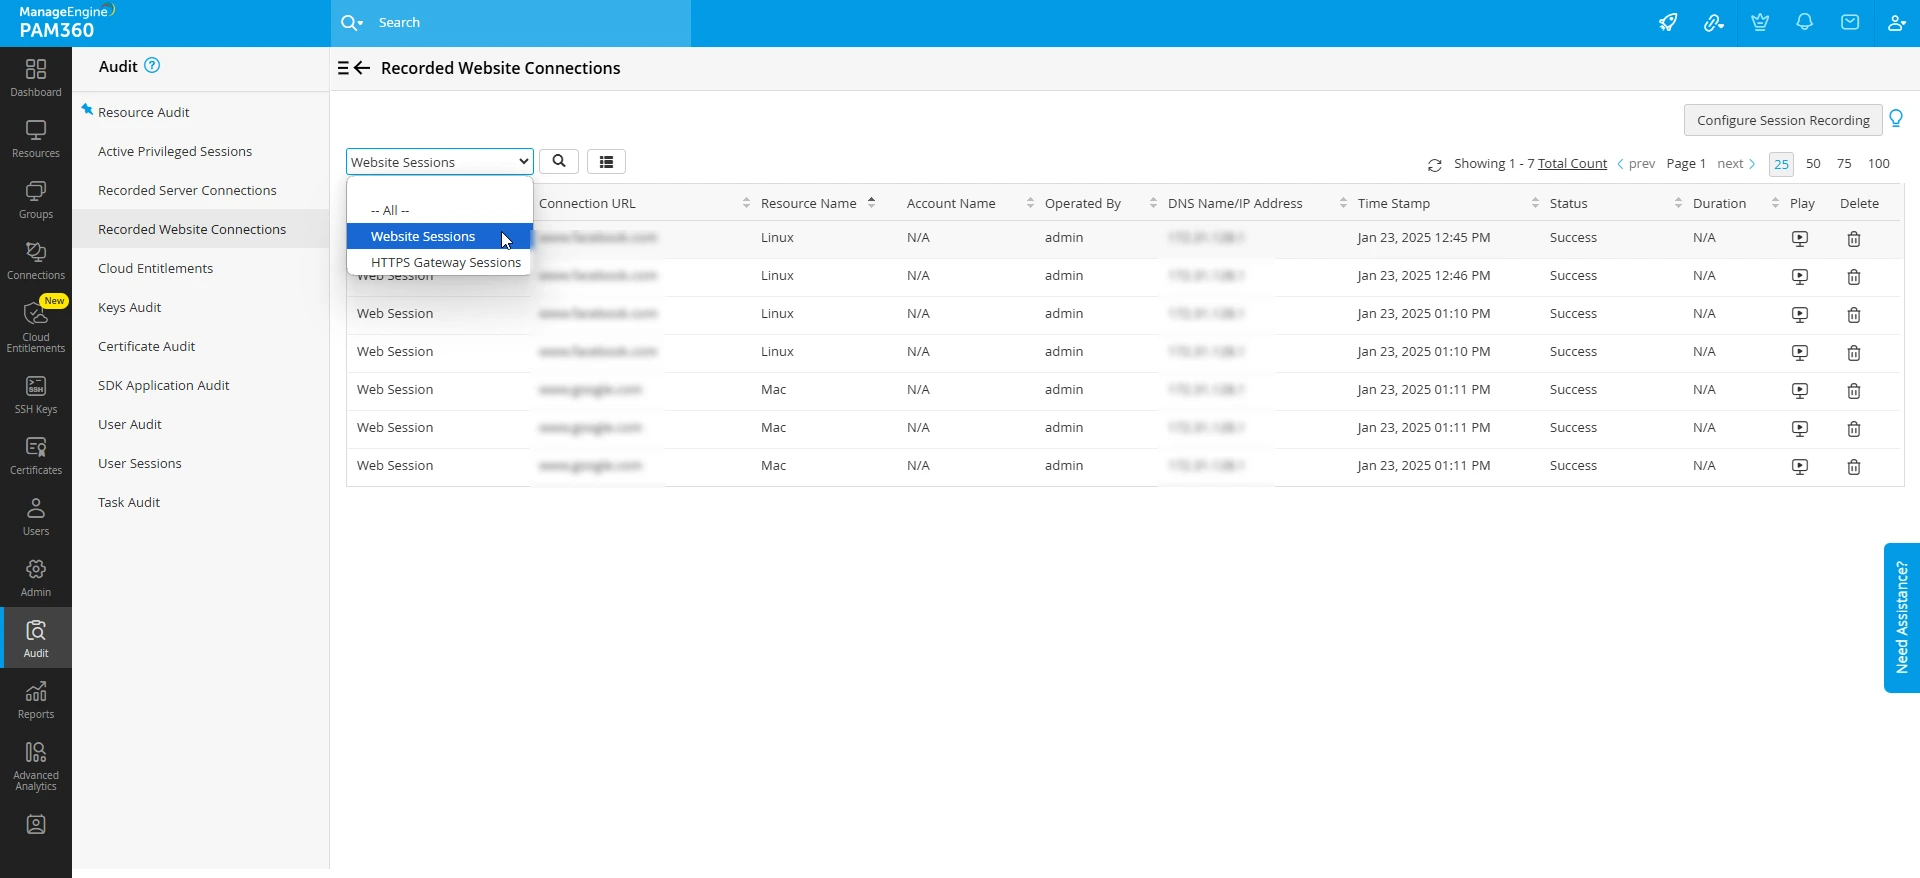
- By default, all the privileged sessions will be displayed on this page, which includes the website sessions launched directly from the PAM360 server and those via the HTTPS gateway server.
- You can use the Search option to find the desired session recording.
- Once you find the desired session, click the Play icon to view the privileged session recording.
- Navigate to the Audit tab and select Recorded Connections on the left pane.
- Here, you can view the list of recorded RDP/SSH/Telnet/VNC/SQL sessions.
- You can use the Search or the Filter option to find the desired session recording.
- Once you find the desired session, click the Play icon to view the privileged session recording. While viewing a recorded session, use the seek bar to skip a part of the recording.

4. Splitting Recorded Sessions
PAM360 offers a robust provision to split recorded privileged sessions into several small files and encrypt them individually. This option applies to session recording files larger than 10 MB in size. By default, PAM360 encrypts all privileged session recordings in your local storage. However, for lengthy sessions resulting in large file sizes, there is a risk of encryption failure during storage. To mitigate this, PAM360 automatically splits the recordings into smaller segments, each not exceeding 10 MB, and ensures that every segment is securely encrypted. Despite being stored as multiple encrypted files, these recordings are merged seamlessly during playback, appearing as a single continuous file. This approach not only guarantees successful encryption but also optimizes playback performance, eliminating buffering delays and ensuring a smooth user experience.
For instance, if a session recording generates a file of 25 MB, PAM360 will split it into three segments: two of 10 MB each and one of 5 MB. By default, the session splitting feature is disabled in PAM360, meaning all session recordings are stored as a single file regardless of size. Follow the steps outlined in this document to enable session splitting and take advantage of this feature. Enabling this option ensures efficient encryption and optimized playback for large recordings.
Caution
- PAM360 supports session splitting only for Legacy SSH and Telnet sessions.
- Session splitting will not work for RDP, VNC, and SSH session recordings, as these are video-based recordings, and PAM360 does not encrypt video-based files. Instead, these recordings are saved as video files in the configured external storage. However, you cannot play these files outside the PAM360 interface using standard media players.
- PAM360 does not support session splitting for website session recordings.
5. Shadowing Active Privileged Sessions
Effective oversight of privileged sessions is crucial to maintaining the security and integrity of IT resources. PAM360 addresses this need with Session Shadowing or Real-time Monitoring, empowering administrators to oversee active sessions on highly sensitive resources. This feature ensures accountability by enabling administrators to monitor user activities as they happen and allows them to intervene when necessary. Whether to mitigate potential security risks, terminate suspicious activities, or provide real-time assistance during troubleshooting, PAM360’s session shadowing offers a seamless way to maintain control and ensure compliance. With this capability, organizations can strengthen their security posture and enhance operational efficiency in managing privileged access. To monitor an active privileged session:
- Navigate to Audit>>Active Privileged Sessions.
- On the Active Privileged Sessions page, you will see a list of all the active privileged sessions in your organization.
- Identify the desired session you wish to monitor and click the Join button to join the privileged session. You can observe the user’s activities within the remote session in real time.
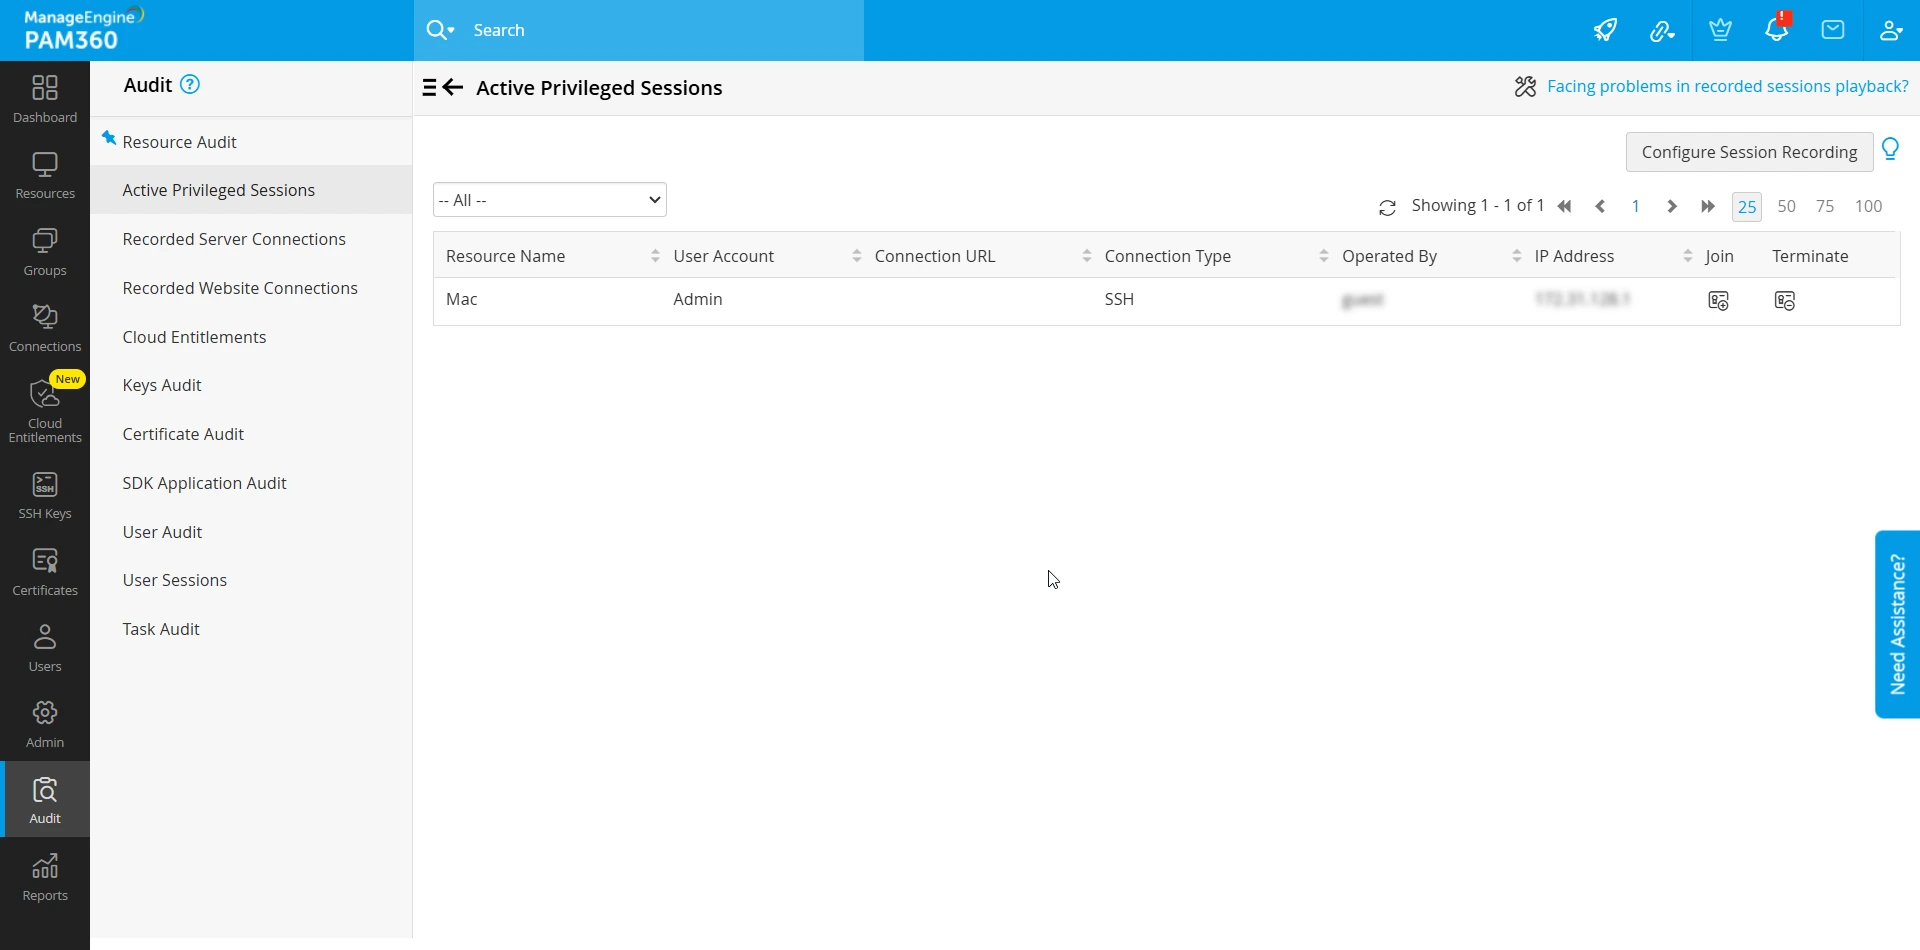
- If you find any suspicious behavior or wish to terminate the session, you can click the Terminate button beside the respective session. PAM360 will terminate the privileged session immediately, revoking the user's access to the remote resource.
Caution
PAM360 does not support the session shadowing feature for active website sessions.
6. Deleting Recorded Sessions
Deleting a privileged session recording allows administrators to manage storage space and ensure compliance with data retention policies. This feature lets you permanently remove specific session recordings that are no longer needed, ensuring efficient management of recorded data while maintaining system security. To delete a privileged session recording,
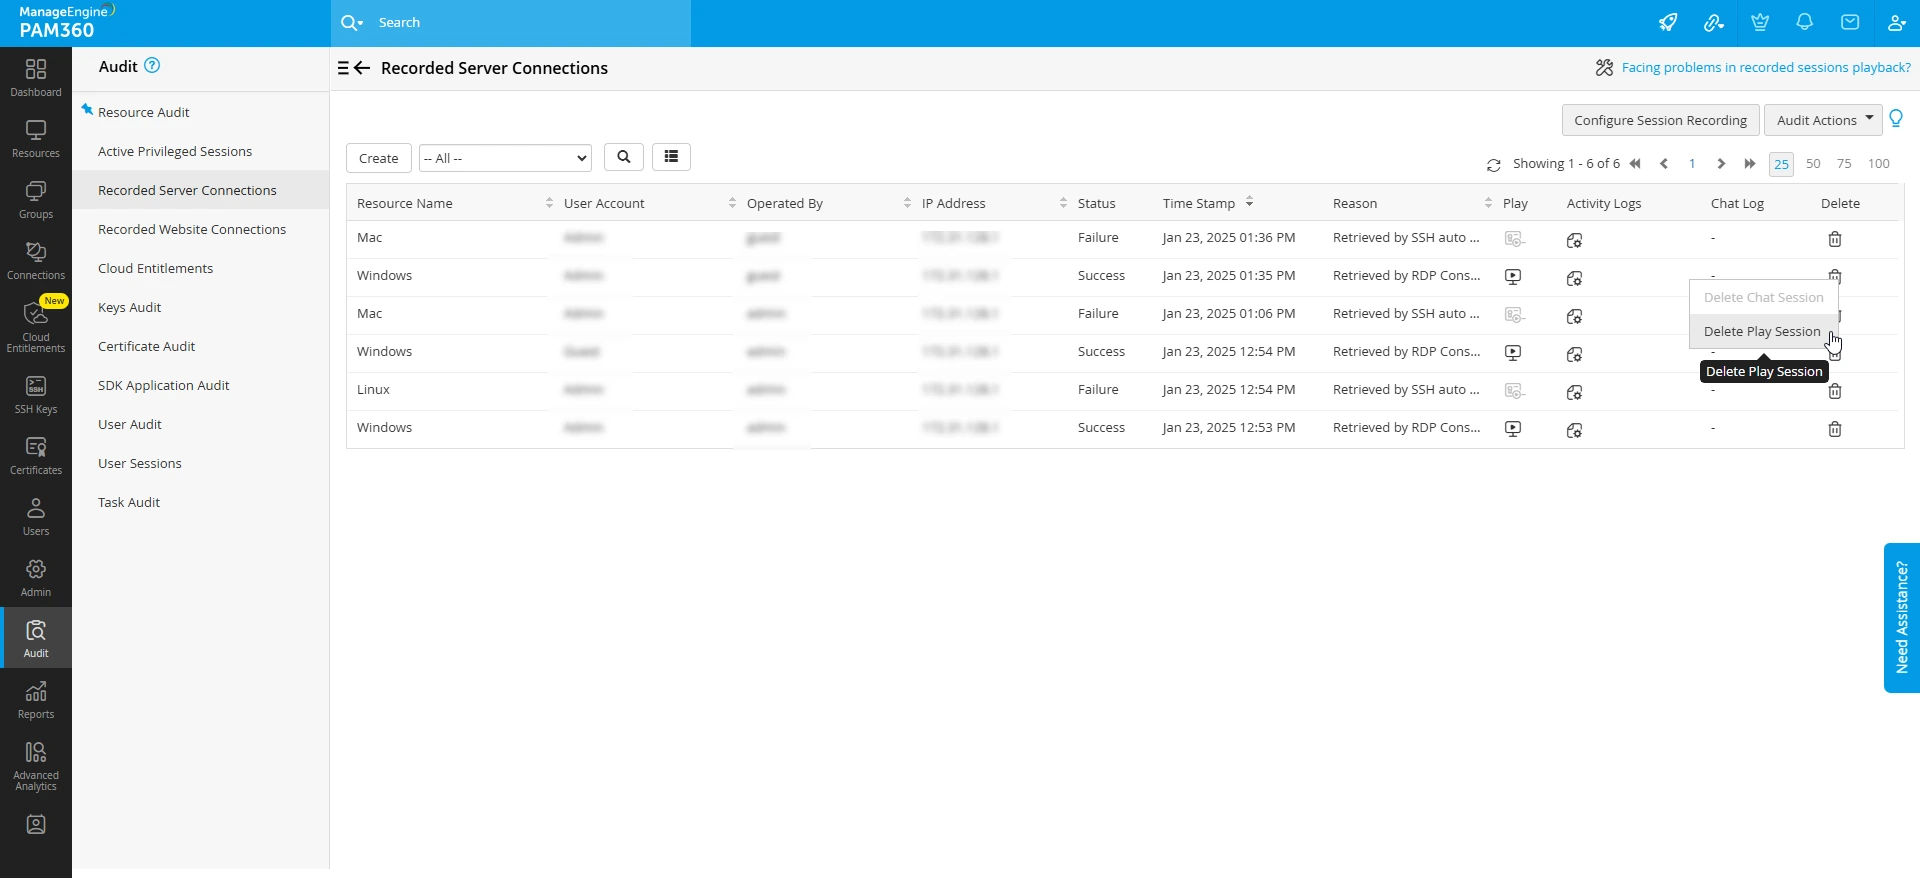
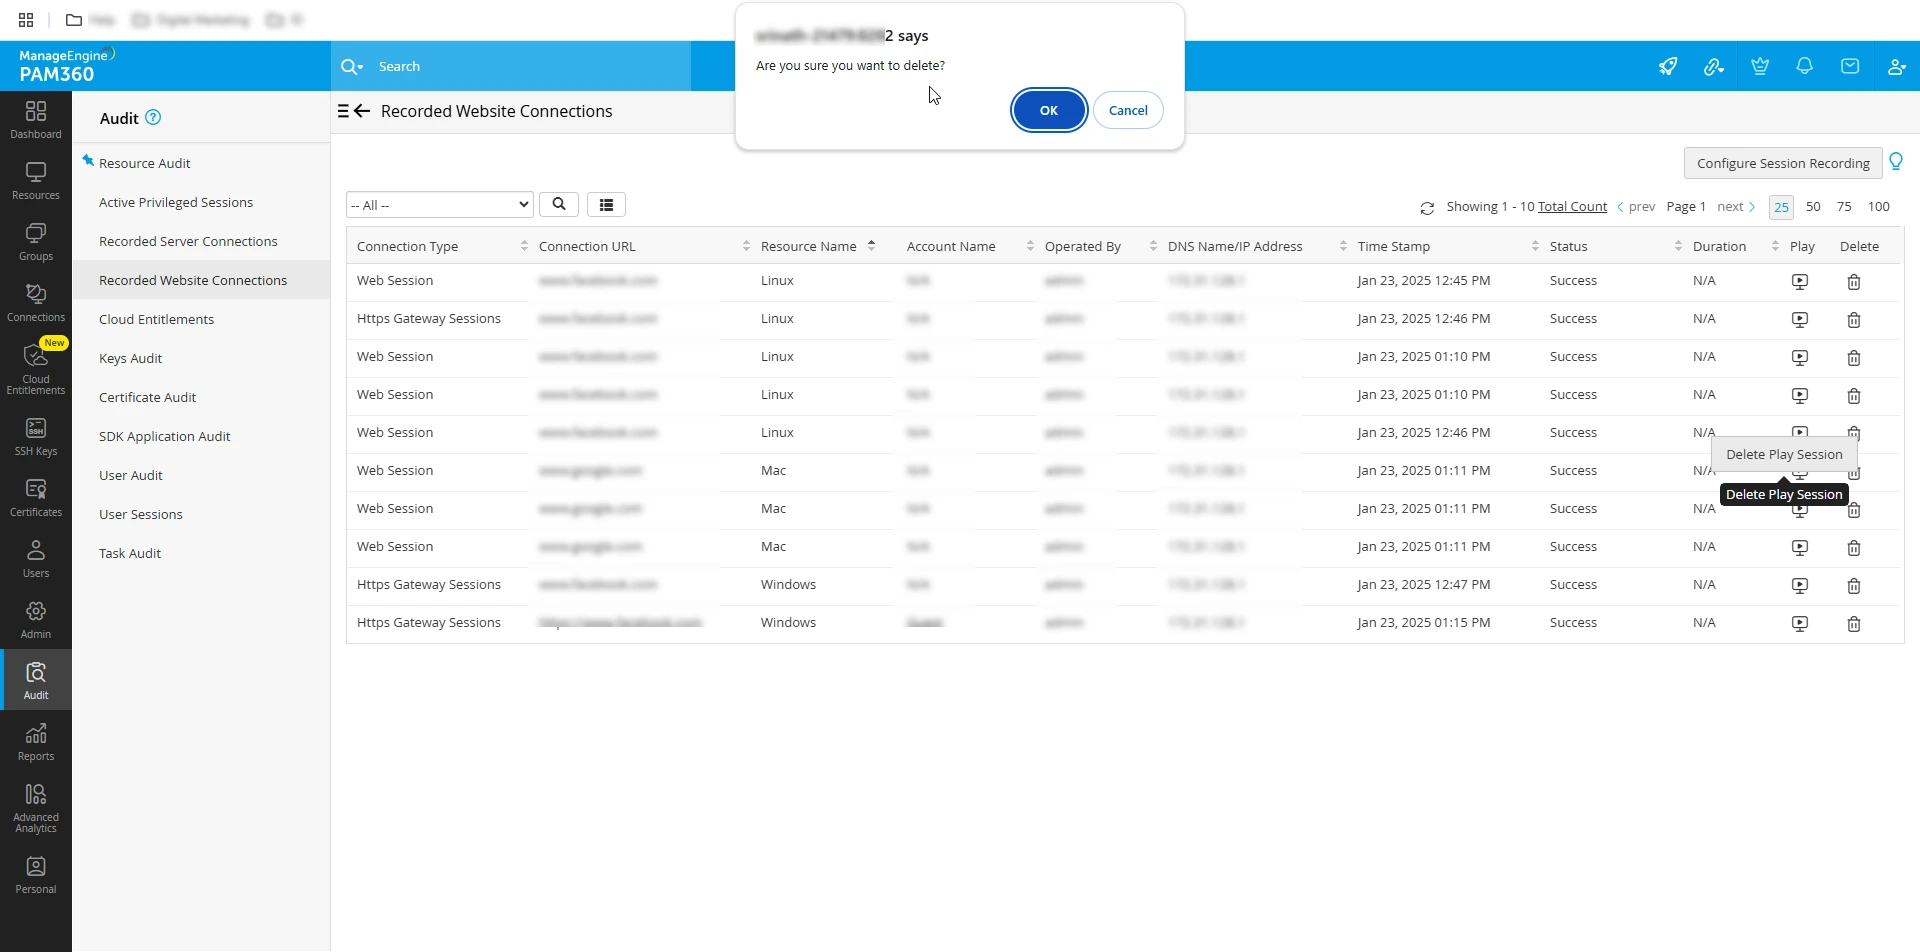
- Navigate to the Audit tab, identify the desired session recording you wish to delete and click the Delete icon. You will see the following options: Delete Chat Logs and Delete Session Recording.
- Delete Chat Logs - To delete all the chat logs associated with the privileged session.
- Delete Session Recording - To delete the session recording file.
Caution
Deleting a session recording from the PAM360 database requires approval from at least one other administrator in your environment. Therefore, two administrators are required to delete a recorded session.
- After choosing the desired option, you will see a confirmation window. Click OK to confirm the operation.
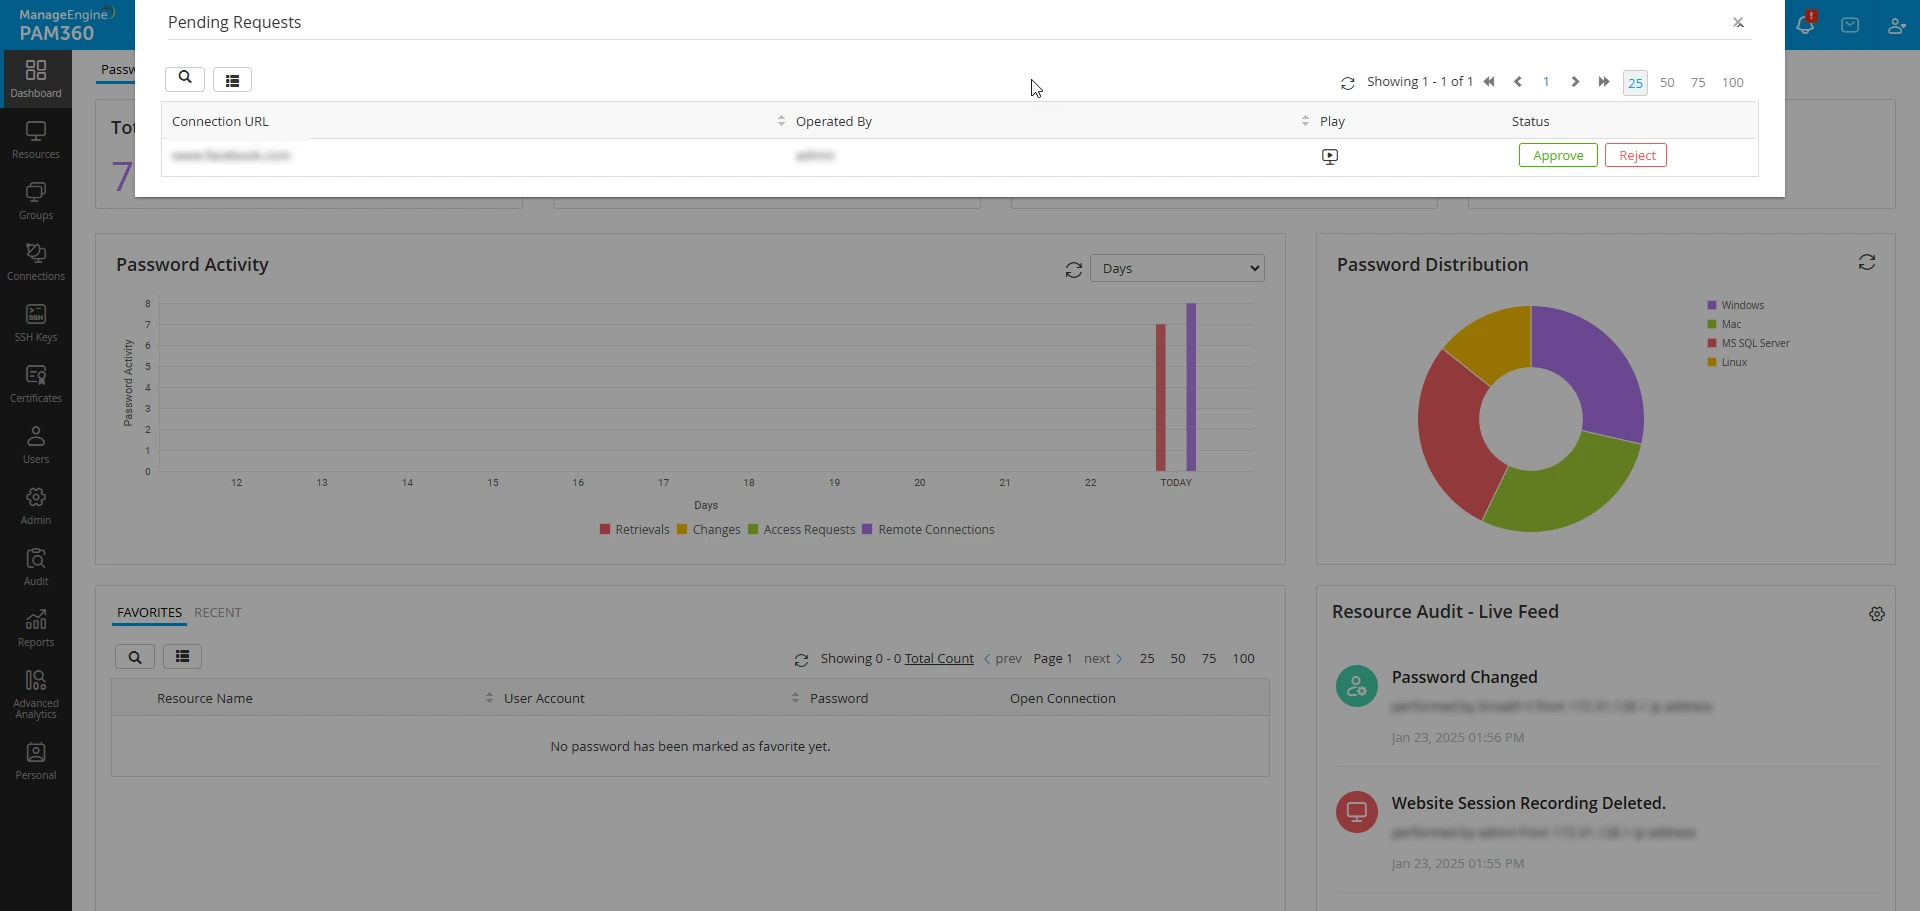
- All other administrators in your environment will be notified about this operation, and it will appear as a request in the Pending Requests tab. Administrators can approve or reject this request. To delete a session recording permanently, you must obtain approval from at least one other administrator. If one administrator approves your request, the session recording will be deleted, regardless of other administrators' decisions.
- The deletion process for session recordings varies depending on where the files are stored.
- Scenario 1 - If the session recordings are stored locally on the server, PAM360 will delete the files immediately after an administrator approves the deletion.
- Scenario 2 - If the session recordings are stored on an external device and are not accessible in PAM360 at the time of approval, PAM360 will schedule the deletion. PAM360 will run a system scheduler to delete these files. The files will only be removed if the external device is connected to the PAM360 server during a scheduled deletion run.
Additional Details
In scenario 2, if a deletion request is approved by the administrator, but the process is pending due to device unavailability, PAM360 will temporarily restrict access to the session recordings. During this time, the recordings cannot be viewed, even by administrators, until the recording is deleted.
7. Configuring FFmpeg for Session Recording
Follow these steps to configure FFmpeg in your environment:
- Visit ffmpeg.org and download the appropriate version for your operating system.
- Extract the downloaded archive to a directory of your choice.
- Windows: Configure the FFmpeg path in the PAM360 system.properties file:
- ffmpeg.path=D:\<path-to-ffmpeg>\bin\ffmpeg.exe
- ffprobe.path=D:\<path-to-ffmpeg>\bin\ffprobe.exe
- Linux: Install FFmpeg using your package manager (e.g., sudo apt install ffmpeg) and ensure it is added to the system's PATH environment variable, allowing PAM360 to access it.
- Confirm FFmpeg is installed correctly by running the ffmpeg -version command in the command prompt or terminal.
Caution
Ensure the paths are accurately defined to avoid configuration errors.
8. Session Summary for Recorded Privileged Sessions
PAM360 integrates with various AI platforms to generate a summary of all the actions performed by the user during a remote connection. The integrated AI model analyzes the privileged session recording and automatically generates concise and intelligent summaries of the recorded remote connections that allow administrators to quickly view the actions carried out by the user during each session. The session summary will include the logged-in user details and the list of operations they executed during the established privileged session. Follow these steps to view the AI summary for a recorded SSH or Telnet connection:
- Navigate to Audit>>Recorded Server Connections.
- On the Recorded Server Connections page, click the Play button beside the desired SSH or Telnet session.

- The session recording playback will open in a new tab in the browser window.
- In the Session Player window that opens, click the AI Session Summary icon on the top-right corner of the screen to view a concise, AI-generated overview of the recorded session.
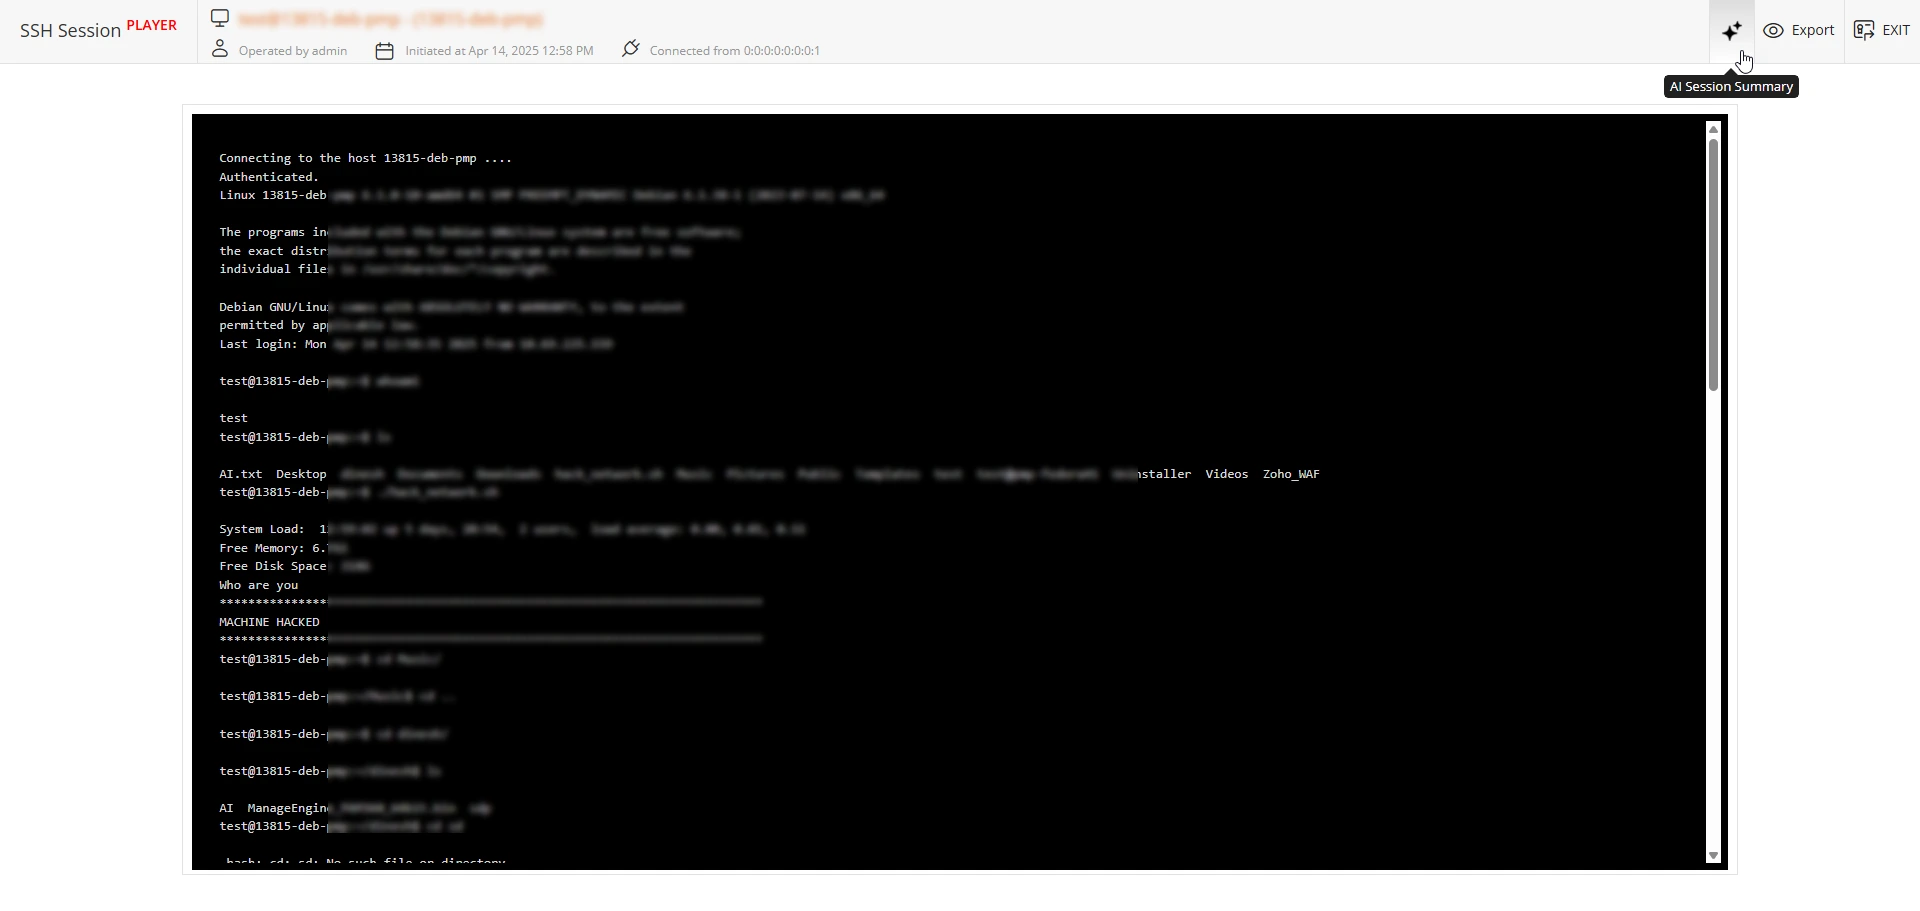
- An AI Session Summary page will slide in, highlighting key actions, commands executed, and potential anomalies during the selected session.

- Click the Regenerate button at the top pane of the Session Summary window to regenerate the recorded session summary.
- Click the Copy button to copy the AI-generated recorded session summary to the clipboard.
Caution
- The AI-generated session recording summary is available only for the remote connections launched using Legacy SSH and Telnet.
- The session summary feature for recorded connections will be available only if you have a valid AI integration enabled in your environment.
- Once a session summary is generated, the same summary will be displayed on the Session Summary window unless it is regenerated.
- The integrated AI platform may fail to generate session summaries if the input exceeds the token limit of the selected AI model.