Manage Agents
- Adding an agent
- Updating an agent
- Uninstalling an agent
- Force restart an agent
- Associate devices to an agent
- Stop an agent
1. Adding an agent
1.1 Download agent
- Open Log360 Cloud and select the Settings tab.
- Navigate to Admin > Management > Manage Agents.
- Click the Download Agent button to download the agent.

- Run the downloaded Log360CloudAgent.exe file and complete the installation process.
- Once the agent installation is completed, it will be automatically identified. However, the agent will not communicate with Log360 Cloud until it is approved.
1.2 Approving the agent
- Once the agent is downloaded and installed, go to Settings > Admin > Manage Agents > Pending Agent Registrations to approve the installed agents.

- Select agents in bulk or filter them to complete approval.

- If approved agents fail to communicate with Log360Cloud, the status will change to Sync failed. To resolve this issue, follow the troubleshooting steps to re-establish communication.
- Agents will be automatically uninstalled from machines that are rejected
- Once your agent is synced and configured, you can start collecting logs and monitoring your systems.
Updating an agent
To update an existing agent, follow the steps given below.
- Open Log360 Cloud and select the Settings tab. Then navigate to
- Then navigate to Admin > Management > Manage Agents.

- Click the
 icon corresponding to the desired agent to be updated. The icon will appear when you hover over the name of the agent.

- In the window that pops-up, make the necessary changes.

- After making the desired changes, click Update.
Uninstalling an agent
To uninstall an existing agent, follow the steps given below.
- Open Log360 Cloud and select the Settings tab.
- Navigate to Admin > Management > Manage Agents.

- Tick the box corresponding to the desired agent and click the x Uninstall button.

- Click Yes to confirm the action.

- Now, the agent is uninstalled successfully.
Force restart an agent
To force restart an existing agent, follow the steps given below.
- Open Log360 Cloud and select the Settings tab.
- Navigate to Admin > Management > Manage Agents.

- Select the required agents by ticking the box corresponding to the agent name.

- Click the Manage button and select Force Restart from the drop down list.

- Click Yes to confirm the action.

Now the selected agents will be force restarted.
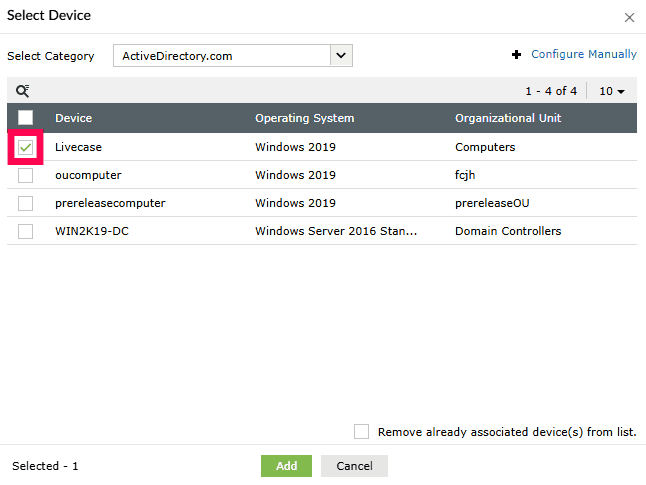
Associate devices to an agent
To associate devices to an agent, follow the steps given below.
- Open Log360 Cloud and select the Settings tab.
- Navigate to Admin > Management > Manage Agents.

- Click on the Associated Device(s) column of the desired agent.

- Now a window pops-up displaying all the devices associated to the agent.

- To delete a device, click on the
 icon that will be displayed when you hover over a device. Then, click Yes to confirm the action.

- To add a device, click on the + Associate Device(s) button on the top of the pop-up window. In the window that appears, select the desired devices by ticking the corresponding boxes. Then click Add.
Stop an agent
To stop an agent from running, follow the steps given below.
- Open Log360 Cloud and select the Settings tab.
- Navigate to Admin > Management > Manage Agents.

- To stop an agent, click on the Stop button that will be displayed when you hover over an agent's status column.

Now, the agent has stopped successfully.