- Log360 Cloud
- Admin Settings
- Configuring object level auditing
Configuring object level auditing
Automatic configuration
Object level auditing must be configured to ensure that events are logged whenever any Active Directory object related activity occurs. On providing Domain Admin credentials, Log360 Cloud automatically configures the required object level auditing for Active Directory auditing.
Note:
- Automatic object level auditing configuration is not done without the users consent.
- Configuring object level auditing requires the "Manage auditing and security log" privilege, which should be assigned via the security policy.
To configure object level auditing:
- Login to Log360 Cloud web console.
- Go to Reports → GPO Management → GPO History.
- In GPO History, click on Object level auditing and Audit policy needs to be configured to view related reports → Know More.
- In the Object level auditing needs to be configured to view related reports message, click on Configure.

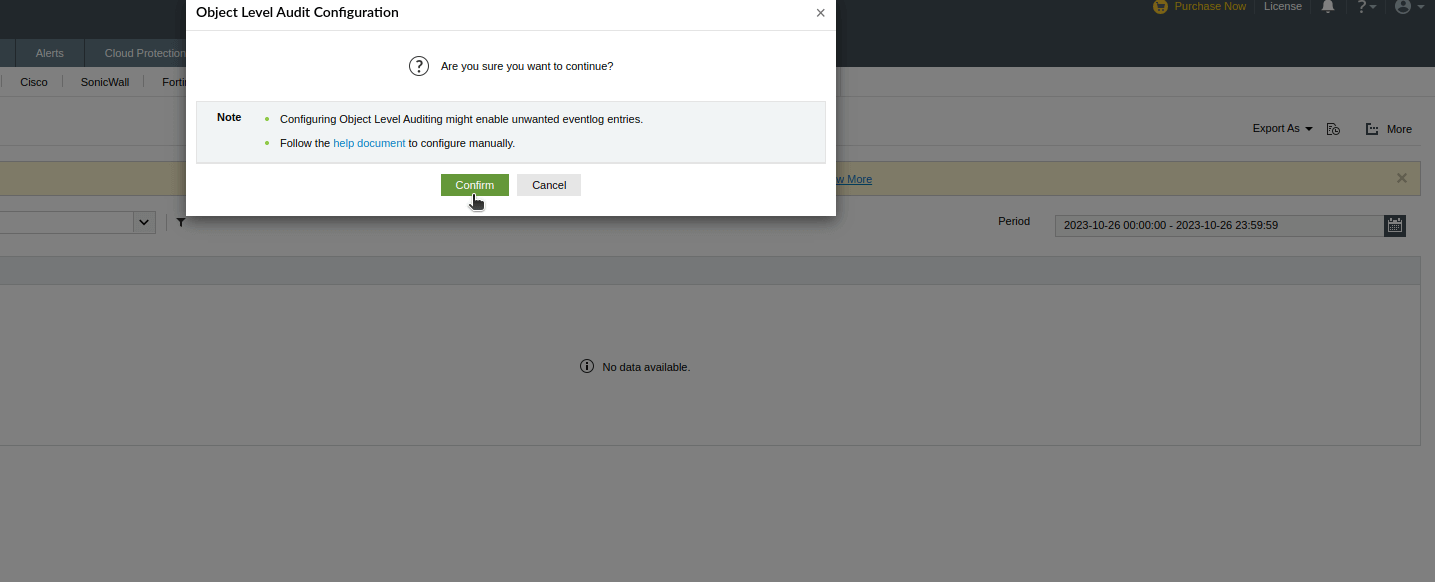
- In the user consent warning, click Confirm to configure object level auditing.

You can also configure object level auditing with the following steps:
- Login to Log360 Cloud web console.
- Go to Domain Settings and click on Object Level Audit: Configure.

- In the user consent warning, click Confirm to configure object level auditing.

Manual configuration
Object level auditing must be configured to ensure that events are logged whenever any Active Directory object related activity occurs.
To configure auditing for OU, GPO, user, group, computer, and contact objects
- Login to any computer that has the Active Directory Users and Computers (ADUC), with Domain Admin credentials.
- Open ADUC.
- Click on View and ensure that Advanced Features is enabled. This will display the advanced security settings for selected objects in Active Directory Users and Computers.
- Right-click on Domain and go to Properties → Security → Advanced → Auditing → Add.
- In the Auditing Entry window, select a principal: Everyone → Type: Success and select the appropriate permissions, as directed in the table below.
Note: Use Clear all to remove all permissions and properties before selecting the appropriate permissions.
| Auditing Entry number |
Auditing Entry for |
Access |
Apply onto |
| Windows Server 2003 |
Windows Server 2008 and above |
| 1 & 2 |
OU |
- Create Organizational Unit objects
- Delete Organizational Unit objects
|
This object and all child objects |
This object and all descendant objects |
- Write All Properties
- Delete
- Modify Permissions
|
Organizational Unit objects |
Descendant Organizational Unit objects |
| 3 & 4 |
GPO |
- Create groupPolicyContainer Objects
- Delete groupPolicyContainer Objects
|
This object and all child objects |
This object and all descendant objects |
- Write All Properties
- Delete
- Modify Permissions
|
groupPolicyContainer objects |
Descendant groupPolicyContainer objects |
| 5 & 6 |
User |
- Create User Objects
- Delete User Objects
- Write All Properties
- Delete
- Modify Permissions
- All Extended Rights
|
This object and all child objects |
This object and all descendant objects |
- Write All Properties
- Delete
- Modify Permissions
- All Extended Rights
|
User objects |
Descendant User objects |
| 7 & 8 |
Group |
- Create Group Objects
- Delete Group Objects
|
This object and all child objects |
This object and all descendant objects |
- Write All Properties
- Delete
- Modify Permissions
- All Extended Rights
|
Group objects |
Descendant Group objects |
| 9 & 10 |
Computer |
- Create Computer Objects
- Delete Computer Objects
|
This object and all child objects |
This object and all descendant objects |
- Write All Properties
- Delete
- Modify Permissions
- All Extended Rights
|
Computer objects |
Descendant Computer objects |
| 11 & 12 |
Contact |
- Create Contact Objects
- Delete Contact Objects
|
This object and all child objects |
This object and all descendant objects |
- Write All Properties
- Delete
- Modify Permissions
|
Contact objects |
Descendant Computer objects |

Image showing: Auditing Entry number 1.
Note: All 12 Auditing Entries must be enabled.
To audit container objects:
- Login to any computer that has the Active Directory Service Interfaces snap-in.
- Open the ADSI Edit console, right-click on ADSI Edit and select Connect to.
- In the Connection Settings window, under Select a Well-Known Naming Context, select Default Naming Context.
- Navigate to the left panel, click on Default naming context.
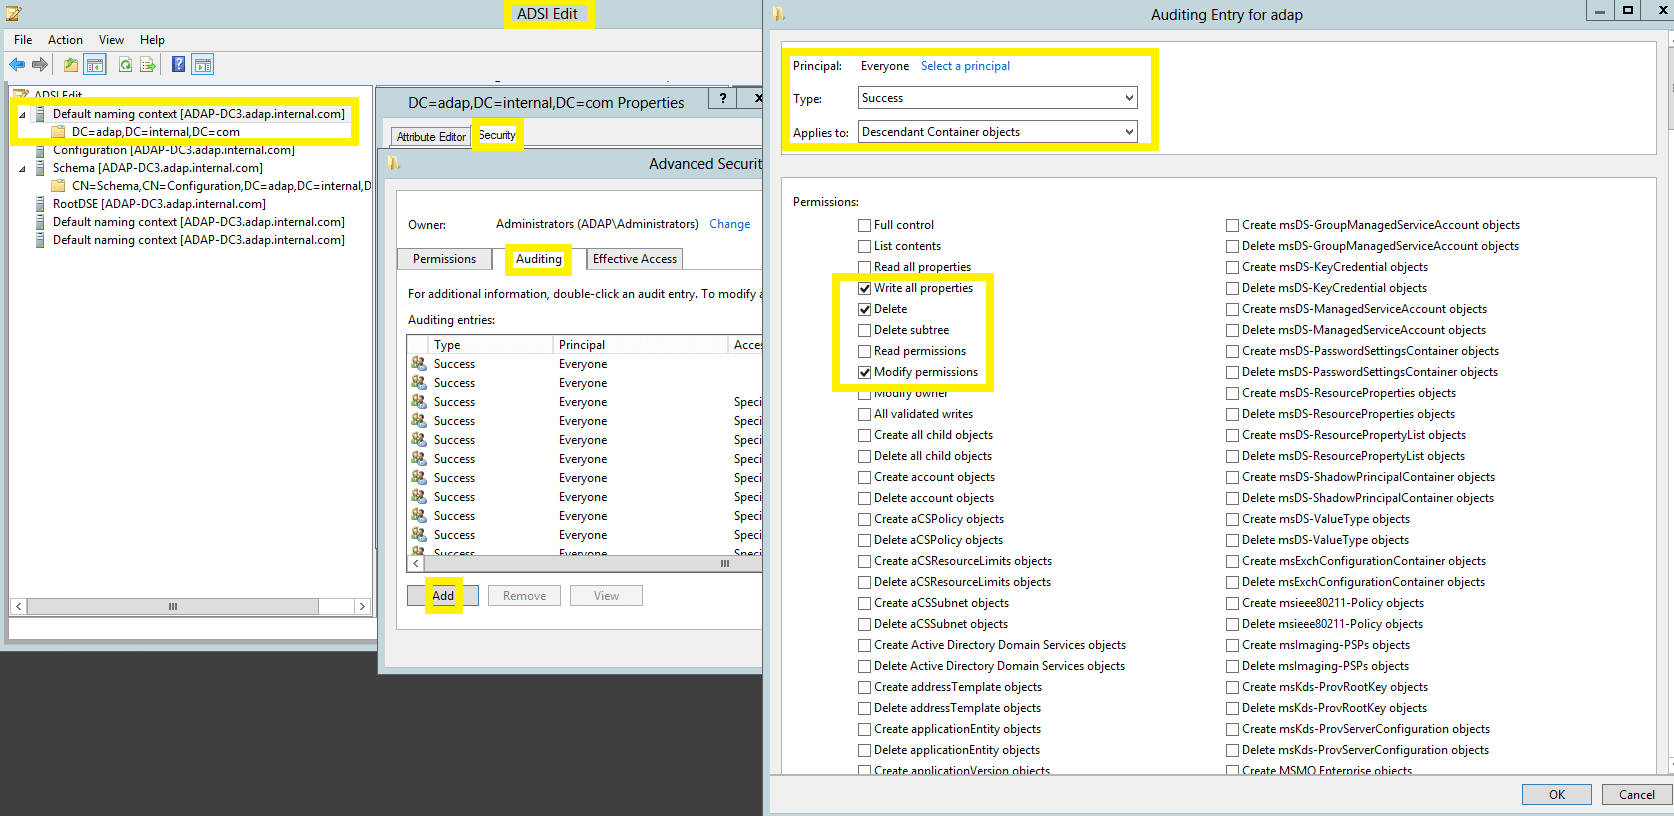
- Right-click on domains distinguished name, select Properties and go to Security → Advanced → Auditing → Add.
- In the Auditing Entry window, select a principal: Everyone → Type: Success, and select the appropriate permissions, as directed in the table below.
Note: Use Clear all to remove all permissions and properties before selecting the appropriate permissions.
| Auditing Entry number |
Access |
Apply onto |
| Windows Server 2003 |
Windows Server 2008 and above |
| Container |
- Write All Properties
- Delete
- Modify Permissions
|
Container objects |
Descendant Container objects |

To configure auditing for password setting objects:
- Login to any computer that has the Active Directory Service Interfaces snap-in.
- Open the ADSI Edit console, right-click on ADSI Edit and select Connect to.
- In the Connection Settings window, under Select a Well-Known Naming Context, select Default Naming Context.
- Navigate to the left pane, click on Default naming context. go to Expand the domain → Expand the System container.
- Right-click on the Password Settings Container and go to Properties → Security → Advanced → Auditing → Add.
- In the Auditing Entry window, select a principal: Everyone → Type: Success and select the appropriate permissions, as directed in the table below.
Note: Use Clear all to remove all permissions and properties before selecting the appropriate permissions.
| Auditing Entry number |
Auditing Entry for |
Access |
Apply onto |
| Windows Server 2003 |
Windows Server 2008 and above |
| 1&2 |
Password Settings Container |
- Create msDS-PasswordSettings objects
- Delete msDS-PasswordSetting objects
|
Not Applicable |
This object and all descendant objects |
- Write All Properties
- Delete
- Modify Permissions
|
Not Applicable |
Descendant msDS-PasswordSettings objects |

Image showing: Auditing Entry number 1.
To configure auditing for configuration objects:
- Login to any computer that has the Active Directory Service Interfaces snap-in.
- Open the ADSI Edit console.
- Right-click on ADSI Edit and select Connect to.
- In the Connection Settings window, under Select a Well-Known Naming Context, select Configuration.
- Navigate to the left panel, click on Configuration, right-click on Configuration naming context.
- Select Properties, and go to Security → Advanced → Auditing → Add.
- In the Auditing Entry window, select a principal: Everyone → Type: Success, and select the appropriate permissions, as directed in the table below.
Note: Use Clear all to remove all permissions and properties before selecting the appropriate permissions.
| Auditing Entry for |
Access |
Apply onto |
| Windows Server 2003 |
Windows Server 2008 and above |
| Configuration |
- Create All Child objects
- Write All Properties
- Delete All child objects
- Delete
- Modify Permissions
- All Extended Rights
|
This object and all child objects |
This object and all |

To configure auditing for schema objects:
- Login to any computer that has the Active Directory Service Interfaces snap-in.
- Open the ADSI Edit console.
- Right-click on ADSI Edit, and select Connect to.
- In the Connection Settings window, under Select a Well-Known Naming Context, select Schema.
- Navigate to the left pane, click on Schema.
- Right-click on Schema naming context, select Properties and go to Security → Advanced → Auditing → Add.
- In the Auditing Entry window, select a principal: Everyone → Type: Success, and select the appropriate permissions, as directed in the table below.
Note: Use Clear all to remove all permissions and properties before selecting the appropriate permissions.
| Auditing Entry for |
Access |
Apply onto |
| Windows Server 2003 |
Windows Server 2008 and above |
| Schema |
- Create All Child objects
- Write All Properties
- Delete All child objects
- Delete
- Modify Permissions
- All Extended Rights
|
This object and all child objects |
This object and all descendant objects |

To configure auditing for DNS objects
- Login to any computer that has the Active Directory Service Interfaces snap-in.
- Open the ADSI Edit console.
- Right-click on ADSI Edit, and select Connect to.
- In the Connection Settings window, under Select or type a Distinguished Name or Naming Context, type the distinguished name, as per your domain name and the partition where the zone is stored.
- Type DC=adap, DC=internal,DC=com as the Distinguished Name. (This partition is generally loaded in Adsiedit by default)
- Type DC=DomainDNSZones,DC=adap,DC=internal,DC=com as the Distinguished Name.
- Type DC=ForestDNSZones,DC=adap,DC=internal,DC=com as the Distinguished Name.


- Navigate to the left pane, click on Default naming context.
- Right-click on MicrosoftDNS, select Properties and go to Security → Advanced → Auditing → Add.
- In the Auditing Entry window, select a principal: Everyone, Type: Success, and select the appropriate permissions, as directed in the table below.

Note: Use Clear all to remove all permissions and properties before selecting the appropriate permissions.
| Auditing Entry number |
Auditing Entries for |
Access |
Apply onto |
| Windows Server 2003 |
Windows Server 2008 and above |
| 1 & 2 |
DNS Zones |
- Create DNS Zones objects
- Delete DNS Zones objects
- Write All Properties
- Delete
- Modify Permissions
|
This object and all child objects |
This object and all descendant objects |
- Write All Properties
- Delete
- Modify Permissions
|
DNS Zone objects |
Descendant DNS Zone objects |
| 3 & 4 |
DNS Nodes |
- Create DNS Nodes objects
- Delete DNS Nodes objects
|
This object and all child objects |
Descendant DNS Zone objects |
- Write All Properties
- Delete
- Modify Permissions
|
DNS Node objects |
Descendant DNS Node objects |
Note: Repeat steps iii. and iv. for the remaining two default naming contexts.


