Configuring Access Control for Connections
Access Manager Plus provides an access control workflow mechanism that allows users to restrict access to the connections added by them. When the access control is in place, no user other than the one who added the particular connection will be able to view the passwords or launch a remote connection unless their access request is approved by the owner.
- Glossary of Terminologies
- How does the Connection Access Control Mechanism Work?
- How to Implement Access Control for Connections?
- Precedence for Modifying Connection Settings for a Shared Connection
- Request and Approval Workflow Operations
1. Glossary of Terminologies
2. How does the Connection Access Control Mechanism Work?
When access control is enabled for a connection, a structured approval workflow is triggered for users attempting to access the connection. The process unfolds as follows:
- A user who owns a connection can enable Access Control from the Manage tab, requiring other users to submit a request for access.
- If multiple users request access to the same connection, their requests are queued for approval.
- The connection owner reviews each request and decides whether to approve or reject it. Additionally, the connection owner can monitor and manage these requests from the Admin tab or the Notifications panel.
- If a request is rejected, it is marked as void. If approved, the user is granted permission to initiate a remote session for the connection.
- When a user checks out the connection password, it remains accessible only for the duration requested by the user or specified by the connection owner.
- The next user in the queue can access the connection only after the previous user's access period ends.
- At any point, the administrators have the authority to revoke a user's connection access.
- To enhance security, the administrators can disable plain text password viewing by configuring the setting Allow plain text view of passwords, if auto logon is configured under Admin >> Server Settings >> General Settings. To know more, see General Settings.
- Also, If required, users can be mandated to provide a reason when retrieving a password by enabling the option Enforce users to provide a reason for password retrieval under Admin >> Server Settings >> General Settings.
This mechanism ensures that access to shared connections remains controlled, secure, and auditable, protecting sensitive credentials from unauthorized modifications or misuse.
2.1 Precedence for Viewing a Connection Password in Plain Text
The ability to view a connection password in plain text is governed by a hierarchical permission structure that determines access based on administrative settings and user group privileges.
Administrator Privileges: Administrators have unrestricted access to view connection passwords in plain text, regardless of whether the option Allow plain text view of passwords, if auto logon is configured enabled under general settings, or Allow plain text view of passwords at the user group level setting.
Standard User Restrictions: A Standard User can view the password of a shared connection in plain text only if the allow plain text view of passwords option is enabled in both general settings and user group privilege settings (for the group to which the user belongs). If this setting is disabled in either of the above places, the standard user cannot view the password of their own connections or shared connections
By enforcing these settings, organizations can maintain strict control over password visibility, ensuring that sensitive credentials are only accessible under predefined security policies.
3. How to Implement Access Control for Connections?
To enable access control for a new connection, first, follow the instructions specified here to add a new connection. Once you have added a connection, follow the steps below to configure access control settings for them:
- Navigate to the Manage tab.
- To implement access control for a single connection, click Actions >> Configure Access Control beside the required connection. To implement access control for multiple connections, select all connections for which you wish to enforce access control in bulk, click the More Actions menu, and choose Configure Access Control.

In the Configure Access Control dialog box that opens, there are three tabs available:
3.1 Excluded Users
Exclude a set of users or user groups from the request-release workflow using this option. The excluded users will be able to access passwords directly without raising connection access requests.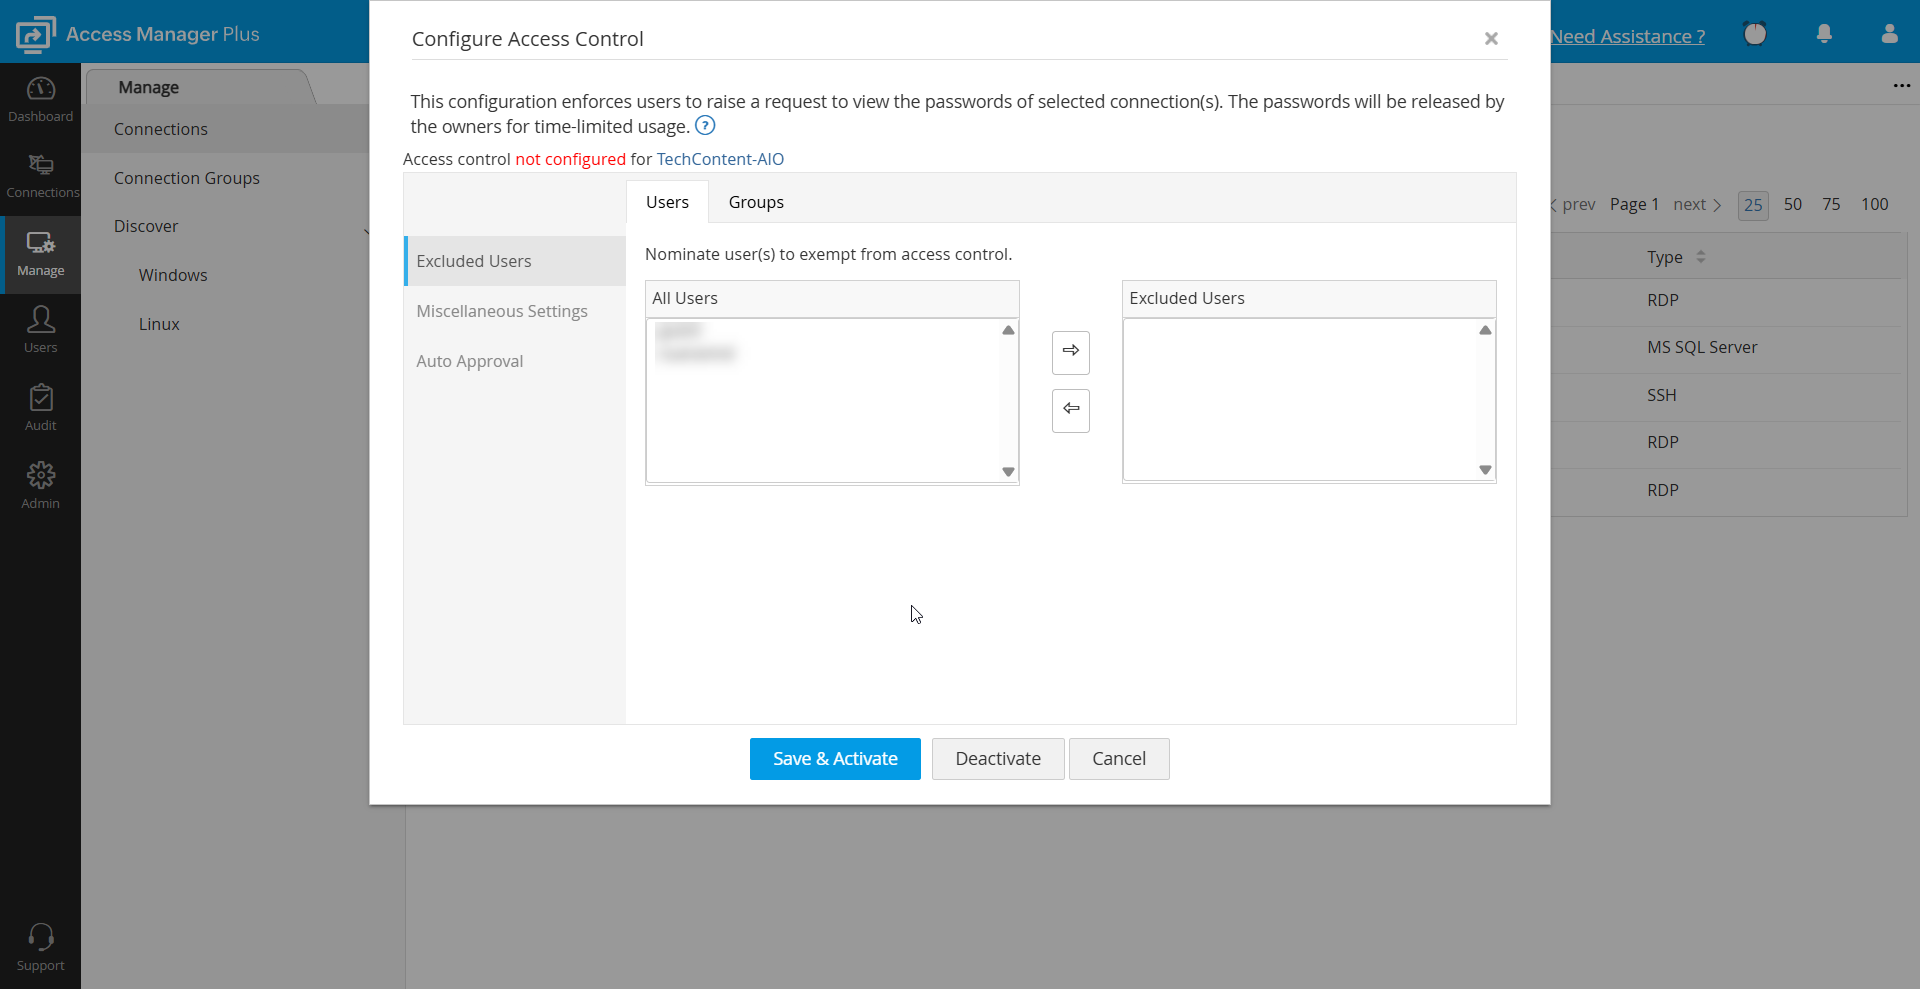
3.2 Miscellaneous Settings
- Enforce users to provide a reason for password retrieval: Use this option to mandate users to provide a reason when they try to retrieve a password in plain text by clicking the asterisks. This is useful for auditing purposes.
- Send a reminder email to the owners asking to process the password access request before X minutes of the stipulated time: Use this option to set a time at which a reminder email will be sent to the connection owner about the access request that is yet to be approved. Access Manager Plus will send the reminder email at the specified number of minutes before the void time.
Note: Reminder email configuration setting is only applicable for builds before 4400.
- Post the allowed access time, provide a grace time of X minutes to the user: Enable this option to provide a grace time of up to 60 minutes to the user, after the connection access time ends.
- Check in the password automatically after X hours of the approved time: Use this option to specify the exact time after which the password will be checked in automatically and will no longer be available for use.
- Make the requests void after X hours, if not approved: Use this option to specify the maximum time, in hours, after which a pending connection access request will become void if the connection owner does not approve.
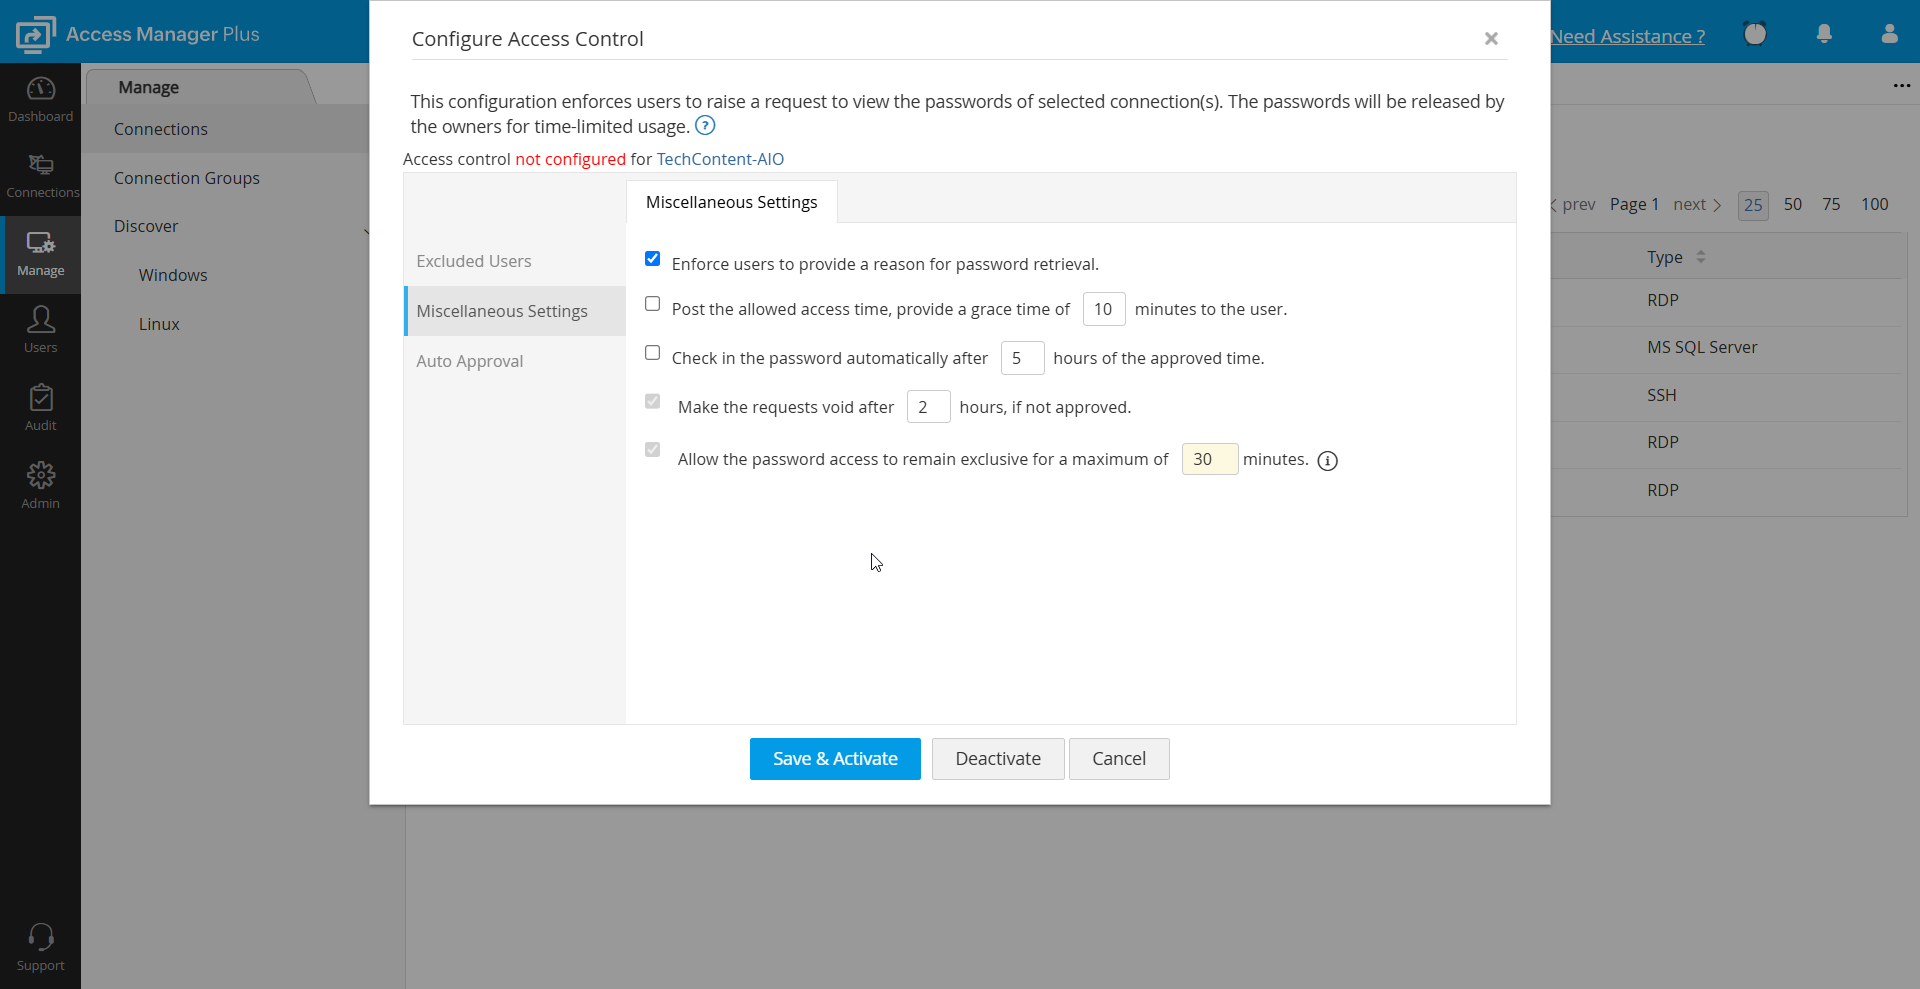
- Allow the password access to remain exclusive for a maximum of X minutes: During the specified time, the password is made available for the exclusive use of a particular user, and no one else, including the connection owner, is allowed to view the password. By default, the password will remain exclusive for the specified amount of time. However, you can modify it to the desired value.
For example, if you specify the time period as two hours, the password will be made available exclusively for that user for two hours. Others cannot view the password during that time. After the specified time, the password access will be void and will not be available to the user and other users will be able to view the passwords. If you specify the value as '0' hours, the password will remain exclusive for an unlimited number of hours.
3.3 Auto Approval
Access Manager Plus provides the option to set automatic approval of password access requests. This auto-approval feature will be handy during the times when the connection owner may not be available to approve access requests for users. There are three ways in which connections owners can set up auto-approval:
- Automatically approve the access requests of all raised requests: If this option is selected, all requests will be auto-approved without the connection owner's intervention.
- Set an approval time frame by choosing specific days and/or times. All connection access requests that are raised within this time frame will be auto-approved, and the connection owner will be notified. For example, you can set auto-approval for all requests raised between 2 PM and 3 PM on Saturday. You can set up to 3 approval time frames for a single day. Except for the automatic nature of approval, all other aspects of this feature will follow the access control workflow.
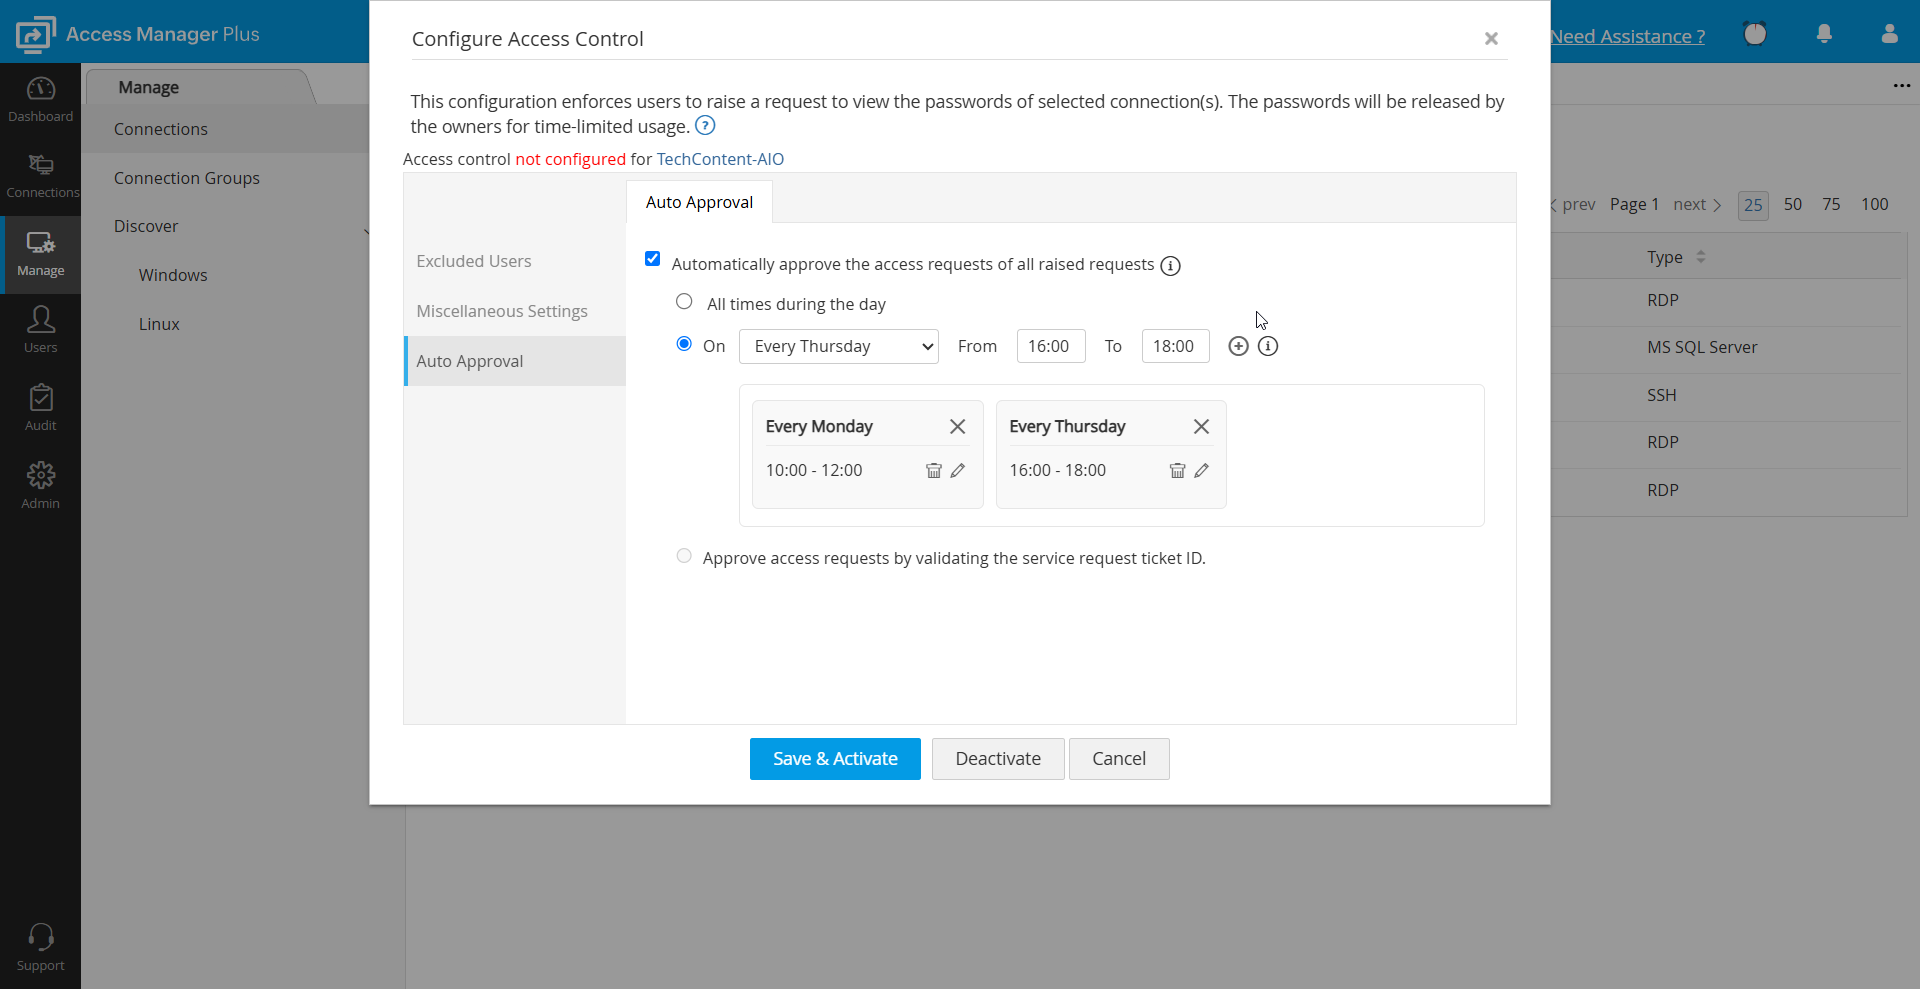
- Approve access requests by validating the service request ticket ID: This option works if ticketing system integration is enabled by the administrator. If this option is selected, the user will be prompted to enter the ticket ID. if the ticket ID entered is valid, then the user will be able to access the connection without sending an access request. However, please note that if the administrator has enabled the Allow users to retrieve password without ticket ID option in general settings, then the user will not be prompted to enter a ticket ID.
Once you have configured the necessary options for setting up the access control workflow for a connection, click Save & Activate. To deactivate access control for a connection for which access control is already configured, click the Deactivate option in this window.
4. Precedence for Modifying Connection Settings for a Shared Connection
By default, users can modify the settings of a shared connection via the Actions drop-down. However, access control configuration of a connection is an exception, as they can only be modified by the connection owner for security reasons.
Administrators can restrict users from modifying the access control relevant settings of a shared connection via:
- General Settings
- User Group Privilege Settings
When both restrictions are in place, the General Settings configured by the administrator take precedence over User Group Privilege Settings. However, this precedence changes when Connection Access Control is enabled for a specific shared connection. If a connection is locked using access control, it overrides individual user privileges and restricts the ability to modify connection settings via the Actions drop-down.
4.1 Scenarios Where a Standard User Can Modify Connection Access Control Settings
There are only two scenarios where a standard user is permitted to modify the settings of a shared connection via the Actions drop-down menu. The conditions for each scenario are detailed below.
Scenario 1: Access Control Enabled | User in Excluded List | Allowed User Group Privilege
- User A is a member of the Sales Team user group.
- Connection access control is enabled for CHNQATEST-01.
- User A is part of the Excluded Users list for this connection, exempting them from the access control workflow.
- The Allow plain text view of passwords, if auto logon is configured option is enabled in both General Settings and at the Sales Team user group level.
Outcome: User A can modify the connection settings of CHNQATEST-01 from the Actions drop-down.
Scenario 2: Access Control Disabled | Allowed User Group Privilege
- Connection access control is disabled for CHNQATEST-01.
- The Allow plain text view of passwords, if auto logon is configured option is enabled in both General Settings and at the Sales Team user group level.
Outcome: User A can modify the connection settings of CHNQATEST-01 from the Actions drop-down.
4.2 Scenarios Where a Standard User Cannot Modify Connection Access Control Settings
Below are various scenarios in which a standard user is restricted from modifying the settings of a shared connection via the Actions drop-down menu.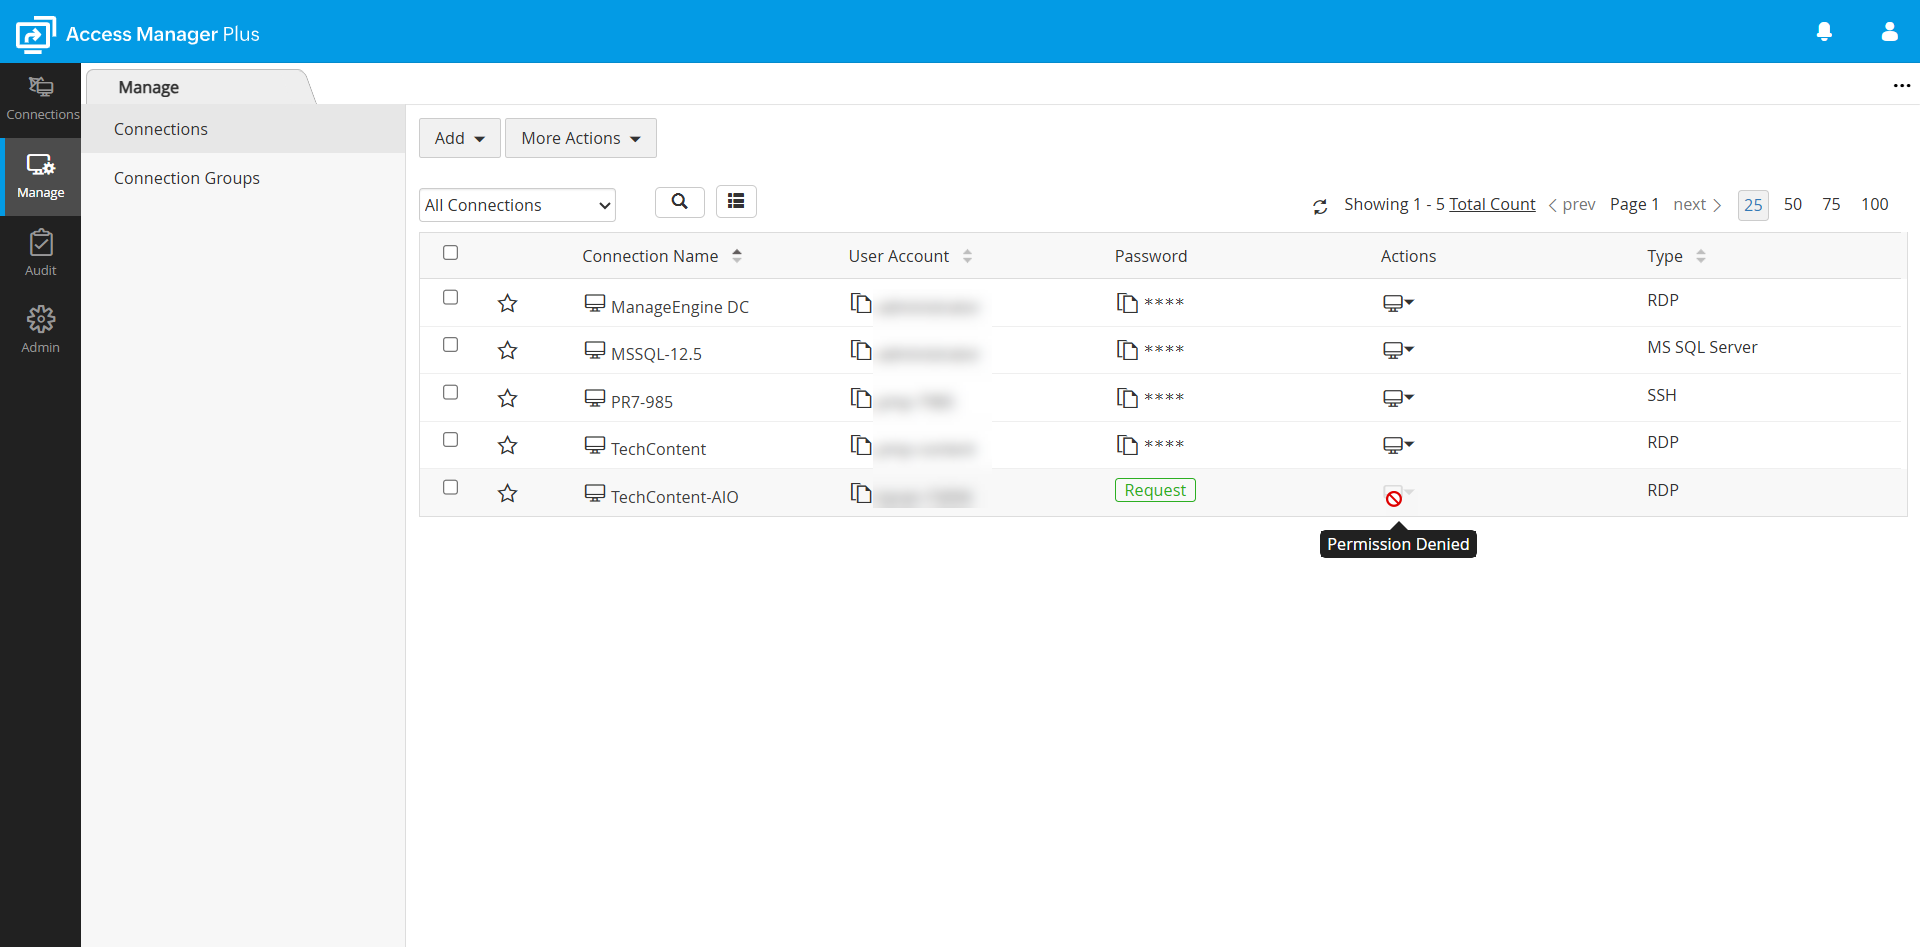
Scenario 1: User Not in Excluded List | Access Control Enabled
- The Allow plain text view of passwords, if auto logon is configured option is enabled in General Settings and for the user group Sales Team.
- Connection access control is enabled for CHNQATEST-01.
- User A is not listed under Excluded Users for the shared connection CHNQATEST-01.
Scenario 2: User in Excluded List | Access Control Enabled
- The Allow plain text view of passwords, if auto logon is configured option is enabled in General Settings but disabled for the user group Sales Team.
- Connection access control is enabled for CHNQATEST-01.
- User A is included in the Excluded Users list for CHNQATEST-01.
Scenario 3: User Not in Excluded List | Access Control Enabled | Restricted User Group Privilege
- The Allow plain text view of passwords, if auto logon is configured option is enabled in General Settings but disabled for the user group Sales Team.
- Connection access control is enabled for CHNQATEST-01.
- User A is not in the Excluded Users list for CHNQATEST-01.
Scenario 4: Access Control Disabled | Restricted User Group Privilege
- The Allow plain text view of passwords, if auto logon is configured option is enabled in General Settings but disabled for the Sales Team.
- Connection access control is disabled for CHNQATEST-01.
Scenario 5: User in Excluded List | Access Control Enabled | Allowed User Group Privilege
- The Allow plain text view of passwords, if auto logon is configured option is disabled in General Settings but enabled for the Sales Team.
- Connection access control is enabled for CHNQATEST-01.
- User A is included in the Excluded Users list for CHNQATEST-01.
Scenario 6: User Not in Excluded List | Connection Control Enabled | Allowed User Group Privilege
- The Allow plain text view of passwords, if auto logon is configured option is disabled in General Settings but enabled for the Sales Team.
- Connection access control is enabled for CHNQATEST-01.
- User A is not in the Excluded Users list for CHNQATEST-01.
Scenario 7: Connection Control Disabled | Allowed User Group Privilege
- The Allow plain text view of passwords, if auto logon is configured option is disabled in General Settings but enabled for the Sales Team.
- Connection access control is disabled for CHNQATEST-01.
Scenario 8: User in Excluded List | Access Control Enabled | Restricted User Group Privilege
- The Allow plain text view of passwords, if auto logon is configured option is disabled in General Settings and for the Sales Team.
- Connection access control is enabled for CHNQATEST-01.
- User A is included in the Excluded Users list for CHNQATEST-01.
Scenario 9: User Not in Excluded List | Access Control Enabled | Restricted User Group Privilege
- The Allow plain text view of passwords, if auto logon is configured option is disabled in General Settings and for the Sales Team.
- Connection access control is enabled for CHNQATEST-01.
- User A is not in the Excluded Users list for CHNQATEST-01.
Scenario 10: Access Control Disabled | Restricted User Group Privilege
- The Allow plain text view of passwords, if auto logon is configured option is disabled in both General Settings and for the Sales Team.
- Connection access control is disabled for CHNQATEST-01.
5. Request and Approval Workflow Operations
Following are the operations related to the request-release access control workflow:
5.1 Requesting Access to a Connection Password
To access a connection enabled with access control workflow, a user will have to request the connection owner to grant permission to view the connection. Follow the steps to make a connection request:
- Navigate to the Manage tab or the Connections tab to view all the available connections listed in the display area.
- Click the Request button on the desired connection tile to request access permission from the connection owner.
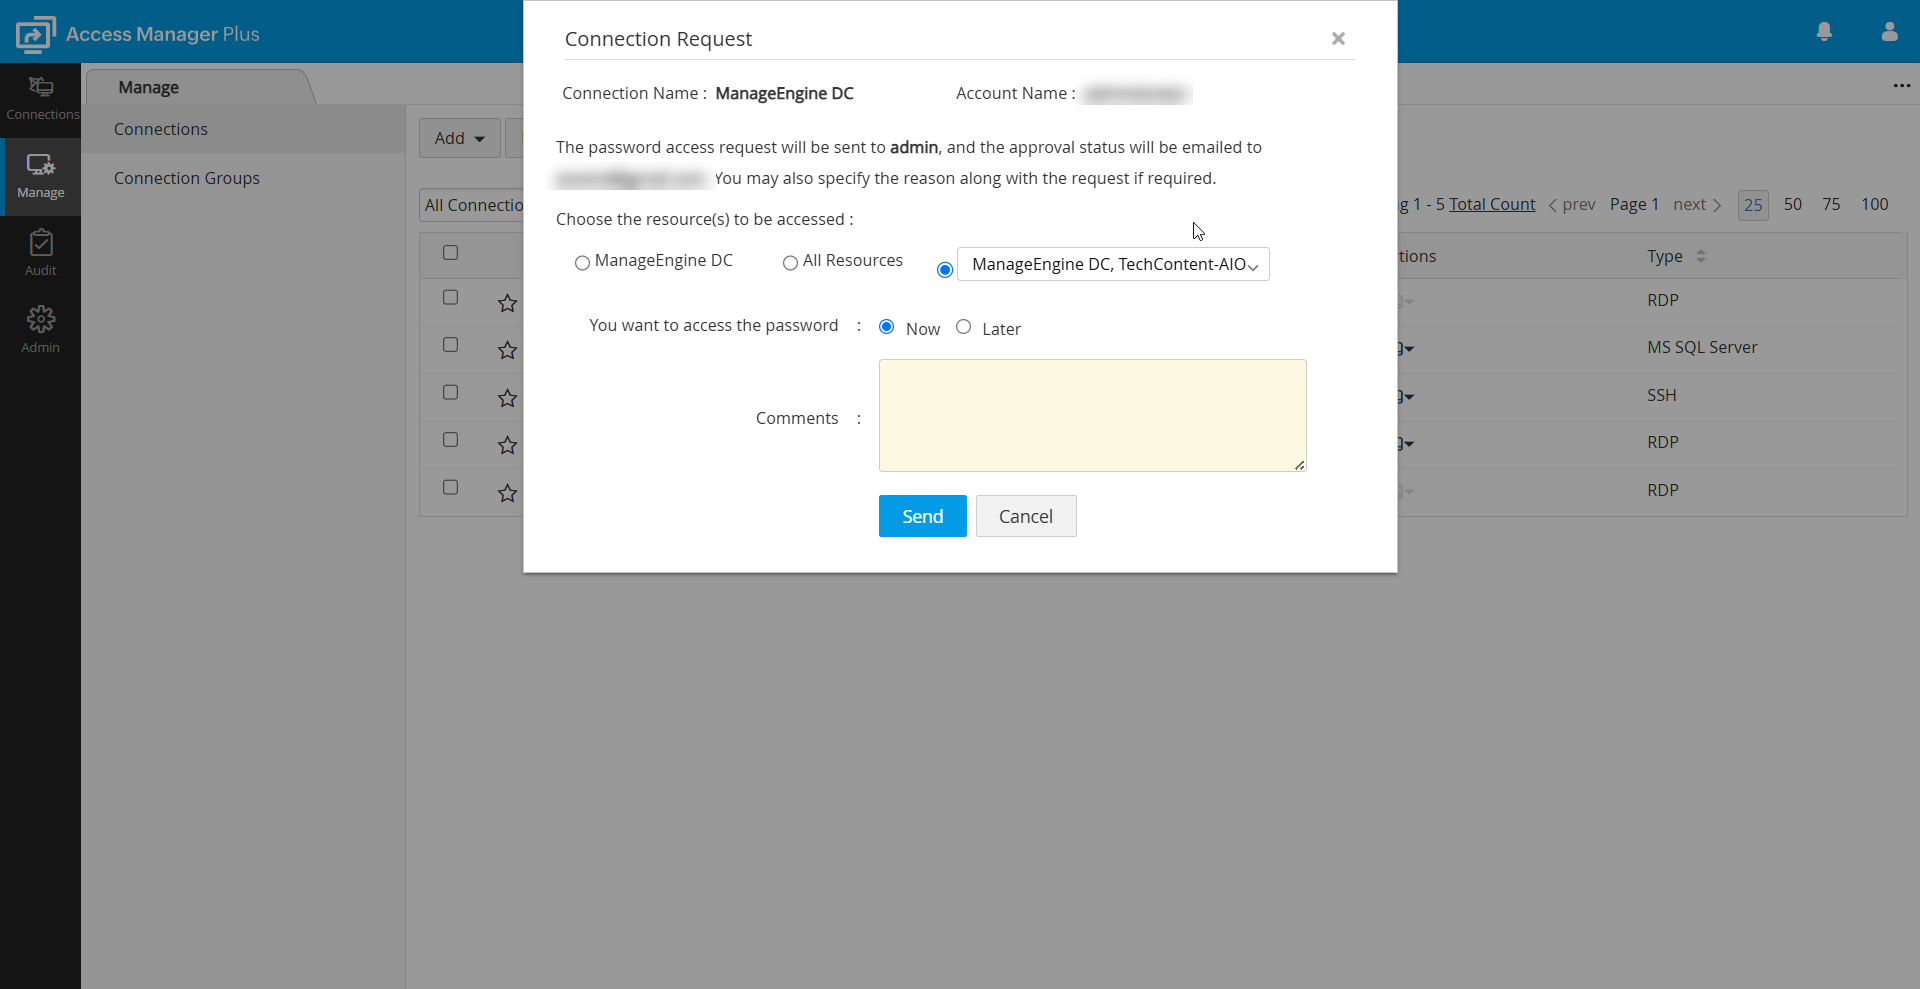
- In the Connection Request dialog box that opens, specify the following details as applicable:
- If you are requesting a connection for a domain connection, choose the desired connections you wish to access using the selected domain connection.
- Domain Controller - To access only the domain controller
- All Connections - To access all the shared RDP, SSH, and SQL connections that are part of the domain.
- Select Connections - To select specific connections from the list of connections displayed on the drop-down menu.
Note: In builds prior to 4400, the domain connection could only be used to access the domain itself. However, from build 4400 onwards, domain connection usage can be selectively enabled for target connections, providing greater flexibility and enhanced security. When submitting a request, users must specify whether they need the domain credential to access a domain controller, a specific connection, or all connections. Connection owners can review, modify, and approve requests, ensuring users receive only the necessary access while maintaining strict control over privileged connections.
- Access Time - Choose between one of the following options:
- Now - To access the password immediately
- Later - To schedule access for a future time.
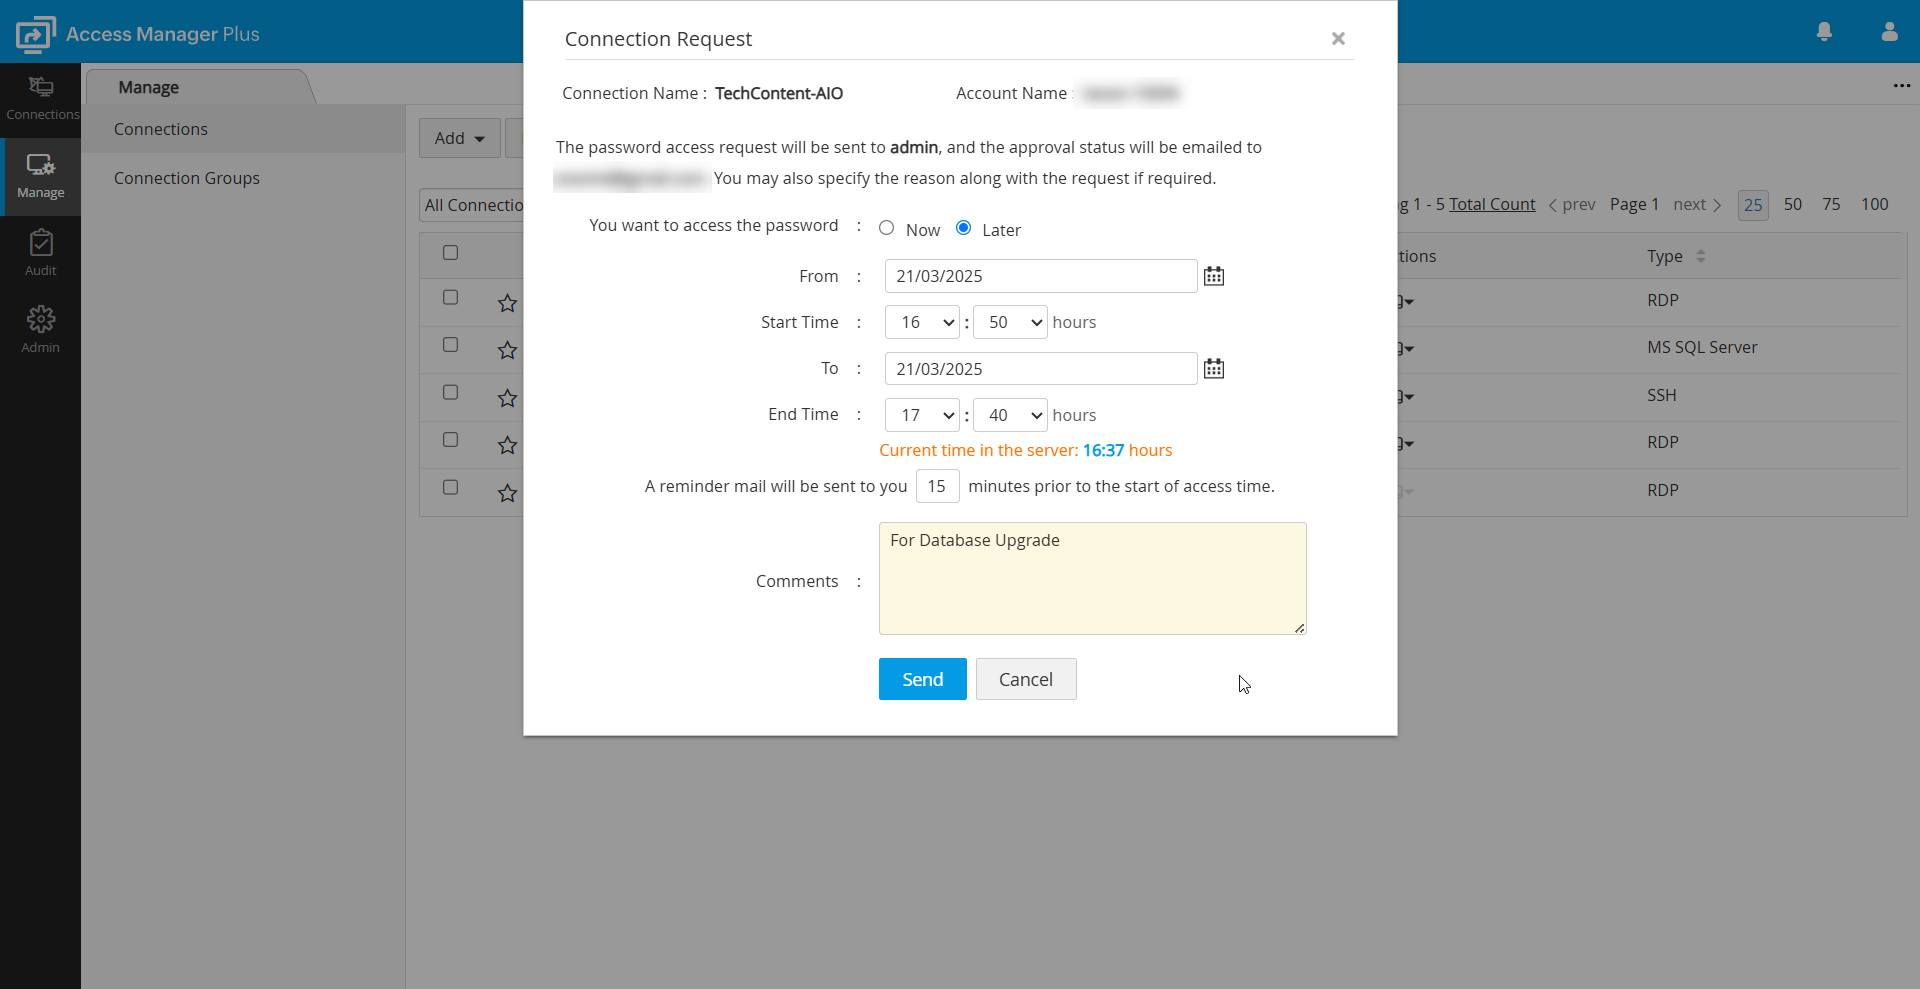
Notes: The Later option is only applicable from build 4400 onwards.
- Time Slot - Use the calendar option to select the Start Time and End Time for the connection access.
- Email Notification - Specify the time (in minutes) before the access duration when Access Manager Plus should send a reminder email.
- Enter the reason for your request in the Reason field. This option will be mandated only if the administrator has enforced users to provide a reason for retrieval under the General Settings, or the Miscellaneous tab while configuring access control.
- If ticketing system integration is enabled in your environment for auto-approval, enter the ticket ID details in the Ticket ID field.
- If you are requesting a connection for a domain connection, choose the desired connections you wish to access using the selected domain connection.
- Verify the connection and account names and click Send to submit the connection access request. The status beside the account name will change to Waiting for Approval.
- Once the administrator approves your request, you will be allowed to use the connection. Till then, the status will be Waiting for approval.
- Once the administrator approves the request, the status will change to Check Out. To gain access to the connection, click Check Out. Please note that the Check Out button will be enabled only during the approved access time. Exclusive access to the connection will be granted for the stipulated amount of time requested or set by the connection owner.
- Click Save. Now, you will be allowed to access the connection.
5.2 Approving a Connection Request
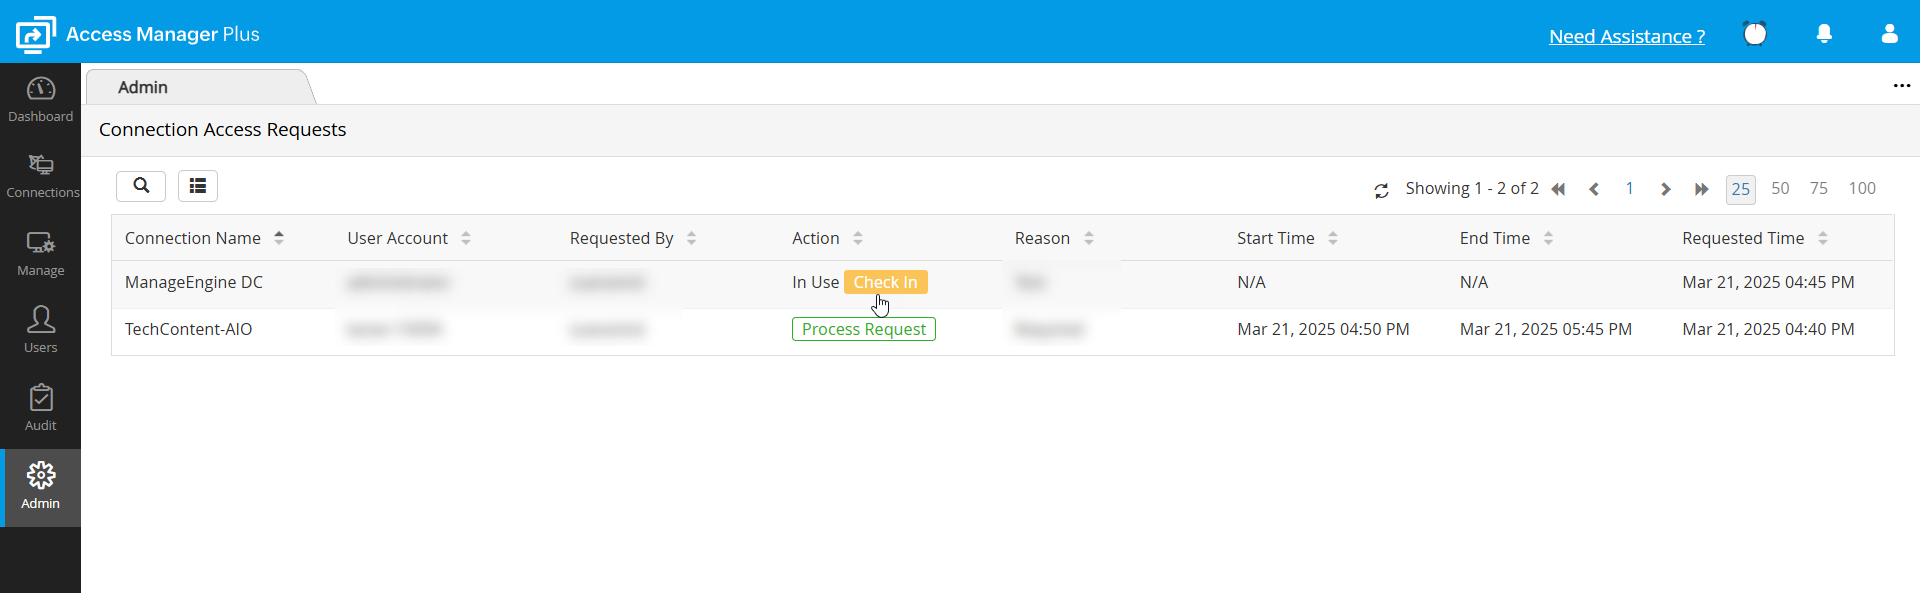
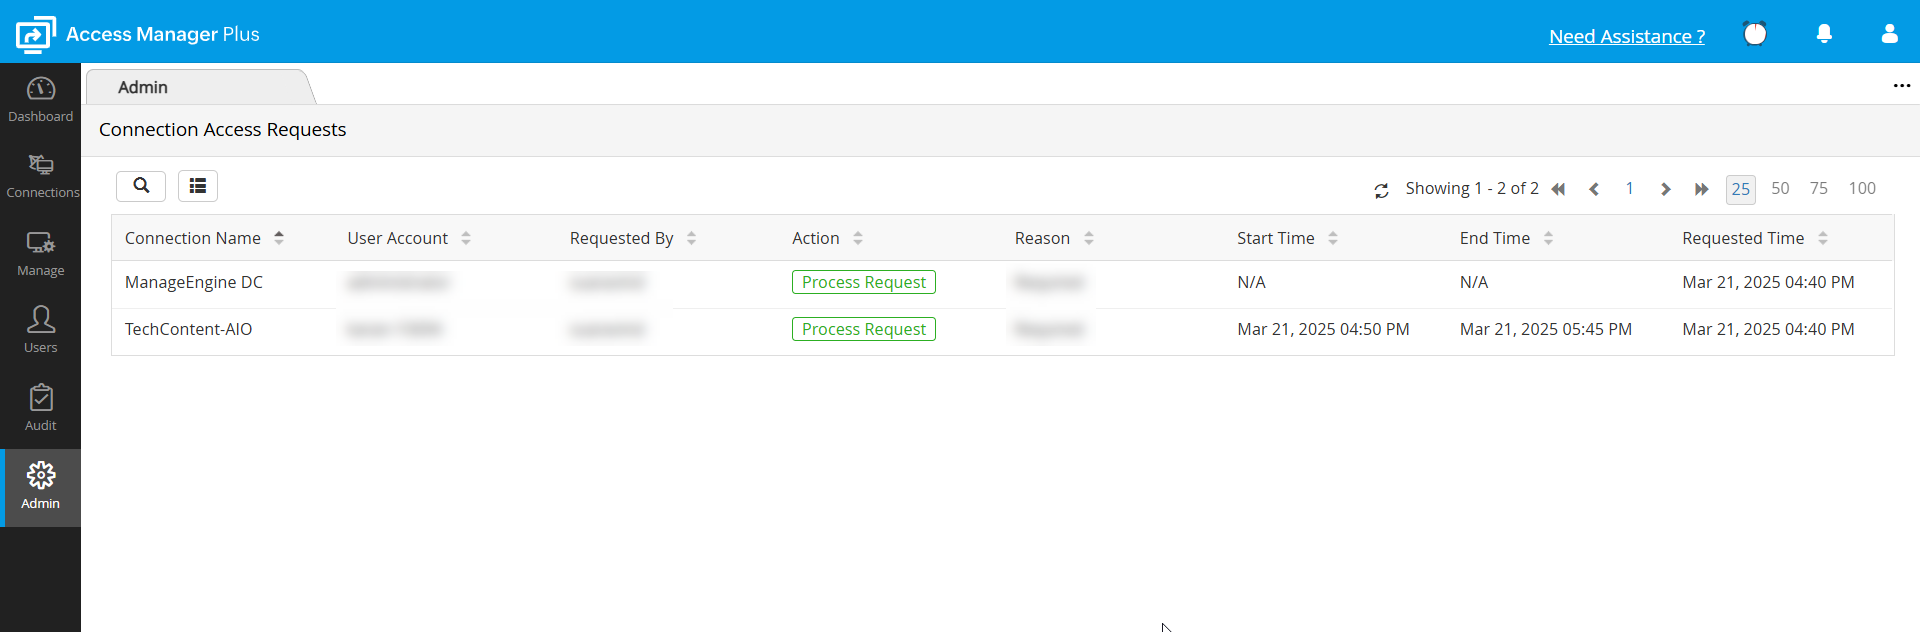
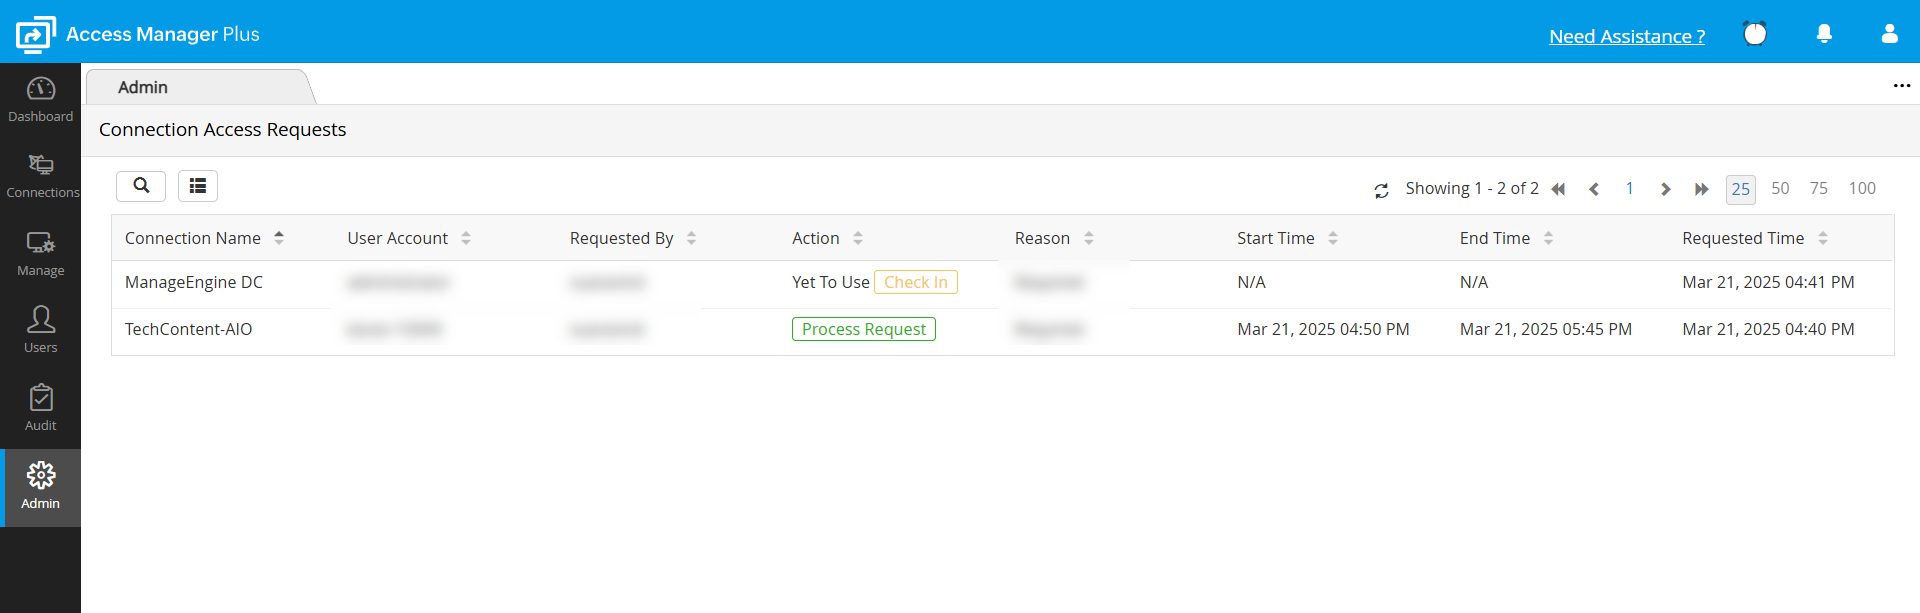
If you are an administrator and a user has requested your approval to view a connection, you will receive an email notification about the request. You can view all the requests pending your approval from the Admin tab. To approve a request, follow these steps:
- Navigate to Admin >> Session Settings >> Connection Access Requests.
- Click Process Request beside a request to allow the user to view the connection. Once you do this, a new window will open where you can validate and approve or reject the access request.
- Immediately after you approve the request, the status of the link will change to Yet to Use, indicating that the user is yet to check out the password and start using the connection.
- Once the user checked out the password, the status will change to In Use.
Note: If a connection access request is rejected by an admin in the above scenario, the request will be removed from the queue.
5.3 Check In Password After Connection Usage
The core of the access control mechanism ensures that users receive only temporary access to connections based on the set duration. If a user finishes their work before the expiry of the allotted time, they can give up access and end the connection.
To end the connection, click the Check In button beside the connection name. Now, the connection access will be checked back into the system and the status will change to Request again. You will no longer be able to view the password and access the connection. In case you require access again, you will have to go through the request-release process again.
5.4 Forcefully Check In a Connection Password
Access control mechanism allows exclusive access privilege to a user for a specified period. During this period, no one else will be allowed to access the connection. In case an emergency arises to revoke the exclusive permission of the user, the connection owner can forcefully check in the password and revoke access at any point of time. To Check In a connection password forcefully, follow these steps:
- Go to Admin >> Session Settings >> Connection Access Requests
- Click Check in beside the specific request to revoke the user's access permission. Once you do this, user will not be allowed to access the connection. The connection access request will also vanish from the list.