SNMP Traps and Syslog Settings
Access Manager Plus allows users to raise SNMP traps and send syslog messages from Access Manager Plus to external log management systems. SNMP traps and syslog messages are collected for various password actions and audit events that occur during the operation of Access Manager Plus and they help in determining the success or failure of a particular action along with the reason for the same. Once configured, tailor specific events for which notifications should be raised, from the Audit tab of Access Manager Plus.
The syslog messages sent from Access Manager Plus are RFC-3164 compliant, and they will be sent to the configured host and port, using the chosen protocol (TCP or UDP). Default facility name will be AUTH, but you can change it to any of the unassigned facility names from the pick list.
Similarly, SNMP v2c traps will be sent to the configured host and port number. The data sent will include the connection name, user who operated, IP address from which the user operated, etc. Elaborated below are the steps to configure SNMP trap/syslog messages in Access Manager Plus as well as to choose the audit events for which you wish to generate traps or syslog messages.
1. Configuring SNMP Traps
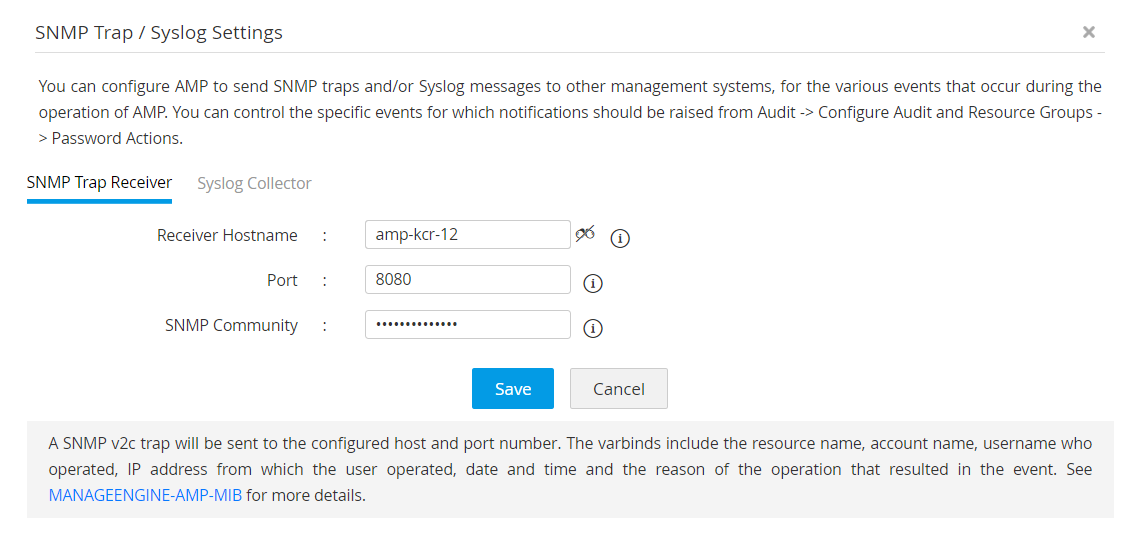
In the configuration steps, specify a desired host and port to which you want Access Manager Plus to send the traps. Follow the below steps to configure SNMP traps:
- Navigate to Admin >> Session Settings >> SNMP Trap / Syslog Settings.
- In the pop-up window, click the SNMP Trap Receiver tab and enter the name of the Host which has to receive the traps, its Port and the SNMP community.
- Click Save.

The varbinds sent from Access Manager Plus have the following information:
- Connection name
- Name of the user who operated
- IP address from which the user operated
- Date and time at which the Connection was accessed
- The reason for the operation that resulted in the event.
2. Configuring Syslog Messages
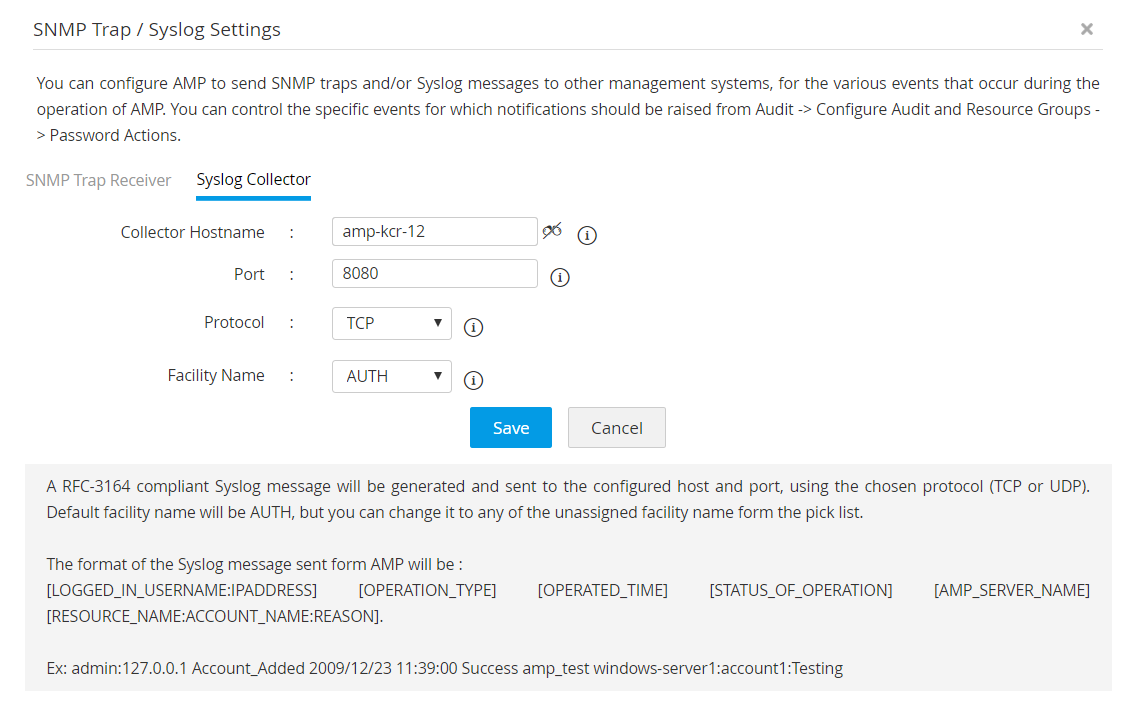
In the configuration steps, specify a desired collector host and port to which you want Access Manager Plus to send the syslog messages. Follow the below steps to configure SNMP traps:
- Navigate to Admin >>Session Settings >> SNMP Trap / Syslog Settings.
- In the pop-up window, click the Syslog Collector tab and enter the Collector Host Name, Port, Protocol, Facility Name.
- Click Save.

An RFC-3164 compliant syslog message will be generated and sent to the configured host and port, using the chosen protocol (TCP or UDP). Default facility name will be AUTH, but you can change it to any of the unassigned facility name from the pick list. The format of the syslog message sent from Access Manager Plus will be as follows:
[LOGGED_IN_USERNAME:IPADDRESS] [OPERATION_TYPE] [OPERATED_TIME] [STATUS_OF_OPERATION] [AMP_SERVER_NAME] [CONNECTION_NAME:ACCOUNT_NAME:REASON].
Ex: admin:127.0.0.1 Account_Added 2019/12/23 11:39:00 Success amp_test windows-server1:account1:Testing.
3. Specifying Audit Events
Specify the audit events for which you wish to send SNMP traps or Syslog messages.
To generate traps or syslog messages for connection-oriented operations, follow the below steps:
- Navigate to Audit >> Audit Actions >> Configure Connection Audit.
- Under Connection Audit Configuration, select the checkbox under Generate Syslog or Raise SNMP Trap for the preferred operations.
Click here for more information on Audit notifications.