Manage SSH Keys
After the discovery and the management of the SSH resources, you can perform the following operations to manage the SSH keys:
1. Import the Discovered Keys to Key Manager Plus.
The discovery and the subsequent connectivity establishment and credential supply processes enumerate the SSH keys associated with the resources. You are now required to import the keys to Key Manager Plus
As mentioned in section 4 of manage SSH resources, Key Manager Plus requires SSH user credentials for SSH key management. If the credentials are in place, you can import the SSH keys already discovered. To import the key files from the discovered SSH resource:
- Navigate to the SSH >> Discovered Keys tab in the GUI.
- The SSH keys are listed with their details. Select the keys you want to import.
- Click the Import button.
The imported keys can be viewed from the SSH >> SSH Keys tab.
Note : If the keys are protected with a passphrase, even though the import operation will execute successfully, while associating with user accounts, you need to enter the passphrase to use the key.
1.1 Import Keys from the Systems
In addition to the automated discovery of key files from the SSH servers, you can also specify the location and import the keys present in any system. To import the key files from the system, do the steps that follow:
- Navigate to SSH >> SSH Keys >> More and click Import Key.
- Click the Browse button and select the key file within the system.
Note: You can either import SSH keys from systems individually or in bulk. If you opt for the individual import process, enter the passphrase of the respective SSH key. For the bulk import process, the selected SSH keys should either share the same passphrase or should be passphrase-free.
- Enter Key Name and SSH Key Passphrase.
- Enter a Key Comment for your reference.
- Click Add to include the key in the repository.
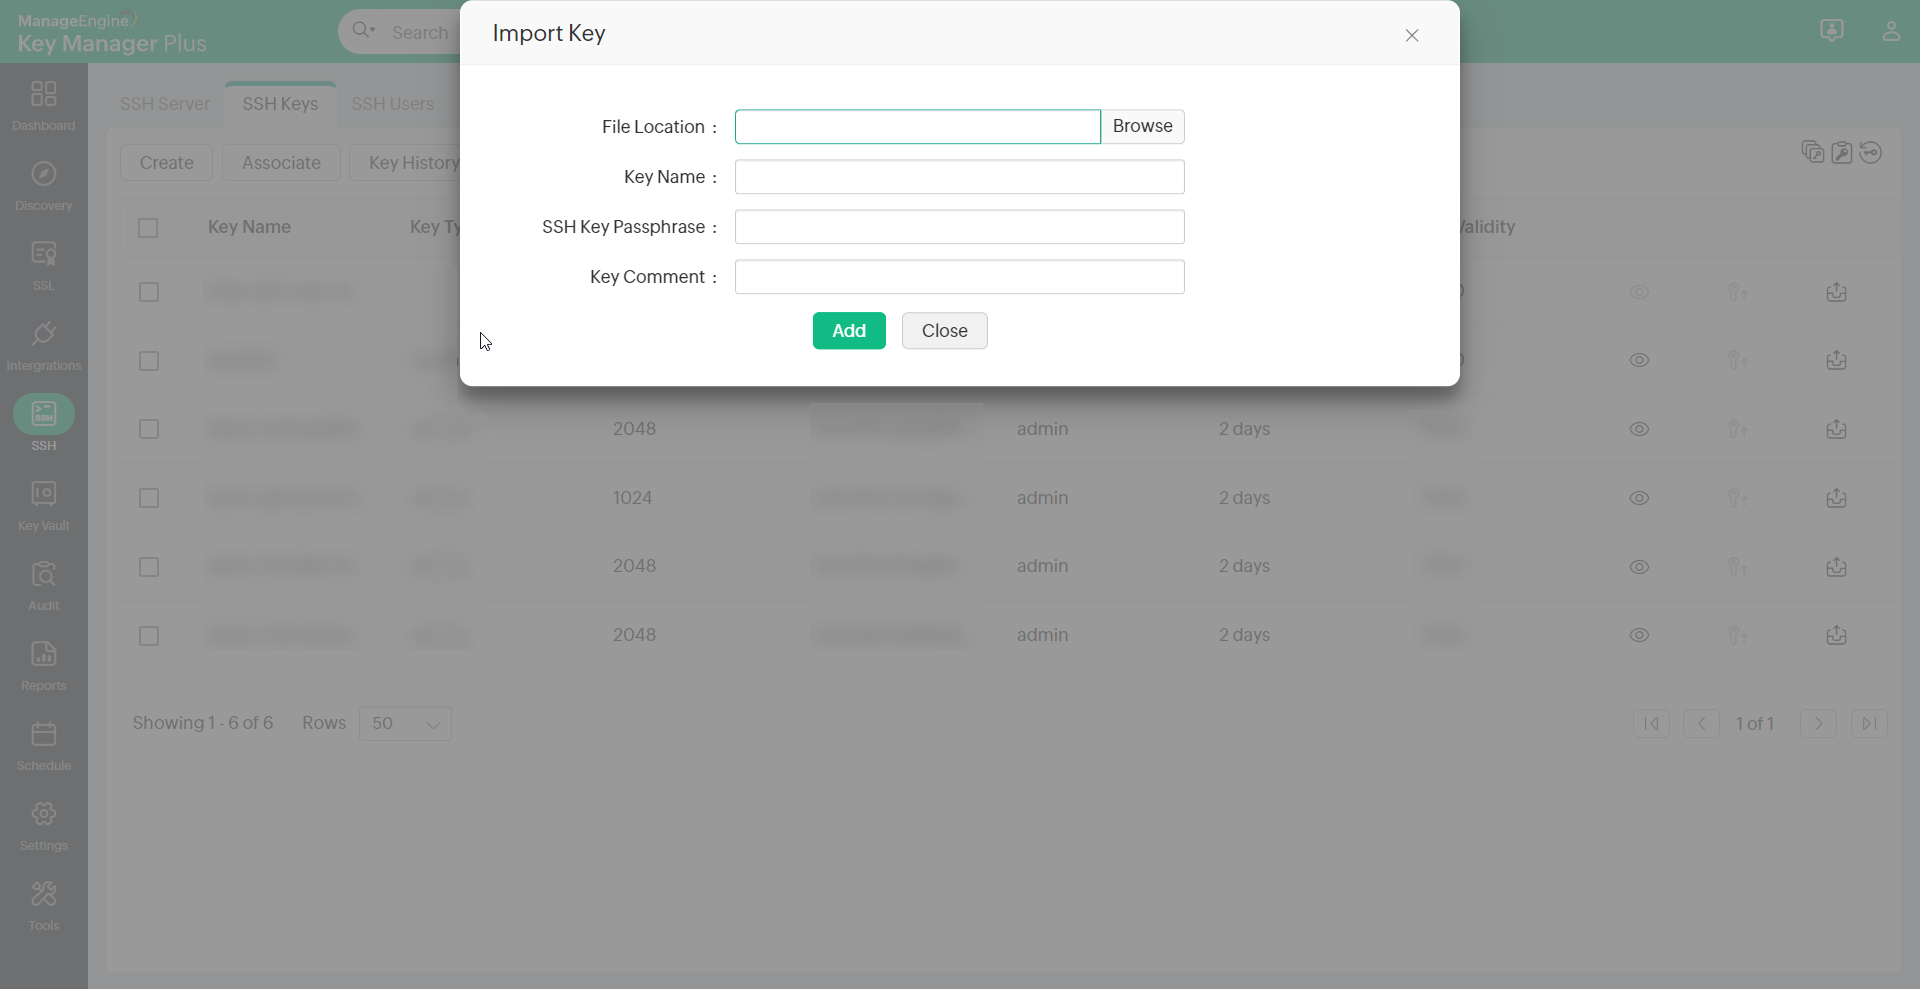
Note : If the key is protected with a passphrase, then the same has to be entered to import the key successfully.
To edit a Key Comment in already imported keys, follow the below steps:
- Navigate to the SSH >> SSH Keys tab.
- Select the required key from the repository.
- Click the More drop-down from the top menu, choose Edit and enter the required key comment.
- Select the checkbox Update the comment in the 'authorized_keys' file of the associated user(s) account to apply the updated key comment in the authorized_keys file automatically. This option eliminates the need to update the key comments manually in the associated user accounts.
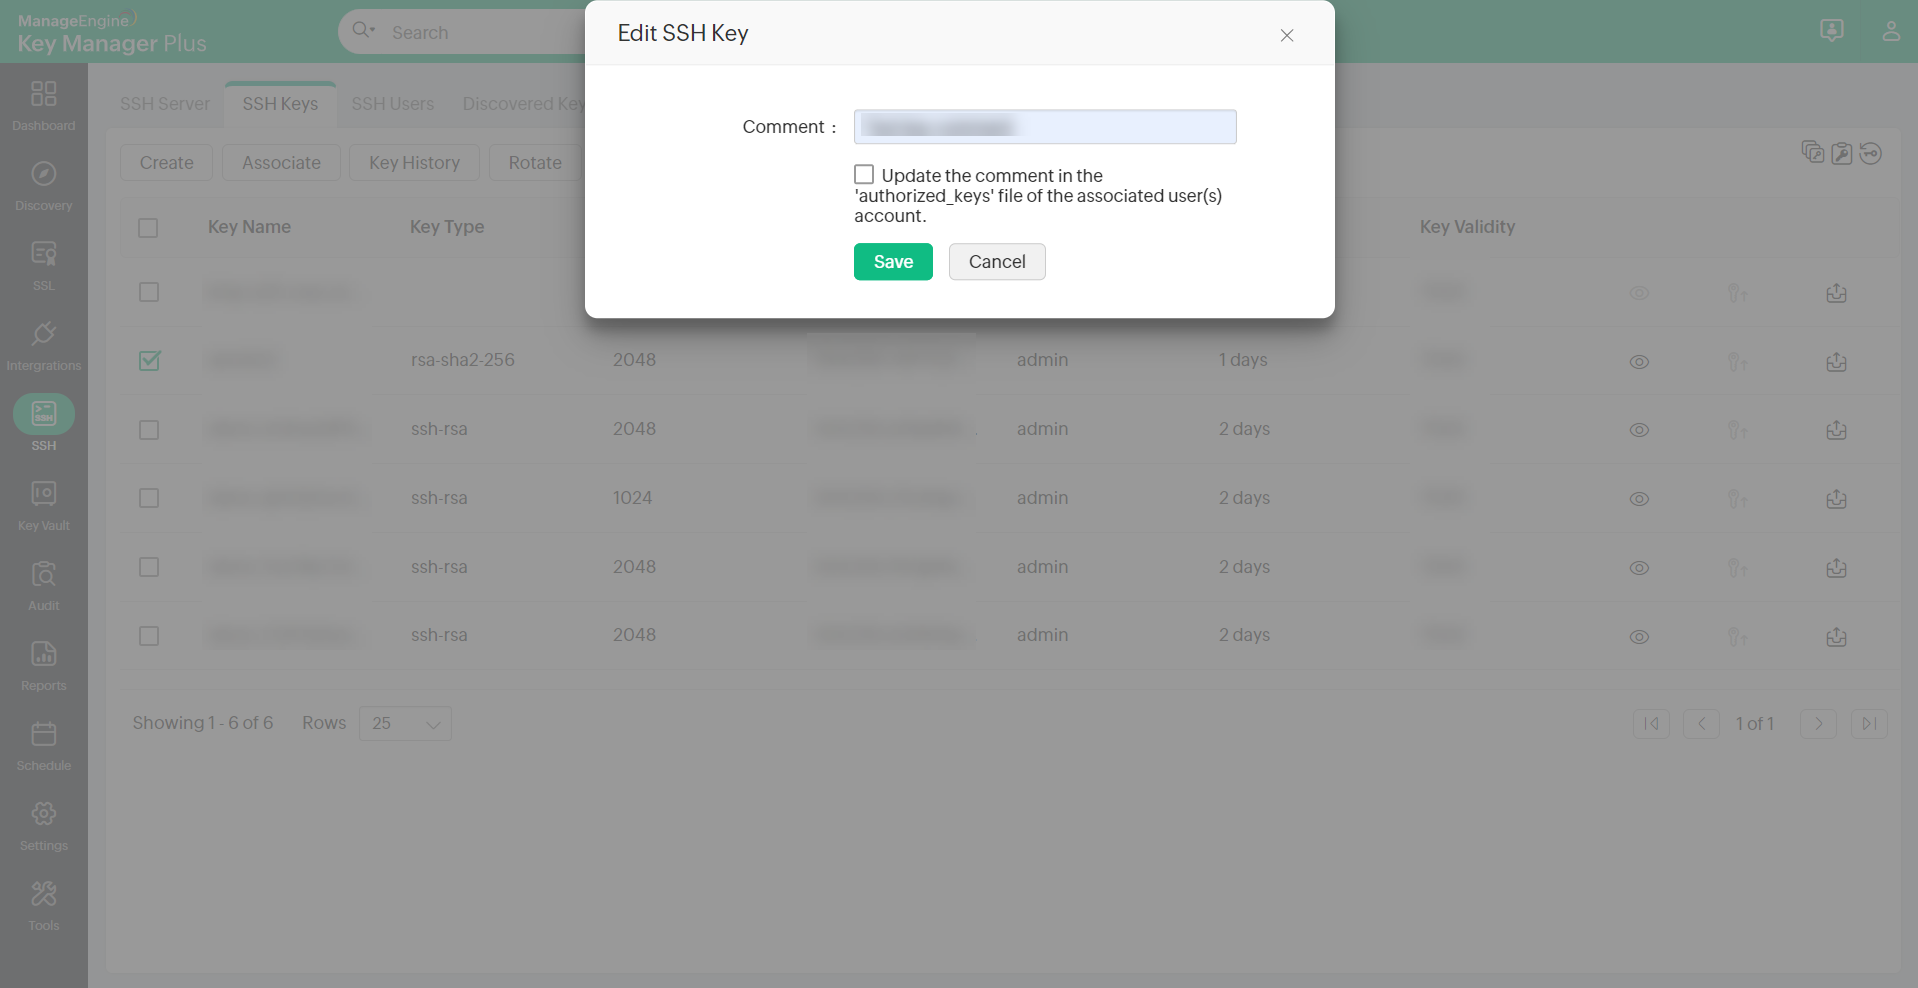
Note: Key Comment can be edited for only one key at a time.
2. Create New Keys and Deploy
Key Manager Plus also allows you to create new key pairs and deploy them on target systems. The create and deploy feature of Key Manager Plus can be used for one click generation and deployment of keys. Unique key pairs are generated for each user account and the corresponding keys are deployed automatically in user accounts of the target servers.
The SSH key pair can be generated using the algorithms as per the details below:
- RSA, Key Length - 1024/2048/4096, RSA Type - rsa-sha2-256/rsa-sha2-512
- DSA, Key Length - 1024
- ECDSA - Key Length - 256/384/521
- ED25519
To create new keys:
- Navigate to SSH >> SSH Keys tab in the GUI.
- Click Create.
- In the Create SSH Key window, enter the details of the key, and select the key type and length.
- Click the Create Key button to generate the key pair.
You will get confirmation that the new key has been created.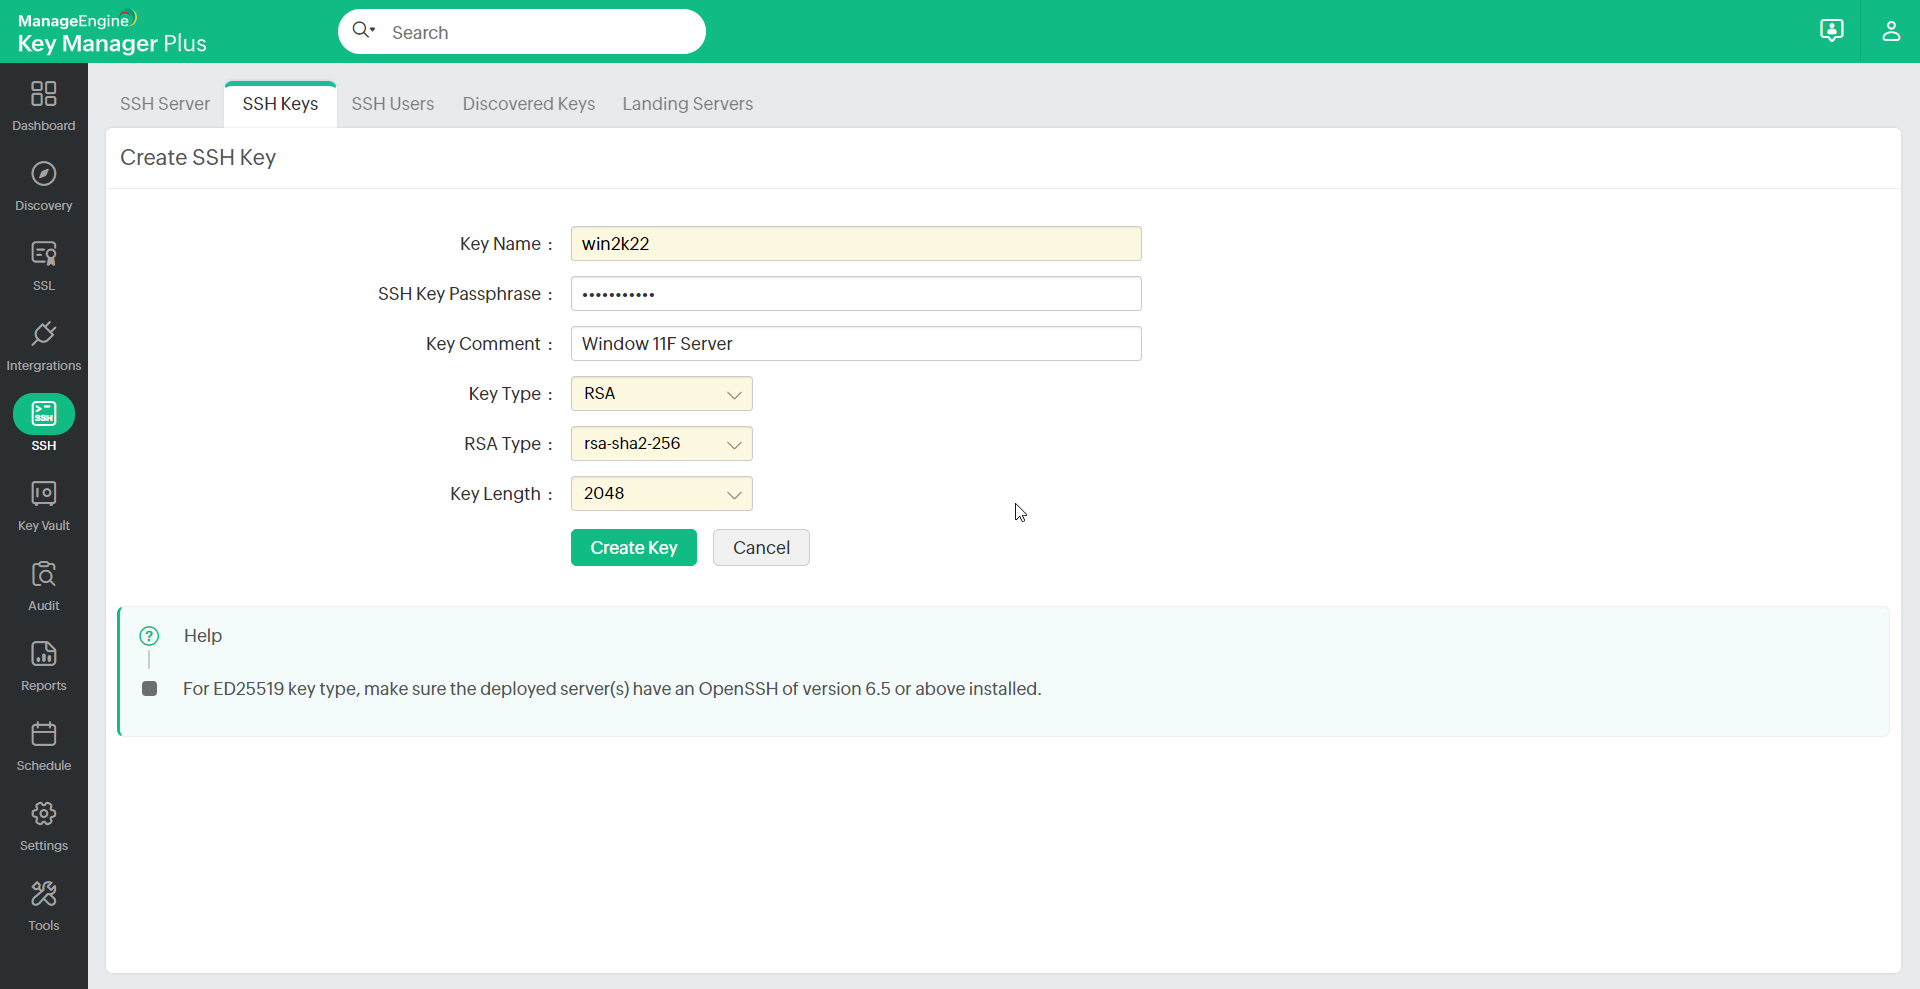
All the keys that are created are automatically added to the centralized repository of Key Manager Plus. You can view these keys from the SSH >> SSH Keys tab in the user interface. KMP allows you to search SSH Keys using Key Name, Key Type, Key Length, Finger Print, Created By, Age and additional fields.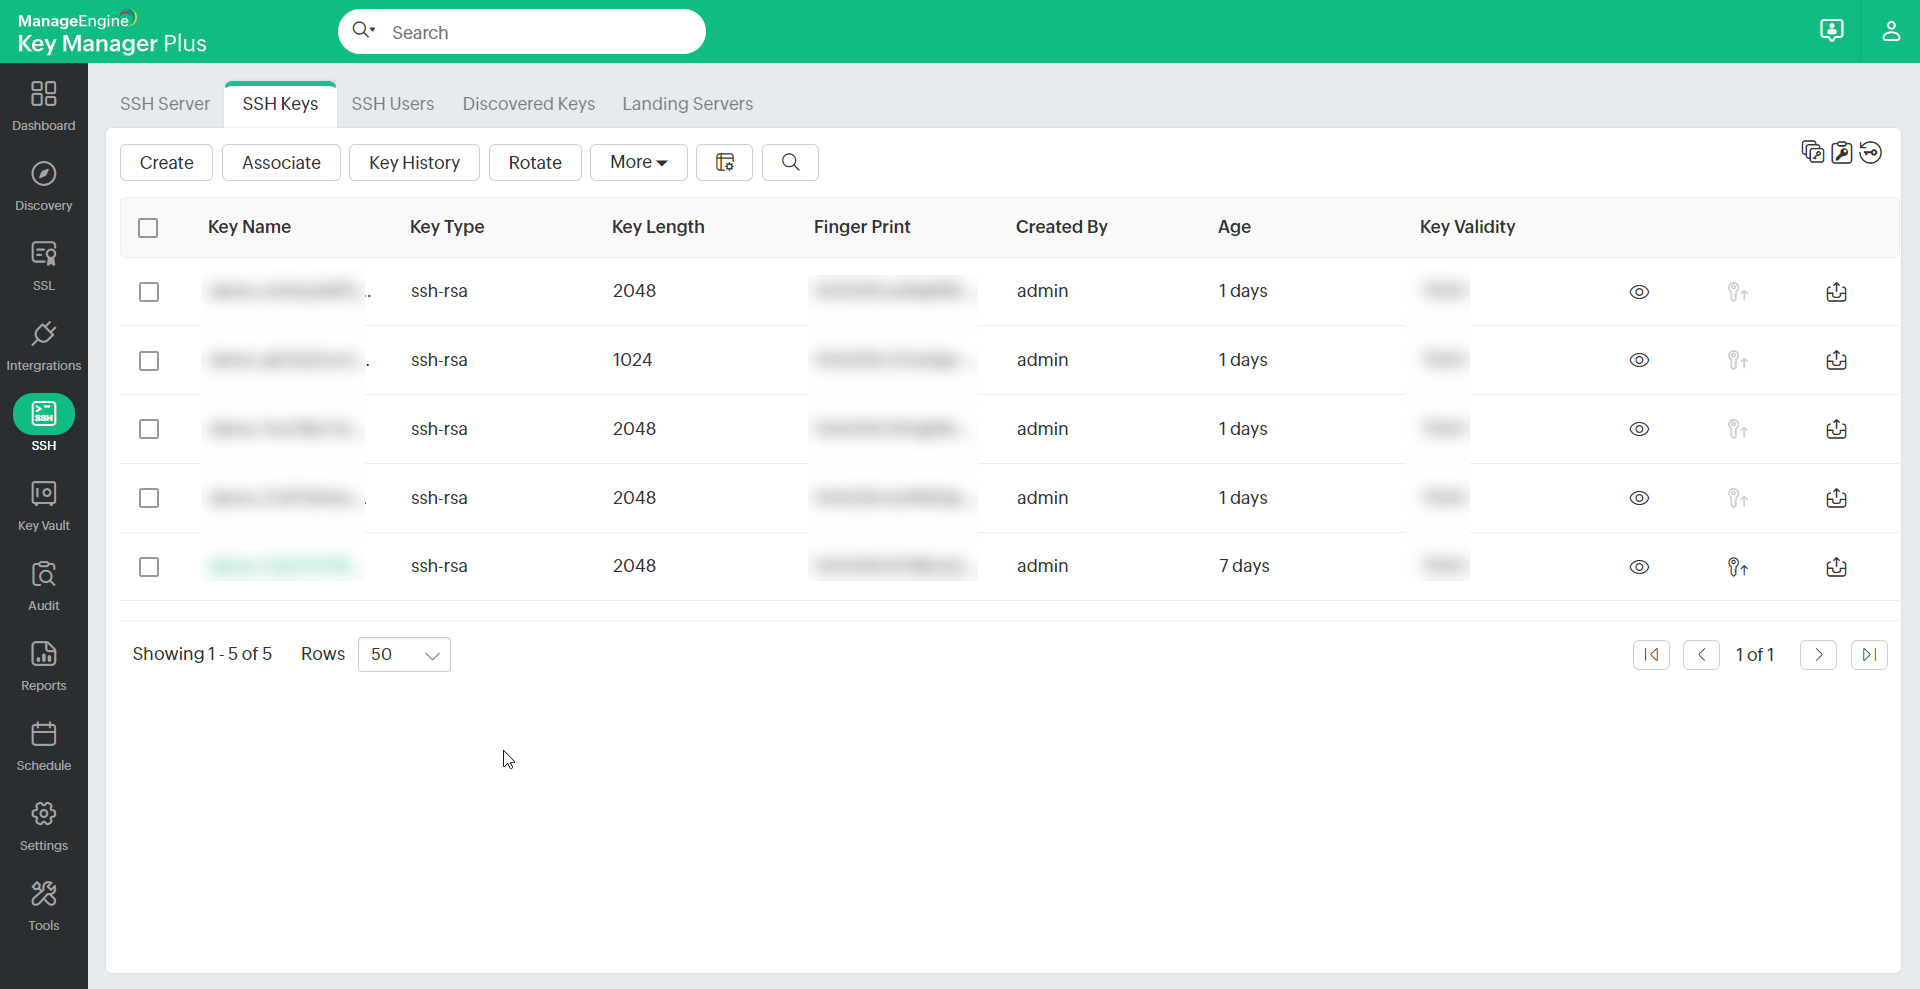
To view key passphrase:
Administrators can view the passphrases of keys by clicking on the show passphrase icon ( ![]() ) provided at the right end of the keys.
) provided at the right end of the keys.
To create and associate keys with all the user accounts in a discovered resource:
- Navigate to the SSH >> SSH Servers tab in the GUI to deploy the keys in all its enumerated user accounts. Or else, navigate to the SSH >> SSH Users tab and select the user accounts individually.
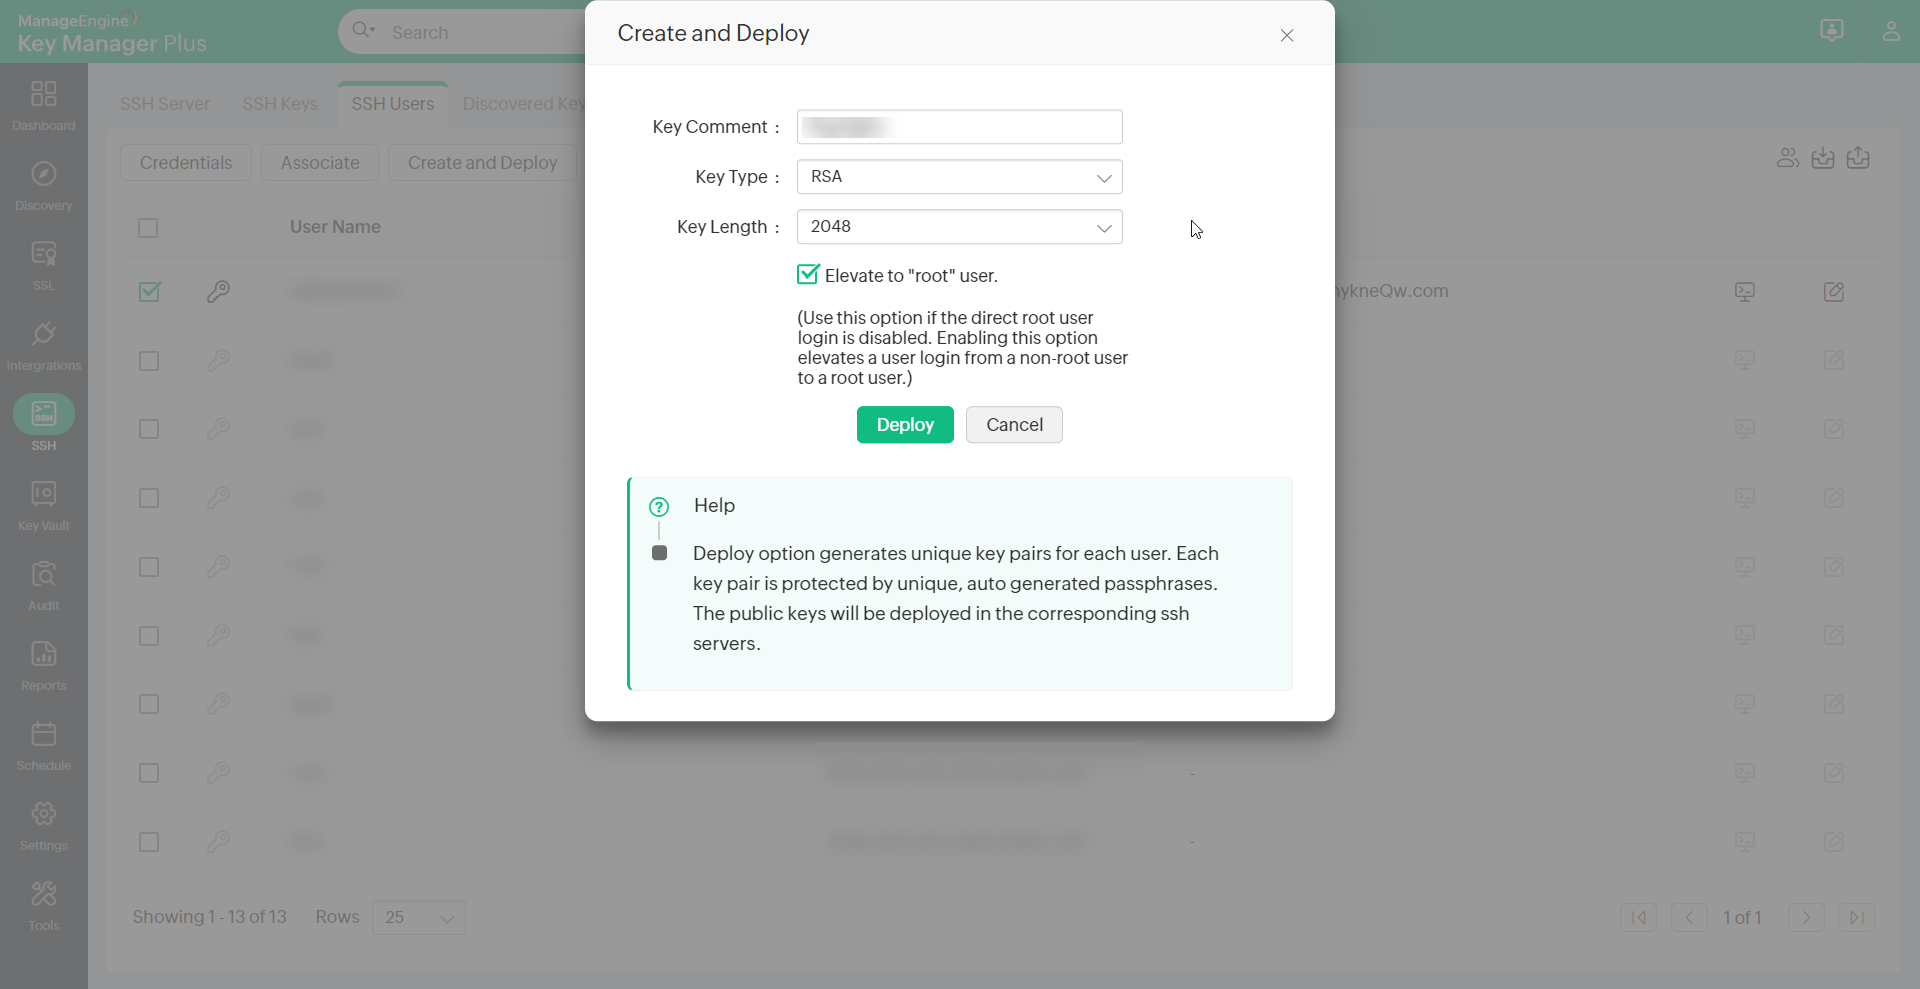
- Click the Create and Deploy icon in the right corner of the table view corresponding to the required resource.
- Select the key comment, type, and length.
- Select the checkbox to Elevate to "root" user.
Note: For security reasons root user login might be disabled for servers/machines. Enabling this option elevates a user login from a non-root user to a root user and allows you to associate keys to all other users in the server. Users have to provide root user and any non-root user credentials to KMP to elevate to a root user.
- Deploy to create key pairs and deploy them simultaneously in all the user accounts of the resource, for which credential is available.
3. Associate the Created or Existing Keys with Users or Vice-Versa and View Key-User Relationship
After importing / creating keys, you can associate the keys with SSH users.
Note :
- As mentioned in section 2 of manage SSH resources, if root user or administrator credential has been provided for a resource, keys can be associated with all enumerated user accounts of the resource.
- If there are no keys available in the Key Manager Plus database, then you will be prompted to create a key during association. Create a key pair and return to these steps.
To associate the created or imported keys with the user accounts of a single resource:
- Navigate to the SSH >> SSH Servers tab in the GUI.
- Click the SSH Users icon in the right corner of the table view.
- Select the user accounts for association.
- Click the Associate button at the bottom of the SSH Users window.
- Select a key and again click the Associate button.
You will get a confirmation message that the key association has started and you will be redirected to the Key Association Audit page.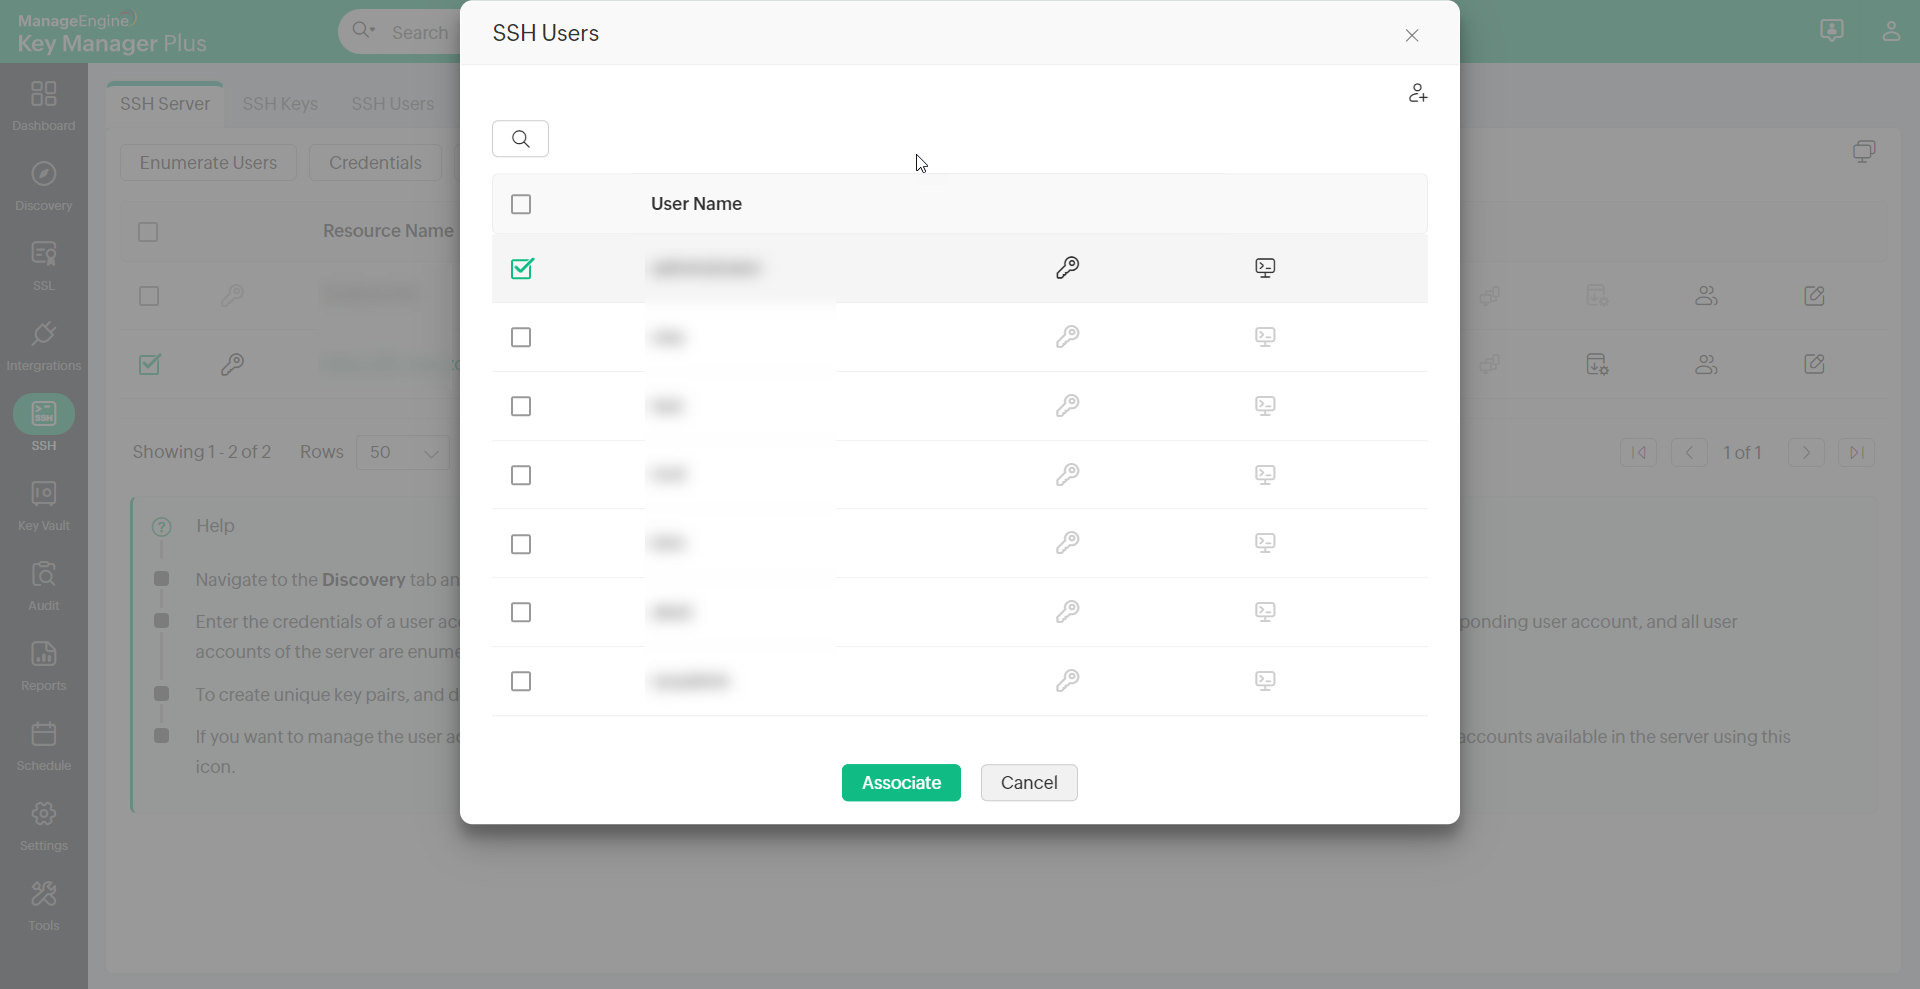
To select a SSH key and associate it directly with the user accounts:
- Navigate to SSH >> SSH Keys tab.
- Select a key from the list displayed.
- Click the Associate button.
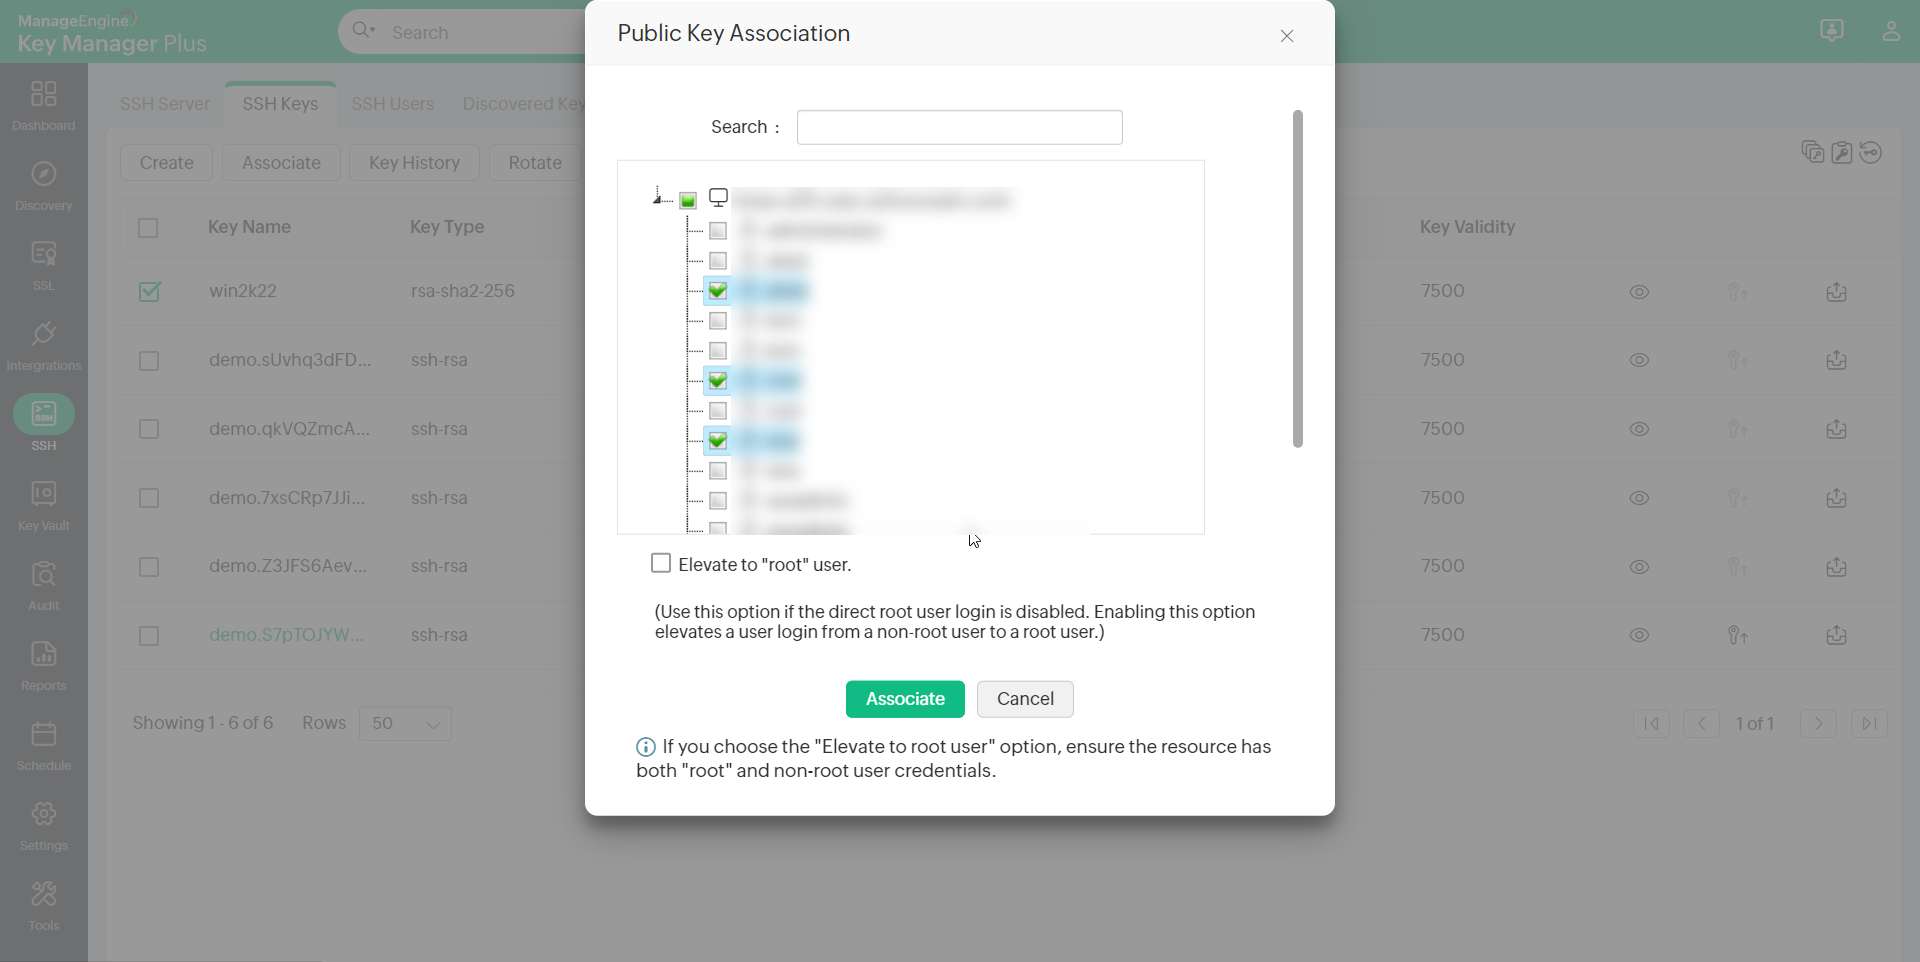
- In the Public Key Association window, select the user accounts to be associated.
- Select the checkbox to Elevate to "root" user.
Note: For security reasons root user login might be disabled for servers/machines. Enabling this option elevates a user login from a non-root user to a root user and allows you to associate keys to all other users in the server. Users have to provide root user and any non-root user credentials to KMP to elevate to a root user.
- Click Associate.
Keys can also be created and simultaneously associated with the user accounts. To do this:
- Navigate to the SSH >> SSH Servers tab in the GUI.
- Click the SSH Users icon in the right corner of the table view.
- Select the user accounts.
- Click the Associate button at the bottom of the resource users window.
- In the new window, click the Create Key icon beside the Select Key drop-down list.
- Enter details of the key and click the Create Key button.
- Select the new key from the Select Key list.
- Select the checkbox to Elevate to "root" user.
Note: For security reasons root user login might be disabled for servers/machines. Enabling this option elevates a user login from a non-root user to a root user and allows you to associate keys to all other users in the server. Users have to provide root user and any non-root user credentials to KMP to elevate to a root user.
- Click Associate.
4. Perform Key Management Operations (Edit, Rotate, Dissociate, Delete) and Launch Direct Terminal Connections.
4.1 Rotate SSH Keys
You can configure Key Manager Plus to automatically rotate the SSH keys at periodic intervals. With a single click, all the deployed keys can be replaced. The keys can be rotated based on a schedule, or anytime based on your need.
i. Manual Key Rotation
To rotate the keys manually:
- Navigate to SSH >> SSH Keys tab.
- Select the keys to be rotated.
- Click the Rotate option.
A confirmation message will be displayed and you will be redirected to the Key Rotation Audit page where the status of rotation is updated.
Note : Only the keys which have already been associated with user accounts of resources can be rotated.
ii. Scheduled Key Rotation
To schedule the rotation of keys:
- Click the Schedule tab in the GUI.
- Click the Add Schedule button.
- In the Add Schedule window, enter a name for the schedule and select the type of schedule as Key Rotation from the drop-down list.
- Select the keys to be rotated.
- Select the time and date for rotation. Enter the email addresses of the users to be notified.
- Click Save.
The result of the schedule execution will get updated in the Schedule audit and the result of the rotation of the keys will get updated in the Key Rotation Audit.
4.2 Dissociate Keys from SSH Users
When a SSH user leaves the organization or is provided temporary privileged access, you can dissociate the keys associated with the user to and discontinue access. Until you dissociate all the SSH keys, you cannot delete the user account nor the resource.
To select the keys and dissociate it from the users accounts:
- Navigate to the SSH >> SSH Keys tab.
- Select a single key which has to be dissociated.
- Click the Dissociate button from the More drop-down list.
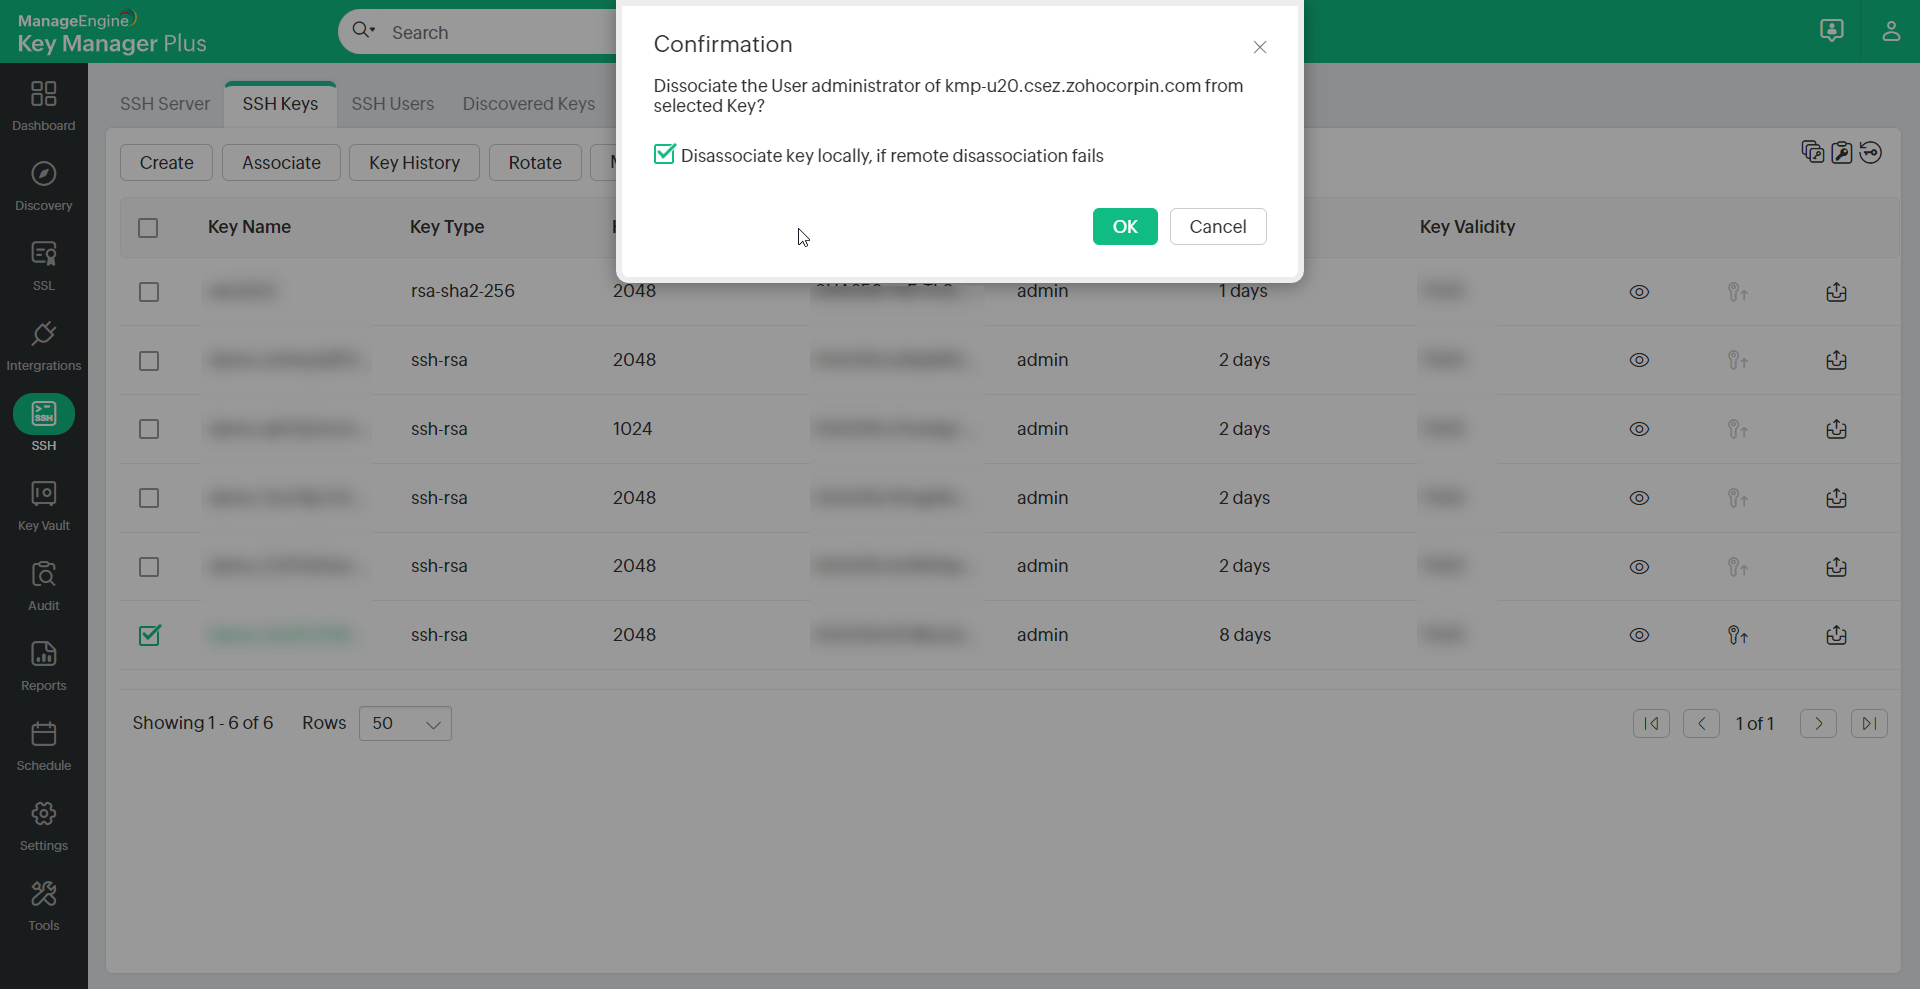
- If the key is associated with a single user account, select this checkbox to Dissociate key locally if remote dissociation fails and click Ok in the confirmation dialog box to dissociate the key.
- If the key is associated with multiple user accounts, select the user accounts from which the key has to be dissociated, select this checkbox to Dissociate key locally if remote dissociation fails and click the Dissociate button in the Dissociate Users window.
To select the user accounts and dissociate keys from it:
- Navigate to the SSH >> SSH Users tab.
- Click Dissociate from the More option
- If the user account is associated with a single key, select Ok in the pop-up window.
- If more than one key is associated with the selected user, select the keys which have to be dissociated and click the Dissociate button in the Dissociate Keys window.
Note : When you select and delete the user accounts enumerated in Key Manager Plus, the SSH keys associated with them are automatically dissociated.
4.3 Push Keys to Remote User Accounts
In addition to deployment, Key manager Plus allows you to push a private key or a public key or both onto its associated users.
To push a key file to remote user accounts,
- Click on the Push Key to User icon (
 ) at the right extreme of the selected key.
 - Select whichever key needs to be pushed (private, public or both), provide the appropriate key names, select the required associated users and click Push.
- The key file(s) is/are pushed to the selected users.
This feature is also available as a part of Key Rotation schedule. After the scheduled key rotation is performed and fresh key pairs are created and deployed, you can automatically push either the private key or both the private and public keys onto its selected associated users by enabling the 'push key to user' option instead of pushing the key files manually after every scheduled rotation.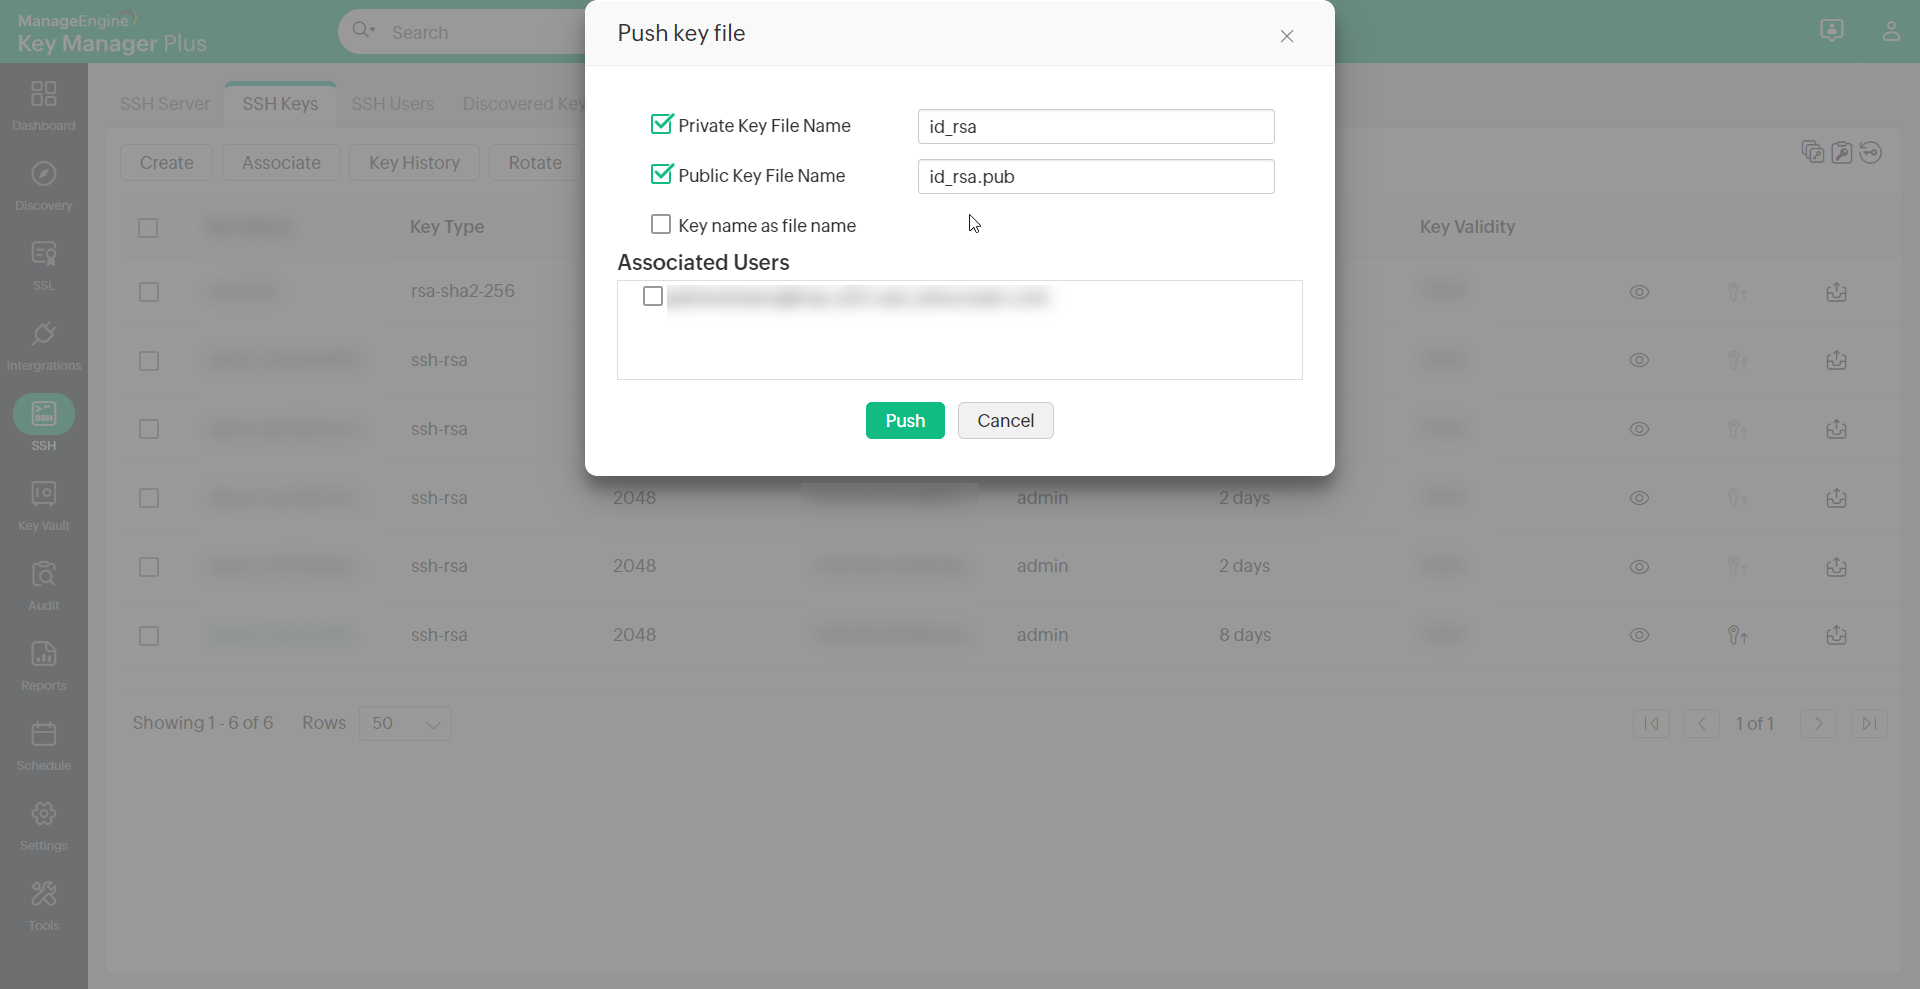
Add commands and restrict host per key
You can add commands to specific user accounts, thereby providing an additional layer of restriction enabling them to only execute the commands on establishing connection with the host. Also you can predefine appropriate key to user relationship by specifying the IP address of the user in the appropriate format (as specified below).
To add command to a public key,
- Navigate to SSH >> SSH Users.
- Click on Add Command from the More option.
- An Add Command dialog box opens up, where you can add commands to be executed in the following format. i.e.,(command="usr/local/bin/script.sh").
To restrict hosts for a key, click on Add Command and provide the name or IP addresses of the hosts in the following format. i.e.,(from="host1/ip1,host2/ip2")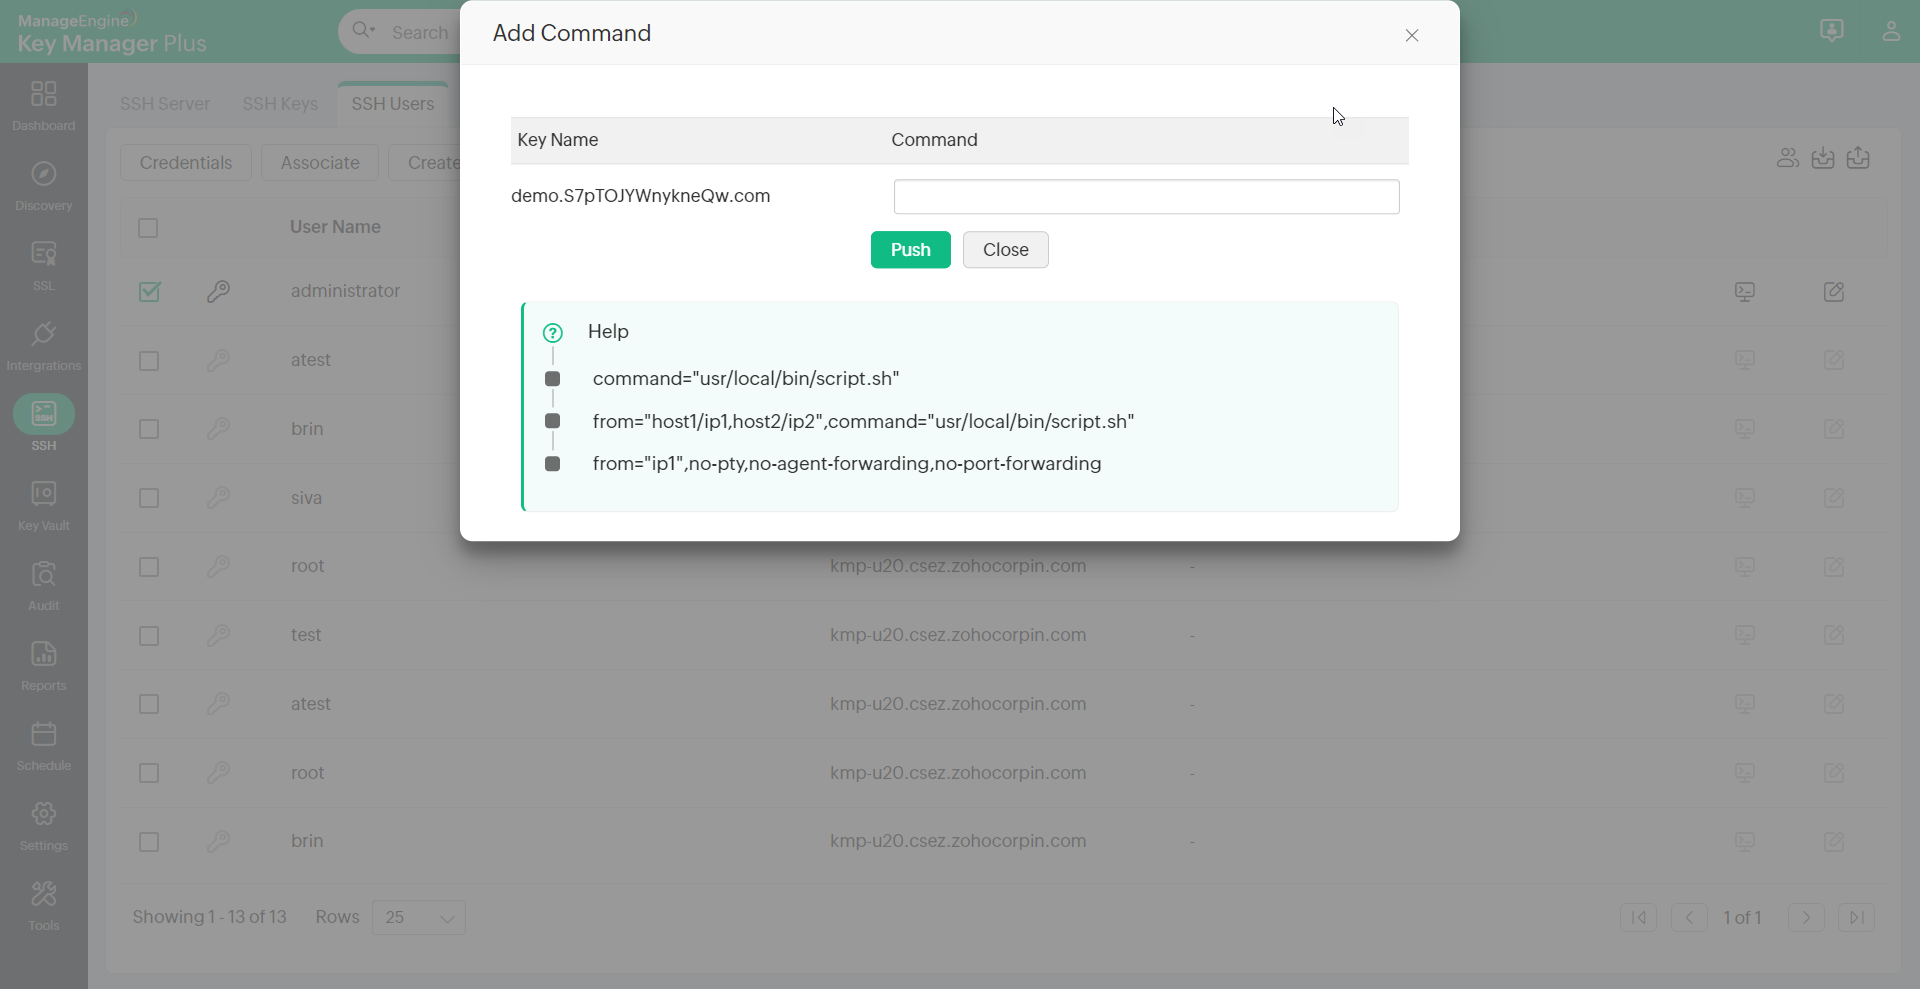
4.4 Edit Authorized Keys File
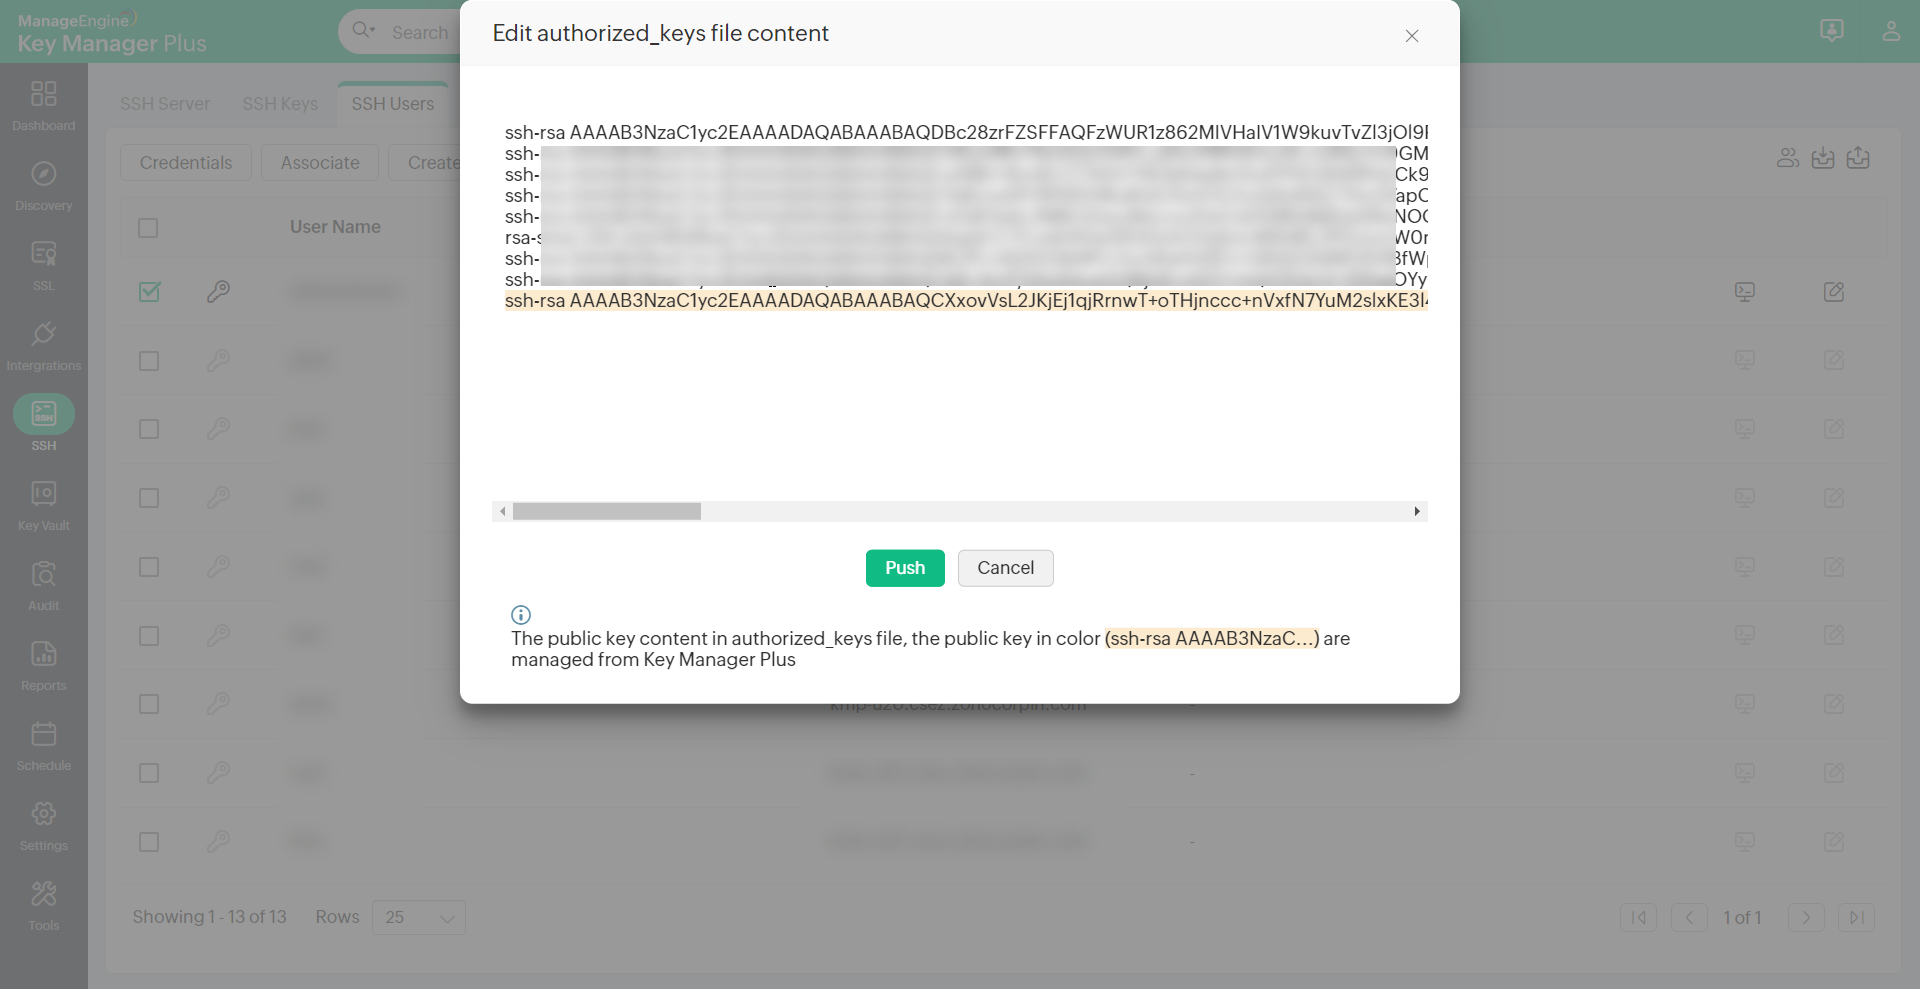
You can fetch authorized_keys files from various user accounts, edit the key content and push them to respective user accounts from Key Manager Plus.
To do this,
- Navigate to SSH >> SSH Users tab
- Select the required user account and click on Edit Key Authorization File icon (
 ) from the extreme right
 - A window opens displaying the list of public keys in the authorized_keys file of the respective user. The keys that are managed using Key Manager Plus are highlighted.
- You can now edit the contents of the keys displayed, and deploy them back to the respective user accounts by clicking the Push button.
4.5 Secure File Transfer
You can securely transfer files from your system to specific user accounts using Secure Copy Protocol (SCP) in Key Manager Plus. To perform secure file transfer,
- Navigate to SSH >> SSH Users
- Select the user account to which the file has to be transferred.
- Click More on the top menu and select Transfer File.
- Browse and upload the file from your system and specify the path in the user account where the file has to be placed.
- Click Transfer. The file is successfully transferred to the specified path in the user account chosen.
Note :
- Since file transfer using SCP is essentially based on SSH, you have to initially associate SSH keys to the required user accounts before transferring files.
- Currently, you can upload a maximum file size of 16MB per transfer.
4.6 Delete Keys
When you try to delete the SSH keys from Key Manager Plus repository, they are first dissociated automatically from their user accounts. Key deletion fails for the SSH keys that are not dissociated from all their user accounts.
To delete the SSH Keys:
- Navigate to the SSH >> SSH Keys tab.
- Select the keys to be deleted.
- Click the Delete button from the More drop-down list.
- Click OK in the confirmation window.
4.7 Launch Terminal Connection
Once you have associated a key with the respective user accounts, you can launch direct connection to the server via Key Manager Plus. You can connect directly from the SSH >> SSH Users tab, by clicking the Connect icon against the required user. You can also navigate to the SSH >> SSH Servers, or the SSH >> SSH Keys tabs, and drill down to the user accounts associated, and then click the Open Connection icon.
A new window will open up with connection established with the required server, using the selected user account.