Help Center
Quick Start
- Overview
- System requirements
- Minimum privileges required
- Default port configuration
- Installing DataSecurity Plus
- Uninstalling DataSecurity Plus
- Starting DataSecurity Plus
- Launching DataSecurity Plus
- Configuring your solution
- Licensing details
- Applying a license
File Auditing
- About File Auditing
- Domain configuration
- File server configuration
- Failover cluster configuration
- NetApp server configuration
- Nutanix server configuration
- Workgroup configuration
Setting up File Audit
Dashboard
Reports
Alerts
Configuration
Storage Configuration
File Analysis
- About File Analysis
- Domain configuration
- File server configuration
- Workgroup configuration
- SMB File Server Configuration
- On-Demand Reports
Setting up File Analysis
Dashboard
Reports
Alerts
Configuration
Data Risk Assessment
- About Data risk assessment
Setting up Data risk assessment
Dashboard
Reports
Ownership analysis
Configuration
Endpoint DLP
- About Endpoint DLP
Setting up Endpoint DLP
Reports
Alerts
Prevention policies
Configuration
Cloud Protection
- About Cloud Protection
- Gateway Server Installation Steps
- Gateway Configuration in Endpoint
- Gateway Cluster Configuration
- Gateway Server Management
- Certificate Authority Configuration
- Two-way SSL configuration
- Manage Certificate Trust Store
- Threat Analytics Database
- Manage Banned Applications
- Manage Authorized Applications
- Regenerating gateway server access key
- Updating gateway server
- Gateway Server Failover
- Load Balancer Configuration
- Global Insight
- Application Insight
- User Insight
- Shadow Application Insight
- Banned Application Insight
- Cloud App Discovery
- File Upload & Download Reports
- Control Policy reports
- General Reports
- Application Insights
- Shadow Domain Insights
- Banned Domain Insights
Setting up Cloud Protection
Dashboard
Reports
Control Policies
Storage Configuration
Administrative settings
- Technician configuration
- Notification filters
- Manage agent
- Agent settings
- SIEM integration
- Business hours configuration
- Two-factor authentication
- Workgroup configuration
- Security policy
Email configuration
General settings
- Connection
- Personalize
- DataSecurity Plus Server
- Privacy Settings
- Disk utilization
- Schedule Retention Policy
Release notes
2026
2025
2024
2023
2022
2021
2020
2019
2018
2017
2016
2015
Troubleshooting
- HTTP communication failure
- Dormant DataEngine
- Secure Gateway server failure
- RPC communication failure
- Cloud Protection Gateway server failure
- Known issues and limitations
- Known errors and solutions
- Report discrepancy in File Analysis
Guides
- Agent document
- How to Migrate/Move DataSecurity Plus
- How to apply SSL certificate
- How to automate DataSecurity Plus database backup
- How to set alerts in DataSecurity Plus
- How to secure your DataSecurity Plus installation
Configuring alerts in the Endpoint DLP module
Default alert profiles
The Endpoint DLP module can be configured to trigger real-time email alerts, execute scripted actions, prevent USB access, and relocate or remove sensitive files from your data repository. Alert conditions in default profiles can be customized and are helpful in identifying critical endpoint actions quickly.
Editing alerts
To view and edit alerts in the Endpoint DLP module, follow the steps below:
- Select Endpoint DLP from the modules drop-down.
- Go to Configuration > Audit/Alert Profiles > Alert Configuration. Here, you will find preconfigured alerts in the File Integrity Monitor, Removable Storage, Printer, Clipboard, Email Client, Web, File Share, and Network Share categories.
- Click the edit icon option next to an alert profile to see its parameters.
- In the Criteria section, use the following tabs to narrow down the criteria that trigger an alert:
- 4.1. Use the Include tab to select the entities you want to create an alert for.
- 4.2. Use the Exclude tab to exempt trusted entities from the alert.
- 4.3. Use the Threshold tab if you want to configure a threshold-based alert (i.e., to trigger an alert when the number of events occurring within a given duration exceeds the specified value). Click Enable and configure the number of events from a source beyond which the alert should be triggered (for example, 1700 = Events in: = 2 = Minutes by: = Same User).
- 4.4. Use the Response tab to do the following:
- Click Email > Enable email notification.
- Provide the email addresses that you wish to send the alert email to. Separate the addresses with commas. Ensure that there are no spaces in the email addresses.
- Assign a Priority level to the email.
- Personalize the email by providing a Subject and Message. By using the Customize option next to each, you can include alert details such as the User Name and Source.
- If necessary, you can limit the number of emails that will be sent to each recipient by configuring an appropriate value in the Send a maximum of section. For example, if you have configured a threshold-based alert for 10,000 access events in one minute, and you set this section to Send a maximum of = 1 = mail(s) in = 1 = Hour(s), after the initial alert, one email will be sent every hour if the unusual access trend continues.
- Click Script > Enable Script.
- In the Script Files field, select the script of your choice. You can choose from the built-in scripts or create your own.
- In the Arguments field, select the arguments in the intended order of execution.
- From the Response tab, click Block USB > Enable block USB.
- Select Block all external storage devices if you want to block all USB devices from being used on the source machine. Select Block only the source device if you want to block the USB device that triggered the alert.
- From the Response tab, click Move/Delete > Enable Move/Delete.
- Select Delete if you want to delete an entity. Otherwise, select Move and provide the Destination Path to which you want to move the entity that triggered the alert.
- From the Response tab, click User prompt > Enable User prompt.
- Select Allow or Block to warn users about policy violations.
- Once you have chosen one or multiple responses, click Save.
4.4.1. To send an email notification to a stakeholder:
4.4.2. To automate a response action when the alert is triggered:
4.4.3. To block USB devices (applicable only for Removable Storage profiles):
4.4.4. To enable the move and delete responses (applicable only for Clipboard profiles):
4.4.5. To enable the user prompt (applicable only for Email Client profiles):
\\MachineName\HiddenDriveShare\
\\MachineName\Share\Folder\
Example 1: To move a file to the folder Myfolder on drive C on server S01, configure the destination path as \\S01\C$\Myfolder.
Example 2: To move a file to the folder Myfolder in the share Myshare on server S01, configure the destination path as \\S01\Myshare\Myfolder.
For example, to disable a user account through which ransomware is encrypting file extensions on the server, configure an alert using the details below:
Include: User Object = In = ALL
Action = In = File Extension Change
File Type Category = In = Ransomware Encrypted Files
FIM Folder = Equals = True
Script Files: disableADAccount
Arguments: User Name
Automated alert responses
Users can instruct the Endpoint DLP module to execute a scripted response action when an alert is triggered. For this, you must link the desired script file in the Script Files field while configuring alerts. The script files can be PowerShell files, VBScript files, executables, and batch files. These automated, versatile responses help you perform remedial actions the instant a security incident is detected, reducing the damage caused.
To target these commands at specific entities in your network, configure one or more Arguments to provide the necessary inputs in the commands. The selected parameters will be replaced in the commands by the corresponding values from the alert event.
Arguments and their descriptions
The arguments below can be used based on the alert profile configured.
| Alert profile name | Applicable argument | What it refers to | Example (How it will be displayed in the alert notification) |
|
Violated Profile | The name of the DLP profile for which the alert was triggered | File Integrity Monitoring - File System |
|
User Name | The sAMAccountName of the user who performed the action | John |
|
Source | The name of the file server or machine where the file resides | DESKTOP-BPFJEIS |
|
File Size | The size of the file when the alert event occurred | 163840 [In bytes] |
|
Creation Time | The exact time at which the user created the file | 1671235784 [Unix epoch timestamp] |
|
Last Access Time | The most recent time at which the file was accessed | 1672305065 [Unix epoch timestamp] |
|
Last Modified Time | The most recent time at which the file was modified | 1672305065 [Unix epoch timestamp] |
|
Message | The action performed on the file | Modify |
|
Location | The local path of the file for which the event was generated | C:\DSPDEMO\myfile.txt or \\DSP-DEMO\Test\ExcludeConf.txt |
|
Location | The network path of the file for which the event was generated | \\DSP-DEMO\Test\ExcludeConf.txt |
|
New File Name | The new name or location of the file after the action was performed | C:\DSPDEMO\testing\myfile.txt |
|
New File Name | The new network path of the file after the action was performed | \\DSP-DEMO\Test\IncludeConf.txt |
|
Process Name | The name and the full path of the process that carried out the file action | C:\Program Files\Mozilla Firefox\firefox.exe |
|
Client Host | The name of the client machine from which the file action was initiated | ADMANMS1 |
|
USB Event | Whether the action was performed on the USB or not | false |
|
Time Generated | The time at which the file operation was made by the user | 1672305065 [In milliseconds] |
|
Attachment File Name | The names of the files sent as attachments | Employee details.docx |
|
Attachment File Size | The cumulative size of the files sent as attachments | 456378 [In bytes] |
|
Attachment Classification | The classification value marked for the attached files | Internal |
|
Mail Classification | The mail classification value set by the user or derived from the attachment, if applicable | Restricted |
|
Mail From | The email address of the user who sent the email | john@dsp.com |
|
Mail To | The descriptive names of the email recipients | sebastian@dsp.com |
|
Mail CC | The email addresses of the secondary recipients, to whom a copy of the email is sent: The email CC can contain no addresses, one address, or many addresses | steve@dsp.com |
|
Mail BCC | The secondary recipients' email addresses, which are invisible to the other recipients of the email: The email BCC can contain no addresses, one address, or many addresses | rachel@dsp.com |
|
Mail Subject | The concise description given at the top of the email to describe its purpose or content | Regarding sensitive data |
|
Mail Sent Time | The time at which the email was sent | 1672305065 [In milliseconds] |
|
Is Network Copy | Whether or not the file was copied from a network share | false |
|
Copy Source | The share path or the location where the file was copied from | DESKTOP-BPFJEIS |
|
Printer Name | The name of the destination printer | Lexmark MS317dn |
|
Notify Name | The name of the user who has printed | Charlie-18670 |
|
Total Pages | The total number of pages printed | 1 |
|
Device Instance Path | The unique ID given by Windows to the external hardware device on which the action was performed | USBSTOR\DISK&VEN_SANDISK&PROD_CRUZER_BLADE&REV_1.00\4C530001040815117131&0 |
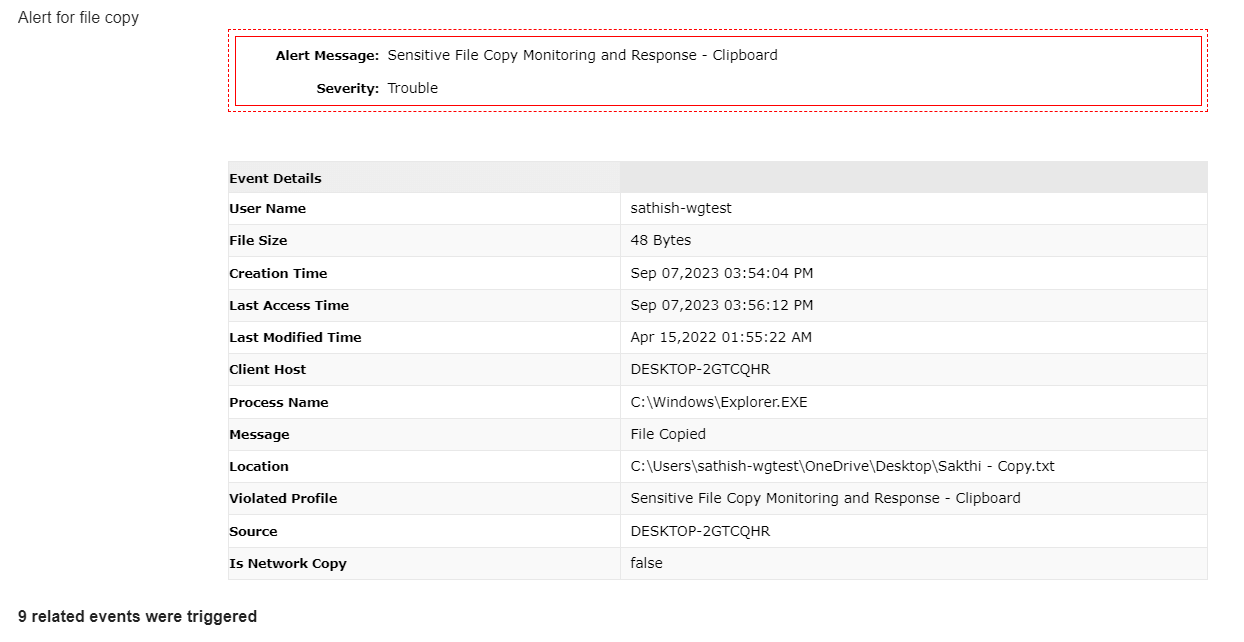
Example of a notification email for a triggered alert
Default script responses
The DataSecurity Plus installation package contains some built-in scripts for commonly used response actions. Some of these are listed below:
| Script file name | Script action | Applicable arguments in the UI | Sample use case |
| disableADAccount.ps1 | *Disables AD accounts | User Name | This can be used to disable the source user account of the file change that triggered the alert. |
| disableNetwork.ps1 | Disables network access on machines | Client Host or Source | This can be used to disable network access on the source machine of the file change that triggered the alert. |
| triggerShutdown.bat | Shuts down computers or servers | Client Host or Source | This can be used to shut down the source machine of the alert-triggering file action. In case of a ransomware attack or data breach, the Source argument or the Client Host argument can be used to stop the spread of the incident by shutting down the affected server. |
| ransomwareResponse.ps1 | *Locks out the source user account, ends the user session, and shuts down the host machine, provided the host machine and the DataSecurity Plus server belong to the same network | User Name, Client Host, and Source | When a potential ransomware attack is launched, this response script will prevent the ransomware from spreading by isolating the contaminated machine, locking out the user, ending the user's session, and shutting down the host machine. |
*The below services need to be enabled in the machine where DataSecurity Plus is installed for the successful execution of certain script files.
- Windows Remote Management
- Type Services in the Start Menu and open the Services window.
- Select the Windows Remote Management (WS - Management) service.
- In the left pane of the window, under Services (Local), click Start the service.
- RSAT: Active Directory Domain Services and Lightweight Directory Services Tools
- Type Apps & features in the Start Menu.
- Select Optional features and click Add a feature in the top-left corner.
- Type RSAT: Active Directory Domain Services and Lightweight Directory Services Tools in the search bar, select it, and click Install.
Generating a password for alert scripts
We recommend generating an encrypted password for your script files, which is used for authentication when executing the intended scripts. To set a password, follow these instructions:
- Navigate to [installation_directory]\bin\alertScripts > helper folder.
- Execute the generatePassword.bat script to set up authentication.
- In the Windows PowerShell credentials request window, enter your PowerShell credentials beside the User name and Password fields to generate an encrypted password. Ensure that you give the correct password to authenticate the server.
- Click OK.
Disabling alerts
You can disable an alert to temporarily stop it from being triggered. To disable an existing alert:
- Select Endpoint DLP from the modules drop-down.
- Go to Configuration > Audit/Alert Profiles > Alert Configuration.
- On the Alert Profile page, within the Actions column, you'll find a green icon indicating the target alert's active status. Click the green icon to disable that alert.
For more information on configuring alerts in DataSecurity Plus, refer to this guide.