Integration with Let's Encrypt CA
Maintaining a threat-free network requires much more than just securing your domains with SSL certificates. For organizations that deal with a large SSL environment, the process of purchasing, deploying and renewing SSL certificates often proves to be cumbersome, time-consuming and has hardly been straightforward. Oversight, manual errors, improper configuration, weak ciphers, and expiration often lead to downtimes, compliance issues and security breaches. Certificate life-cycle management is a practice that streamlines certificate management process by automating acquisition, issue, deployment, re-issue, renewal and revoking of certificates. Key Manager Plus facilitates end-to-end certificate life-cycle management for your public facing websites by integrating with the renowned open Certificate Authority, Let's Encrypt. This means you can procure domain validated certificates from Let's Encrypt for your public domains, deploy, track, request alerts on expiry, renew certificates; everything done entirely from the product interface.
You can request, procure, deploy, monitor, track and renew certificates from Let's Encrypt CA directly from Key Manager Plus interface.
Before you proceed with the integration, complete the following step as a prerequisite:
Prerequisite
Add the following base URL and port as an exception in your firewall or proxy to ensure Key Manager Plus is able to connect to Let's Encrypt's CA Services.
URL: https://acme-v02.api.letsencrypt.org/acme/
Port: 443
Follow the step-by-step procedure below to integrate Let's Encrypt with Key Manager Plus:
1. Create a Let's Encrypt Account
The first step in requesting for certificates from Let's Encrypt CA is creating an account with Let's Encrypt. This is a one-time process and can be done from Key Manager Plus interface itself.
To create Let's Encrypt account,
- Navigate to Integrations >> ACME Integrations >> Let's Encrypt >> Manage.
- Under Account tab, click New Registration.
- In the UI that opens, provide an account name and specify a valid e-mail address. Choose either Production or Staging, based on the URL you will be using.
- Accept the Let's Encrypt Subscriber Agreement by enabling the check-box.
- Click Register.
- An account with Let's Encrypt is created.
Once your account is created, you can update the account email address, delete it from Key Manager Plus, or deactivate the account entirely. Please note that deleting the account only removes it from Key Manager Plus. Even if you delete the account here, it will still be active in the Let's Encrypt portal. To add the same account back to Key Manager Plus, export the key and use the Add Account option with the same details used before. However, if you select the Deactivate option while deleting the account, then the Let's Encrypt account will be removed completely and you cannot add it back to Key Manager Plus with the same details.
Note: This privilege is available for only the administrator users and only one Let's Encrypt account can be created from Key Manager Plus.

2. Raise a Certificate Request
After creating an account with Let's Encrypt, you have to generate a certificate request. You are then presented with a challenge which you have to fulfill in order for Let's Encrypt to validate your domain and issue the certificate.
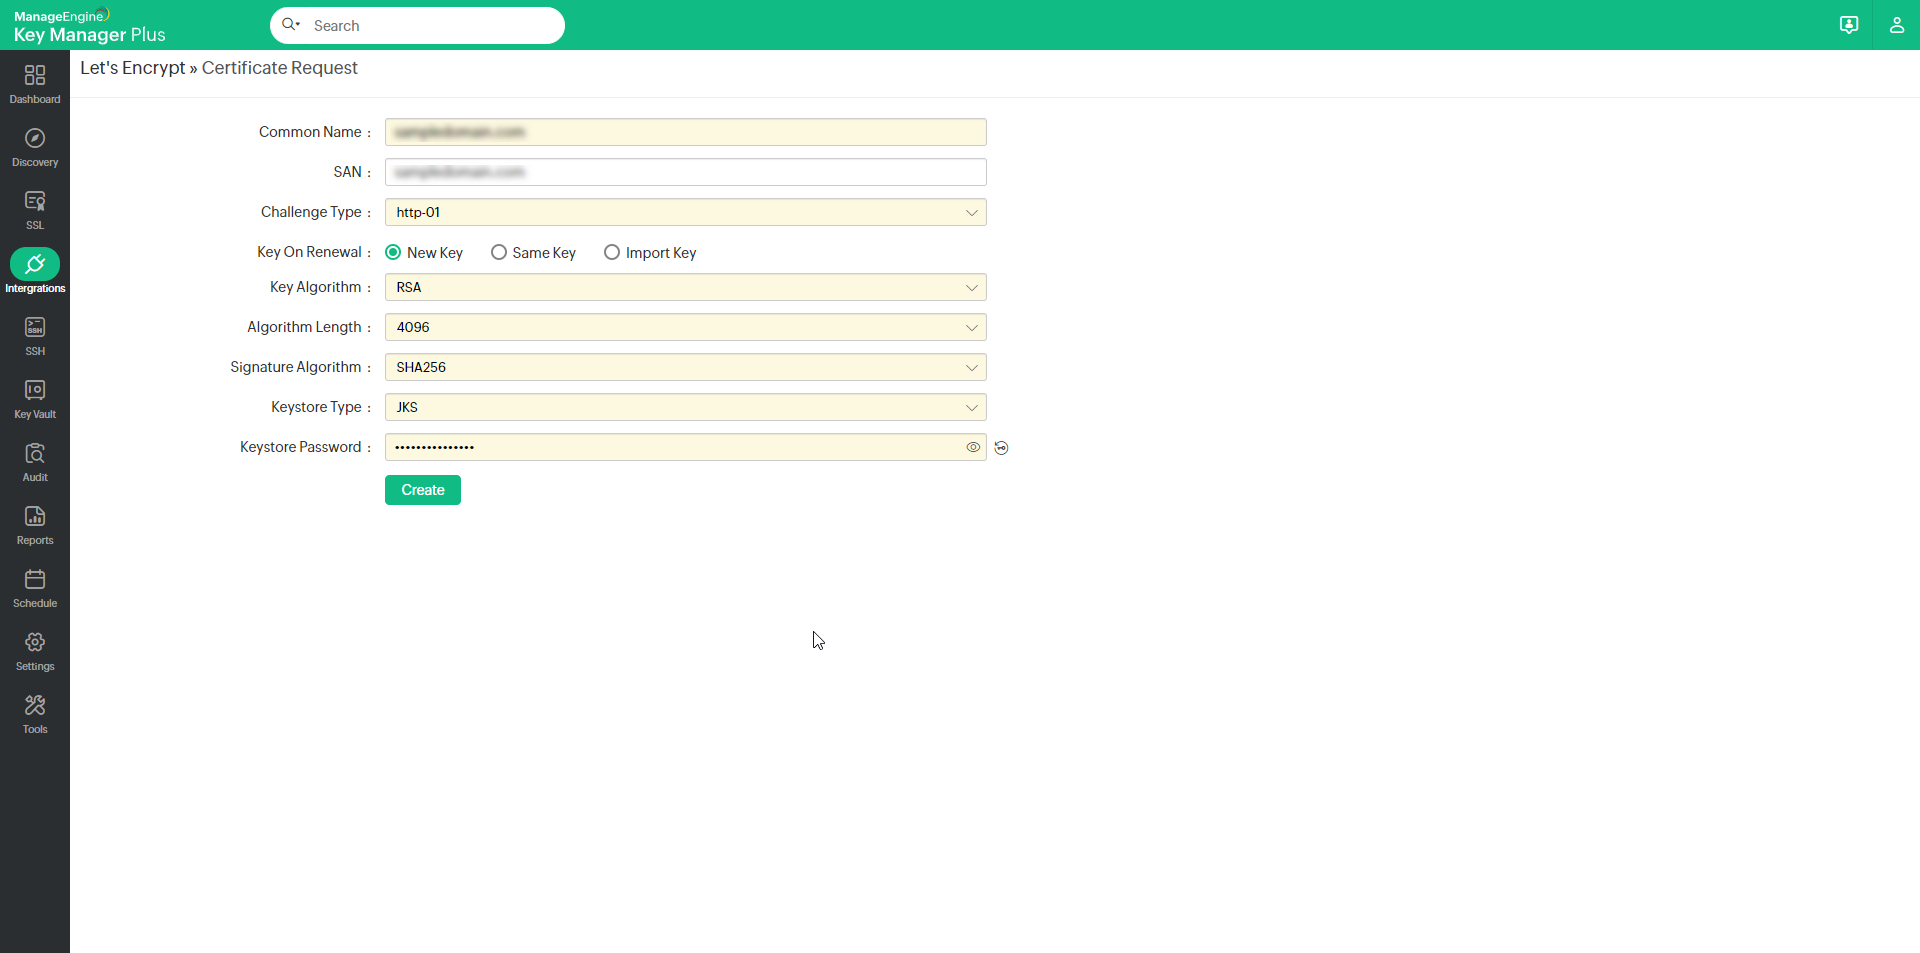
- Navigate to Integrations >> ACME Integrations >> Let's Encrypt.
- Click Certificate Request.
- Fill in the domain name, select the challenge type, choose the key algorithm, algorithm length, signature algorithm, keystore type, enter the keystore password and click Create.
- For dns-01 challenge type, you can choose and assign a DNS account from the drop-down if you have already configured your DNS credentials. This will be used for automatic challenge verification for all the domains specified in the request.
- Also, you have options to change the private key whenever the certificate is renewed.
- If you need to change the key, use New Key. This option will generate a new key every time the certificate is renewed.
- If you want to retain the same key on renewal, use the Same Key option.
- To use your own key, use the Import Key option. This key will be used for the first time when the certificate is generated and also for subsequent renewals.
Note: Key Manager Plus supports wildcard certificate requests for DNS based challenges. For wildcard certificate requests, enter the common name in the format *.domainname.com
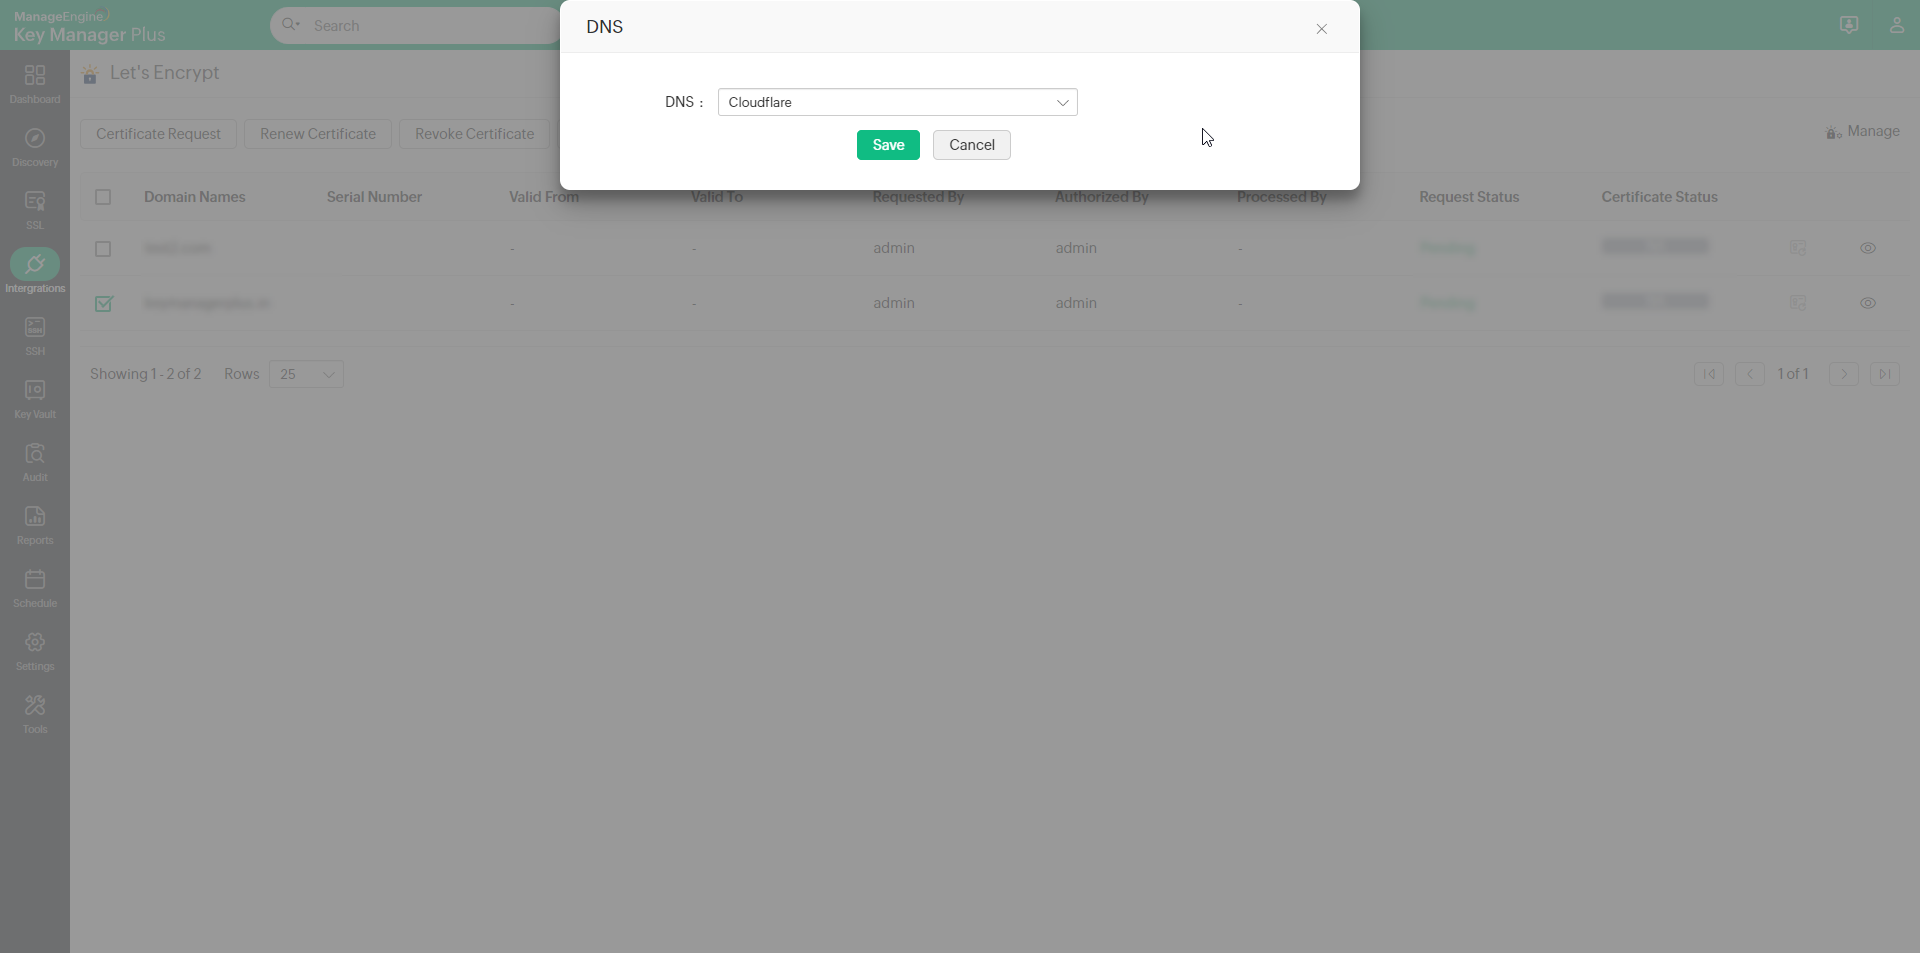
To configure your DNS account,
- Navigate to Let's Encrypt >> Manage
- Switch to the DNS tab.
- Here, you can add a maximum of one DNS account for each DNS provider supported. Key Manager Plus currently supports automatic challenge verification for Azure DNS, CloudFlare DNS, and Amazon Route 53 DNS, RFC2136 DNS update (nsupdate), GoDaddy DNS, and ClouDNS.
- Click Add. In the pop-up that opens, choose the DNS provider.
2.1 Azure DNS
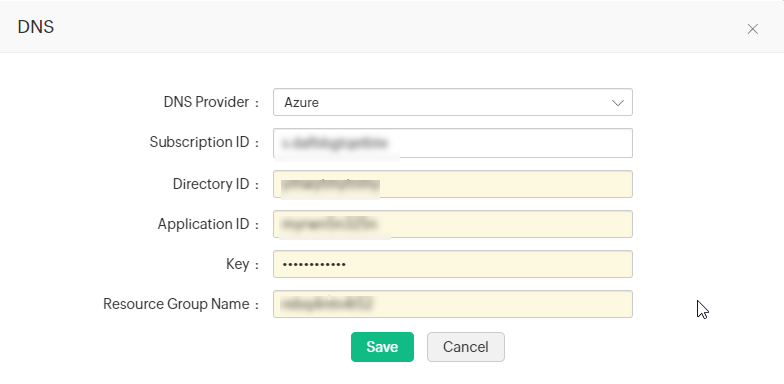
- Provide the Subscription ID, which is available in the Overview page of the Azure DNS zone.
- Provide the Directory ID, which is available in Azure Active Directory >> Properties.
- If you have an already existing Azure application, provide its Application ID and Key.
- If not, follow the steps mentioned in this document to create the Azure application and key, and give the application access to the DNS zones for making API calls.
- Finally, enter the Resource Group Name, which is the group name in which you have created the DNS zone and click Save.
- Your DNS account details are saved and listed under Manage >> DNS.
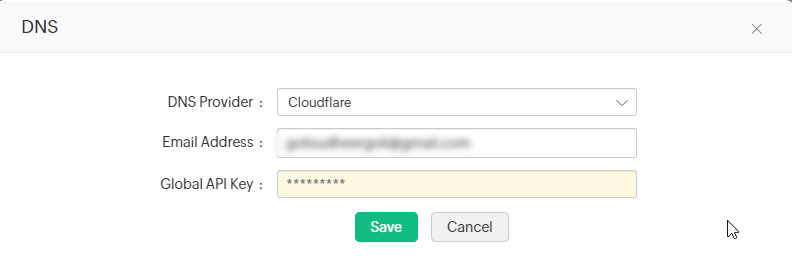
2.2 Cloudflare DNS
- In the Email address field, specify the email address associated with the Cloudflare account.
- For Global API Key, use the 'Generate API' key option in the domain overview page of the Cloudflare DNS to generate the key and paste the value in this field.
- Click Save. Your DNS account details are saved and listed under Manage >> DNS.
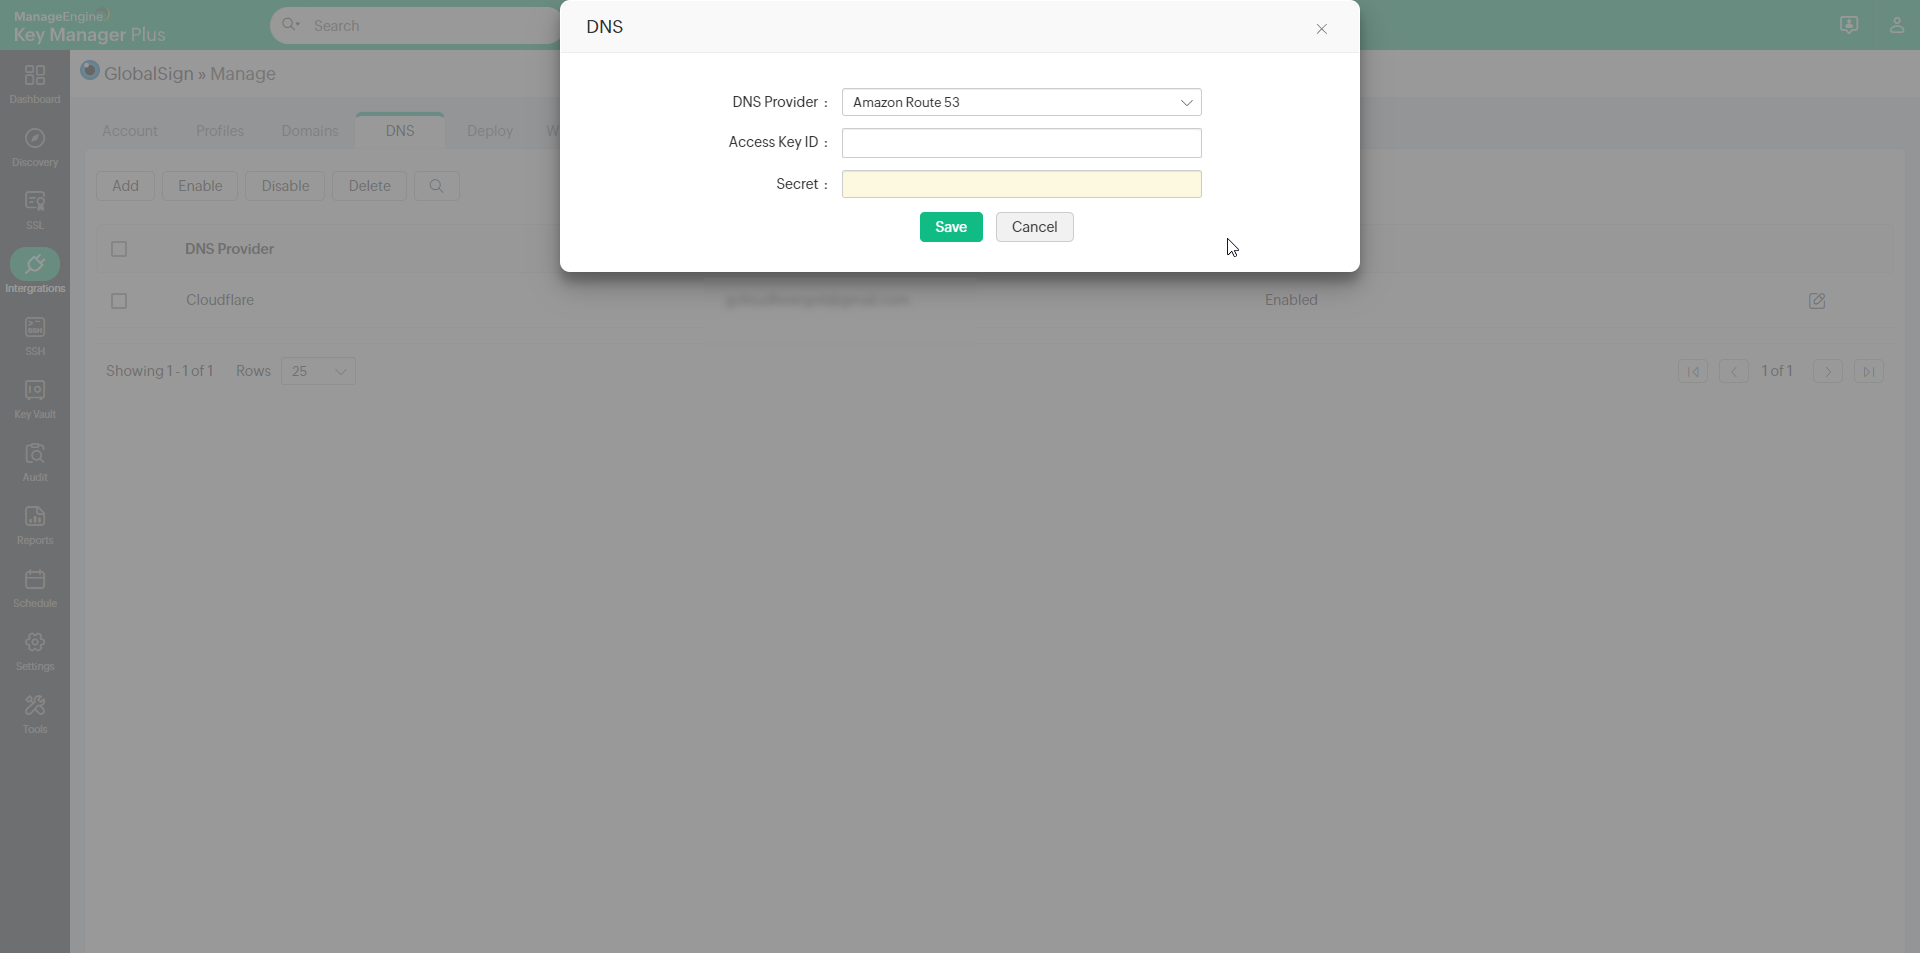
2.3 AWS Route 53 DNS
- Generate and specify the Access Key ID and Secret associated with your AWS account.
- If you do not have an AWS account, create one and generate the Access Key ID and Secret by following the steps given below:
- Login to the AWS console and navigate to IAM Services >>Users.
- Click Add user.
- Provide the user name and select the access type as Programmatic access.
- Switch to the next tab, click Attach existing policies directly under Set Permissions and search for "AmazonRoute53FullAccess".
- Assign the policy that is listed and switch to the next tab.
- In the tags section, add appropriate tags (optional) and switch to the next tab.
- Review all the information entered and click Create user.
- The user account is created and subsequently, an access key ID and a secret is generated. Copy and save the key ID and secret in a secure location for it will not be displayed again.
- If you already have an AWS user account, you have to grant "AmazonRoute53FullAccess" permission to the user and generate the access key if the user doesn't have one. And if the user account has an access key associated already, it is just enough to ensure the required permission is granted.
To grant the required permissions:
- Navigate to the Permissions tab, select the required user account and click Add Permission.
- Click Attach existing policies directly under Set Permissions and search for "AmazonRoute53FullAccess".
- Assign the listed policy and hit Save.
- To generate the access key,
- Select the particular user account and navigate to the Security Credentials tab.
- In the window that opens, click Create access key.
- An access key ID and a secret is generated. Copy and save the key ID and secret in a secure location for it will not be displayed again.
2.4 RFC2136 DNS Update
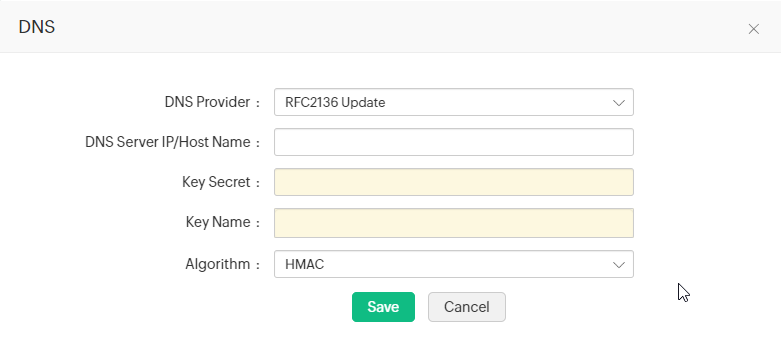
If you are using open source DNS servers such as Bind, PowerDNS etc., that support RFC2136 DNS update, follow the steps below to automate DNS-based domain control validation procedure using Key Manager Plus.
- Mention the DNS Server IP / Hostname represents the server name / IP address in which the DNS server is installed or running.
- These details are usually found in the server installation directory. For instance, in the case of Bind9 DNS server, you can find these in the file named.local.conf in the server installation directory.
- Provide the Key Secret, which is nothing but the key content found in the server installation directory.
- Provide a name for the key, and choose the signature algorithm.
- Click Save.
2.5 GoDaddy DNS
If you are using GoDaddy DNS for DNS validation, follow the steps below to automate DNS-based domain control validation procedure using Key Manager Plus:
Steps to Obtain GoDaddy API Credentials:
- Go to the GoDaddy developer portal and switch to the API keys tab.
- Log in to your GoDaddy account if you aren't logged in already.
- Once you log in, you will be redirected to the API keys page where you can create and manage API keys.
- Click Create New API key.
- Provide your application name, choose the environment type as Production and click Next.
- The API key and its secret is generated. Copy and save the secret in a secure location, as it will not be displayed again.
Now, in Key Manager Plus interface, follow the below steps to add GoDaddy DNS to Let's Encrypt CA:
- Navigate to Integrations >> ACME Integrations >> Let's Encrypt and click Manage from the right most corner.
- Switch to the DNS tab and click Add.
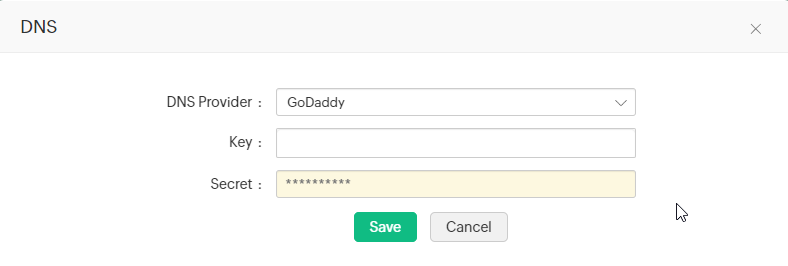
- Choose GoDaddy from the DNS Provider drop-down.
- Enter the Key and Secret that was previously generated from the GoDaddy portal.
- Click Save.
2.6 ClouDNS
If you are using ClouDNS for DNS validation, follow the steps below to automate the DNS-based domain control validation procedure using Key Manager Plus:
Steps to Obtain ClouDNS API Credentials:
- Login to your ClouDNS account and go to Reseller API.
- If you have already created an API user id, you will find it under API Users. If not, click Create API to generate a new one.
Click here to learn more about ClouDNS API Auth IDs.
Now, in the Key Manager Plus interface, follow the below steps to add ClouDNS to Let's Encrypt CA:
- Navigate to Integrations >> ACME Integrations >> Let's Encrypt and click Manage from the right most corner.
- Switch to the DNS tab and click Add.
- Choose ClouDNS from the DNS Provider drop-down.
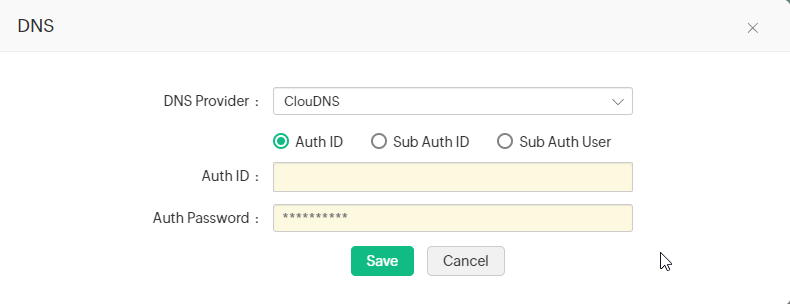
- Choose one of the following options: Auth ID, Sub Auth ID, Sub Auth User.
- Enter the chosen ClouDNS Auth ID, its respective Auth Password, and click Save.
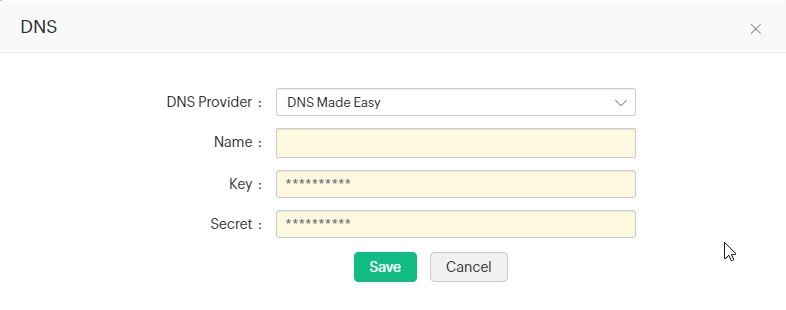
2.7 DNS Made Easy
- Enter the name of your choice in the Name field.
- The Key and the Secret will be available in the DNS Made Easy webpage under Config >> Account Information. Enter those details in the respective fields.
- Now, click Save to save your DNS account details. The saved DNS details will be listed under Manage >>DNS.
Notes:
- One certificate can secure up to 100 domains. You can enter a maximum of 100 names in the 'domain name' field out of which the first name is considered as the common name and the rest are treated as Subject Alternative Names (SAN).
- Key Manager plus supports http-01 and dns-01 based domain validations. Choose the challenge type based on your requirements.
- For dns-01 based domain validation, if you are using your configured DNS account for challenge verification, make sure that the status of the chosen DNS account is marked Enabled under Manage >>DNS.
- Option to change the private key currently works only with the RSA key algorithm.
3. Let's Encrypt Challenge Verification
Key Manager Plus expedites domain validation through automatic verification of HTTP-01 and DNS-01 challenges (currently Azure, Cloudflare, Amazon Route 53, RFC2136 DNS update, GoDaddy DNS, ClouDNS). For the automation to take effect, you have to initially map the end-server details to Key Manager Plus, which is a one-time process.
1. Domain validation through HTTP-01 challenge verification
For domain validation through http-01 challenge,
- A window opens displaying the challenge to be fulfilled.
- Click the Agent mapping icon(
 ).
). - A pop up will open. If the domain server is a Linux machine, fill in the required details and click Save.
- If the domain server is a Windows machine, download and install the Key Manager Plus agent for Windows server using the steps mentioned below:
Downloading Key Manager Plus agent for Windows servers:
The Key Manager Plus agent package is a zip file comprising of the necessary executables, configuration files required for automatic verification of Let's Encrypt challenges through automatic domain validation. You have to just unzip and install the agent on your Windows domain server after download. To download the agent,
- Navigate to Integrations >> ACME Integrations >> Let's Encrypt, and click the Manage button in the top right corner.
- Switch to the Windows agents tab.
- Download the Key Manager Plus agent from the top right corner of the window based on your server compatibility (32 bit or 64 bit).
Installing Key Manager Plus agents for Windows server:
To install Key Manager Plus agent as a Windows service,
- Open the command prompt and navigate to the Key Manager Plus installation directory.
- Execute the command 'AgentInstaller.exe start.'
To stop the agent and uninstall the Windows service,
- Open the command prompt and navigate to the Key Manager Plus installation directory.
- Execute the command 'AgentInstaller.exe stop.'
- If the domain server is a Windows machine, download and install the Windows agent on the domain server. Navigate to Manage >> Windows agents, download and install the agent on the domain server.
- Once, the above agent mapping settings are configured (agent mapping is a one-time configuration), Key Manager Plus automatically handles the verification of challenges presented by Let's Encrypt.
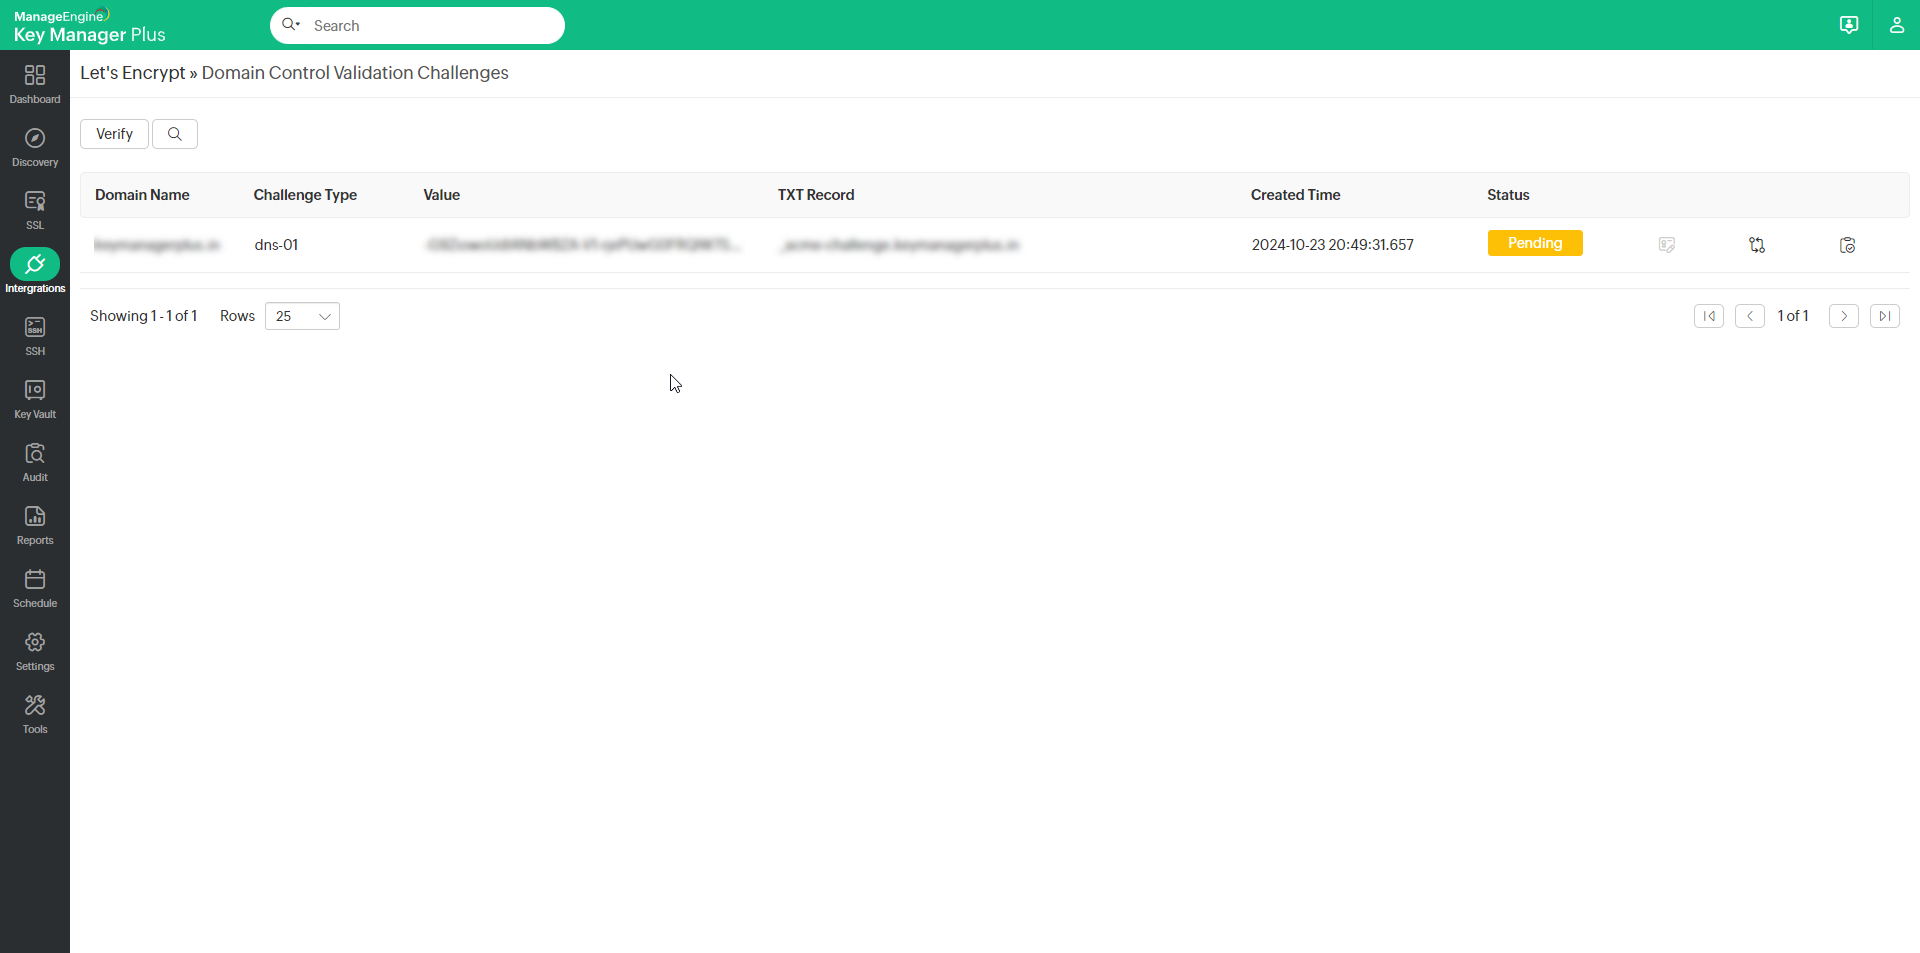
- After configuring agent mapping, click Pending on the pending requests and click Verify. The challenge is verified and certificate request is submitted to Let's Encrypt CA.
2. Domain validation through DNS-01 challenge verification
For DNS-01 challenge verification from Key Manager Plus,
- Switch to Let's Encrypt tab and click on the request status (Pending) corresponding to the certificate request.
- You'll be directed to a window that displays the DNS challenge value and TXT record.
- If you have already configured your DNS account details and have opted for DNS while creating the certificate request, you can assign the DNS account to the request.
- Select the request, choose Assign DNS from More top menu and select the required DNS account.
- In cases where you do not have a DNS account configured or have not opted for it when raising the certificate request, Key Manager Plus provides an option for automating DNS-01 challenge verification through Agent Mapping.
- Click on the Agent Mapping icon present to the left side of the request. Agent mapping is a one-time configuration.
Agent Mapping
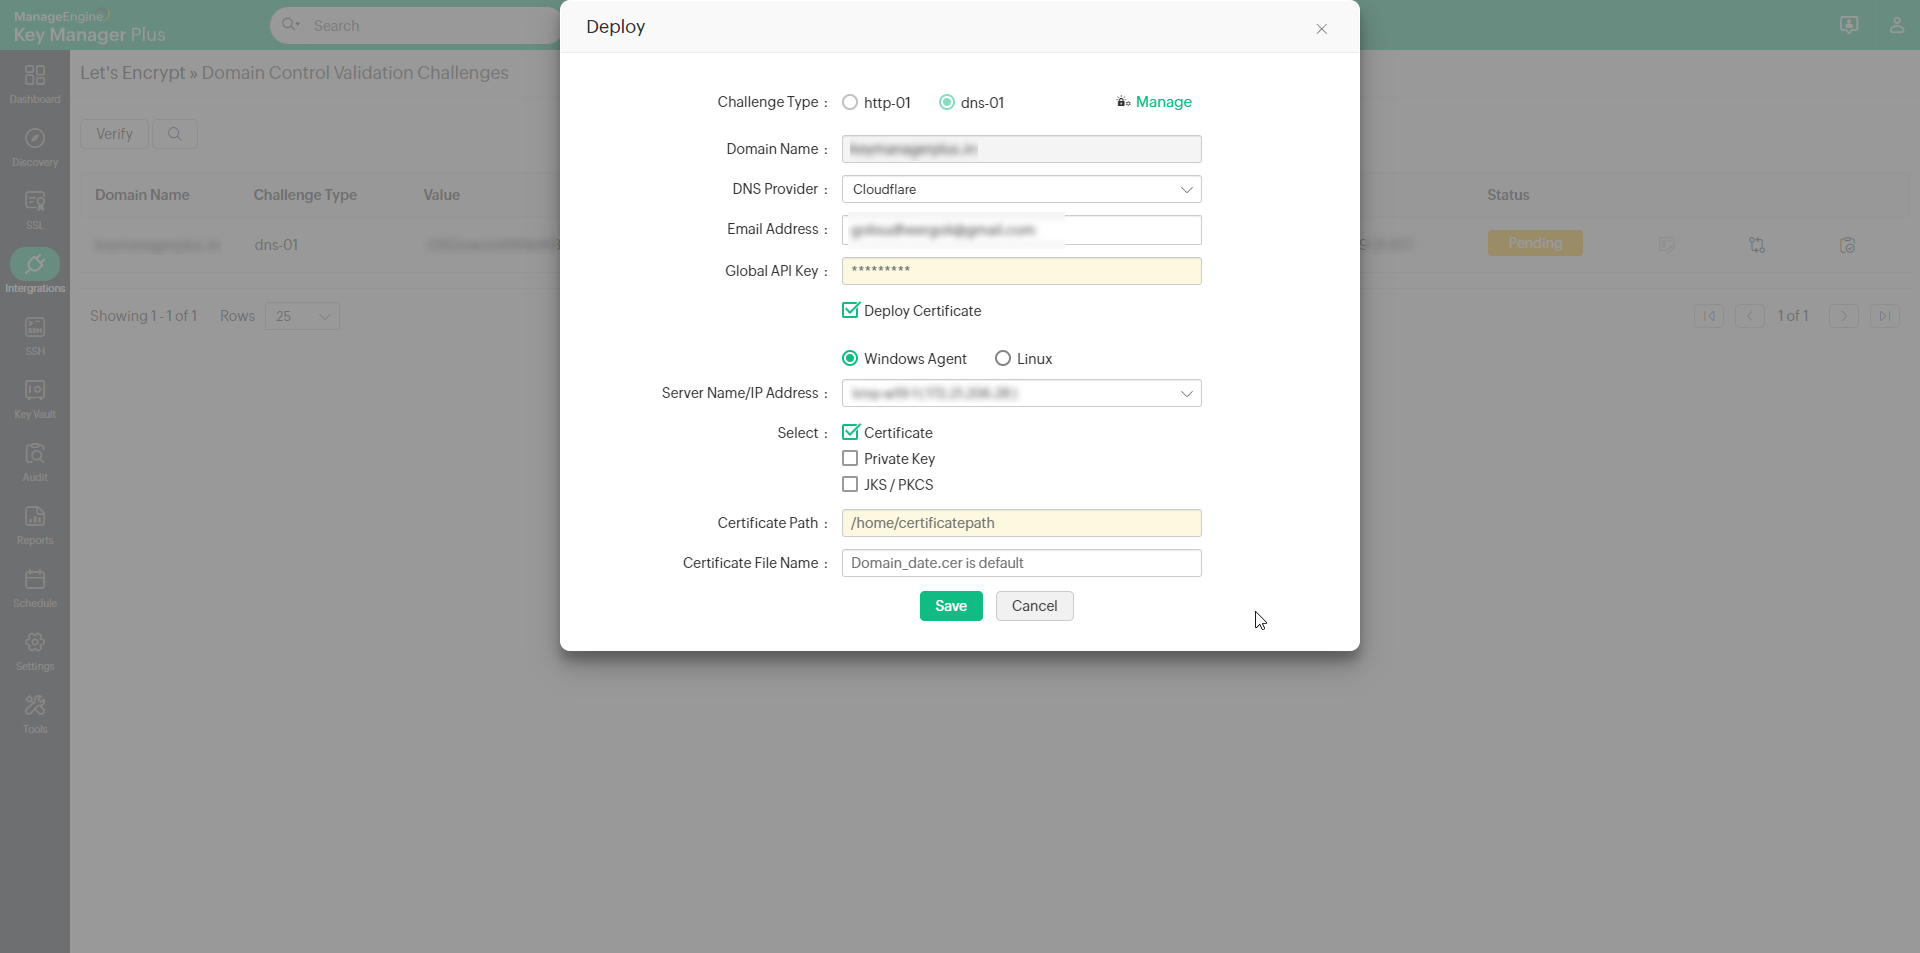
In the Deploy window that opens, carry out the following operations to map and save your end-server details in Key Manager Plus.
- Choose your DNS provider. For Azure DNS, provide the required details—subscription ID, directory ID, application ID, application key and resource group name.
- For Cloudflare DNS, enter the email address associated with your Cloudflare account and the Global API key.
- For Amazon Route 53 DNS, enter the Access Key ID and Secret associated with your AWS account.
- Enable the Deploy Certificate check-box to automate deployment of the certificate to their corresponding end-servers after domain validation and after successive renewals.
- For linux end-servers provide the required details, while for Windows end-servers download and install the Windows agent using the same procedure as mentioned for http-01 challenge.
- After filling in the details, click Save. The end-server details are successfully mapped and stored in Key Manager Plus, which you can view or edit from Manage >> Deploy tab.
Notes:
- You can request and acquire certificates only for public domains using Let's Encrypt integration.
- The handling of challenges can also be done manually without automation. Copy and paste the challenge values / text records manually in your domain server. Then in the Key Manager Plus server, navigate to Pending Requests page and click Verify. The challenge is verified and certificate is issued.
- Key Manager Plus automates challenge verification using DNS for a certificate request only when Agent mapping is not available. Challenge verification is automated through agents, if agent details are available in Manage >> Deploy tab.
- Currently, Key Manager Plus agents are only available for Windows servers.
- For RFC2136 DNS update, if you have opted Global DNS configuration, the domain name itself acts as the zone name (Global DNS configuration is possible only if you are using the same Key Secret for all zones). Whereas, if you have opted domain-agent mapping, you have to provide the Zone name, Key Name, and Key Secret for each domain separately.
4. Procure and Save the Certificate
- On successful verification, Let's Encrypt issues the requested certificate.
- The window automatically redirects to a page which displays the certificate and its status (status is marked Available, if the challenge verification is successful and Failed if the challenge verification fails).
- Click the Available button to save the certificate in Key Manager Plus repository, e-mail or export it.
- If the challenge fails, click New challenge(
 ) to obtain another set of challenges and repeat the above process.
 - On saving, the certificate gets added to the Key Manager Plus repository which can be viewed from the SSL >> Certificates tab.

5. Renew Certificates
Certificates issued by Let's Encrypt have a life-time of ninety days after which they are not valid. Also, as mentioned above, the domain authentication validity period is sixty days, which means that the user has to fulfill the challenges once in every sixty days in order to prove his ownership of the domain.
Certificate renewals can be carried out manually or automatically through automatic domain validation. To renew a certificate manually,
5.1 Certificate Renewal
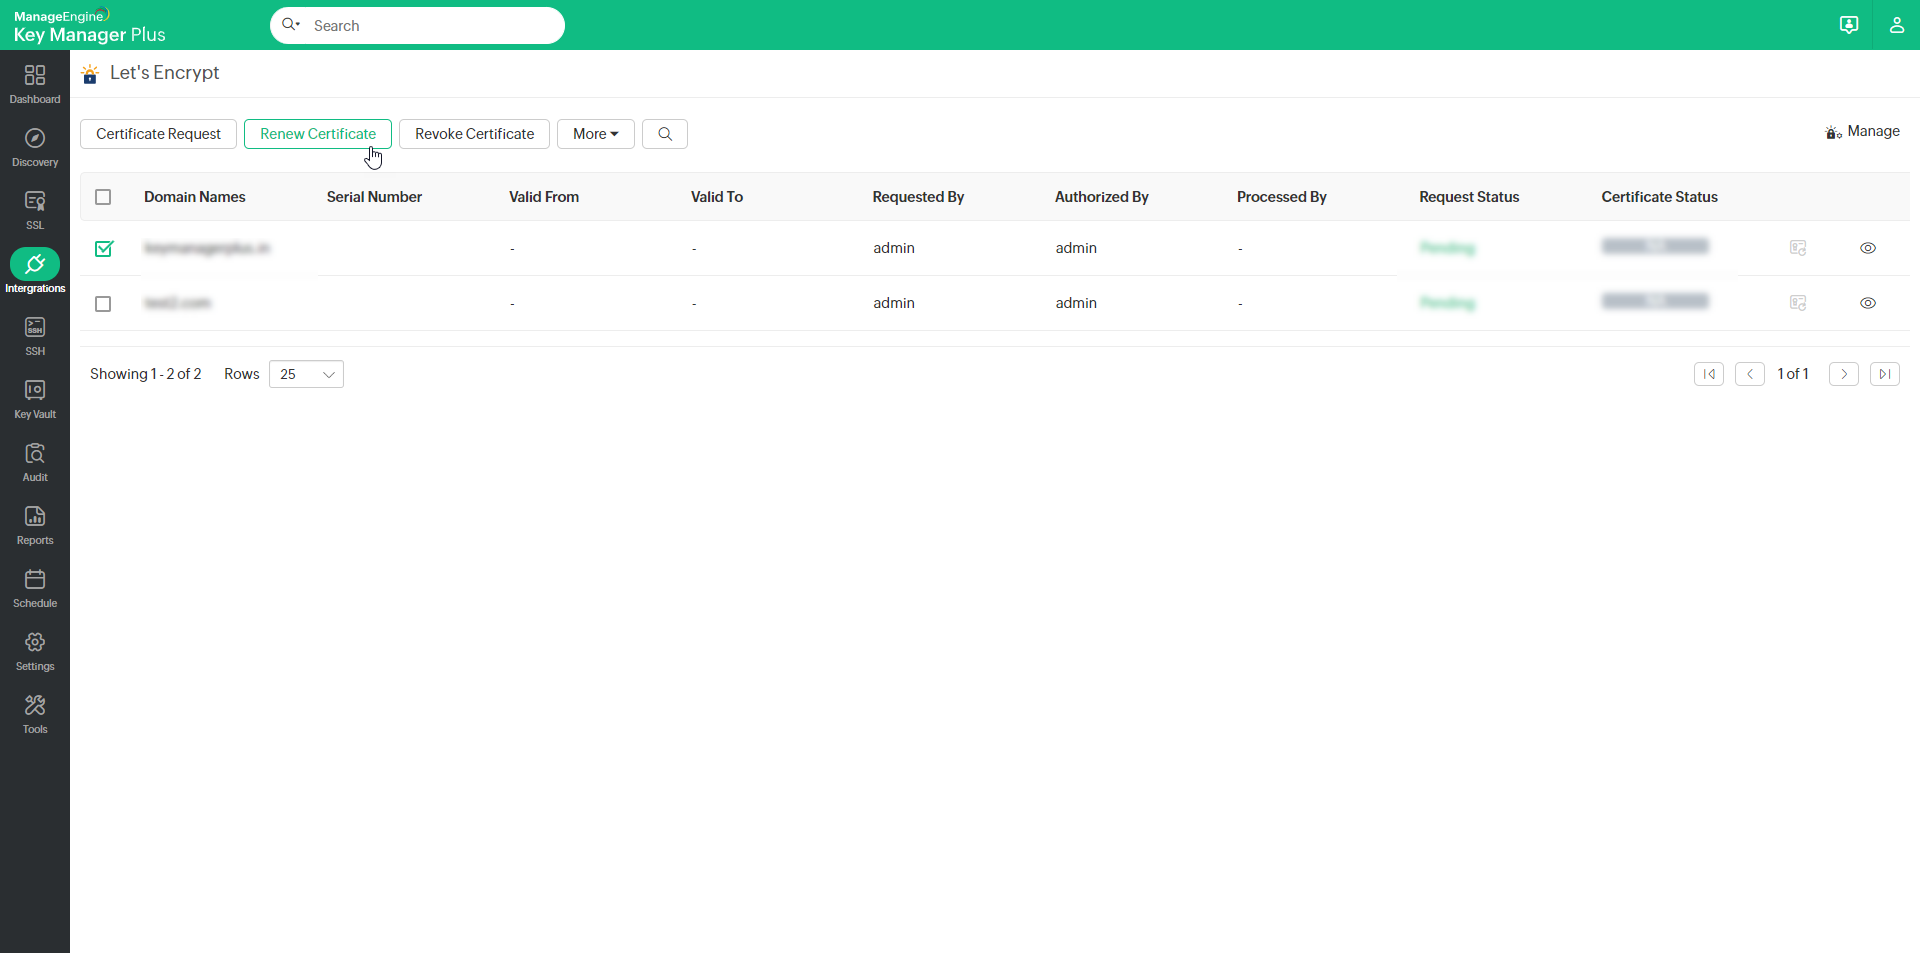
- Navigate to Integrations >> ACME Integrations >> Let's Encrypt.
- Select the certificate you wish to renew and click the Renew Certificate button. Once the renewal is complete, the certificate status will update to Renewed in the Certificate Status bar.The certificate is renewed and the Certificate Status bar displays Renewed.
- Click on it to save the renewed version of the certificate to KMP certificate repository.
Note: The certificate should be saved after renewal in order to be updated in the certificate repository. Else, only the old version of the certificate will continue to remain in repository.
5.2 Automated Certificate Renewal
Note: This procedure is only applicable from builds 7040.
To configure the auto-renewal process for the desired certificates, perform the steps that follow:
- Navigate to Integrations >> ACME Integrations >> Let's Encrypt >> Manage and click Auto-Renewal from the top pane.
- From the page that appears, enable the Auto-Renew toggle.
- Enter the number of days before expiry in which the auto-renewal process is to be carried out.
- Select the desired certificates that are to be auto-renewed and click Save.
Based on the configured details, the auto-renewal process will be carried out. Click the Auto-Renewal Audit to get insights about the certificates renewed through the auto-renewal process.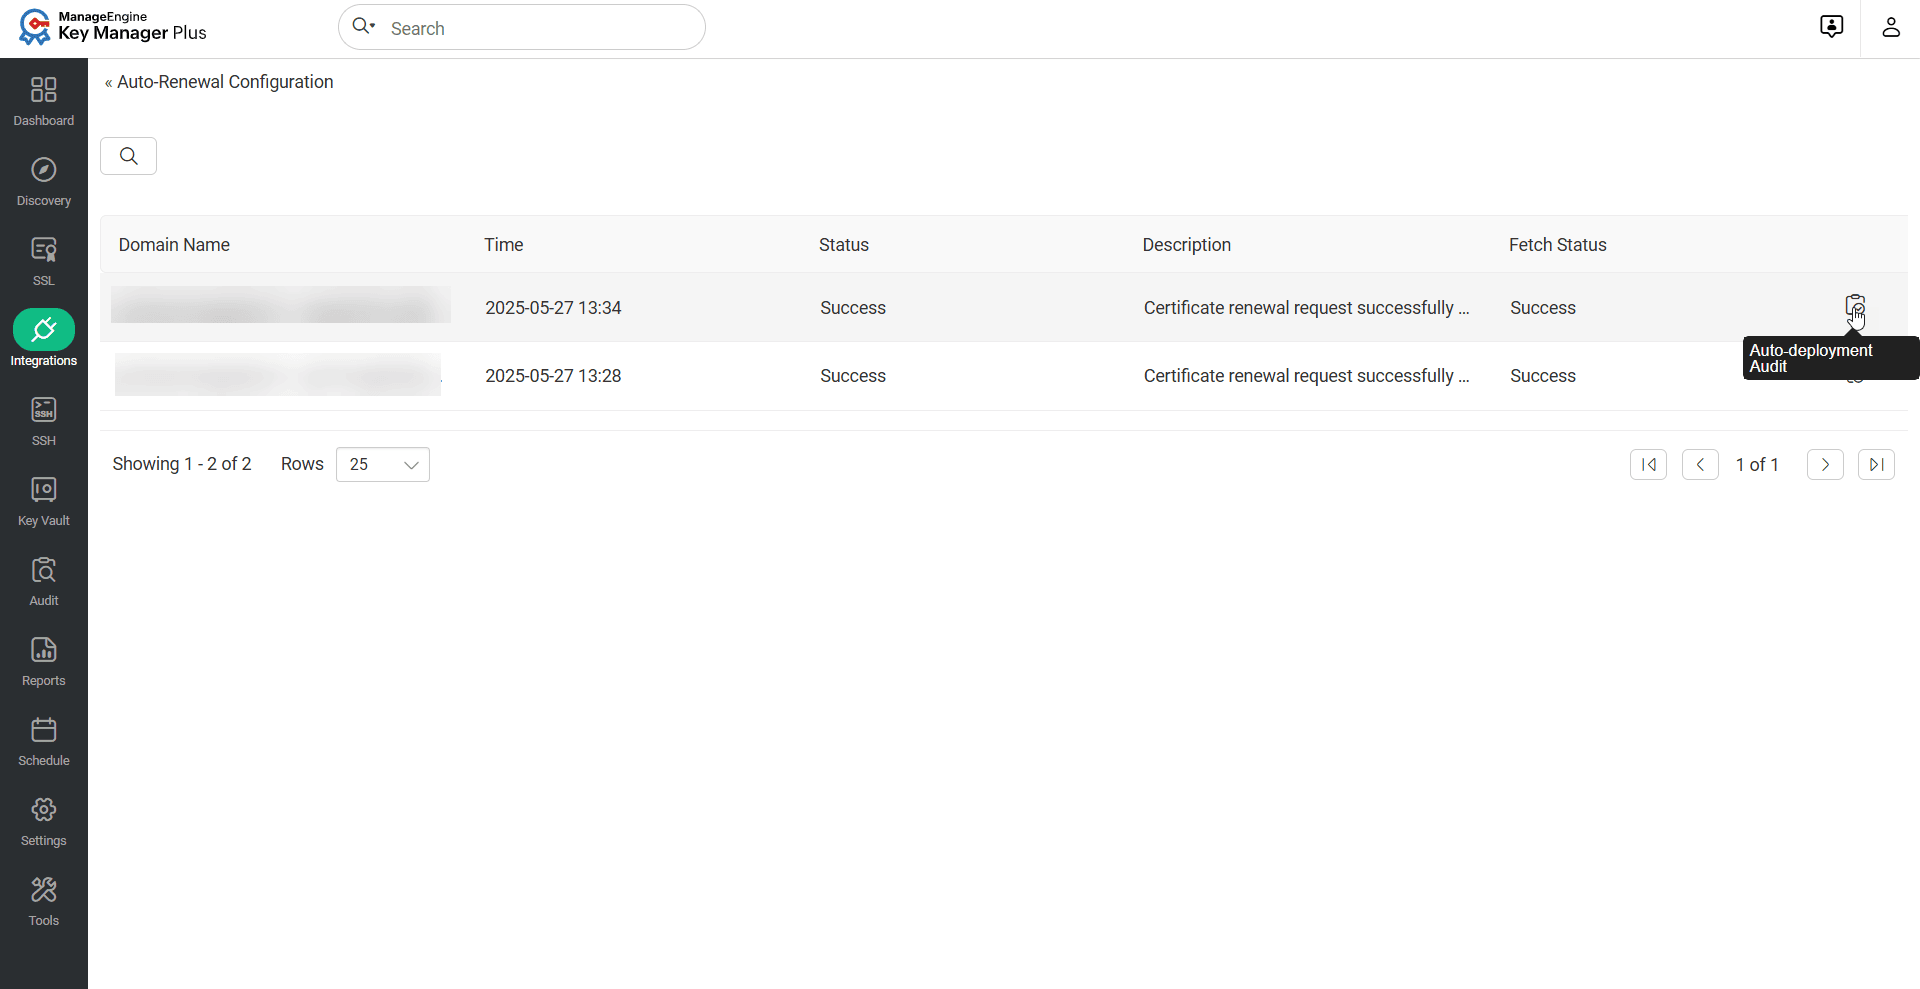
Upon successful auto-renewal, the certificate will be automatically deployed to the respective server based on the system-defined schedule interval. You can view the deployment status for each server in the Auto-Deployment Audit section.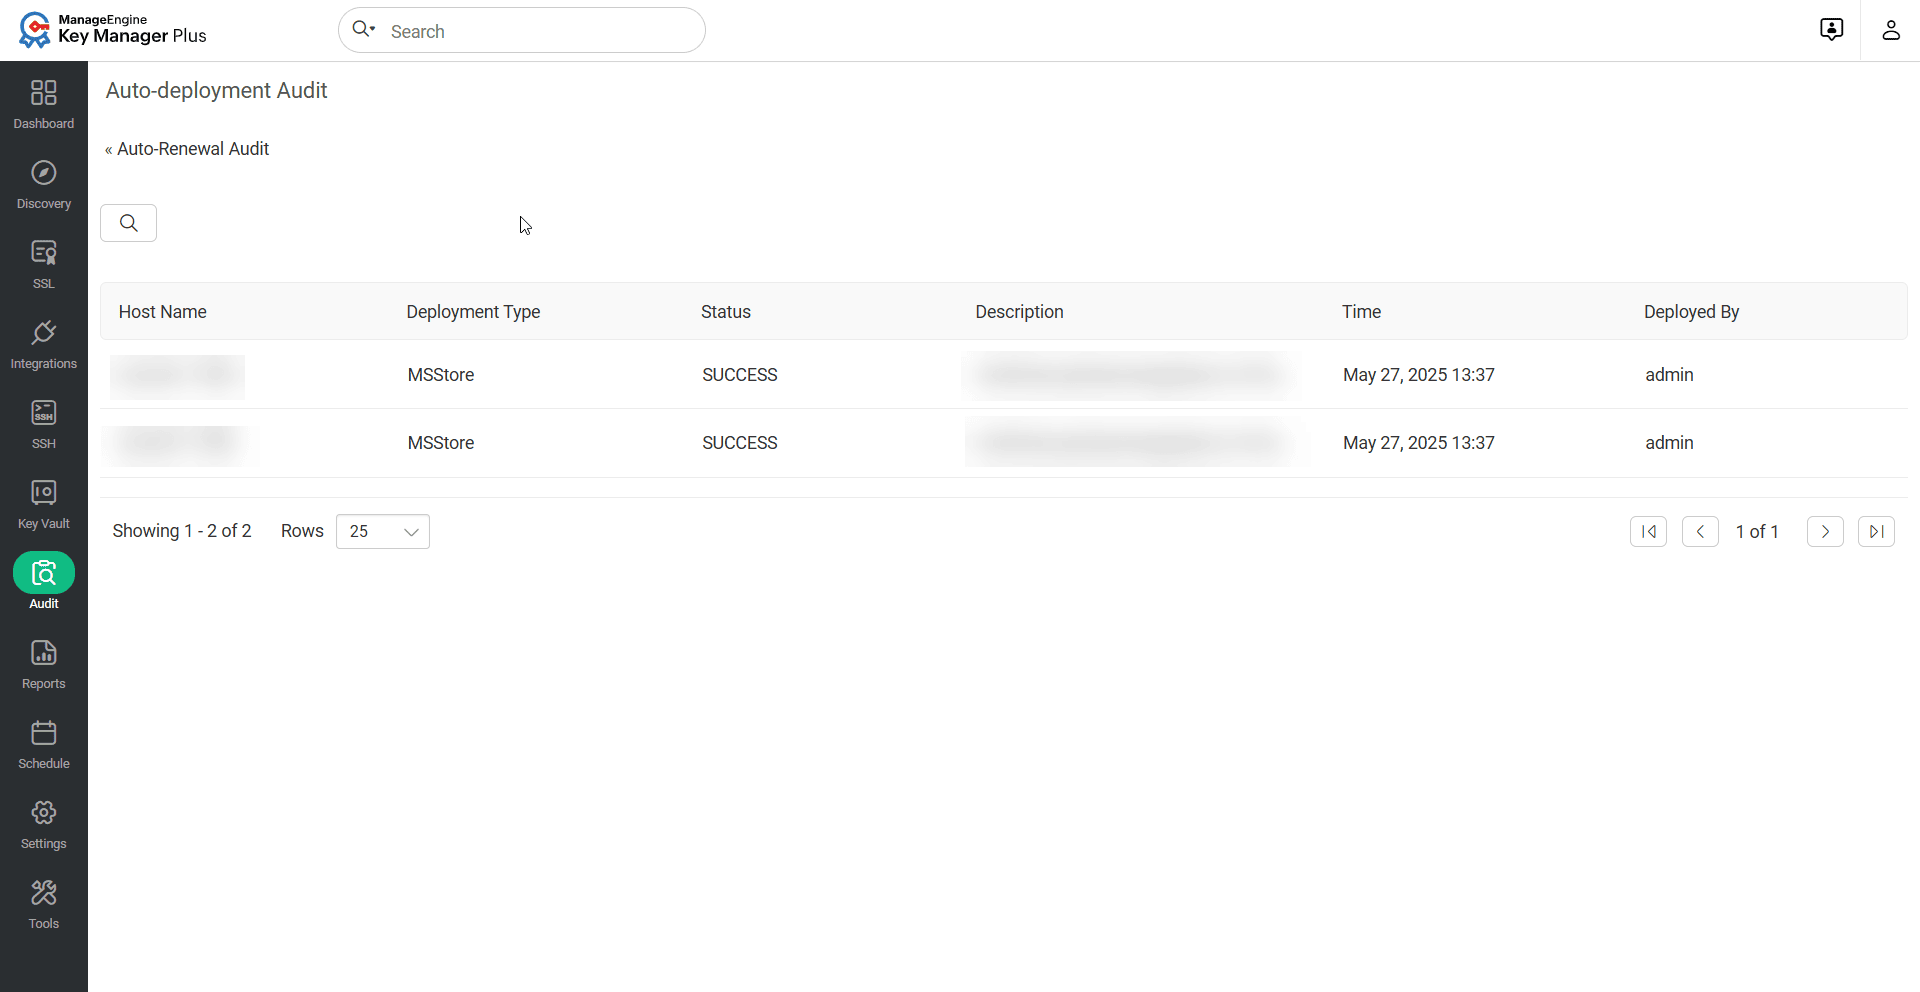
5.3 Automatic Renewals through Automatic Domain Validation
Note: This procedure is only applicable prior to builds 7040.
If agent mapping had been configured, the certificate renewal process is done automatically without manual intervention. All the certificates in your organization procured from Let's Encrypt is automatically renewed after every 75 days. i.e., 15 days before its expiry and a notification is sent to the account holder's e-mail address.
Note: Automatic renewals are applicable only for those certificates saved in Key Manager Plus repository. i.e., after procuring a certificate from Let's Encrypt, you have to save it in order for the automatic renewal to take effect.
6. Revoking Certificates
Revoking a certificate renders the certificate invalid and immediately removes the HTTPS from the website.
To revoke a certificate,
- Navigate to the Integrations >> ACME Integrations >> Let's Encrypt window.
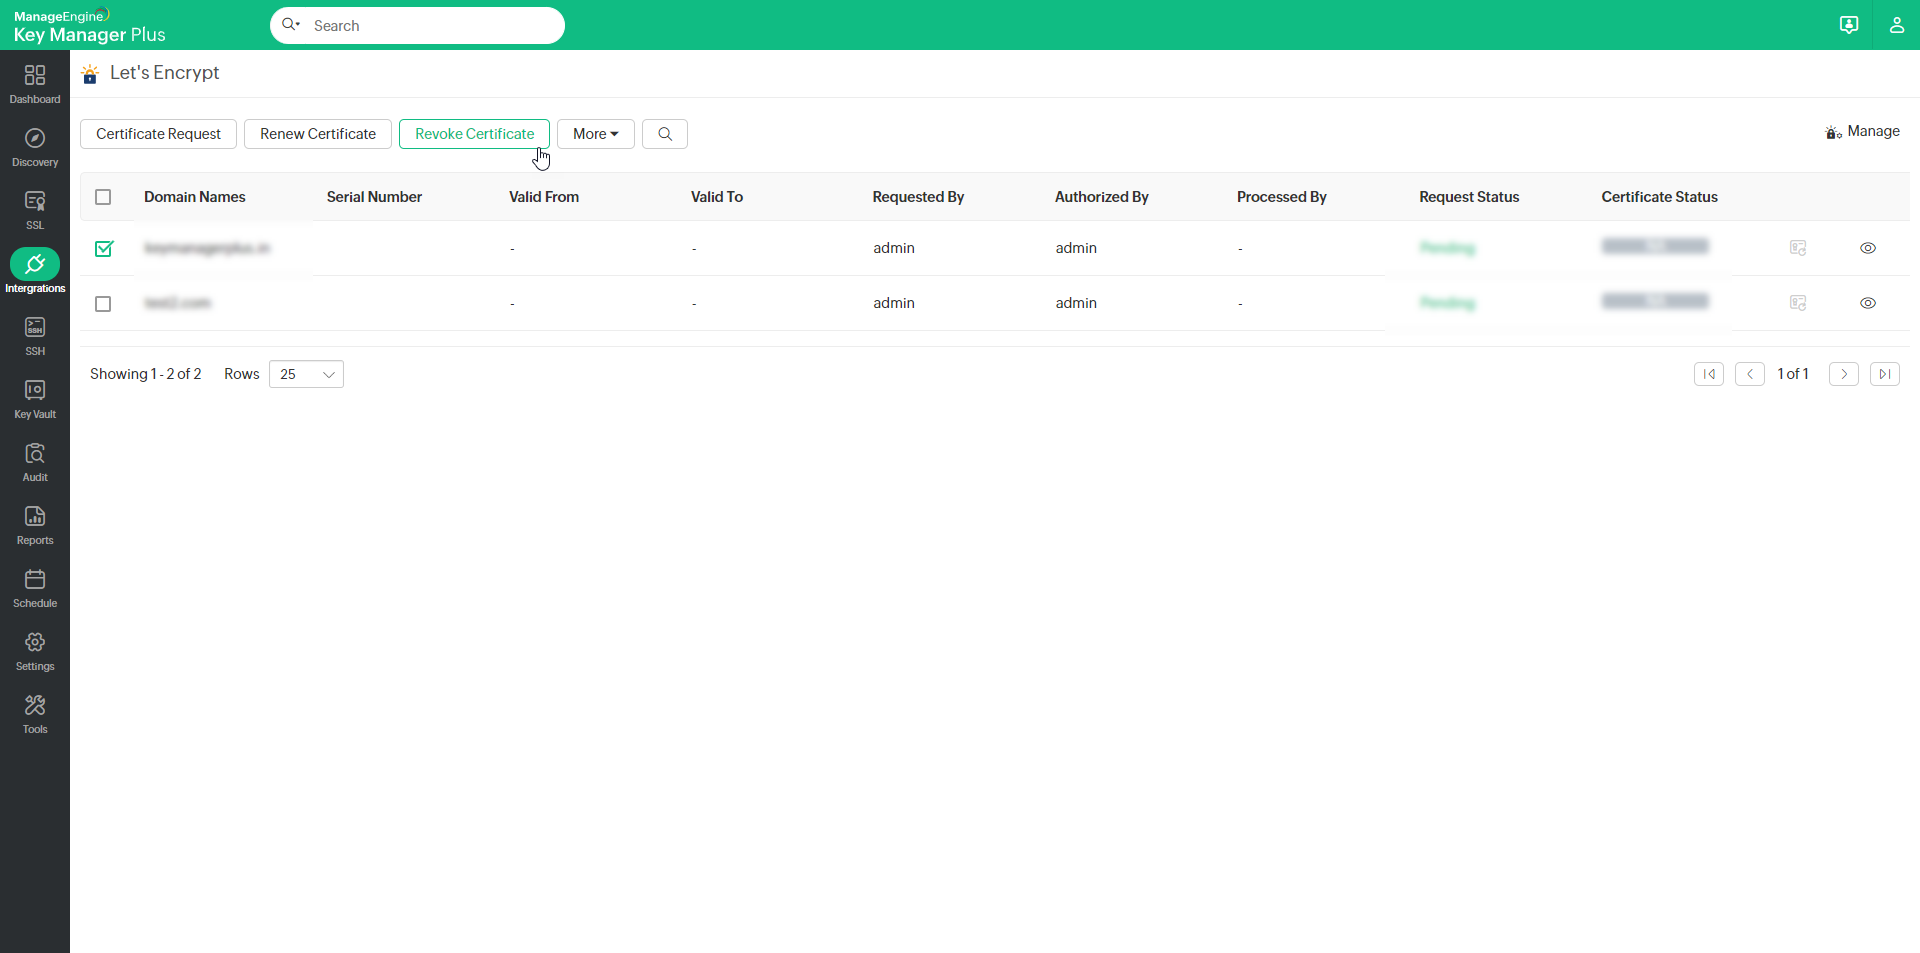
- Select a certificate you want to revoke and click Revoke Certificate.
- The certificate is revoked and is no longer valid.
7. Deleting Certificates
Deleting a certificate removes the certificate from Key Manager Plus repository, but the certificate still remains valid.
To delete a certificate,
- Navigate to Integrations >> ACME Integrations >> Let's Encrypt.
- Select the certificate you want to delete and click More >> Delete.
- The certificate is deleted from the KMP database.

8. About Let's Encrypt
Let's Encrypt is a free, automated and open Certificate Authority developed by the Internet Security Research group (ISRG) with a main motive to reduce the complexity involved in establishing HTTPS connection and smoothen the overall certificate installation process. Till date, Let's Encrypt issues only domain validated certificates. Organization validation and extended validation are not available and are not being planned to be distributed anytime in the near future. All certificates issued by Let's Encrypt have a life time of ninety days after which they are not valid. Also, the domain authentication validity for a certificate is sixty days. i.e., for every domain you secure, you'll have to fulfill the challenges once in sixty days in order to prove your ownership of the domain. The main purpose of domain validation is to ensure security and Let's Encrypt is planning to reduce this domain authentication validity period to seven days.For more information about Let's Encrypt, click here.
