Mail Server Settings
Prior to configuring Key Manager Plus in an organization, you must configure some prerequisites that allow Key Manager Plus to send emails directly from within the application without requiring an external email client. Key Manager Plus sends email notifications to newly added users to notify details that include - their login credentials, configured schedules, policy enforcement, and reports.
You can either configure the SMTP mail server used in your environment, or an external mail server, such as Microsoft Exchange Service or Google, which allow OAuth authentication to be enabled for all emails sent from Key Manager Plus.
Scroll down to learn about configuring different mail server settings in Key Manager Plus.
- Configuring Microsoft Exchange Service as the mail server
- Configuring Microsoft Graph Mail as the Mail Server
- Configuring Google as the mail server
- Configuring other mail servers
1. Configuring Microsoft Exchange Service as the Mail Server
To configure Microsoft Exchange Service as the mail server in Key Manager Plus, you must create an Azure application in the Microsoft Azure portal to generate certain inputs for the OAuth authentication. Follow the below section for further configuration details:
1.1 Creating an Azure Application for Microsoft Exchange Service as the Mail Server
- Log in to the Microsoft Azure portal with your user credentials.
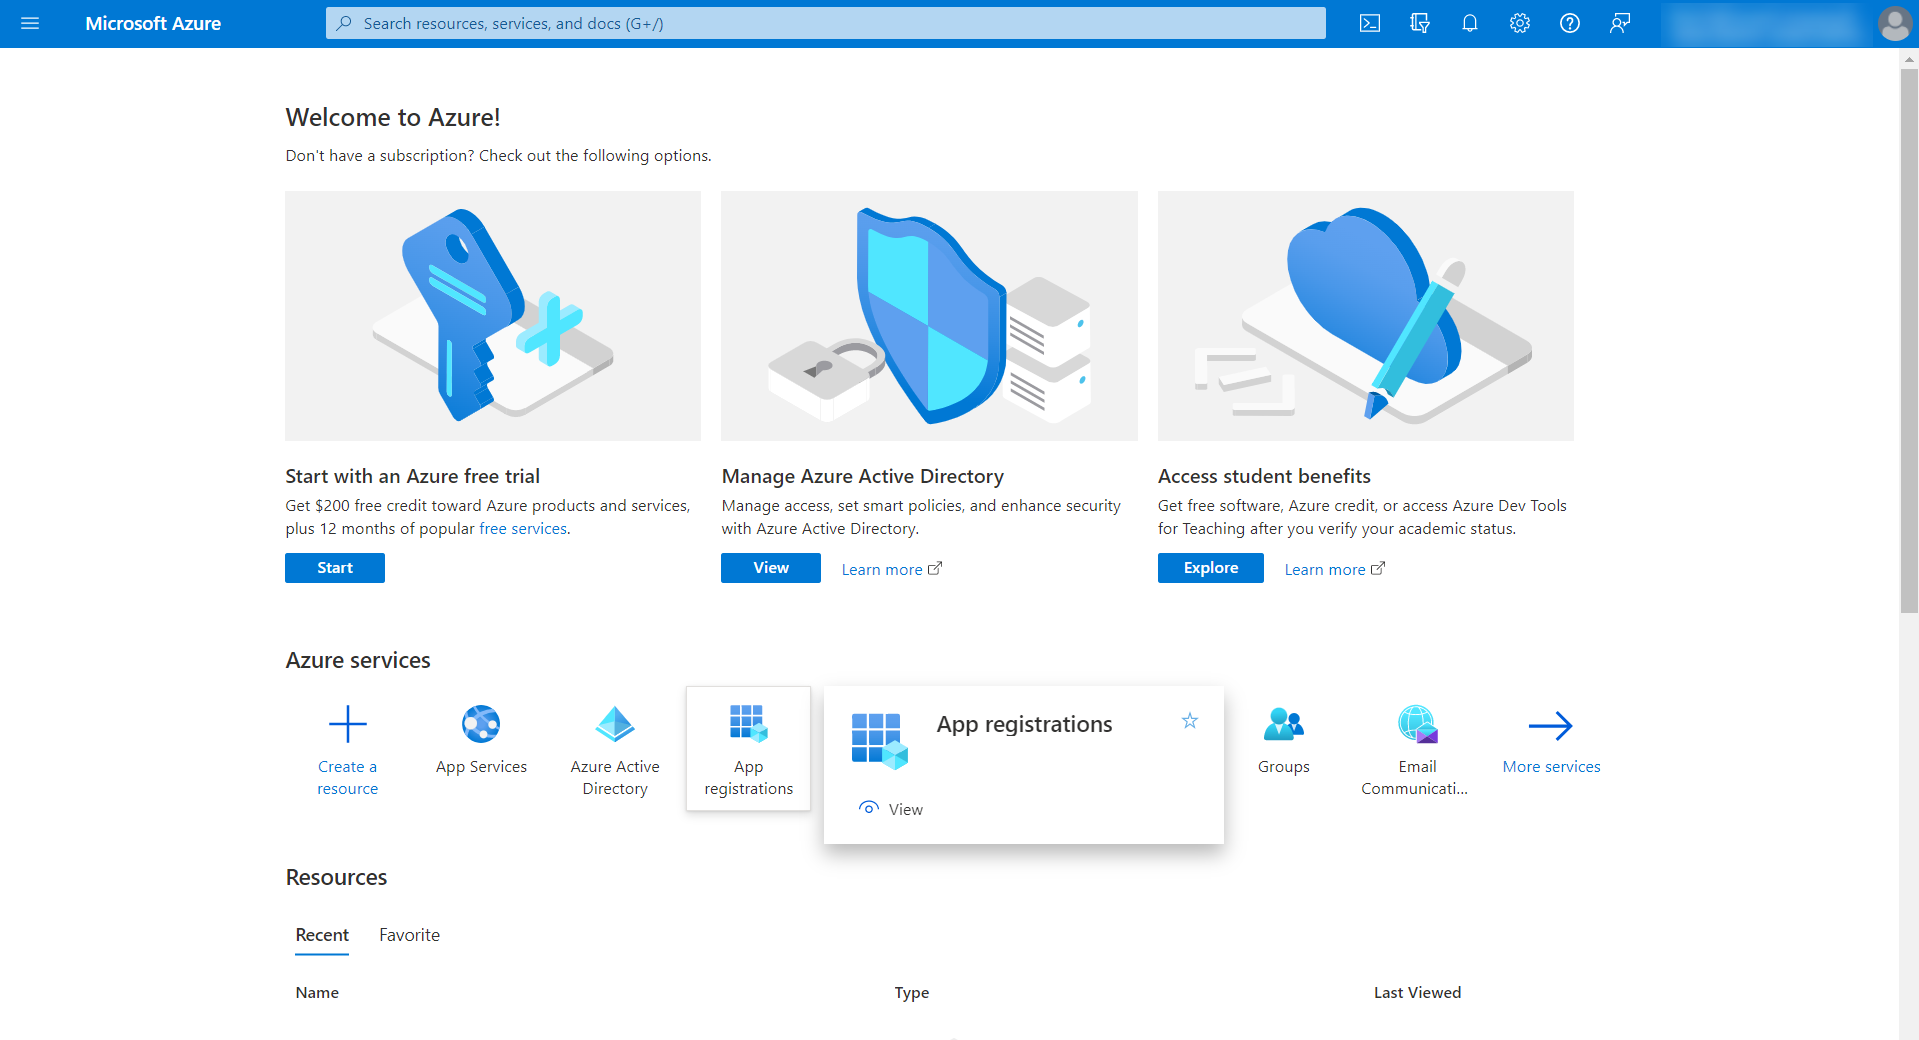
Click App registrations on the Microsoft Azure home page.
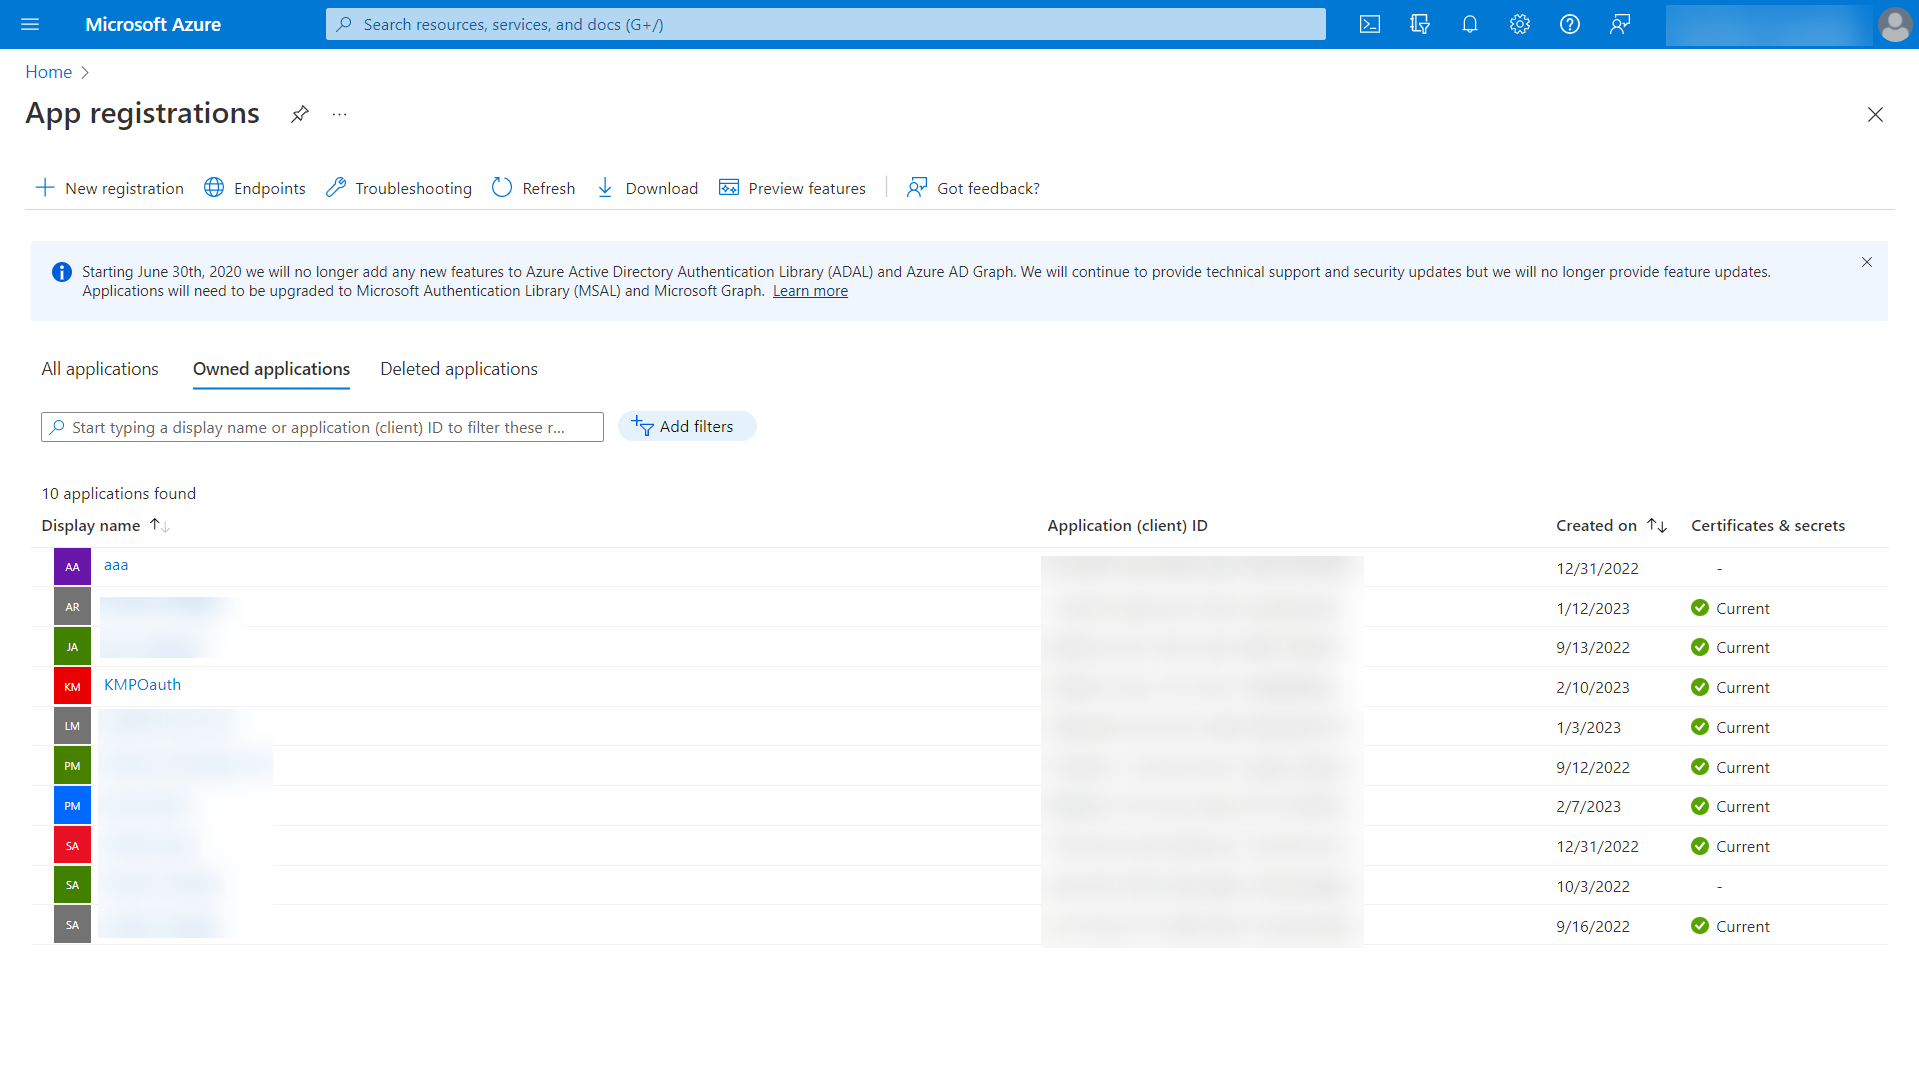
On the page that appears, click + New registration from the top pane.
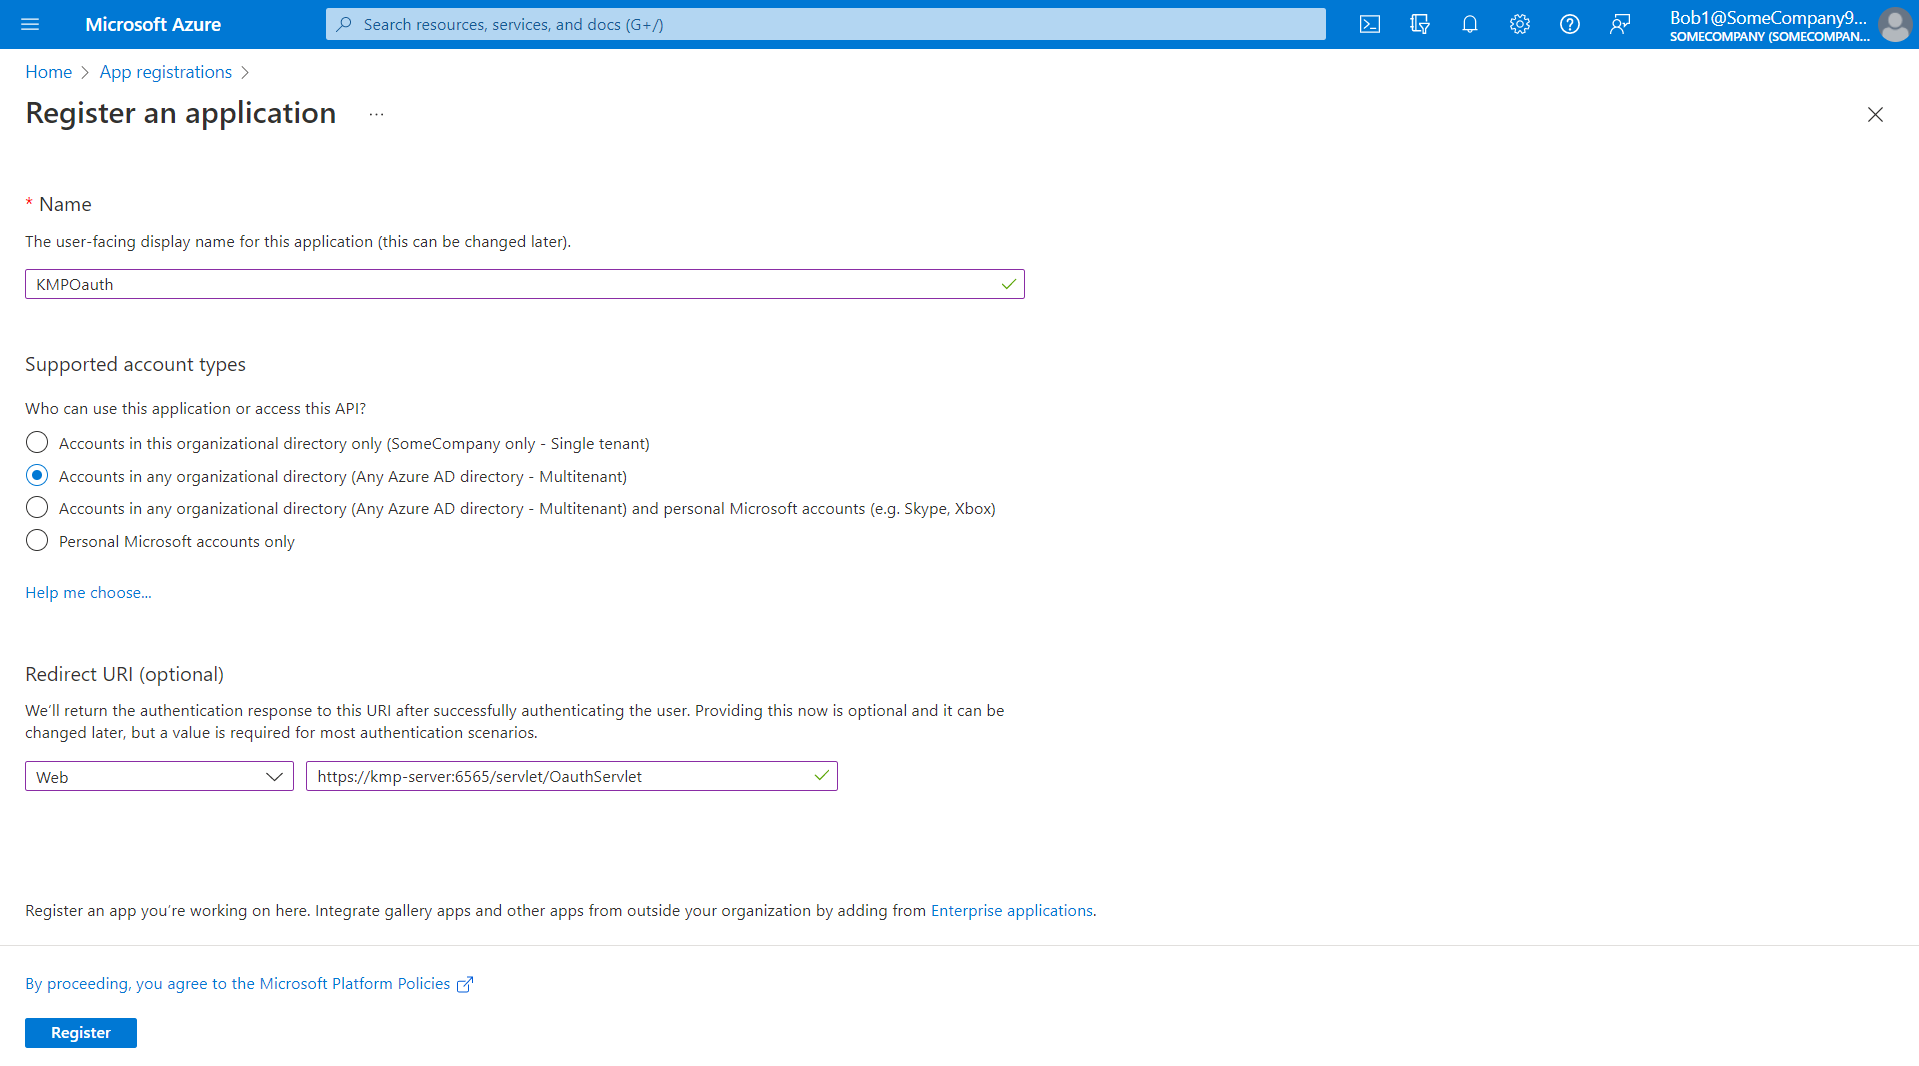
- On the Register an application page, enter the following attributes:
- Enter a name of your choice.
- Choose the Supported account type.
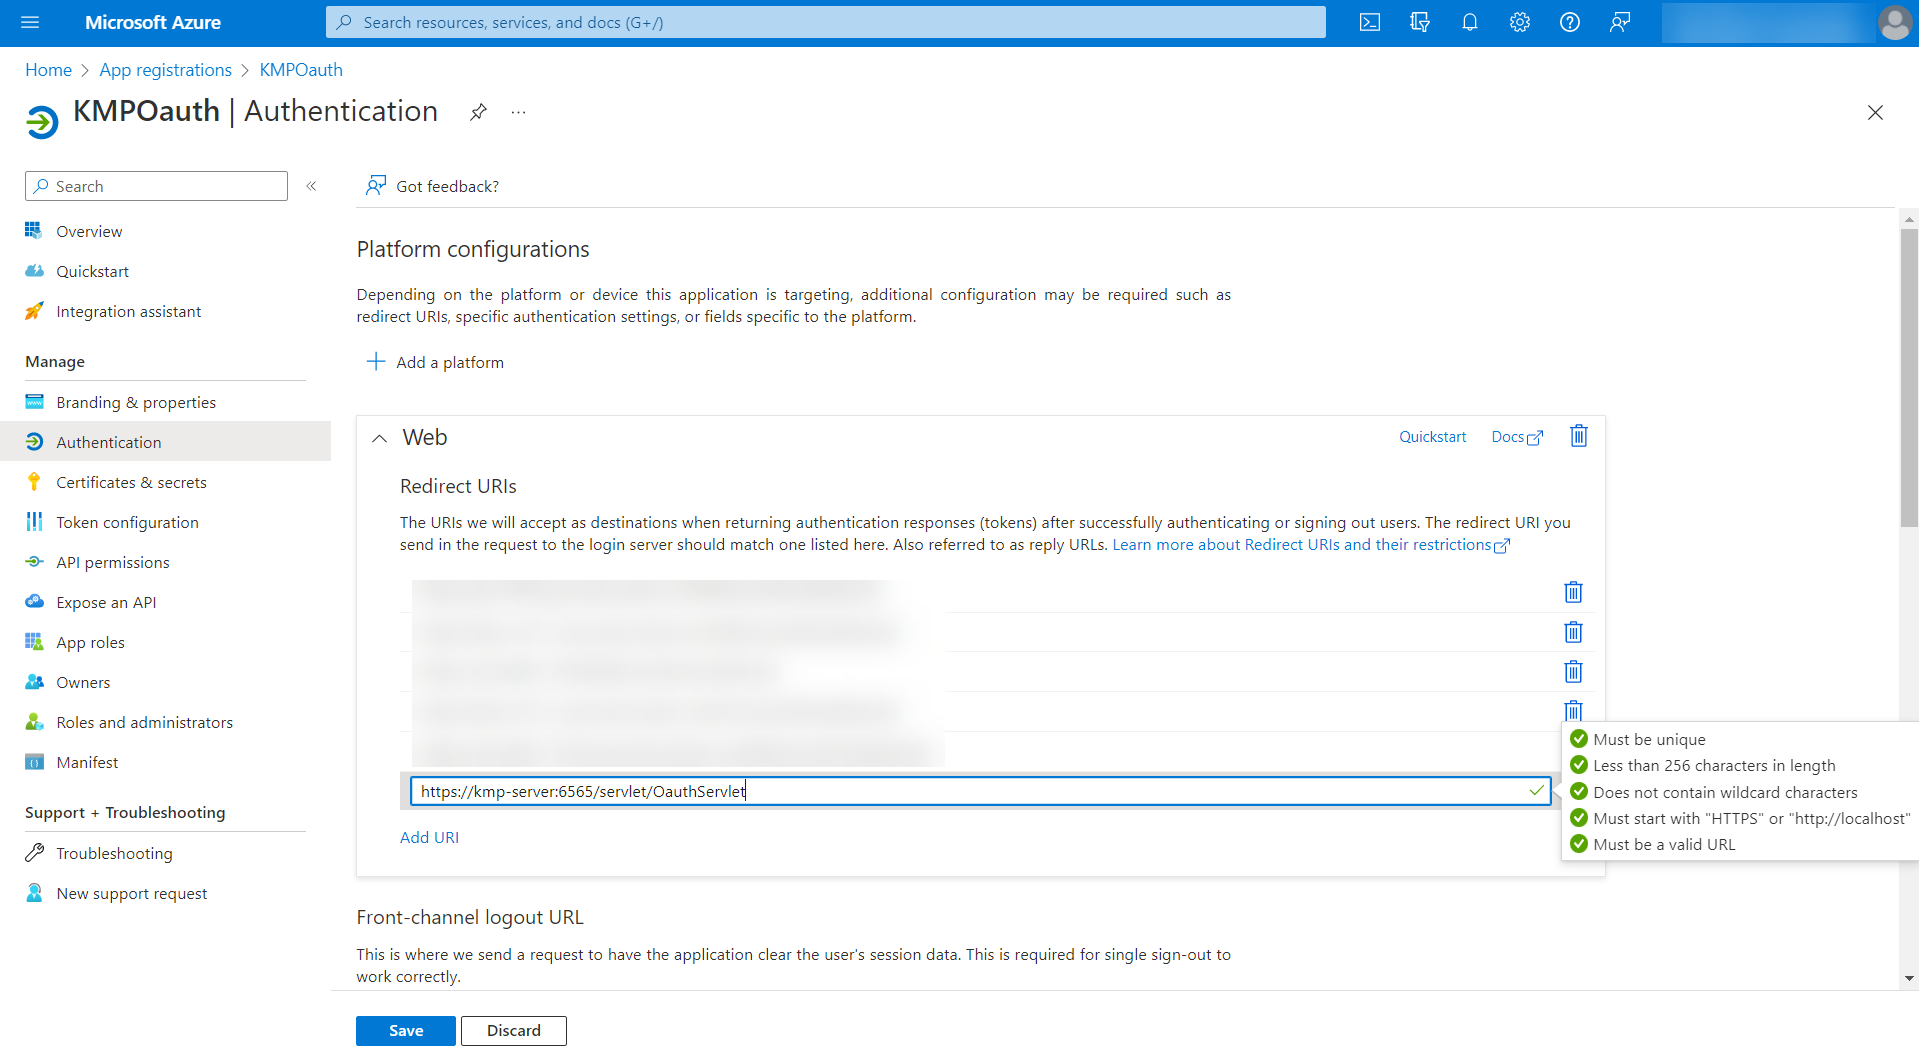
In the Redirect URI, choose Web from the drop-down and enter the URL of the KMP application in the format 'https://kmp-server:6565/servlet/OauthServlet'.
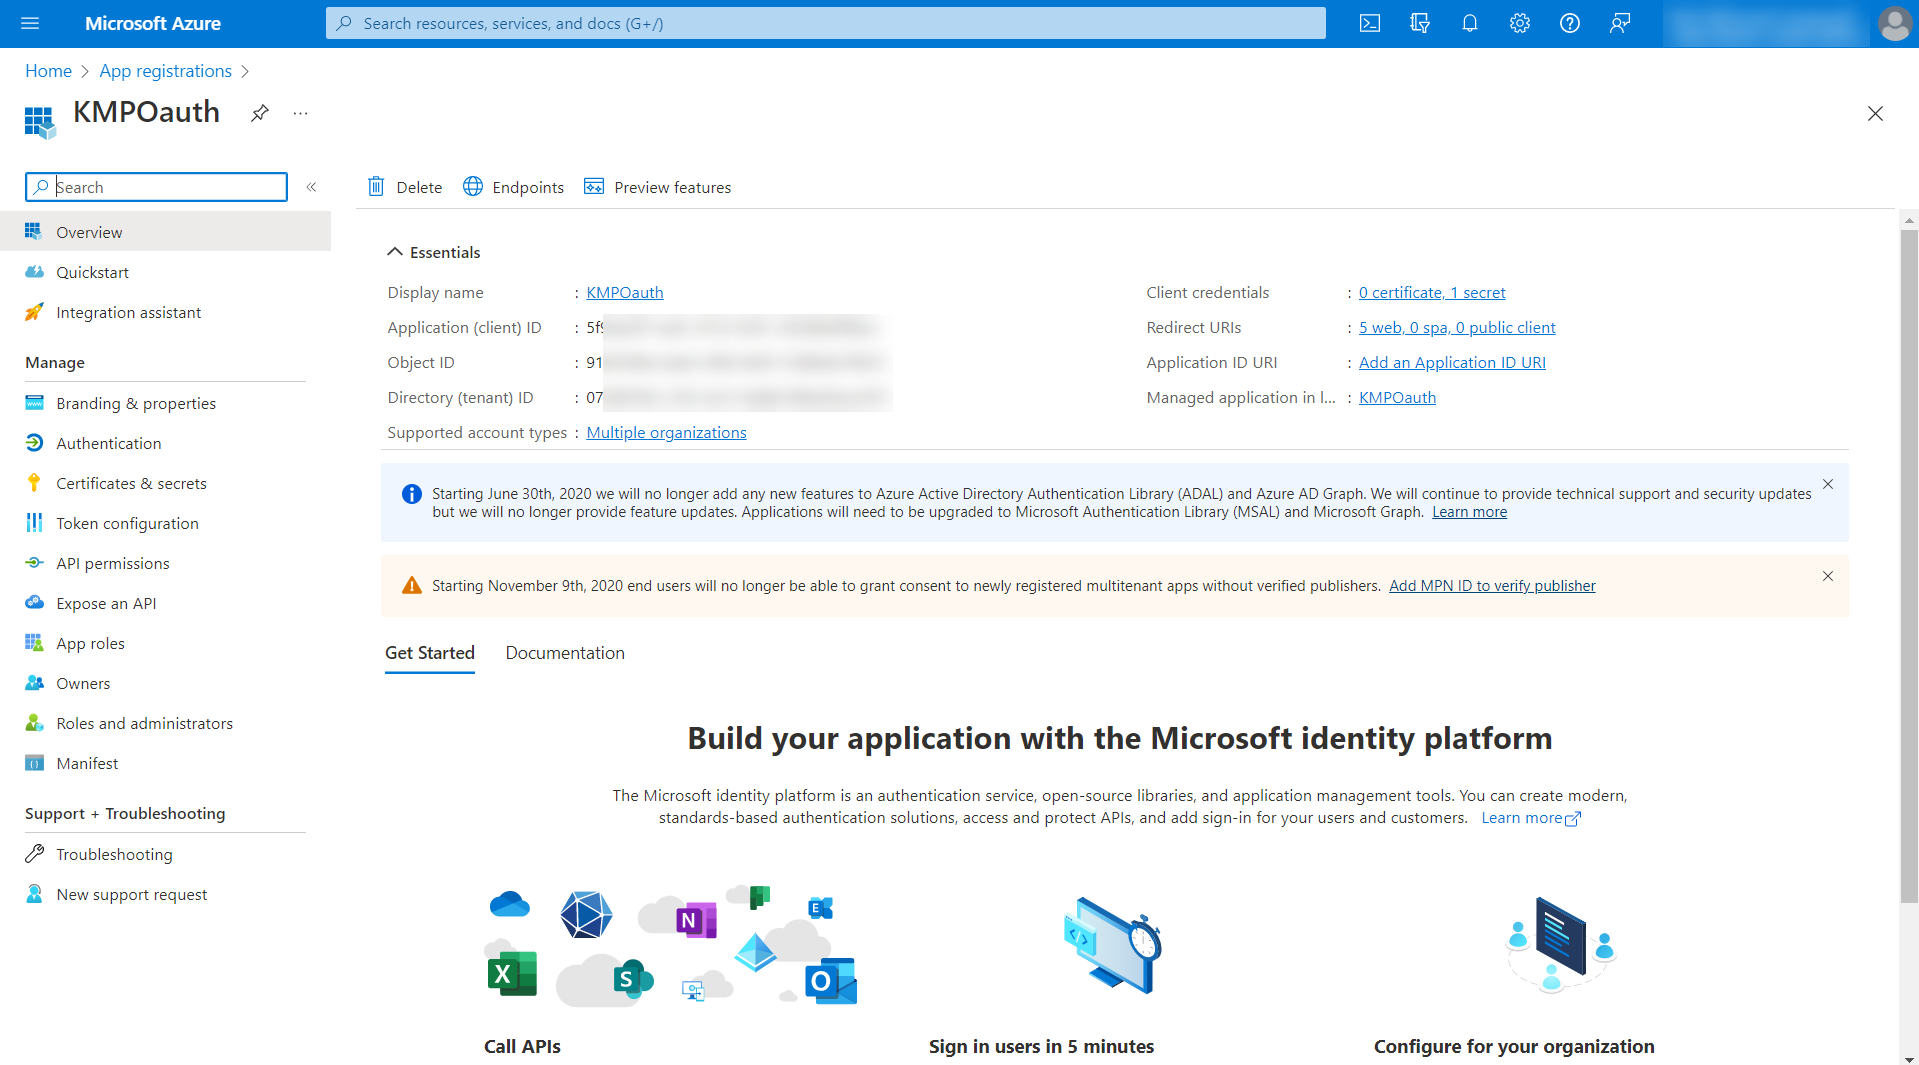
Click Register. Now KMPOauth will be added as an application in the Microsoft Azure portal, and you will be taken to the page with the details of the newly registered application.
- From the left pane, under Manage, click API permissions. In the API Permissions page, click + Add a permission.
- In the Request API Permissions page, choose Microsoft Graph.
- Click Delegated Permissions and search for 'SMTP.Send' in the Select Permissions search bar to populate relevant permissions. Select the option SMTP.Send and click Add Permissions.
- Click Delegated Permissions and search for 'offline_access' in the Select Permissions search bar to populate relevant permissions. Select the option offline_access and click Add Permissions.
Click Delegated Permissions and search for 'User.Read' in the Select Permissions search bar to populate relevant permissions. Select the option User.Read and click Add Permissions.
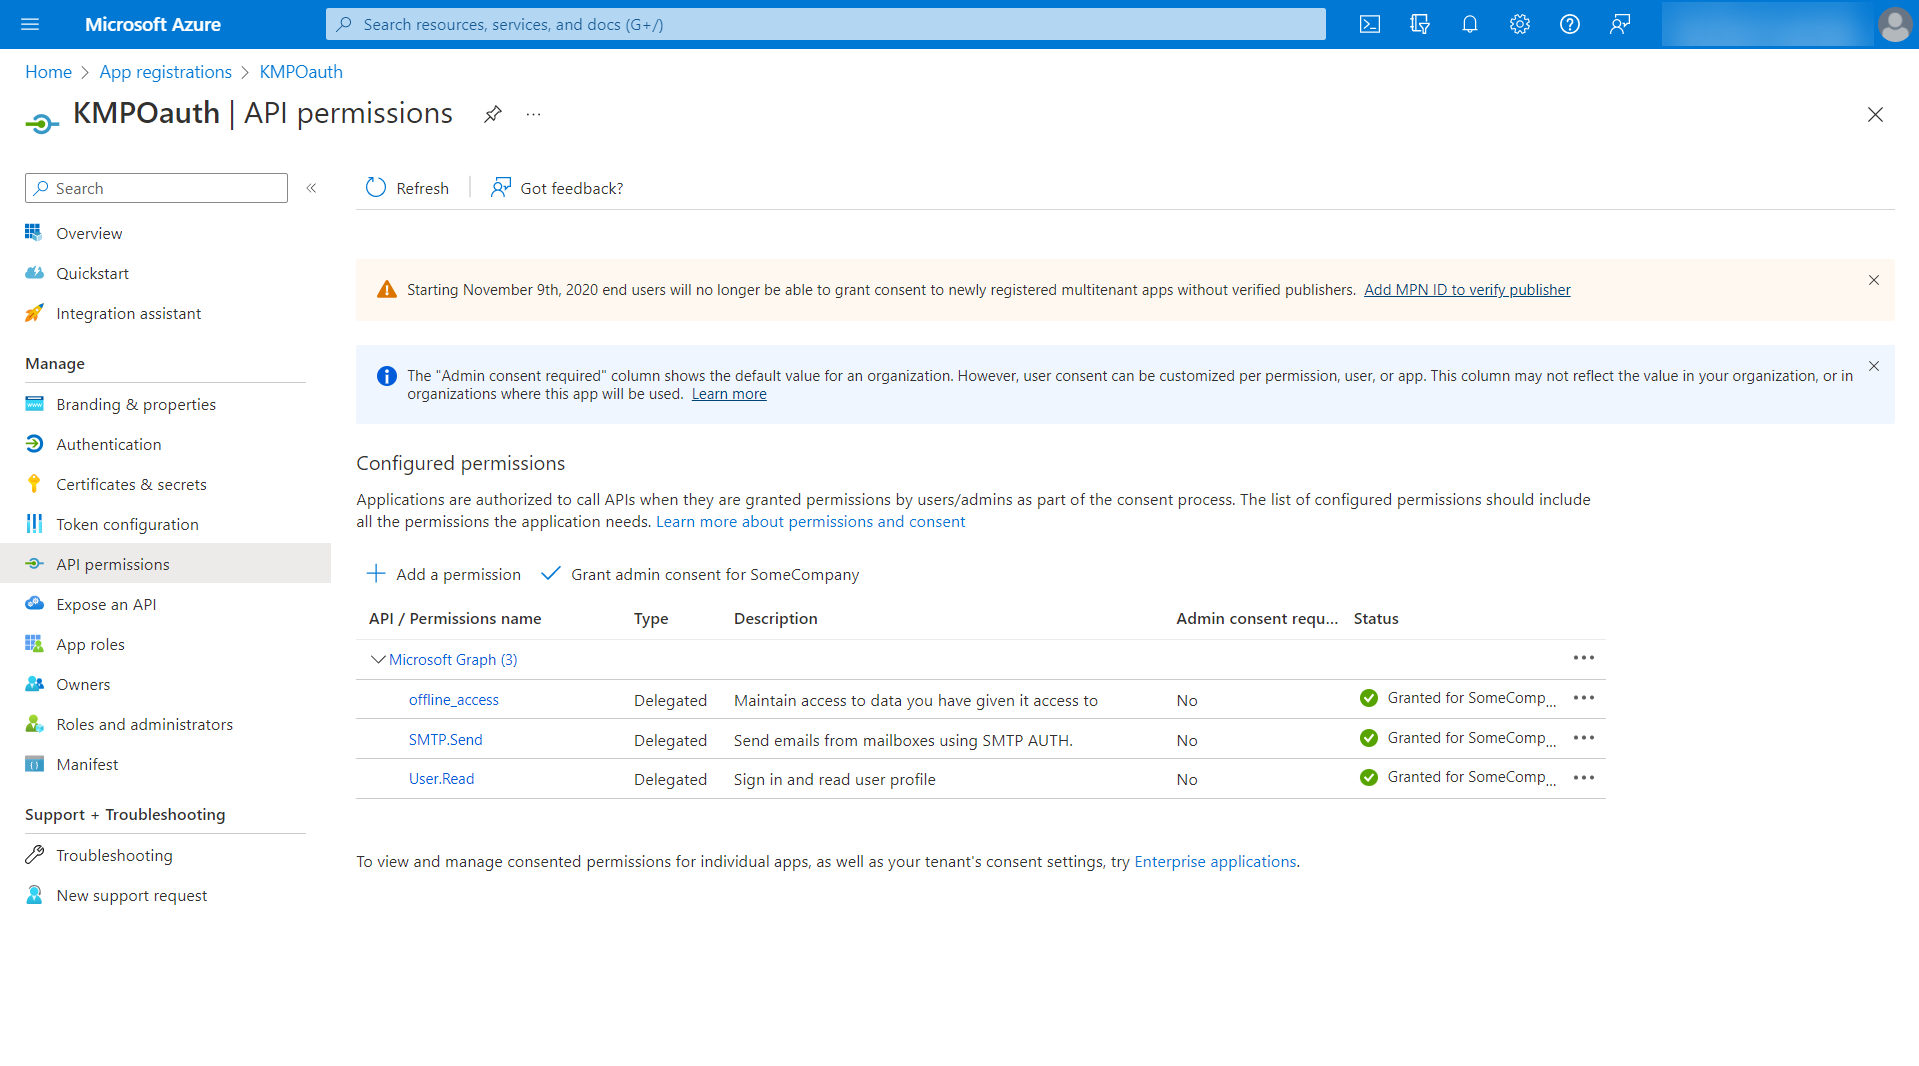
- Now, click the Grant admin consent for some company button beside + Add a Permission.
- In the pop-up that opens, click Yes to grant consent for the requested permissions.
- Click the Certificates & secrets option on the left pane.
Navigate to the Client secrets tab and click + New client secret.
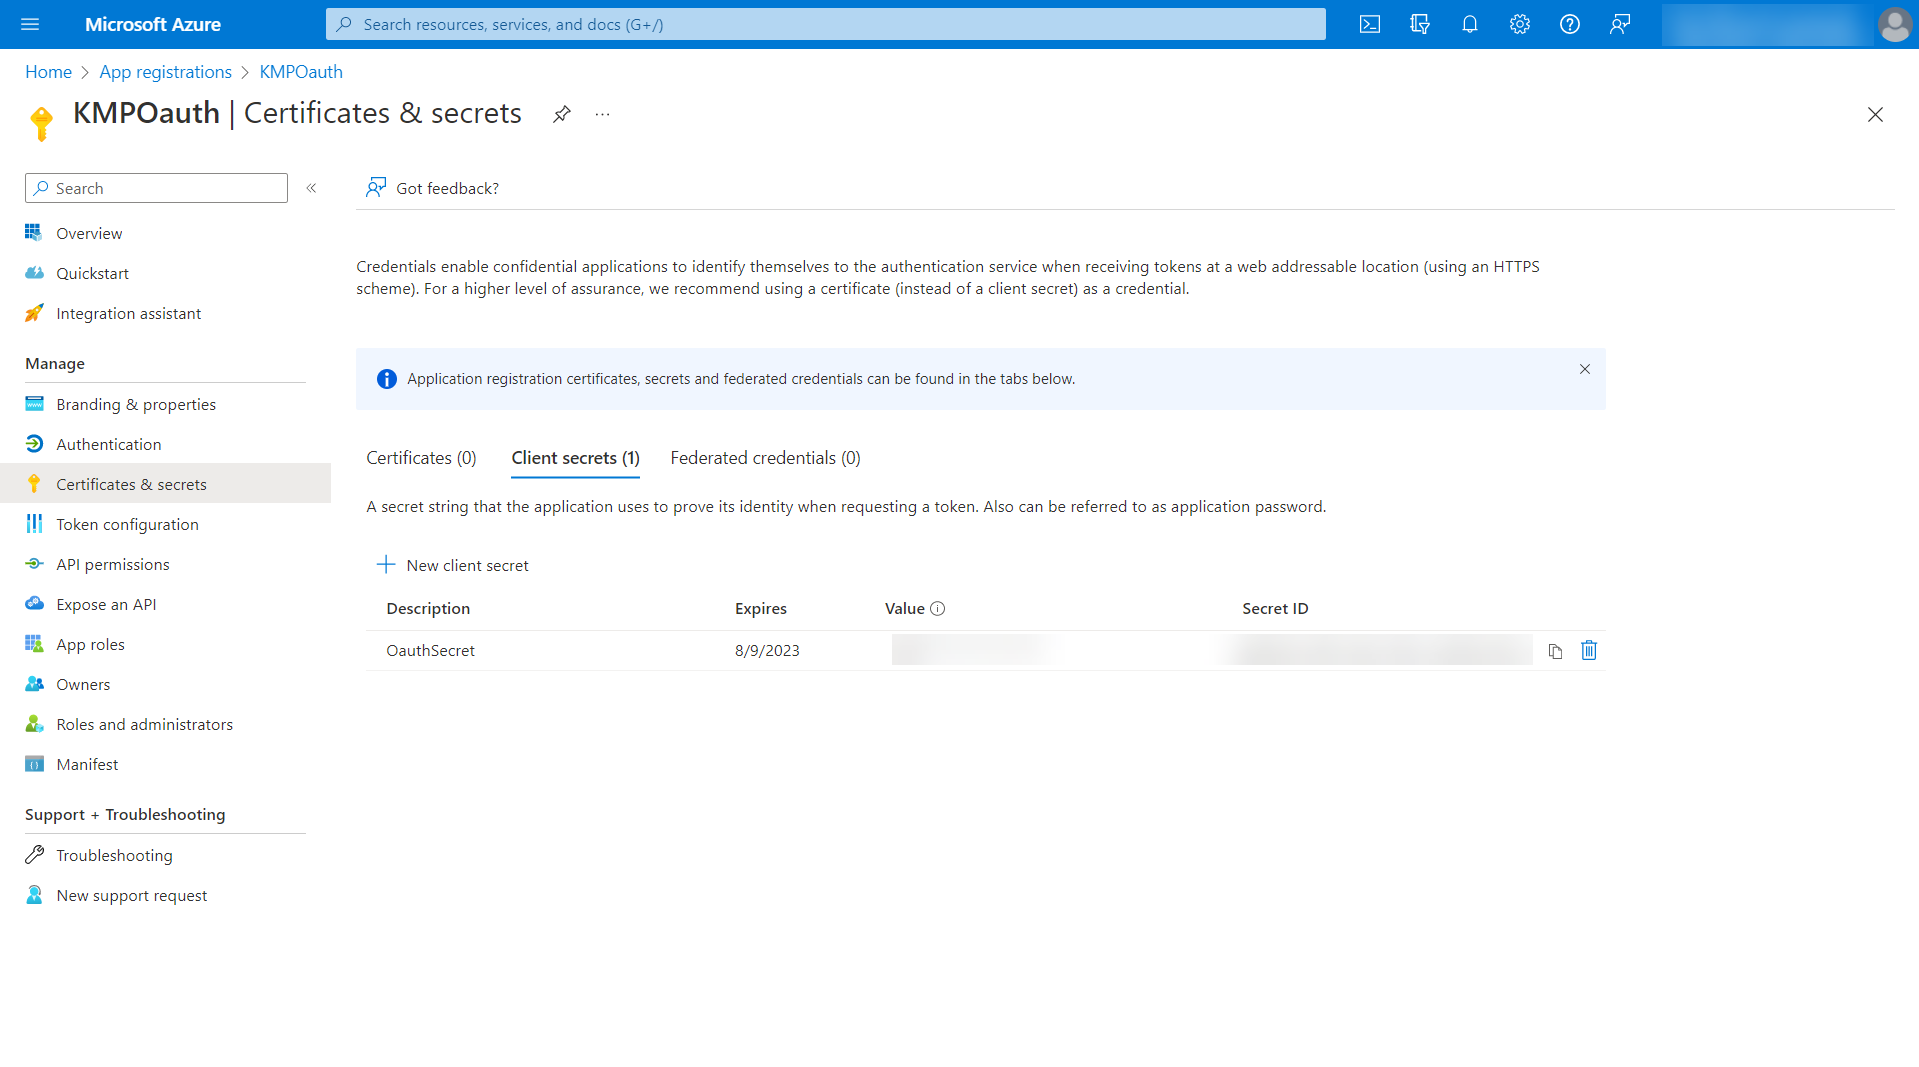
- Enter a Description, choose an expiry period, and click Add.
- Immediately after the creation, the client secret value will be displayed under the Value column in the table. Copy the value and save it in a secure location. This client secret value will be displayed only once and will not be accessible once you navigate to other pages of Microsoft Azure portal.
- Once you have registered the application with the appropriate permissions, go to Key Manager Plus web interface and configure the mail server settings.
1.2 Configuring Microsoft Exchange Service as the Mail Server in Key Manager Plus
- Navigate to Settings >> General Settings >> Mail Server.
- On the page that appears to the right, enter the following:
- Select OAuth in the Authentication Type.
- The SMTP Server field will be filled in default with 'smtp.office365.com'.
- Port - The default port for TLS is 587.
- Choose Microsoft Exchange Service from the Mail Server drop-down.
- To Address - Enter an email address here to check the mail server setting functionality after the mail server configuration.
From/Sender Address- Enter the sender's email address. Make sure that the address you provided here is the same as the email provided in the Microsoft Azure sign-in credentials.
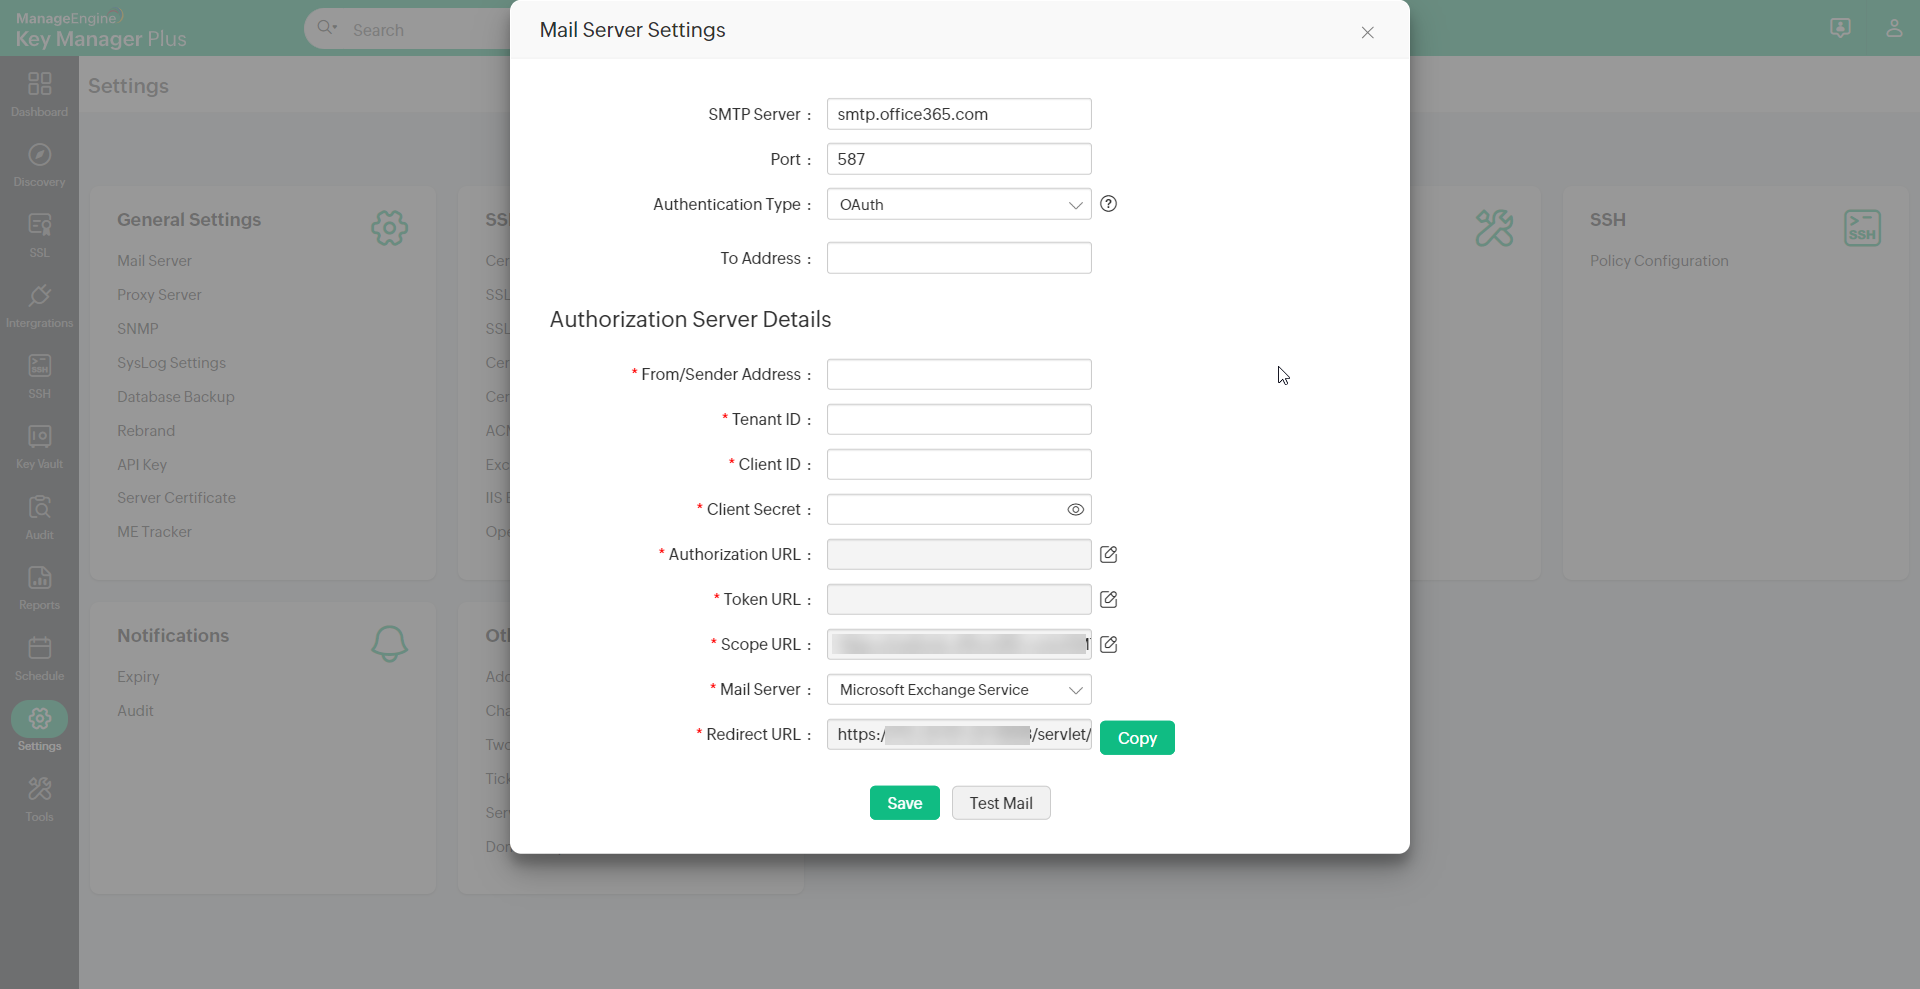
- Tenant ID - Enter the directory ID of the Azure application.
- Client ID - Enter the application ID of the Azure application.
- Client Secret - Enter the client secret value created for the Azure application.
Redirect URL - Copy the URL shown here and add it to the Authentication page of the Microsoft Azure portal as shown below:
- Click the Test Mail button to check the mail server functionality. If you have configured the mail server settings correctly, then the recipient will receive an email from the Key Manager Plus interface.
- Click Save to save the mail server settings.
- You have now configured Microsoft Exchange Service as your mail server for your organization.
2. Configuring Microsoft Graph Mail as the Mail Server
Microsoft Graph Mail integration in Key Manager Plus lets you send notifications and email alerts securely through Microsoft 365 using Graph API instead of legacy SMTP or other mail services. It offers token-based authentication for better security control and seamless mailbox communication with modern Microsoft infrastructure.
2.1 Prerequisites
Before configuring Microsoft Graph Mail as the mail server in Key Manager Plus, you should register Key Manager Plus as an application in the Azure portal and obtain the required authentication values, including Client ID and Client Secret. Once the application registration is complete, ensure that the following Graph API permissions are granted via API Permission >> Add a Permission >> Delegated Permission for a smooth access and communication between the applications: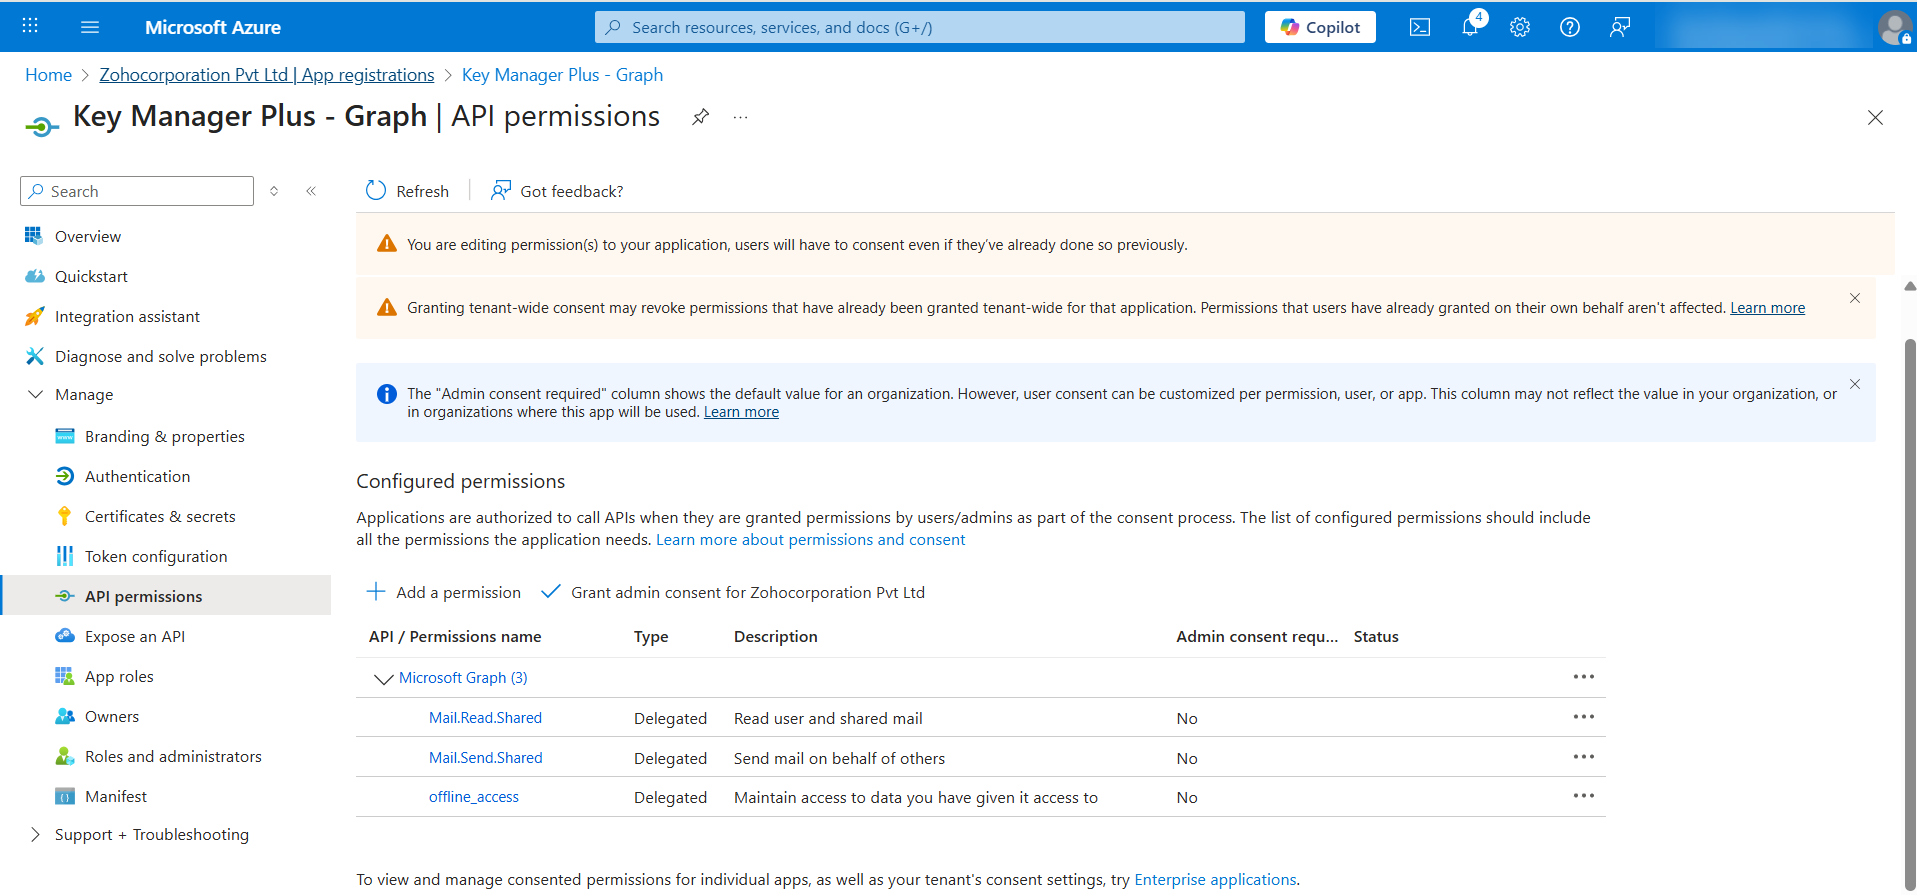
- Mail.ReadWrite
- Mail.Send.Shared
- offline_access
2.2 Configuring Microsoft Graph Mail as Mail Server in Key Manager Plus
- Navigate to Settings >> General Settings >> Mail Server.
- On the Mail Server Settings page that appears, set the Connection Protocol as Microsoft Graph. and enter the following required details:
- Graph Endpoint - By default, this field is populated with the global endpoint for Microsoft Graph. If the global endpoint is not accessible in your region, specify the appropriate regional endpoint from the list below.
- Microsoft Graph global service - https://graph.microsoft.com/v1.0
- Microsoft Graph for US Government L4 (GCC, GCC High) - https://graph.microsoft.us/v1.0
- Microsoft Graph for US Government L5 (DOD) - https://dod-graph.microsoft.us/v1.0
- Microsoft Graph China operated by 21Vianet - https://microsoftgraph.chinacloudapi.cn/v1.0
- To Address - Enter the recipient email address used for test delivery.
- From/Sender Address - Enter the sender's email address. Make sure that the address you provided here is the same as the email provided in the Microsoft Azure sign-in credentials.
- Tenant ID - Enter the Directory (Tenant) ID of the Azure application.
- Client ID - Enter the Application (Client) ID of the Azure application.
- Client Secret - Enter the client secret value created for the Azure application.
- Redirect URL - Copy the URL shown here and add it to the Redirect URIs under Manage >> Authentication >> Web section of the registered application.
- Graph Endpoint - By default, this field is populated with the global endpoint for Microsoft Graph. If the global endpoint is not accessible in your region, specify the appropriate regional endpoint from the list below.
- Click Test Mail to verify the configuration. If successful, a test email will be delivered to the specified recipient.
- Click Save to apply the mail server settings.
Once completed, Microsoft Graph Mail will be fully configured as your mail server for Key Manager Plus.
3. Configuring Google as the Mail Server
To configure Google as the mail server in Key Manager Plus, you must create a project in the Google cloud and generate the respective Client ID and Client Secret value. Follow the below sections for further configuration details:
3.1 Creating a Google Application for Google as the Mail Server
- Log in to the google cloud console with your login credentials.
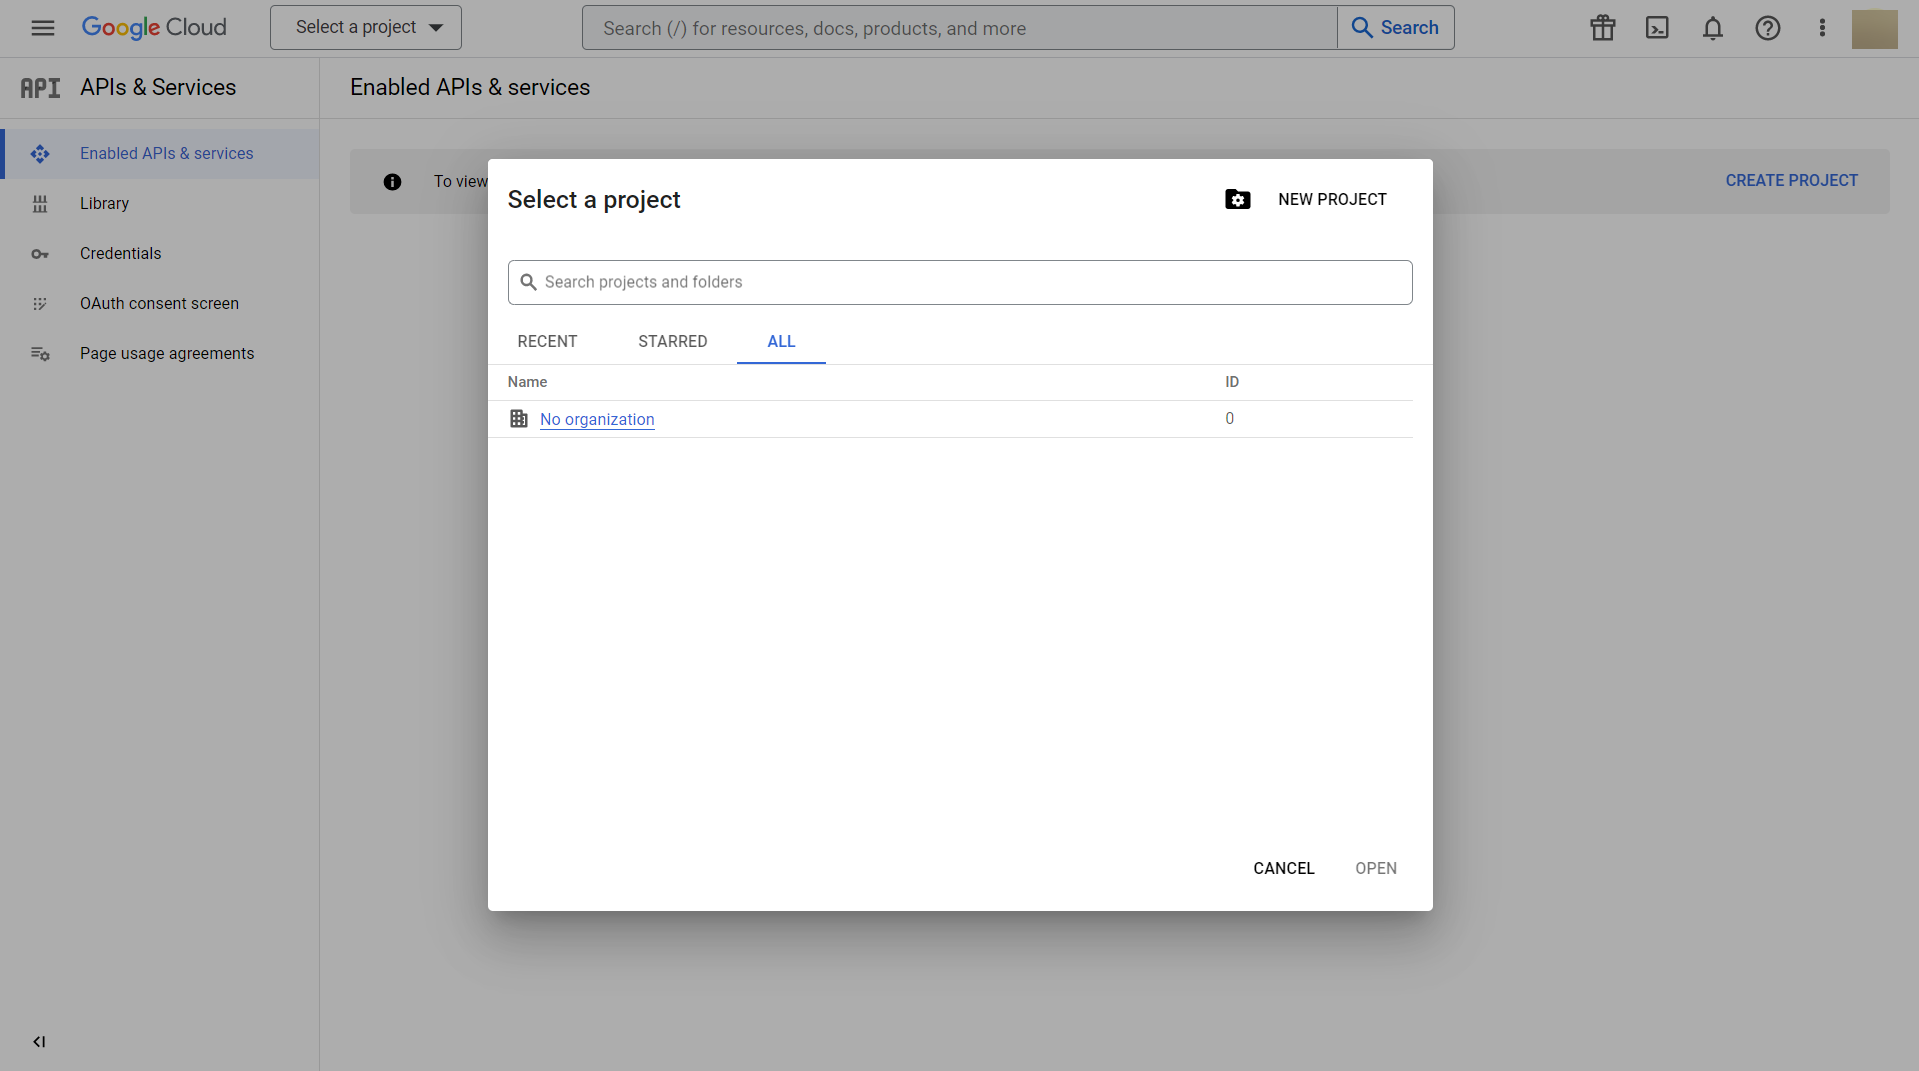
Click on Select a project from the home page and in the pop-up that appears select New Project.
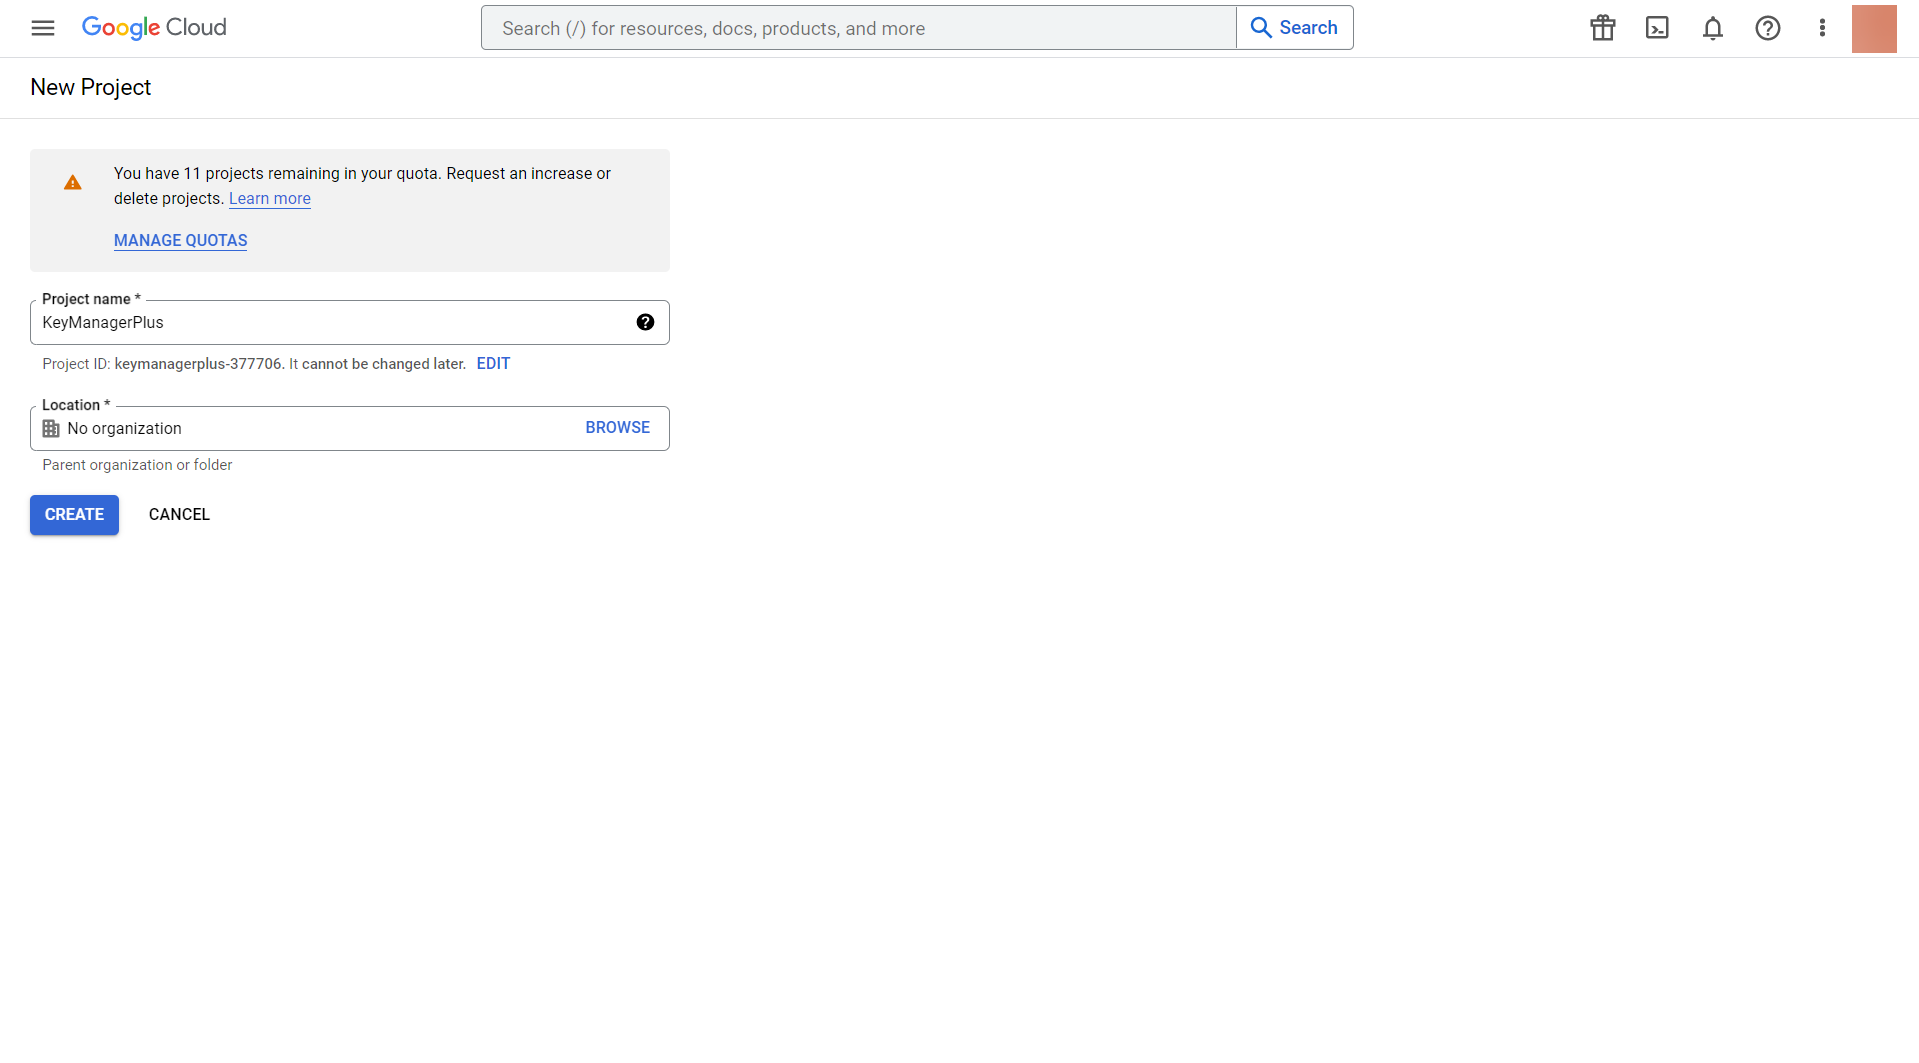
In the window that opens, enter the Project Name, select the organization under the Location, and click CREATE.
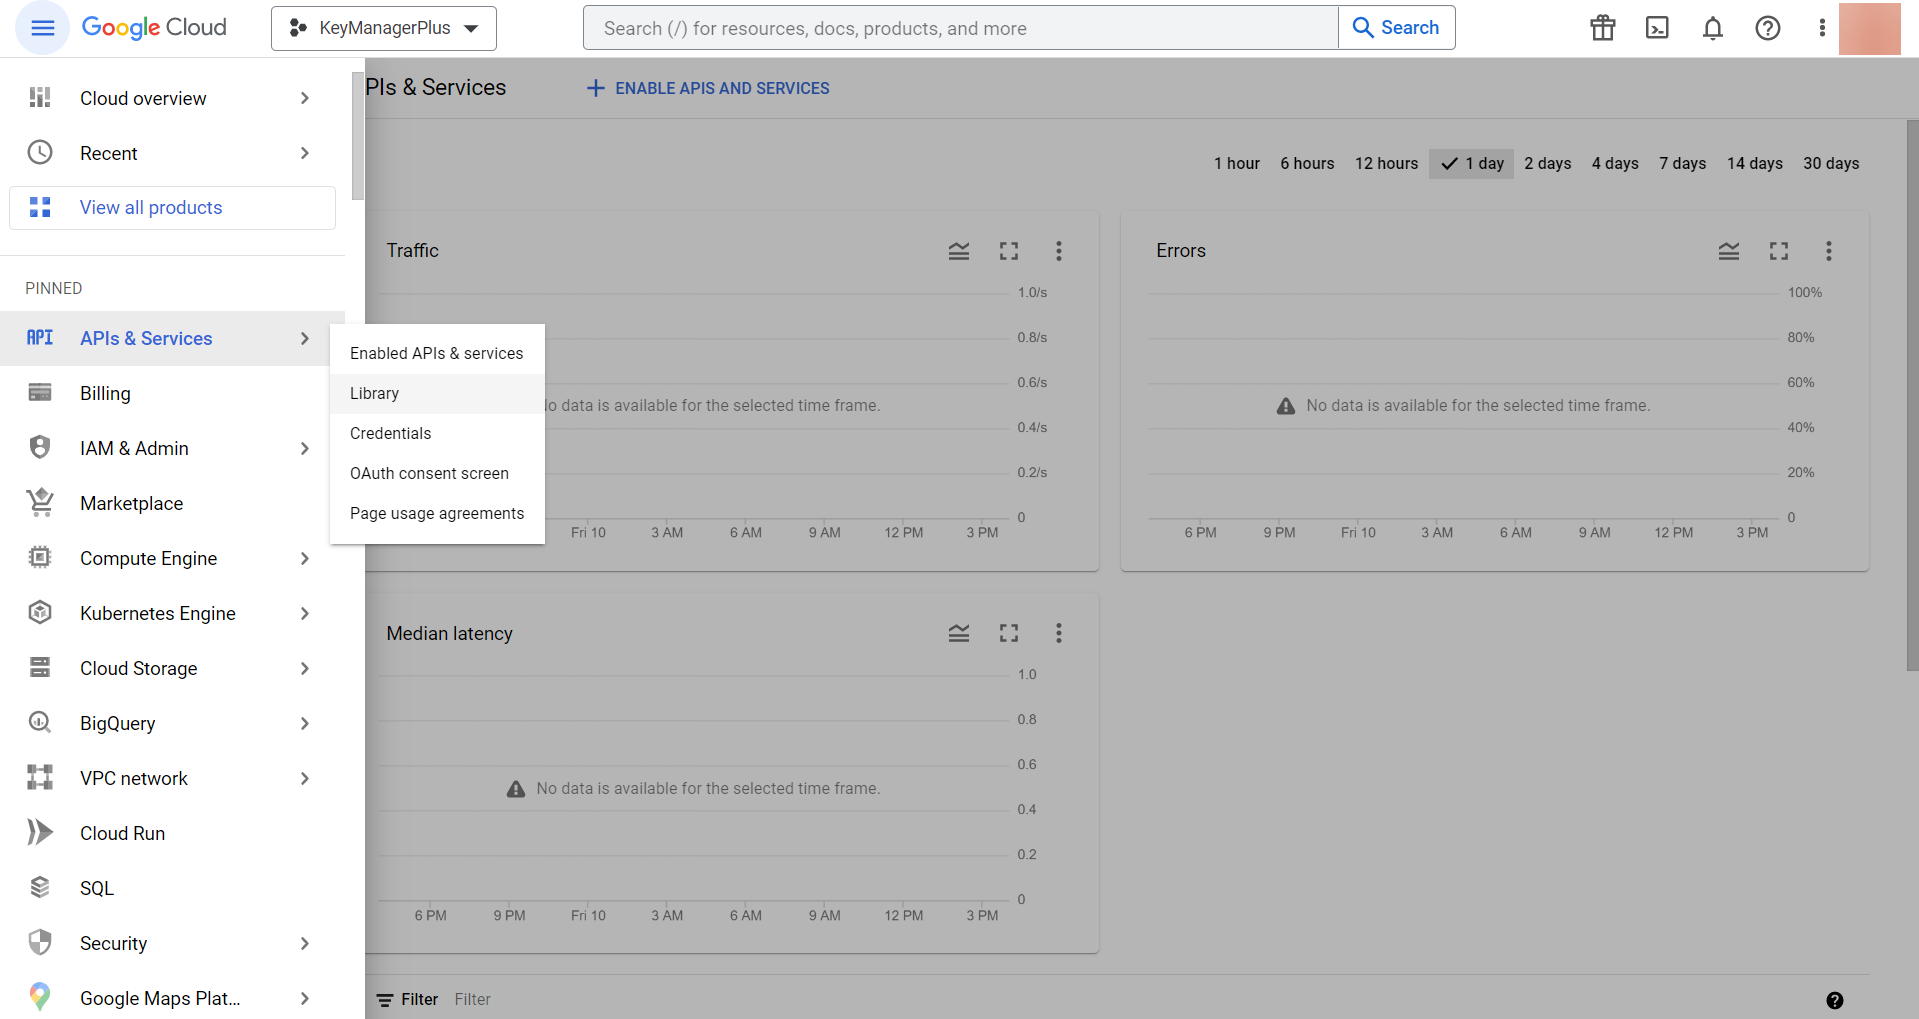
Expand the Navigation Menu on the top left and navigate to APIs & Services >> Library.
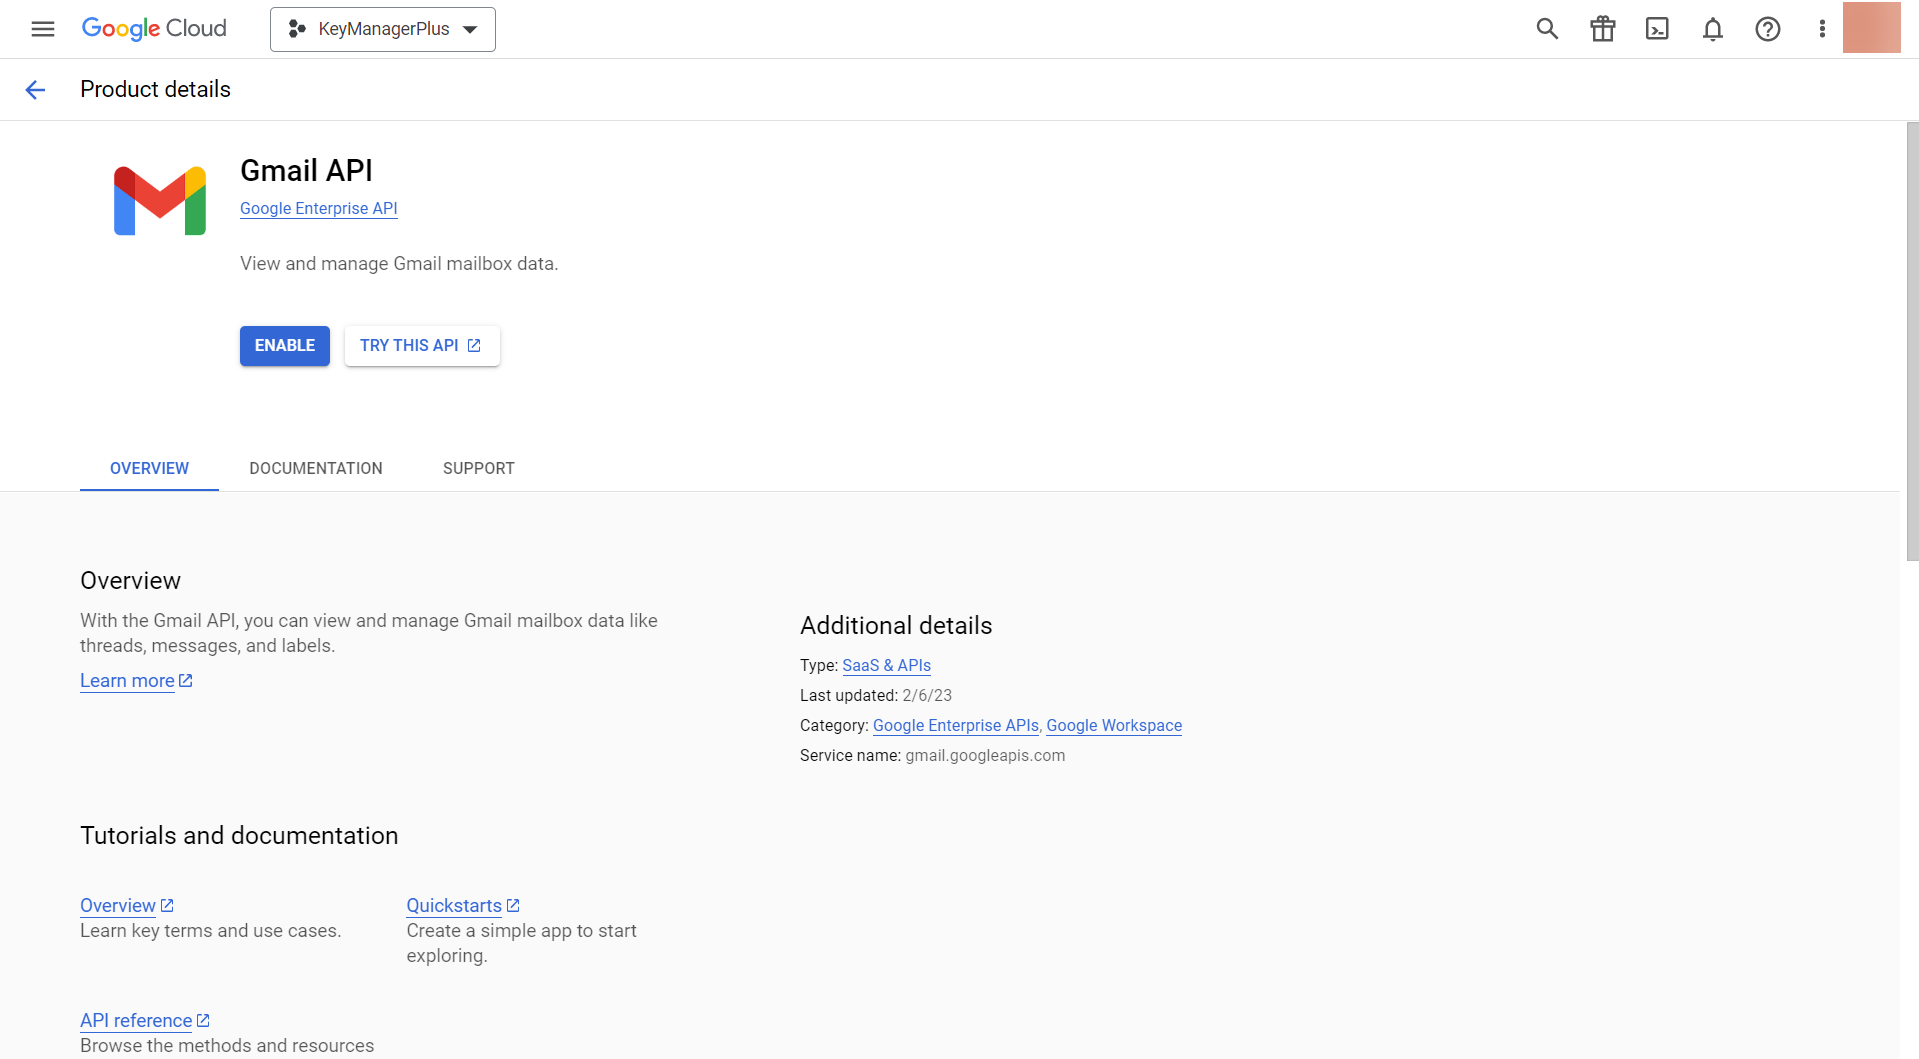
- Select Gmail API from the available list of APIs using the available search option.
In the window that opens, click Enable.
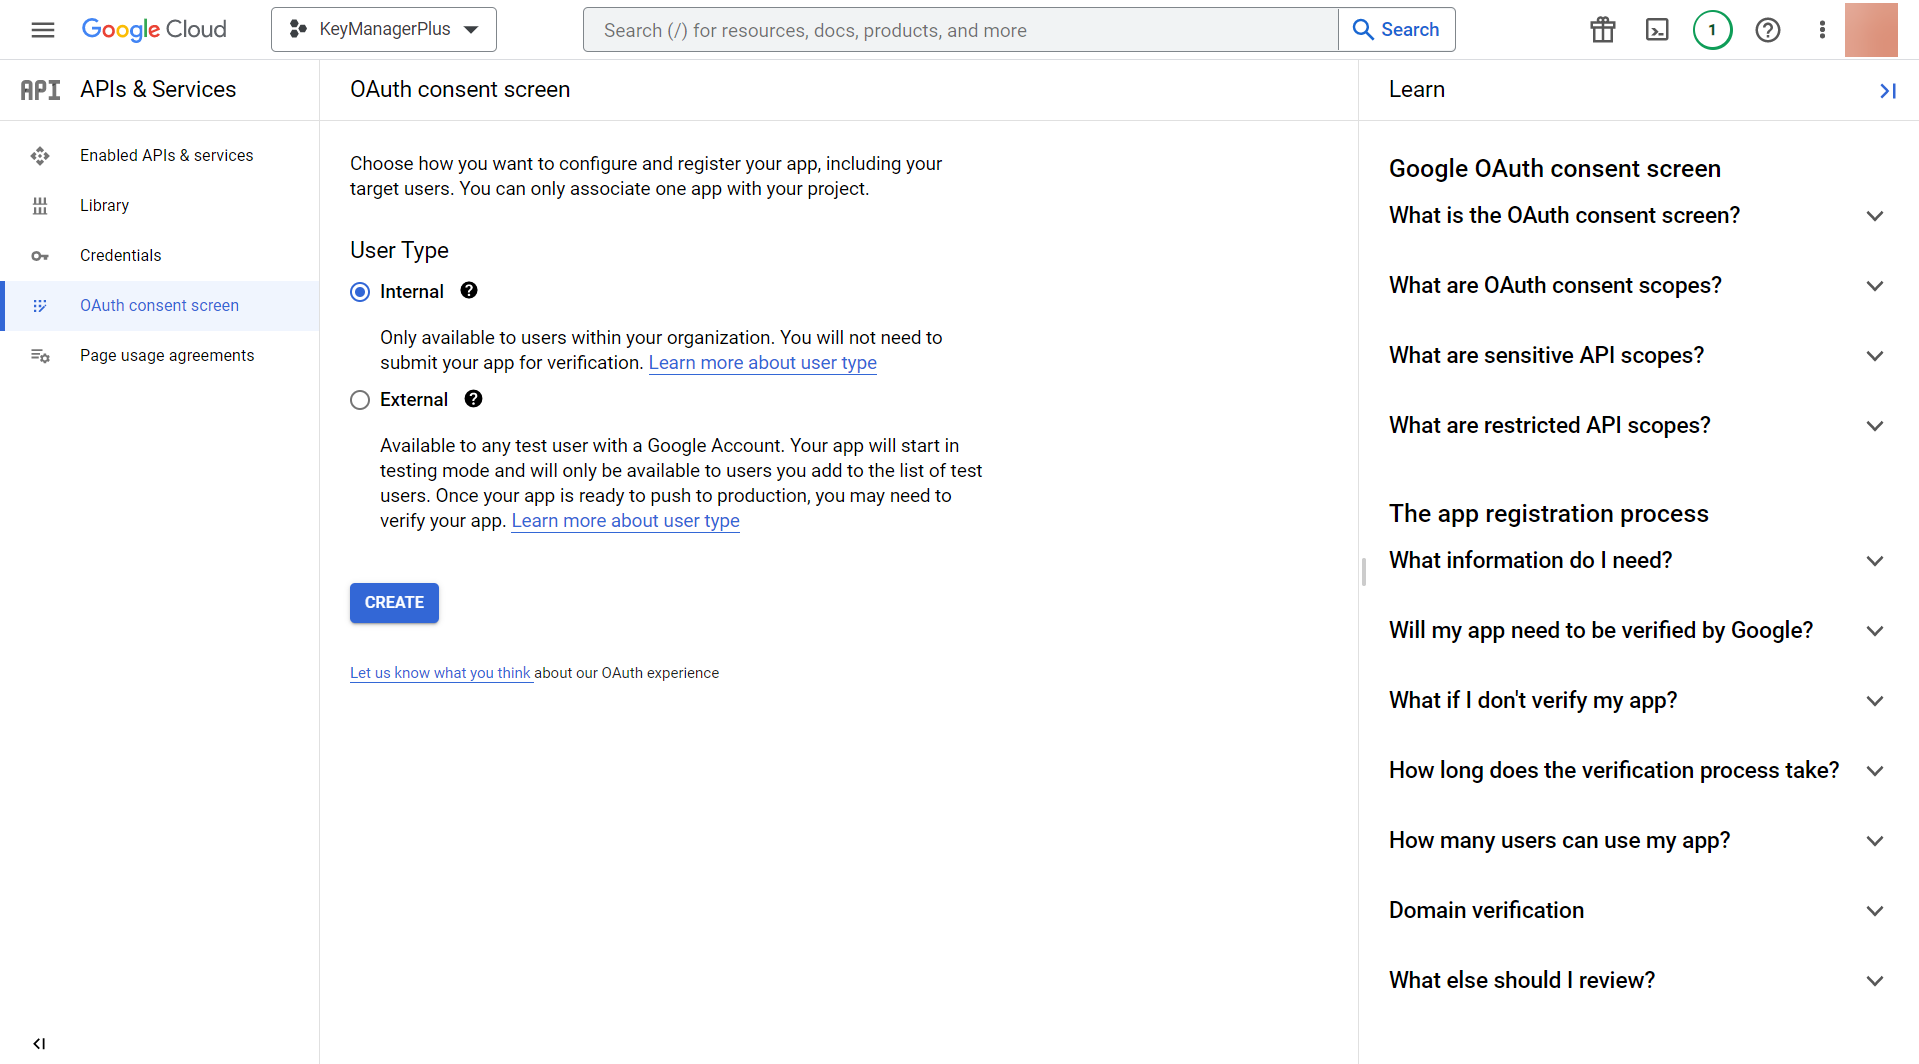
Click the OAuth consent screen from the left menu, choose the User Type, and click CREATE.
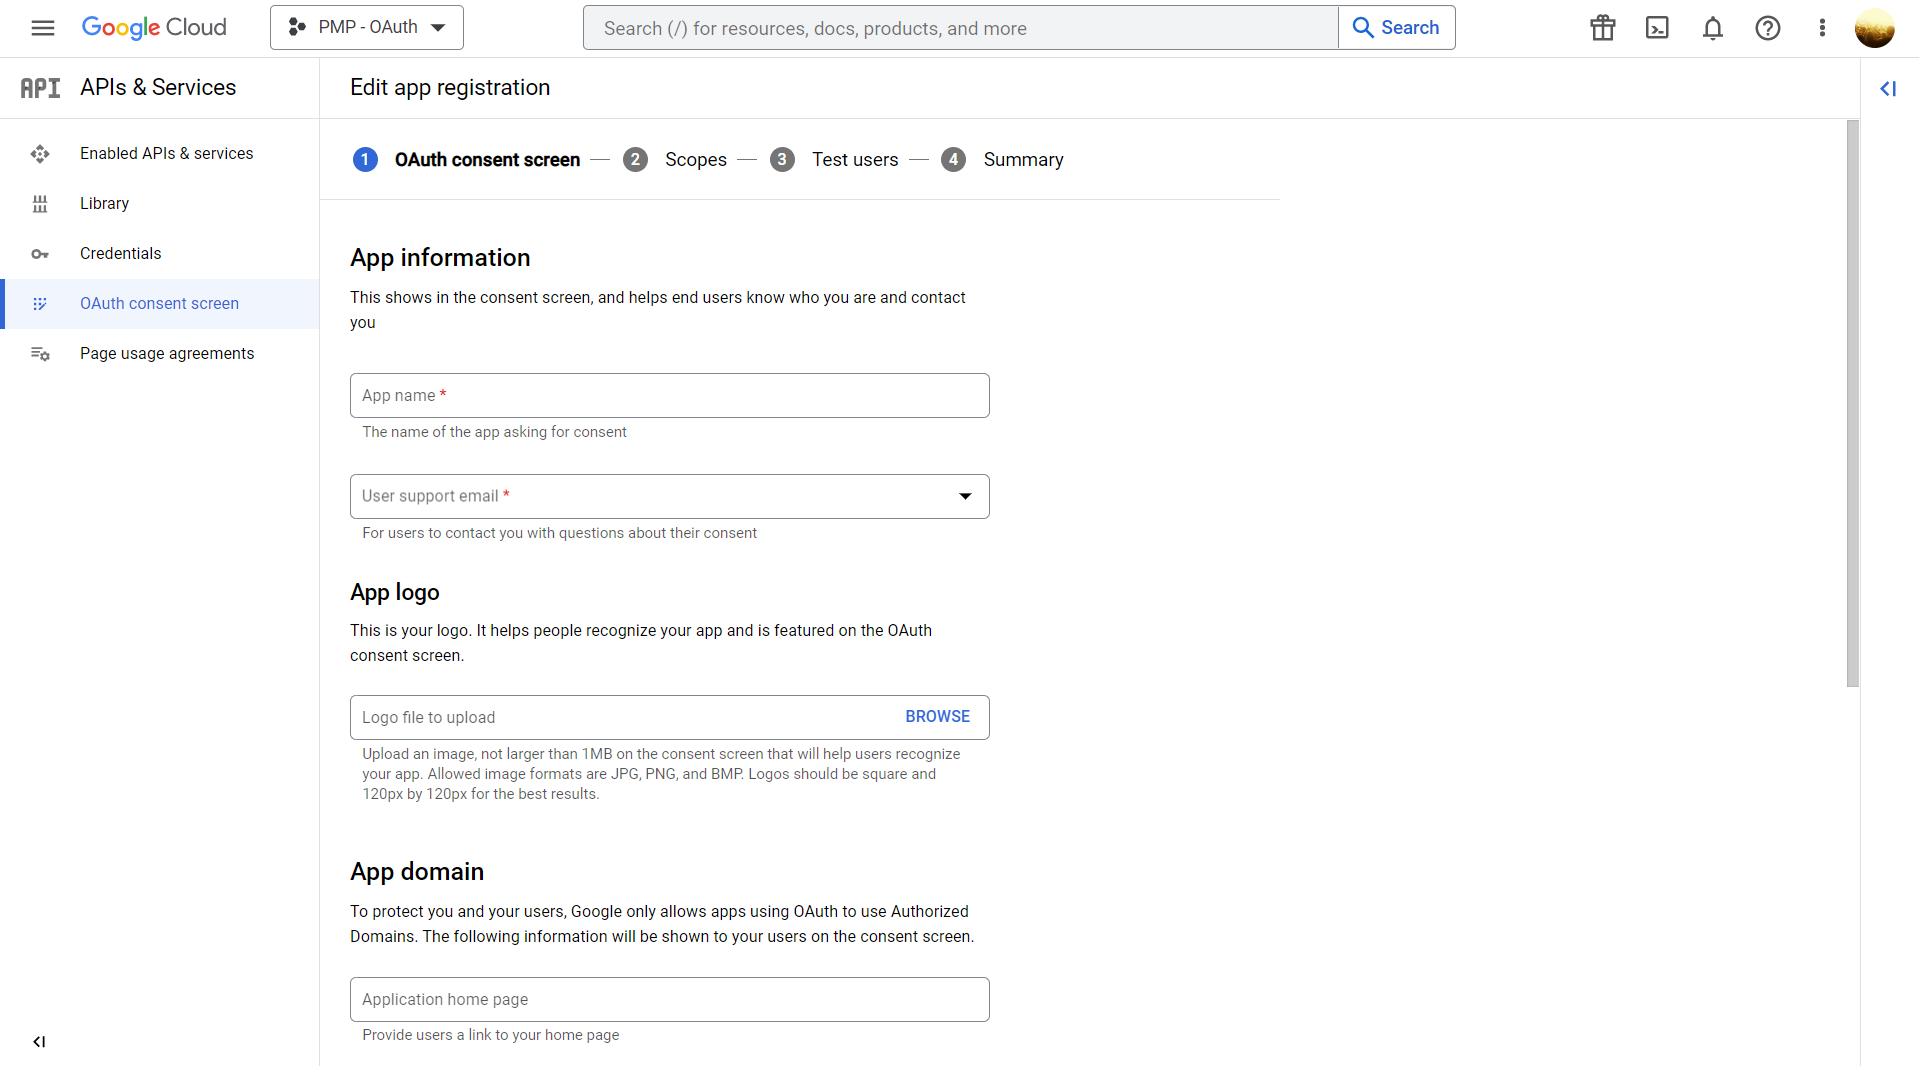
- On the page that opens (Edit app registration), enter the application name and fill in all the mandatory fields.
Upon entering the valid information, click Save and Continue.
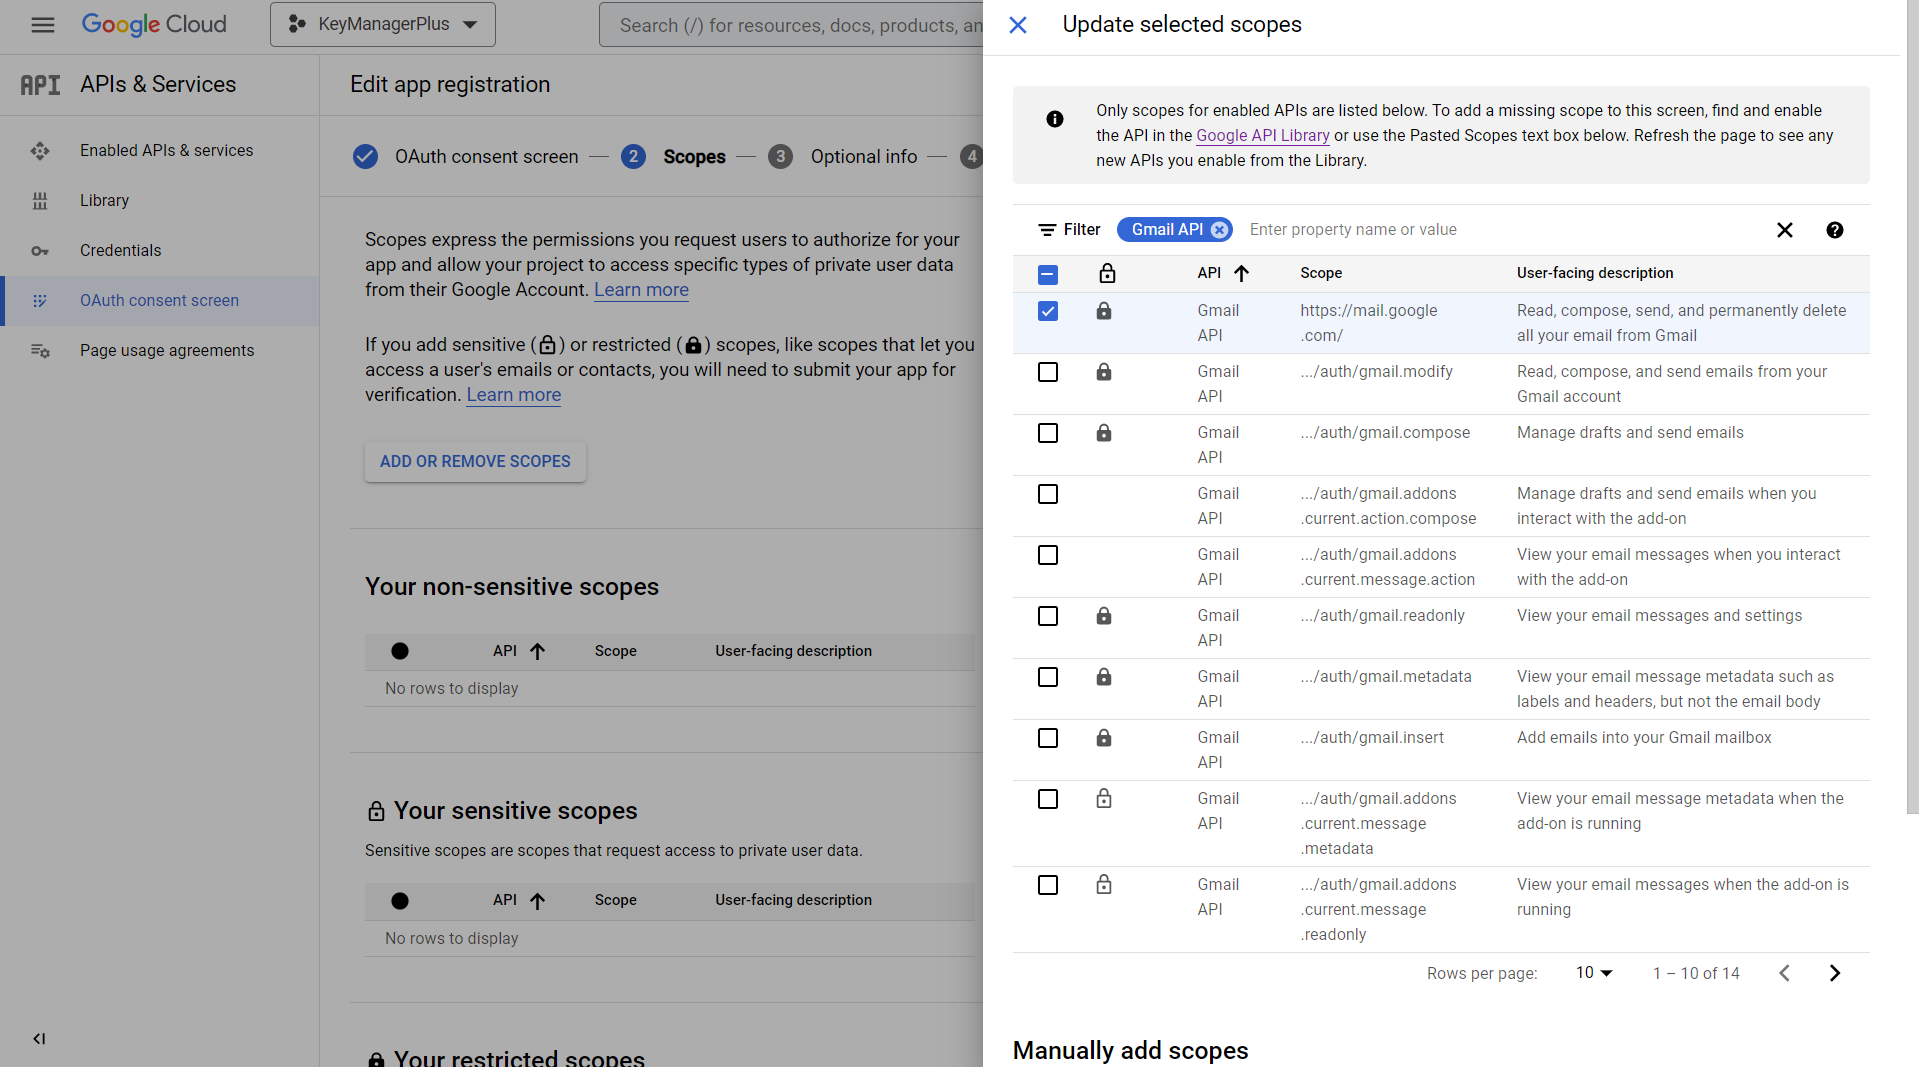
- Click ADD OR REMOVE SCOPES button and search for Gmail API.
Select the Gmail API with scope - https://mail.google.com/ and click Update.
- Click Save and continue for the next two occurrences and select BACK TO DASHBOARD.
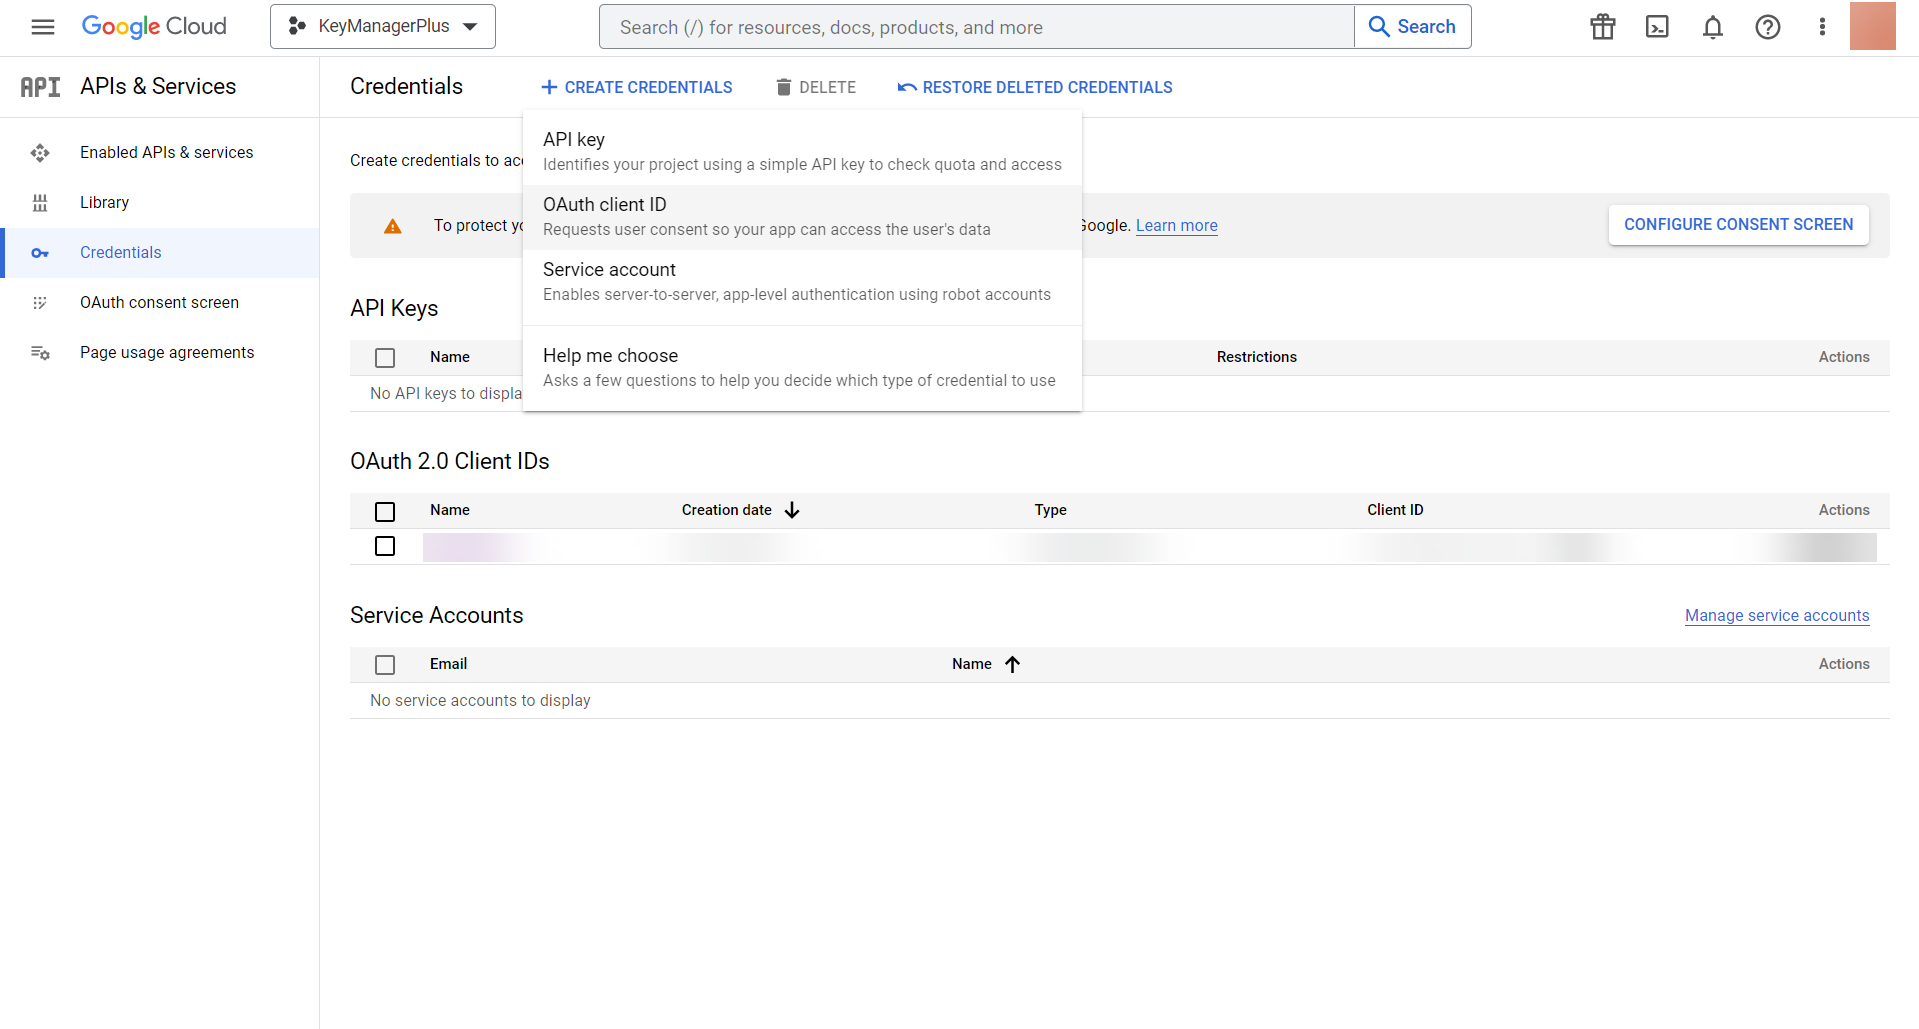
From the left panel, navigate to Credentials >> + Create Credentials >> OAuth Client ID.
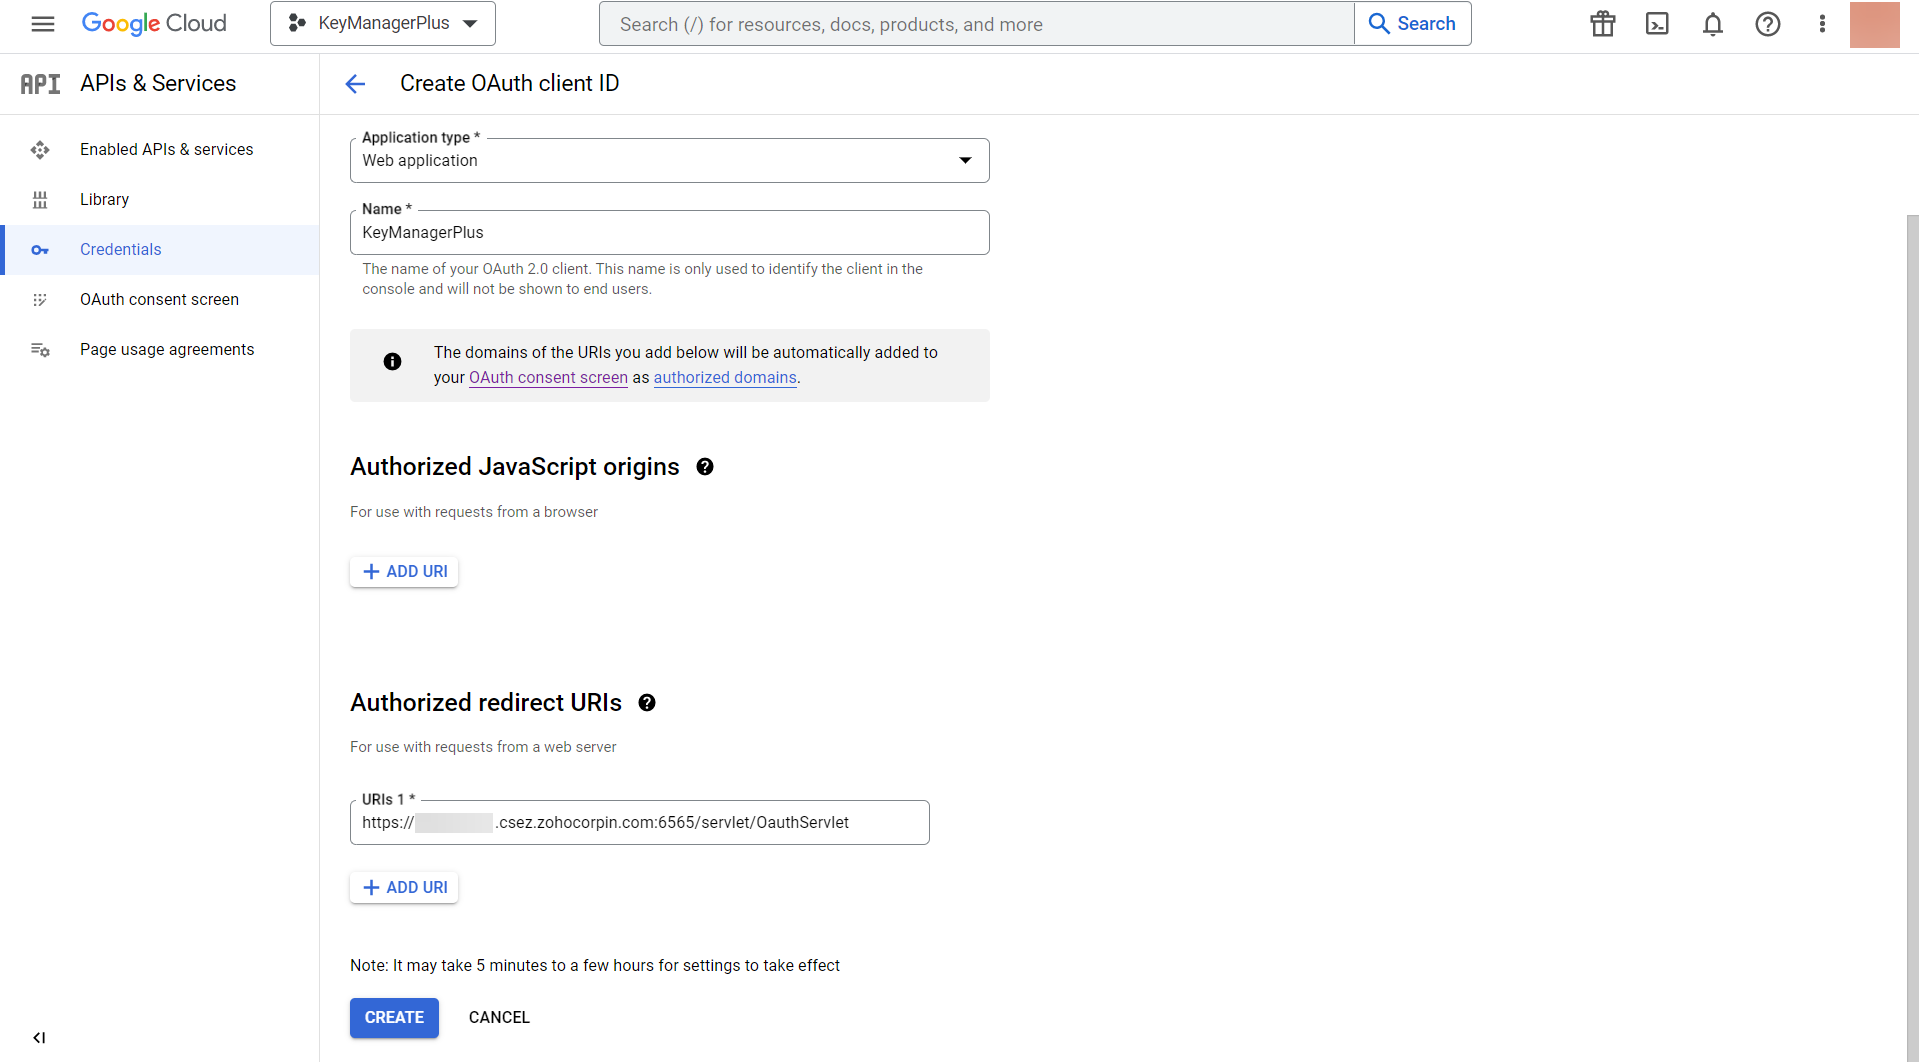
- In the page that appears, select the Application type as Web Application and provide a Name.
- Under Authorized redirect URIs, click the + ADD URIs and enter the Redirect URL of Key Manager Plus in any one of the below format:
- https://kmp-server.csez.manageenginecorpin.com:6565/servlet/OauthServlet
- https://localhost:6565/servlet/OauthServlet
- https://kmp-server.csez.manageenginecorpin.com:6565/servlet/OauthServlet
Upon entering the required fields, click Create.
- A pop-up displaying the Client ID and Client Secret will be displayed. Copy the values and save them in a secure location.
- Click DOWNLOAD JSON to download the file containing the authorization server details.
Click OK.
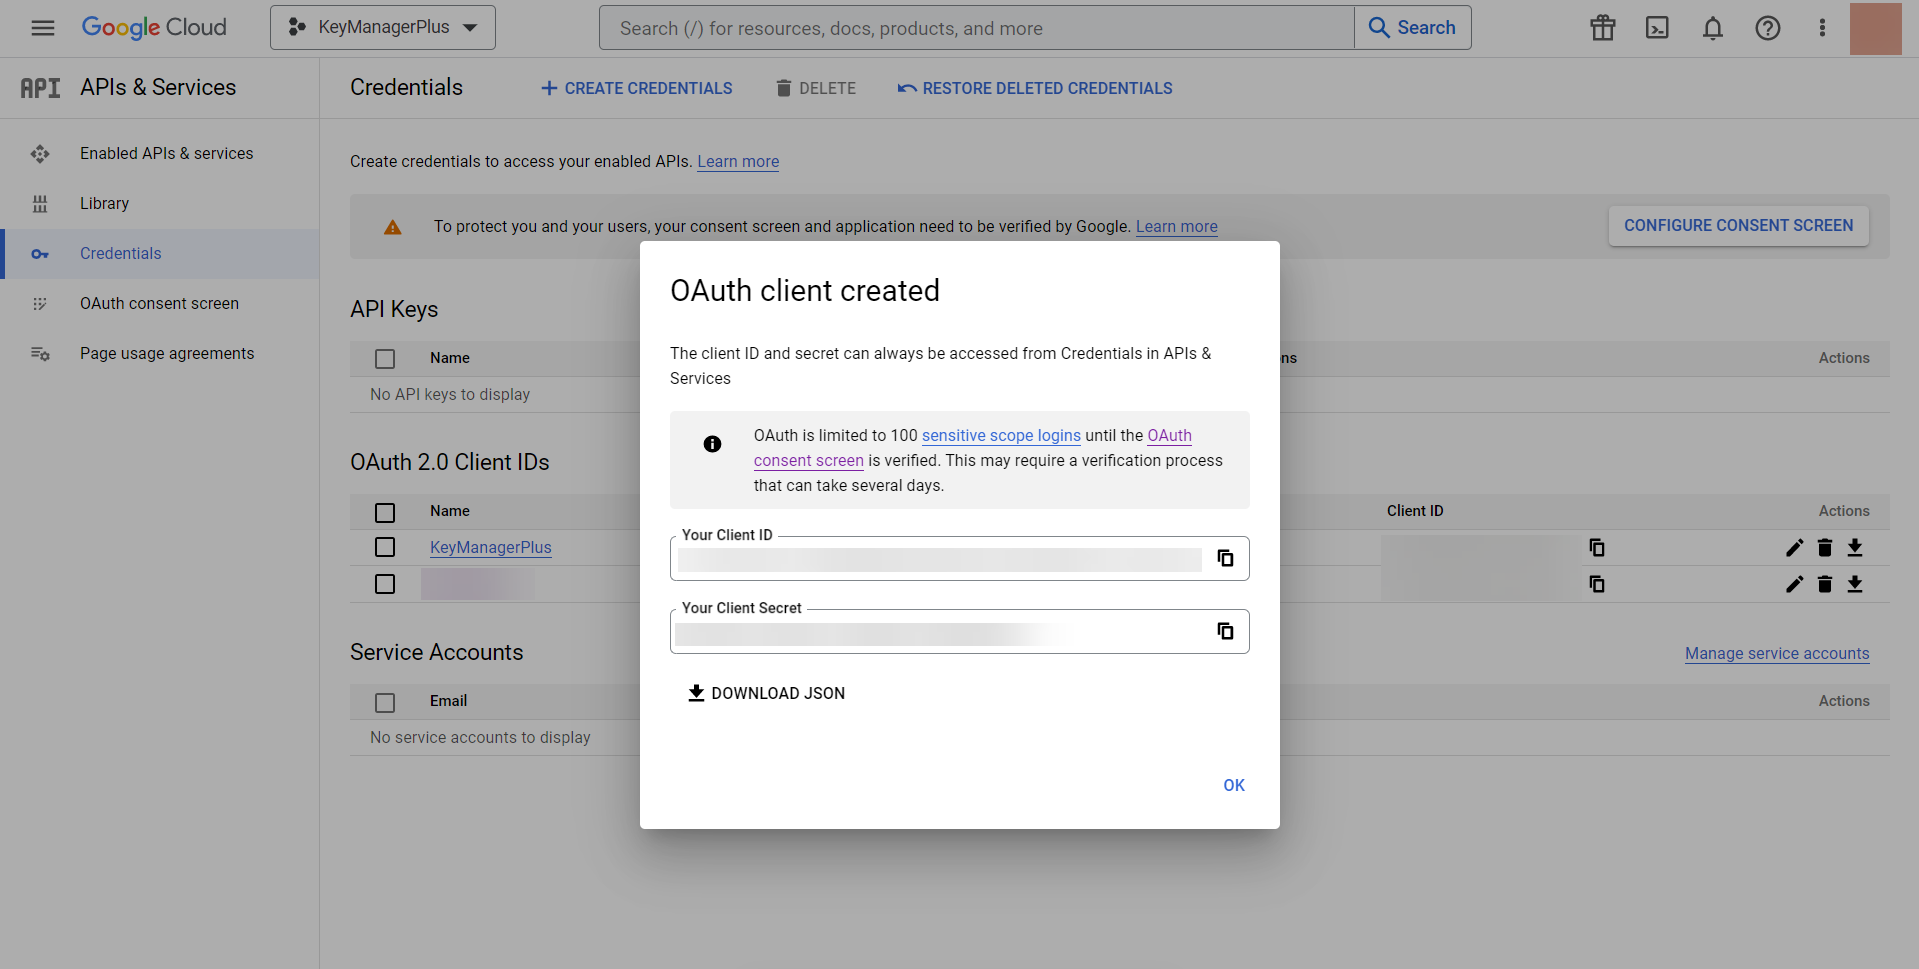
Google is now configured as your organization's authorization server.
3.2 Configuring Google as the Mail Server in Key Manager Plus
- Navigate to Settings >> General Settings >> Mail Server.
- On the page that appears to the right, enter the following:
- Select OAuth in the Authentication Type.
- The SMTP Server field will be filled in default with 'smtp.gmail.com'.
- Port - The default port for TLS is 587.
- Choose Google from the Mail Server drop-down.
- To Address - Enter an email address here to check the mail server setting functionality after the mail server configuration.
From/Sender Address- Enter the sender's google email address.
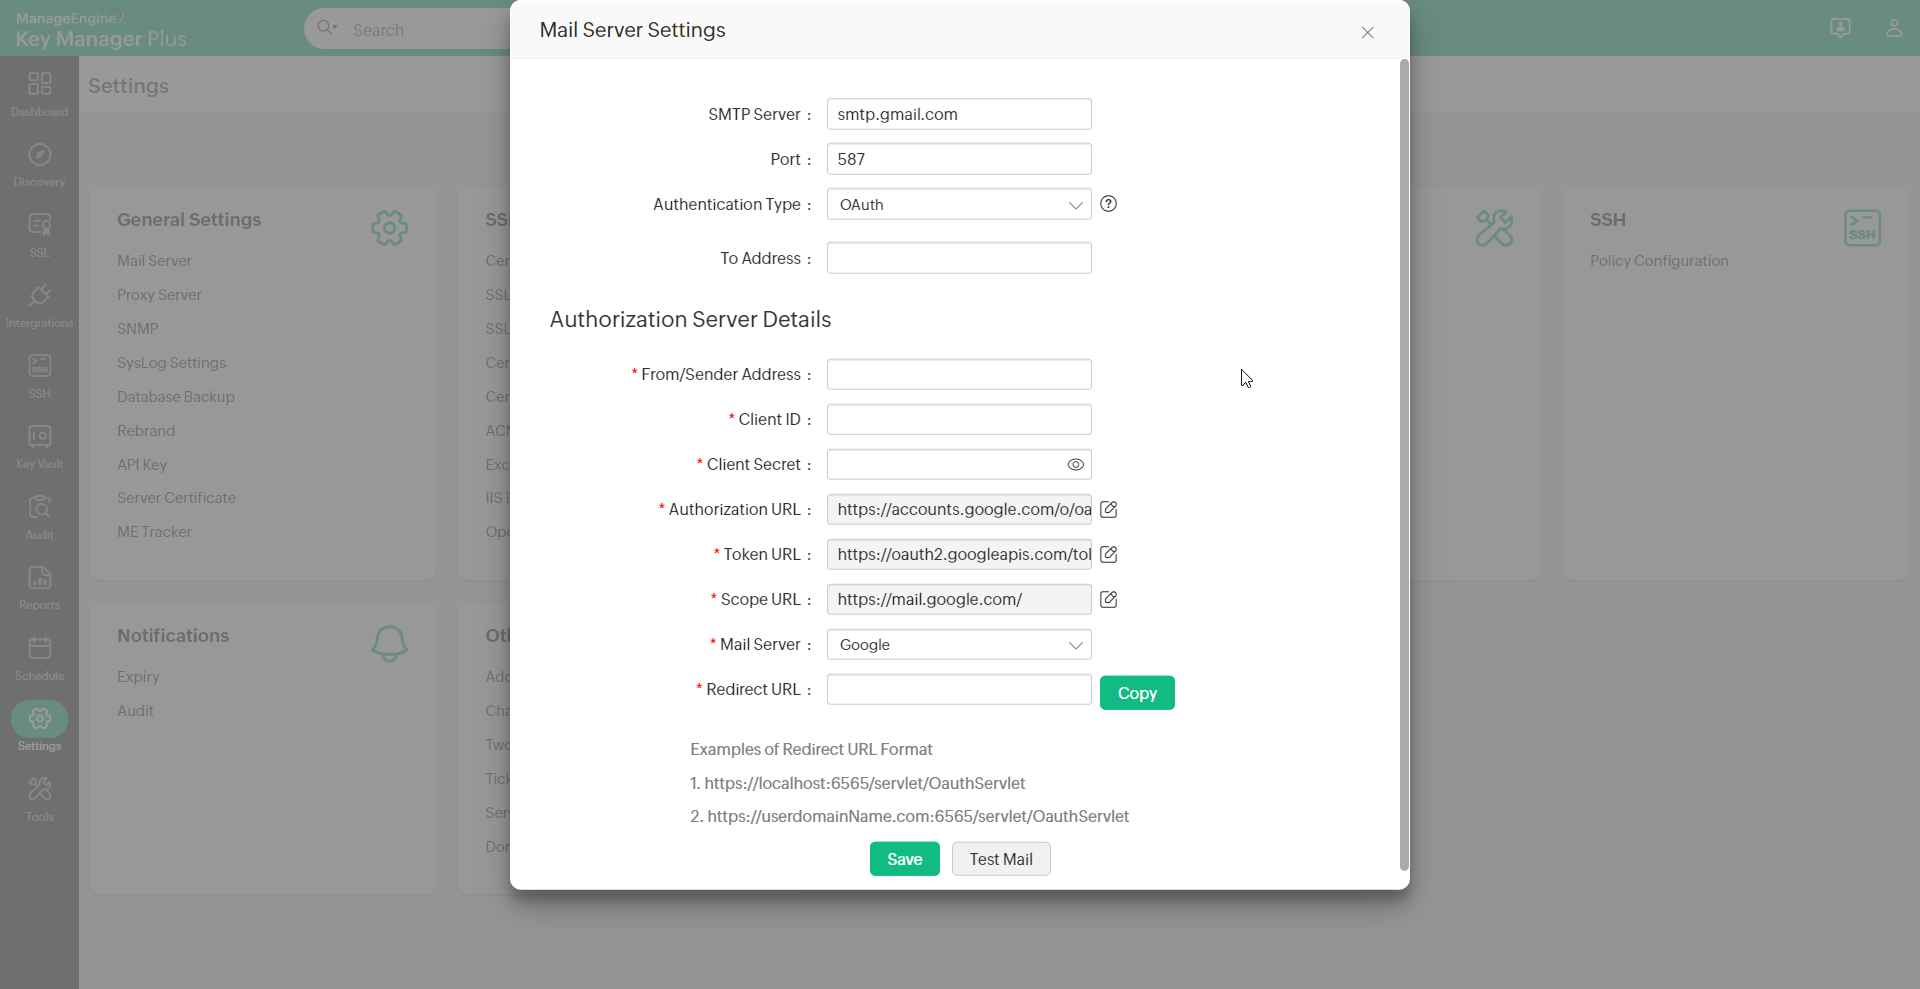
- Client ID - Enter the application ID of the Azure application.
- Client Secret - Enter the client secret value created for the Azure application.
Redirect URL - The redirect URL must end with a public top-level domain such as .com or .org. Enter the Redirect URL of Key Manager Plus in any one of the below formats as entered while configuring Google as the mail server:
- https://kmp-server.csez.zohocorpin.com:6565/servlet/OauthServlet
- https://localhost:6565/servlet/OauthServlet
The Google application accepts only the redirect URLs that end with a public top-level domain such as .com or .org.
- You have now configured Google as your mail server for your organization.
4. Configuring Other Mail Servers
- Navigate to Settings >> General Settings >> Mail Server.
- On the page that appears to the right, enter the following:
- Select Basic in the Authentication Type.
- SMTP Server - Enter the actual SMTP server's name. For e.g., smtp.manageengine.com.
- Port - Most SMTP servers work with port 25. However, the default port for TLS is 587, and for SSL is 465.
- From/Sender Address - Enter the sender's email address.
To Address- Enter the recipient email address for whom the emails are to be sent from the Key Manager Plus.
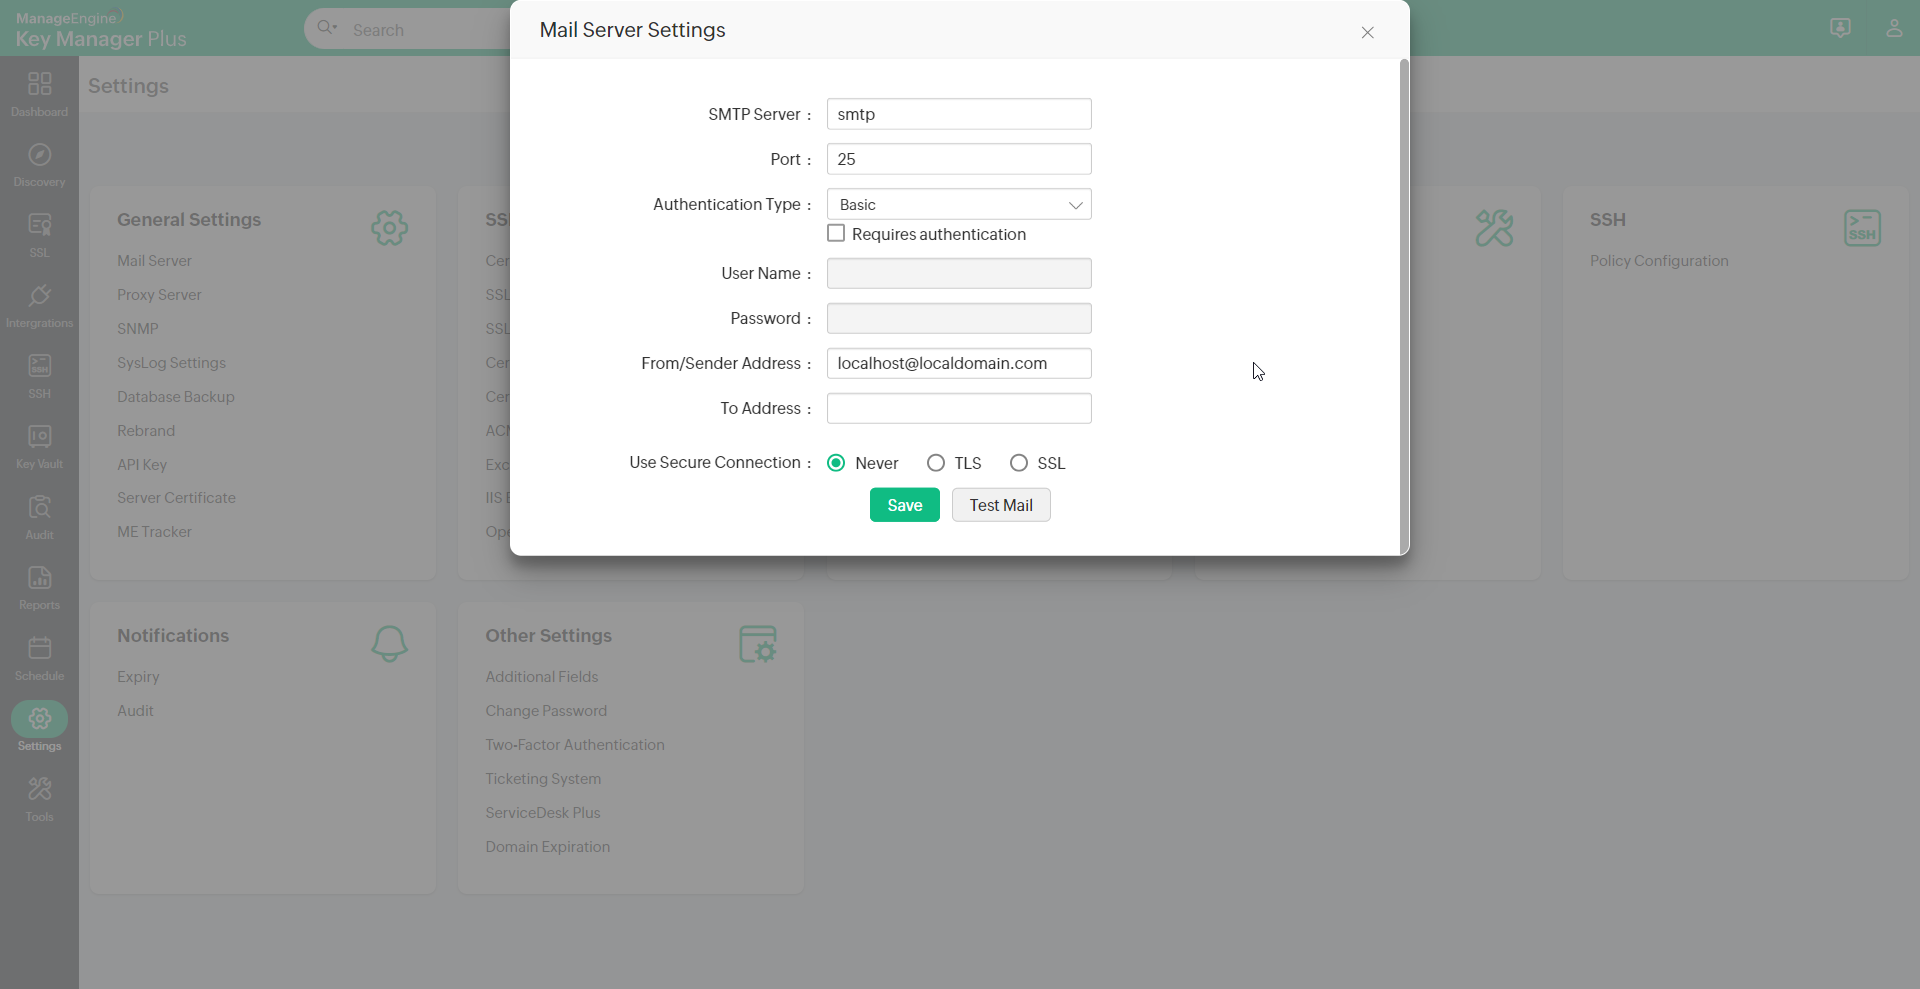
- Upon clicking the Requires Authentication checkbox, the pop-up form enables two options.
- Enter the User Name and the Password details and click Save.
- You also have the option to choose the Secure Connection Protocol - Never/TLS/SSL.
- SSL - Secure Sockets Layer (SSL) is a cryptographic protocol that enables secure connection over the internet.
- TLS - Transport Layer Security (TLS) is a new version of SSL that enables secure connection over the internet.
- Once you have provided the authentication details and the secure connection mode, click Save.
You have now configured your organization SMTP mail server in as the mail server for Key Manager Plus.
Notes:
- It is recommended to use SSL/TLS options for secure communication over the internet /intranet.
- If the mail server is using a self-signed certificate, then we need to import it into Key Manager Plus.
- Copy the server certificate and paste it under <Key Manager Plus Installation Folder>/bin directory..
- From <Key Manager Plus Installation Folder>/bin directory, execute the command importCert.bat <name of the server certificate>. This adds the certificate to the Key Manager Plus certificate store.
- After providing the authentication details and the secure connection mode, you also have the option to test the mail server before clicking save.