OpManager Plus sends SMS notifications via
- SMS Gateway
- SMPP
Before configuring the SMS gateway in OpManager Plus, you can also verify the configuration using a third-party API tool from any browser.
Install a third party extension like POSTMAN from chrome and check the response of the same before saving the configuration in OpManager Plus.
SMS Gateway:
Now OpManager Plus supports SMS notifications via HTTP API. You can configure your own custom SMS gateway provided that the gateway is HTTP or HTTPS. An account in any of SMS Gateway portal is mandatory to generate a HTTP API Key.
Please refer your respective SMS gateway's HTTP API documents for more details.
Prerequisites:
1.An account in the SMS Gateway portal.
2.SMS gateway API URL should be reachable from OpManager Plus installed server.
3.Must have enough credits to send SMS.
Please refer your respective SMS gateway's HTTP API documents for more details.
To configure SMS server settings,
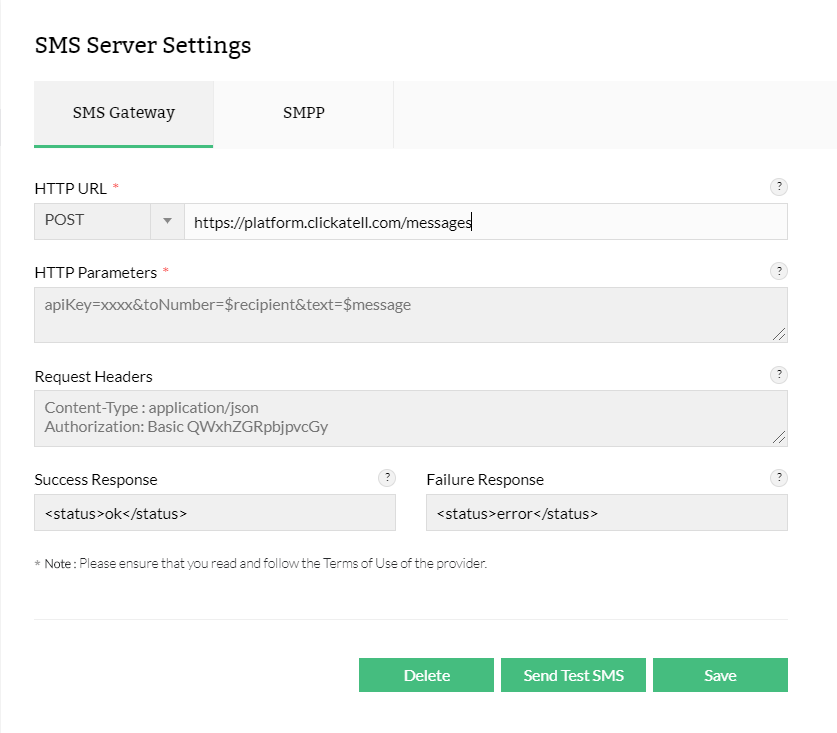
Go to Settings --> Basic Settings --> SMS Server Settings --> SMS Gateway

1) HTTP URL: Denotes the URL of your SMS gateway provider. This field does not include URL parameters.
Eg: http://www.smsserver.com/sendsms
https://api.clickatell.com/http/sendmsg
Select whether you want to use POST or GET HTTP method for sending SMS.
Let's take an example as Clickatell SMS gateway provider

Configure the URL with the help of the API document.The above URL "https://platform.clickatell.com/messages" is used with the help of the API document below,you may refer
https://www.clickatell.com/developers/api-documentation/rest-api-send-message/

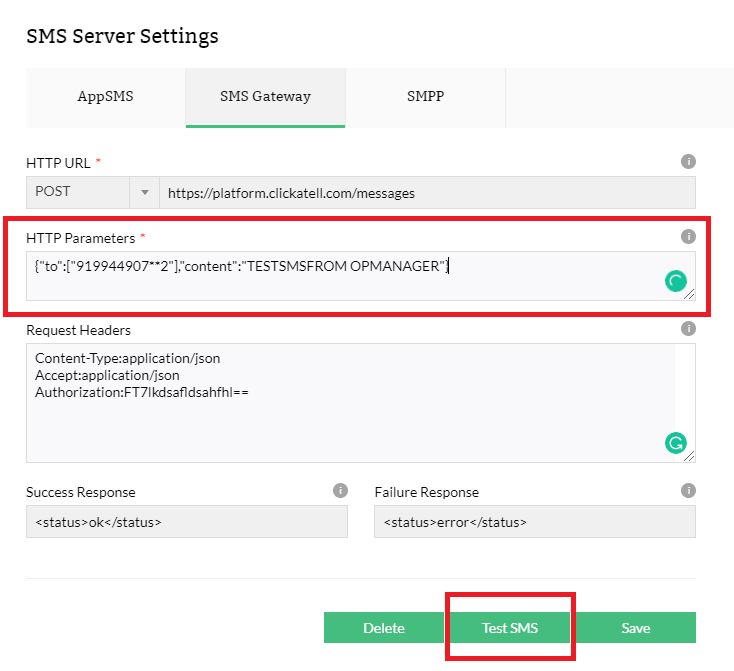
2) HTTP Parameters: Indicates the URL parameters or request body of the HTTP request based on the provider's API document.
Example:
apiKey=xxxx&toNumber=$recipient&text=$message
(or)
{"apiKey":"xxxx","to":["$recipient"],"content":"$message"}
** The above parameters like apikey is an example and it might vary based on your
provider.Please check for the API document for the mandatory and optional parameters and use it accordingly.
3) Request Headers(optional, based on gateway provider):
Indicates URL’s request headers.
Each header should be in a new line as shown below
Eg:
Content-Type : application/json
Accept: application/json
4) Response:
The success and failure response fields are optional and this is only used to know whether the SMS is sent successfully or not while using Test SMS.
Each provider will have a set of success and failure responses.
By clicking on TestSMS ,OpManager Plus will check the response from the provider and match the string configured and show it accordingly in the UI.
The responses for success or failure message will be available in the API document of the gateway provider.
Success Response: Check the API document of the SMS gateway provider from their sample "RESPONSE"
For example:
A sample success response from a API document:
Response:
<xml>
<message_id>[ID of message in outbox]</message_id>
<status>ok</status>
</xml>
You can configure the Success response under SMS server settings as <status>ok</status>.
Failure Response: Check the API document of the SMS gateway provider from their sample "RESPONSE"
Response:
A sample failure response from the API document.
Response (when wrong logindata):
<xml>
<error_text>Invalid login or password</error_text>
<status>error</status>
You can configure the Success response under SMS server settings as <status>error</status>
TESTSMS:
While using "Test SMS" replace the "$recipient" and "$message" in the HTTP parameters with the respective mobile number and the desired message to check whether you receive the SMS.

SAVING THE CONFIGURATION:
While saving this configuration please replace the mobile number and message with "$recipient" and "$message" as they are placeholders for recipient and SMS content parameter keys which are hardcoded.

Once the SMS Gateway settings are configured, you can create SMS Notification Profile of type SMS Gateway
Go to Settings --> Notification --> Add --> SMS --> (Select Gateway) --> SMS Gateway.
To configure SMS notification profile, click here.
SMPP:
OpManager Plus also supports SMS notification via SMPP. SMPP stands for Short Message Peer to Peer Protocol. Short Message Peer-to-Peer (SMPP) in the telecommunications industry is an open, industry standard protocol designed to provide a flexible data communication interface for the transfer of short message data between External Short Messaging Entities (ESMEs), Routing Entities (REs) and Message Centres.
Using the SMPP protocol, an SMS application system called the ‘External Short Message Entity’ (ESME) may initiate an application layer connection with an SMSC over a TCP/IP connection and may then send short messages and receive short messages to and from the SMSC respectively. It allows fast delivery of SMS messages.
1) SMPP Server Name: IP Address or Hostname of the SMPP Server
2) SMPP Server Port: Port number of the SMPP Server
3) User Name: Specify the username of the SMPP Server
4) Password: Specify the password of the SMPP Server
Optional Advanced settings:
5) Source Address: Address of Short Message Entity which originated this message.
6) Source Address's TON: Denotes Type of Number for the source address.
7) Source Address's NPI: Denotes Numbering Plan Indicator for the source address.
8) Destination Address's TON: Denotes Type of Number for the destination address.
9) Destination Address's NPI: Denotes Numbering Plan Indicator for Numbering Plan Indicator for the source address.
