Configurations after changing the EventLog Analyzer server Hostname/IP address
This document provides the configurations to check after changing EventLog Analyzer server hostname or IP address.
Configuration for Standalone Edition
- If you have enabled log forwarding from any Linux, Unix, router, switch, firewall, or syslog devices to EventLog Analyzer, you would need to re-point them to the new server.
- If an agent has been configured for any device, check if it has been modified appropriately.
- Do not delete the previous installation until you ensure the migration is successful. Verify the migration by checking the log collection after 30 minutes.
Note: To configure log forwarding through the product, please refer
here.
Configuring Standalone edition-Integration with Log360
Note: Ensure that all the components are set up and running before proceeding with the steps given below. Also, check whether you have the appropriate versions of the components with respect to the Log360 version you are currently running.
Note: If you integrate EventLog Analyzer with Log360, change the IP or host name and protocol & port in Admin -> Log360 Integration -> EventLog Analyzer Integration.
- Go to Admin → Log360 integration. You will be presented with eight tabs, each representing a component of Log360.
- Click on the EventLog Analyzer tab .
- Enter the name or IP address and the port number of the server on which that particular component is running.
- Select the connection Protocol from the drop-down menu.
- Click Integrate Now.
Repeat the above 3 steps for other components under the respective tabs.
Bulk agent administration:
Follow the below steps to update the EventLog Analyzer server new IP address in all the agents using Group Policy Object (GPO).
Step 1
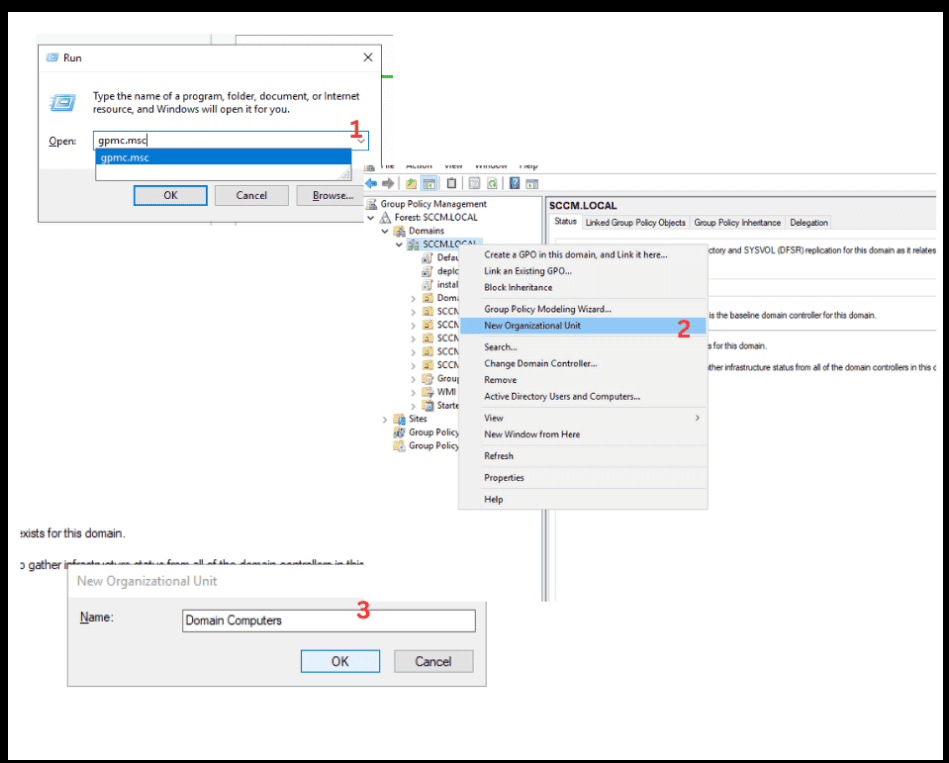
- Open the Group Policy Management Console (gpmc.msc) on a domain controller.
- Right Click on the Domain and Click 'New Organization Unit'.
- Enter OU name and click OK. Add all agent machines which need to update the EventLog Analyzer server IP address to it.
Step 2
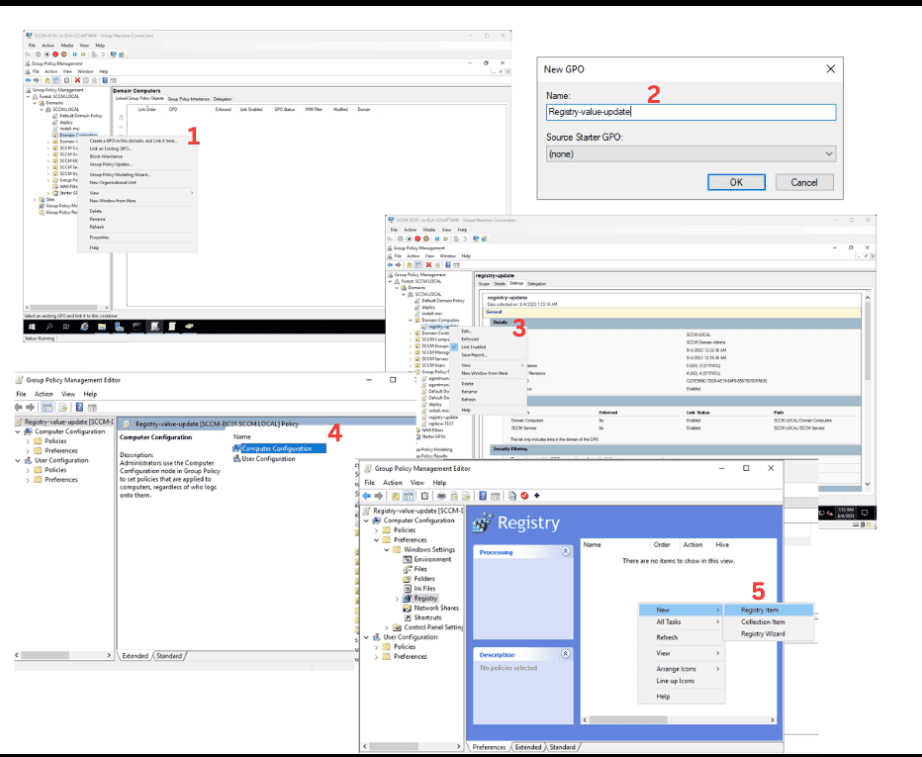
- Right click on the created OU and Click 'create new GPO and link it here'.
- Enter GPO name and click OK.
- Right Click the created GPO and click edit.
- Navigate to Computer Configuration > Preferences > Windows Settings > Registry.
- Right-click on the Registry node and select New > Registry Item.
Step 3
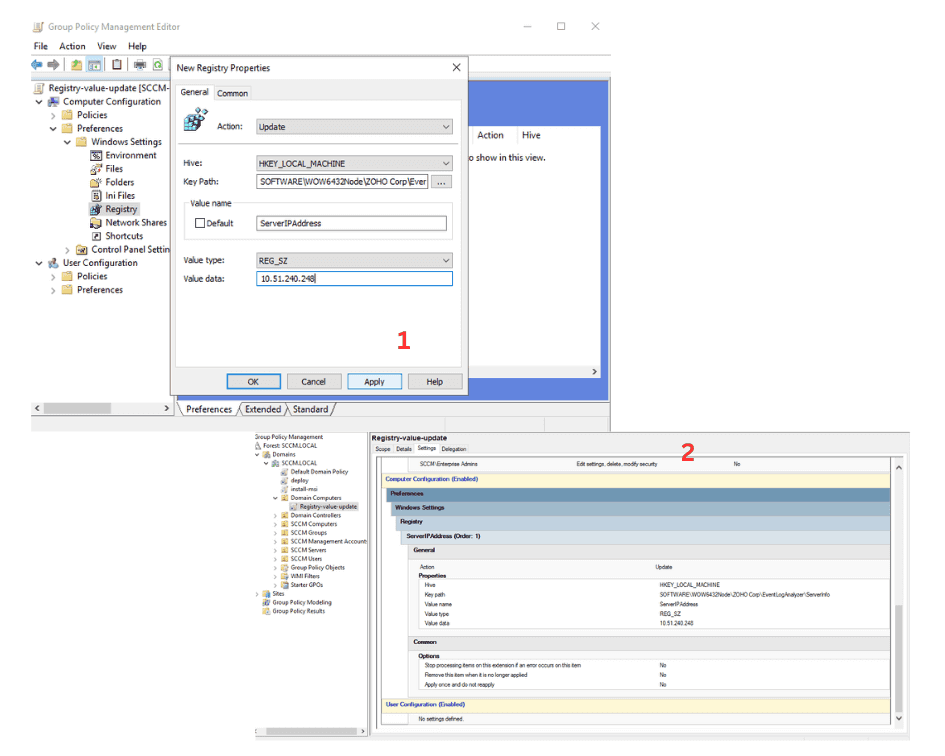
- Configure the registry key values (IP Address) that you want to update and save.
- After completing, check the settings page of GPO and make sure the values are correct.
Step 4
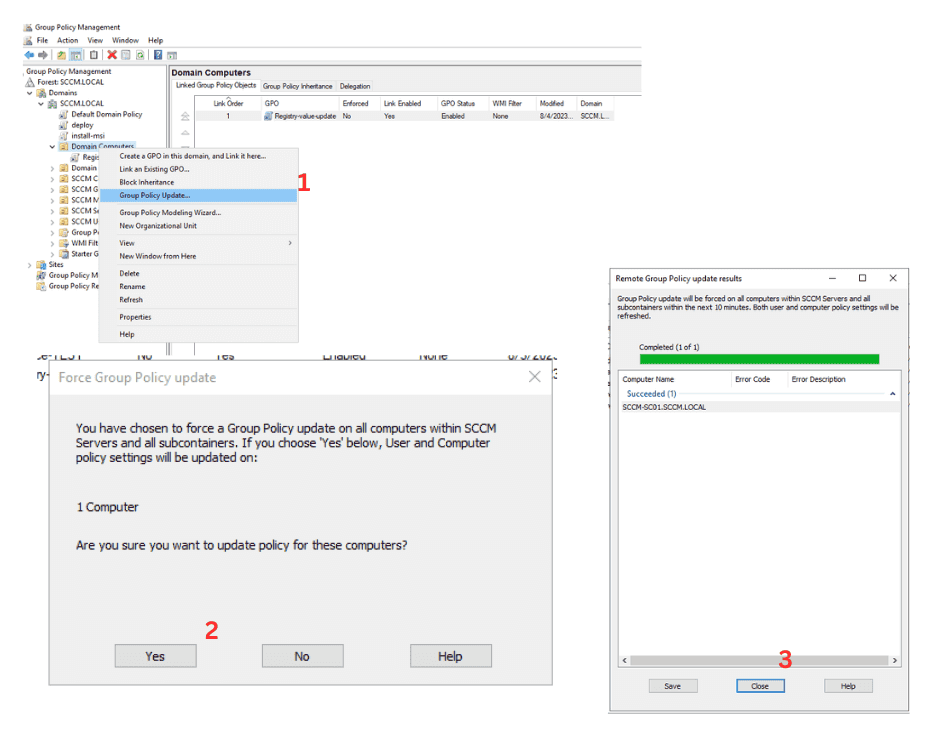
- Update the GPO by Right clicking on the OU and clicking 'group policy update...'
- Click Yes.
- It will take 10min to reflect in all the Domain computers.
Configurations for Distributed Edition
Prerequisites for configuring distributed edition
- Reachability: Check whether both the admin server and managed server are up and open bidirectionally.
- Connectivity: Check whether the admin server console can be accessed in the managed server machine and the managed server console in the admin server machine.
- Product Build: Check whether the admin server build and all managed server builds are the same.
- Navigate to <EventLog Analyzer Installation Directory> Enterprise.txt : Check whether Enterprise.txt values are correctly present as mentioned below.
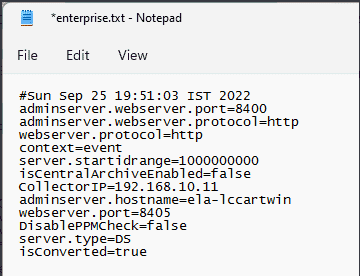
adminserver.webserver.port = admin server running port.
adminserver.webserver.protocol = admin server running protocol.
webserver.protocol = managed server running port.
server.startidrange = managed server using startid.
isCentralArchiveEnabled = set true if Customer using Centralized Archives.
CollectorIP = managed server IP address/ hostname
adminserver.hostname = admin server name.
webserver.port = managed server running port.
DisablePPMCheck = Set false to auto upgrade managed server when Admin Server is upgraded, else set true for Manual upgrade.
Configurations for Managed Server
Registration/Connection
Go to the Database Console and Query as below to find the managed server details - hostname, startid, port, protocol, SSL enabled status in Admin Server : Select * from Collectors
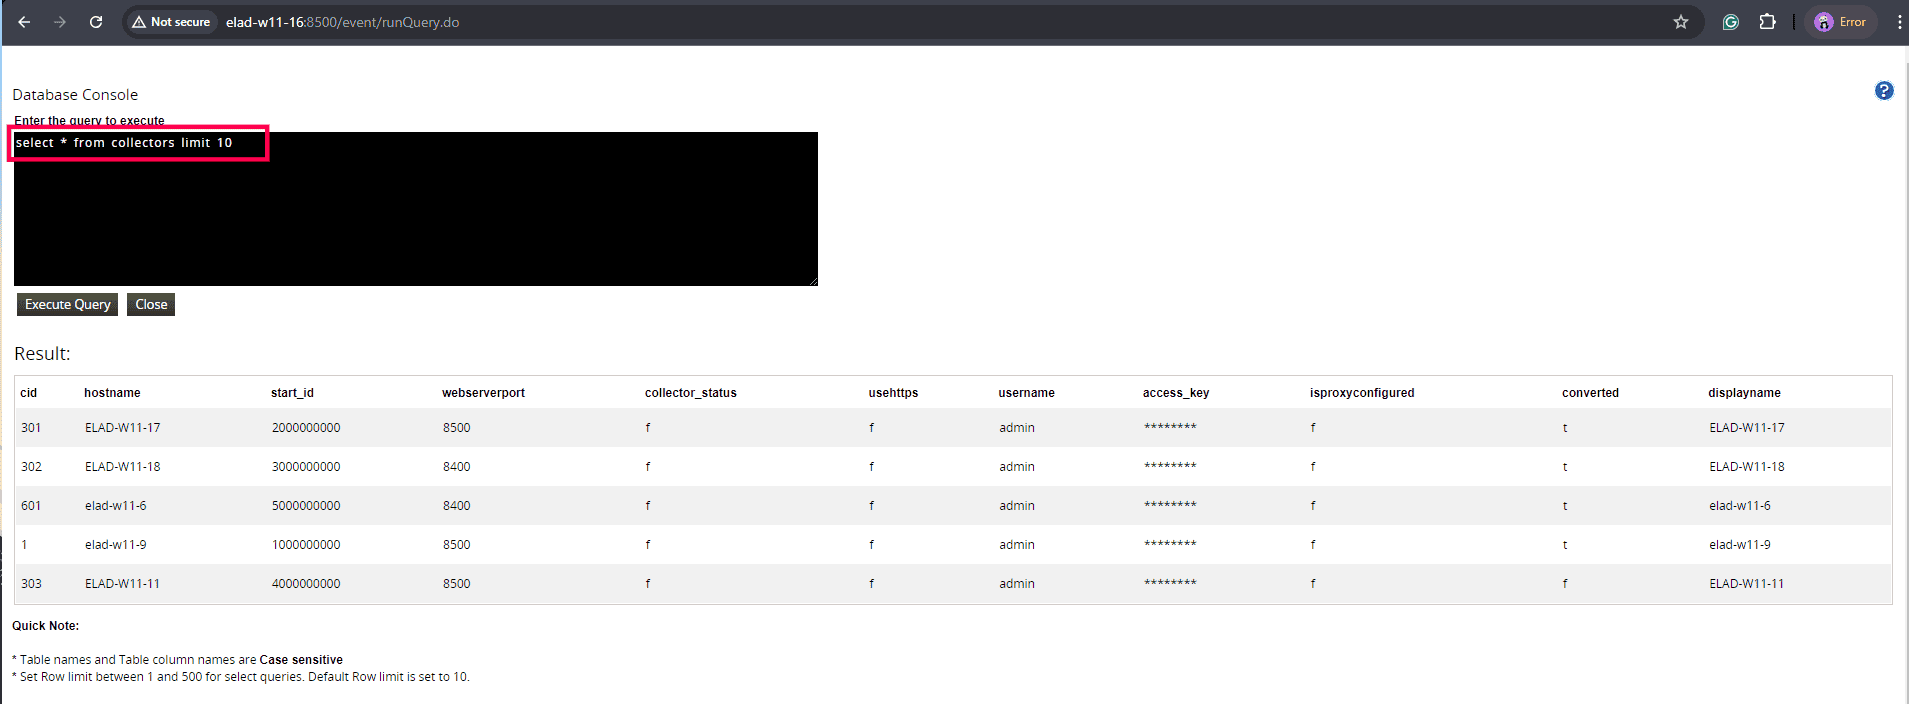
The CollectorIP value in the managed server enterprise file and the hostname column in the admin server collectors table need to be the same.
If not same, edit correct details in managed server enterprise.txt and restart the managed server or update in Admin Server's Manage Server Settings page.
Change in IP and hostname on managed server
If there are any changes in port and protocol, alter that changes in Enterprise.txt file in EventLog Analyzer managed server. Restart the EventLog Analyzer managed server and change managed server details in "Edit user logon details" in admin server.
Migrating Managed Server to another machine
- Follow the stand-alone steps
- When successfully copied, finalize the IP and port for this Managed Server
- Open enterprise.txt in Managed Server and update/add the entry:
CollectorIP=<hostName/IP> and also update the webserver.port entry to match with the new one
- Also open the Admin Server UI collector Settings page and edit the Managed Server that is being moved and update the IP, Port and all the other details that is changed now.
- Restart the Admin Server.
- Now, start the Managed Server.
If Centralized Archiving is enabled:In Admin Server, change the Admin Server Hostname/IP in SSH Server Settings located on Settings -> Admin Settings -> Archives -> Settings
Integration with Log360
Note: Make sure that all the components are set up and running before proceeding with the steps given below. Also, check whether you have the appropriate versions of the components with respect to the Log360 version you are currently running.
- Go to Admin → Log360 integration. You will be presented with eight tabs, each representing a component of Log360.
- Click on any one of the tabs (say EventLog Analyzer).
- Enter the name or IP address and the port number of the server on which that particular component is running.
- Select the connection Protocol from the drop down menu.
- Click Integrate Now.
- Repeat the above 3 steps for other components as well under the respective tabs.
Configurations for Admin Server:
Registration/Connection
Query to find the managed server details - hostname, startid, port, protocol, SSL enabled status in Admin Server : Select * from Collectors
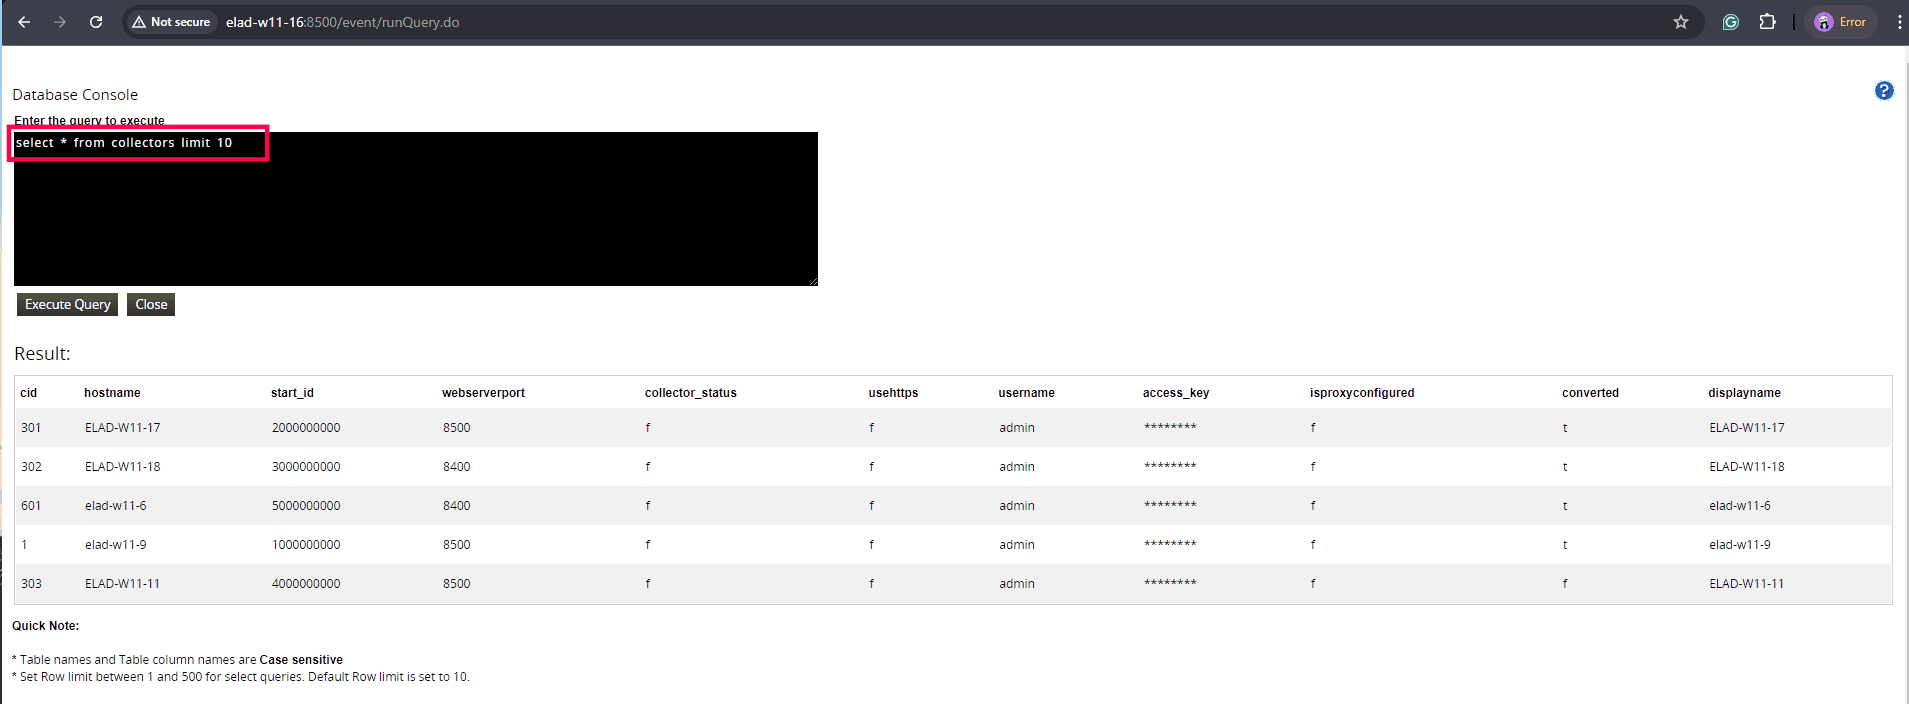
The CollectorIP value in the managed server enterprise file and the hostname column in the admin server collectors table need to be the same.
If not same, edit correct details in managed server enterprise.txt and restart the managed server or update in Admin Server Manage Server Settings page.
Change in IP and hostname in admin server
If any changes in port and protocol alter that changes in Enterprise.txt file of all EventLog Analyzer managed server and restart the all EventLog Analyzer managed server.
Migrating Admin Server to another machine
- Follow the stand-alone steps
- When successfully copied, finalize the IP and port for this Admin Server
- Changes in Enterprise.txt file of all EventLog Analyzer managed server adminserver.hostname and adminserver.webserver.port entry to match with an new one
- Restart the all EventLog Analyzer managed server.
- Run RegisterWithAdminServer.bat in managed server located on <ELA_HOME>/troubleshooting folder the commend prompt as administrator privilege it need to be success.
If Centralized Archiving is enabled
In Admin Server, change the Admin Server Hostname/IP in SSH Server Settings located on Settings -> Admin Settings -> Archives -> Settings.
Integration with Log360
Note: Make sure that all the components are set up and running before proceeding with the steps given below. Also, check whether you have the appropriate versions of the components with respect to the Log360 version you are currently running.
Note: If you integrate the admin server with Log360, change the IP or host name and protocol & port in Admin -> Log360 Integration -> EventLog Analyzer Integration.
- Go to Admin → Log360 integration. You will be presented with eight tabs, each representing a component of Log360.
- Click on any one of the tabs (say EventLog Analyzer).
- Enter the name or IP address and the port number of the server on which that particular component is running.
- Select the connection Protocol from the drop down menu.
- Click Integrate Now.
- Repeat the above 3 steps for other components as well under the respective tabs.
 Click here to expand


