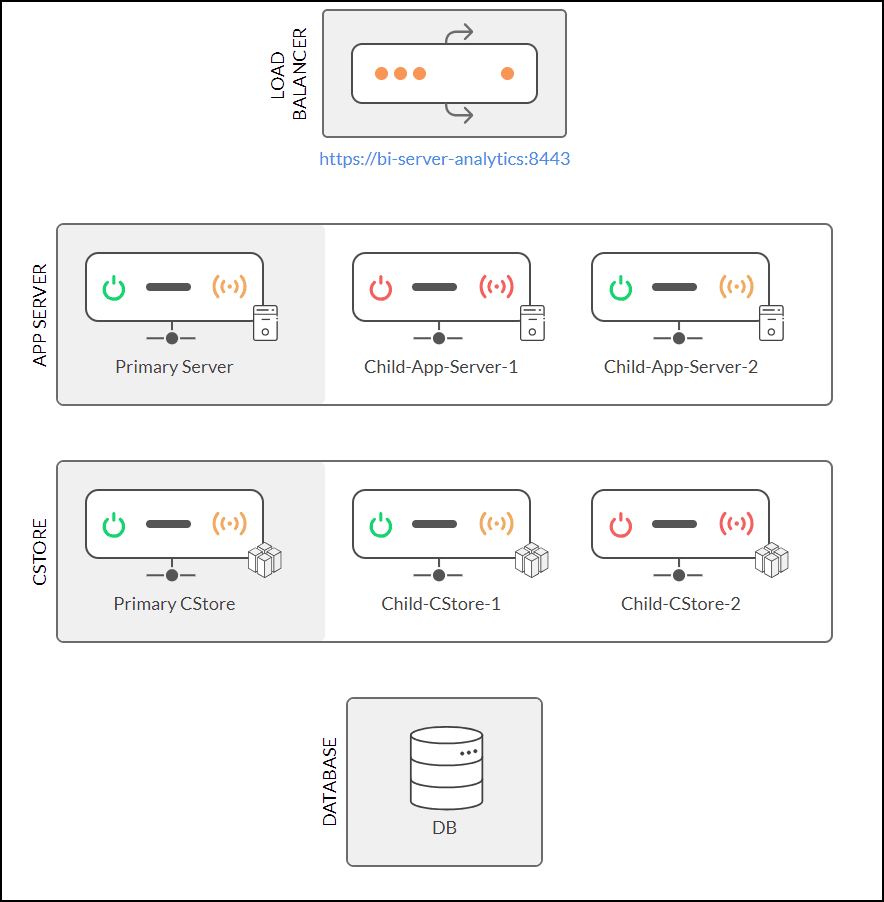
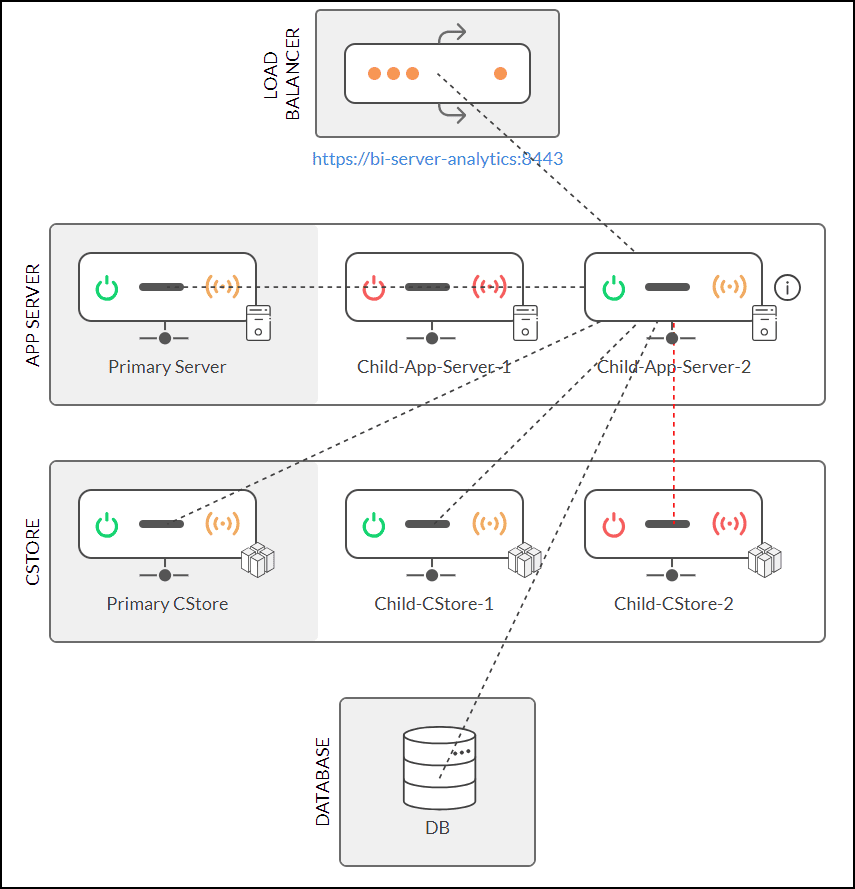
Multi-server user interface
Operational Control Center
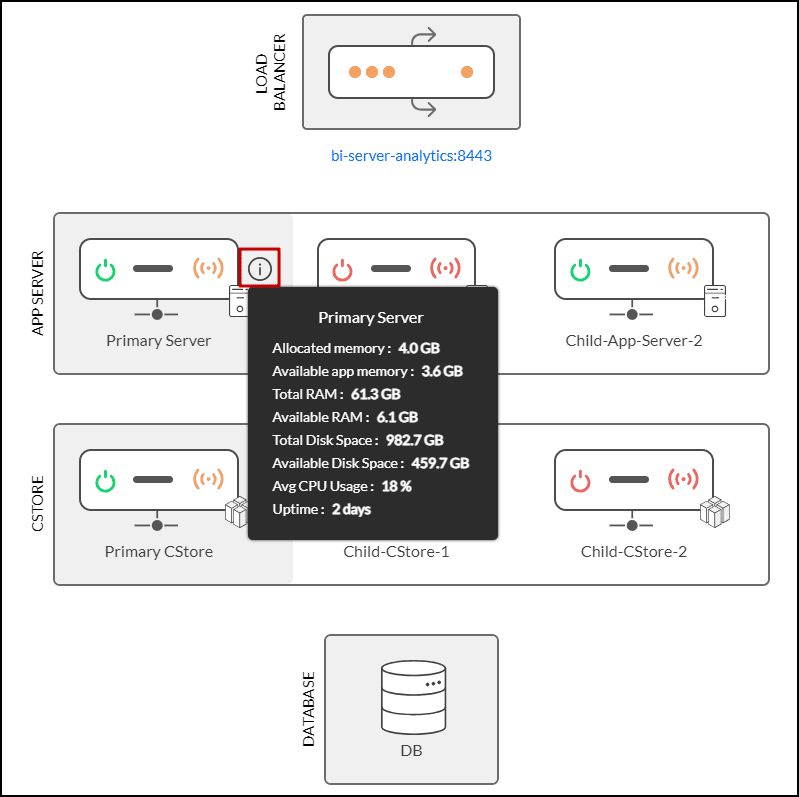
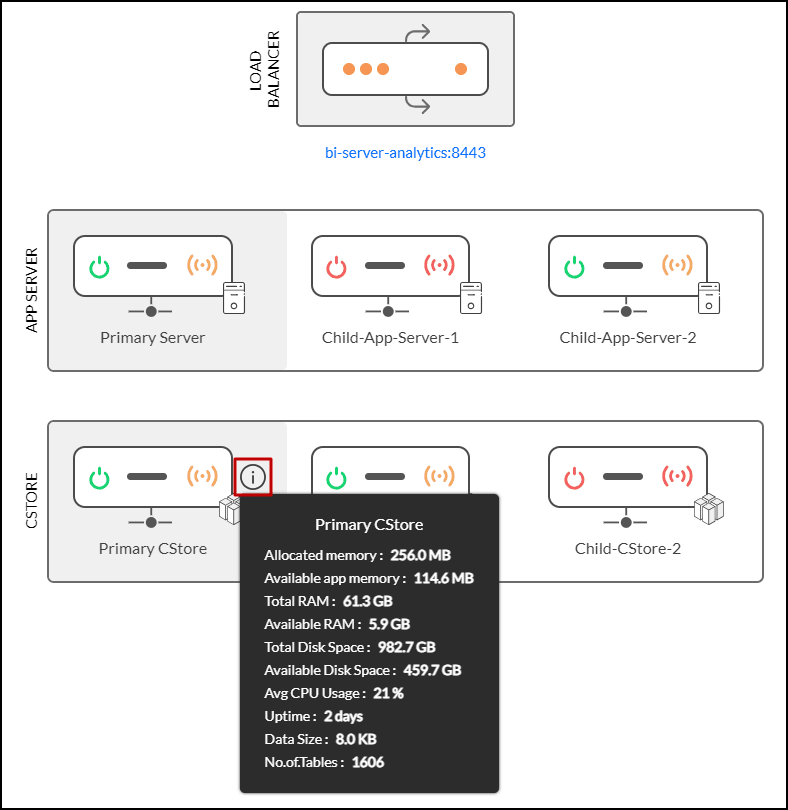
It offers a quick overview of all connections within the multi-server architecture. You can easily monitor which connections are active or inactive, allowing you to verify the status of connections between the App Servers and CStore nodes. You can also get to know the metrics of each server, such as disk space, memory, RAM, CPU Usage, and more.
Connection indicators
Analytics Plus allows you to monitor the status using the following indicators:
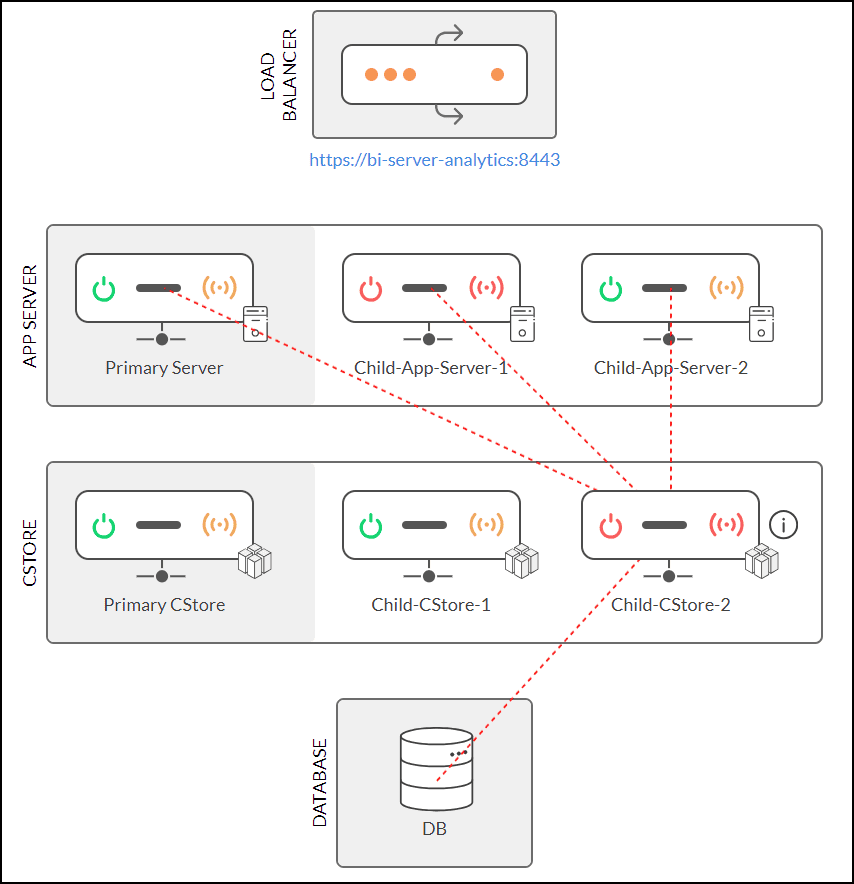
- Power Symbol: Used to indicate the active/inactive status of App Server and CStore.
- Green: Indicates that the App Server/CStore node is active.
- Red: Indicates that the App Server/CStore node is inactive.
- Connection Symbol: Used to indicate the connection status of App Server and CStore.
- Green: Indicates active connection between the App Server and CStore nodes.
- Red: Indicates inactive connection between the App Server and CStore nodes as the App Server/CStore node is inactive.
- Orange: Indicates a partial connection between the App Server and CStore node.
- Red Dotted Line: Indicates that there is no connection to servers.
- Black Dotted Line: Indicates that the connection is established between servers.
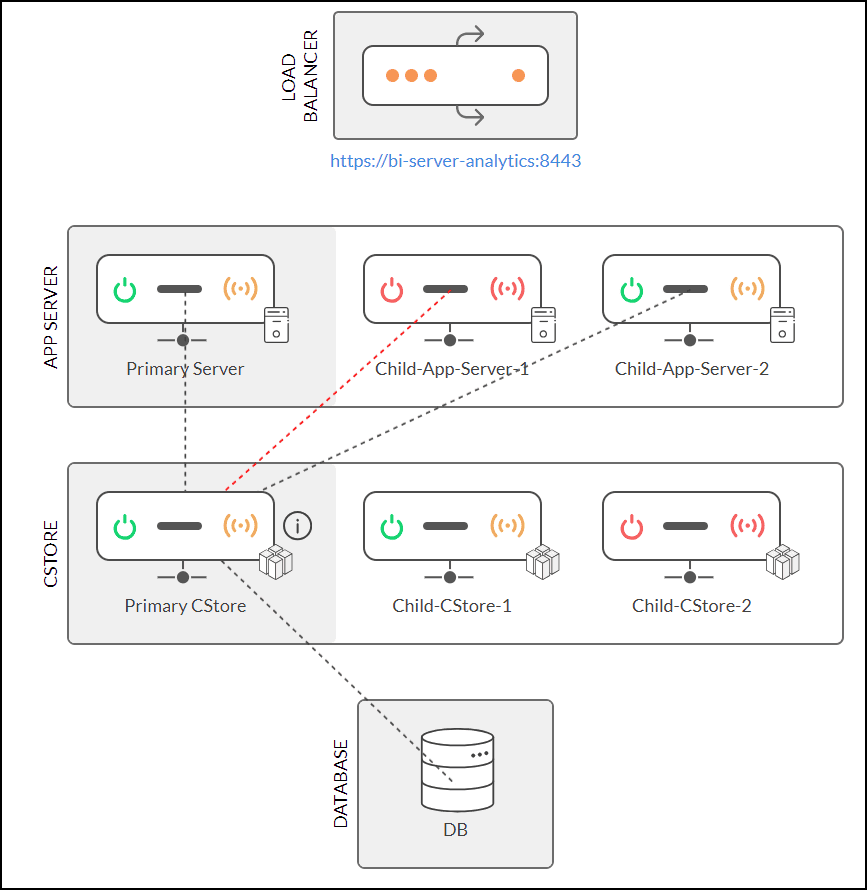
Let us consider the example below:
Primary Server and Child-App-Server-2: It is active but has a partial connection because the Child-CStore-2 node is inactive.
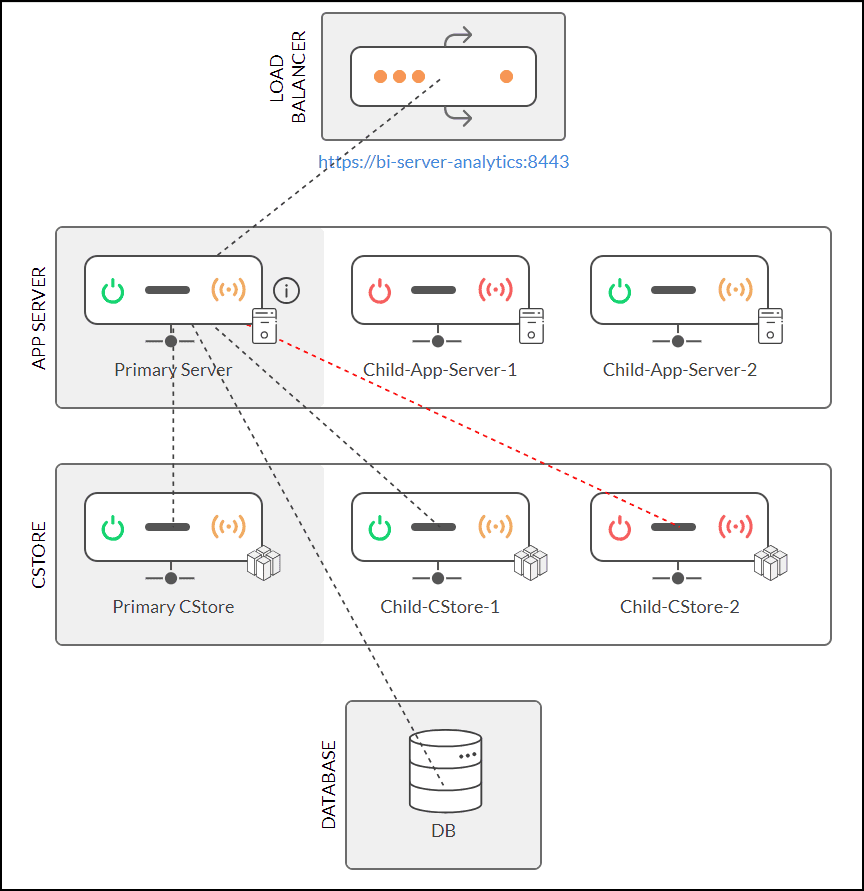
Child-App-Server-1: It is inactive and has no active connection because the server itself is inactive.

Primary CStore ad Child-CStore-1: It is active but has a partial connection because the Child-AppServer-1 is inactive.
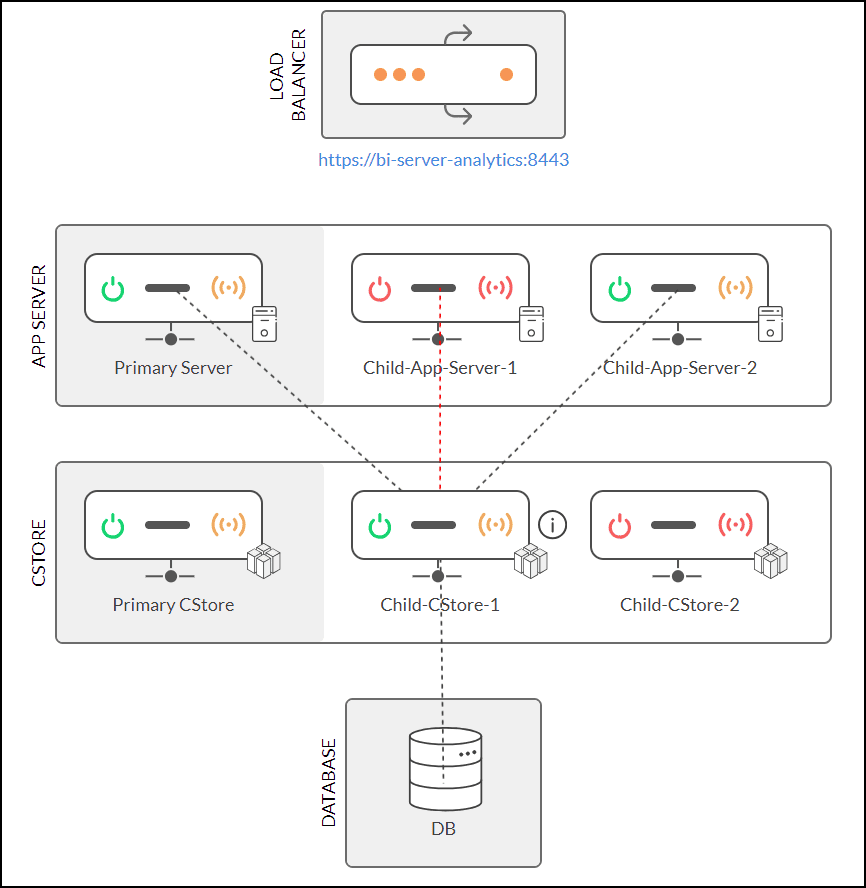
Child-CStore-2: It is inactive and has no active connection because the CStore itself is inactive.
Metrics
Analytics Plus offers the following metrics for App Server and CStore.
App Server
CStore
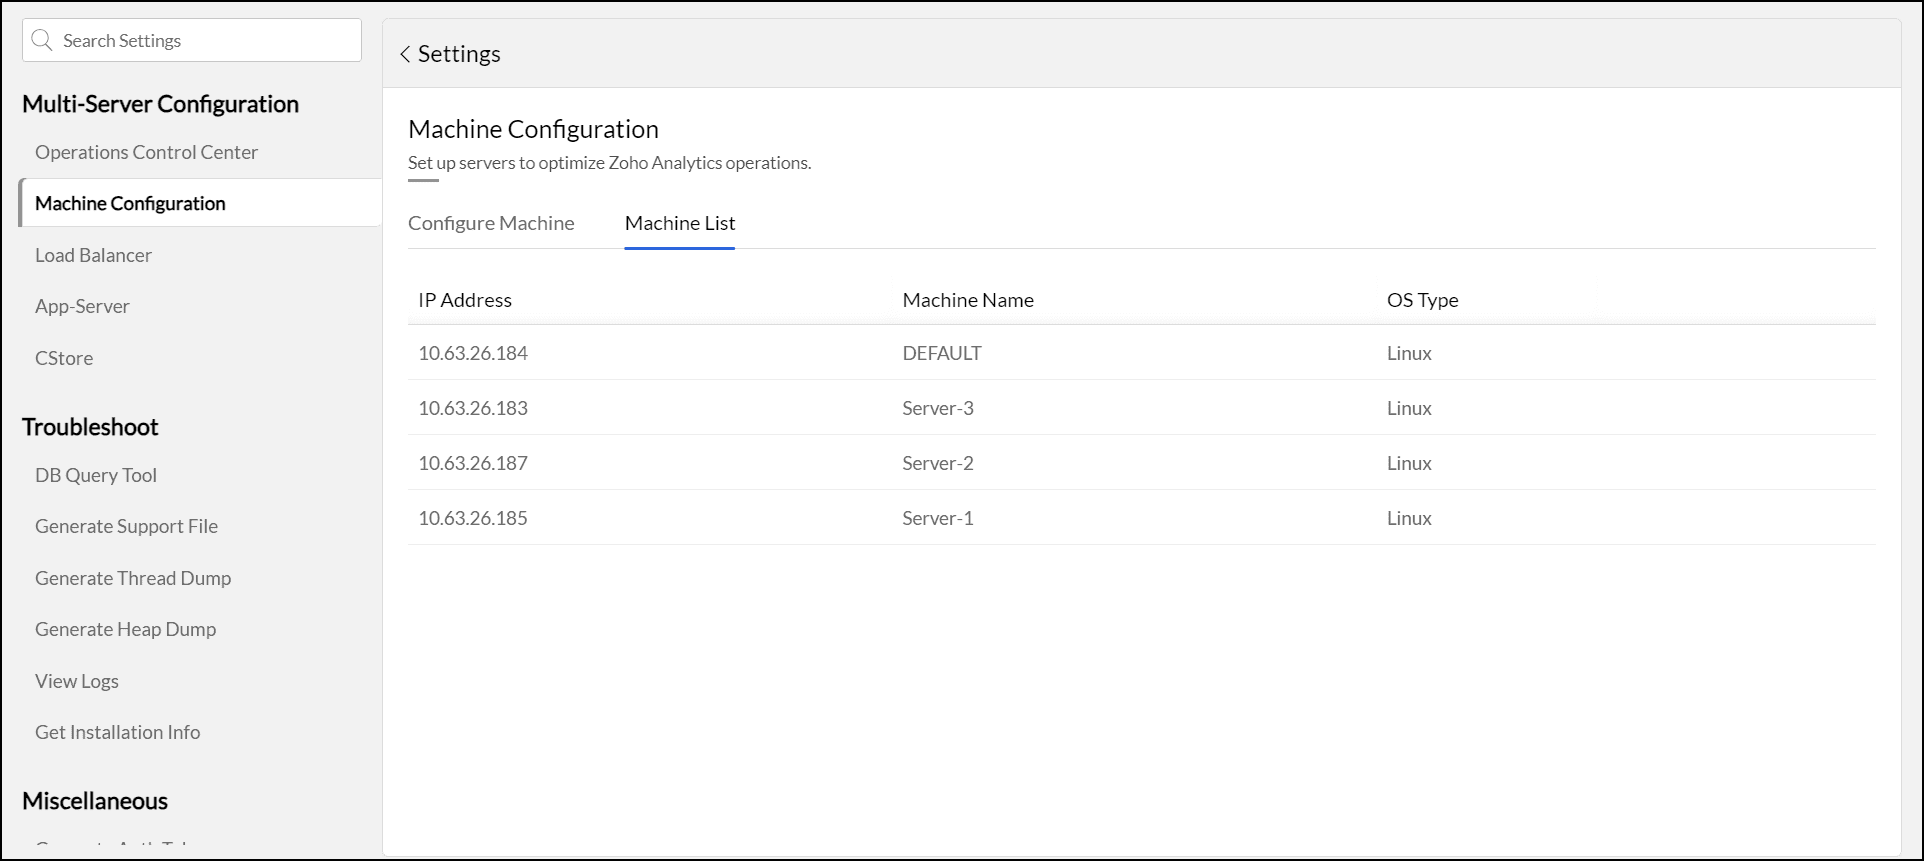
Machine configuration
Machine configuration enables you to add all the server-related information where the App Servers and CStore nodes are installed. You can set up the machine configuration during the installation process. Click here to learn more.
You can also view all added server details under the Machine List tab, where you also have the option to edit or delete configurations as needed.
App Server
This page lets you add the App Server information to Analytics Plus at the time of installation. Click here to learn more.
You can view all added App Server details under the App Server List tab. From this tab, you can:
- Edit the machine name (Please note that the server and port numbers cannot be changed).
- Delete an App Server configuration.
- Identify the primary App Server using the crown symbol.
Note:
- The primary App Server details cannot be deleted.
- When you delete a child App Server configuration in Analytics Plus, it should also be removed from the load balancer and uninstalled from the server. Users cannot reconfigure the same server without uninstalling it first. However, you can uninstall and reinstall the App Server on the same server if needed, and then reconfigure it.

CStore
This option allows you to add the CStore node related information during installation. Click here to learn more.
You can view all added CStore details under the CStore List tab. From this tab, you can:
- Edit the machine name (Please note that the server and port numbers cannot be changed).
- Delete a CStore configuration.
- Identify the primary CStore node using the crown symbol.
Note:
- The primary CStore node details cannot be deleted.
- When you delete a child CStore configuration in Analytics Plus, it should also be uninstalled from the server. Users cannot reconfigure the same server without uninstalling it first. However, you can uninstall and reinstall the CStore on the same server if needed, and then reconfigure it.

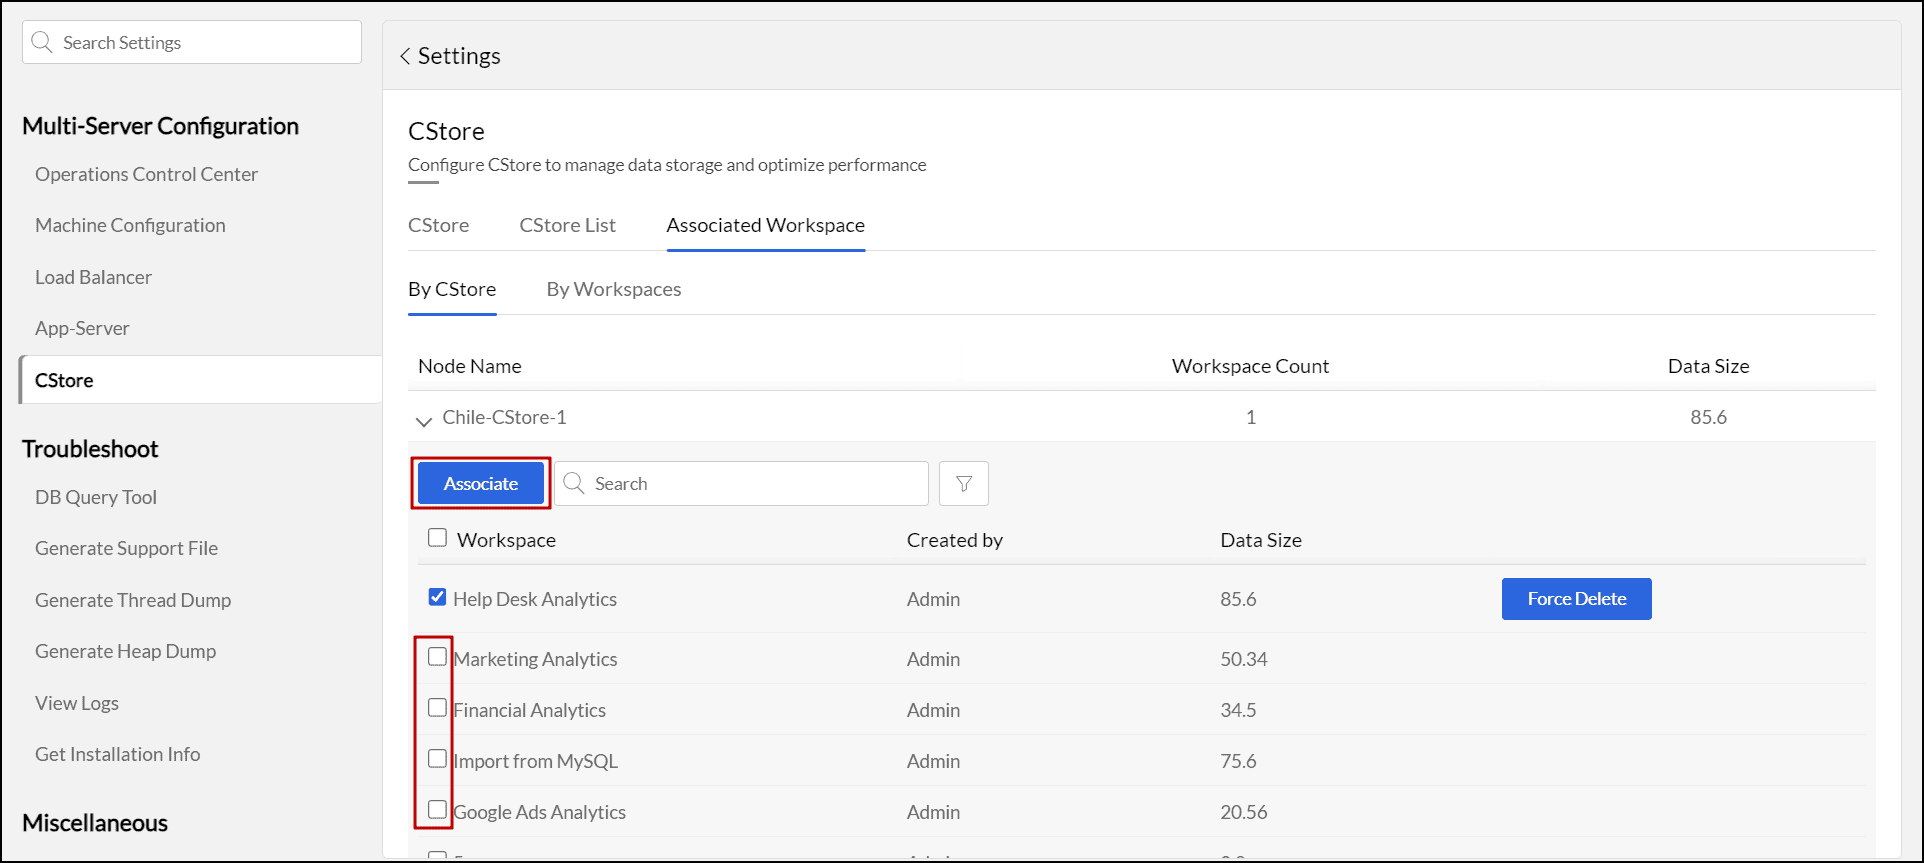
Associate workspace
Analytics Plus allows you to assign workspaces to CStore nodes in order to balance the load and improve performance. This is particularly useful in situations where you wish to assign a dedicated Cstore node to a workspace that is frequently accessed by your users. You can make assignments based on either CStore nodes or workspaces.
- By CStore
- By Workspace
Note:
- The Associate Workspace tab will appear only if you have at least one child CStore configured in Analytics Plus.
- All workspaces are automatically associated with the primary CStore by default. Therefore, the primary CStore node will not appear in the list for assignment to a workspace.
By CStore
This option allows you to allocate multiple workspaces to individual CStore nodes. Follow the steps below to do this.
- On the CStore Configuration page, navigate to the Associated Workspace > By CStore tab. Here, you will find a list of all configured CStores.
- Expand the desired CStore, select the workspaces to be associated.
- Click Associate. The association request will be sent to the scheduler and processed accordingly.
Once the workspaces are assigned, whenever a user accesses a workspace, the data will be retrieved from the assigned CStore.
You can also easily view the amount of data consumed by the assigned workspaces using the Data Size option.
To disassociate a workspace from a CStore node, expand desired CStore, unselect the workspaces and click Associate. The disassociation request will be sent to the scheduler for processing.
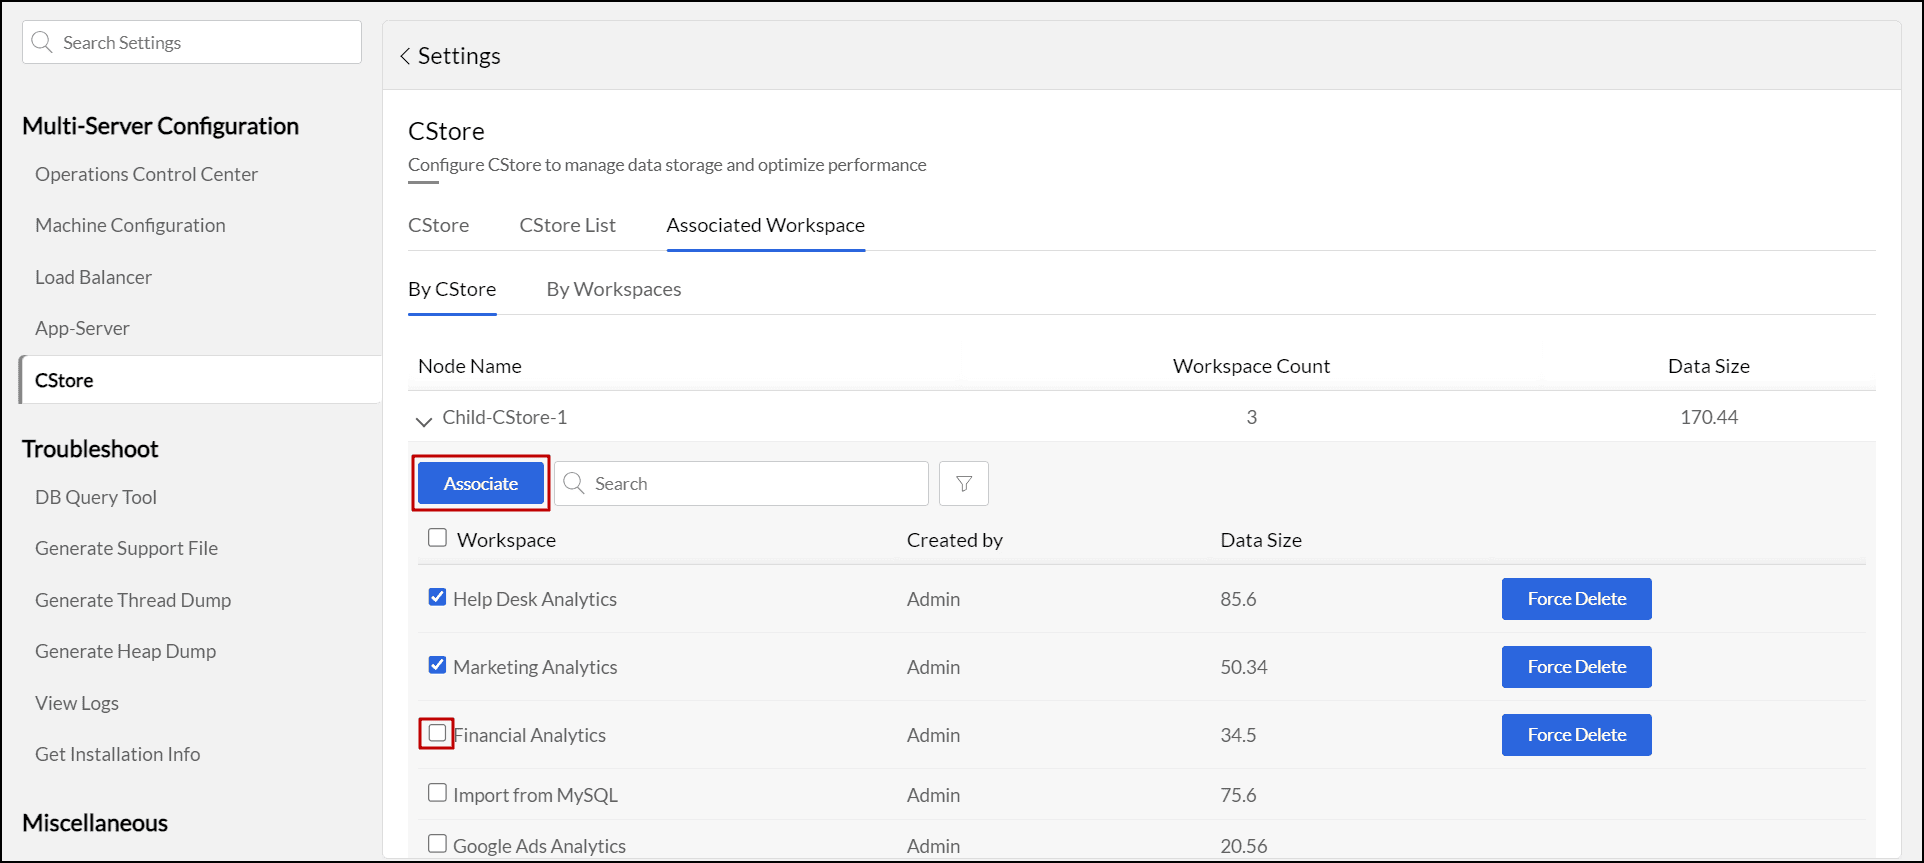
If you need to disassociate a workspace immediately, use the Force Delete option. The disassociated workspaces can be reassigned to the same or different CStore nodes.

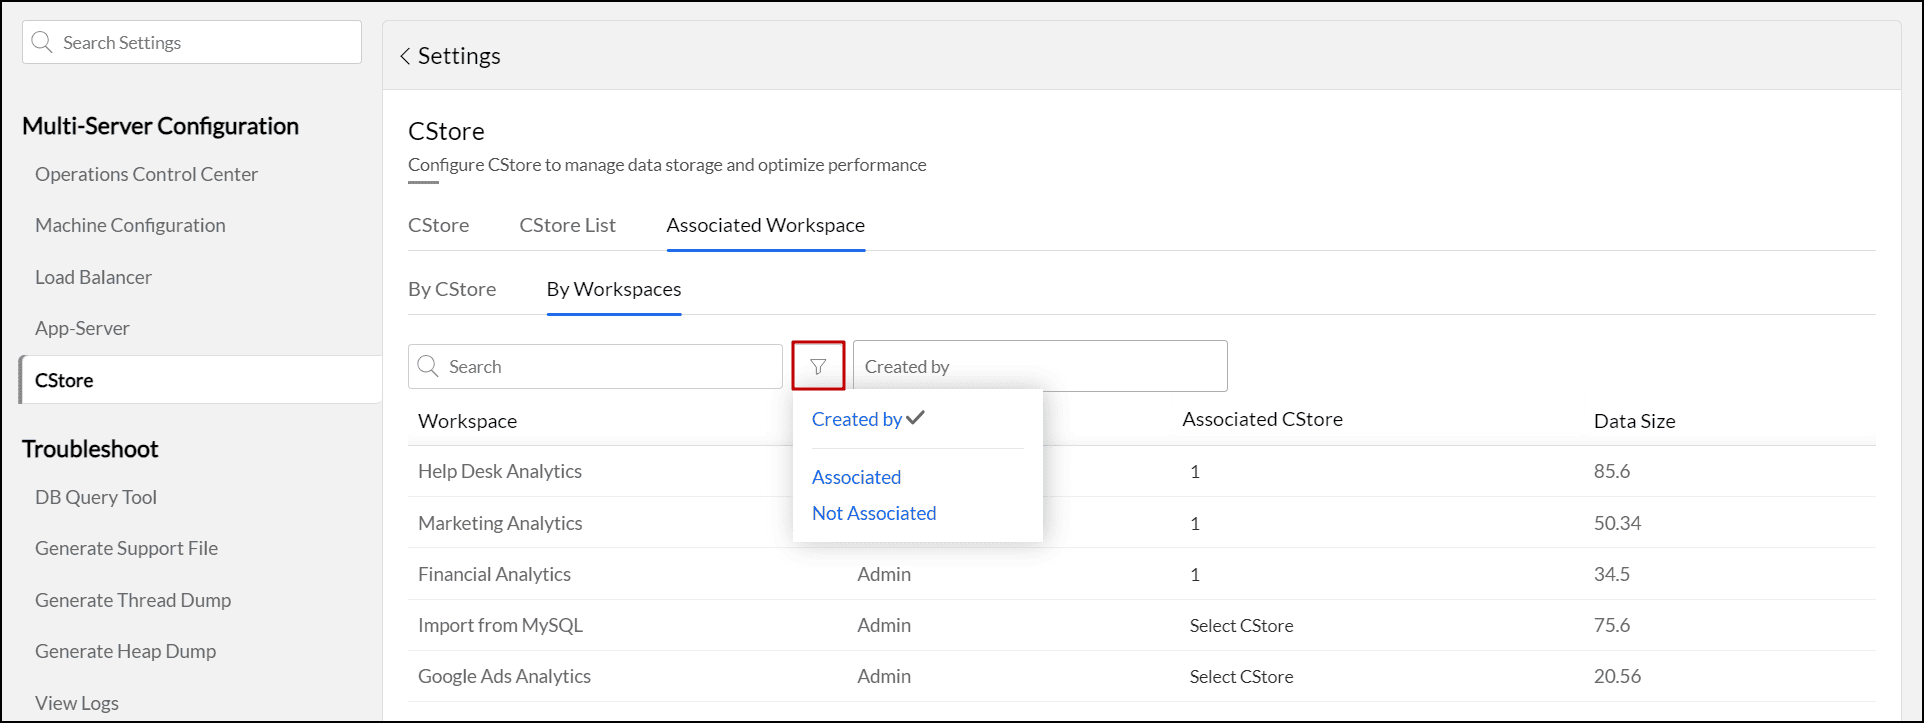
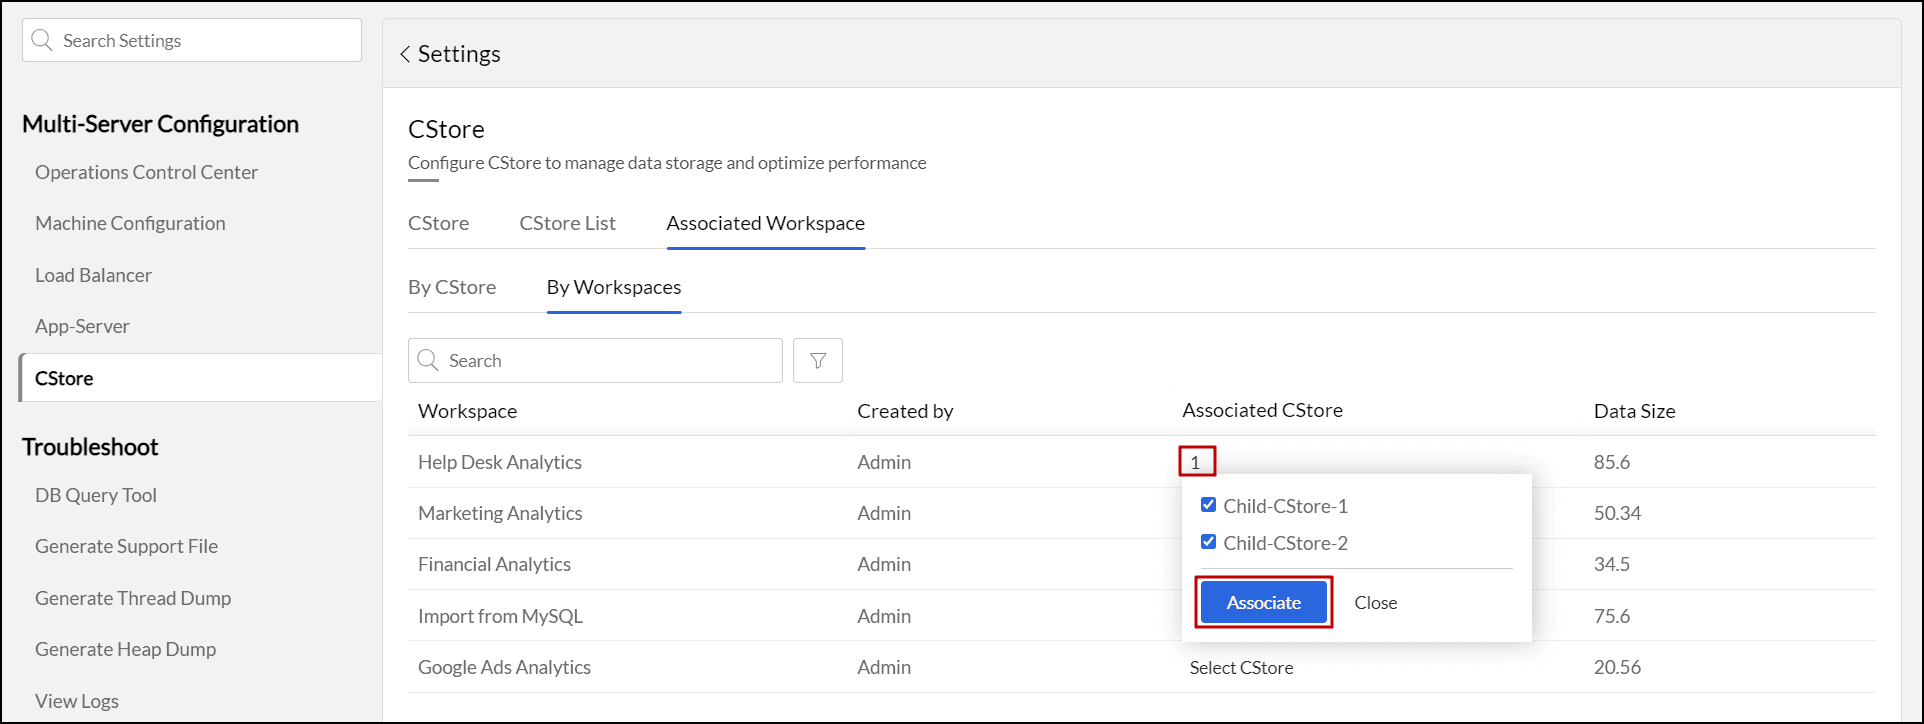
By Workspace
This option enables you to allocate multiple CStore nodes to individual workspace. Follow the steps below to do this.
- On the CStore page, navigate to the Associated Workspace section and select the By Workspaces tab. Here, you will find a list of all workspaces available in Analytics Plus.
- Locate the desired workspace, then click Select CStore. To link additional CStores to an existing association, click the number in the Associate CStore column for the corresponding workspace.
- Choose the CStore you want to associate and click Associate. The association request will be sent to the scheduler and processed accordingly.
Once the CStore nodes are assigned, whenever a user accesses a workspace, the data will be retrieved from one of the assigned CStore nodes according to the load distribution.
You can also easily view the amount of data consumed by the workspace using the Data Size option.
Analytics Plus allows you to sort the workspace by the following criteria:
- Created By: Sorts workspaces based on the username who created the workspace.
- Associated: Sorts workspaces that are already linked to CStores.
- Not Associated: Sorts workspaces that are not linked to any CStores.