Integrating ZeroSSL Certificate Authority with PAM360
PAM360 facilitates integration with ZeroSSL - the certificate authority (CA) that uses the Automatic Certificate Management Environment (ACME) protocol to provide secure SSL certificates free of cost. This integration helps you achieve an end-to-end life cycle management of ZeroSSL certificates installed on your domains from a single interface. This document discusses the steps you should follow to establish a connection with your ZeroSSL account, acquire, deploy, renew and perform all certificate management related operations from PAM360.
Follow the step-by-step procedure below to integrate ZeroSSL CA with PAM360:
- Creating a ZeroSSL Account
- Raising a Certificate Request
- Configuring the DNS Account
- Domain Validation and ZeroSSL Certificate Challenge Verification
- Procuring and Saving Certificates
- Managing Certificates Issued by ZeroSSL CA
Caution
Add the following base URL and port as an exception in your firewall or proxy to ensure PAM360 is able to connect to ZeroSSL's CA Services.
- URL: https://acme.zerossl.com/v2/DV90
- Port: 443
1. Creating a ZeroSSL Account
To begin the process of requesting SSL certificates from ZeroSSL, you must create an account. This is a one-time process and can be done directly from the PAM360 interface.
To create a ZeroSSL account,
- Navigate to the Certificates tab, click the ACME dropdown and select ZeroSSL.
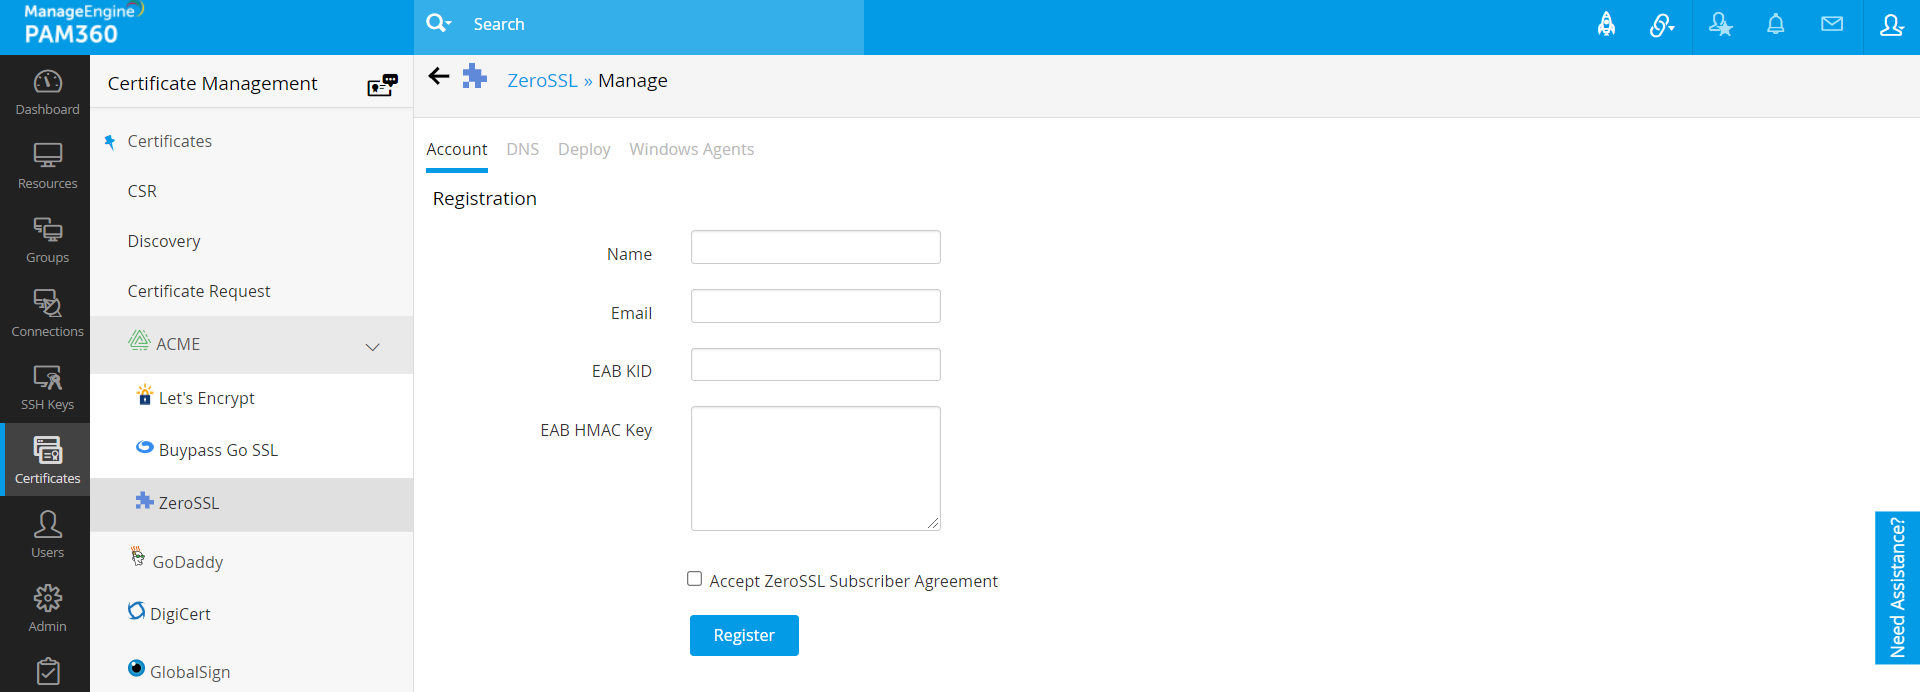
- Click Manage. Under the Account tab, click New Registration.
- In the pop-up, enter an account name and a valid e-mail address. Enter your EAB KID and EAB HMAC Key. Click here to generate EAB KID and HMAC Key for your account, if you do not have one already.
- Click the checkbox to accept the ZeroSSL Subscriber Agreement.
- Click Register to complete the account creation process.
Once your account is created, you can update the account email address, delete it from PAM360, or deactivate the account entirely. Please note that deleting the account only removes it from PAM360. Even if you delete the account here, it will still be active in the ZeroSSL portal. To add the same account back to PAM360, export the key and use the Add Account option with the same details used before. However, if you select the Deactivate option while deleting the account, then the ZeroSSL account will be removed completely and you cannot add it back to PAM360 with the same details.
Caution
- Please note that for each new account registration, a new EAB KID has to be created. After successfully registering for an account, the same EAB HMAC key cannot be used again. Click here to read the ZeroSSL document for more details.
- Only the users who are assigned with the 'ACME' role under 'SSH Keys and Certificates' user roles can perform the above operation. Go to Admin >> Customization >> Roles to activate this user role.
- Only one ZeroSSL account can be created from PAM360.
2. Raising a Certificate Request
Once your ZeroSSL account is registered, you can proceed with raising certificate requests to the CA. To complete a certificate request, you will be presented with a challenge verification to fulfill in order to validate your domain and issue the certificate you have requested.
- Navigate to Certificates >> ACME >> ZeroSSL.
- Click Certificate Request. Fill in the domain name, select the challenge type, choose the key algorithm, algorithm length, signature algorithm, keystore type, enter the keystore password and click Create.
- For dns-01 challenge type, you can choose and assign a DNS account from the dropdown if you have already configured your DNS credentials. This will be used for automatic challenge verification for all the domains specified in the request.
- Also, you have options to change the private key whenever the certificate is renewed.
- If you need to change the key, use New Key. This option will generate a new key every time the certificate is renewed.
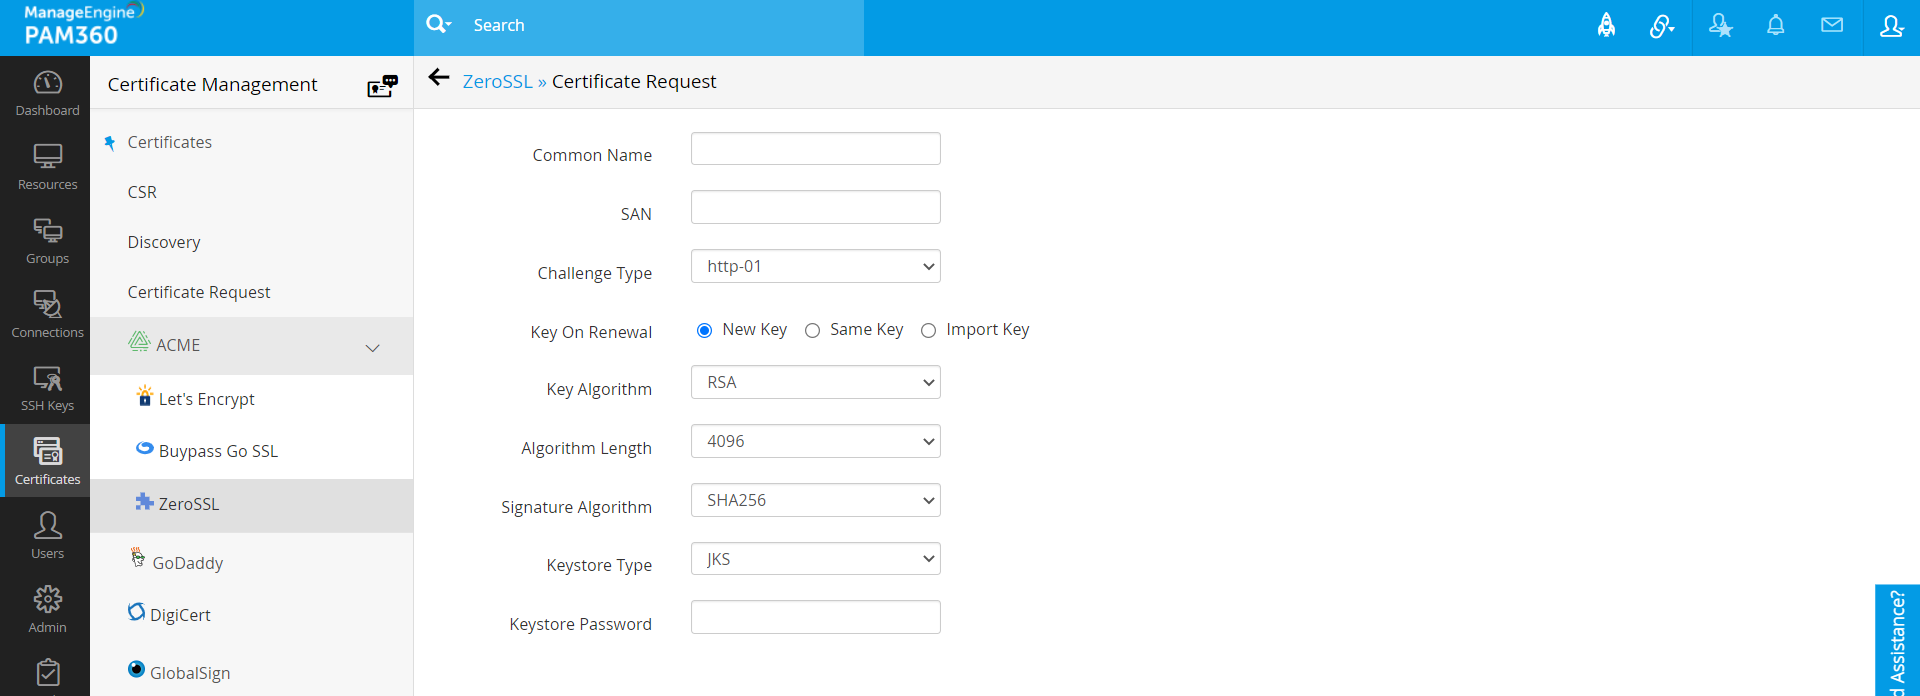
- If you want to retain the same key on renewal, use the Same Key option.
- To use your own key, use the Import Key option. This key will be used for the first time when the certificate is generated and also for subsequent renewals.
- If you need to change the key, use New Key. This option will generate a new key every time the certificate is renewed.
Additional Detail
PAM360 supports wildcard certificate requests for DNS based challenges. For wildcard certificate requests, enter the common name in the format *.domainname.com
3. Configuring the DNS Account
To configure your DNS account, follow the below steps:
- Navigate to ZeroSSL >> Manage. Switch to the DNS tab.
- Here, you can add a maximum of one DNS account for each DNS provider supported. PAM360 currently supports automatic challenge verification for Azure DNS, CloudFlare DNS, and Amazon Route 53 DNS, RFC2136 DNS update (nsupdate), GoDaddy DNS, and ClouDNS. Click Add.
- In the pop-up that opens, choose the DNS provider.
3.1 Azure DNS
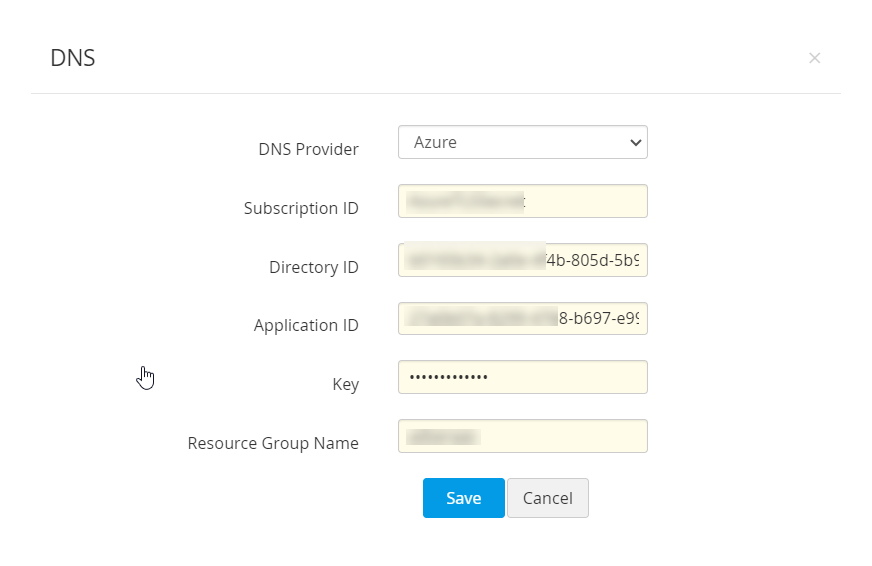
- Provide the Subscription ID, which is available on the Overview page of the Azure DNS zone.
- Provide the Directory ID, which is available in Microsoft Entra ID >> Properties.
- If you have an already existing Azure application, provide its Application ID and Key.
- If not, follow the steps mentioned in this document to create the Azure application and key, and give the application access to the DNS zones for making API calls.
- Finally, enter the Resource Group Name, which is the group name in which you have created the DNS zone and click Save.
- Your DNS account details are saved and listed under Manage >> DNS.
3.2 Cloudflare DNS
- In the Email address field, specify the email address associated with the Cloudflare account.
- For Global API Key, use the Generate API key option in the domain overview page of the Cloudflare DNS to generate the key and paste the value in this field. Click Save.
- Your DNS account details are saved and listed under Manage >> DNS.

3.3 AWS Route 53 DNS
- Generate and specify the Access Key ID and Secret associated with your AWS account.
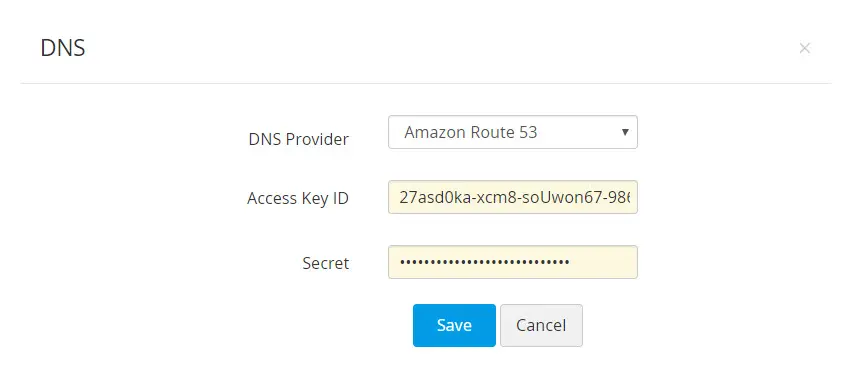
- If you do not have an AWS account, create one and generate the Access Key ID and Secret by following the steps given below
- Log in to the AWS console and navigate to IAM Services >> Users. Click Add user.
- Provide the user name and select the access type as Programmatic access.
- Switch to the next tab, click Attach existing policies directly under Set Permissions and search for AmazonRoute53FullAccess.
- Assign the policy that is listed and switch to the next tab. In the tags section, add appropriate tags (optional) and switch to the next tab.
- Review all the information entered and click Create user.
- The user account is created and subsequently, an access key ID and a secret is generated. Copy and save the key ID and secret in a secure location for it will not be displayed again.
- If you already have an AWS user account, you have to grant 'AmazonRoute53FullAccess' permission to the user and generate the access key if the user doesn't have one. if the user account has an access key associated already, it is just enough to ensure the required permission is granted.
To grant the required permissions, follow these steps:
- Navigate to the Permissions tab, select the required user account and click Add Permission.
- Click Attach existing policies directly under Set Permissions and search for AmazonRoute53FullAccess.
- Assign the listed policy and click Save.
- To generate the access key,
- Select the particular user account and navigate to the Security Credentials tab.
- In the window that opens, click Create access key.
- An access key ID and a secret is generated. Copy and save the key ID and secret in a secure location as it will not be displayed again.
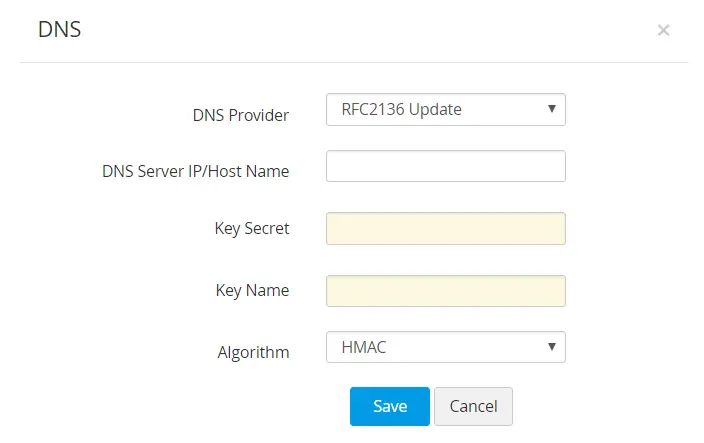
3.4 RFC2136 DNS Update
If you are using open source DNS servers such as Bind, PowerDNS etc., that support RFC2136 DNS update, follow the steps below to automate DNS-based domain control validation procedure using PAM360.
- Mention the DNS Server IP / Hostname represents the server name / IP address in which the DNS server is installed or running.
- These details are usually found in the server installation directory. For instance, in the case of Bind9 DNS server, you can find these in the file named.local.conf in the server installation directory.
- Provide the Key Secret, which is nothing but the key content found in the server installation directory.
- Provide a name for the key, and choose the signature algorithm. Click Save.
3.5 GoDaddy DNS
If you are using GoDaddy DNS for DNS validation, follow the steps below to automate DNS-based domain control validation procedure using PAM360:
To obtain GoDaddy API credentials, follow these steps:
- Go to the GoDaddy developer portal and switch to the API keys tab.
- Log in to your GoDaddy account if you are not logged in already.
- You will be redirected to the API keys page where you can create and manage API keys.
- Click Create New API key.
- Provide your application name, choose the environment type as Production and click Next.
- The API key and its secret are generated. Copy and save the secret in a secure location, as it will not be displayed again.
Now, in PAM360 interface, follow the below steps to add GoDaddy DNS to ZeroSSL CA:
- Navigate to Certificates >> ACME >> ZeroSSL and click Manage from the right-most corner of the page.
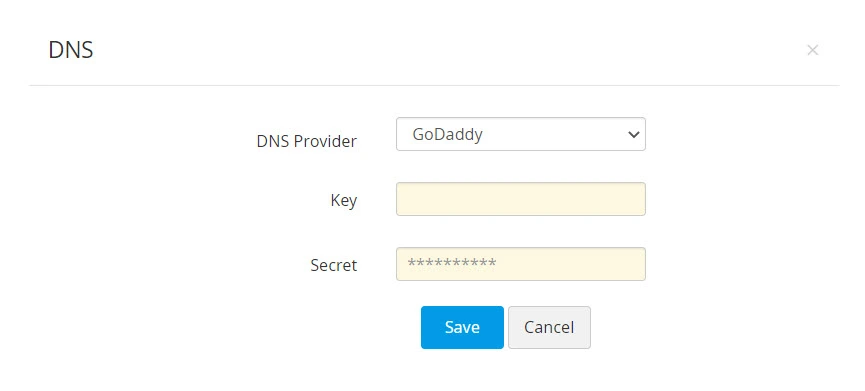
- Switch to the DNS tab and click Add. Choose GoDaddy from the DNS Provider dropdown.
- Enter the Key and Secret that was previously generated from the GoDaddy portal. Click Save.
3.6 ClouDNS
If you are using ClouDNS for DNS validation, perform the steps given below to automate the DNS-based domain control validation procedure in PAM360.
To obtain ClouDNS API credentials, follow these steps:
- Log in to your ClouDNS account and go to Reseller API.
- If you have already created an API user id, you will find it under API Users. If not, click Create API to generate a new one.
- Click here to learn more about ClouDNS API Auth IDs.
Now, in the PAM360 interface, follow the below steps to add ClouDNS to ZeroSSL CA:
- Navigate to Certificates >> ACME >> ZeroSSL and click Manage from the right-most corner of the page.
- Switch to the DNS tab and click Add.
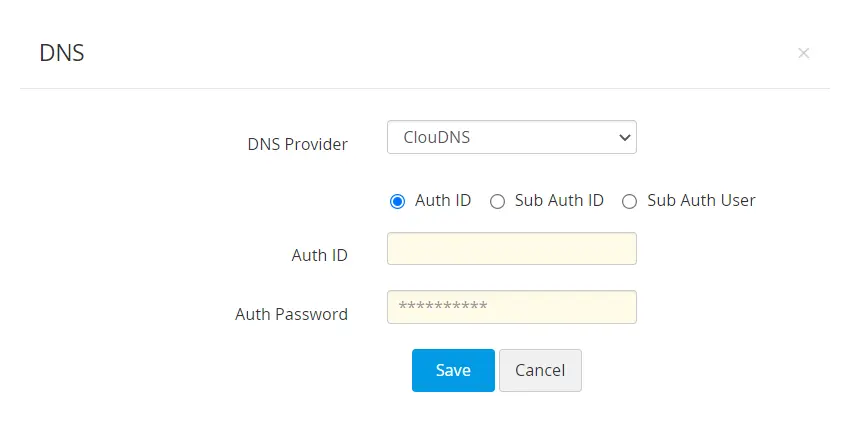
- Choose ClouDNS from the DNS Provider dropdown.
- Choose one of the following options: Auth ID, Sub Auth ID, Sub Auth User.
- Enter the chosen ClouDNS Auth ID, its respective Auth Password, and click Save.
3.7 DNS Made Easy
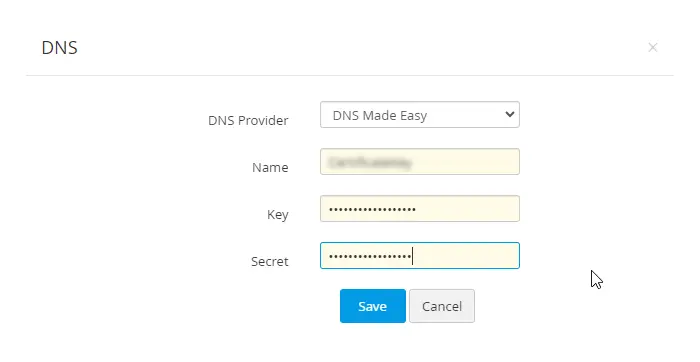
- Enter the name of your choice in the Name field.
- The Key and the Secret will be available on the DNS Made Easy webpage under Config >> Account Information. Enter those details in the respective fields.
- Now, click Save to save your DNS account details. The saved DNS details will be listed under Manage >> DNS.
Additional Details
- ZeroSSL offers multi-domain certificates as well as wildcard certificates.
- PAM360 integration with ZeroSSL supports encryption via RSA and EC algorithms.
- PAM360 supports http-01 and dns-01 based domain validations. Choose the challenge type based on your requirements.
- For dns-01 based domain validation, if you are using your configured DNS account for challenge verification, make sure that the status of the chosen DNS account is marked as 'Enabled' under Manage >> DNS.
- Option to change the private key currently works only with the RSA key algorithm.
4. Domain Validation and ZeroSSL Certificate Challenge Verification
PAM360 expedites domain validation through automatic verification of HTTP-01 and DNS-01 challenges (currently Azure, Cloudflare, Amazon Route 53, RFC2136 DNS update, GoDaddy DNS, ClouDNS). For the automation to take effect, you have to initially map the end-server details to PAM360, which is a one-time process.
4.1 Domain Validation via HTTP-01 Challenge Verification
For domain validation through the http-01 challenge,
- A window opens displaying the challenge to be fulfilled.
- Click the Agent mapping icon.
- A pop up will open. If the domain server is a Linux machine, fill in the required details and click Save.
- If the domain server is a Windows resource, download and install the Windows agent on the domain server.
- Once, the agent mapping settings are configured (agent mapping is a one-time configuration), PAM360 automatically handles the verification of challenges presented by ZeroSSL.
- After configuring agent mapping, click Pending on the pending requests and click Verify. The challenge is verified and certificate request is submitted to ZeroSSL CA.

4.2 Domain Validation via DNS-01 Challenge Verification
For DNS-01 challenge verification from PAM360,
- Switch to the ZeroSSL tab and click on the request status (Pending) corresponding to the certificate request.
- You'll be directed to a window that displays the DNS challenge value and TXT record.
- If you have already configured your DNS account details and have opted for DNS while creating the certificate request, you can assign the DNS account to the request.
- Select the request, choose Assign DNS from More top menu and select the required DNS account.
- In cases where you do not have a DNS account configured or have not opted for it when raising the certificate request, PAM360 provides an option for automating DNS-01 challenge verification through Agent Mapping.
- Click on the Agent Mapping icon available to the left side of the request. Agent mapping is a one-time configuration.
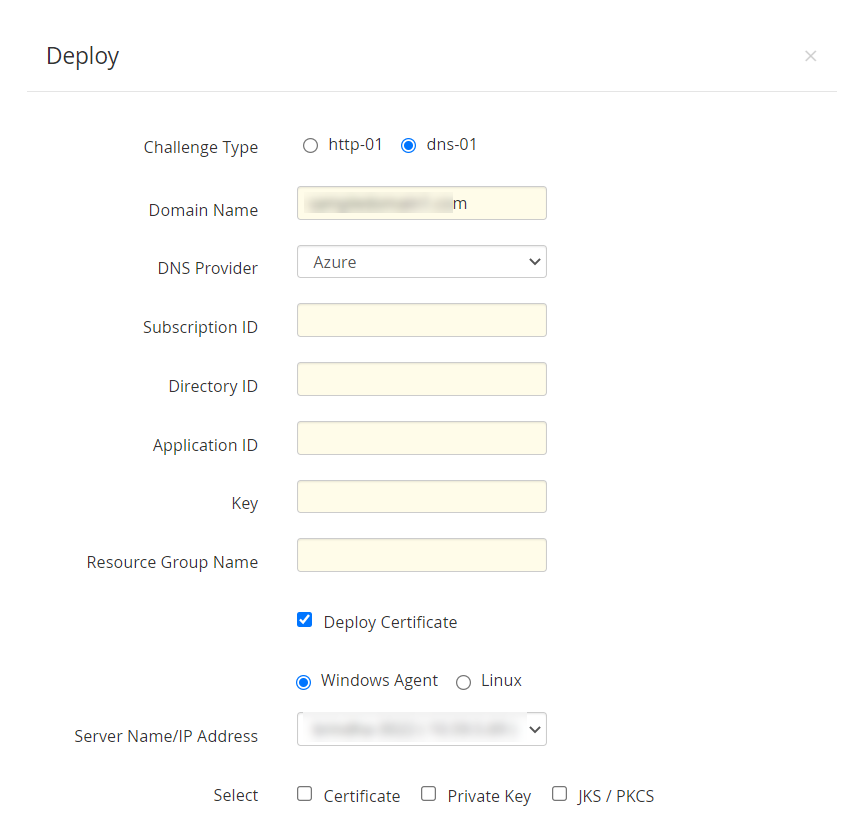
In the Deploy window that opens, carry out the following operations to map and save your end-server details in PAM360.
- In the Deploy window that opens, carry out the following operations to map and save your end-server details in PAM360.
- Choose your DNS provider. For Azure DNS, provide the required details—subscription ID, directory ID, application ID, application key and resource group name.
- For Cloudflare DNS, enter the email address associated with your Cloudflare account and the Global API key.
- For Amazon Route 53 DNS, enter the Access Key ID and Secret associated with your AWS account.
- Enable the Deploy Certificate checkbox to automate deployment of the certificate to their corresponding end-servers after domain validation and after successive renewals.
- For Linux end-servers provide the required details, while for Windows end-servers download and install the Windows agent using the same procedure as mentioned for http-01 challenge.
- After filling in the details, click Save. The end-server details are successfully mapped and stored in PAM360, which you can view or edit from Manage >> Deploy tab.
Caution
- You can request and acquire certificates only for public domains using ZeroSSL integration.
- The handling of challenges can also be done manually without automation. Copy and paste the challenge values / text records manually in your domain server. Then in the PAM360 server, navigate to Pending Requests page and click Verify. The challenge is verified and certificate is issued.
- PAM360 automates challenge verification using DNS for a certificate request only when Agent mapping is not available. Challenge verification is automated through agents, if agent details are available in Manage >> Deploy tab.
- Currently, the SSL agent is only available for Windows Server.
- For RFC2136 DNS update, if you have opted Global DNS configuration, the domain name itself acts as the zone name (Global DNS configuration is possible only if you are using the same Key Secret for all zones). Whereas, if you have opted domain-agent mapping, you have to provide the Zone name, Key Name, and Key Secret for each domain separately.
5. Procuring and Saving Certificates
On successful domain validation through challenge verification, the ZeroSSL CA issues the requested certificate.
- The window automatically redirects to a page which displays the certificate and its status (status will be marked as 'Available', if the challenge verification is successful and 'Failed' if the challenge verification has been failed).
- Click the Available button to save the certificate in PAM360 repository, email or export it.
- If the challenge fails, click New challenge to obtain another set of challenges and repeat the above process.
Upon saving the certificate to the PAM360 repository, you can view it from the SSL >> Certificates tab.
6. Managing Certificates Issued by ZeroSSL CA
This section explain how to renew, revoke, and delete certificates issued by ZeroSSL CA from PAM360.
6.1 Renewing a Certificate
Certificates issued by ZeroSSL have a life-time of 90 days after which they are not valid. Certificate renewals are performed manually or automatically through automatic domain validation. To renew a certificate manually,
- Navigate to Certificates >> ACME >> ZeroSSL.
- Select the certificate that you want to renew and click Renew Certificate button.
- The certificate is renewed and the Certificate Status bar displays Renewed.
- Click on it to save the renewed version of the certificate to the PAM360 certificate repository.
Caution
The certificate should be saved after renewal in order to be updated in the certificate repository. Else, only the old version of the certificate will continue to remain in repository.
Automatic Renewals through Automatic Domain Validation
If agent mapping had been configured, the certificate renewal process is done automatically without manual intervention. All the certificates in your organization procured from ZeroSSL is automatically renewed 15 days before its expiry and a notification is sent to the account holder's e-mail address.
Caution
Automatic renewals are applicable only for those certificates saved in PAM360 repository. i.e., after procuring a certificate from ZeroSSL, you have to save it in order for the automatic renewal to take effect.
6.2 Revoking a Certificate
Revoking a certificate renders the certificate invalid and immediately removes the HTTPS from the website.
To revoke a certificate,
- Navigate to the Certificates >> ACME >> ZeroSSL tab.
- Select a certificate you want to revoke and click Revoke Certificate.
- The certificate is revoked and is no longer valid.

6.3 Deleting a Certificate
Deleting a certificate removes the certificate from PAM360 repository, but the certificate still remains valid.
To delete a certificate,
- Navigate to Certificates >> ACME >> ZeroSSL tab.
- Select the certificate you want to delete and click More >> Delete.
- The certificate is deleted from the PAM360 database.
