Managing Resource Groups
PAM360 enables efficient resource management by organizing resources into resource groups, which can be created in two ways: Static Resource Groups, where administrators manually select specific resources to form a group, and Dynamic Resource Groups, where resources are automatically included based on predefined criteria. Any newly added resource that meets these conditions is automatically added to the group, ensuring seamless and automated resource organization. Further, administrators can share resource groups with users or user groups, ensuring controlled access to privileged accounts. Any modifications to a resource group, such as adding or removing resources, directly impact privileged account access shared through that group. Users with access to a shared resource group can only access passwords for resources currently included in that group.
Additionally, PAM360 supports nested grouping for organizing resource groups. This allows administrators to create nodes or subgroups that reflect an organization's departmental or sectional hierarchy, improving resource management and navigation.
At the end of this document, you will have learned the following topics in detail:
- Dynamic Resource Group
- Static Resource Group
- Viewing Resource Groups
- Nested Groups
- Managing Resource Groups
1. Dynamic Resource Group
Dynamic resource groups automatically include privileged resources based on predefined criteria or expressions. As new resources meet the specified conditions, they are automatically added to the resource group, while resources that no longer meet the criteria are removed. This resource group is useful for:
- Managing resource in a resource group based on attributes (e.g., resource type, department, password policy, etc,.)
- Automating the resource grouping to reduce administrative overhead.
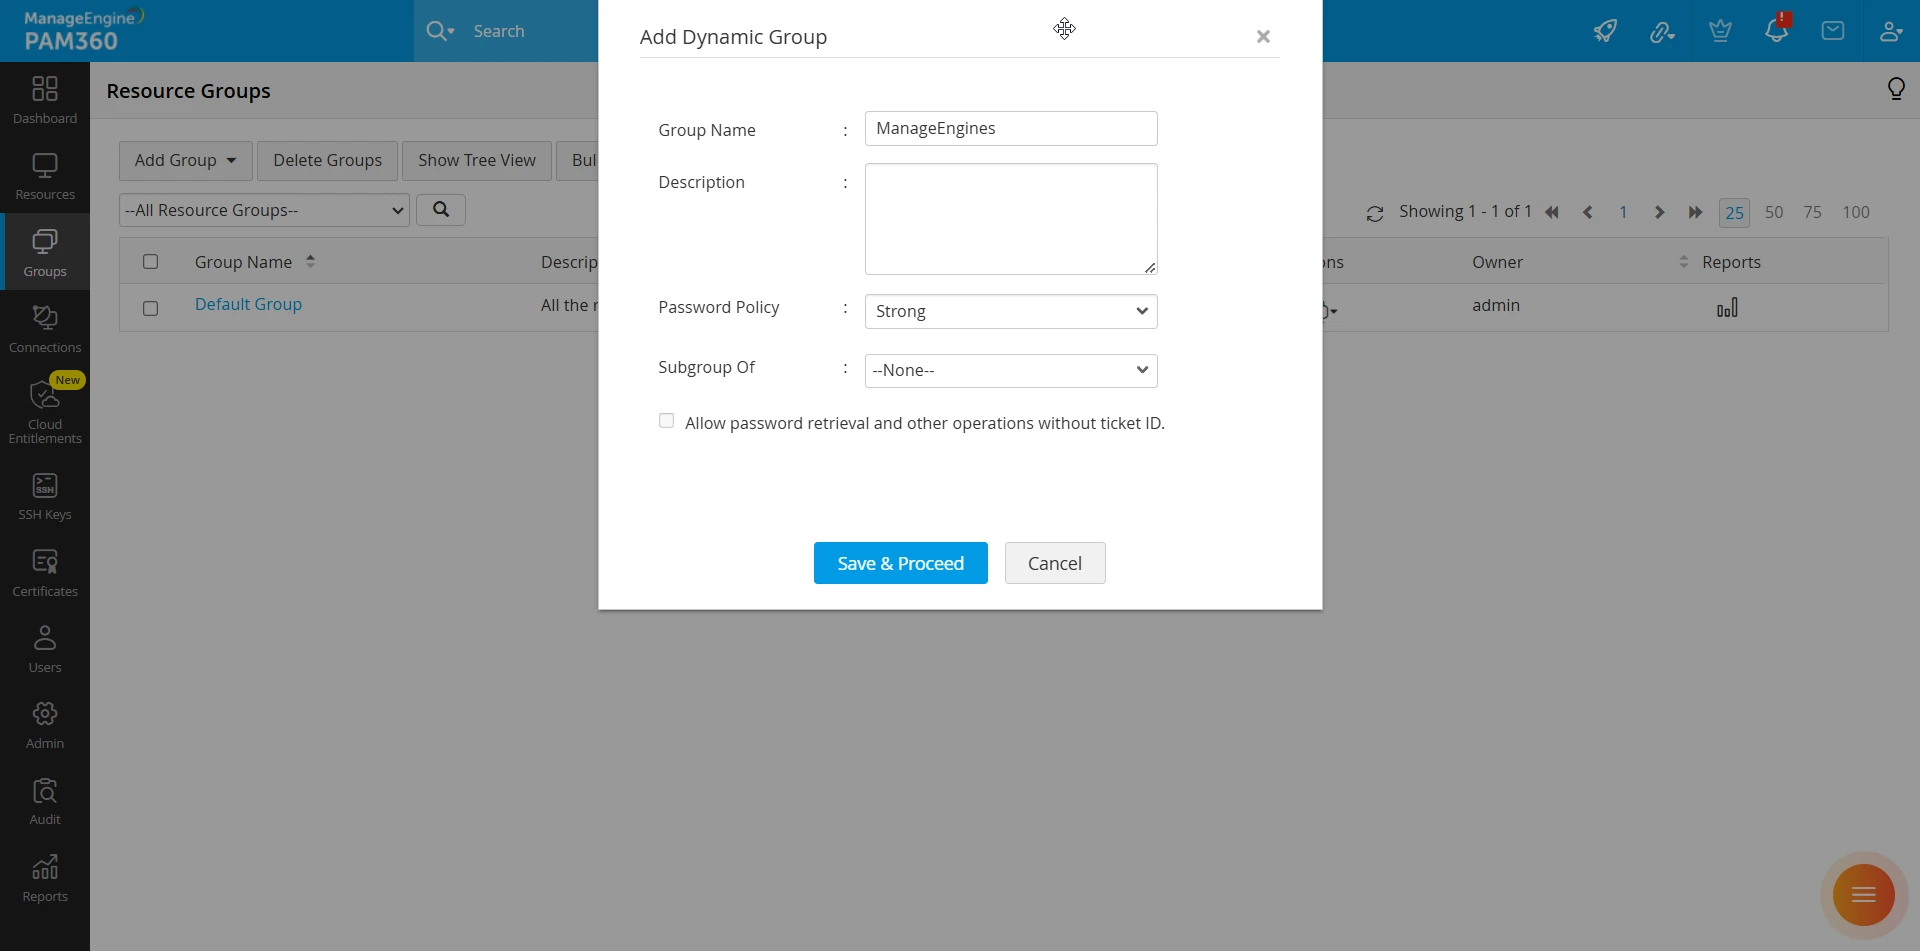
To add a dynamic resource group in PAM360, navigate to Groups >> Add Group >> Dynamic Group. In the window that opens,
- Enter a unique name in the Group Name field.
- Provide a clear description in the Description field for future reference.
- Choose an appropriate Password Policy for the group. The selected password policy will be applied for password allocation during periodic password reset of the accounts in the resource group.
- If you have opted for node-based nested grouping, select the desired root node or subnode in the Subgroup Of dropdown to ensure that the new resource group is placed under the correct hierarchical node.
- If you have opted for inheritance-based nested grouping, select an existing group in the Subgroup Of dropdown to add this new resource group as a subgroup. Also, enable the Inherit sharing permission from the assigned parent group checkbox to inherit the share settings from the selected parent group. If disabled, this resource group has to be shared manually to the respective users or user groups with the required permission level.
Additional Detail
Inheritance-based resource grouping is applicable from build 7410 and above only.
- If needed, tick the Allow password retrieval and other operations without the ticket ID checkbox. This allows access to or retrieval of passwords for accounts within this resource group without requiring a ticket ID. Ensure that the ticketing system configuration is enabled before selecting this option.
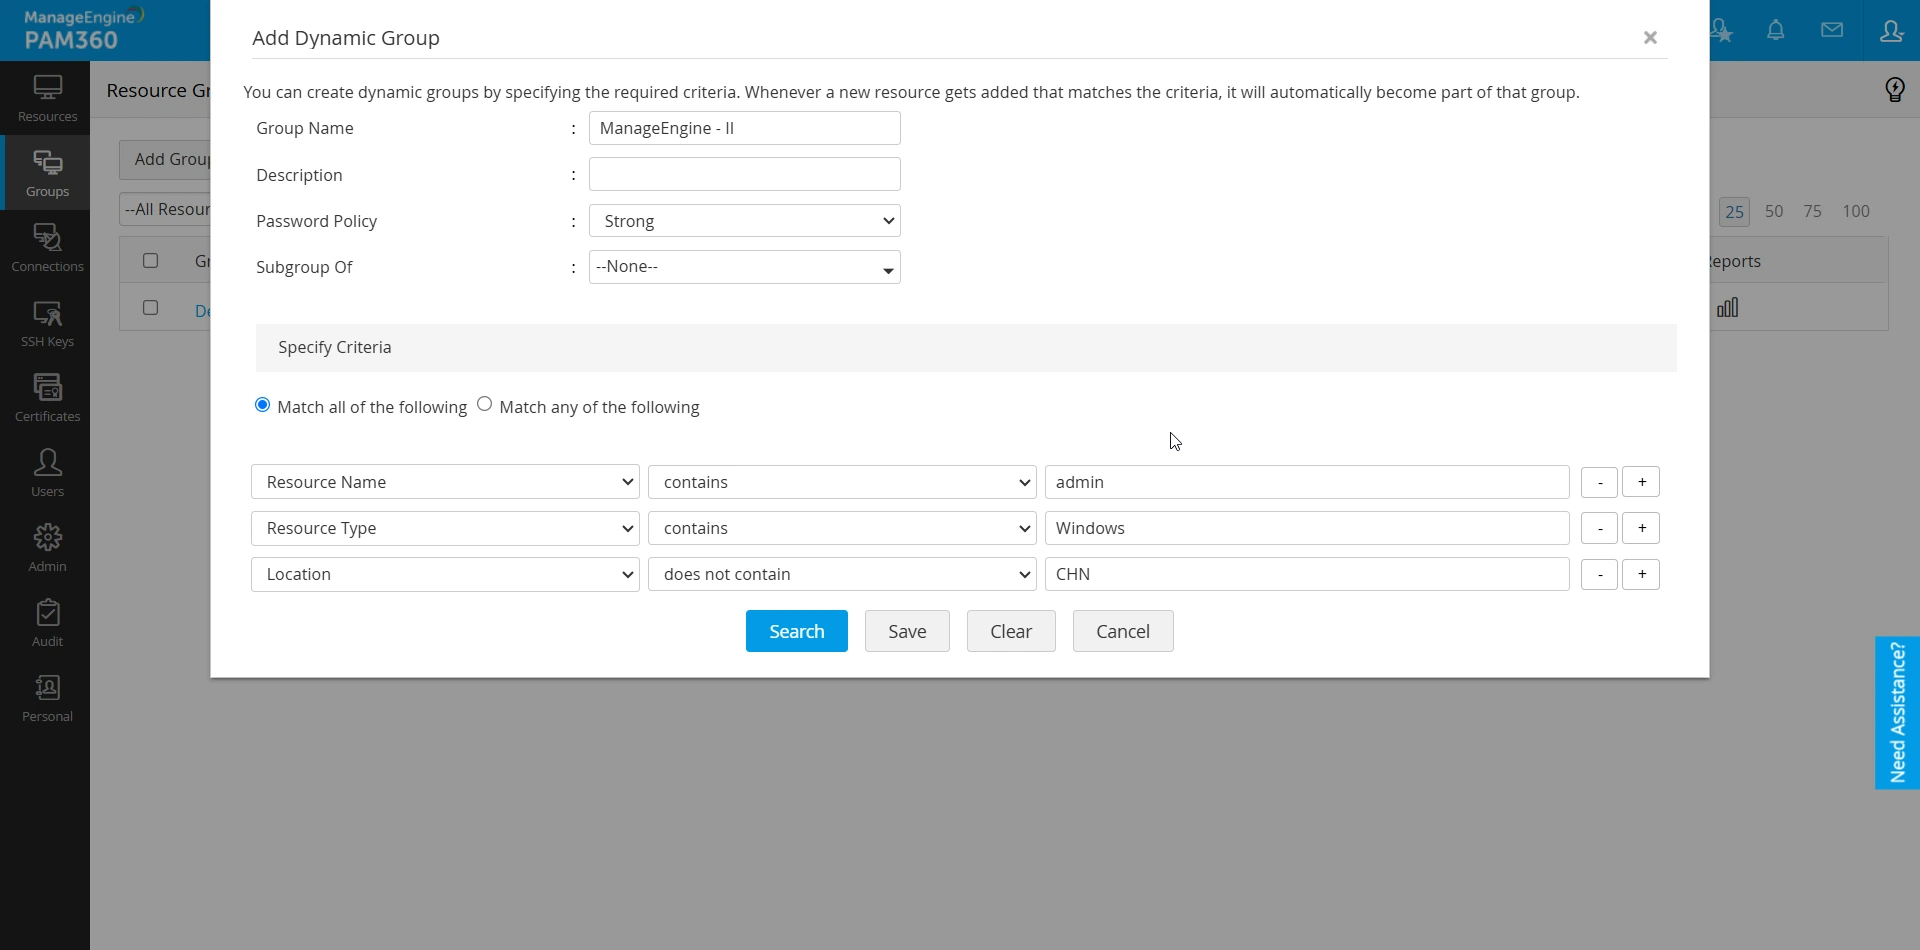
- For build before 7200, perform the following steps:
- Use the available filters to specify the criteria for the group.
- Upon specifying the required criteria, click Search to view the list of available resources that will become part of this group.
- Click Save to create the resource group with the defined criteria.
- For build before 7200, perform the following steps:
- Click Save & Proceed to define the criteria for the dynamic group.
- In the next window, create criteria using the available conditions/subsets and the AND | OR operators for dynamic resource management within the group. If you have existing criteria templates, you can apply them by selecting from the template field and clicking Apply.
- After specifying the criteria, click Search to view the resources that will be included in the group based on the defined conditions.
- Click Save to finalize the creation of the resource group with the specified criteria.
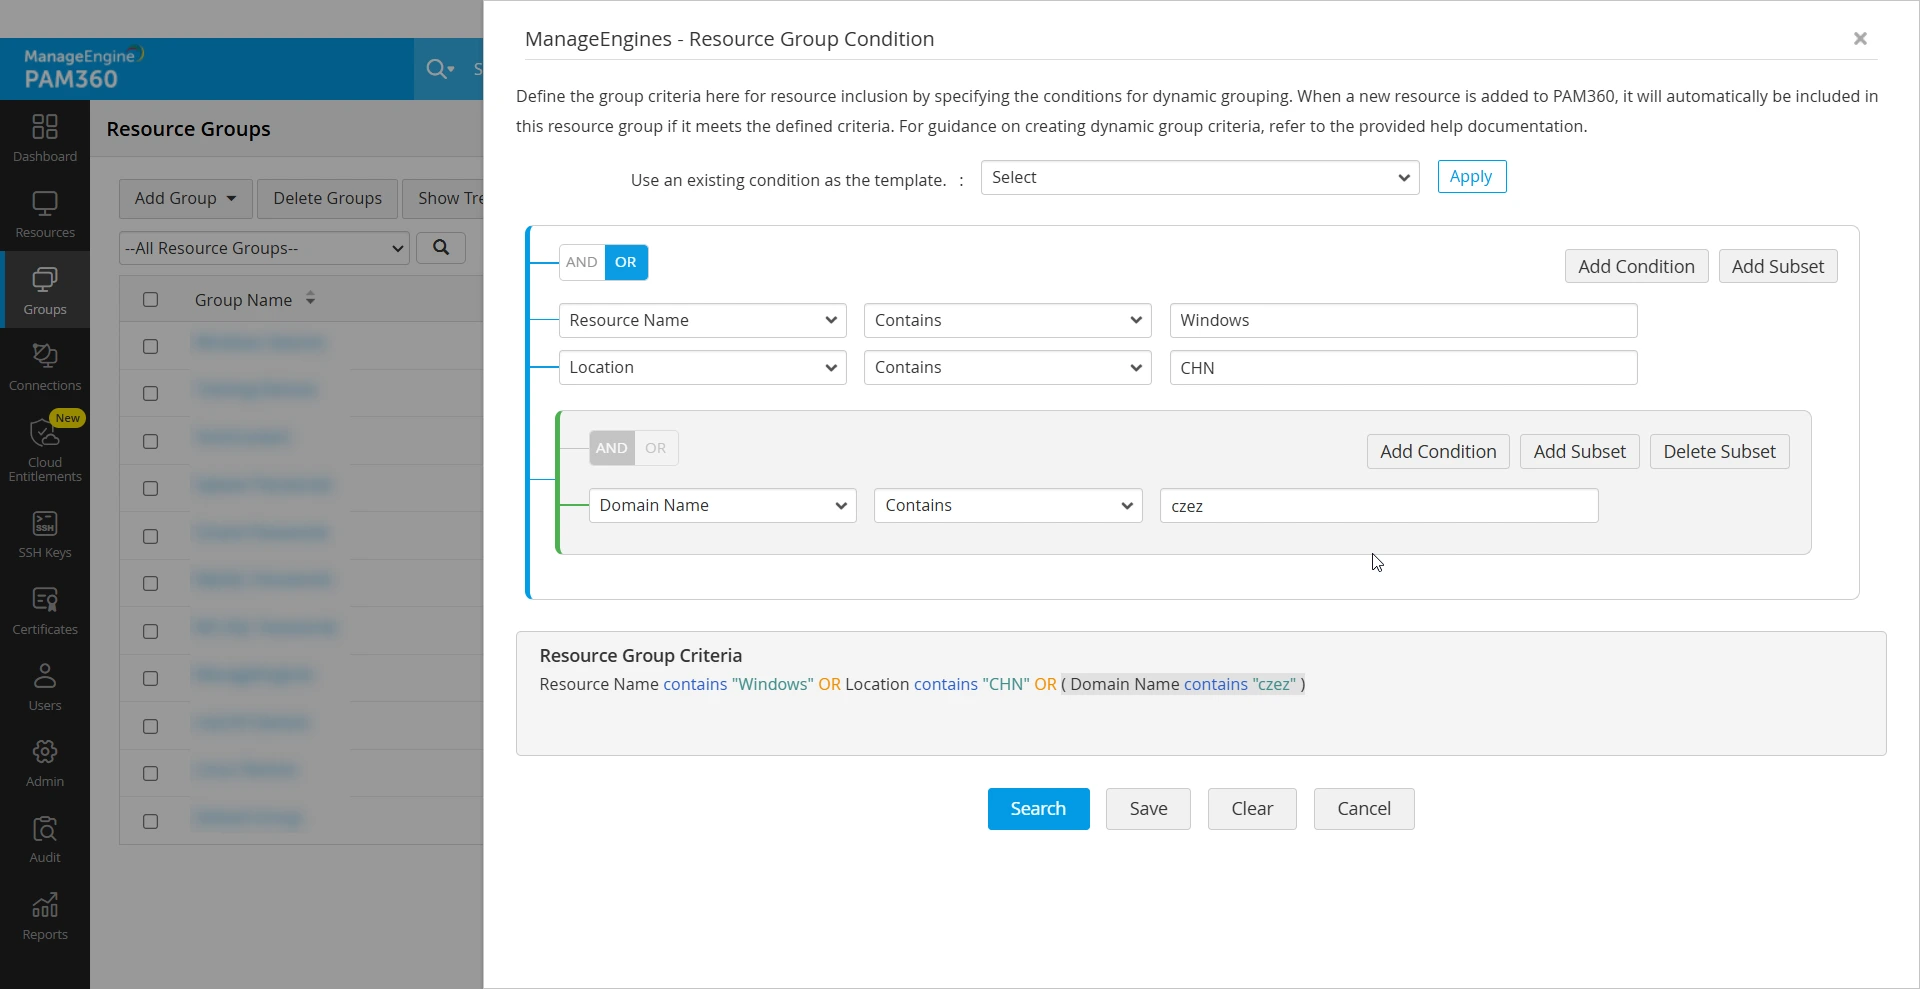
Whenever a resource is added to PAM360 or modified, and if it falls under the created criteria of the dynamic group, it will get added to the respective resource group.
1.1 Scenarios for Creating a Dynamic Groups
For builds applicable from 7200, below are a few scenarios for creating criteria effectively for associating the required resources:
Scenario 1: A system administrator in an organization needs to create a resource group that includes only the Windows resources from the Marketing department and the Linux resources from the Development department. This will enable the administrator to efficiently manage and execute operations across these resources with a single click.
However, the challenge lies in the fact that both departments manage both Windows and Linux resources, and the resources are subject to frequent changes—being added or removed monthly due to departmental policies and restrictions.
To streamline this process and minimize the manual effort required each month, the dynamic resource group feature in PAM360 can be leveraged. By creating a dynamic group with specific criteria as shown below, the system administrator can automatically include the relevant resources, ensuring the group remains up-to-date with minimal intervention.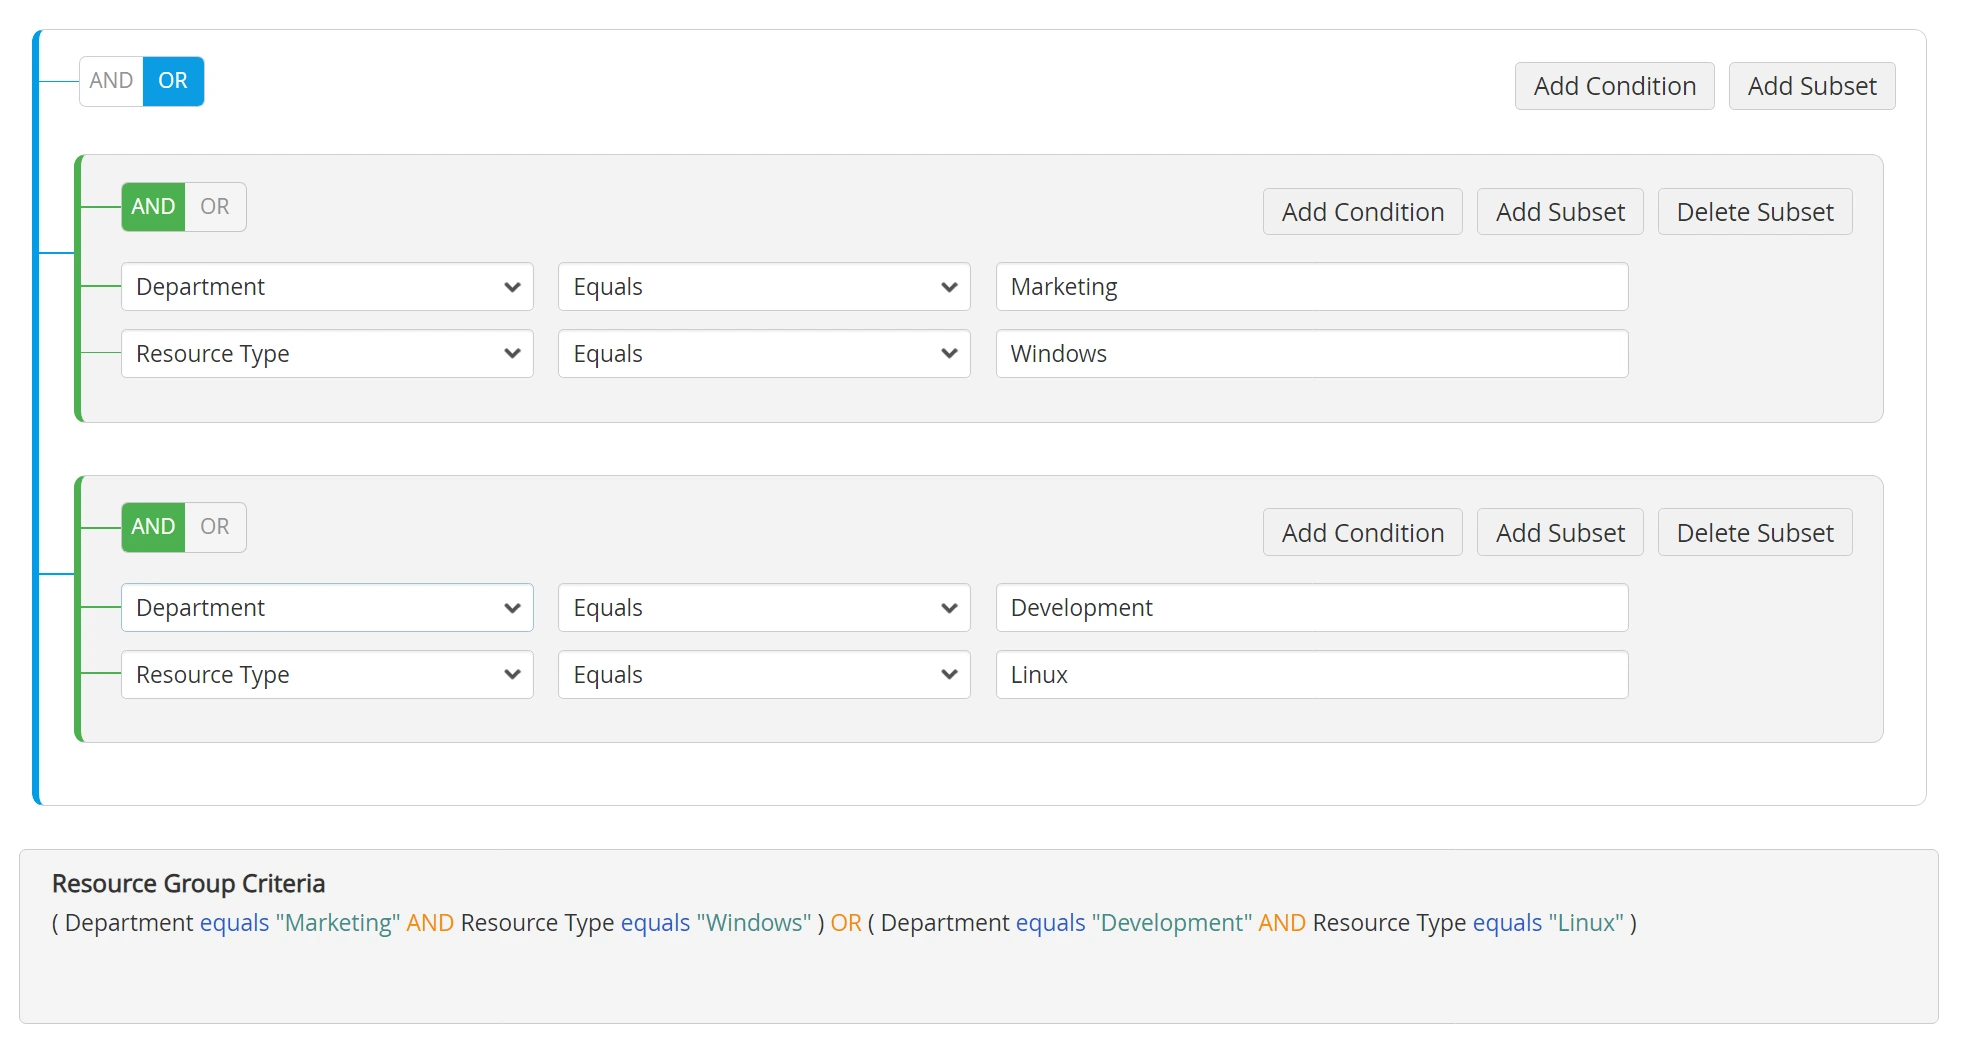
Scenario 2: An IT administrator in an organization needs to perform maintenance, apply security policies, or audit configurations on a specific set of Linux resources created with DNS name starting with "pc01" and "dc23" and ends with ".abccorp.com".
The challenge is to efficiently locate and group these resources, as they may serve different functions and need to be managed accordingly. However, the administrator finds that the Linux resources that need to be grouped are created with a resource name "CV-1" in mixed order. Despite searching and organizing the Linux resources that fall under this criteria, the administrator can utilize the dynamic resource group feature to automate the process.
By creating a dynamic group with the criteria specified in the image below, the administrator can automatically include the relevant Linux resources. This approach ensures that the resource group remains accurate and up-to-date, simplifying ongoing management tasks and reducing the need for periodic manual intervention.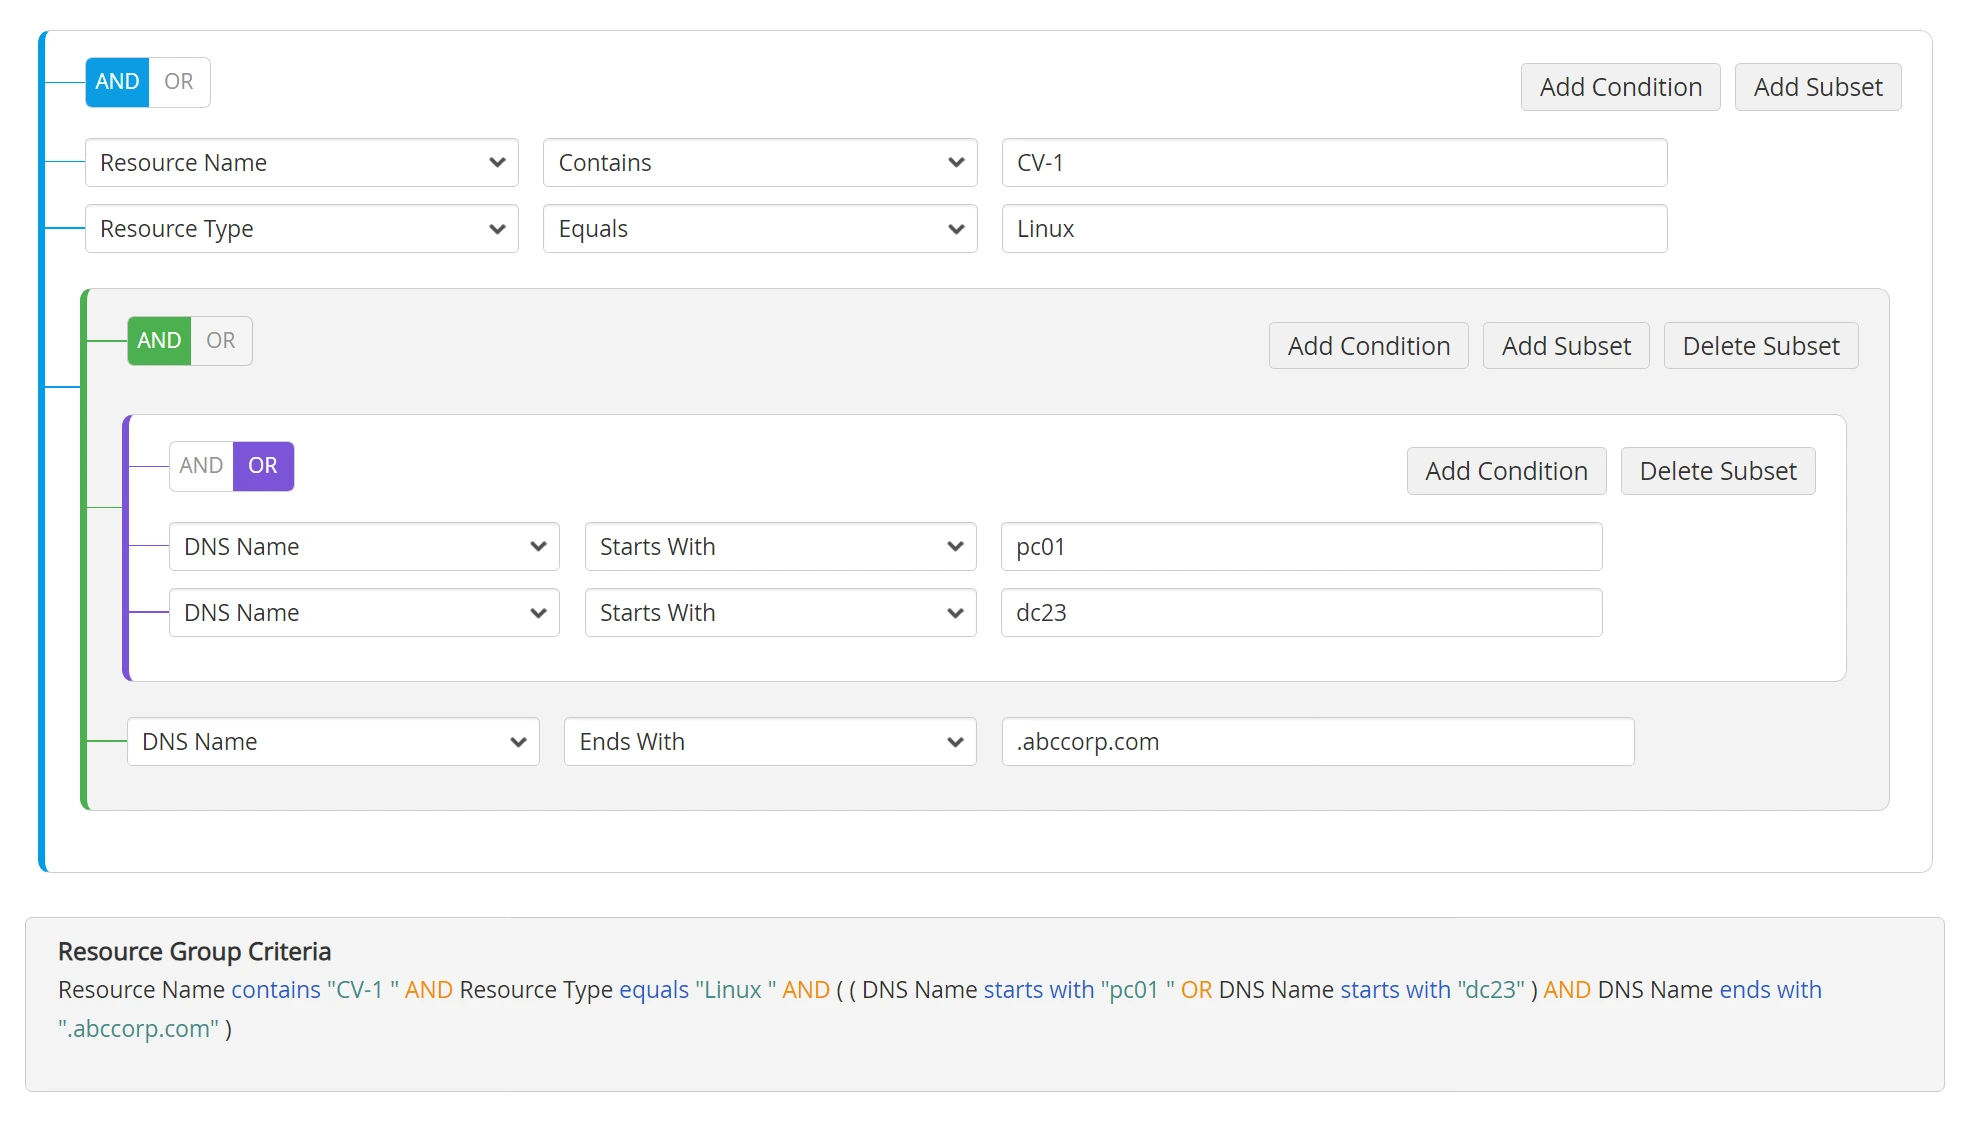
2. Static Resource Group
Static resource groups contain a fixed set of privileged resources that are manually added by the administrators. Once assigned, the resources in the resource group remain unchanged unless modified manually. To add a static resource group in PAM360, navigate to Groups >> Add Group >> Static Group. In the window that opens, perform the following actions:
- Enter a unique name in the Group Name field.
- Provide a clear description in the Description field for future reference.
- Choose an appropriate Password Policy for the static resource group.
- Choose an Access Policy for the static group.
- To make the new resource group a subgroup of an existing one, select the parent group from the Subgroup Of dropdown. The selected resource group will become the parent of the new static resource group.
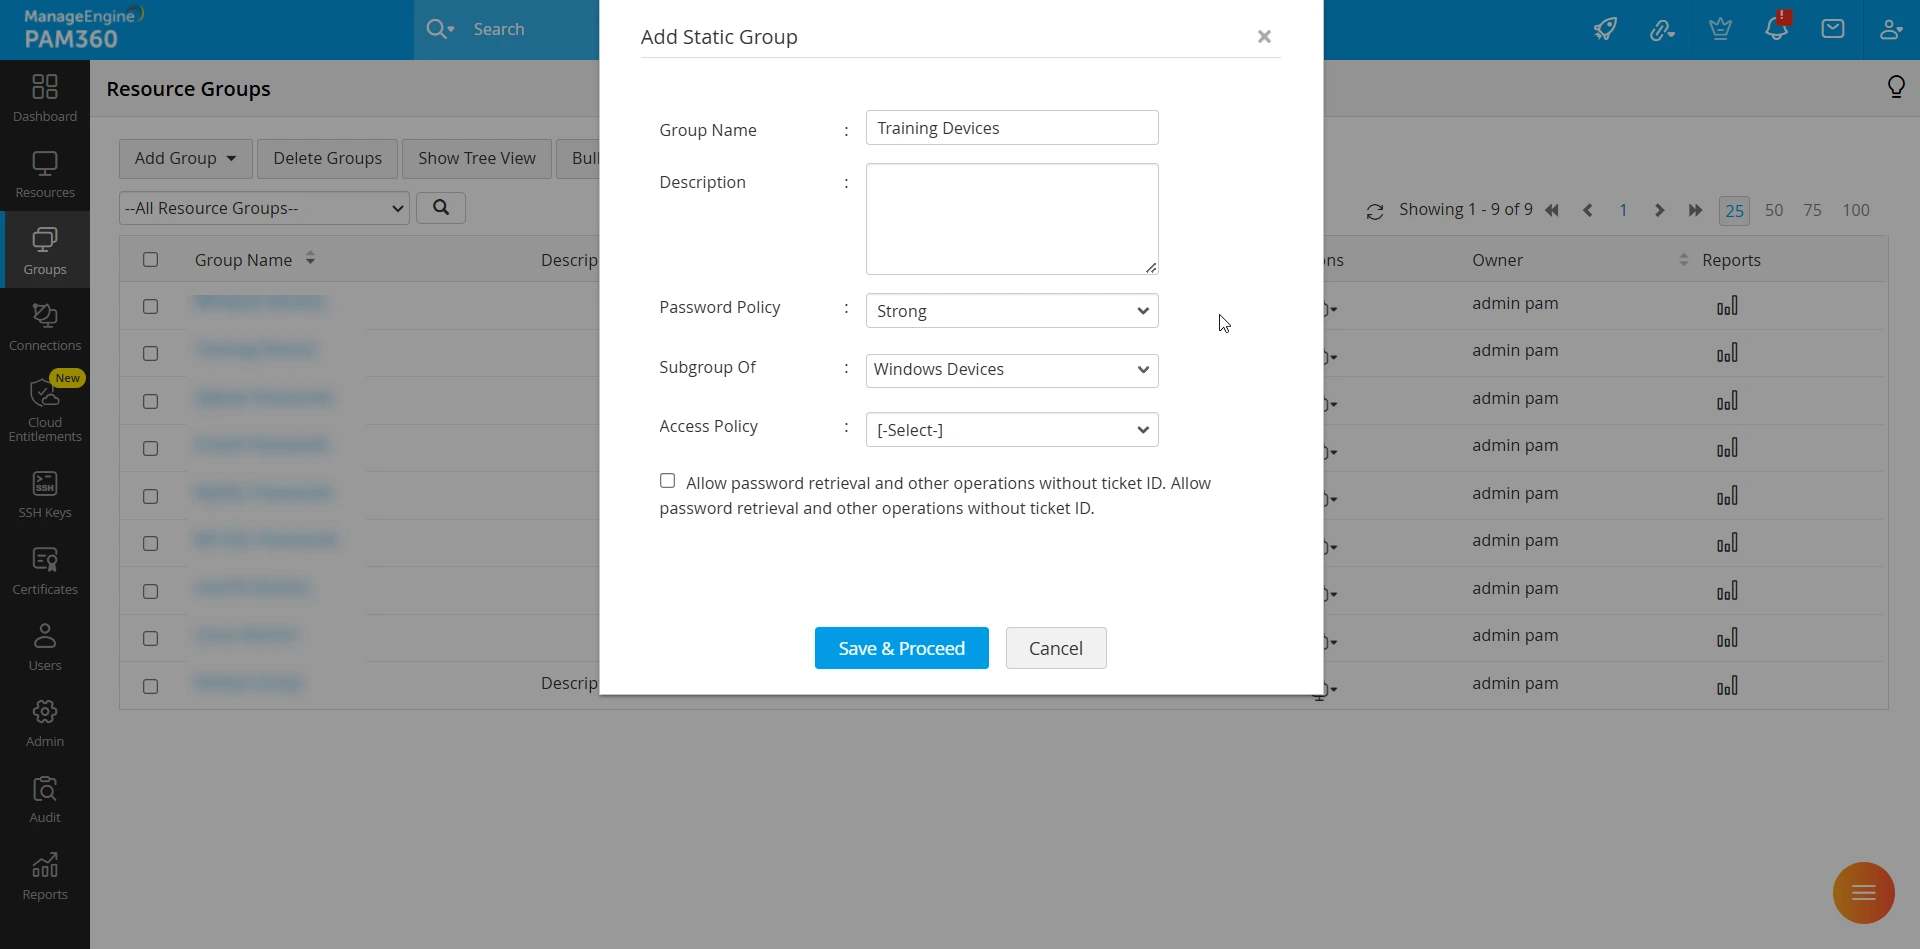
- If needed, tick the Allow password retrieval and other operations without ticket ID checkbox. This allows access to or retrieval of passwords for accounts within this resource group without requiring a ticket ID. Ensure that the ticketing system configuration is enabled before selecting this option.
- Click Save & Proceed.
- In the dialog box that opens, add the desired resources to the created static resource group.
3. Viewing Resource Groups
Resource groups with their associated resources can be viewed from the Groups and Resources tabs. In the Groups tab, selecting a resource group and clicking Show Tree View at the top pane displays the hierarchical view of the resource groups.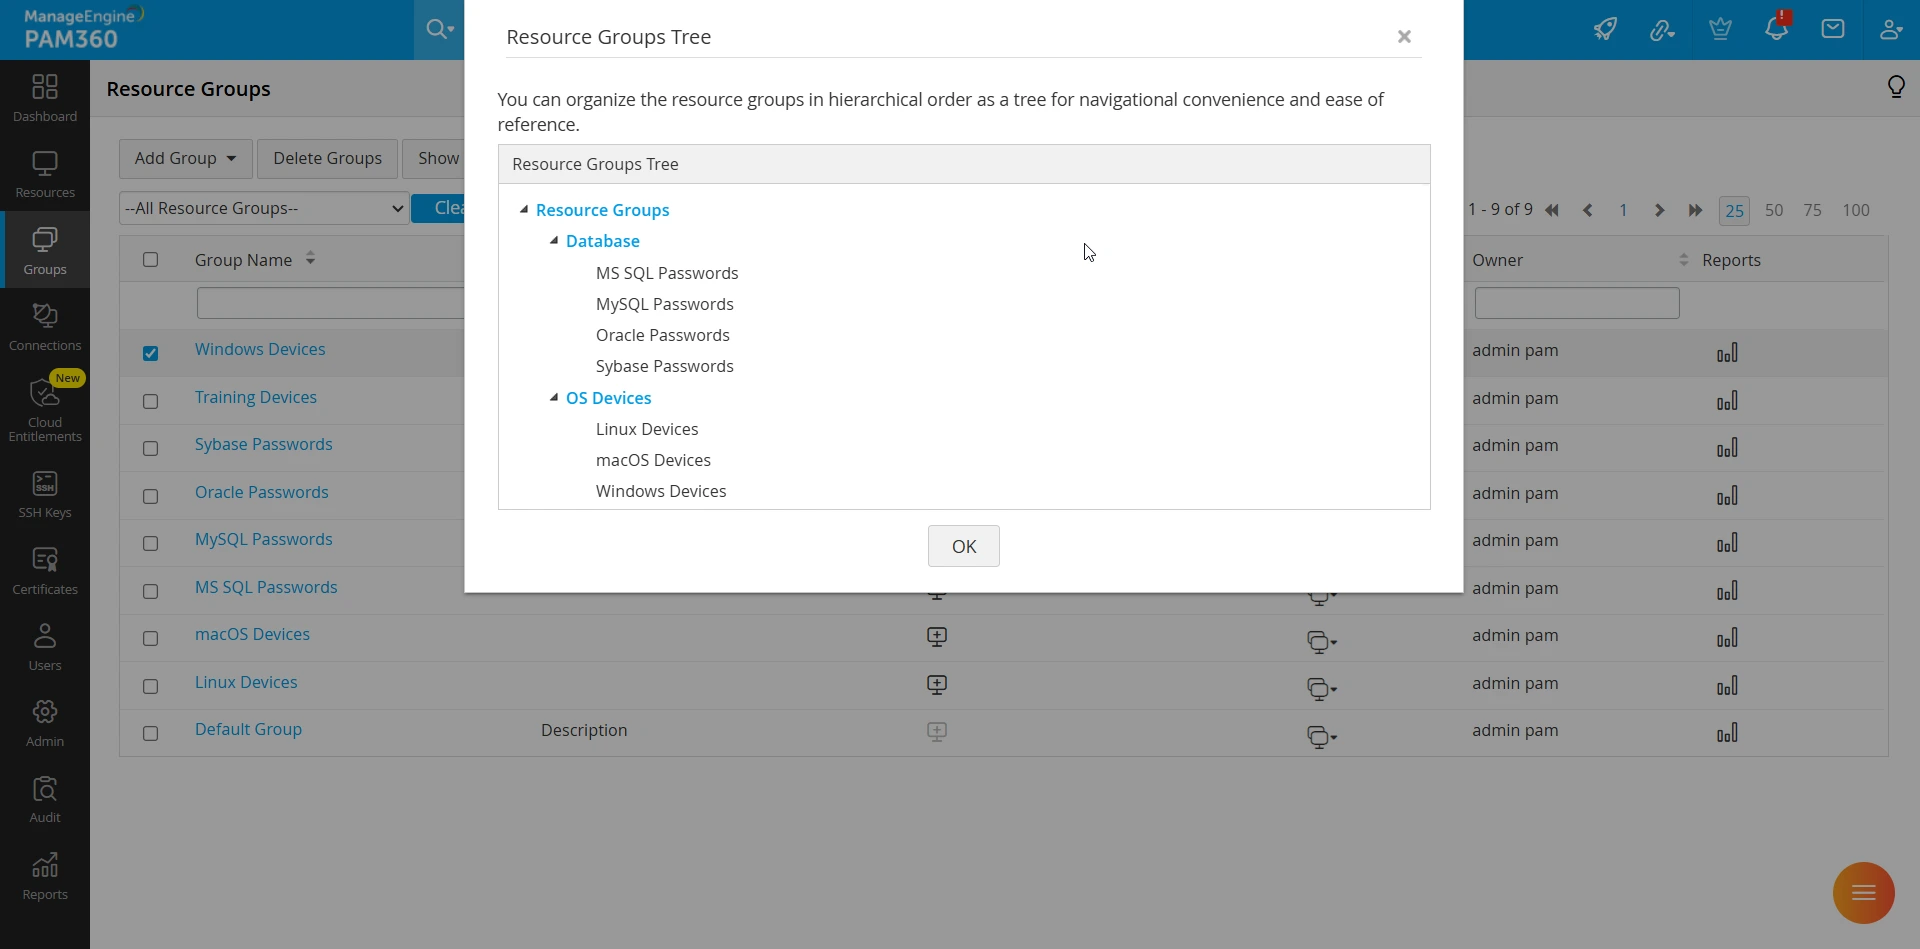
In the Resources tab, resource groups are displayed in a tree view on the left pane. Clicking on a group's name reveals the associated resources and their passwords.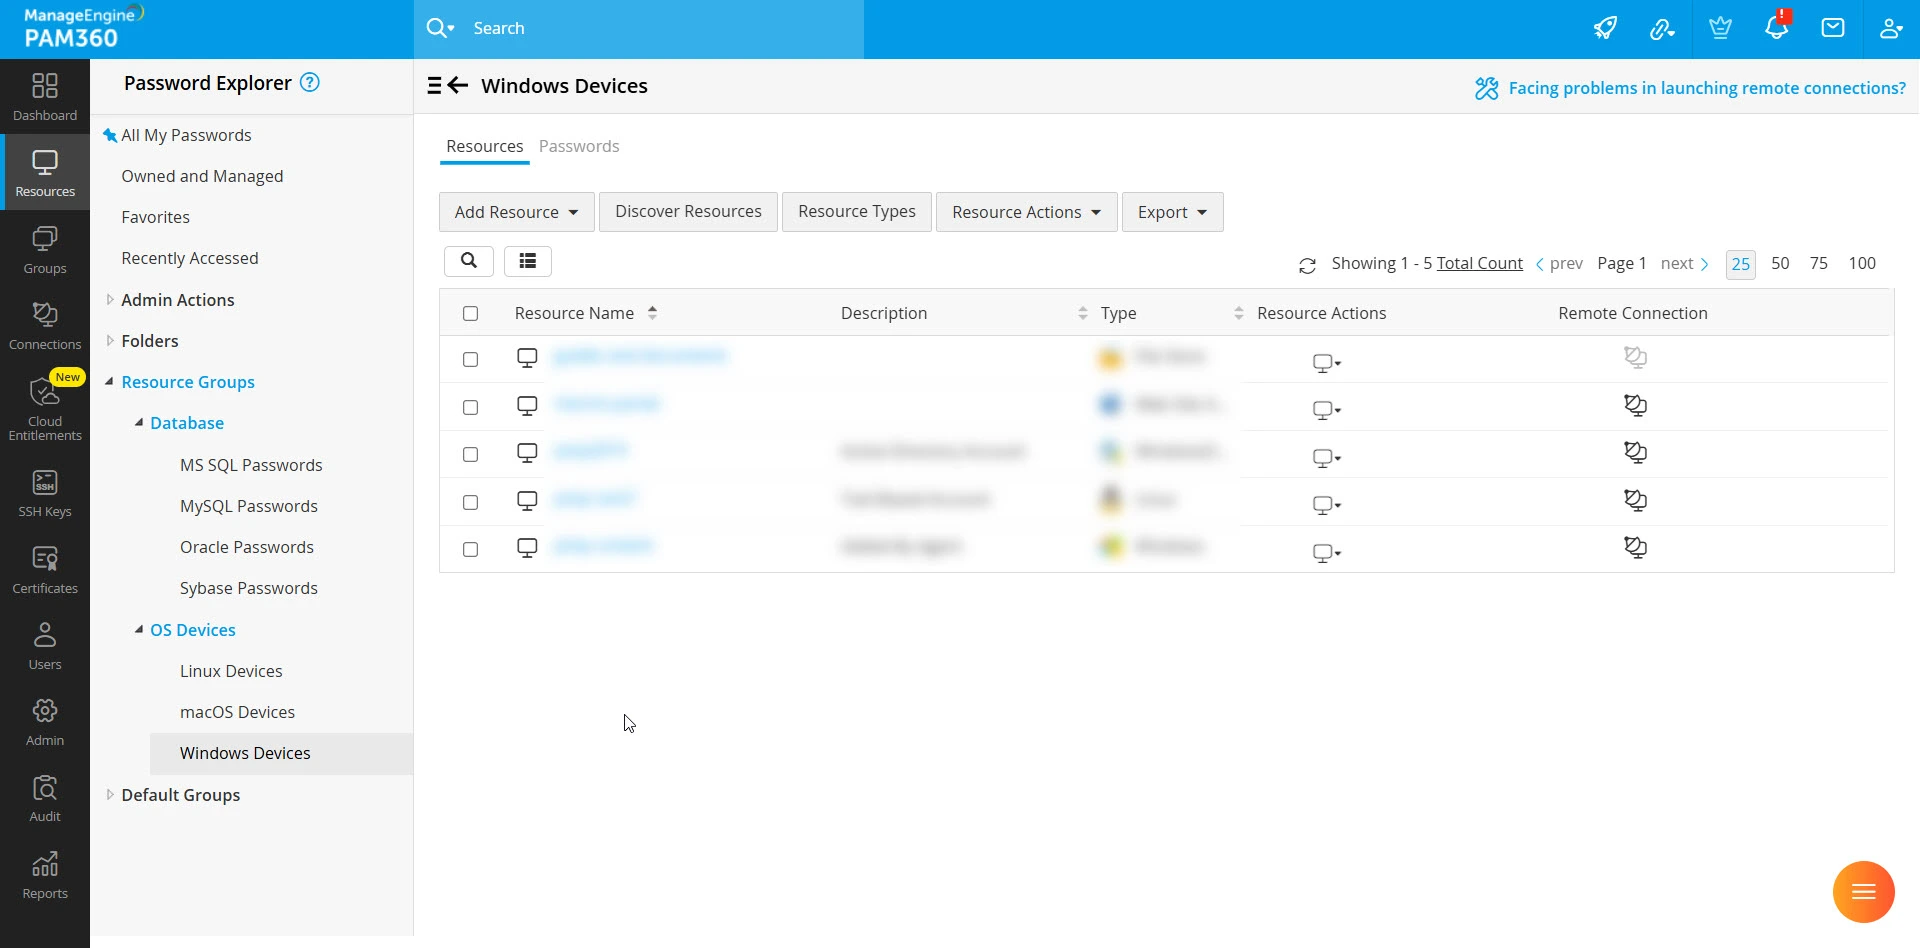
Additional Detail
From build 7010, with the Manage resource groups using inheritance-based grouping enabled in general settings, administrators can directly create, edit, delete resource groups, and share them with users or user groups as required from the Password Explorer tree in the Resources tab.
4. Nested Groups
Refer to this help document to learn more about nested groups in detail.
5. Resource Group Operations
From the Groups tab, administrators can perform individual and bulk configurations for a resource group similar to individual resources, including sharing with users or user groups, transferring ownership of resource groups, resetting passwords (manual and periodic resets), configuring SSH command control, etc. 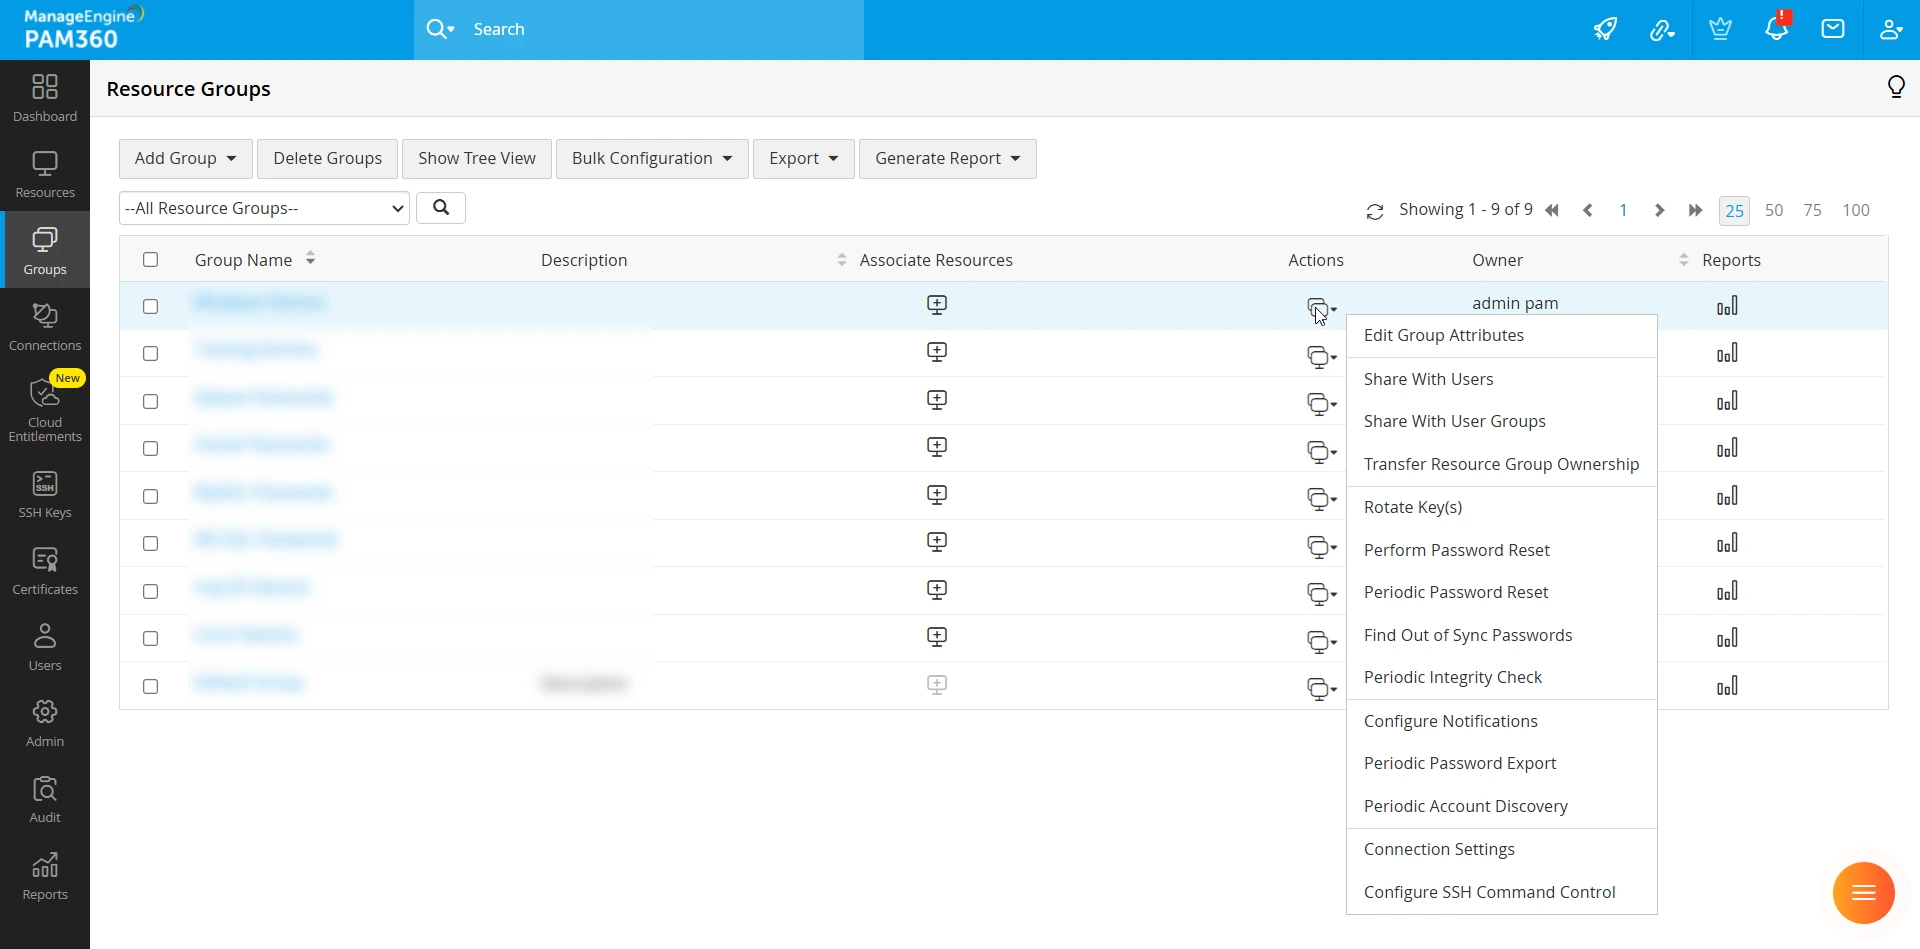
Additionally, PAM360 offers a few resource group-level operations in the Groups tab to enhance security and integrity.
5.1 Finding Out-of-Sync Passwords
This feature verifies whether the passwords stored in PAM360 match those on the target devices. It is a one-time operation. To initiate the check, click Start Now.
5.2 Periodic Integrity Check
In the Periodic Integrity Check window, administrators can schedule periodic integrity checks to ensure password consistency:
- Once: Perform an integrity check without scheduling future checks.
- Day(s)/Monthly: Specify an interval (in days or months) for automated checks.
- Select a start date and time for the periodic check.
- To disable a scheduled check, select Never.
- Click Schedule to confirm the settings.

5.3 Generating Reports
To generate reports such as Password Inventory, Policy Compliance, Password Expiry, or Password Out of Sync for a resource group:
- Navigate to the Groups tab and select the resource group from the list.
- Click the Generate Report button at the top of the list view.
- Choose the required report from the drop-down list to generate it.
For more information about reports in PAM360, click here.
5.4 Deleting a Resource Group
To delete a resource group, go to the Groups tab, select the desired group, and click Delete Groups at the top of the list view.