Managing Accounts and Passwords
Managing your accounts and passwords in PAM360 made easy. This document discusses the different ways in which users can manage accounts in PAM360 such as viewing, editing, copying, moving accounts and also to change password, view password history and check integrity of passwords stored in PAM360.
- Viewing Accounts
- Copying Passwords
- Changing Passwords
- Verifying Passwords Stored in PAM360
- Viewing Password History
- Copying Passcard Link
- Editing Accounts
- Copying Accounts
- Moving Accounts
1. Viewing Accounts
Follow the below steps to view an account that is part of a resource:
- Navigate to the Resources tab and click on the particular resource name whose account details you want to view. The accounts of the respective resource will be displayed in a new dialog box.
- By default, passwords are shown in hidden form behind asterisks; to view the passwords in plain text, just click on the respective asterisks. The passwords will be shown for 10 seconds only. After that, they will be automatically hidden. You can also view the passwords by clicking the asterisks again.
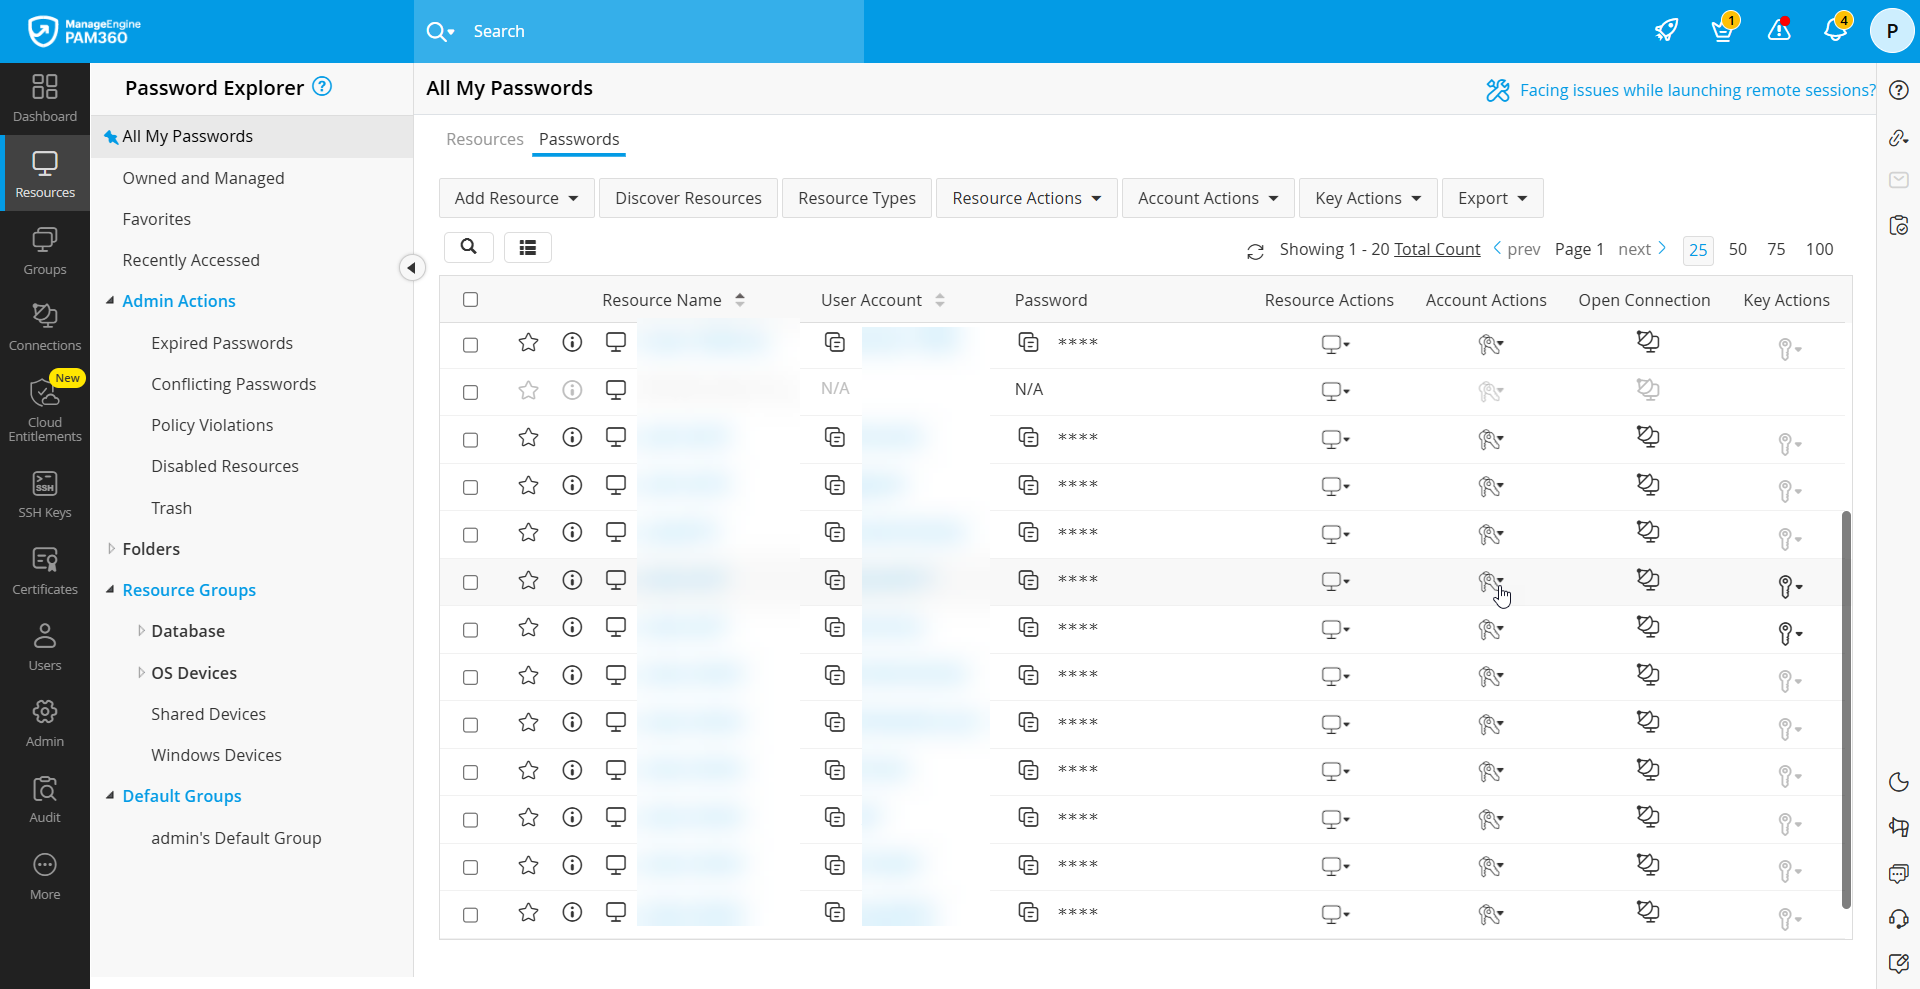
You can modify the default 10 seconds from the General Settings page.
1.1 Allowing End-Users to View Auto Logon Configured Accounts' Passwords
With auto logon enabled, PAM360 allows users to connect directly to a resource without viewing or retrieving its password. Normally, password users and auditors can view the passwords shared with them, but when auto logon is configured, password visibility may no longer be necessary. In such cases, you can choose to permit or restrict password access for users with specific user roles using a setting available under General Settings.
1.2 Enforcing Users to Provide a Reason for Viewing Passwords
By default, passwords are displayed in plain text when a user clicks the asterisks to retrieve a resource password. If you want users to justify why they need access, enable the Enforce users to provide a reason for password retrieval option in General Settings.
2. Copying Passwords
PAM360 leverages clipboard utility of browsers to copy passwords when you intend to copy and paste passwords. Navigate to the Resources tab, switch to the Passwords section and click the copy icon present against the desired passwords to copy. The copied passwords will be available to paste for 30 seconds.
3. Changing Passwords
To change the password of a user account, follow these steps:
- Navigate to the Resources section under the Resources tab, select the relevant resource, and identify the account for which you want to perform a remote password reset.
Alternatively, you can go to the Passwords section under the Resources tab and locate the required account directly. - Click the Account Actions icon against the account whose password you want to change and select Change Password from the drop-down list.

- In the pop-up form that appears, enter the new password and confirm the same. If required, opt for the inbuilt PAM360 password generator.
- If you want the password to be updated on the target system, enable the option Apply password changes to the remote resource.
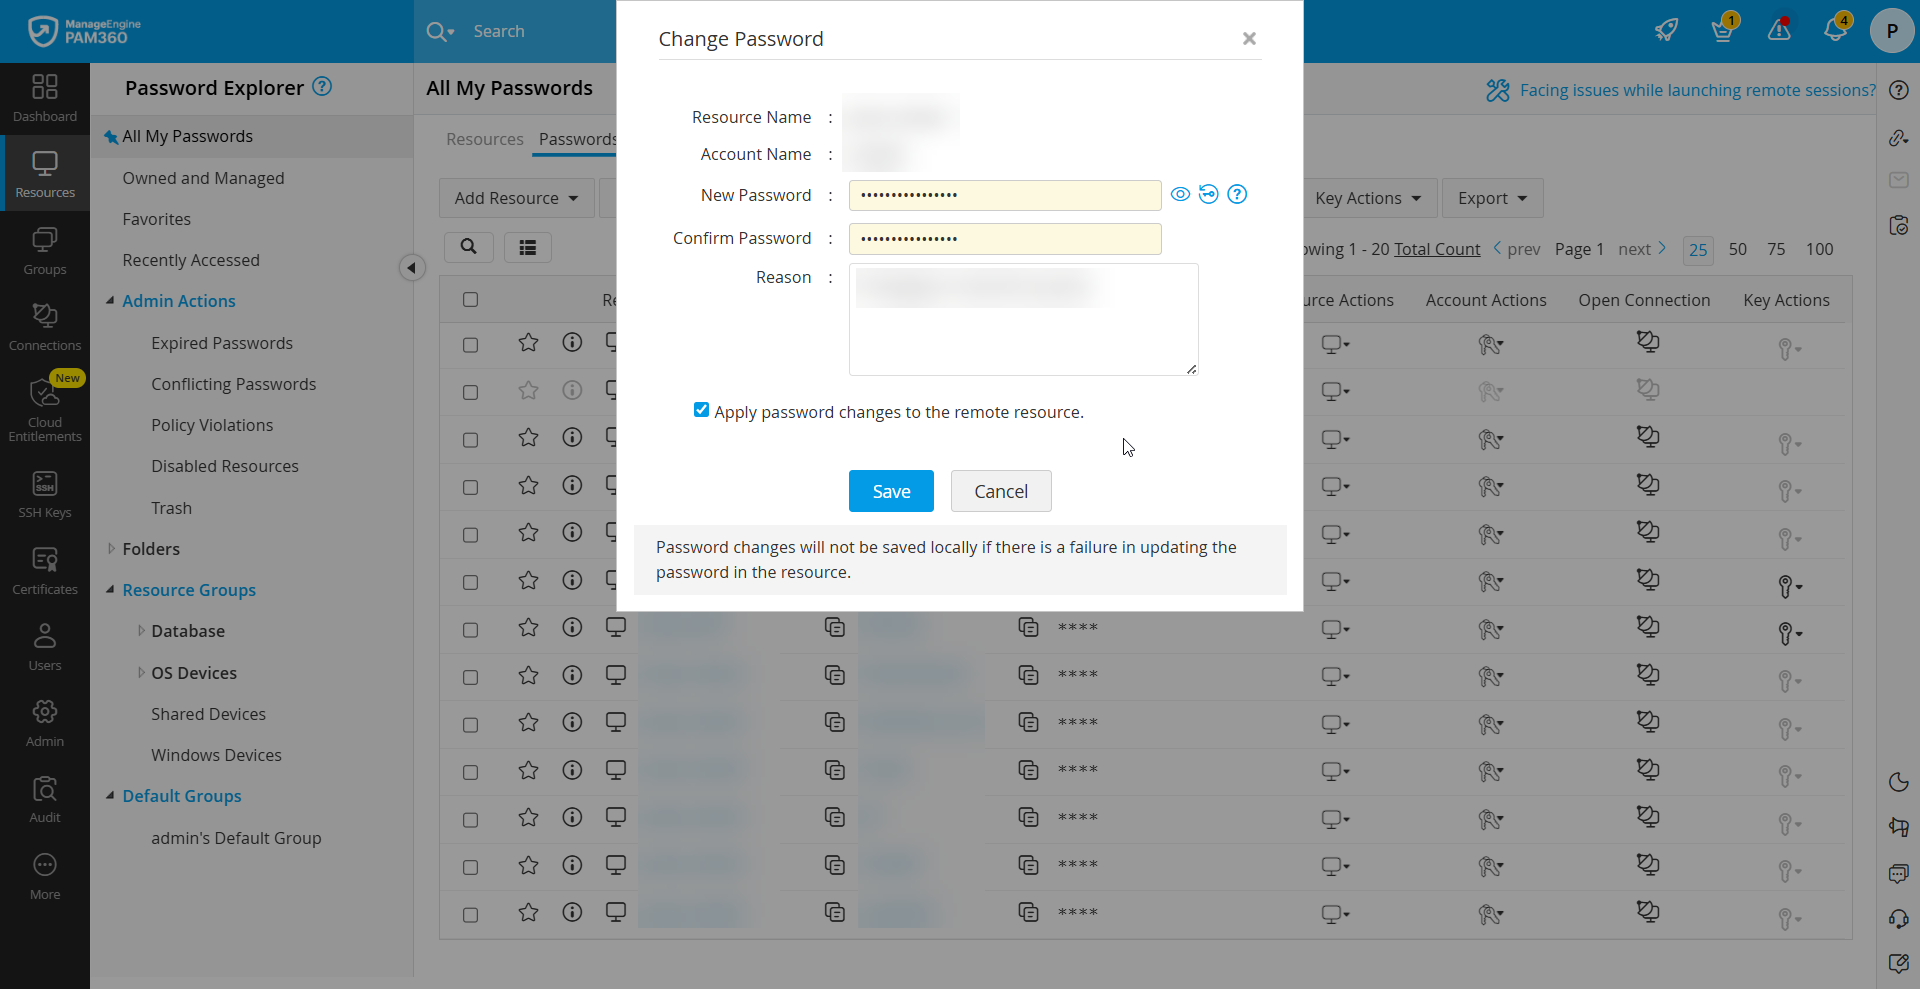
- Click Save to change the account password.
Caution
- When entering a new password, any password policy configured by the administrator for the resource will be automatically enforced.
- If a remote synchronization attempt fails, the password change will not be saved locally to ensure consistency between PAM360 and the target system.
4. Verifying Passwords Stored in PAM360
PAM360 stores passwords for critical resources such as servers, databases, network devices, and applications. However, there may be instances where an administrator updates a password directly on the target system instead of through PAM360. When this happens, the password stored in PAM360 becomes outdated, rendering it unusable for users relying on the vault.
To address this, PAM360 allows you to validate stored passwords against the actual password on the resource. Password verification can be performed at any time, either manually, as needed, or automatically at scheduled intervals. On-demand verification can be initiated for a single account or across all accounts and resources stored in PAM360.
4.1 Verifying Individual Account Password
Follow the below steps to verify the integrity of an account password:
- Go to the Resources tab and click the required resource to open the Account Details dialog, or switch to the Passwords tab.
- Click the Account Actions icon next to the account you want to verify, then select Verify Password from the dropdown.
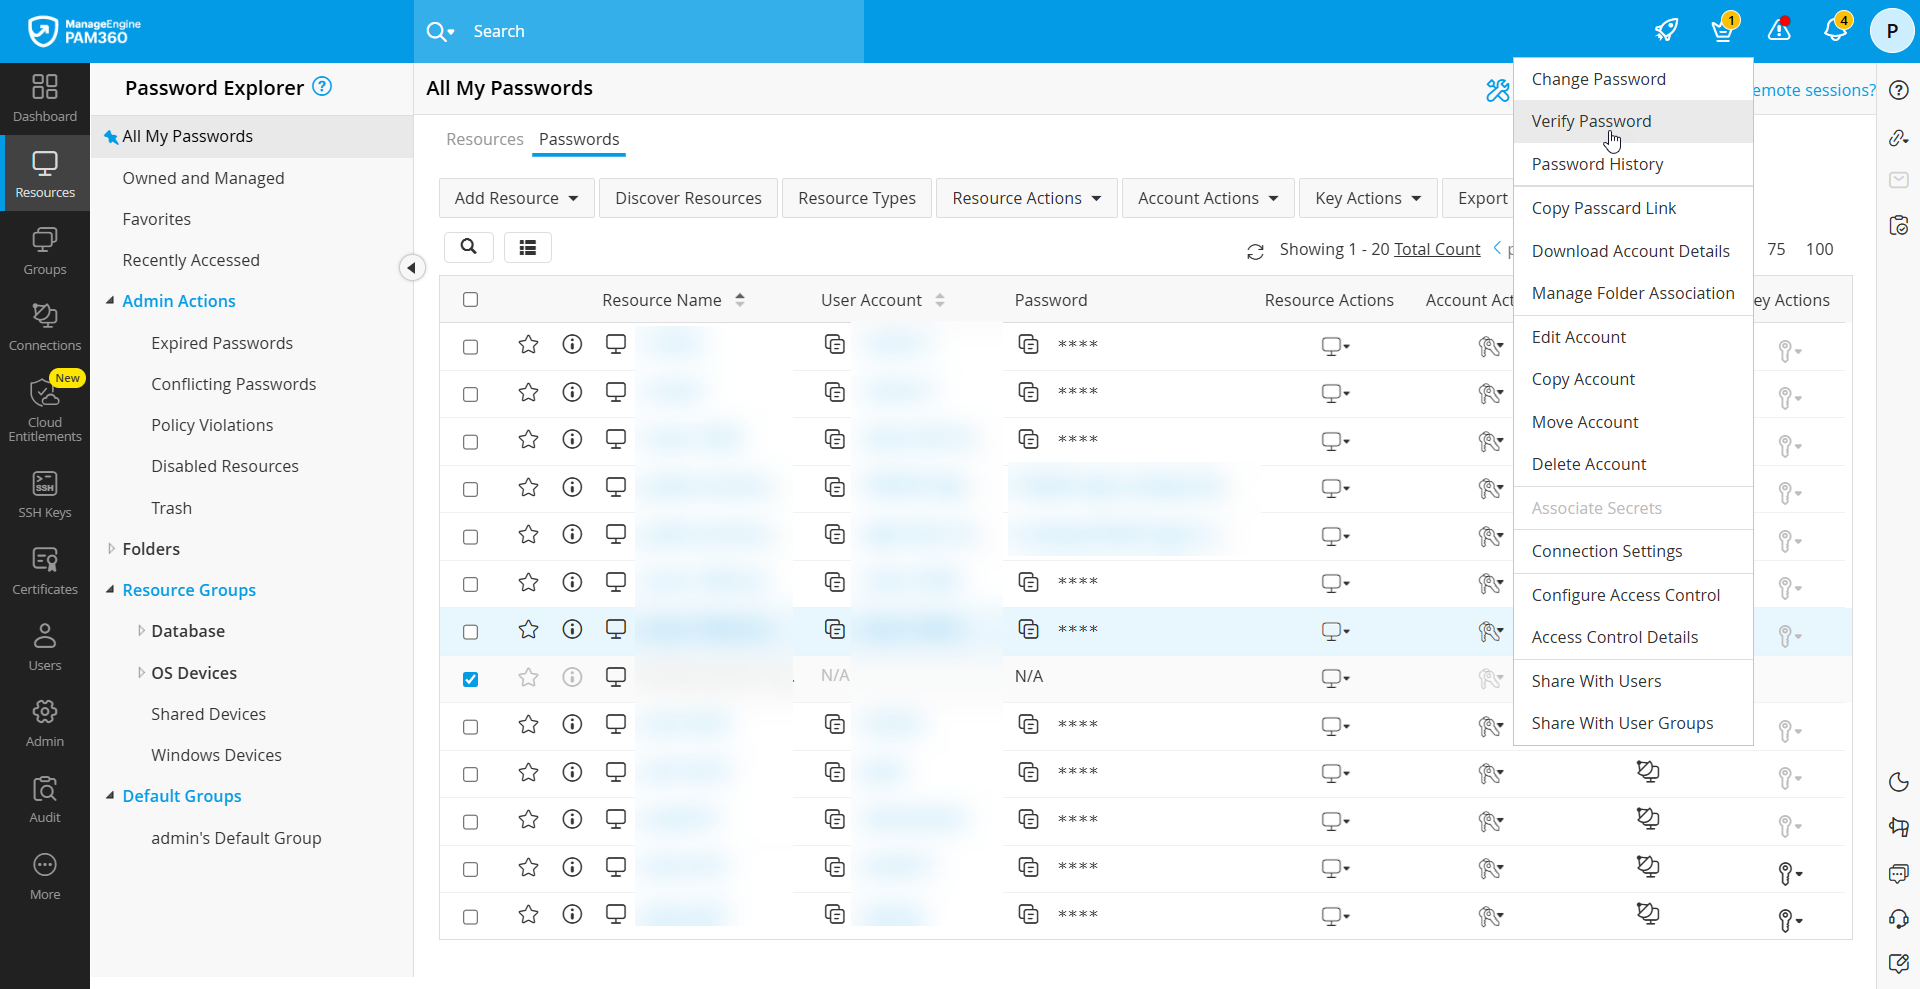
- PAM360 attempts to connect to the target system and log in using the credentials stored in the repository. If authentication fails, the password is marked as out of sync.
Additional Details
- Password verification works only for accounts configured with Remote Login Credential.
- If PAM360 is unable to establish a connection due to network issues, it is not treated as a password mismatch.
4.2 Verifying Account Passwords in a Group
Verify the passwords of multiple accounts within a group in bulk to ensure that the stored credentials match the actual passwords on the respective target systems. Follow the steps below to perform password integrity checks in bulk for a resource group:
- Go to the Groups section, click the Actions icon next to the required group, and select Find Out-of-Sync Passwords.
- In the dialog box that appears, click Start Now. Now, all the passwords of the selected group will be checked and email notification will be sent to the administrator.
4.3 Scheduled Verification of Passwords in a Group
You can schedule recurring integrity checks to verify whether a group's passwords in PAM360 remain in sync. Follow these steps:
- Go to the Groups section, click the Actions icon next to the required group, and select Periodic Integrity Check.
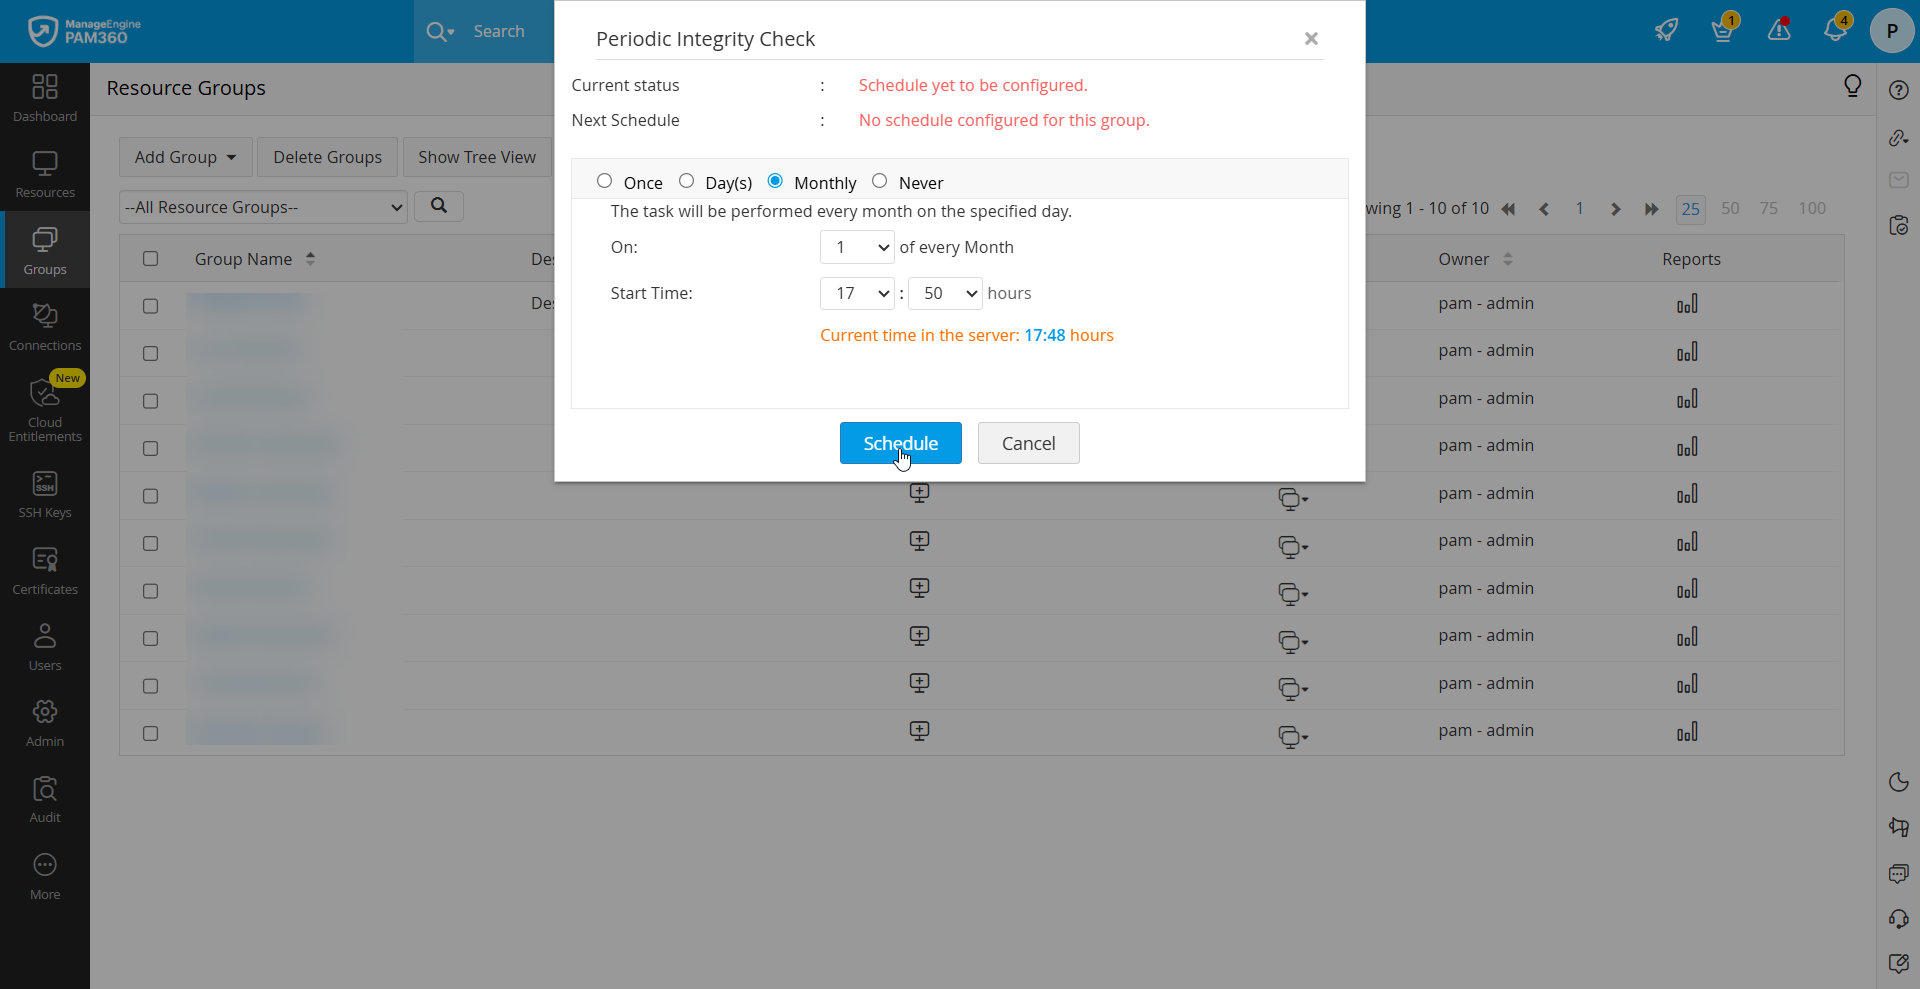
- In the pop-up that opens, schedule the integrity check or modify the existing schedule by choosing any of the below options:
- Once, on a specific day and time
- On an interval based on the specified days, from a specific day and time
- Monthly, on a specific day and time
- Never
- Click Schedule.
Now, the verification task runs as per the configured schedule. PAM360 will connect to each target system in the selected group where remote login credentials are available. Once connected, it attempts authentication using the stored credentials. If the login fails, the password is marked as out of sync. If PAM360 is unable to connect due to network issues, the password is not marked as out of sync. Upon completion, a consolidated report is emailed to all administrators and auditors.
4.4 Verifying All Passwords Stored in PAM360
Use this option to perform an integrity check across all passwords stored in PAM360. Once the verification is complete, administrators will receive an email notification.
- Navigate to Reports >> Password Out of Sync.
- Click Find Out of Sync Passwords, and in the dialog box that appears, select Start Now.
- After scheduling the verification, PAM360 attempts to connect to each target system for all accounts where remote login credentials are available. Once connected, it proceeds to log in using the stored credentials. If authentication fails, the password is flagged as out of sync. If PAM360 is unable to connect due to network issues, the password is not marked as out of sync. Upon completion, a consolidated report is emailed to all administrators and auditors.
5. Viewing Password History
PAM360 maintains a complete history of password changes for each account. The password history records details such as the previous password, the user who made the change, the machine from which it was modified, and the exact time of modification. To view the password history of an account,
- Go to the Resources tab and click the required resource to open the Account Details dialog, or switch to the Passwords tab.
- Click the Account Actions icon next to the account you want view the password history, then select Password History from the dropdown.
- In the pop-up for that appears, the password history will be displayed.
Additional Details
For shared resources with access control enabled, an administrator should approve your request before you can view the password history.
6. Copying Passcard Link
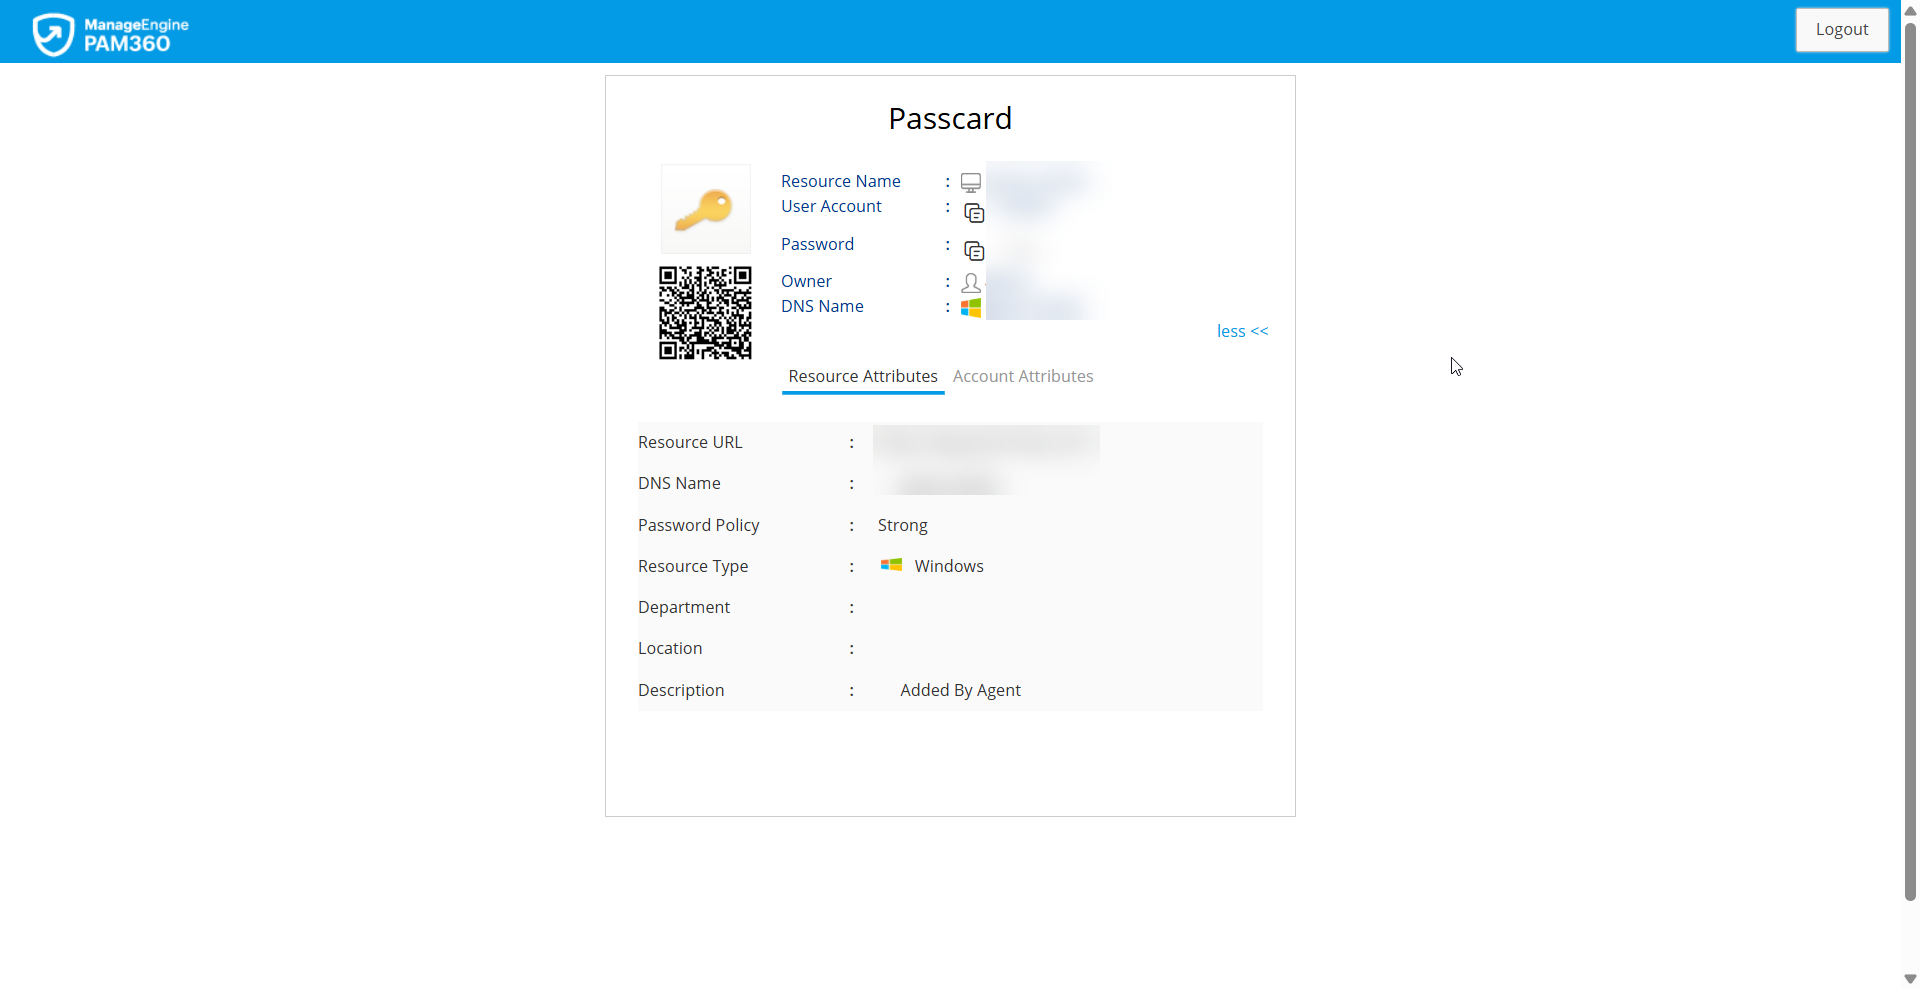
A passcard typically contains details such as Resource Name, Account Name, Password of the account, Owner of the resource and the DNS name, along with any additional resource or account attributes that might be added to it. To view the passcard of an account, you should be logged into PAM360 and the corresponding resource must be owned by you or shared to you. The Passcard link provides consolidated details of an individual account in PAM360 as a shareable link. The link can be accessed by only those to whom the passcard is shared with the relevant privilege (read-only, read-write, or manage).
Follow the below steps to copy the Passcard of an account:
- Go to the Resources tab and click the required resource to open the Account Details dialog, or switch to the Passwords tab.
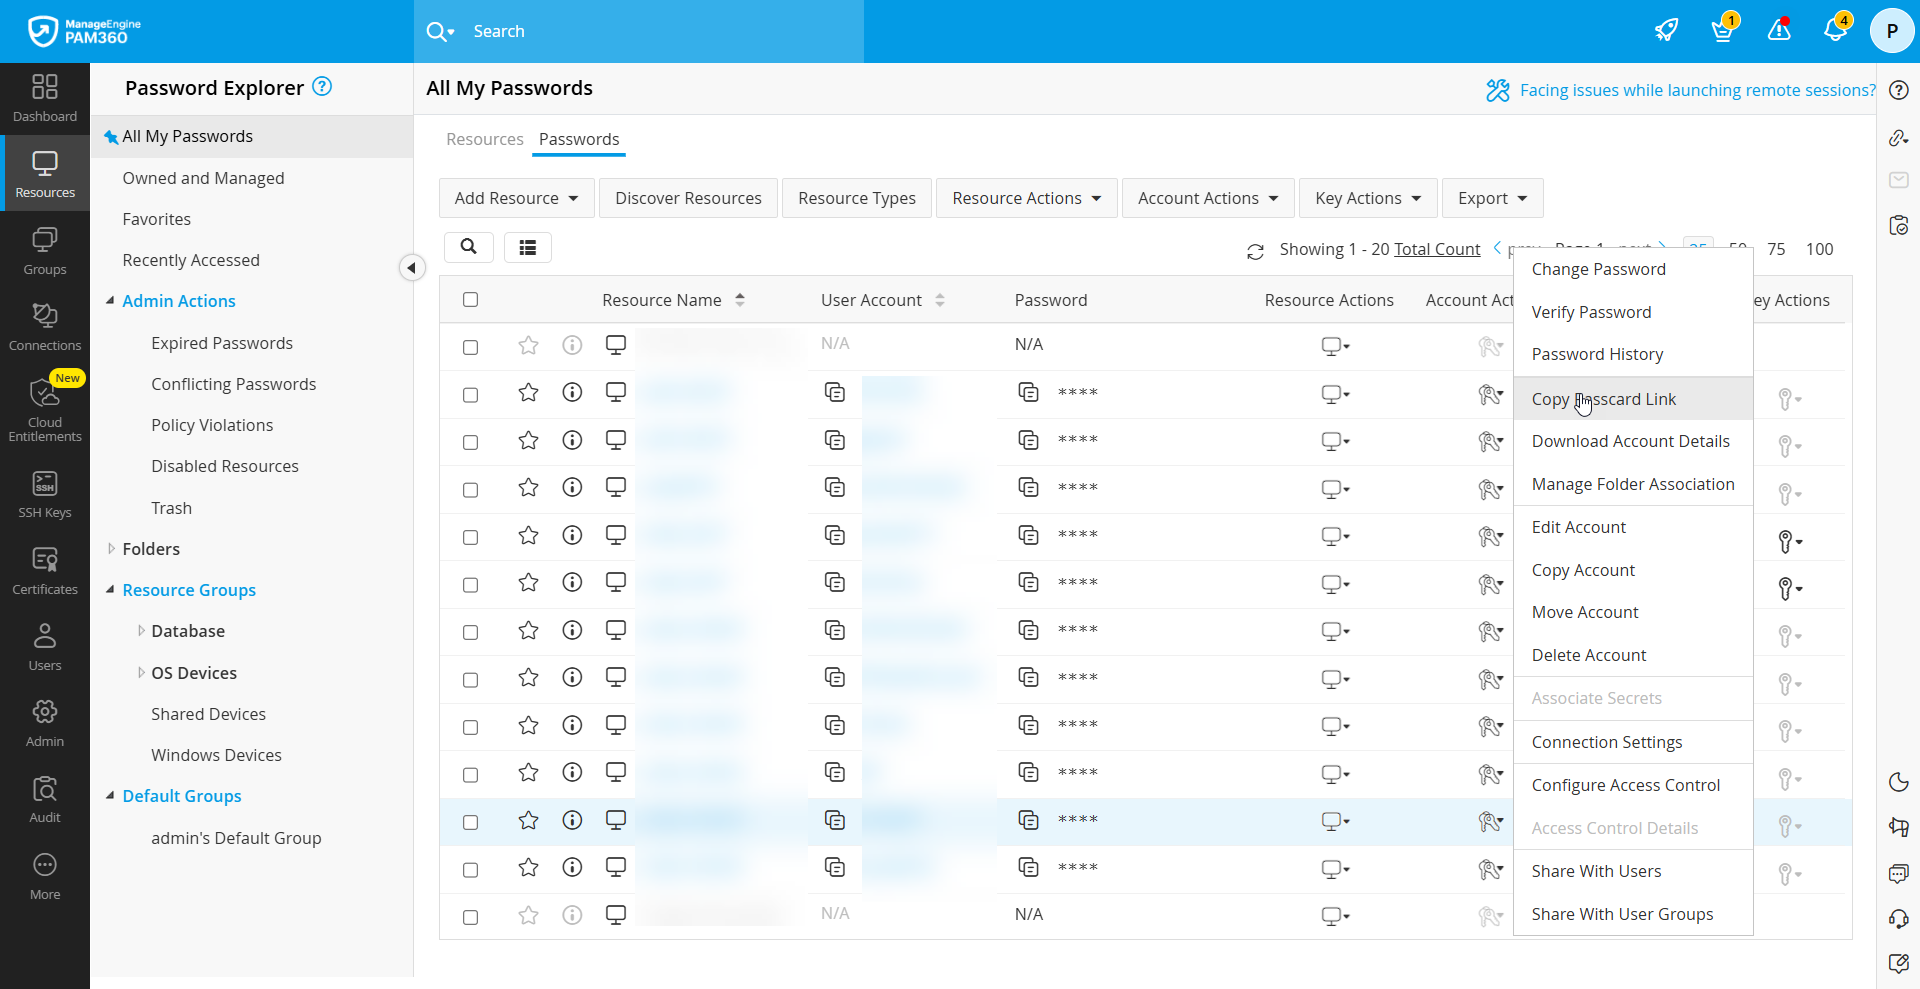
- Click the Account Actions icon next to the desired account and select Copy Passcard Link from the dropdown. The Passcard link will be copied to the clipboard and will remain there until you clear the clipboard.
- Paste the copied passcard URL in a new browser window to view its contents. The passcard will also contain a QR code from which the URL can be scanned and extracted.
7. Editing an Account
You can edit the details of any account at any time. To do so, follow these steps:
- Go to the Resources tab and click the required resource to open the Account Details dialog, or switch to the Passwords tab.
- Click the Account Actions icon next to the account you want to edit and select Edit Account from the dropdown.
- In the Edit Account form that appears, edit the required attributes of the account. Refer to this document to learn more about the account attributes.
- Once you are done, click Save. The required change will get reflected in the view.
8. Copying Accounts
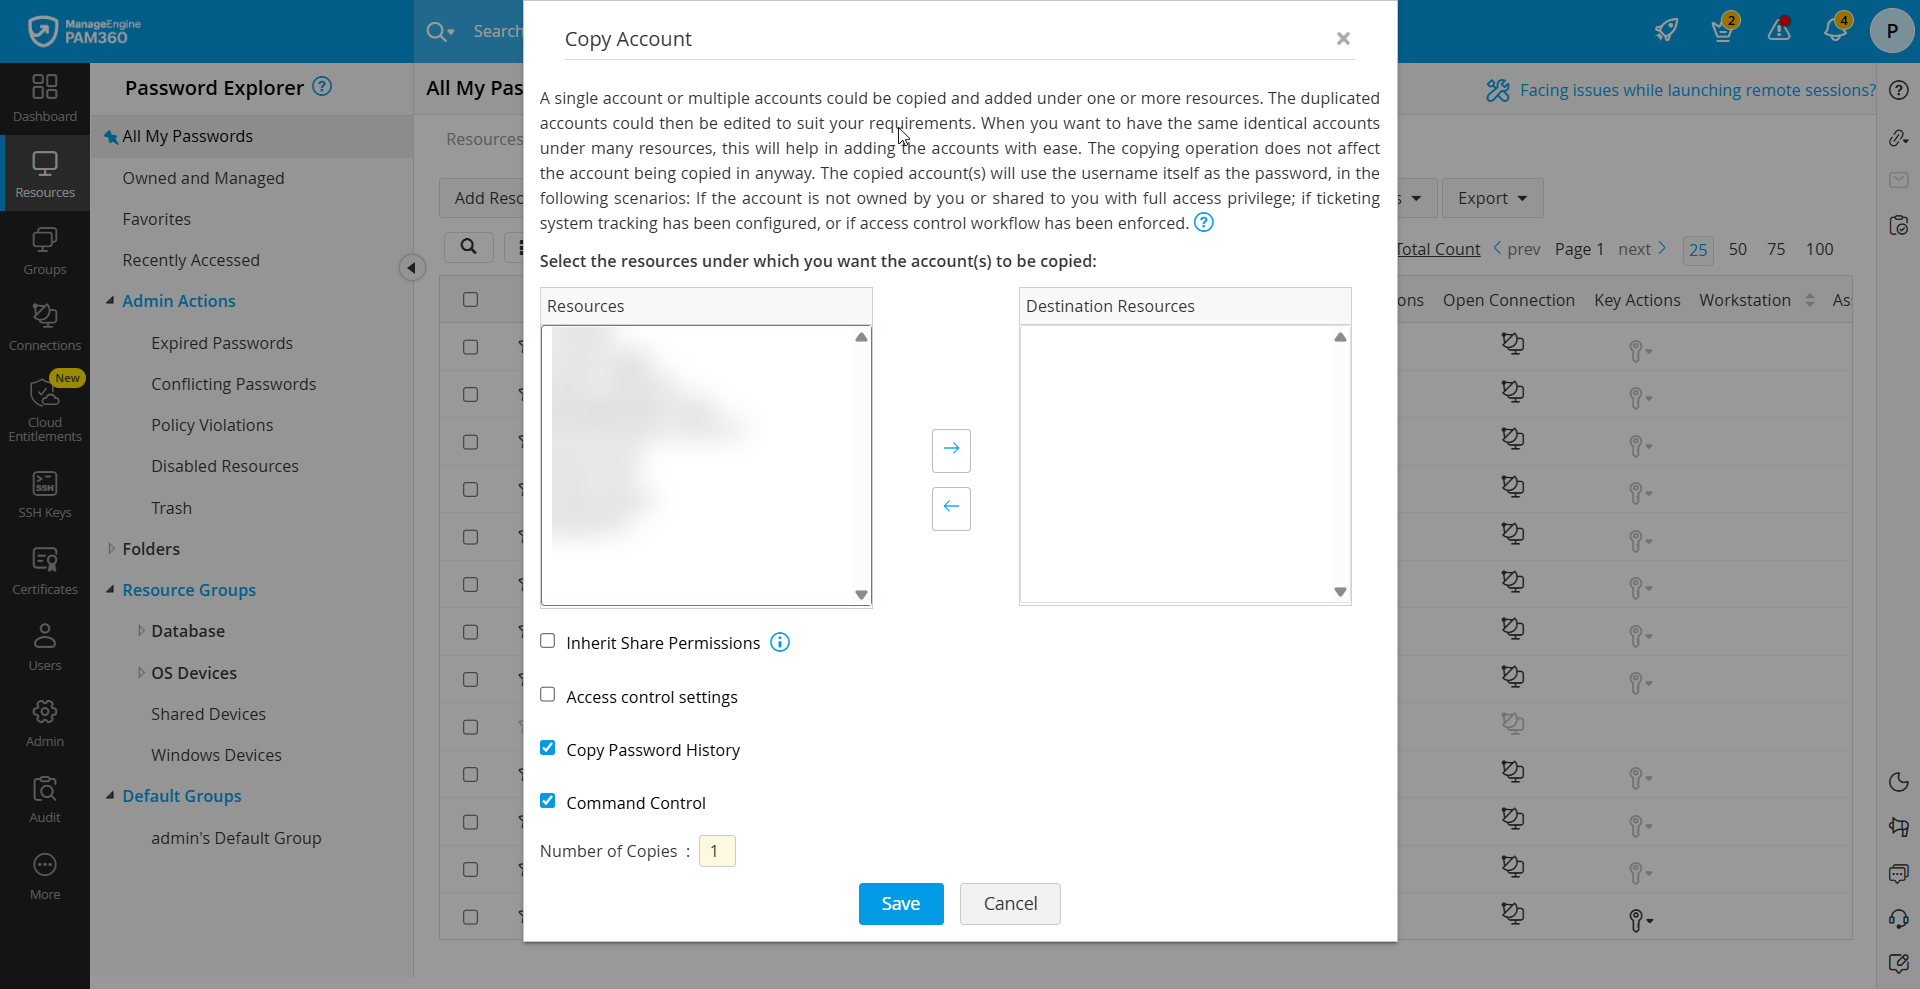
You can copy accounts and add them under one or more resources. Once copied, you can edit these accounts to meet your requirements. The Copy Account feature is useful when managing identical accounts across different resources. Note that the original accounts remain unchanged during this process. Follow the steps below to copy one or more accounts:
- Go to the Resources tab and click the required resource to open the Account Details dialog, or switch to the Passwords tab.
- Click the Account Actions icon next to the account you want to copy and select Copy Account from the dropdown.
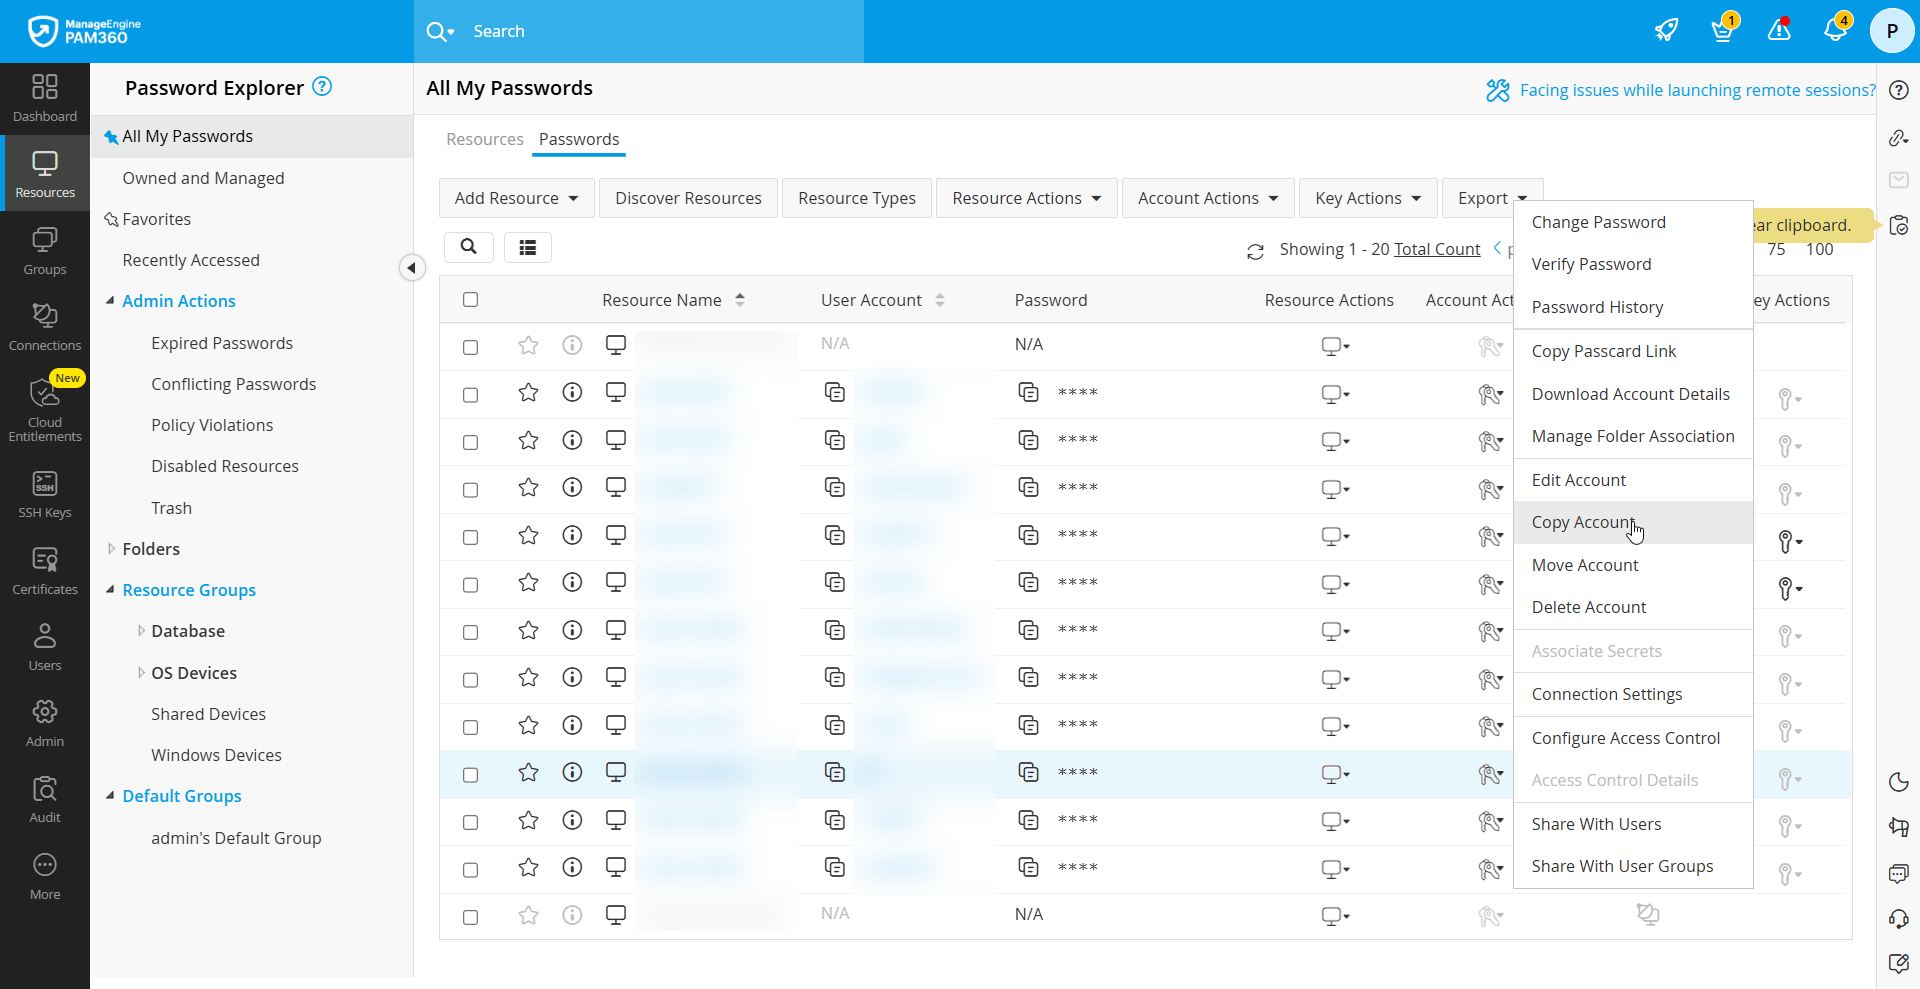
- In the Copy Account dialog box that opens, select the resources under which you want the account to be copied. Move the required resources to the Destination Resources pane using the arrows.
- Enable the Inherit Share Permissions option to inherit the selected account's share permissions i.e., the new account will also be shared with all those who had permission to view the parent account.
- Enable the Access Control Settings option to retain the access control configuration done for the selected account, during the copy operation. Please note that this copy operation will retain only the account-level access control configuration. If this option is unchecked during the copy operation or if the selected account does not have any individual access control settings configured, then the resource level access control settings of the destination resource will be applied to this account as well.
- Enable the Copy Password History option to retain the selected account's password history. Click here for more information on password history.
- Enable the Command Control option to retain the command control configuration done for the selected account during the copy operation.
- Specify the required number of copies and Click Save. The account will now appear under the selected resources.
9. Moving Accounts
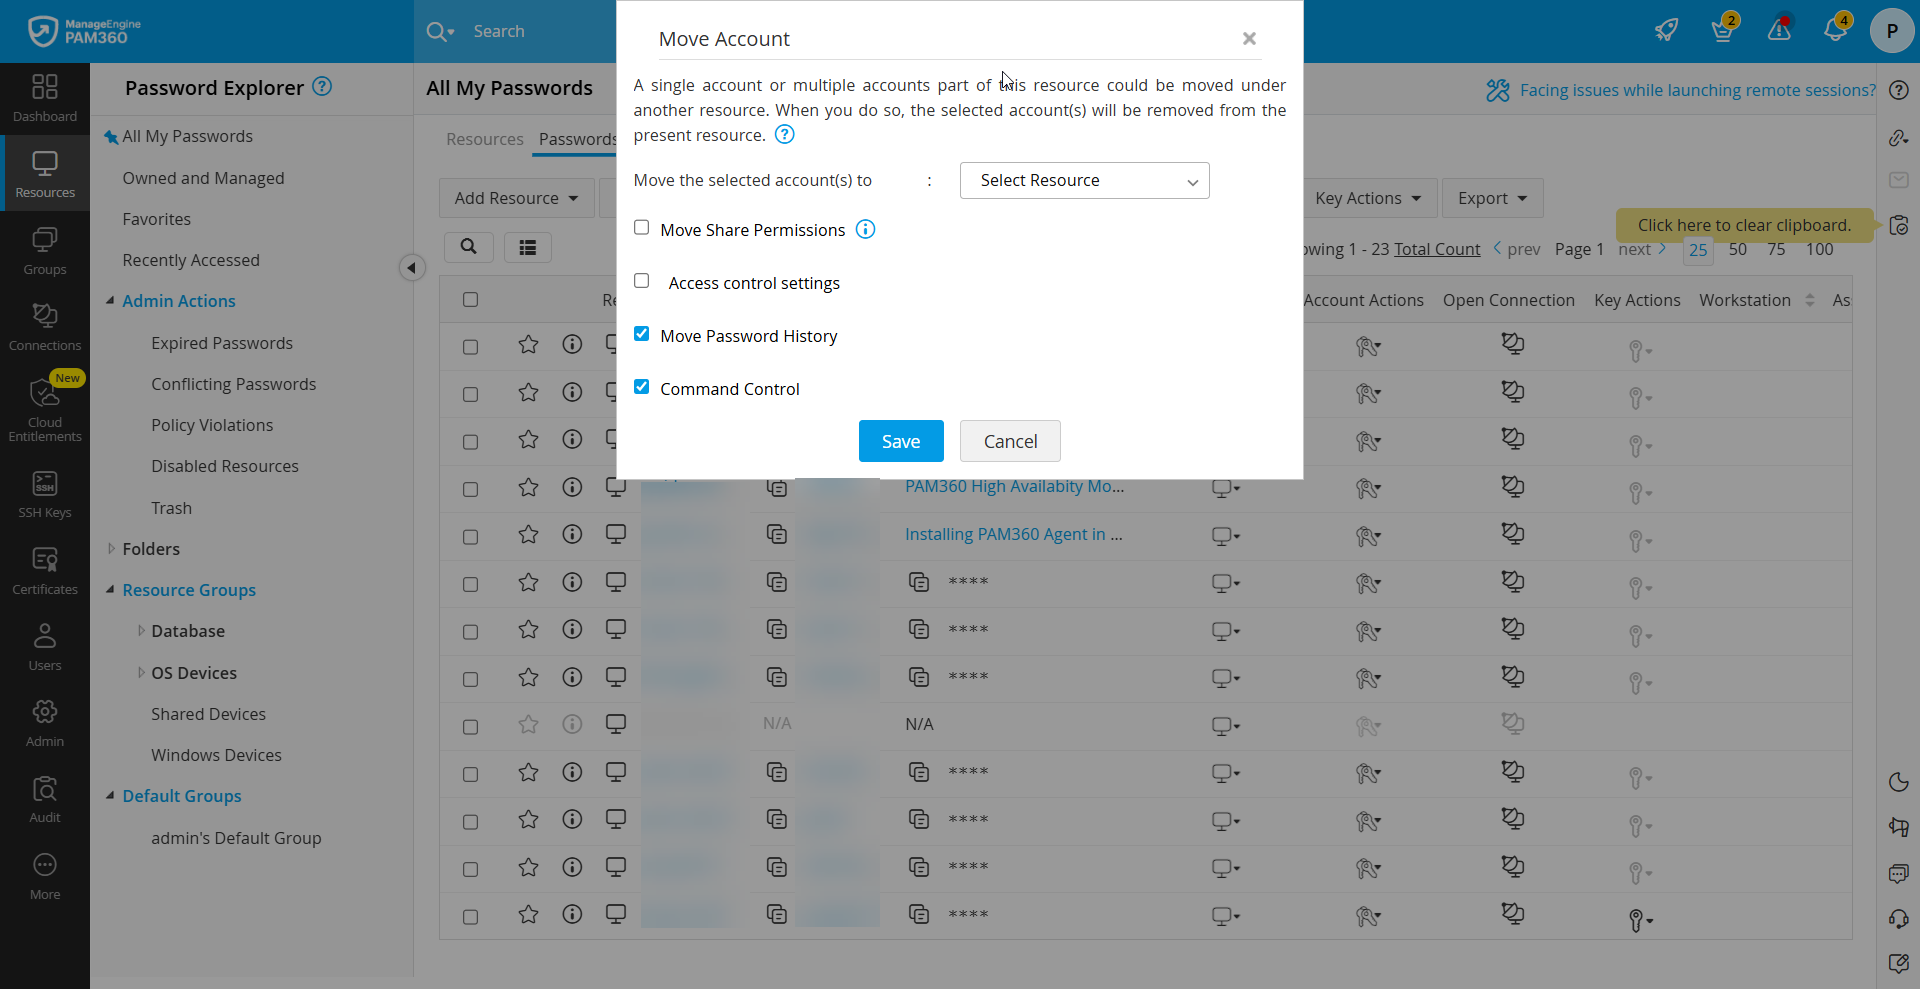
You can move an account from one resource to another. When an account is moved, it is removed from the current resource and added to the target resource. Follow these steps to move accounts:
- Go to the Resources tab and click the required resource to open the Account Details dialog, or switch to the Passwords tab.
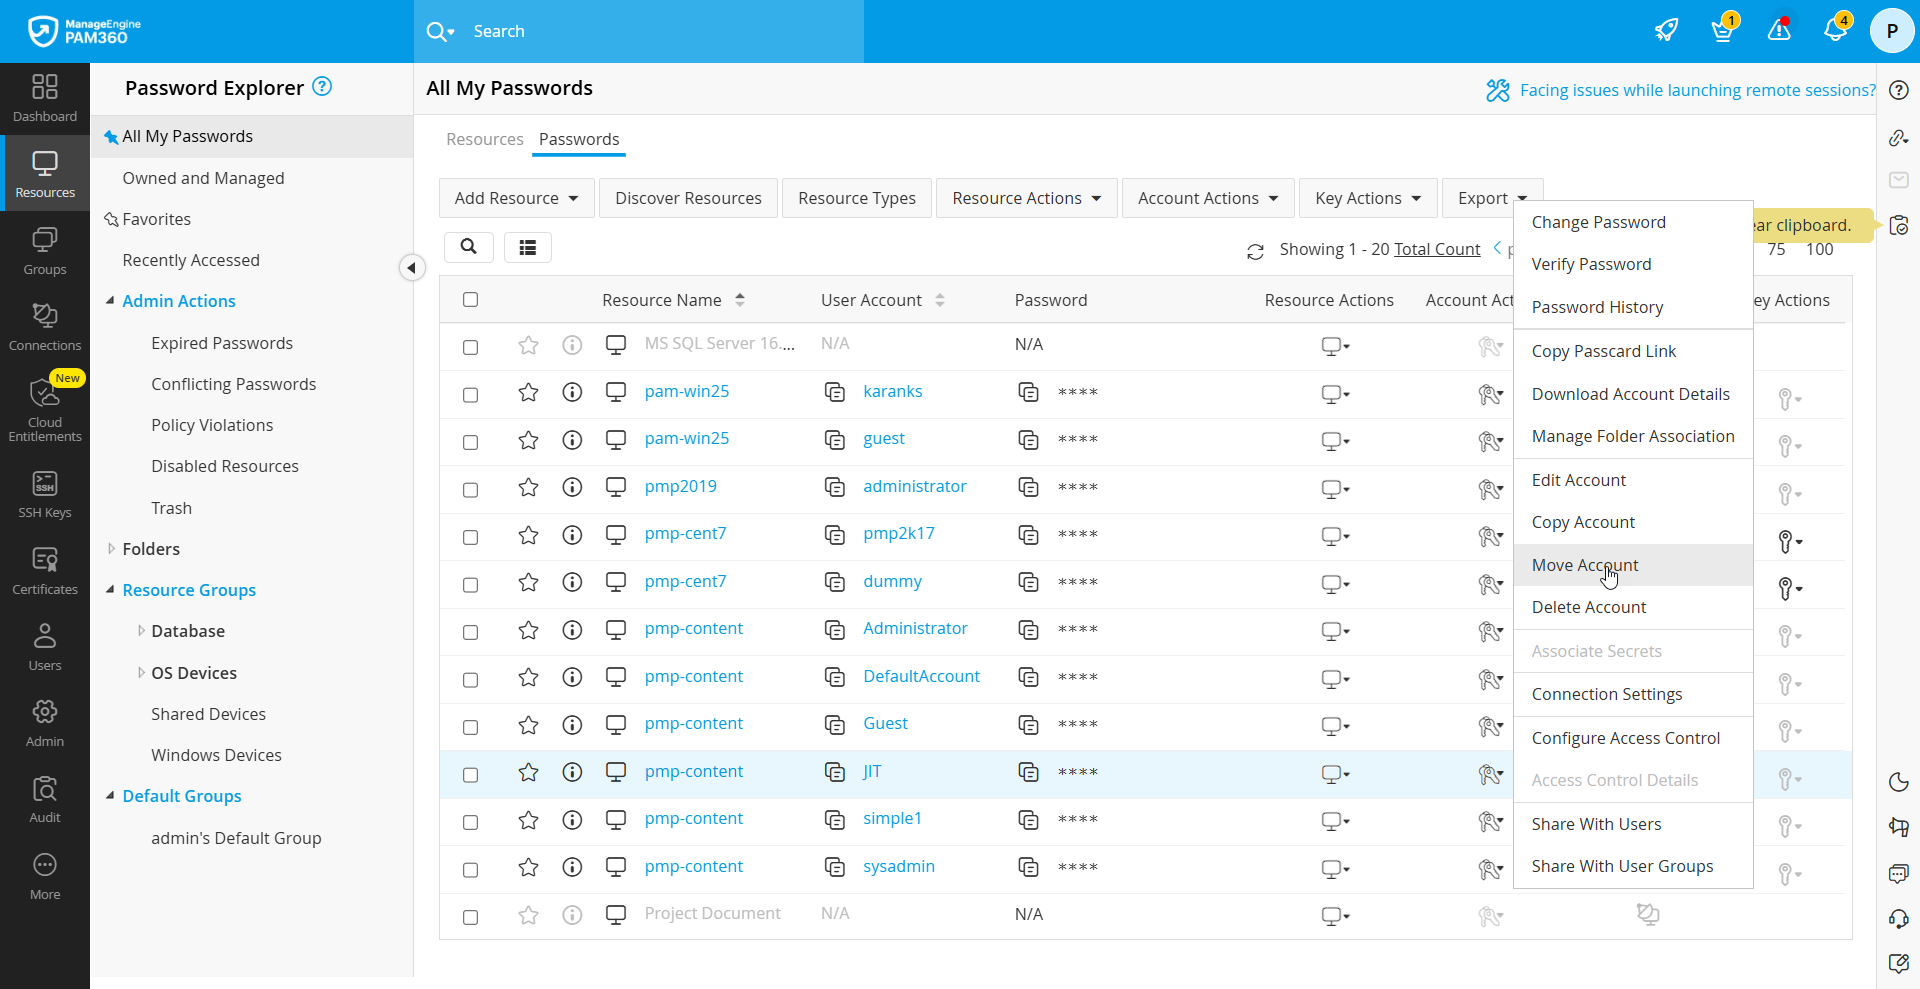
- Click the Account Actions icon next to the account you want to move and select Move Account from the dropdown.
- In the Move Account dialog box that opens, choose a resource from the Move the Selected Accounts to dropdown.
- Enable the Move Share Permissions option to move the selected account's share permissions.
- Enable the Access Control Settings option to retain the access control configuration done for the selected account, during the move operation. Please note that this move operation will retain only the account-level access control configuration. If this option is unchecked during the move operation or if the selected account does not have any individual access control settings configured, then the resource level access control settings of the destination resource will be applied to this account as well.
- Enable the Move Password History option to move the selected account's password history. Click here for more information on password history.
- Enable the Command Control option to move the command control configuration done for the selected account during the move operation.
- Click Save. The accounts will be removed from the present resource and it will appear under the selected resource.
