SCIM-Based User Provisioning in PAM360
SCIM (System for Cross-domain Identity Management) provisioning offers a standardized approach for managing user identities across various systems and applications. In the context of PAM360, SCIM integration facilitates seamless provisioning of users and user groups, empowering administrators to efficiently manage access to critical resources. Since PAM360 is an on-premise application, a provisioning agent is required from the identity provider to establish the connection to the PAM360 server. This enables administrators to effortlessly synchronize user and user group details between their existing identity management systems and the PAM360 application using the provided PAM360 SCIM APIs. This eliminates the need for manual intervention, ensuring that user information remains up-to-date and aligned with organizational requirements.
User Account Requirements - An API user account with the Privileged Administrator, Administrator, or custom role with the Manage SCIM Provisioning privilege is required to implement SCIM-based identity provisioning in PAM360.
The PAM360 SCIM APIs are divided into the following three categories, comprising sixteen APIs in total, aimed at facilitating CRUD (Create, Read, Update, Delete) operations:
- Users
- Groups
- SCIM Configuration
These APIs empower users to provision and manage user identities across various identity management systems. For further insights into the PAM360 SCIM APIs and their functionalities, please refer to this document.
Caution
To disable the SCIM functionality in PAM360 at the cost of emergency, navigate to Admin >> Server Hardening >> Emergency Measures, select the Disable SCIM API Access checkbox and click Save >> OK.
The image below illustrates how PAM360 SCIM APIs operate to provision users and user groups in Entra ID. This documentation also offers a sample configuration of user and user group provisioning from Microsoft Entra ID to PAM360.

1. Prerequisites
In order to set up SCIM provisioning in Entra ID, create a PAM360 API user account with the Privileged Administrator, Administrator, or custom role with the Manage SCIM Provisioning privilege enabled. Ensure to copy the user Authentication Token generated during the API user creation process, as it will be required for the SCIM configuration in the identity management system or application. In addition to the above requirements, you will need a Windows Server endpoint connected to the PAM360 server network with a valid SSL certificate for the SCIM agent deployment.
2. Configuring SCIM Provisioning in Microsoft Entra for PAM360 Application
- Log in to the Azure Portal and navigate to the Microsoft Entra ID.
- In the left-side pane, click on Enterprise applications located under Manage.
- In the new page that appears, click the Add button and add a new SCIM application.
- Look out for the On-premise SCIM app in the search results.
- Upon clicking the On-premise SCIM app application, enter the Name for the application and click Create.

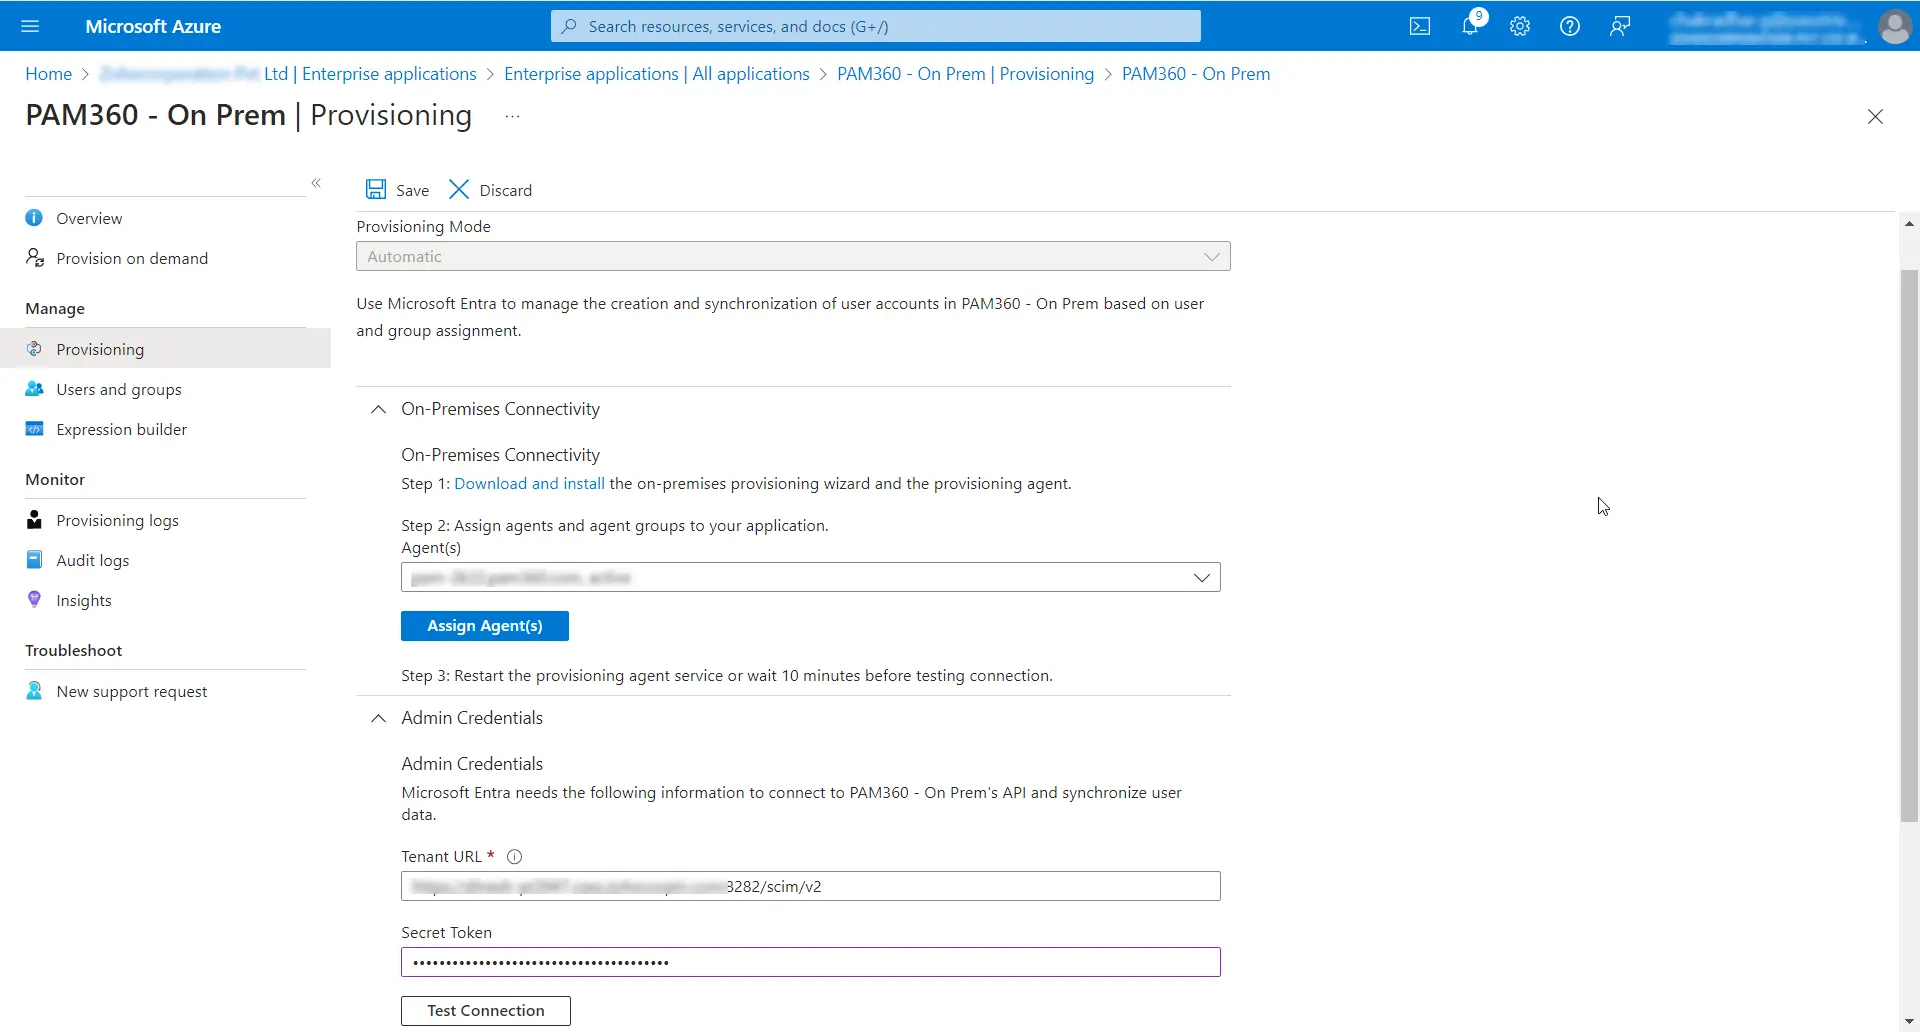
- In the application page that opens, click Provisioning under Manage.
- Select Automatic as your provisioning mode.
- Expand the On-Premises Connectivity tab, and follow the steps given below to assign agents and agent groups to the SCIM application:
- Log in to a Windows Server machine that resides in the PAM360 server network using the global administrator credentials.
- Download and install the on-premises provisioning wizard and the provisioning agent on the Windows Server machine.
- Restart the provisioning agent service and check if the agent name is listed in the Agent(s) dropdown on the Entra ID SCIM Provisioning page.
- If listed, select your agent from the dropdown and click Assign Agents.
- Next, expand Admin Credentials and enter the PAM360 SCIM API endpoint URL in the Tenant URL.
- Enter the Authentication Token copied from PAM360 during the API user creation for the SCIM configuration with the relevant role.
- Click the Test Connection button and wait until the authentication is completed.
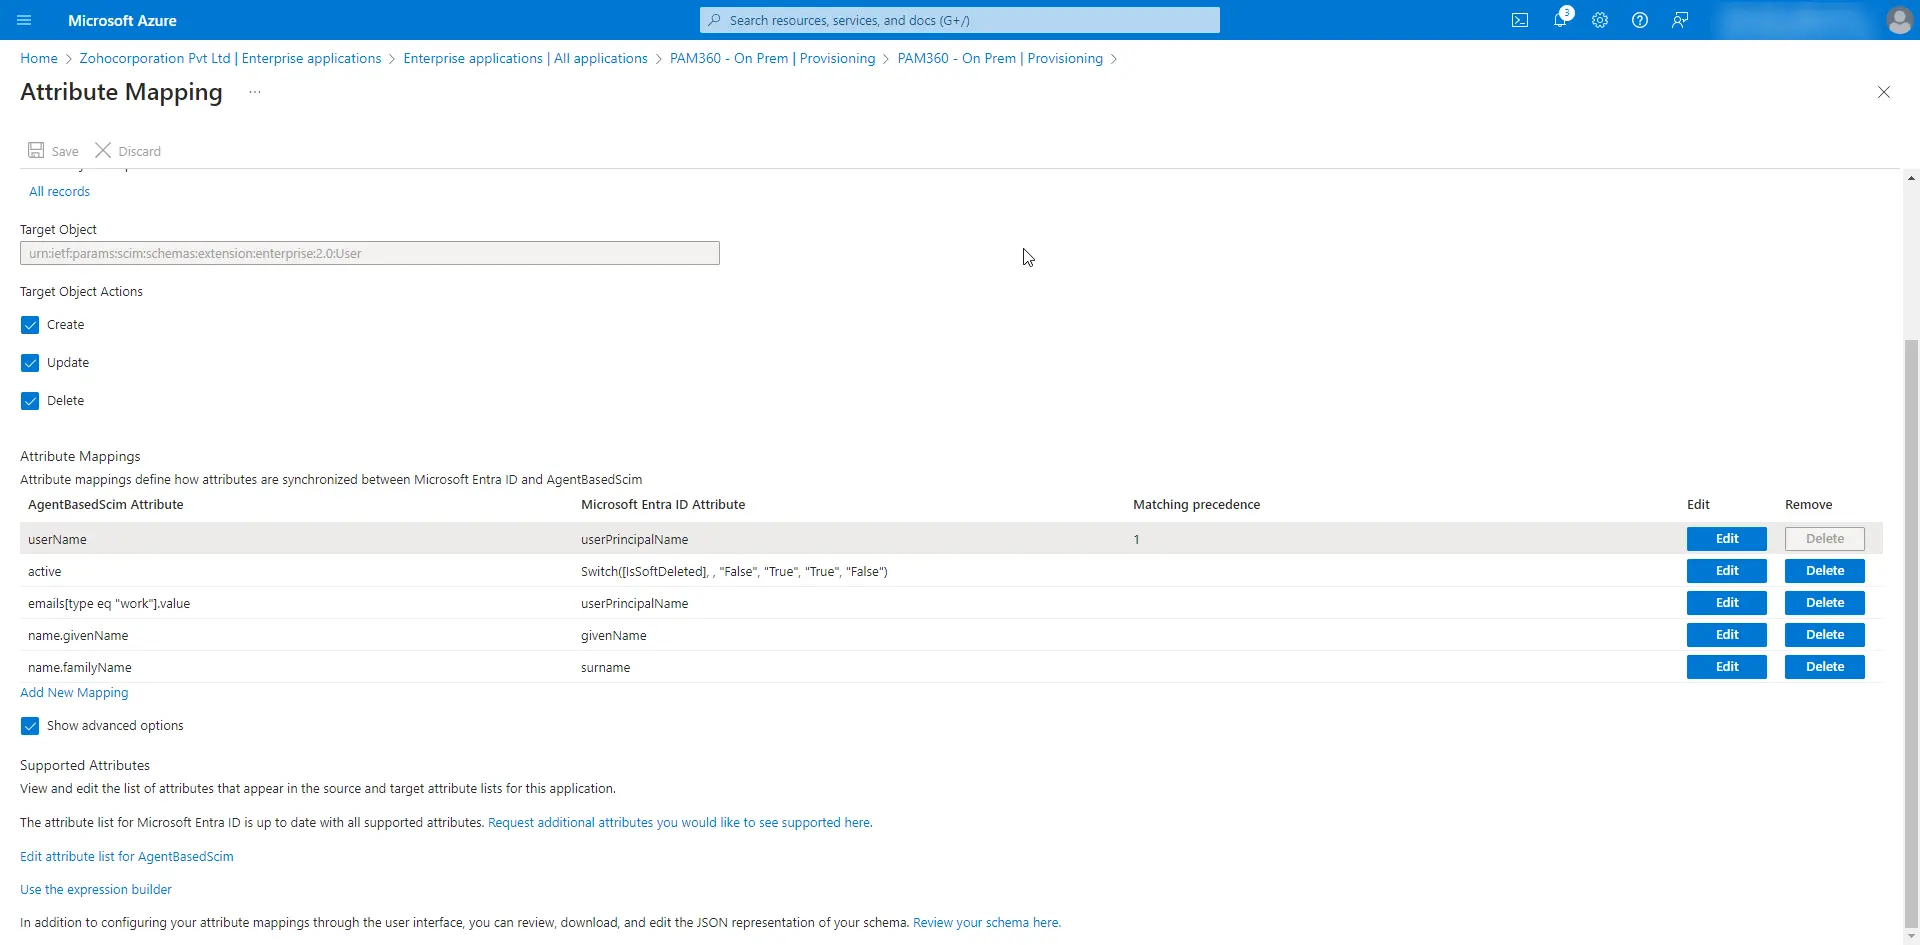
- Expand the Mappings tab and click on Provision Microsoft Entra ID Users.
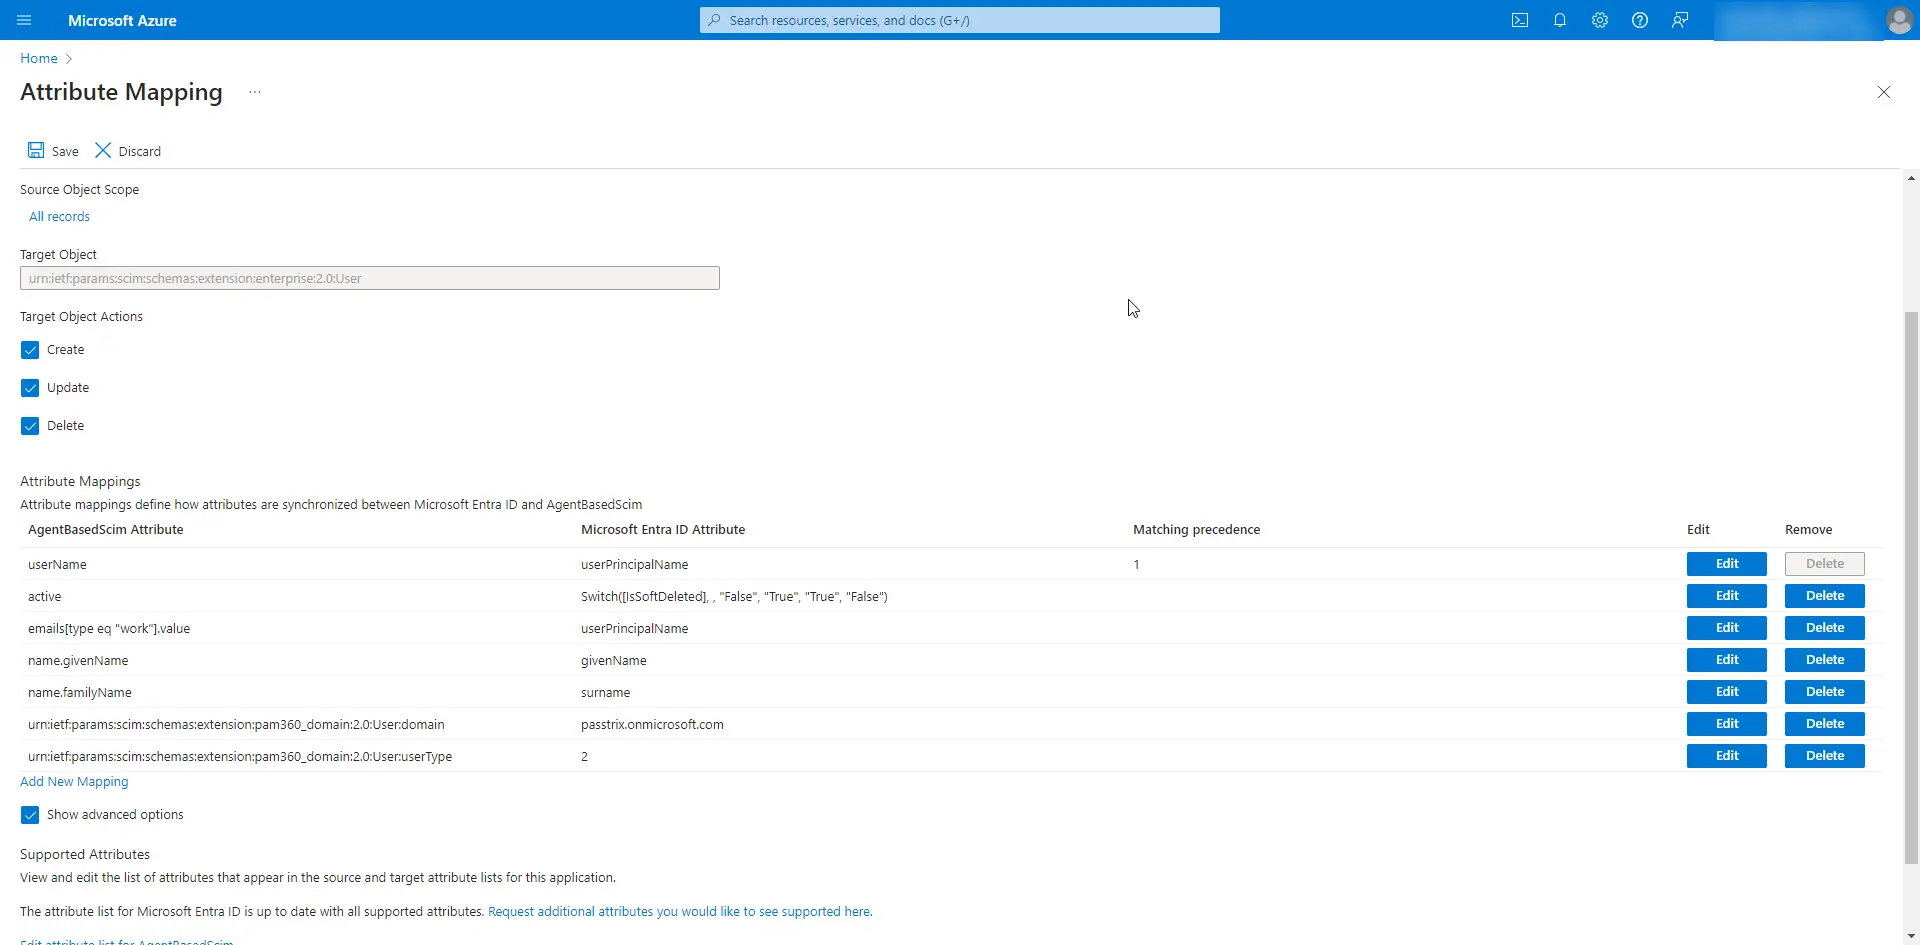
- Select the following supported attributes under Attribute Mappings and delete the rest.
- To import Entra ID users as domain users in PAM360, follow these steps:
- Add the following custom schema extension attributes:
- urn:ietf:params:scim:schemas:extension:pam360_domain:2.0:User:domain
- urn:ietf:params:scim:schemas:extension:pam360_domain:2.0:User:userType
- Select the Show advanced options checkbox and click Edit attribute list for AgentBasedScim to add the custom schema extension attributes.
- Add the above attributes to the attribute list.
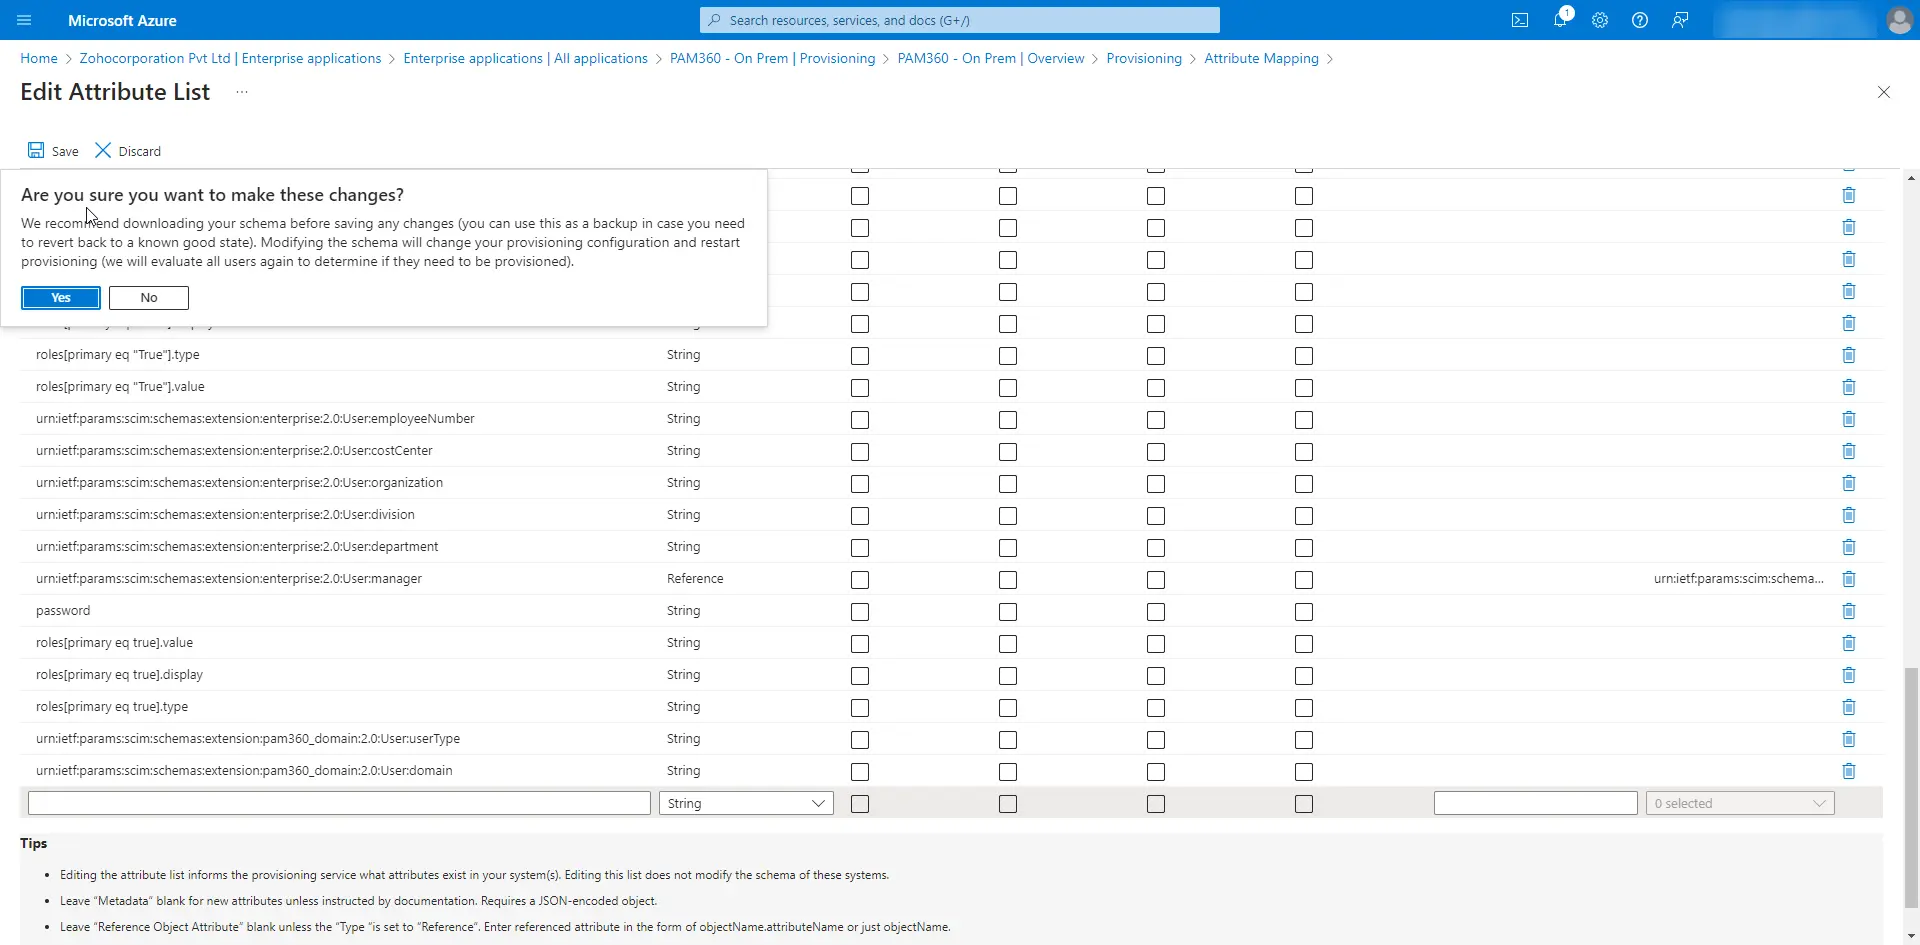
- Click Yes and the Save to apply the selected attributes.
- Click the Add New Mapping to add the custom schema extension attributes to the AgentBasedScim Attributes.
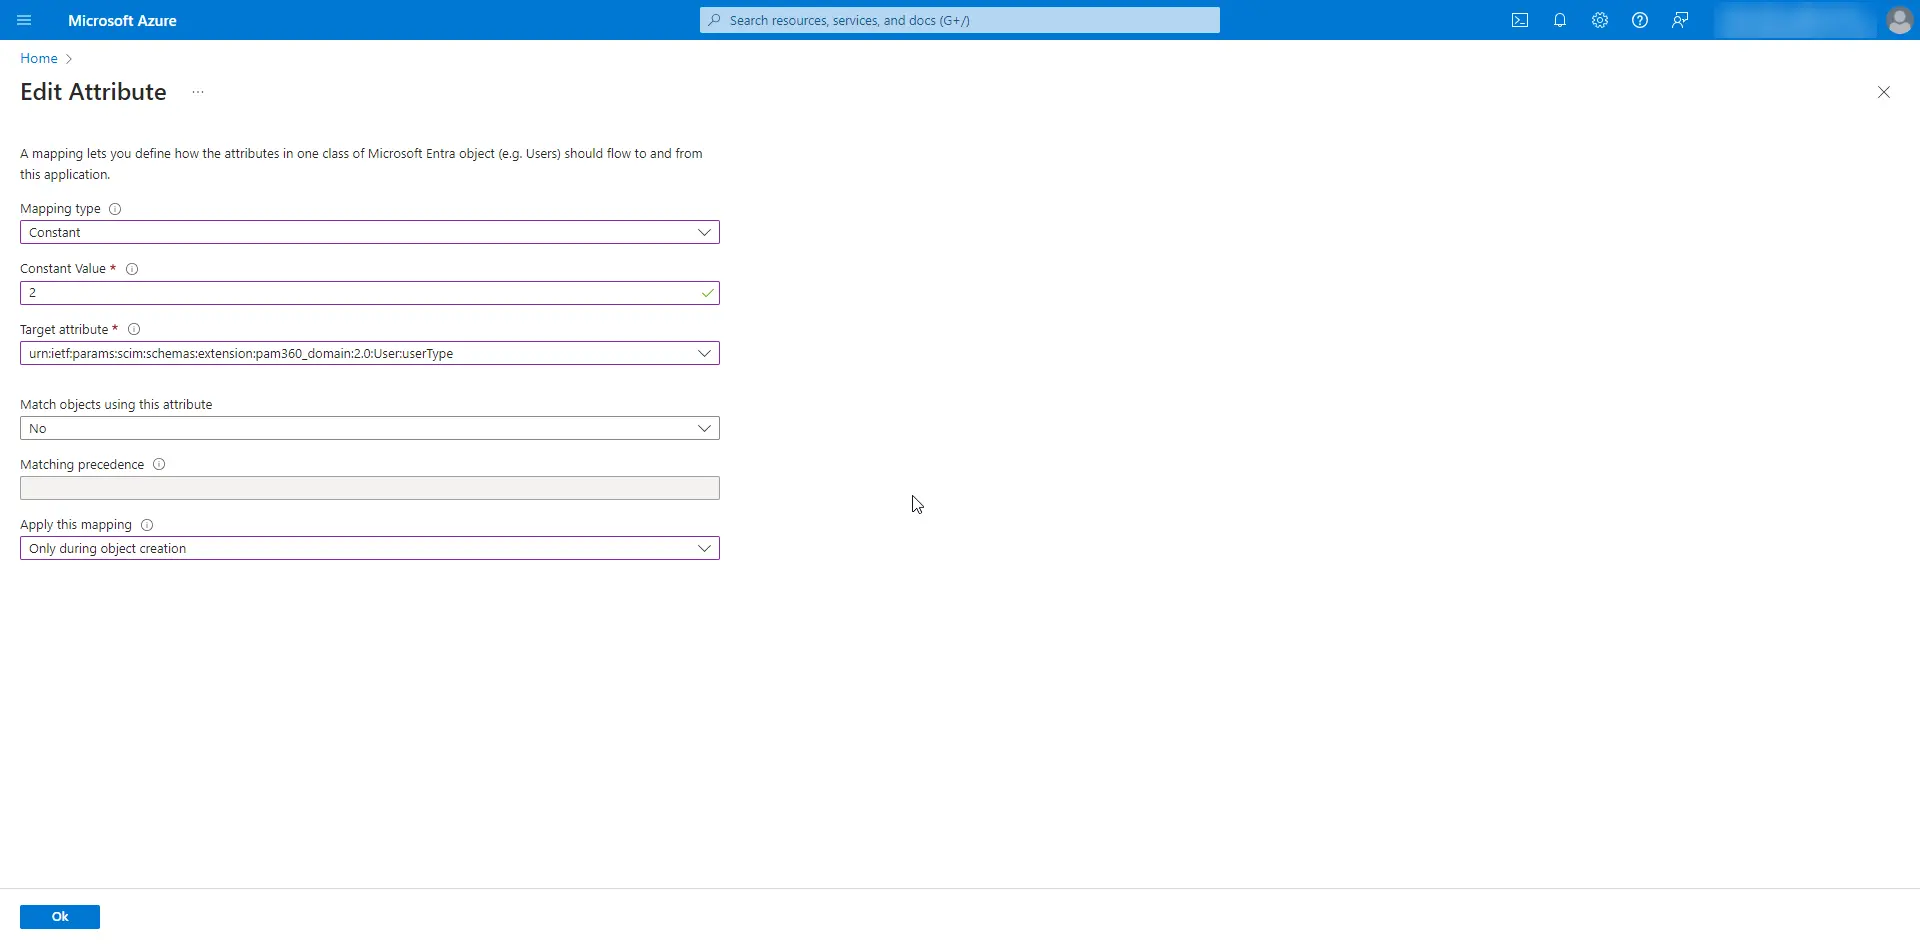
- In the window that appears, enter the domain name in the Constant Value field and select the Target attribute as urn:ietf:params:scim:schemas:extension:pam360_domain:2.0:User:domain with the following details:
Caution
The domain name provided here should match the one used during the Entra ID users import process to import the SCIM users.
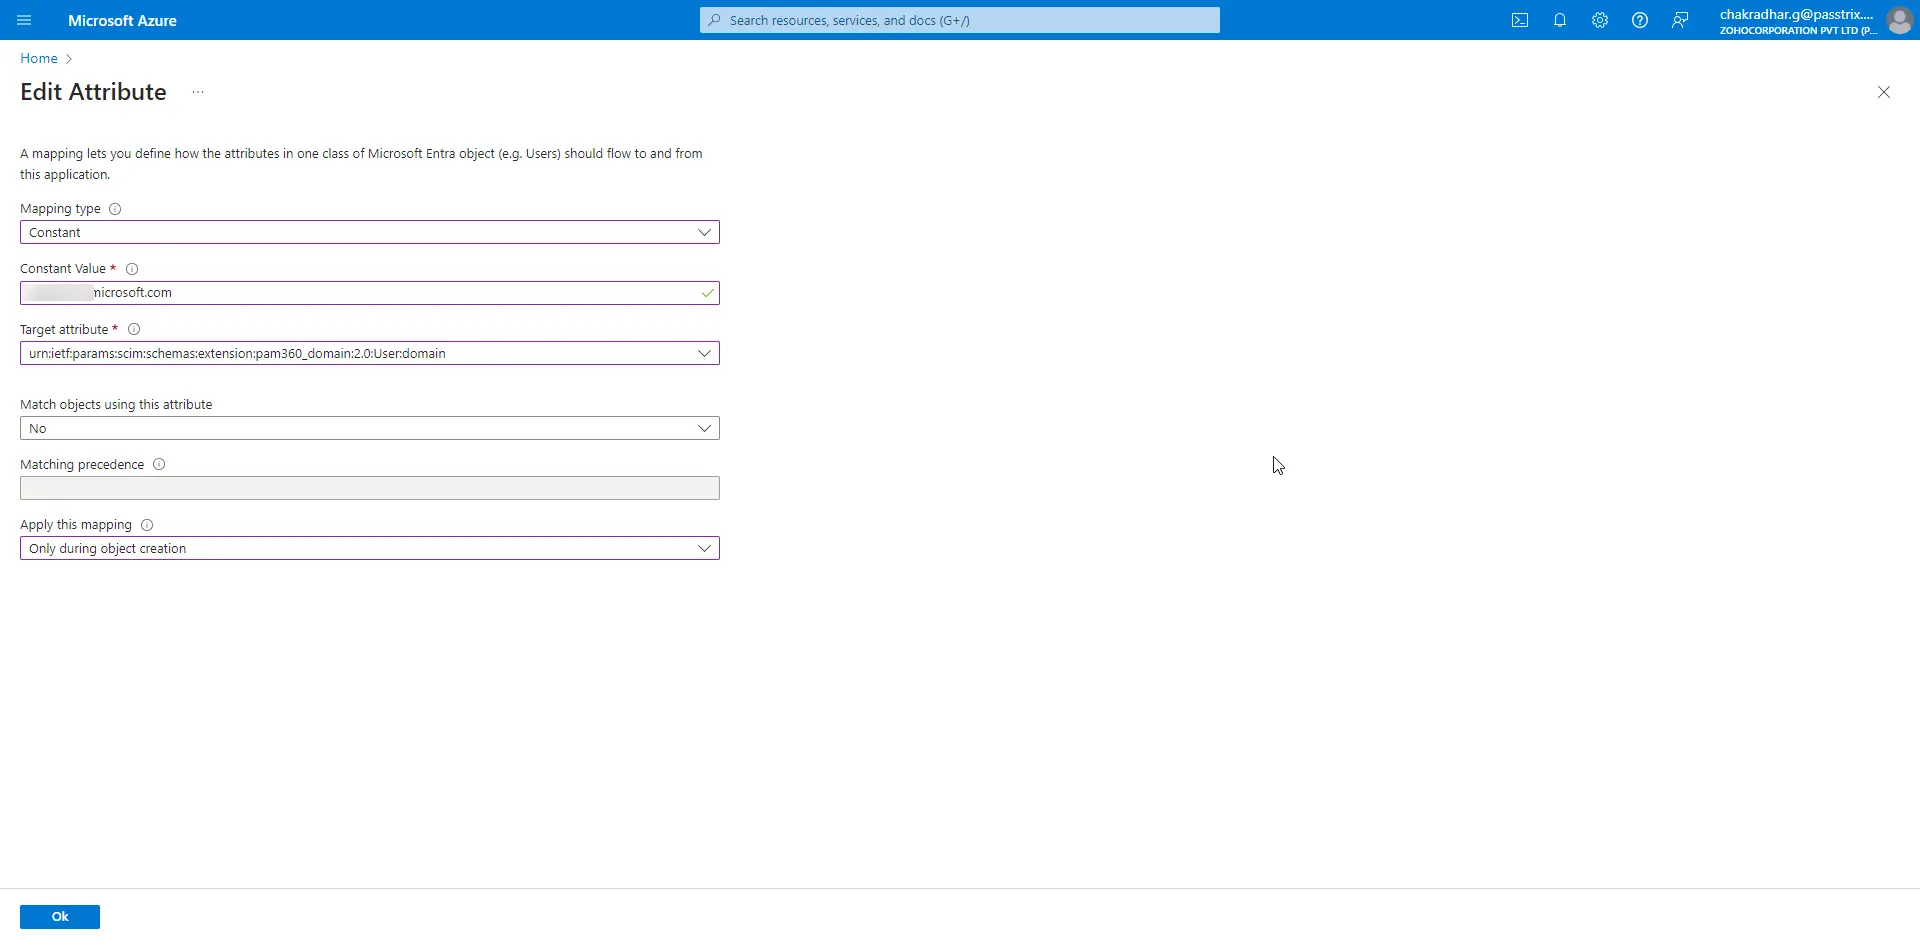
- Repeat the steps for the attribute urn:ietf:params:scim:schemas:extension:pam360_domain:2.0:User:userType with the Constant Value as 2. Ensure to follow the details as shown in the provided image for accurate configuration.
- Add the following custom schema extension attributes:
- Click Yes >> Save to apply the selected attributes.
- Now, click on Provision Microsoft Entra ID Groups under Mappings and edit the attributes as required.
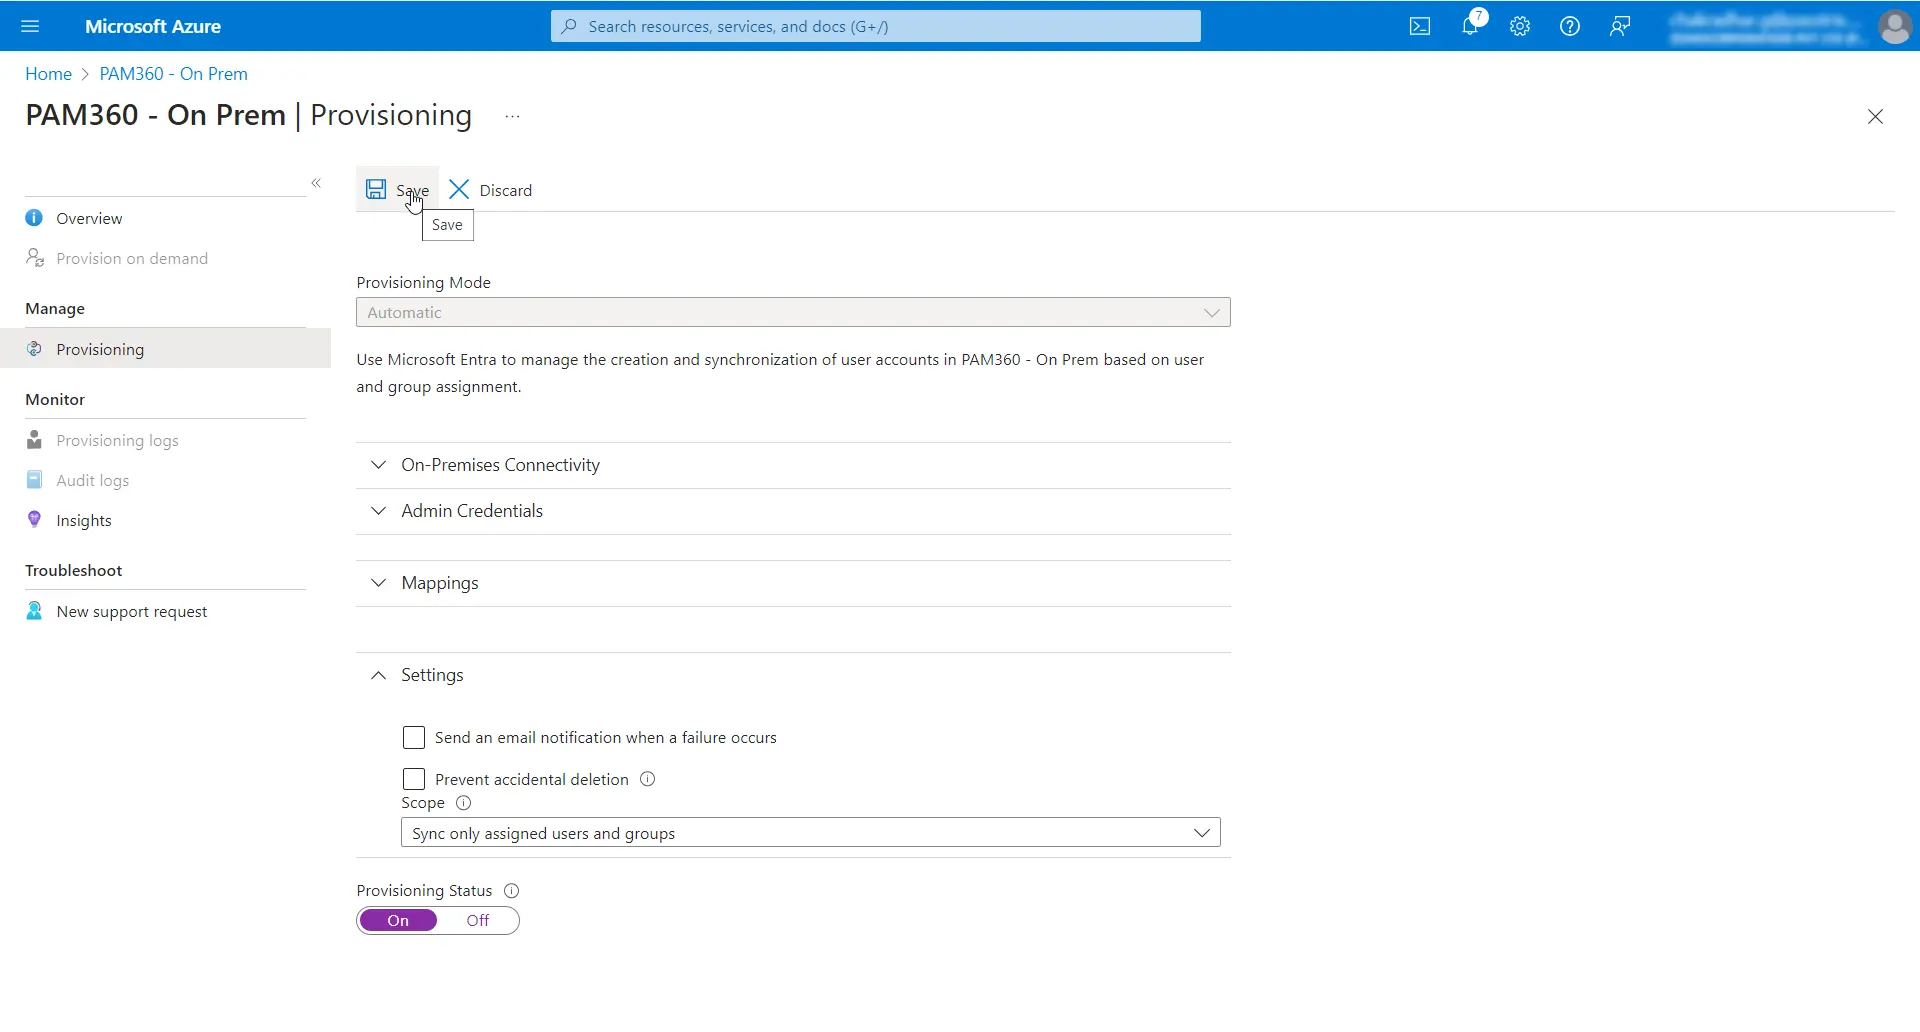
- Expand Settings and select the Sync only assigned users and groups option from the dropdown.
- Turn on Provisioning Status and click Save.
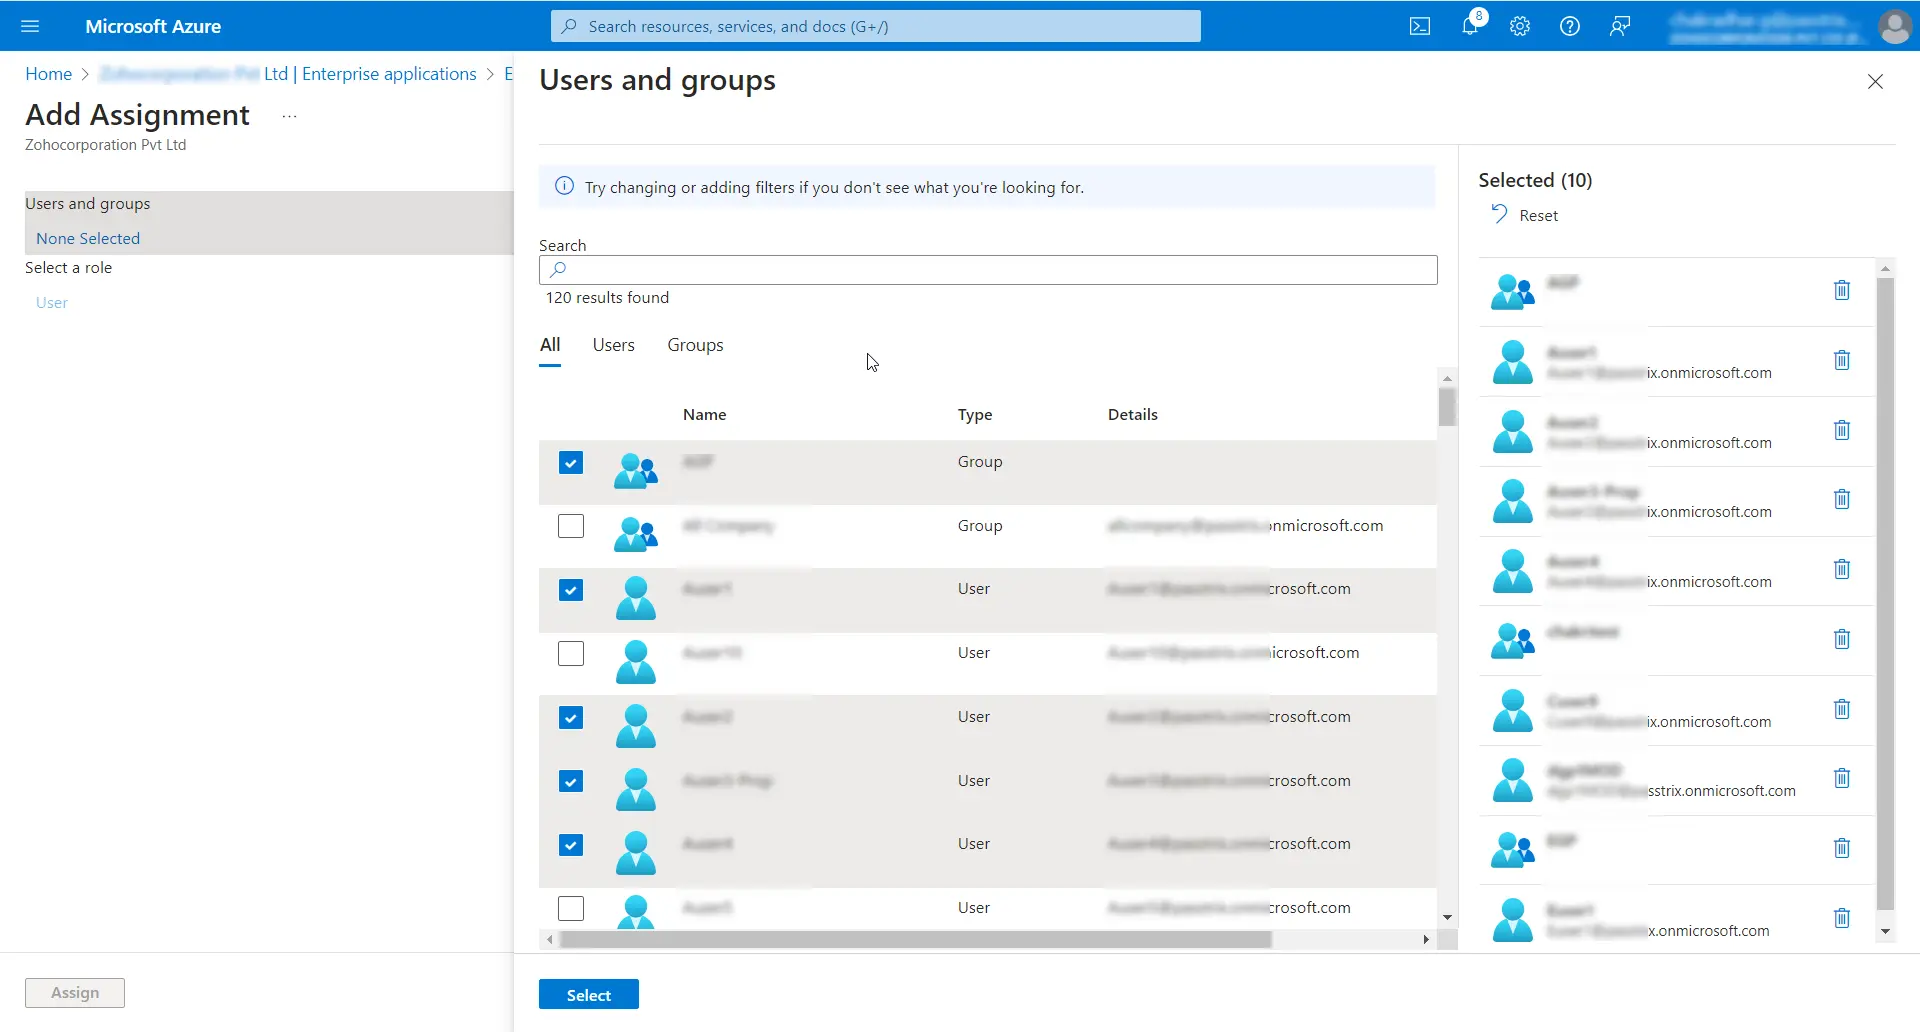
- Navigate to the Users and groups tab in the created SCIM application and click the Add user/group button at the top menu.
- Click on None Selected and add the users and groups as required.
- Click Select >> Assign to assign the selected users and groups to the application.
For example: https://<Hostname-of-the-PAM360-server>:<Port>/scim/v2
Whenever a user or a user group is added/modified in the PAM360 SCIM application of Entra ID, with the PAM360 SCIM APIs and the agent deployed, those user and user group will be synced between the identity management system or application (i.e., Entra ID) and the PAM360 server at synchronization. You can check the status of users and groups provisioned with the PAM360 server in the Overview tab.
3. Limitations
- Exercise caution when deleting users or user groups added via SCIM Provisioning on PAM360, as it can cause synchronization issues with the identity management system or application and PAM360.
- Only the Authentication Token generated while creating an API user in PAM360 can be used for authentication during SCIM provisioning in any identity management system or application.
- The data exchange process may encounter errors due to disparities in the structure and storage of group information (nested group) between the identity management system or application and PAM360.
- SCIM API requests might fail if an unsupported parameter is included.
- In case the user principal name (UPN) of an imported user is altered in the identity management system or application, any corresponding modifications may not be reflected in the PAM360, nor will a new user with the updated UPN be automatically added.