Configuring SAML Authentication for PAM360
ManageEngine PAM360 supports Security Assertion Markup Language (SAML) 2.0, facilitating integration with Federated Identity Management Solutions for Single Sign-On and Single Logout functionalities. SAML 2.0 is a widely adopted open standard that facilitates the exchange of authentication and authorization information between an Identity Provider (IdP) and a Service Provider (SP). This standard provides Single Sign-On (SSO) access to web-based applications, allowing users to authenticate once and gain access to multiple applications without needing to log in repeatedly. Additionally, SAML 2.0 supports Single Logout (SLO), enabling users to log out of all user sessions established during SSO simultaneously with a single click.
PAM360 acts as the SP and integrates with various IdPs, facilitating SSO access for users. The integration process involves exchanging details between the SP and IdP to establish trust and enable secure communication. Upon SAML configuration, users can log in to the IdP and automatically gain access to PAM360 from the IdP's interface without needing to authenticate using the PAM360 credentials, and with Single Logout (SLO), they can log out from all applications with a single click. This help document covers the following topics in detail:
- SAML Configuration for PAM360
- Configuring PAM360 as the SP on the IdP Interface
- Configuring IdP Details in PAM360
1. SAML Configuration for PAM360
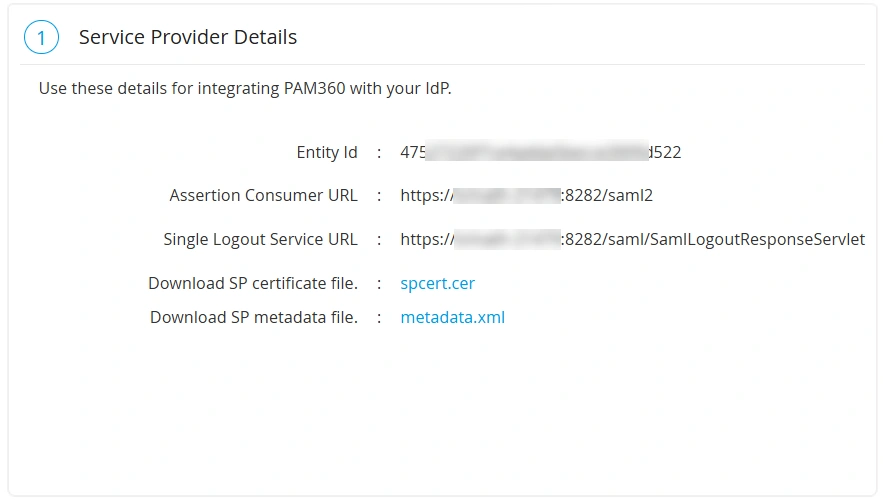
To configure PAM360 as the SP on the IdP's website, you need SP details i.e., the PAM360 SAML configuration details displayed on the SAML configuration page. These details are necessary for setting up PAM360 as the SP on the IdP console, ensuring a seamless integration between PAM360 and IdP. Follow these steps to obtain the SP details:
- Navigate to Admin >> Authentication >> SAML Single Sign-On.
- On the Configuration For Single Sign-On Using SAML page, under the Service Provider Details section, you will find the required SP details. Copy the following SP details to configure PAM360 as an SP on the IdP console: Entity ID, Assertion Consumer Service URL, and Single Logout Service URL.
Additional Details
For SAML SSO authentication, the Assertion Consumer Service (ACS) URL is the hostname of the PAM360 server by default. Follow these steps to update the ACS URL
- Navigate to Admin >> Settings >> Mail Server Settings.
- Under Access URL, update the required URL and click Save. The Assertion Consumer URL under the Service Provider Details section will be updated.
- Additionally, copy the Recipient and Destination URLs if you are configuring SAML SSO for a client organization.
- Click the spcert.cer button beside the Download SP Certificate file field to download the PAM360 server certificate to your machine.
- Click the metadata.xml button beside the Download SP metadata file field to download the SP details as a metadata.xml file to your machine. You can use this file to auto-populate the SP details on the IdP console.
- Click Next to continue to the next step.
2. Configuring PAM360 as the SP on the IdP Interface
The following help documents will assist you in configuring PAM360 as the SP on the desired IdP:
Upon completing the configuration, download the IdP Metadata XML file or note down the IdP details, such as the Issuer, IdP Login URL, IdP Logout URL, etc. This information will be used in the PAM360 application to complete the SAML configuration.
3. Configuring SAML SSO in PAM360
After configuring the SP details on the IdP's interface, you should configure the IdP details in the PAM360 application. On the Configuration For Single Sign-On Using SAML page, under the Configure Identity Provider Details section, you should provide the required IdP details and upload the IdP certificate under the Import IdP's Certificate section.
3.1 Configuring Identity Provider Details
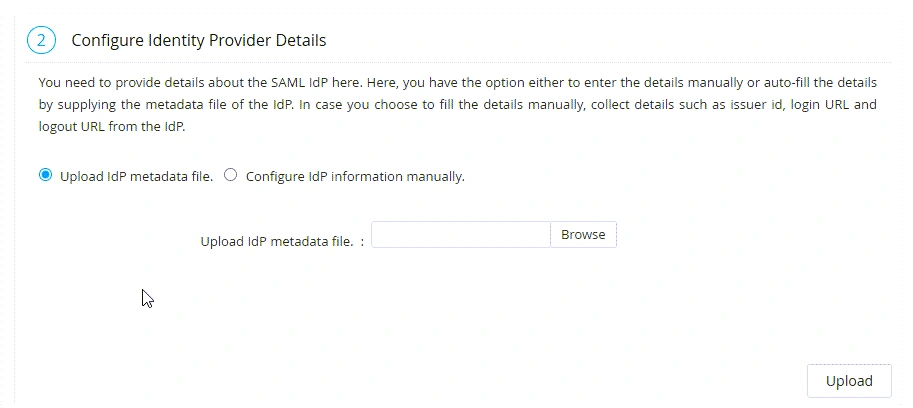
You can configure the IdP details manually or upload a metadata file obtained from the IdP's website that contains all the required IdP details. Follow these steps to auto-populate the IdP details using the metadata.xml file:
- Under the Configure Identity Provider Details section on the Configuration For Single Sign-On Using SAML page, select the Upload IdP metadata file checkbox to upload the metadata.xml file downloaded from the IdP's website.
- Click the Browse button beside the Upload IdP metadata file field, select the XML file from your machine, and click Open.
- After selecting the IdP file from your machine, click the Upload button at the bottom of the section to successfully configure the IdP details.
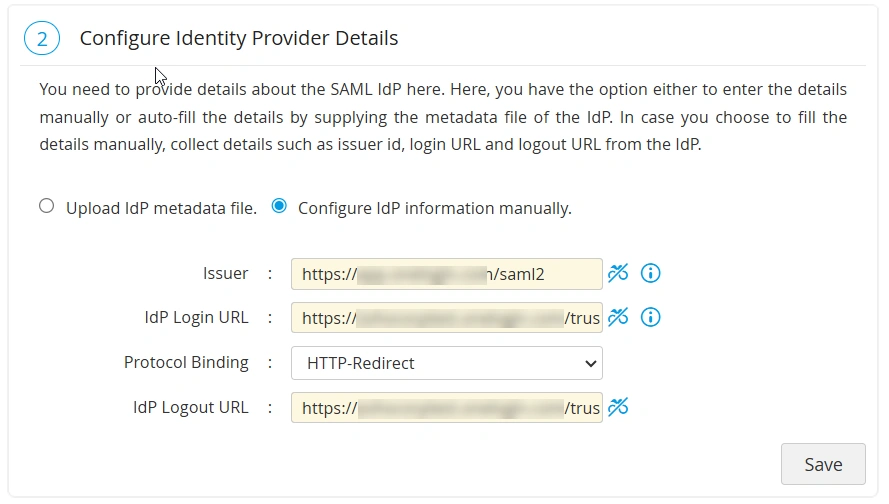
Alternatively, if you wish to enter the IdP details manually, follow these steps:
- Select the Configure IdP information manually option and enter the following details in the respective fields:
- Issuer - Enter the IdP Issuer URL or URI provided by the IdP in this field. PAM360 verifies and validates the SAML requests and responses it receives from IdP using the IdP Issuer.
- IdP Login URL - Specify the URL to which users should be redirected for authentication when they access the PAM360 application directly.
- Protocol Binding - Select the protocol binding supported by the IdP from the given options. The selected protocol binding will be used on both the AuthnRequests and LogoutRequests sent by the SP.
- IdP Logout URL - Specify the URL to which the users should be redirected when they log out of PAM360 to initiate the SLO process.
- After entering the required details, click the Save button to save the configured IdP details.
3.2 Importing IdP Certificate
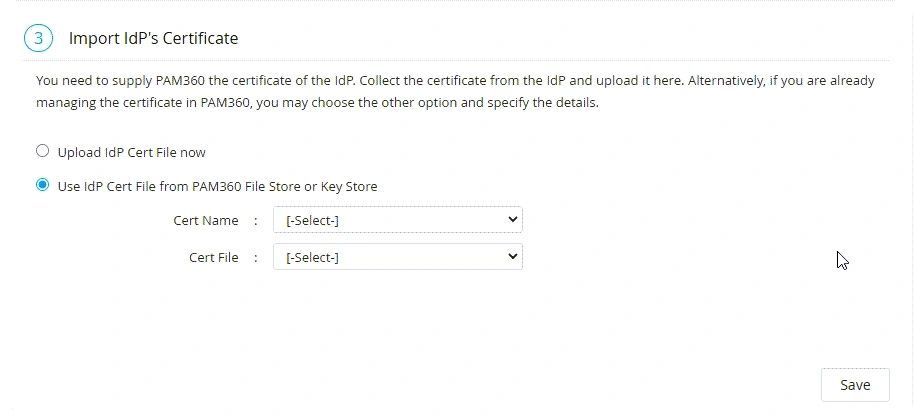
After configuring the required IdP details, you must upload the IdP certificate under the Import IdP's Certificate section on the Configuration For Single Sign-On Using SAML page. You can upload the IdP certificate directly from your machine or select a File/Key Store from PAM360 if you have the certificate stored in your PAM360 account.
- Upload IdP Cert File now - Select this radio button to upload the IdP certificate directly from your machine. Click the Browse button beside the Import Certificate field, select the certificate file from your machine, and click Open.
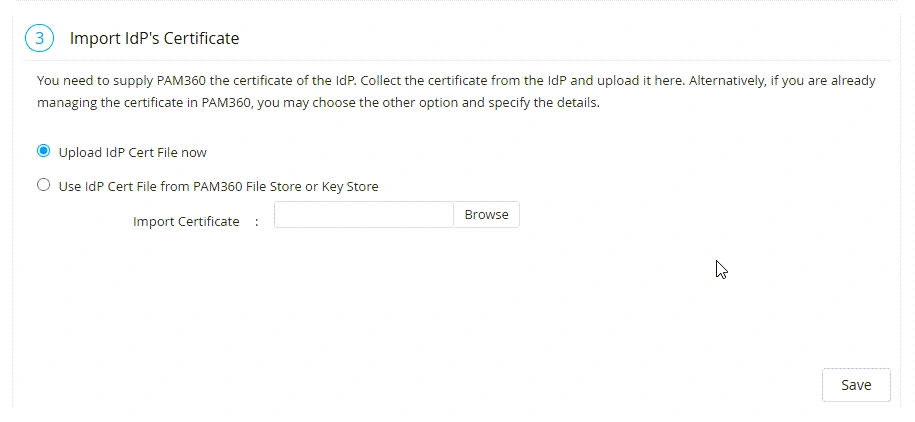
- Use IdP Cert File from PAM360 File Store or Key Store - Choose this radio button if you have the certificate stored in your PAM360 account. Select the respective file store resource and account on the Cert Name and Cert File fields and click Save.
Caution
- When you upload the XML file to populate the IdP details on the PAM360 console, the XML file will also populate the certificate details under the Import IdP's Certificate section. In case the certificate details are not auto-filled upon uploading the XML file, try configuring the Configure Identity Provider Details and Import IdP's Certificate manually and then click Save.
- SAML Single Logout is applicable from PAM360 build 5304 and above only. To configure SAML Single Logout, navigate to <PAM360_Installation_Directory\PAM360\conf\system_properties.conf> and append the following system property under the existing properties.
- saml.logout.redirect.slo=true
3.3 Enabling SAML Single Sign-On
The final step in configuring SAML SSO is enabling SAML Single Sign-On for the PAM360 users. On the SAML configuration page, click the Enable Now button at the bottom-right corner of the screen to enable SAML SSO for the users in your environment.