Configuring SAML Authentication for PAM360
For SAML configurations in builds prior to 7400, please refer to this help document.
ManageEngine PAM360 supports Security Assertion Markup Language (SAML) 2.0, facilitating integration with Federated Identity Management Solutions for Single Sign-On and Single Logout functionalities. SAML 2.0 is a widely adopted open standard that facilitates the exchange of authentication and authorization information between an Identity Provider (IdP) and a Service Provider (SP). This standard provides Single Sign-On (SSO) access to web-based applications, allowing users to authenticate once and gain access to multiple applications without needing to log in repeatedly. Additionally, SAML 2.0 supports Single Logout (SLO), enabling users to log out of all user sessions established during SSO simultaneously with a single click.
PAM360 acts as the SP and integrates with various IdPs, facilitating SSO access for users. The integration process involves exchanging details between the SP and IdP to establish trust and enable secure communication. Upon SAML configuration, users can log in to the IdP and automatically gain access to PAM360 from the IdP's interface without needing to authenticate using the PAM360 credentials, and with Single Logout (SLO), they can log out from all applications with a single click. This seamless integration enhances the user experience and streamlines access management across various platforms. This help document covers the following topics in detail:
- SAML Terminologies
- SAML Configuration for PAM360
- Configuring SAML Authentication for PAM360 High-Availability Servers
- Managing SAML SSO Configuration
- Troubleshooting Tips
- Frequently Asked Questions
1. SAML Terminologies
Understanding SAML terminologies is crucial for grasping how the protocol facilitates secure and seamless authentication and authorization. Explore the following table to understand the various terms used in SAML 2.0.
| Terminology | Explanation |
|---|---|
IdP | An IdP is an entity that authenticates users and provides identity assertions to SP. The IdP is responsible for verifying the identity of users through processes such as username and password verification, multi-factor authentication, etc. |
SP | A SP is an entity that provides services or resources to users. SP depends on the IdP to verify user identities and accepts the identity assertions issued by the IdP. Based on these assertions, the SP grants users access to its services or resources. |
SAML Request | A SAML request is an XML-based message sent by the SP to the IdP to initiate the authentication or logout processes. It typically includes the details of the SP and the request for an assertion/session termination. The elements may vary depending on the request type. |
SAML Response | A SAML response is an XML-based message that contains the assertion(s) and LogoutResponse. It is the overall container for the message sent from the IdP to the SP. The response is usually digitally signed to ensure its authenticity and integrity. It could include multiple assertions. |
AuthNRequest | It is a SAML authentication request message sent by the SP to the IdP, requesting an authentication assertion from the IdP when a user requests access to the SP. It contains the ACS URL, NameID format, protocol binding, and the necessary information for the IdP to identify the SP, understand the required authentication context, and handle the user's authentication process. It is a type of SAML Request. |
Assertion | An assertion is a package of information that certifies the identity of the user requesting access to the SP. It is a part of the SAML Response sent by the IdP to SP that contains the authentication and authorization information about a user. |
Protocol Binding | Binding refers to the method used to transport SAML messages between the IdP and SP. The common bindings include HTTP Redirect and HTTP POST. |
Metadata | Metadata is an XML document that describes the configuration and capabilities of the IdP and SP. It includes endpoint URLs, supported bindings, and cryptographic keys for digital signatures. |
Access URL | It is the URL through which the users access the SP (application/service). |
Entity ID | The Entity ID is a unique identifier for an entity within the SAML system. This identifier distinguishes an SP from other entities within a SAML environment and helps establish trust with the IdP. Both the IdPs and SPs have distinct entity IDs. |
Assertion Consumer Service (ACS) URL | It is the endpoint URL on the SP where the IdP sends the SAML Response (Assertions). |
Single Logout (SLO) Service URL | It is the URL where the SP receives logout requests from the IdP. Single Logout is a process that ensures a user is logged out of all SPs once they log out from an SP within the SAML system or the IdP. |
IdP Issuer | It is a unique identifier for an IdP. Typically, it is a URL or URI that represents the IdP, which the SP uses to identify and validate the IdP in SAML responses. |
IdP Login URL | It is the URL where users are redirected for authentication when they access the SP application. It is the endpoint URL to which the SP sends the SAML authentication request. |
IdP Logout URL | This is the URL used by the SP to initiate the SLO process. When users log out of the SP, they are redirected to this URL to log out from the IdP and the linked SPs with an active session, terminating all the active user sessions. |
NameID | It is a unique identifier for a user included in a SAML Assertion within the SAML response sent by the IdP to the SP. This can be the user’s full name, email address, group memberships, roles, etc. The SP makes authorization decisions based on the NameID attribute. |
NameID Format | The NameID Format specifies the format of the identifier for the user. The SP includes the NameID Format it expects from the IdP in the NameIDPolicy element within a SAML Request. The IdP sends the NameID Format used to authenticate the user within the subject component of the SAML Response. This could be any of the following: transient, persistent, encrypted, X.509 subject name, Kerberos, or entity. |
NameIDPolicy | The NameIDPolicy element within a SAML Request encapsulates the desired NameID Format the SP expects from the IdP in a SAML Response. It also includes the AllowCreate element, if True, allows the IdP to generate a new NameID if one does not exist for the user. |
Authentication Context Class | It specifies the type and strength of the authentication the user completed at the IdP. |
RequestedAuthnContext | The AuthnContextClassRef in a RequestedAuthnContext element within a SAML AuthnRequest specifies the desired authentication context the SP expects the IdP to use for user authentication. |
AuthnContext | The AuthnContextClassRef in an AuthnContext element within a SAML Response specifies the authentication method the IdP used to authenticate the user. |
LogoutRequest | This is a SAML message sent by the SP or the IdP to initiate the SLO process. This message informs the recipient about the logout request for a particular session, and it includes the necessary details for identifying the session and the user. |
LogoutResponse | This is a SAML message sent in response to a LogoutRequest, indicating the status of the logout operation. It confirms the status of the logout request, specifying whether the request was successful or if there were any errors. |
Authentication Context Comparison | Authentication Context Comparison defines how the IdP should evaluate the authentication context requested by the SP with its available methods. This could be any of the following: exact, minimum, maximum, and better. |
Algorithm | It describes the cryptographic algorithm used for signing SAML assertions and requests by the IdP and SP. |
2. SAML Configuration for PAM360
To start using SAML authentication for the PAM360 application in your environment, you must perform the configuration in both IdP and SP (i.e., PAM360). The configuration process involves four key steps: adding an IdP for the access URL, configuring PAM360 as SP in the IdP interface, configuring the IdP details in PAM360, and configuring the SAML properties.
Navigate to Admin >> Authentication >> SAML Single Sign-On and follow the below sections to configure SAML authentication for PAM360:
2.1 Adding an IdP for the PAM360 Access URL
When you access the SAML Single Sign-On page for the first time and do not have any IdPs configured, you will see the Add IdP window. If you have an existing SAML configuration, you will see the SAML Dashboard with the configured IdP details.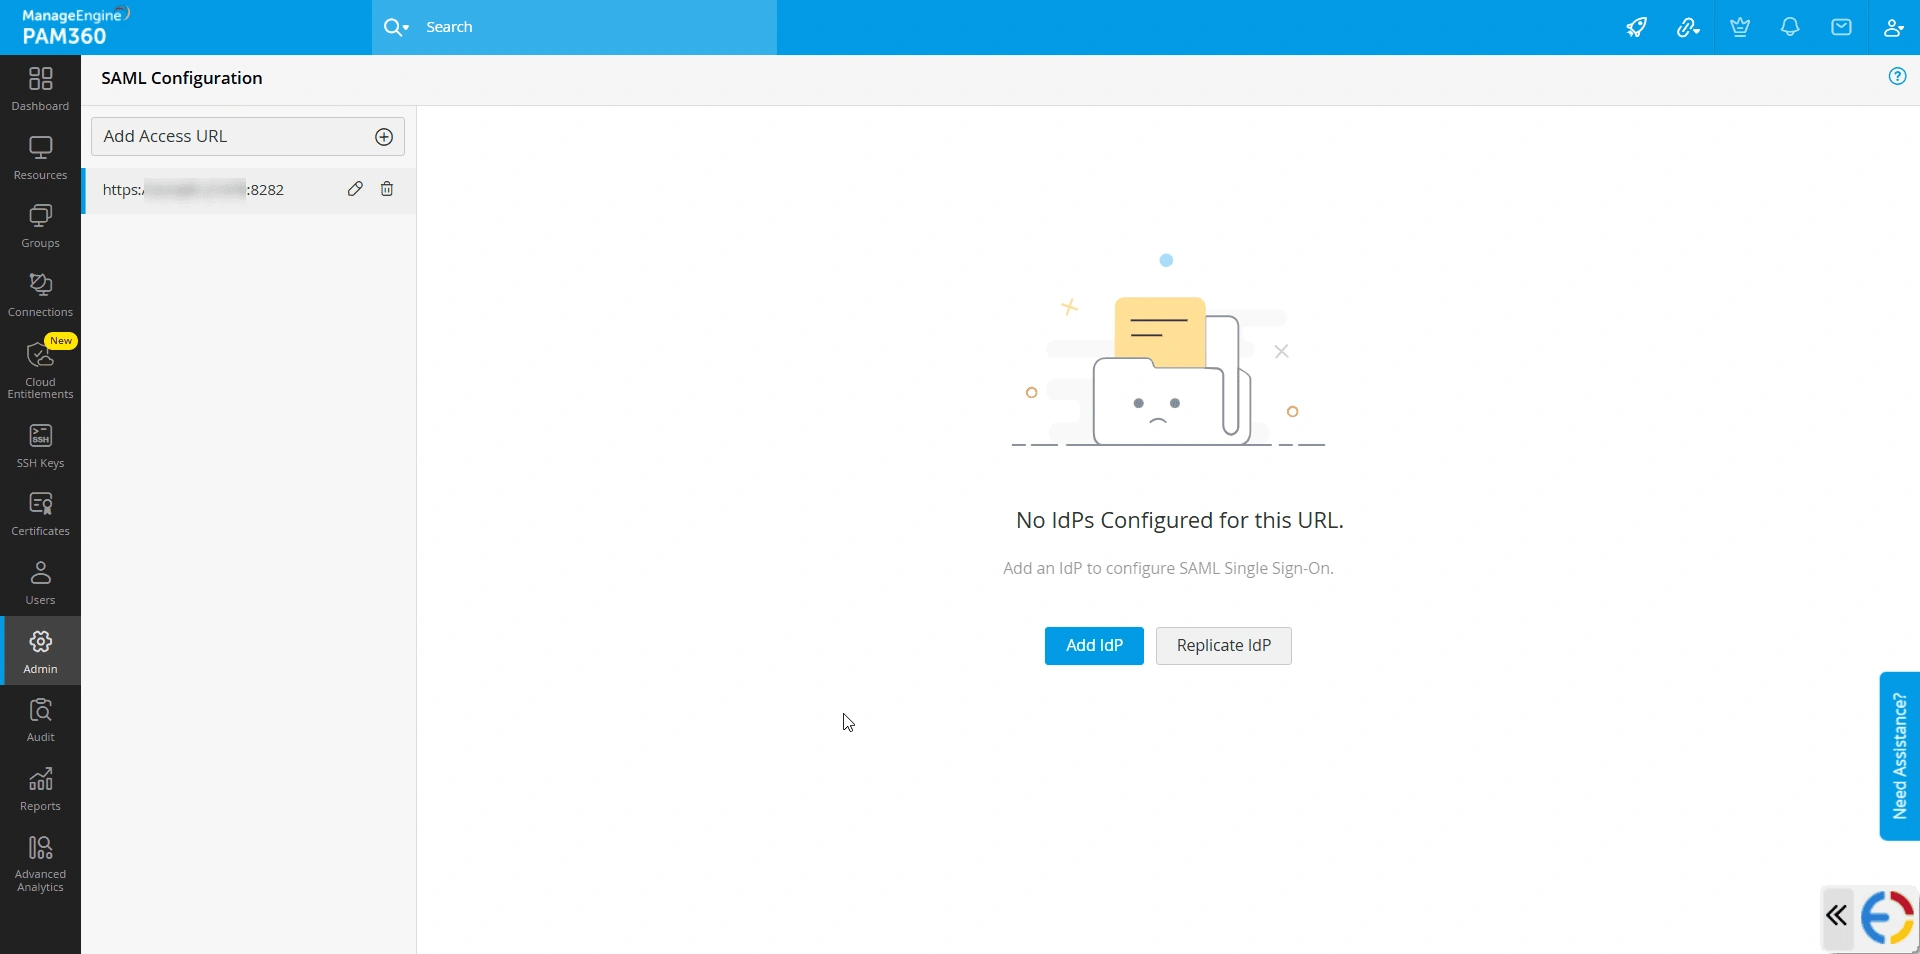
Follow these steps to add a new IdP:
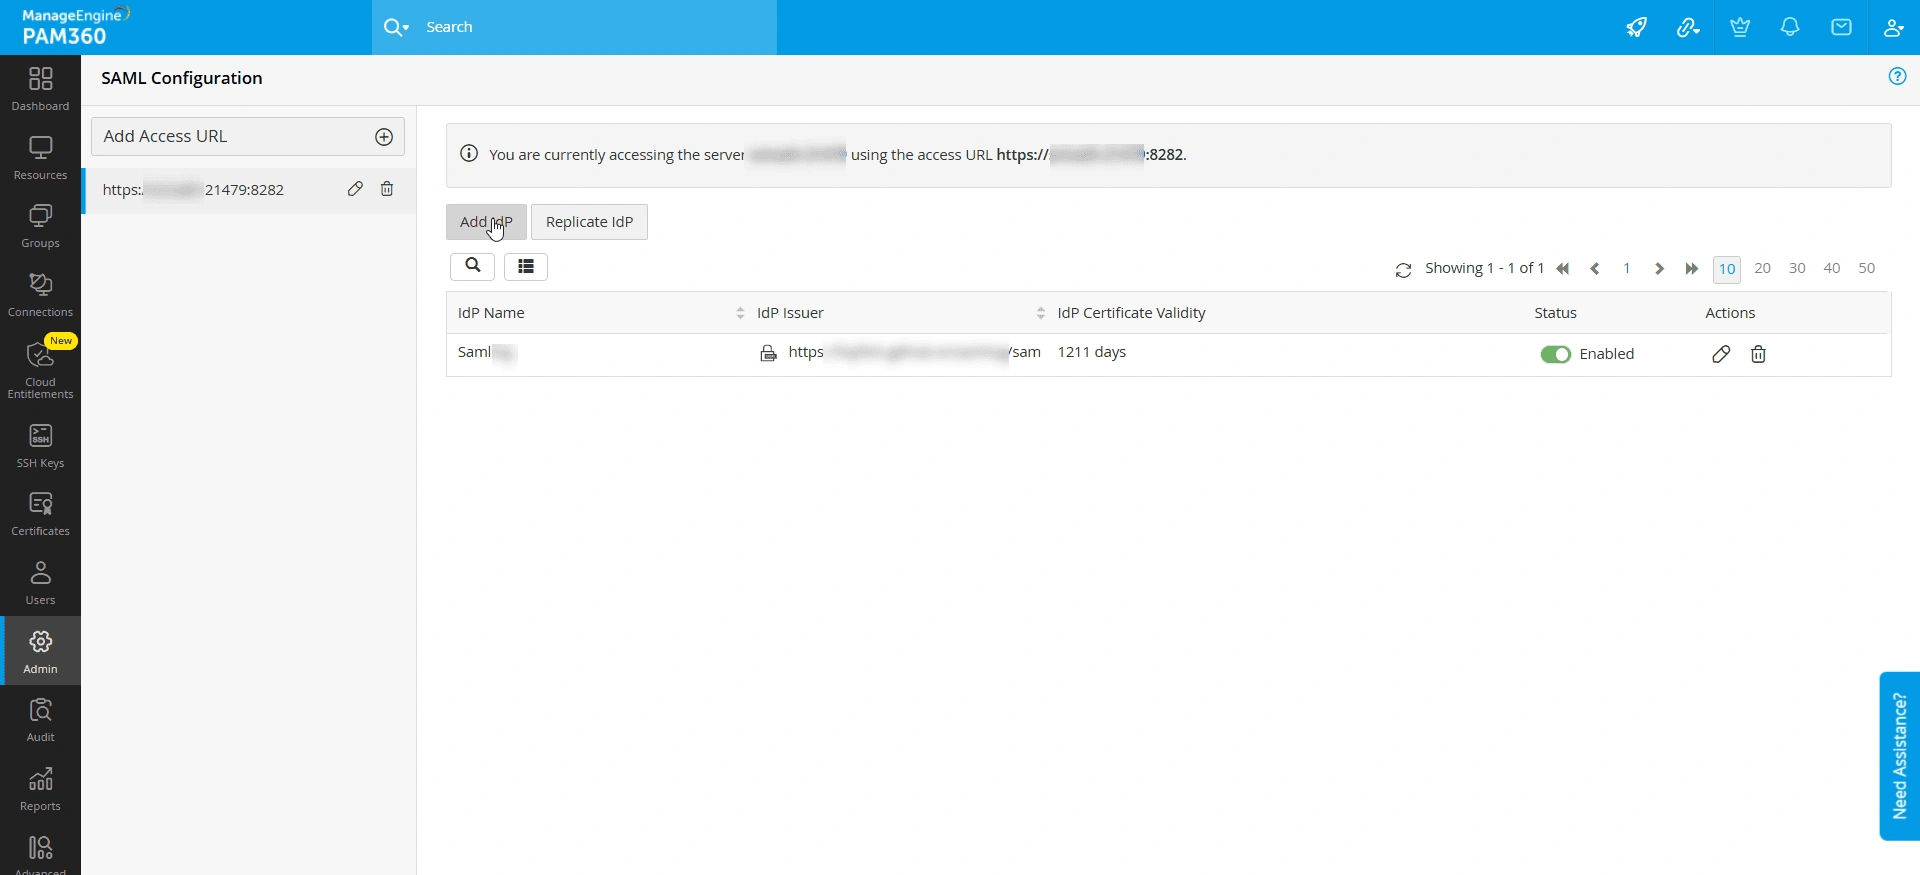
- Click the access URL on the left pane for which you wish to create a new IdP configuration.
- Click the Add IdP button from the top pane.
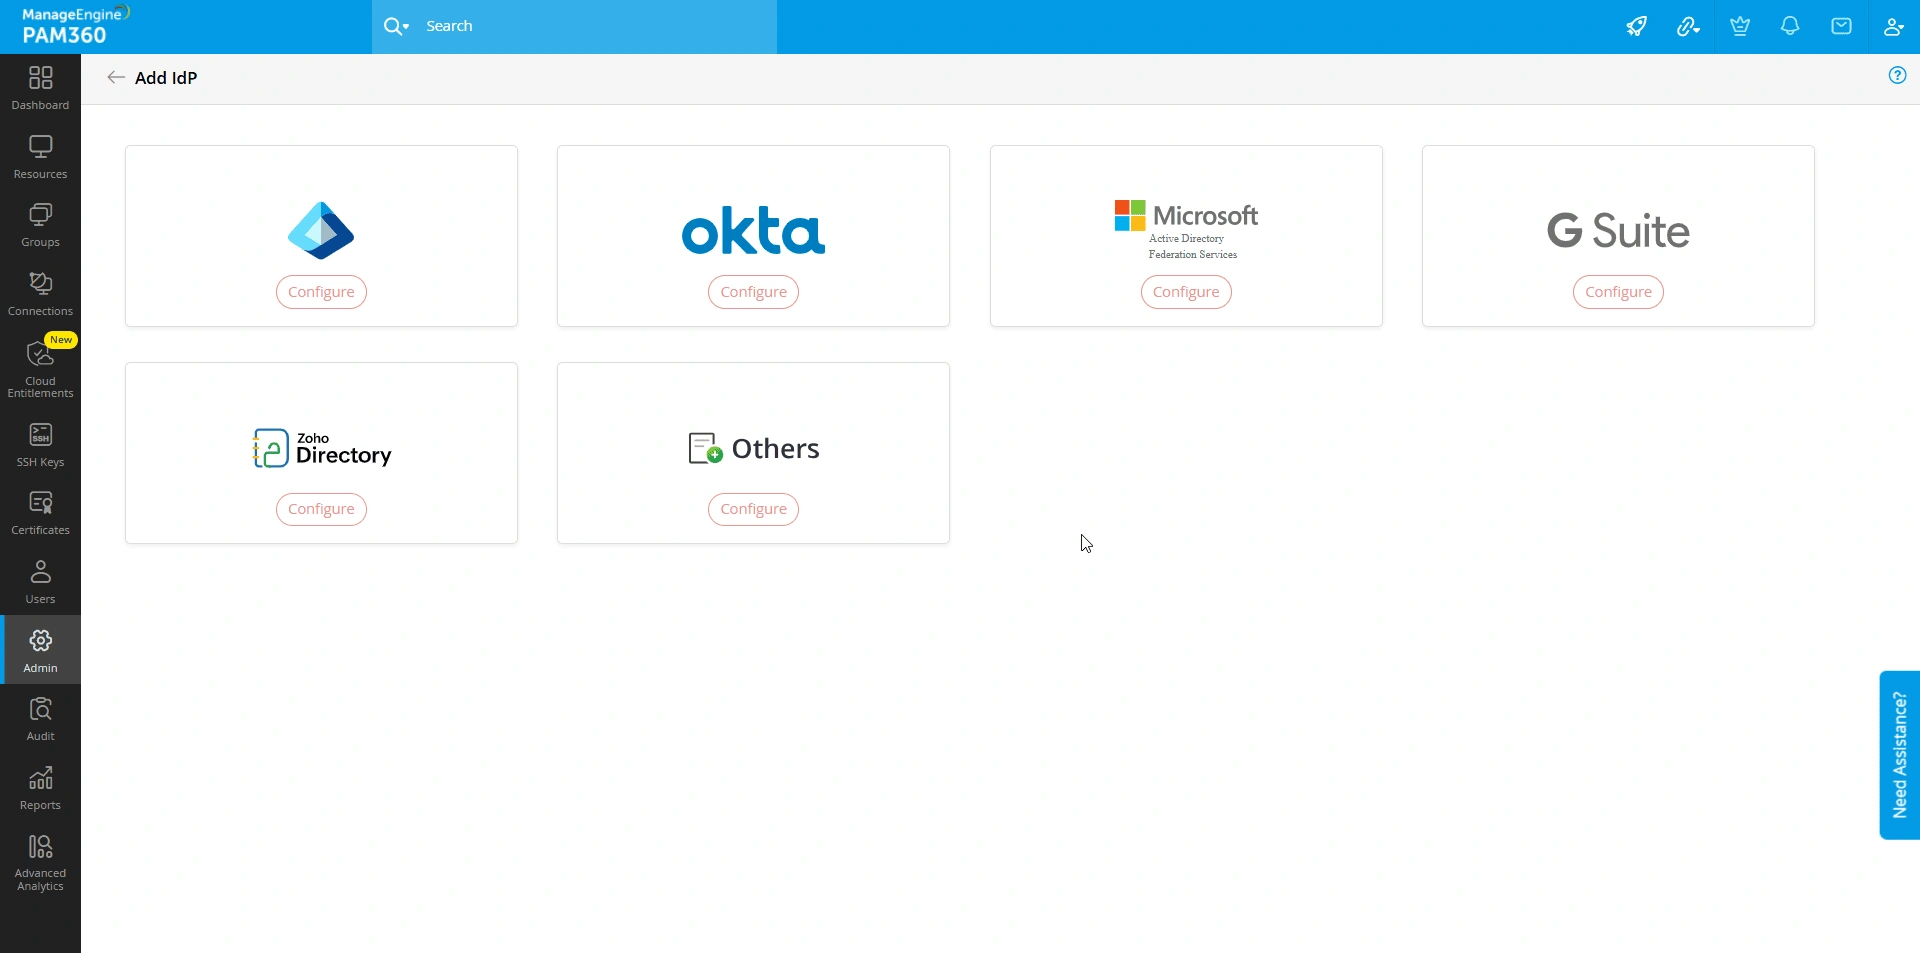
- In the Add IdP window, click the Configure button below the desired IdP. If you do not find the desired IdP from the list, click the Configure button below the Others section.
- In the new window that opens, under the Configure Service Provider Details section, PAM360 displays the following details that are required to register it as the SP on the IdP's interface.
- Access URL - The PAM360 access URL for which you are configuring SAML.
- Entity ID - Entity ID is a unique identifier for PAM360 as the SP within the SAML environment. This identifier distinguishes it from other entities that the IdP trusts.
- Assertion Consumer Service URL - The Assertion Consumer Service URL is the endpoint URL on the SP (i.e., PAM360) where the IdP will send the SAML response.
- SP Certificate - A digital certificate that the PAM360 uses to sign the SAML requests it sends to the IdP or decrypt SAML assertions or responses it receives from the IdP. The IdP validates the authenticity of the requests and responses received from the SP using this certificate.
- SP Metadata - An XML document containing all the SP configuration details, such as entity ID, certificate, access URL, and endpoints you need while configuring the SP details on the IdP's website. Click the metadata.xml button beside the SP Metadata field to the download SP details as an xml file to your machine. You can upload this xml file on the IdP's website to auto-populate the SP details during SAML configuration.
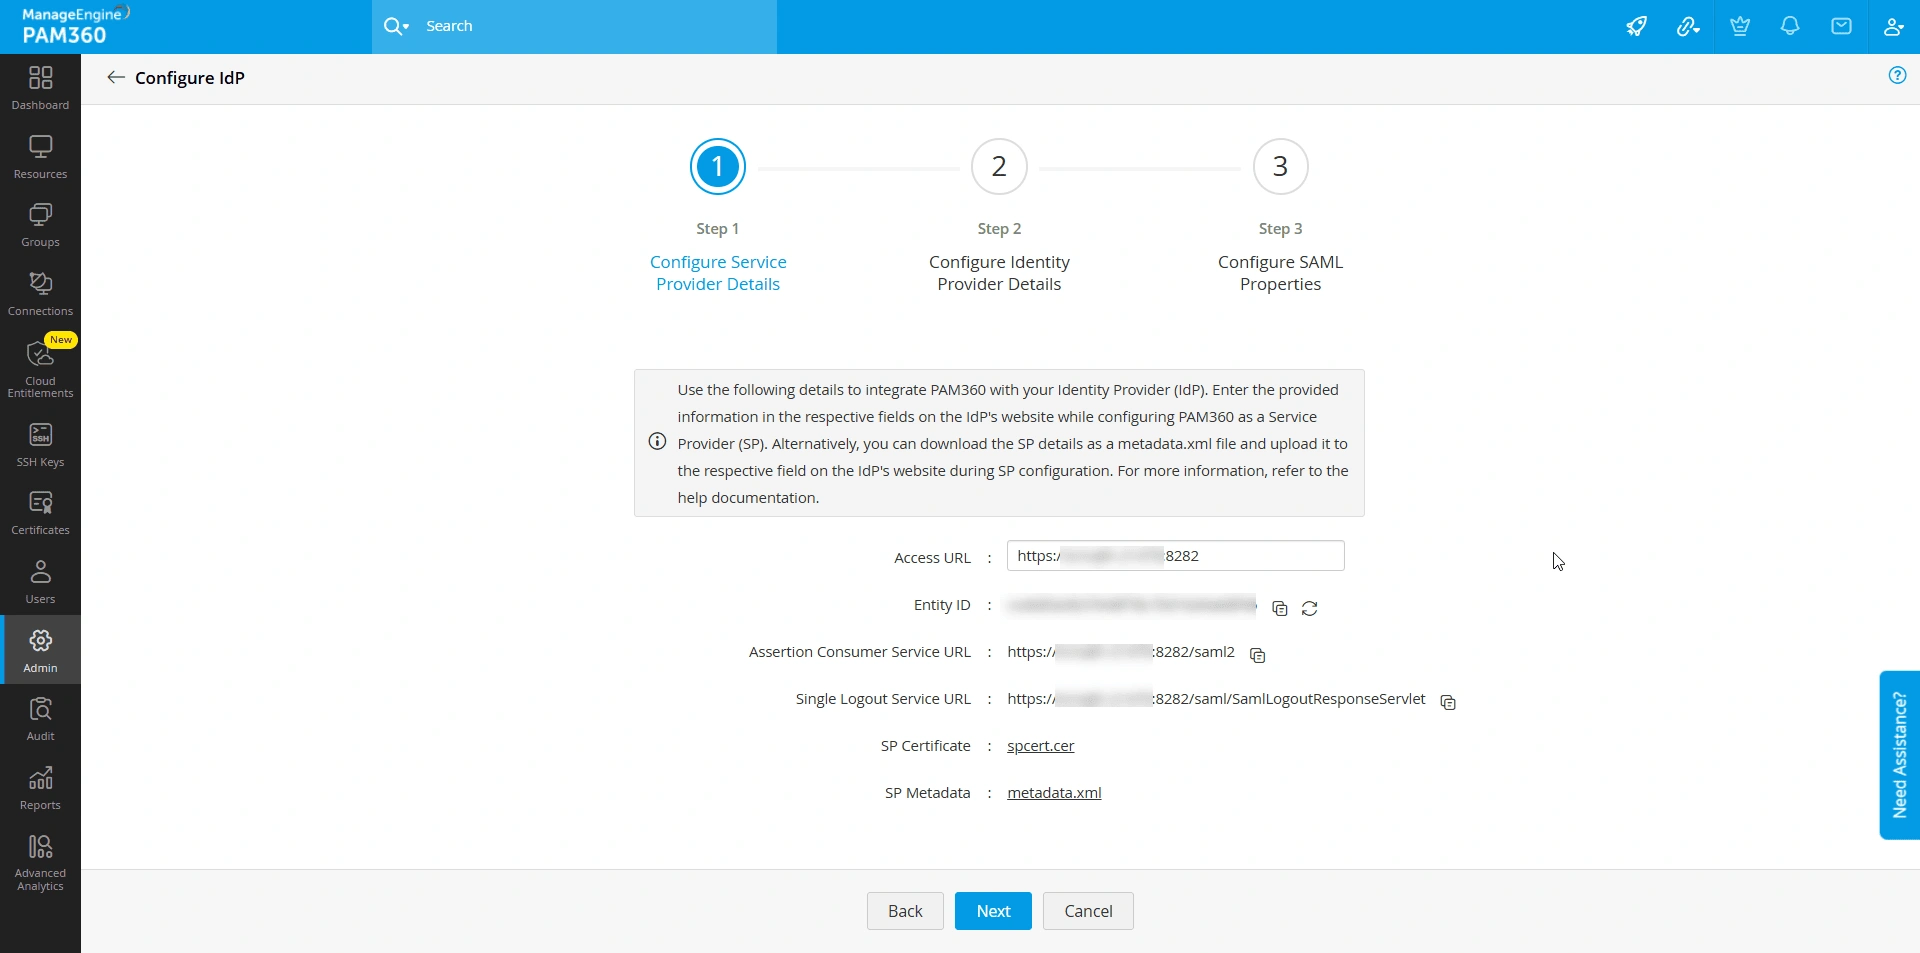
- In the upcoming section, use this auto-generated SP information or the metadata.xml file to configure PAM360 as the SP on the IdP interface.
2.2 Configuring PAM360 as the SP on the IdP Interface
The following help documents will assist you in configuring PAM360 as the SP on the desired IdP:
- Microsoft Entra ID
- Okta
- Active Directory Federation Services (AD FS)
- Google Workspace
- Zoho Directory
- ADSelfService Plus
- OneLogin
Upon completing the configuration, note down the IdP details, such as the IdP Issuer URL, IdP Login URL, IdP Logout URL, etc., or download the IdP Metadata XML file. This information will be used in the PAM360 application to complete the SAML configuration.
2.3 Configuring IdP Details in PAM360
After configuring the SP details on the IdP's interface, you should configure the IdP details in the PAM360 application. You can enter the details manually or upload an XML file (provided by the IdP) in the given field to auto-populate the IdP details.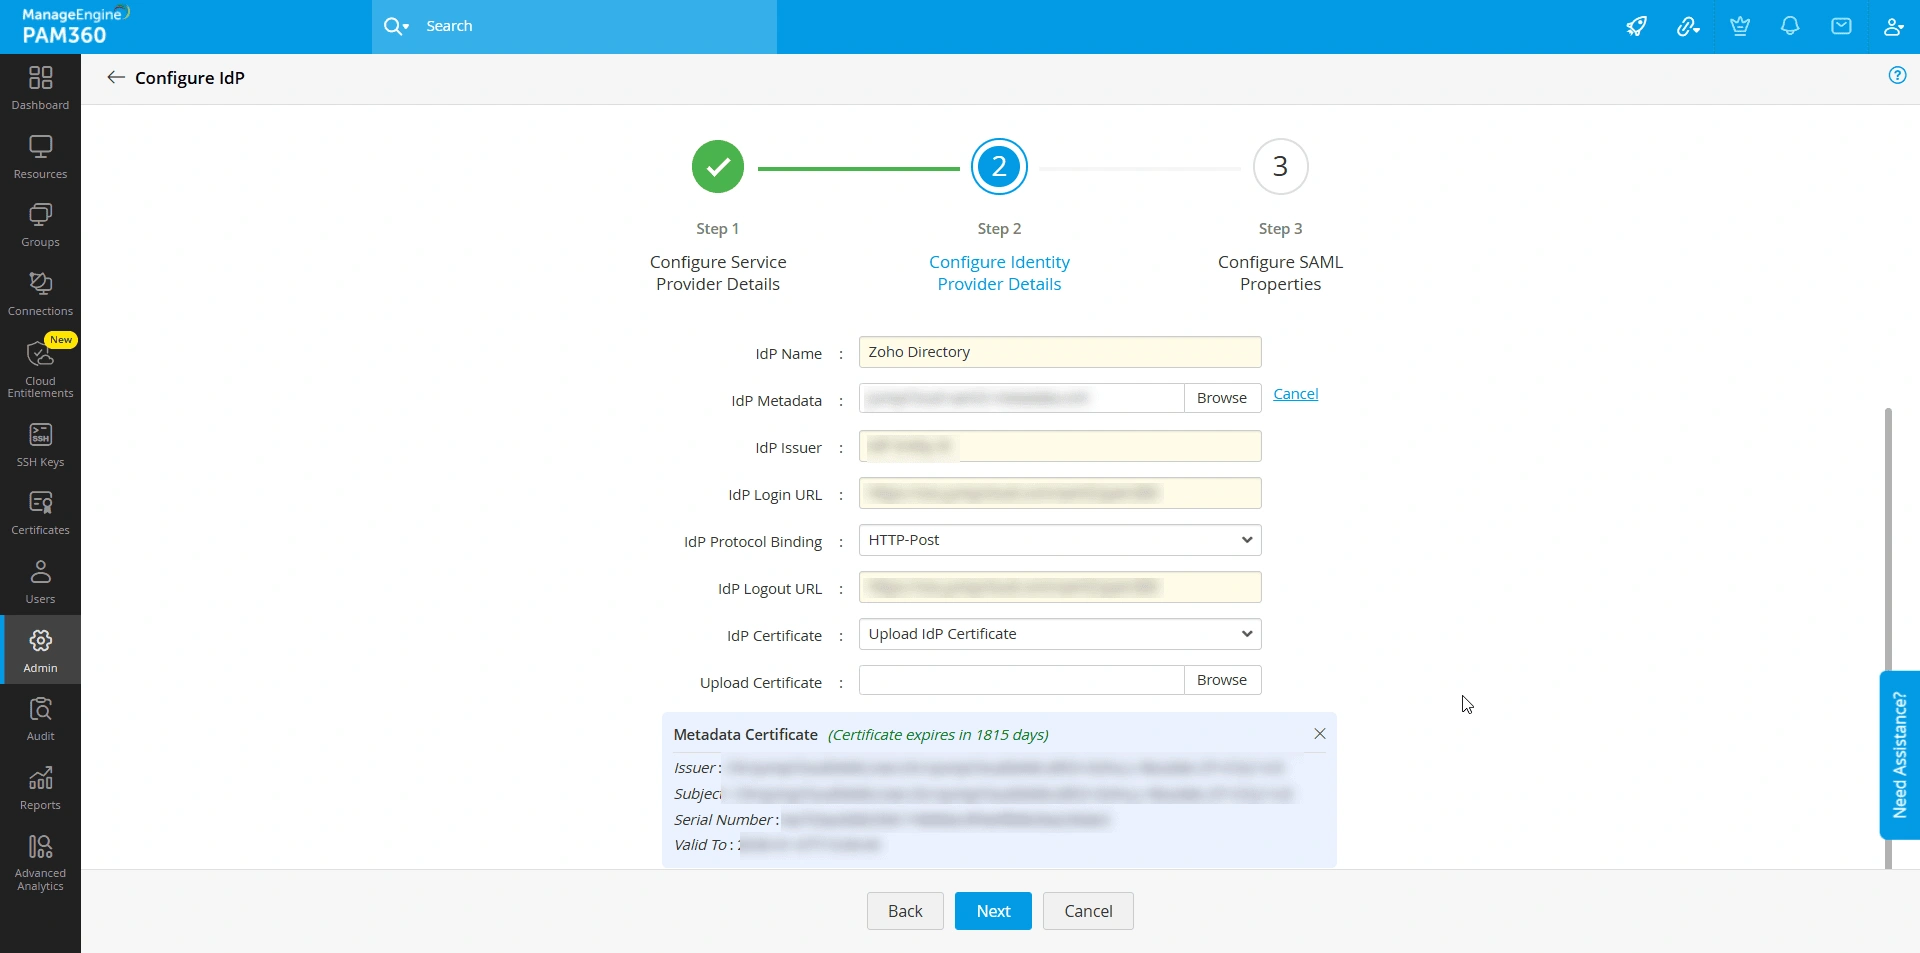
- IdP Display Name - Enter a display name for the IdP you are configuring. The display name will serve as a unique identifier for the IdP on the SAML SSO dashboard.
- IdP Metadata - Upload the metadata.xml file downloaded from the IdP's website to avoid manual entries of the following IdP details. This action will auto-populate the IdP details on the respective fields.
- IdP Issuer - Enter the IdP Issuer URL or URI provided by the IdP in this field. PAM360 verifies and validates the SAML requests and responses it receives from IdP using the IdP Issuer.
- IdP Login URL - Specify the URL to which users should be redirected for authentication when they access the PAM360 application directly.
- IdP Protocol Binding - Select the protocol binding supported by the IdP from the given options. The selected protocol binding will be used on both the AuthnRequests and LogoutRequests sent by the SP.
- IdP Logout URL - Specify the URL to which the users should be redirected when they log out of PAM360 to initiate the SLO process.
- IdP Certificate Upload Mode - Select the desired option from the drop-down field. You can either upload the IdP certificate from your machine or select the certificate from a resource stored in PAM360.
- If you choose the Upload IdP Certificate option, click the Browse button, select the desired IdP certificate from your machine, and Click Open.
- If you choose the Choose a certificate from PAM360 File/Key Store option, select the PAM360 resource and account that holds the IdP certificate.
- Click Next to proceed to the next step.
2.4 Configuring the SAML Properties
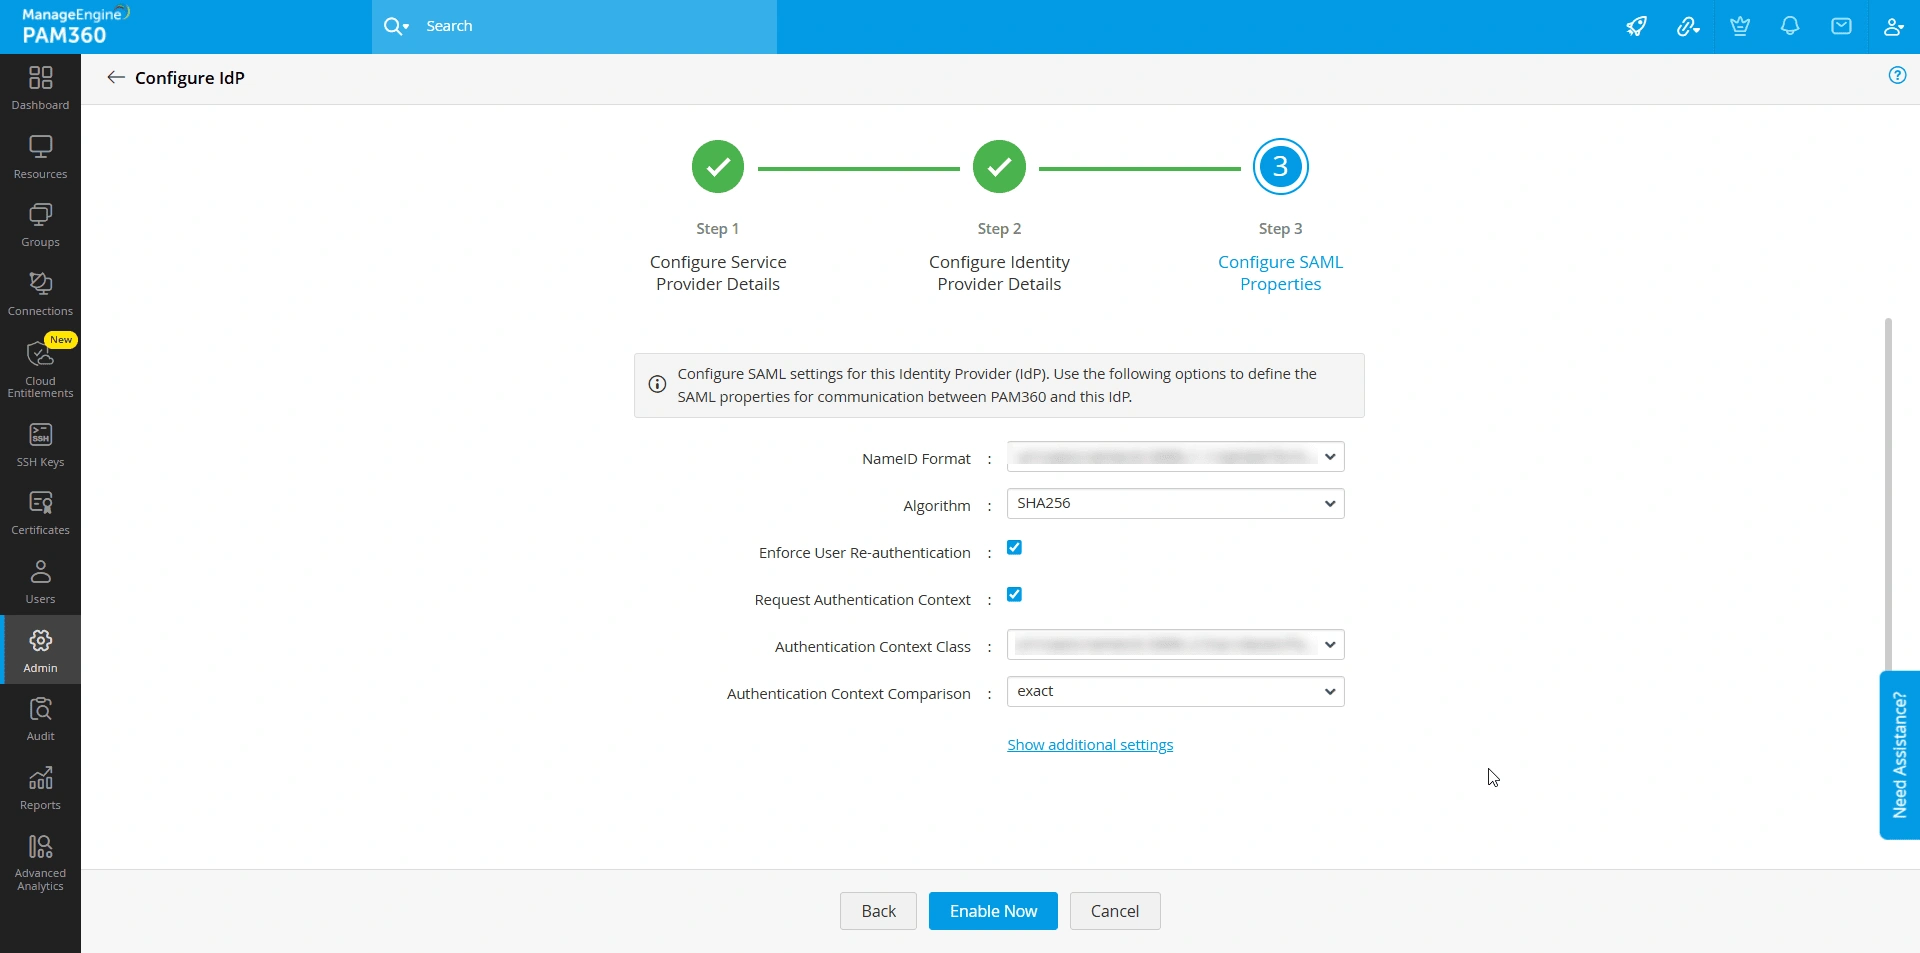
After configuring the IdP details in PAM360, you should configure the SAML properties, which is the final step of the SAML configuration process. These properties define how PAM360 and IdP interact with each other. Specify the methods and endpoints for authentication and provide details to validate and securely process the SAML requests/responses. Proper configuration ensures seamless Single Sign-On (SSO) and Single Log-Out (SLO) functionalities and protects sensitive data during authentication and authorization processes.
- NameID Format - Select the desired NameID format from the drop-down field.
- Algorithm - Choose the desired cryptographic algorithm for signing the SAML Requests to ensure data integrity and confidentiality.
- Enforce User Re-authentication - Enable this checkbox to enforce users to authenticate again while accessing the PAM360 application from the IdP's dashboard even if they have an active session with the IdP.
Caution
Ensure you enable the Honor Force Re-authentication option (if available) during SAML configuration on the IdP's website.
- Request Authentication Context:
- Enable this checkbox to specify the authentication context the IdP should use while authenticating the users.
- If disabled, PAM360 will not specify a particular authentication context for user authentication in the AuthnRequests it sends to the IdP. In this case, the IdP will use its default authentication method to authenticate users, which might not align with your specific security requirements or preferences.
- Authentication Context Class - This drop-down field is available when the Request Authentication Context checkbox is enabled. Select the desired authentication context class from the available options. The selected class defines the type of authentication (e.g., password, multi-factor) the IdP should use during user authentication.
- Authentication Context Comparison - This parameter specifies how the IdP should interpret and match the requested authentication context class with its available authentication methods. Select the desired comparison method from the available options: Exact, Minimum, Maximum, Better. The IdP decides on the authentication method based on the selected option.
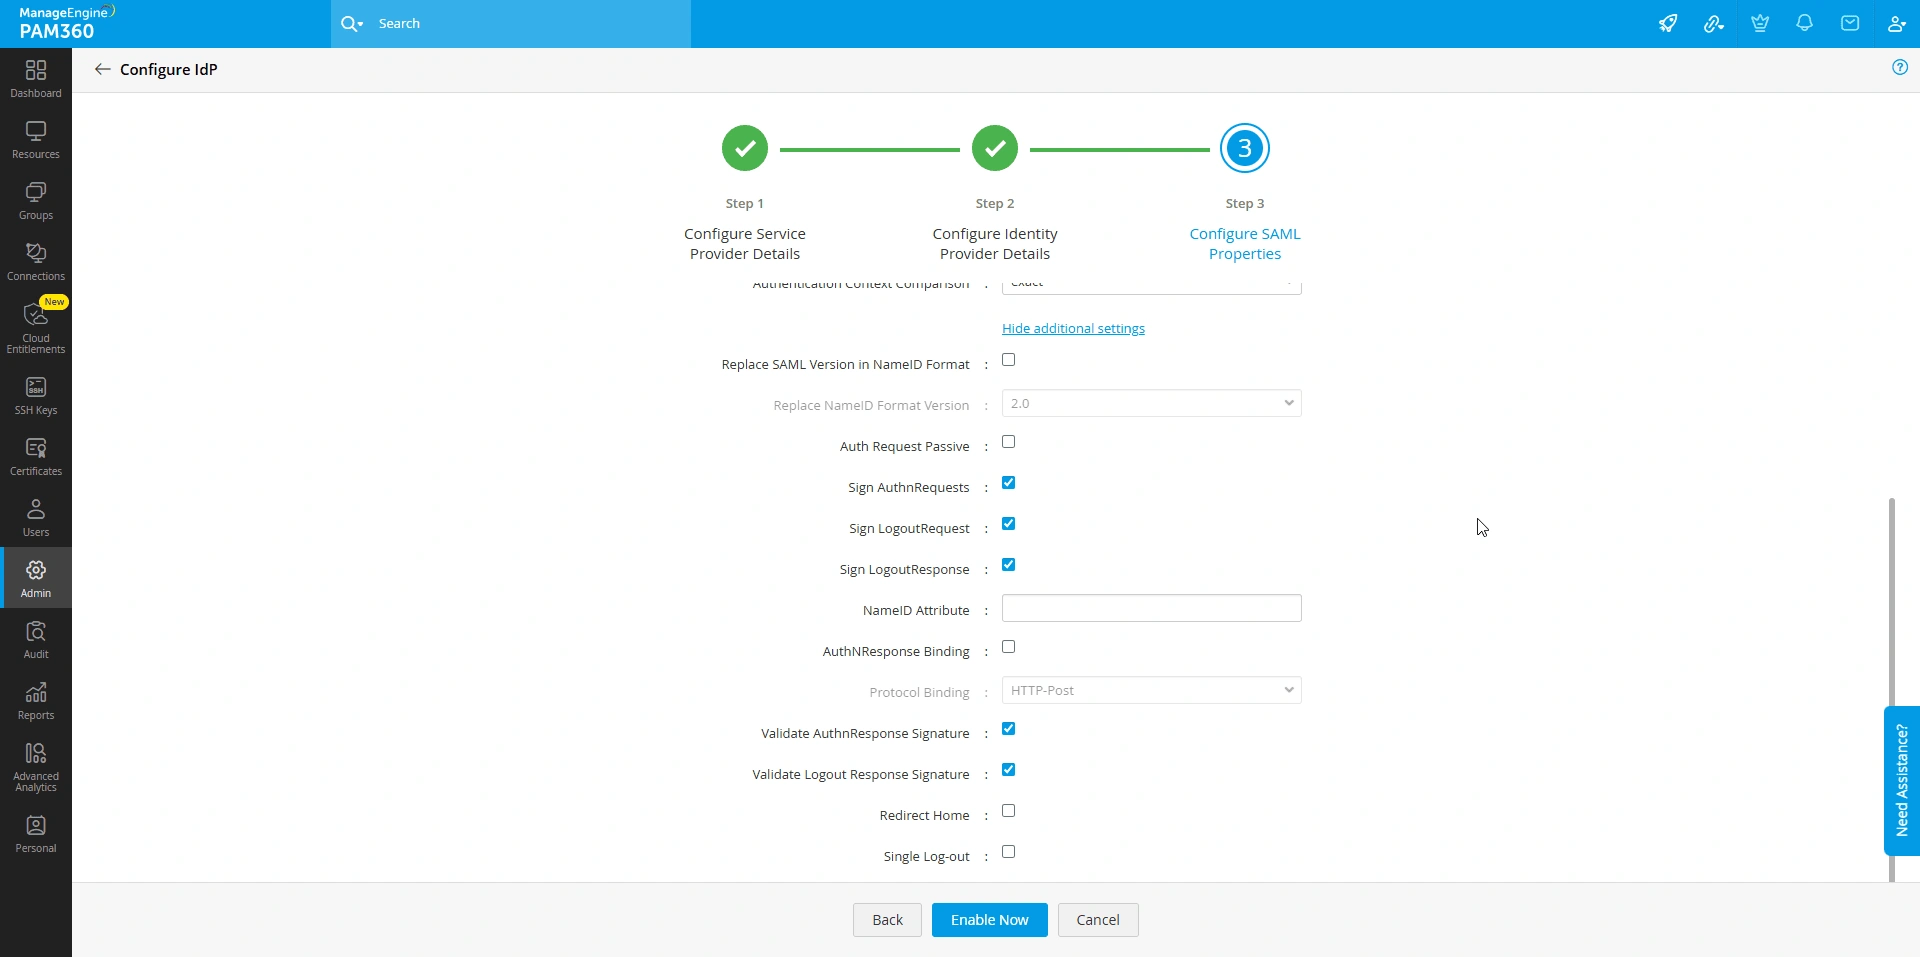
- Replace Saml Version In Name ID Format - Enable this checkbox to update the SAML version in the NameID Format within the AuthNRequests sent to the IdP. In the Replace NameID Format Version drop-down field, select the appropriate SAML version supported by the IdP to ensure seamless interaction between the SP and the IdP.
- Auth Request Passive - Enable this option to allow the IdP to use passive authentication methods to authenticate users. In a passive authentication request, the IdP will attempt to authenticate users using existing session information without prompting them to log in.
- Auth Request Signed - Enable this option to sign the authentication requests sent to the IdP. Signing the AuthNRequest ensures the integrity and authenticity of the request, allowing the IdP to establish that the request originated from PAM360, which is a trusted SP, and the request has not been tampered with
- Logout Request Signed - Enable this option to sign the logout requests sent to the IdP.
- Logout Response Signed - Enable this option to sign the logout responses sent to the IdP.
- NameID Attribute - Specify the NameID attribute the PAM360 should verify in the SAML assertions received from IdP before granting user access. Ensure the NameID Attribute aligns with the IdP configuration to facilitate accurate user identification.
- Validate Auth Response Signature - Enable this option to validate the signature of the authentication responses received from the IdP.
- Validate Logout Response Signature - Enable this option to validate the signature of the logout requests or responses received from the IdP.
- Redirect Home - Enable this option to redirect users to the logout URL specified during the IdP configuration after they log out of PAM360. If this option is enabled, users logging out of PAM360 will be redirected to the URL specified in the Logout URL field. Enter "https://<PAM-ACCESS-URL>"?skipsamlsso=true" in the Logout URL field to redirect users back to the PAM360 login page
Caution
Enabling this option will disable the Single Logout feature.
- Single Logout - Enable this checkbox to terminate the active user session with the IdP when the user logs out of PAM360, terminating all the active user sessions across different SPs established during SSO
After configuring the required SAML properties, click Enable Now to finalize the SAML setup for your PAM360 application. The configured IdP will be associated with the selected PAM360 access URL. Once the configuration is successful, you will be redirected to the SAML SSO Dashboard, where you can add or manage IdP configurations for your PAM360 access URLs.
3. Configuring SAML Authentication for PAM360 High-Availability Servers
If you have configured any of the PAM360 High-Availability models for the PAM360 application, you can add their access URLs individually under the Access URLs section in the SAML SSO Dashboard. Follow the steps mentioned in section 4.1 to add access URLs to the SAML dashboard and section 2 to configure IdPs for those access URLs.
Caution
Each PAM360 access URL functions as a distinct SP. Therefore, each PAM360 server access URL requires an application to be created on the IdP's platform further followed by IdP configuration as shown in section 2 to successfully configure SAML authentication.
4. Managing SAML SSO Configuration
The SAML SSO dashboard in PAM360 is a comprehensive interface to manage your SAML configurations. If you have configured High-Availability servers for your PAM360 environment, you can efficiently configure and manage SAML authentication for all PAM360 server access URLs from this dashboard. From the SAML SSO Dashboard, you can add or remove server access URLs, configure IdPs for each URL, enable or disable IdP configurations, modify SAML properties, and search or delete IdPs. This centralized configuration ensures seamless management of SAML configurations across multiple servers/URLs with multiple IdPs, enhancing security and usability.
4.1 Managing Server Access URLs
Follow these steps to add a new server access URL to your SAML dashboard.
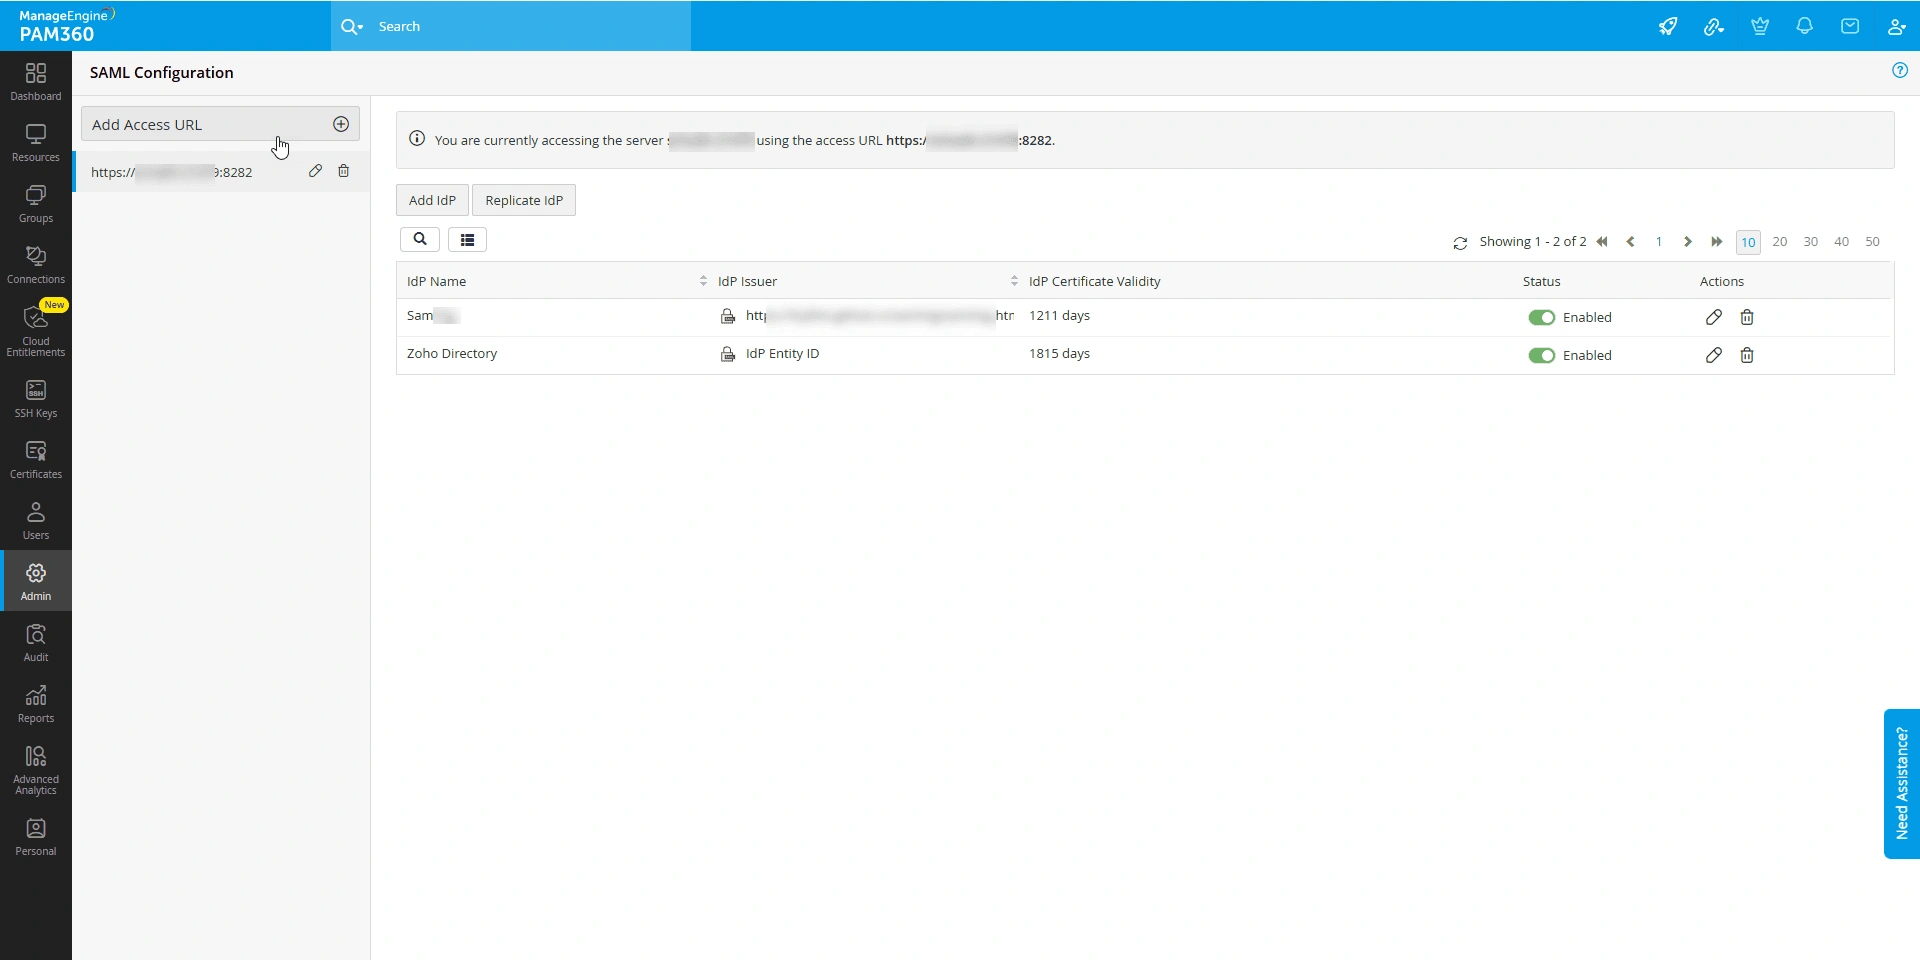
- Click the Add Access URL button on the top-left pane of the SAML dashboard.
- In the Add Access URL window, enter the desired URL for which you wish to configure SAML SSO in the Access URL field.
- Click Add to save the new URL.
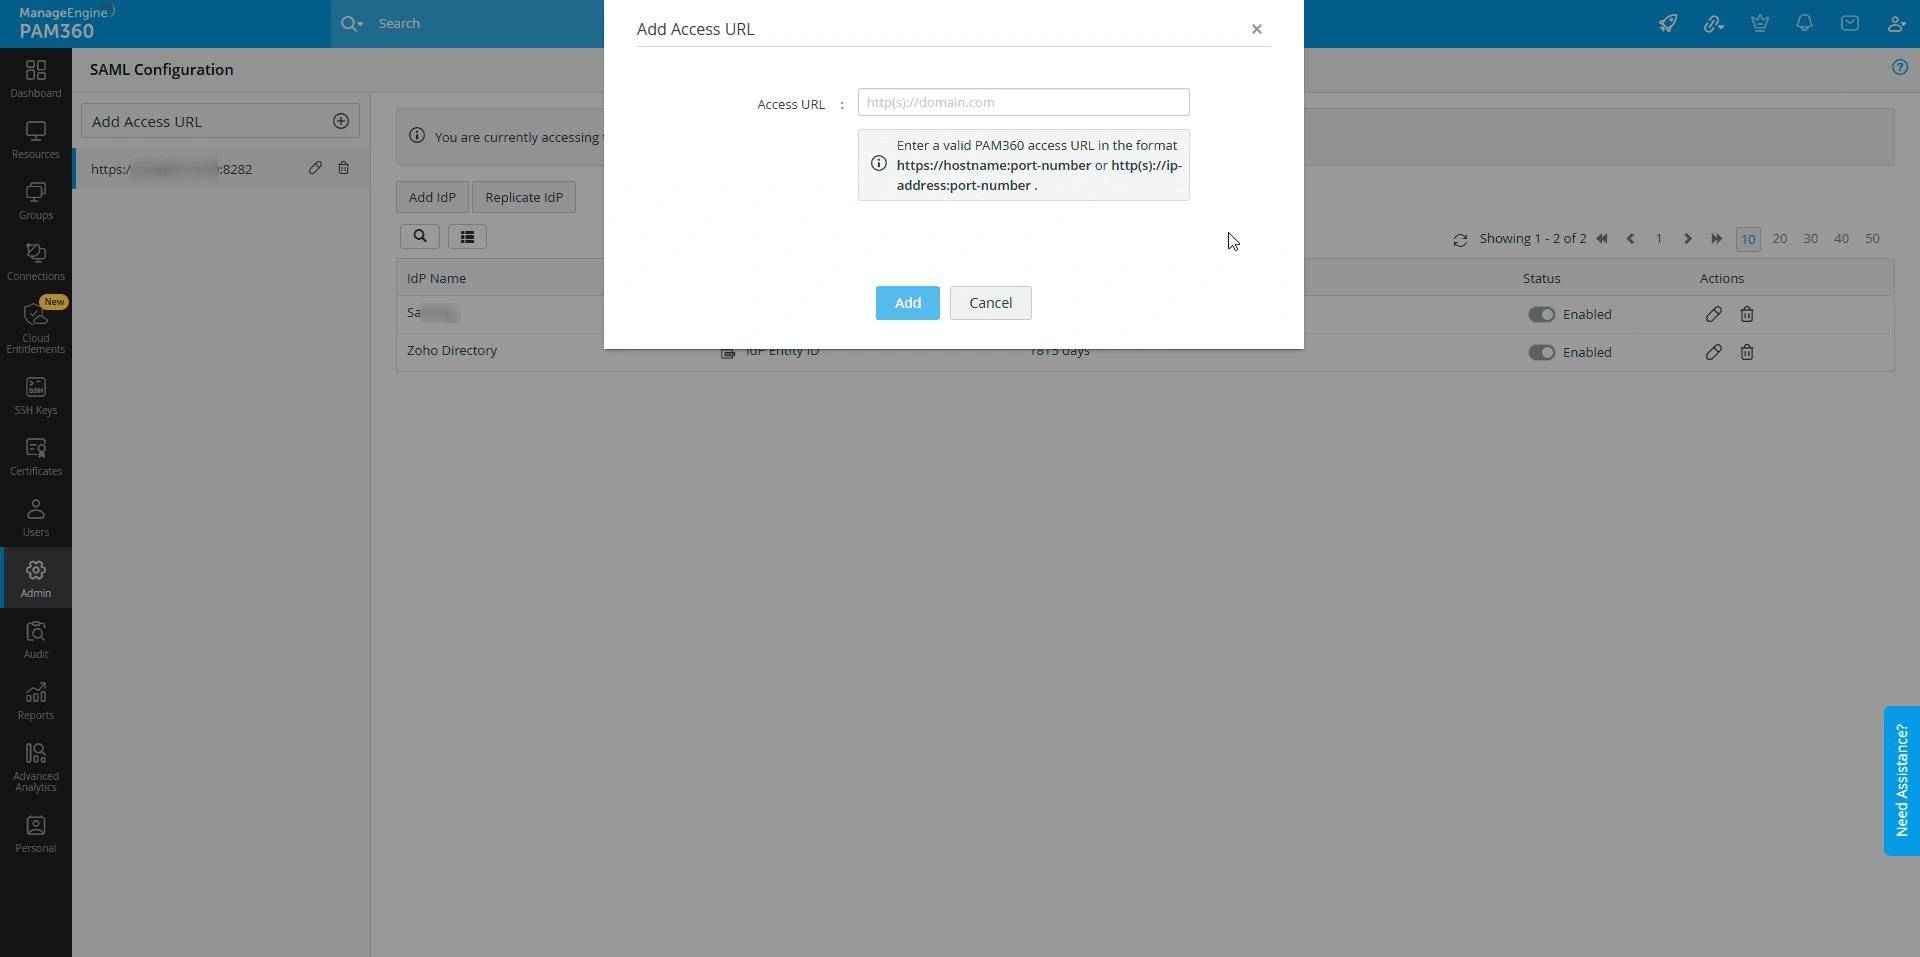
- Use the Edit icon beside the desired access URL to modify it, and the Delete icon to delete the access URL permanently
A new server access URL will be added under the Access URLs section on the SAML dashboard. You can now configure IdPs for this URL and manage its SAML configuration as required. This streamlined process makes it easy to manage multiple access URLs, especially in PAM360 environments with High-Availability servers, ensuring that each access URL is configured for secure SSO authentication.
4.2 Managing IdP Configurations
Follow these steps to add a new IdP configuration for a server access URL in your SAML dashboard.
- Select the desired access URL for which you wish to configure an IdP and click the Add IdP option.
- In the Add IdP window, click the Configure button below the desired IdP you wish to configure.
- Follow the IdP configuration steps mentioned in section 2 to configure the IdP successfully.
Follow these steps to replicate an existing IdP configuration for a server access URL in your SAML dashboard:
- Select the access URL where you wish to replicate an existing IdP and click the Replicate IdP option.
- In the Replicate IdP window, select the desired IdP from the Identity Provider drop-down field and click the Replicate IdP button.
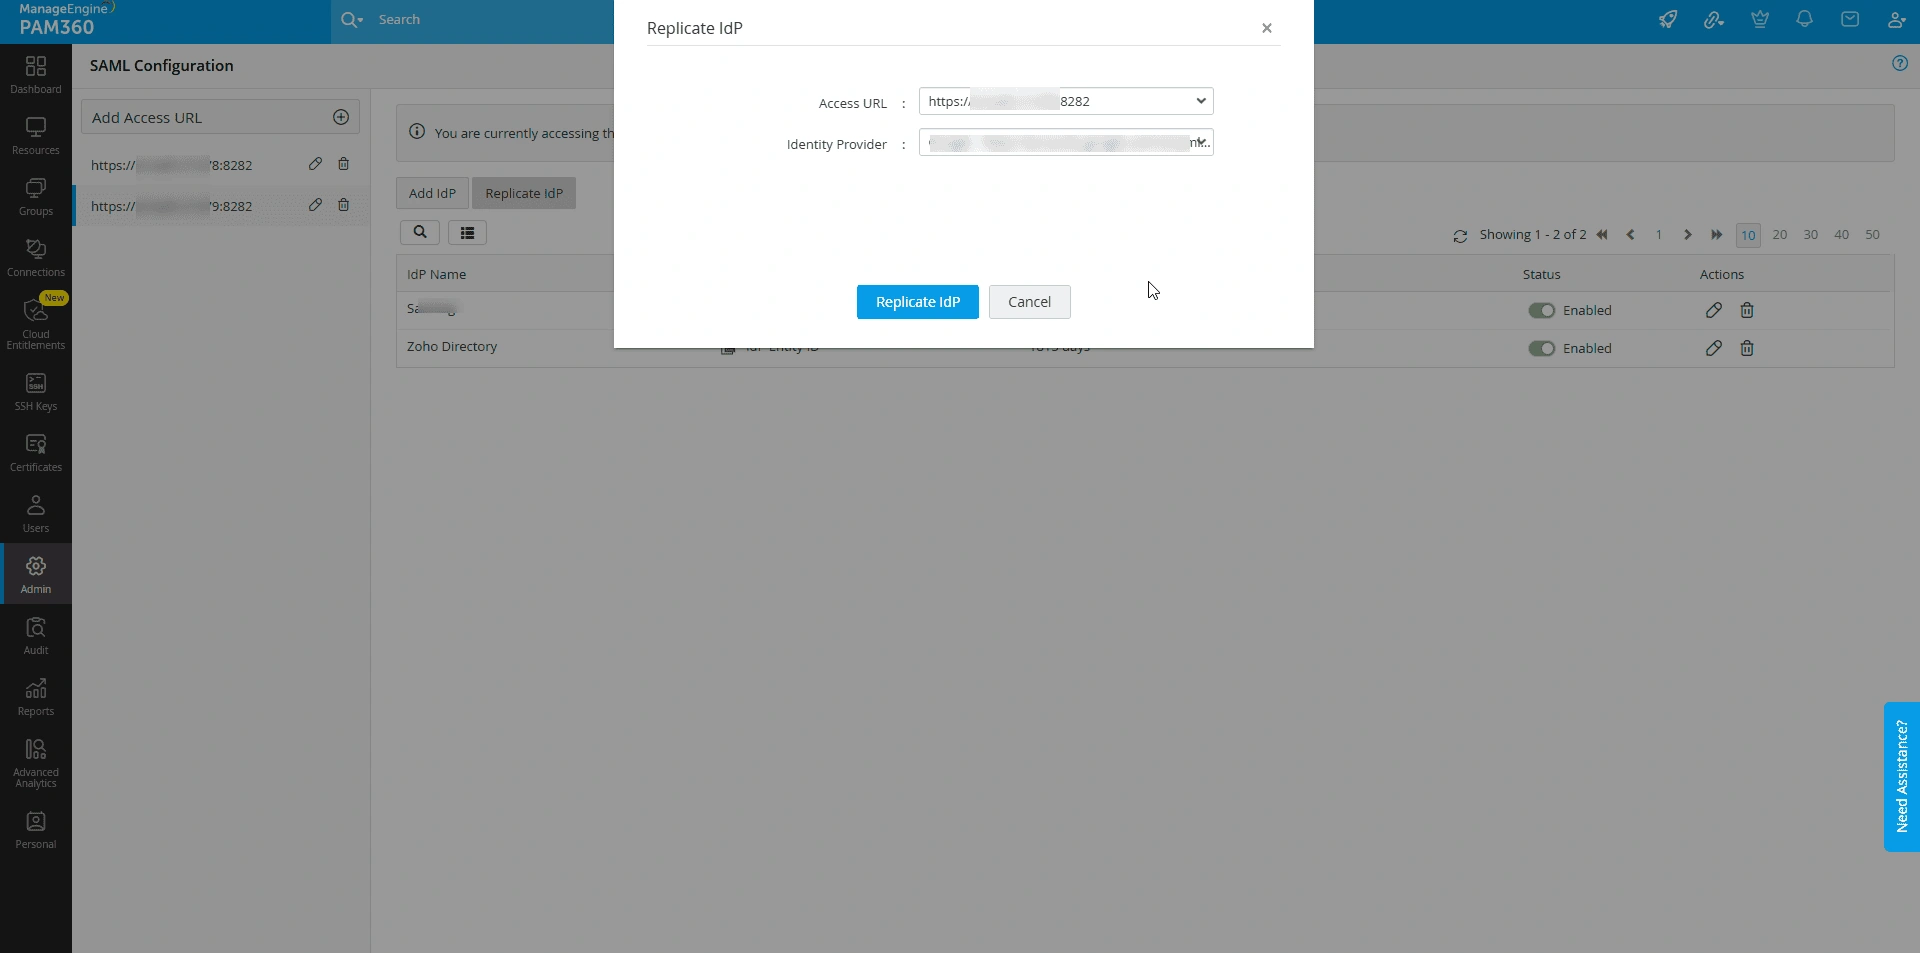
- The selected IdP configuration will be added for the chosen access URL.
From the SAML dashboard, click the desired access URL to view the configured IdPs. You will see a list of all the configured IdPs with details such as display name, IdP issuer, and certificate validity. Use the toggle switch below the Status column beside the desired IdP to enable or disable them. Additionally, you can click the Edit icon beside the desired IdP to edit the SAML properties and the Delete icon to delete the configured IdP.
Caution
Exercise caution while deleting an IdP as this action will prevent users from accessing PAM360 via that specific server access URL using the SAML SSO set up with that IdP. If you have users utilizing this IdP to access your PAM360 server, they can no longer authenticate using SAML SSO. Enable alternate authentication methods such as LDAP, Microsoft Entra ID, or AD authentication before deleting an IdP associated with a server access URL to ensure a seamless login experience.
5. Troubleshooting Tips
Follow these steps if you encounter issues with SAML SSO authentication in your environment:
1. Verify IdP Login URL:
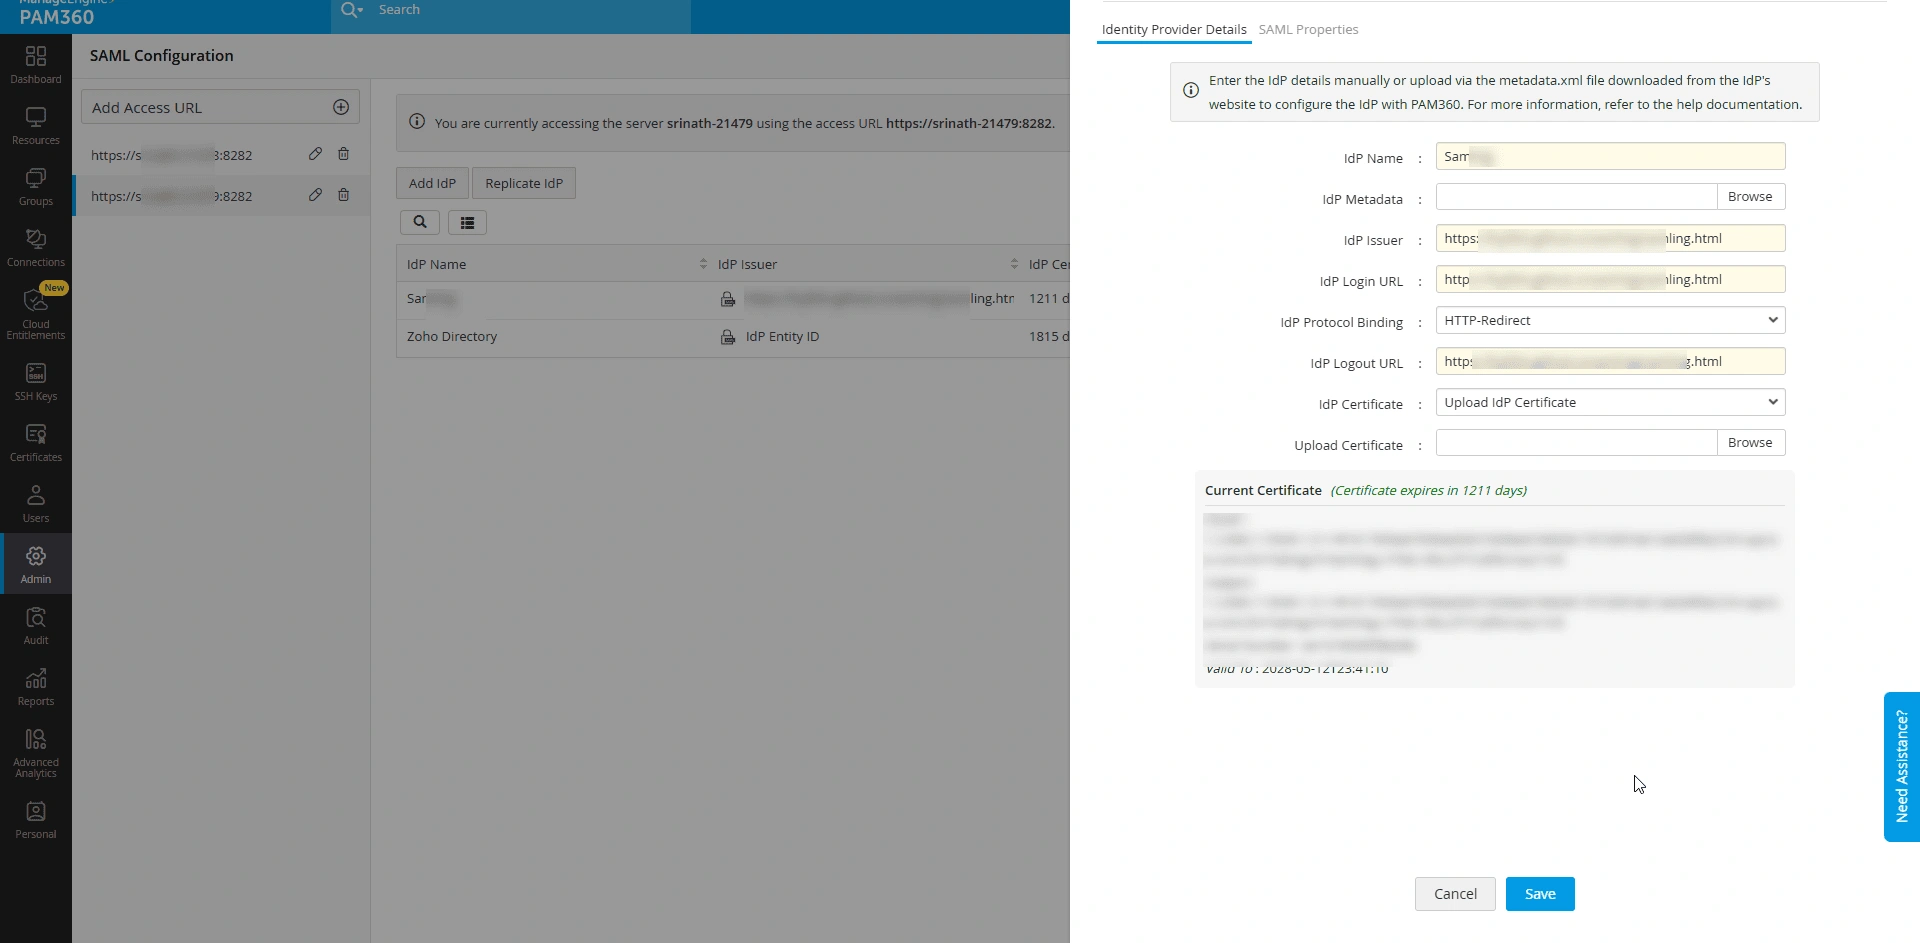
- Navigate to the SAML dashboard and click the Edit option beside the desired IdP to access the Identity Provider Details window, where you can verify or modify the URL.
- Ensure the IdP Login URL provided during the IdP configuration is accurate and matches the URL provided by the IdP. If this URL is incorrect, users cannot authenticate with the IdP, preventing access to PAM360.
2. Verify IdP Certificate:
After configuring an IdP for an access URL, click the Edit option beside the desired IdP to access the Identity Provider Details window, and verify the IdP certificate under the Current Certificate section against the certificate on the IdP's website. This step ensures that the correct certificate is being used for authentication.
3. Reconfigure High-Availability Secondary Server:
- If you are using PostgreSQL as a backend database and have configured a secondary server as the High Availability model, you must reconfigure the secondary server setup after the PPM upgrade.
- Upon reconfiguring the secondary server, reconfigure SAML authentication for the secondary server, as any previously configured SAML SSO settings on the secondary server will be lost.
- Before reconfiguring the secondary server, take a copy of the system properties and reconfigure the SAML properties during IdP Configuration accordingly.
4. Reconfigure SAML Properties for High-Availability Secondary Server:
- If you are using MSSQL as a backend database, configured a secondary server as the High Availability model, and have configured SAML SSO for the secondary server, you must reconfigure Step 3 - SAML Properties for the secondary server URL on the SAML dashboard after the PPM upgrade.
- After applying the PPM upgrade, any previously configured SAML properties for the secondary server will be lost.
- Therefore, before applying the PPM upgrade, take a copy of the system properties configured for the secondary server setup and reconfigure the SAML properties for the secondary server URL on the SAML SSO dashboard.
5. Load Balancer URL Configuration:
- If you are using a load balancer in your environment and the LB URL is not configured in the mail server settings, only the SAML configuration corresponding to the URL set in the mail server settings will be retrieved and displayed on the SAML configuration page after a PPM upgrade.
- To ensure proper functionality, manually add the LB URL on the SAML Dashboard and reconfigure the SAML Single Sign-On (SSO) settings.
By following these troubleshooting tips, you can resolve common issues with SAML SSO authentication and ensure seamless access to PAM360 for your users. If the issues persist, contact PAM360 Support for further assistance.
6. Frequently Asked Questions
1. Can I configure SAML SSO for multiple server access URLs in PAM360?
Yes, from build 7400 onwards, PAM360 allows you to configure SAML SSO for multiple server access URLs directly from the SAML SSO dashboard.
2. What happens to the existing SAML SSO configuration upon PPM upgrade?
Consider, you have a multi-server environment with a load balancer and configured SAML SSO for the load balancer URL. Upon applying the PPM upgrade, only the SAML SSO configuration for the load balancer URL will be imported and displayed in the SAML SSO Dashboard. After that, you can manually configure SAML SSO for all other servers in your environment to ensure seamless SAML SSO authentication.
3. Do I need to create a new SAML application for each PAM360 access URL?
Yes, new SAML applications must be created in the IdP platform for each PAM360 access URL. Each PAM360 access URL acts as a distinct SP and requires its own application configuration in the IdP platform.
4. Are the Assertion Consumer Service URL and Single Logout Service URL the same for all the PAM360 access URLs?
The Assertion Consumer Service URL and Single Logout Service URL differ for each PAM360 access URL. During the IdP configuration for an access URL, PAM360 will auto-generate both Assertion Consumer Service and Single Logout Service URLs during the Configure Service Provider Details step based on the PAM360 access URL.
5. What happens to the Metadata XML file for the High-Availability Servers?
Each PAM360 access URL will act as a distinct SP while configuring SAML SSO. Therefore, the SP details, which include Entity ID, ACS URL, and SLO URL, are unique for each PAM360 access URL. While configuring SP details on the IdP's website, you must use the respective metadata.xml file generated for each access URL (SP) in the Configure Service Provider Details step during the IdP configuration.
6. Are the Attributes and Claims the same for both servers?
Yes, the Attributes and Claims for the High-Availability servers are the same as those configured for the Primary server. Ensure that the same attribute mapping (e.g., email, user ID) is used in the new SAML application for the High-Availability servers.
7. What steps are required if a load balancer was previously configured?
If your environment previously used a load balancer for SAML Single Sign-On (SSO) and you want to transition to separate Primary and Secondary URLs, you must reconfigure SAML SSO for each server access URL individually. To do this, follow the steps outlined in section 2 to set up SAML SSO for both the primary and secondary URLs. Ensure you remove the existing SAML configuration for the load balancer URL.
8. How are existing SAML properties handled when upgrading to Build 7400?
Previously, until build 7301, SAML properties had to be configured manually in the system_properties.conf file within the PAM360 installation directory. Starting from build 7400, the SAML properties configured in the system_properties.conf file will be automatically fetched and displayed in the SAML SSO dashboard for the configured access URL. You can view or modify these properties directly through the Edit IdP Details window in the SAML SSO dashboard.