Configuring Single Sign-On for Microsoft Entra ID Users
ManageEngine PAM360 integrates seamlessly with Microsoft Entra ID (formerly Azure Active Directory), enabling organizations to leverage Entra ID's robust identity and access management capabilities for secure Single Sign-On (SSO). By configuring PAM360 as a Service Provider (SP) and Microsoft Entra ID as an Identity Provider (IdP), users can centralize authentication processes, streamline access management, and enhance security through Entra IDs advanced authentication mechanisms. This integration ensures that users can log in once via Entra ID and gain access to PAM360 without re-authentication, providing a simplified and secure user experience. Additionally, the integration supports Single Logout (SLO), ensuring that when users log out from one application, they are automatically logged out from all connected applications, thereby maintaining secure and efficient user session management. This document covers the following topics:
- Prerequisites
- Steps to Configure SAML SSO for Microsoft Entra ID Users
- Steps to Enable MFA and Set up First Login for Microsoft Entra ID Users
- Troubleshooting Tips
1. Prerequisites
- Explore this link for the detailed instructions to import users from Microsoft Entra ID to PAM360. After successful user import, you can configure SAML SSO, enabling seamless authentication through Microsoft Entra ID.
- To configure PAM360 as an SP on the Microsoft Entra ID portal, you need the SP details displayed in step 1 during theIdP configuration in PAM360. These details are necessary for setting up PAM360 as an SP on the Entra ID portal, ensuring a seamless integration between PAM360 and Entra ID.
2. Steps to Configure SAML SSO for Microsoft Entra ID Users
Before configuring SAML SSO for the users imported from Microsoft Entra ID, you must add PAM360 as an enterprise application in the Entra ID portal and assign Entra ID users to PAM360. In this section, you will learn how to add PAM360 as an enterprise application in the Entra ID portal, assign users to the enterprise applications, and configure SAML SSO. Follow the detailed instructions given below to complete the configuration process.
2.1 Adding PAM360 as an Enterprise Application in Entra ID Portal
Follow these steps to add PAM360 as an enterprise application in the Azure Portal.
- Log in to the Azure portal.
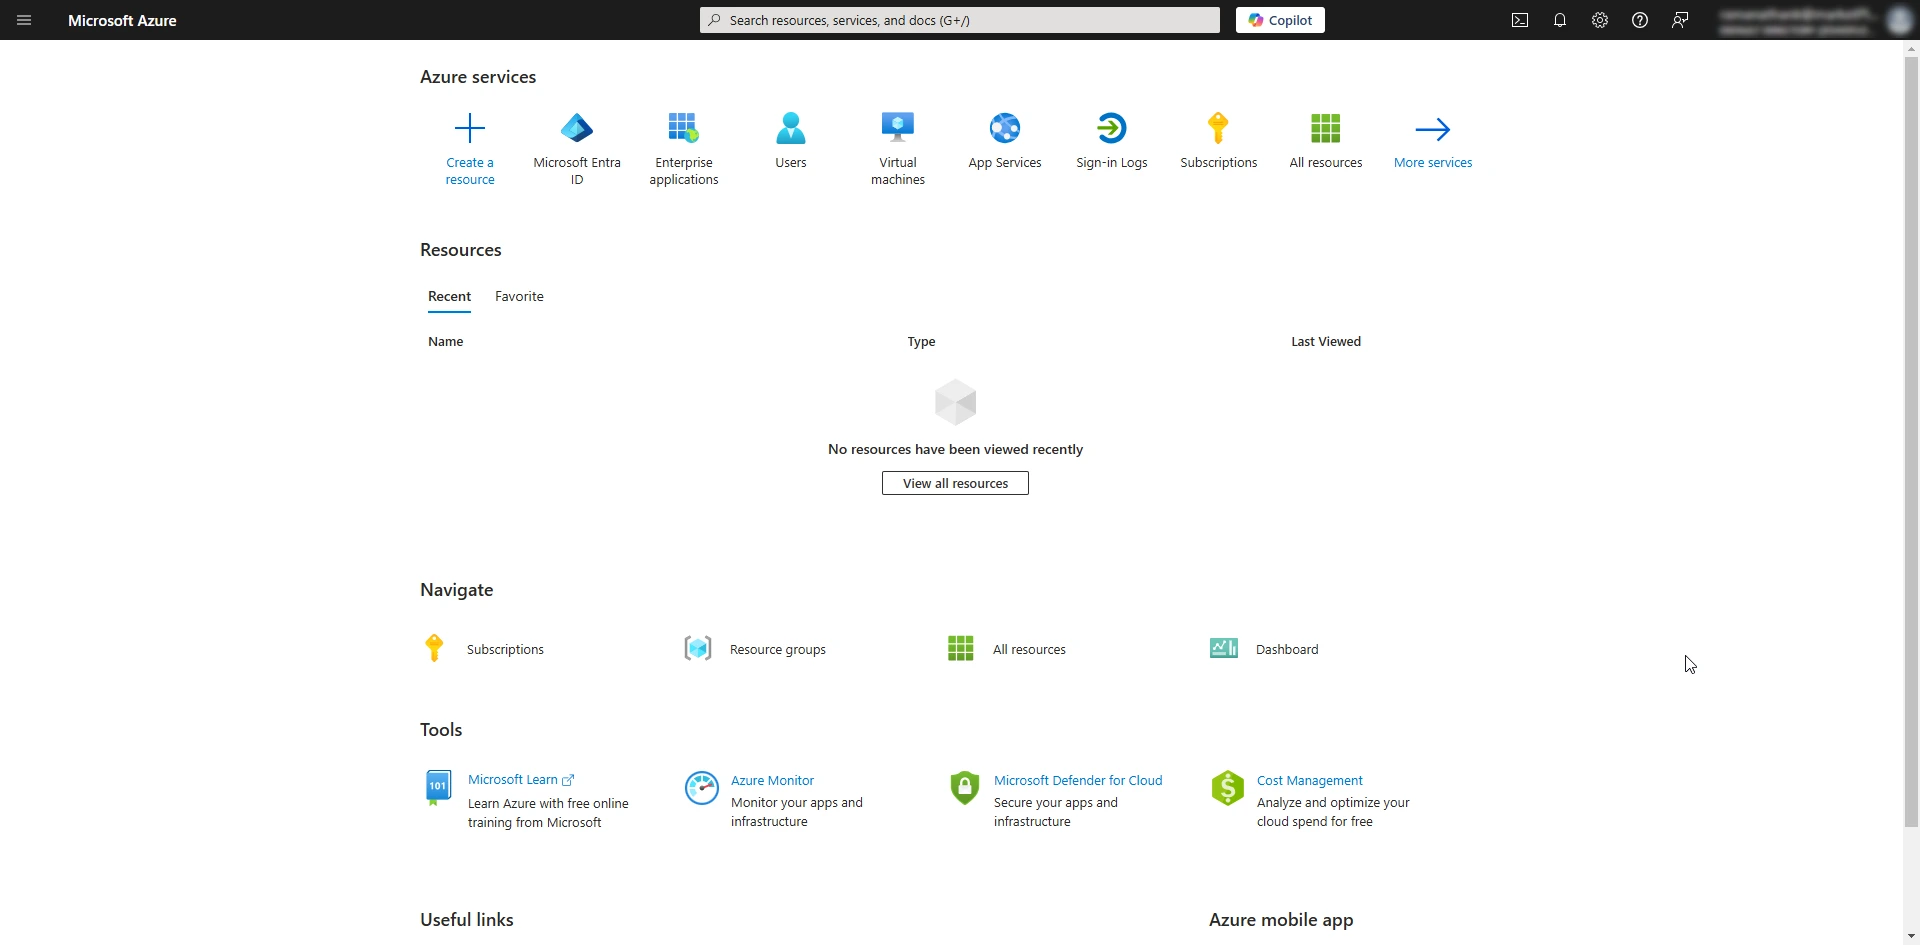
- Select Microsoft Entra ID under the Azure services section on the Microsoft Azure home page.
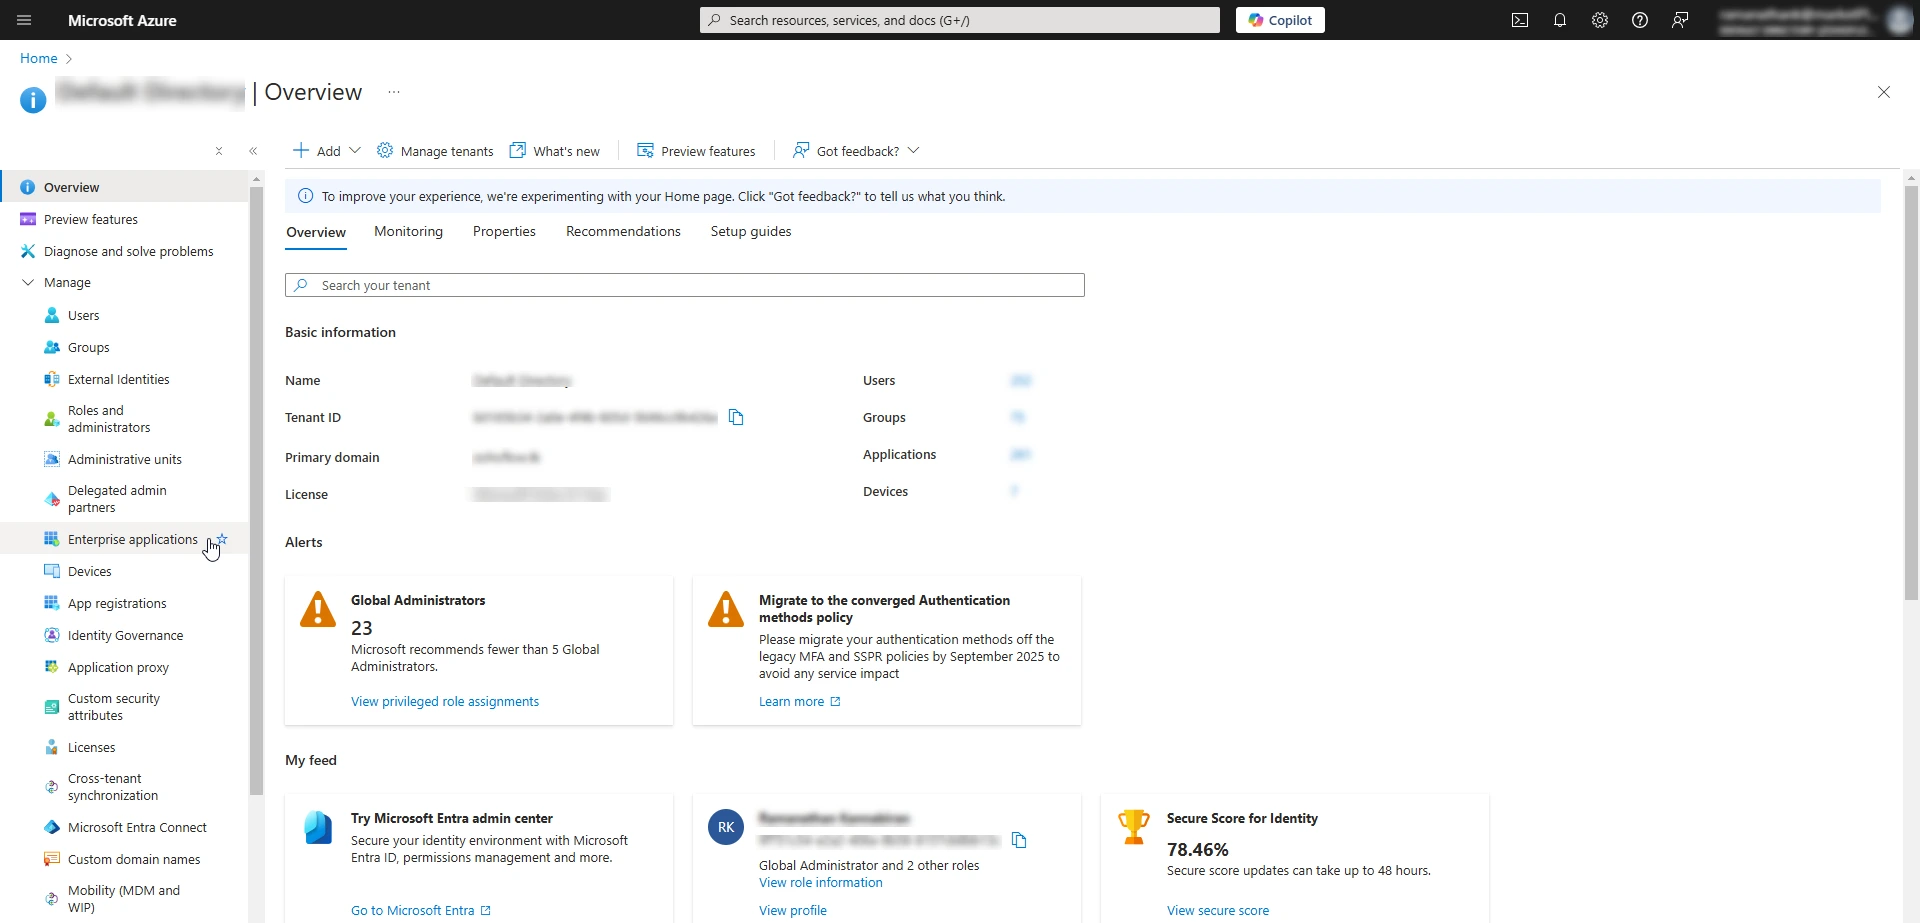
- On the Directory page, Select Manage >> Enterprise Applications from the left pane.
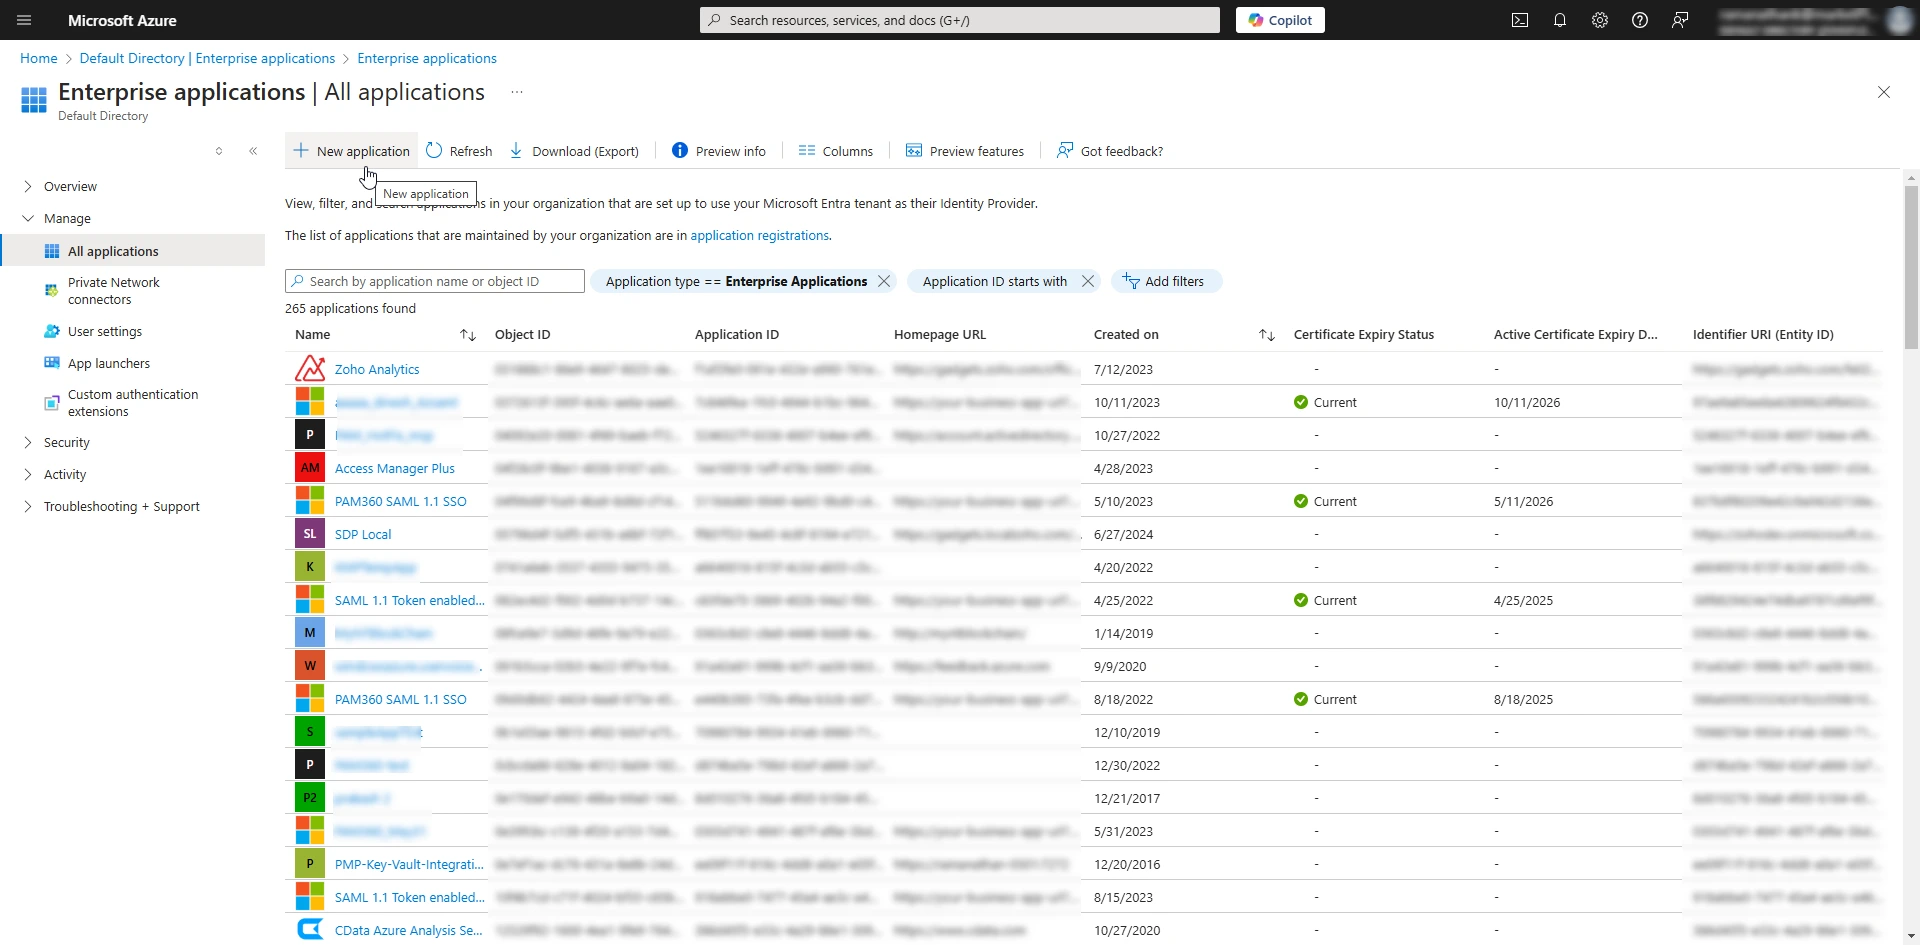
- On the All Applications page, click the + New application button.
- On the Browse Microsoft Entra Gallery page, find the SAML 1.1 Token enabled LOB App application using the search function and click on it.
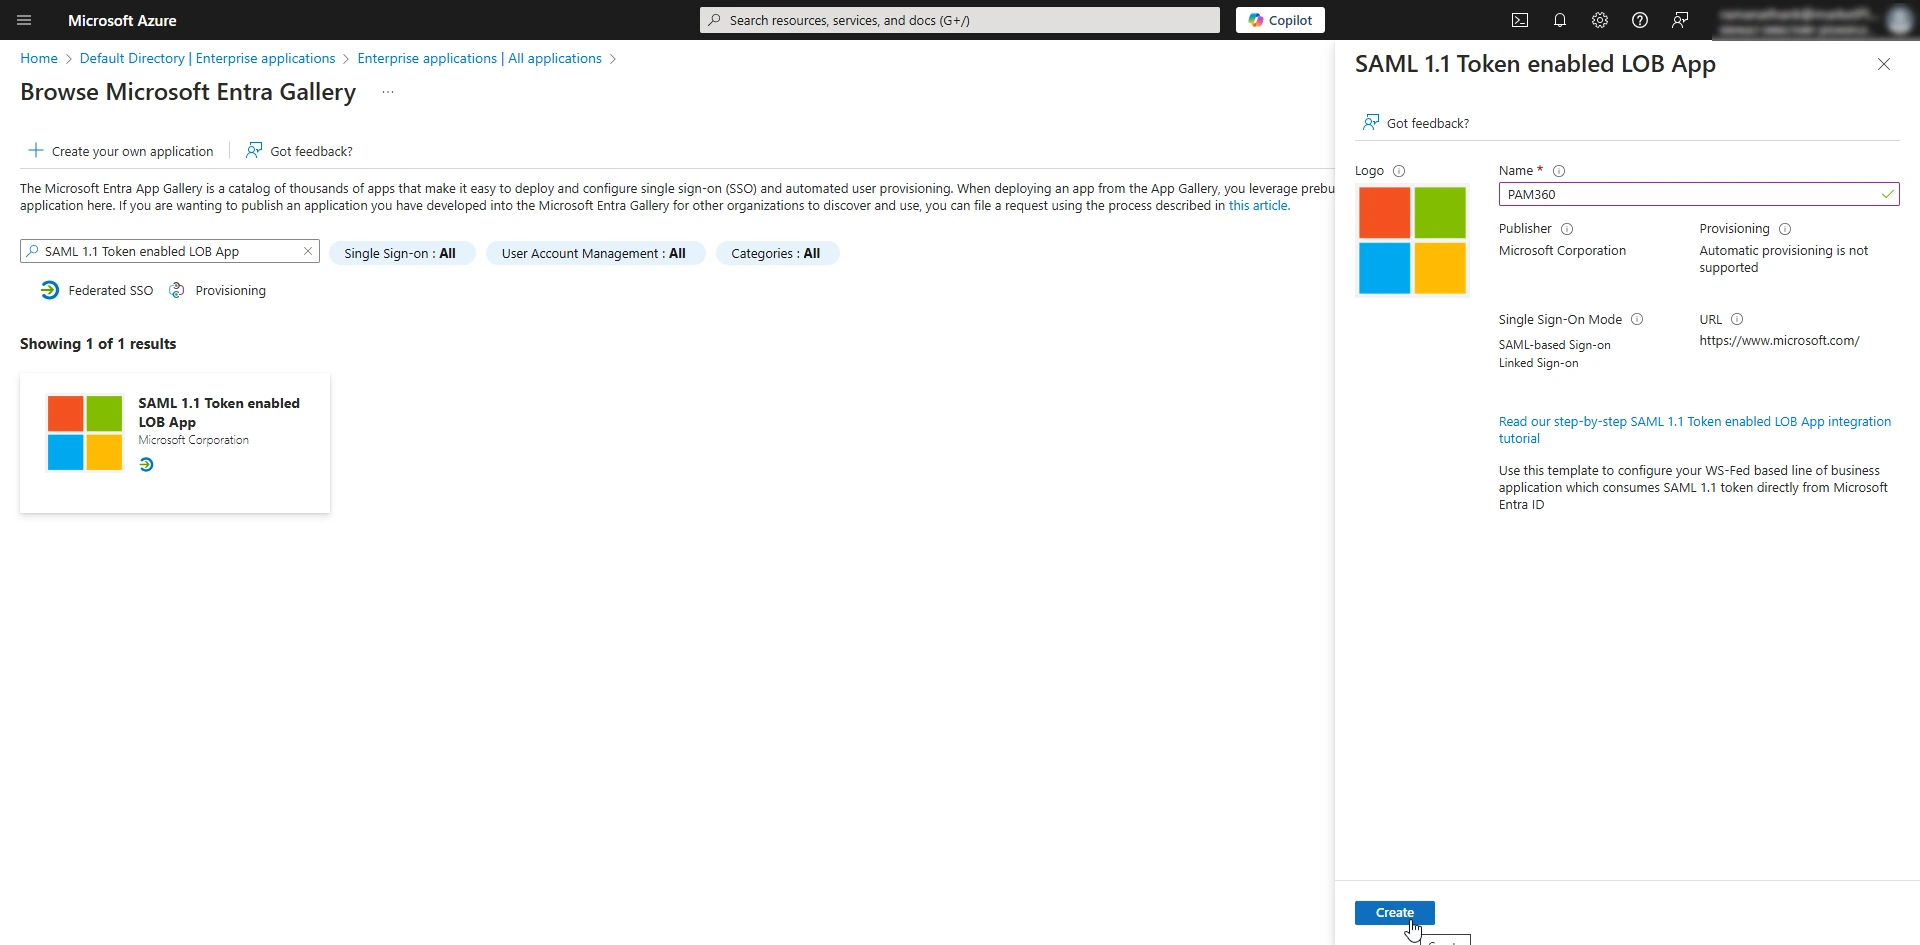
- On the page that appears, enter a desired name for the application, e.g., PAM360, and click Create. Users will see this application name under the My Apps section.
- Now, PAM360 will be added as an enterprise application on the Microsoft Entra ID Portal. You will be redirected to the newly added Enterprise Application page.
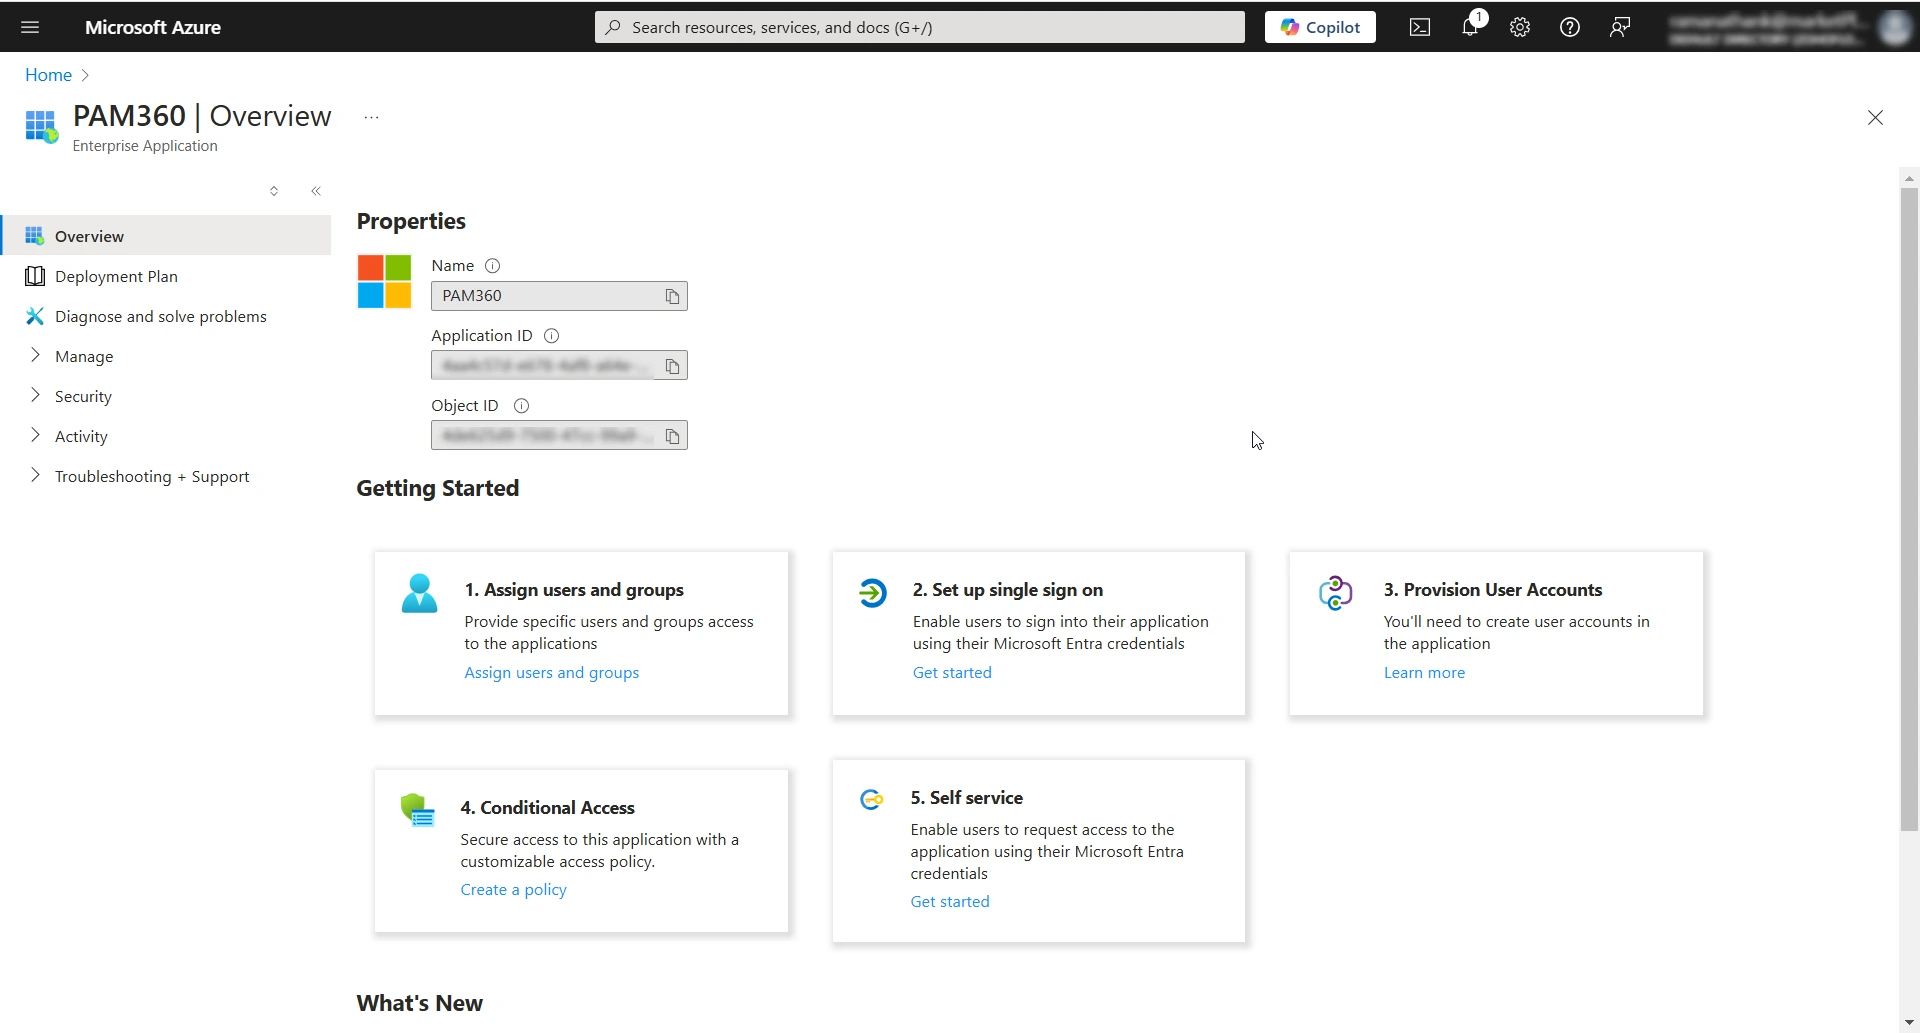
2.2 Assigning Entra ID Users to PAM360 Enterprise Application
Follow these steps to assign Entra ID users to the PAM360 enterprise application:
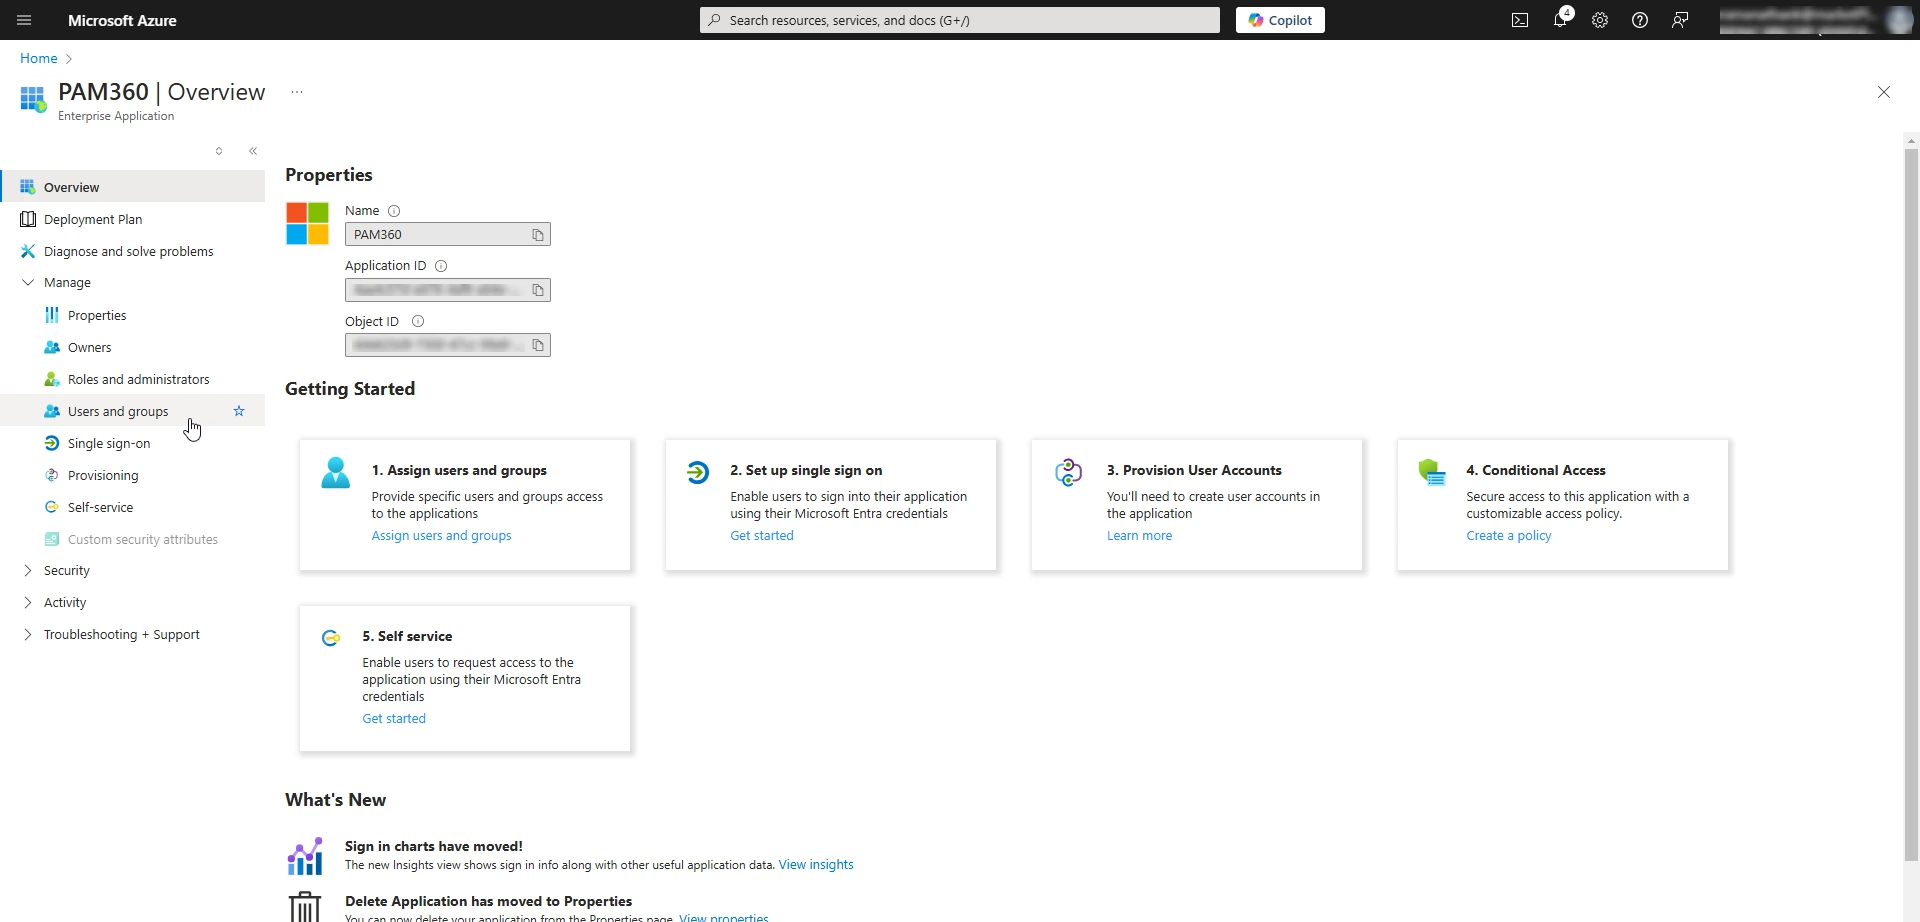
- On the PAM360's Enterprise Application page, Select Manage >> Users and groups.
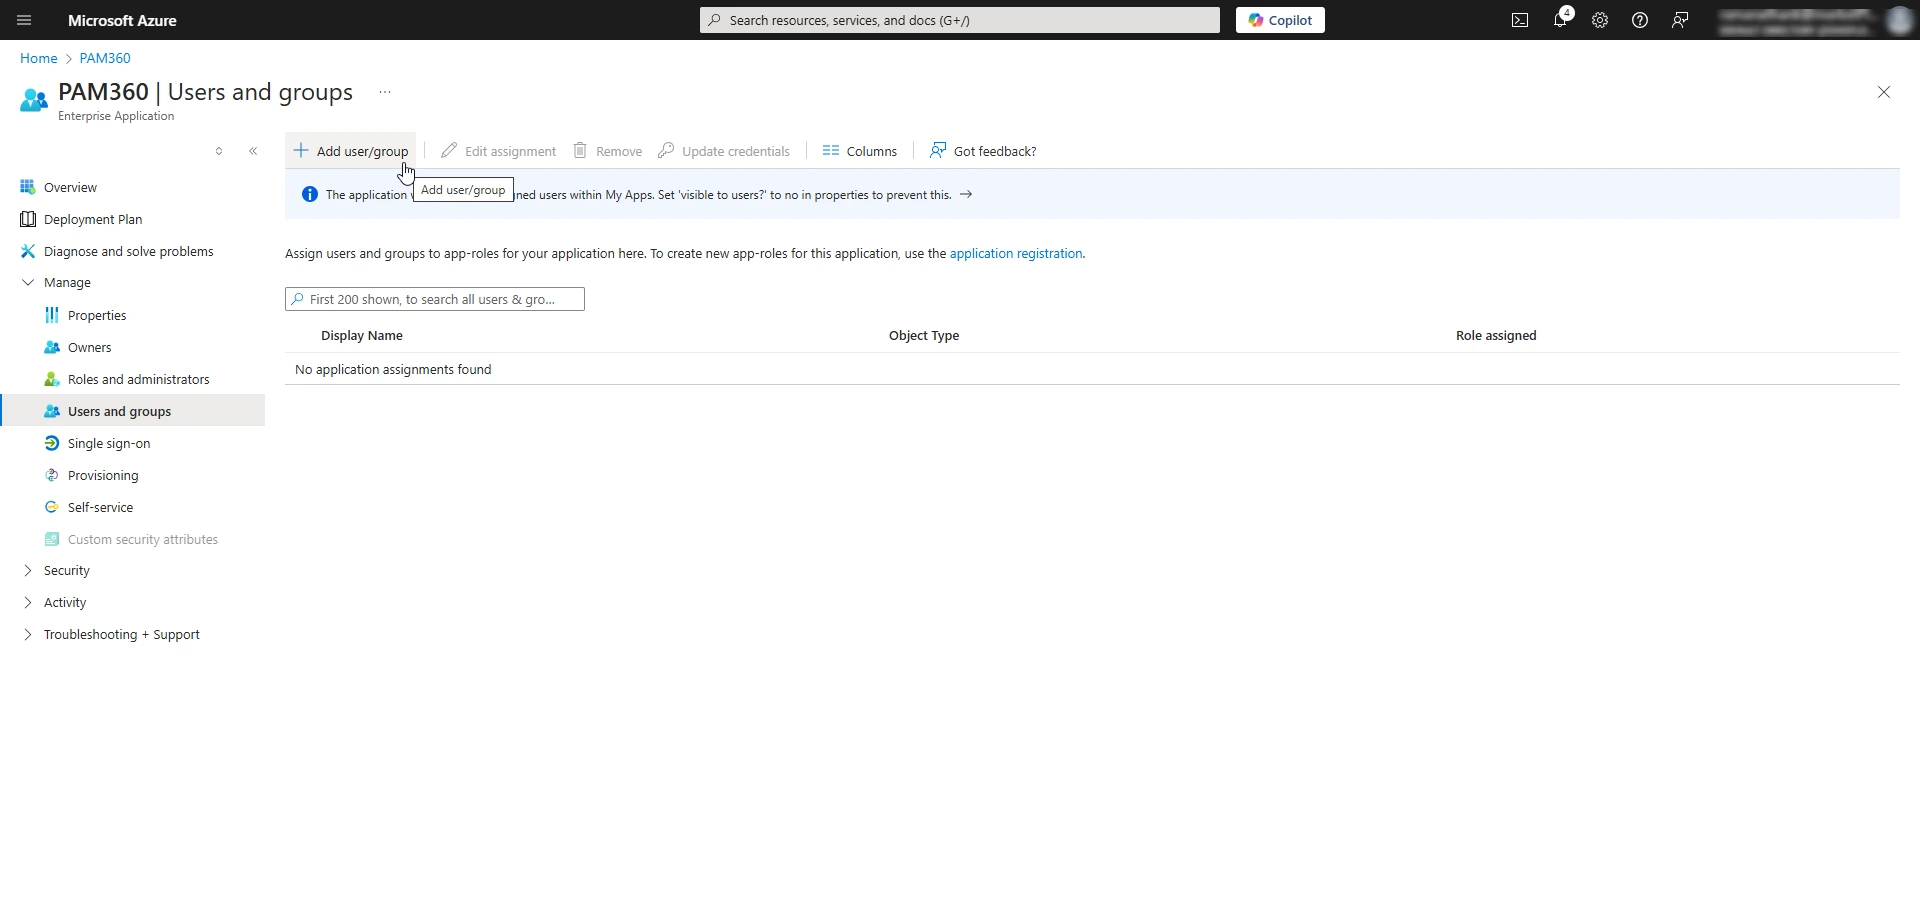
- On the Users and groups page, Click the + Add user/group button from the top pane.
- In the Add Assignment window, click the None Selected button under Users to access the Users window.

- In the Users window, you will see a list of all the Entra ID users in your directory. Tick the checkbox beside the desired users from the available list and click Select.
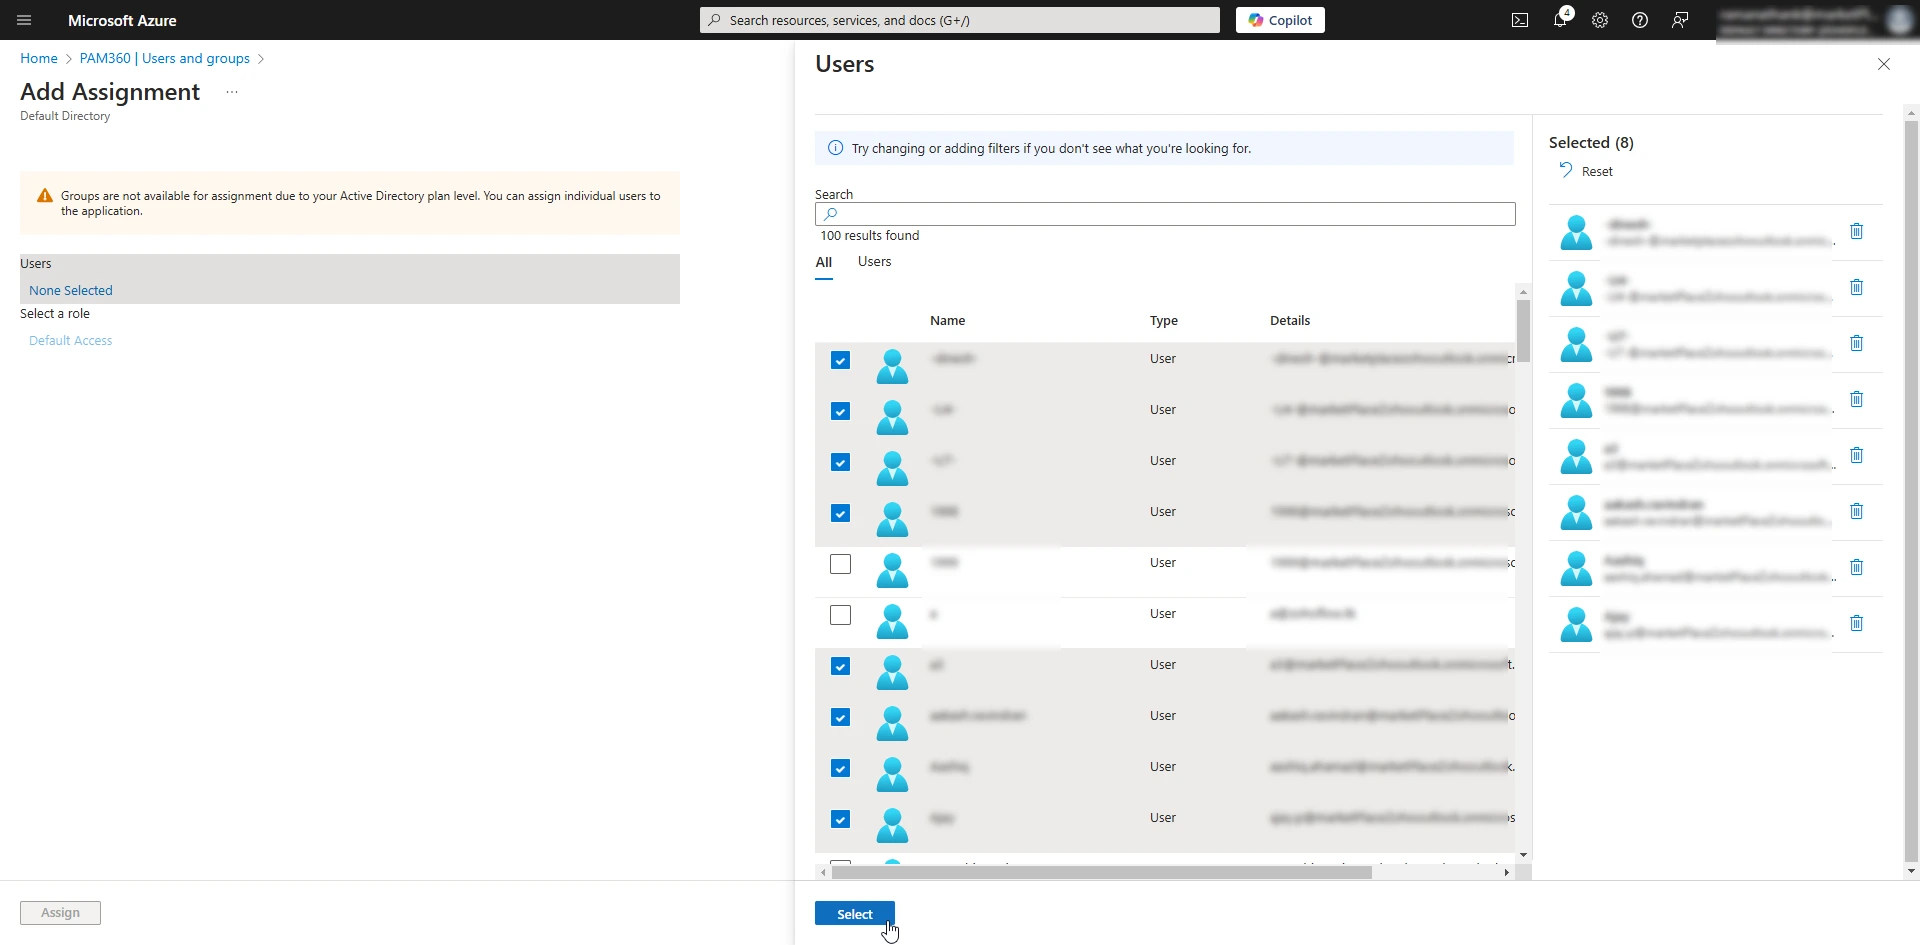
- Click Assign to assign the selected Entra ID users to the PAM360 enterprise application.

- You will see the list of assigned users on the PAM360's Users and groups page.
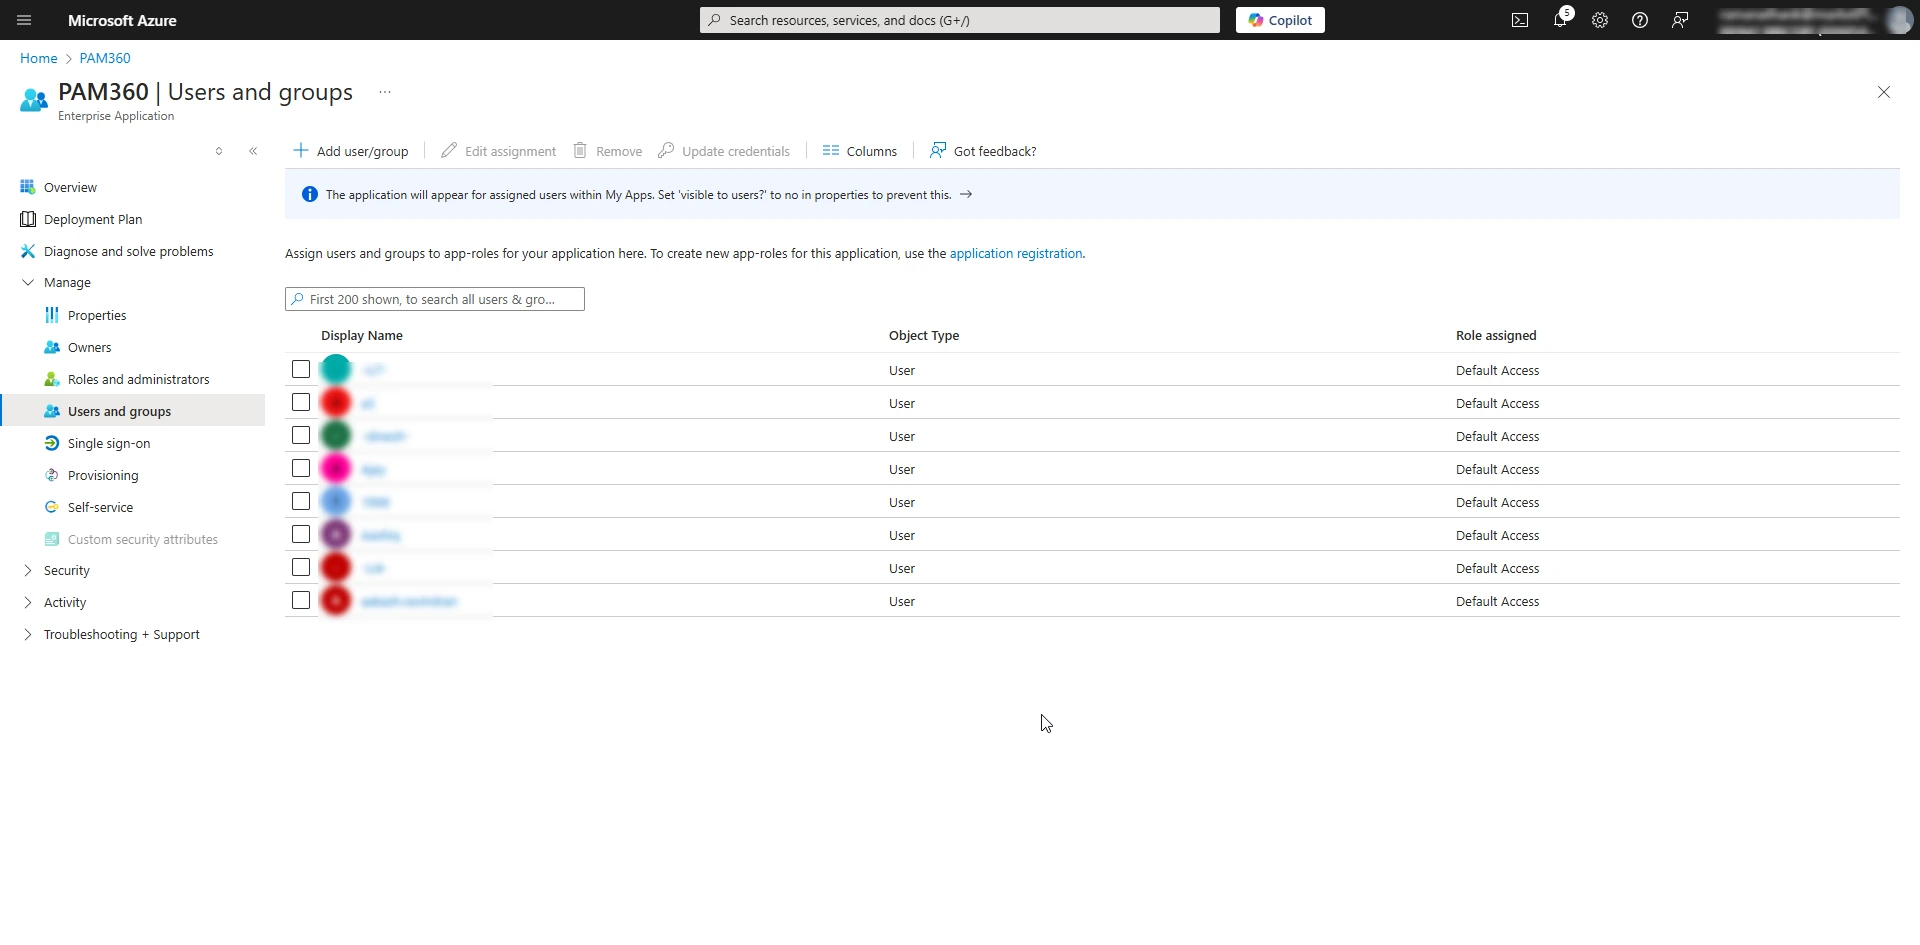
You have successfully assigned the Microsoft Entra ID users to the PAM360 enterprise application.
2.3 Configuring SAML SSO for Entra ID Users in PAM360
Configuring SAML Single Sign-On (SSO) in the Entra ID portal involves setting up key components to enable seamless authentication with PAM360. The process includes Basic SAML Configuration, where you define the SP details, and Attributes & Claims, where you specify the attributes or claims that Entra ID must include in the SAML assertions sent to PAM360. Additionally, under SAML Certificates, you should upload the PAM360 server certificate to allow Entra ID to verify the SAML requests it receives from PAM360.
2.3.1 Basic SAML Configuration
- Click the Single sign-on option under the Manage section on the left pane.
- Select SAML on the Single sign-on page. Set up the SAML configuration on the SAML-based Sign-on page.
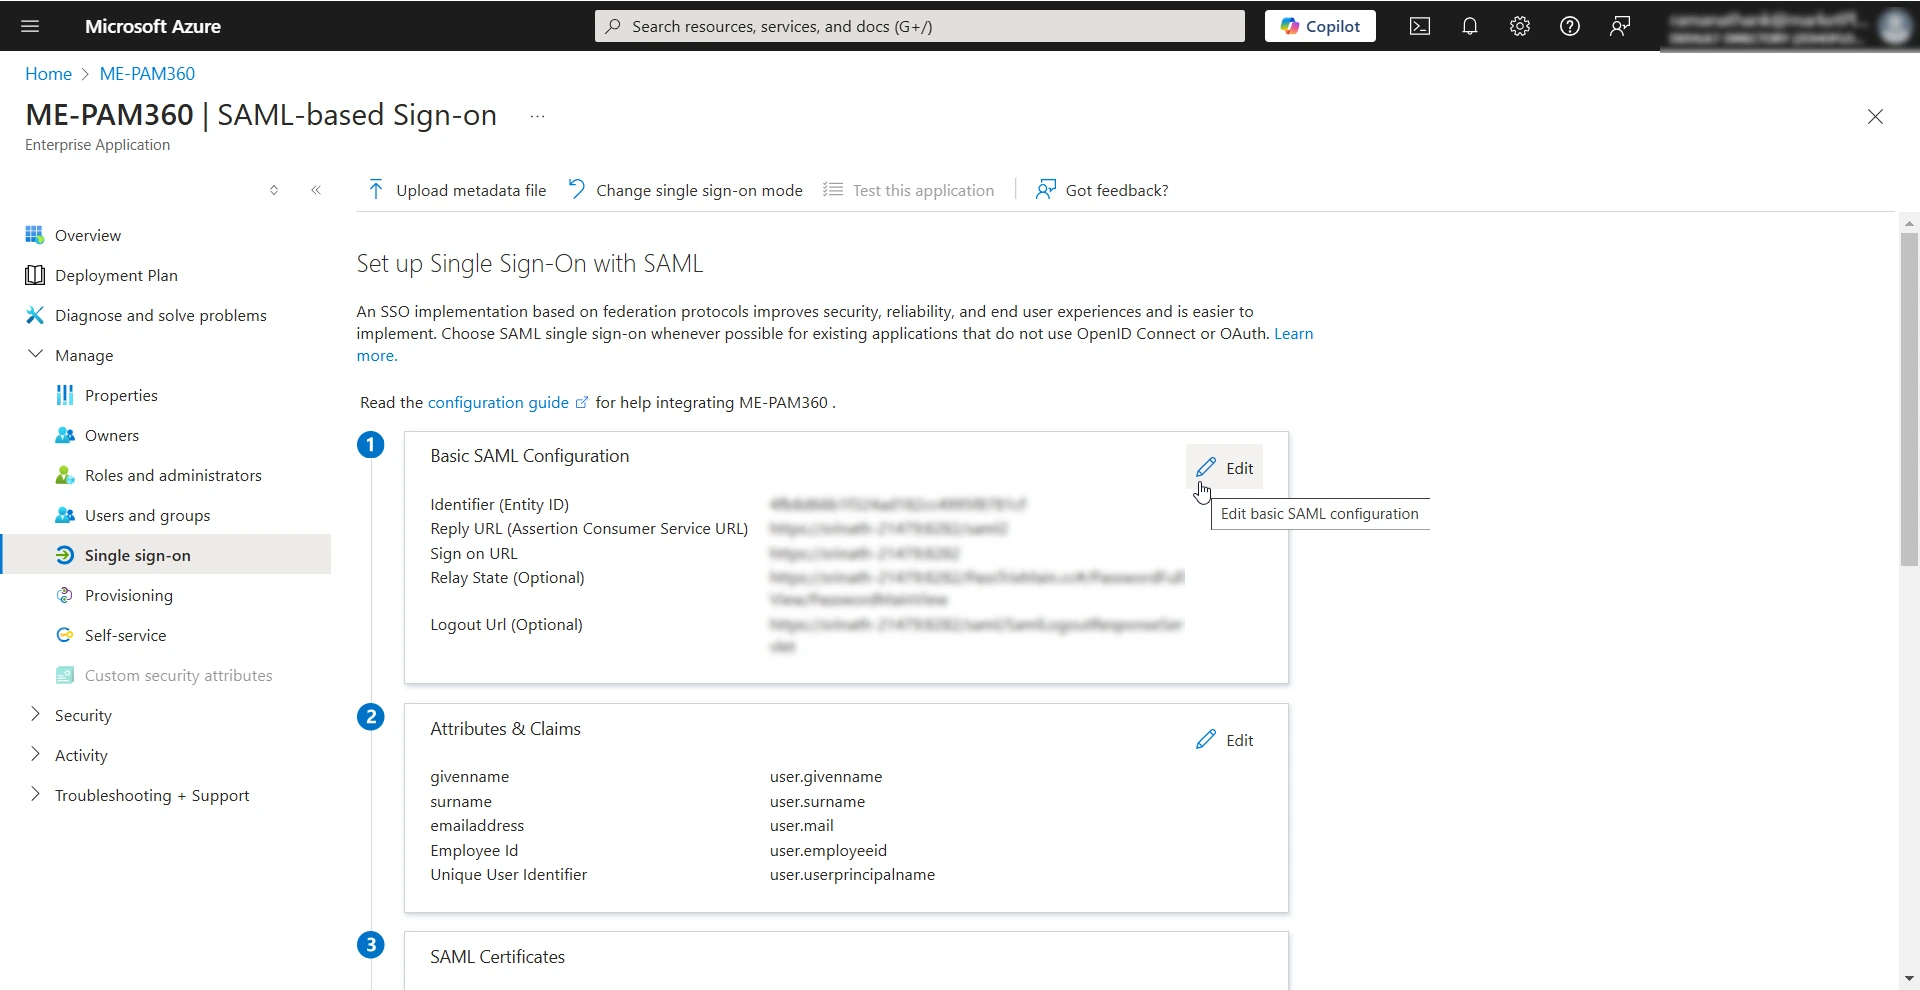
- Click the Edit icon beside the Basic SAML Configuration section and enter the following details in the Basic SAML Configuration window that appears.
- Identifier (Entity ID) - Enter the PAM360's entity ID in this field.
- Reply URL (Assertion Consumer Service URL) - Tap the Add reply URL button and enter PAM360's Assertion Consumer Service (ACS) URL in this field. This is the endpoint URL on PAM360, where Microsoft Entra ID will send the SAML responses.
- Sign on URL - Enter the PAM360's access URL in this field.
- For Non-MSP users, enter the access URL in the https://<Host-Name-of-PAM360-Server OR IP address>:<Port> format.
- For MSP users, enter access URL in the https://<Host-Name-of-PAM360-Server OR IP address>:<Port>/<Org_name> format.
- Relay State (Optional) - Leave this as a blank field.
- Logout Url (Optional) - If you wish to enable Single Logout (SLO) for your users, enter the PAM360's Single Logout Service URL in this field. Leave this field blank if you do not wish to configure SLO.
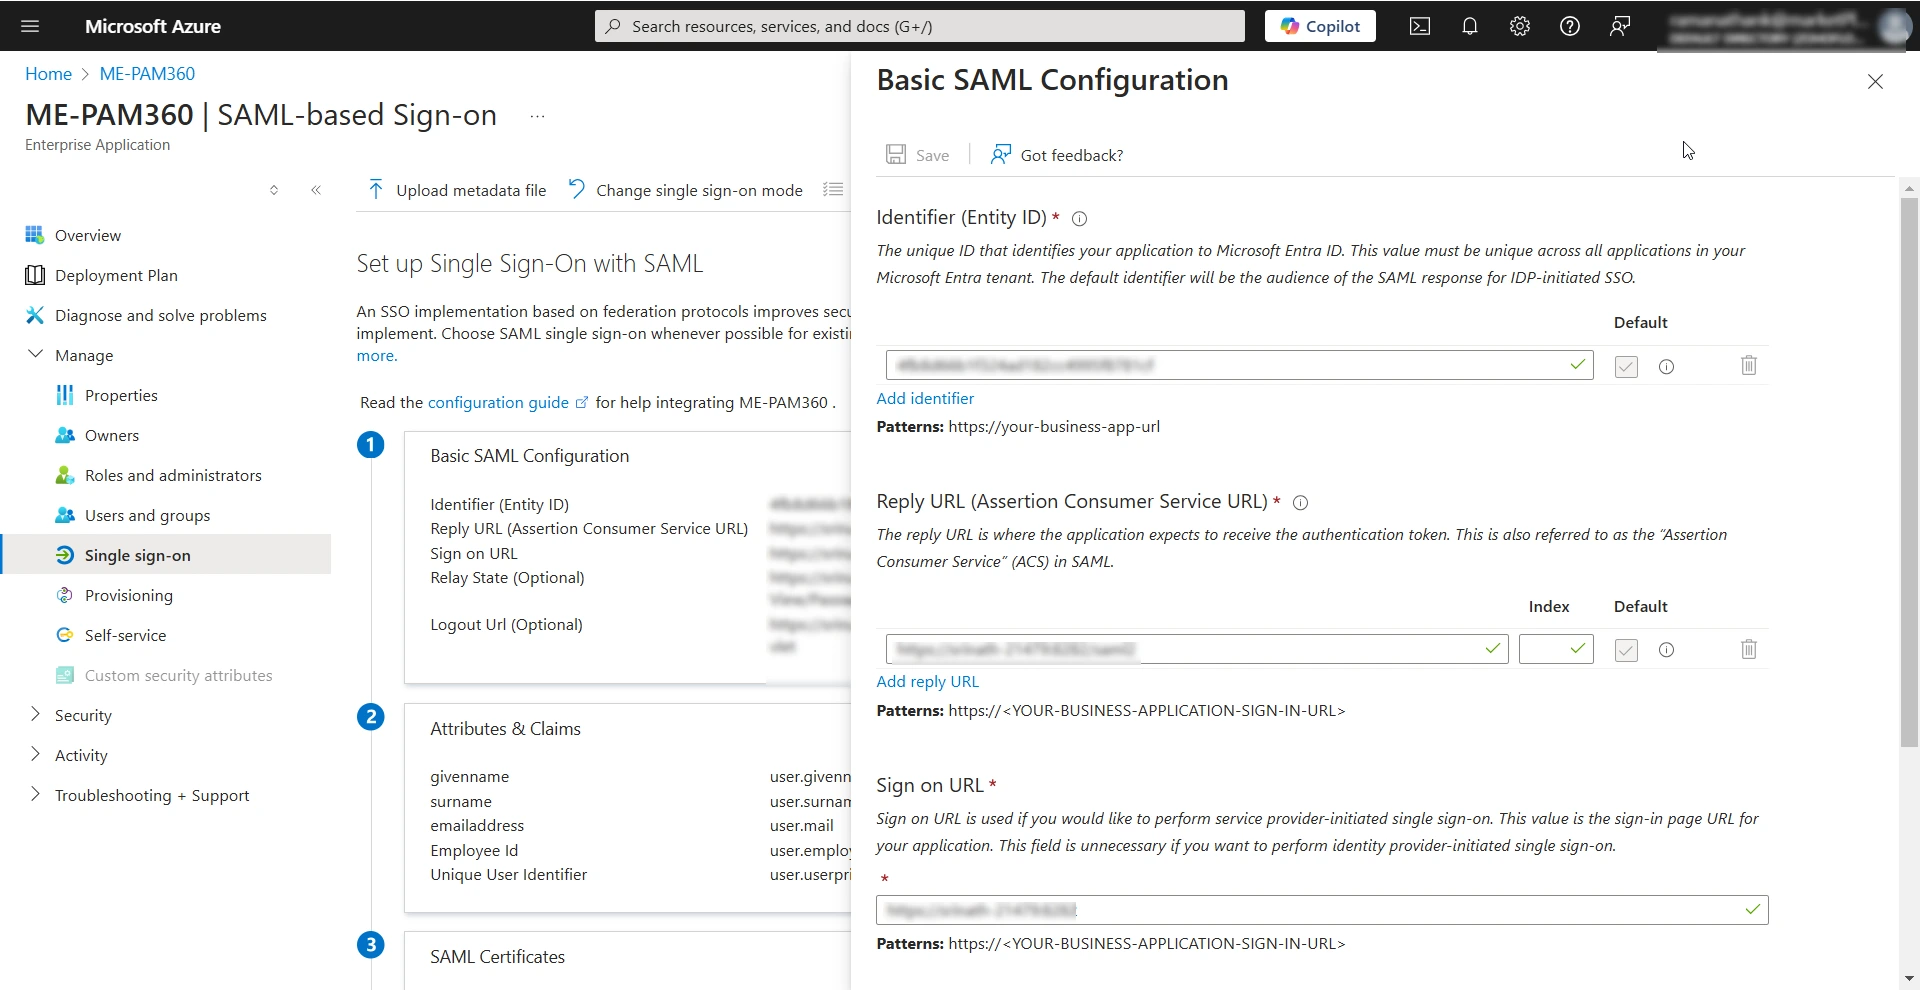
- Click the Save icon on the top pane to save the configured details.
- To download the IdP details as a metadata.xml file, click the Download button beside the Federation Metadata XML field under the SAML Certificates section.
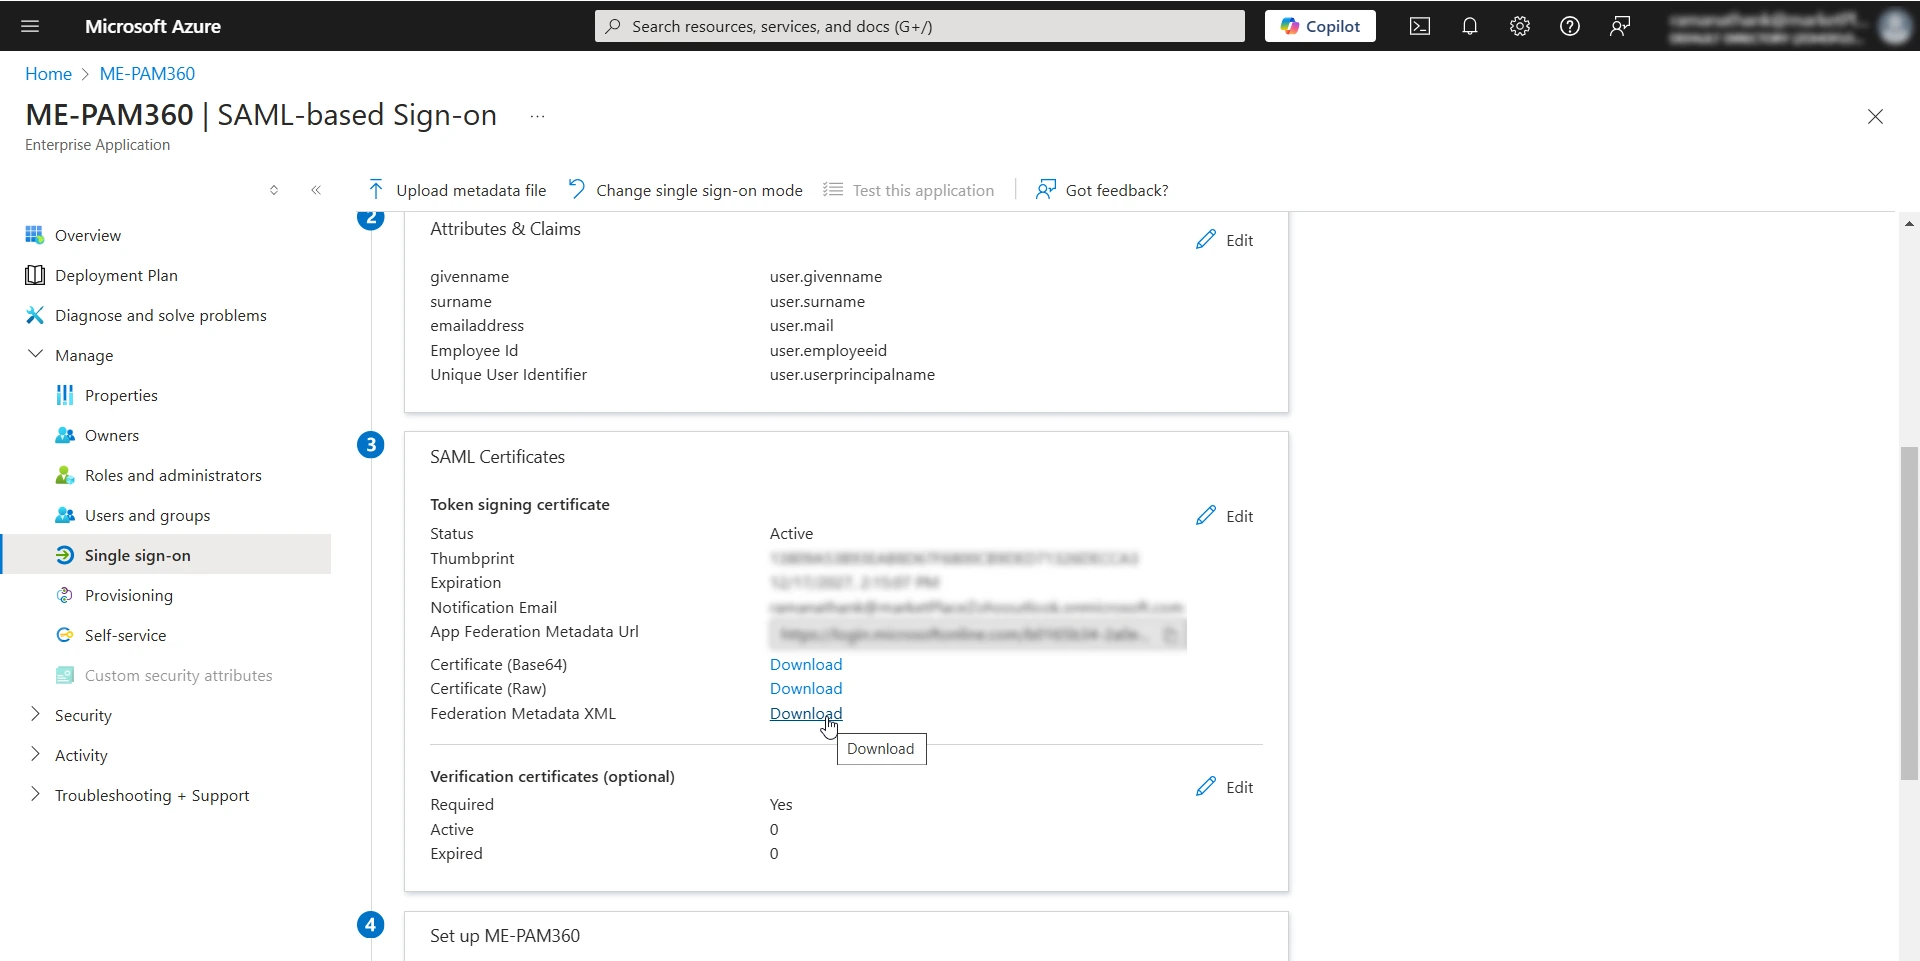
- The IdP details will be downloaded as an XML file to your machine, with the file name applicationname.xml. Now, you can upload this XML file while configuring the IdP details on the PAM360 interface, eliminating the need to enter all the IdP information manually.
2.3.2 Attributes & Claims
After providing the required SP (PAM360) details under the Basic SAML Configuration section, you must configure the NameID Attributes Entra ID must include in the SAML Assertions it sends to PAM360 after user authentication. PAM360 will compare the NameID attributes received in the SAML assertion with the PAM360 username before providing user access. Therefore, the NameID format must match the PAM360 username in your environment. When you create a custom SAML application in the Azure portal, the following claims are available by default under the Attributes and Claims:
- Principal Name - user.userprincipalname
- Email Address - user.mail
- First Name - user.givenname
- Last Name - user.surname
If the PAM360 username for the users in your environment matches any of these claims, SAML Single Sign-On will work as intended. Follow these steps if you wish to include a new claim in the SAML assertion sent by Entra ID to PAM360:
- Click the Edit icon beside the Attributes and Claims section on the PAM360 Enterprise Application page.
- On the Attributes & Claims page, click the Add new claim button. You will see the Manage claim page.
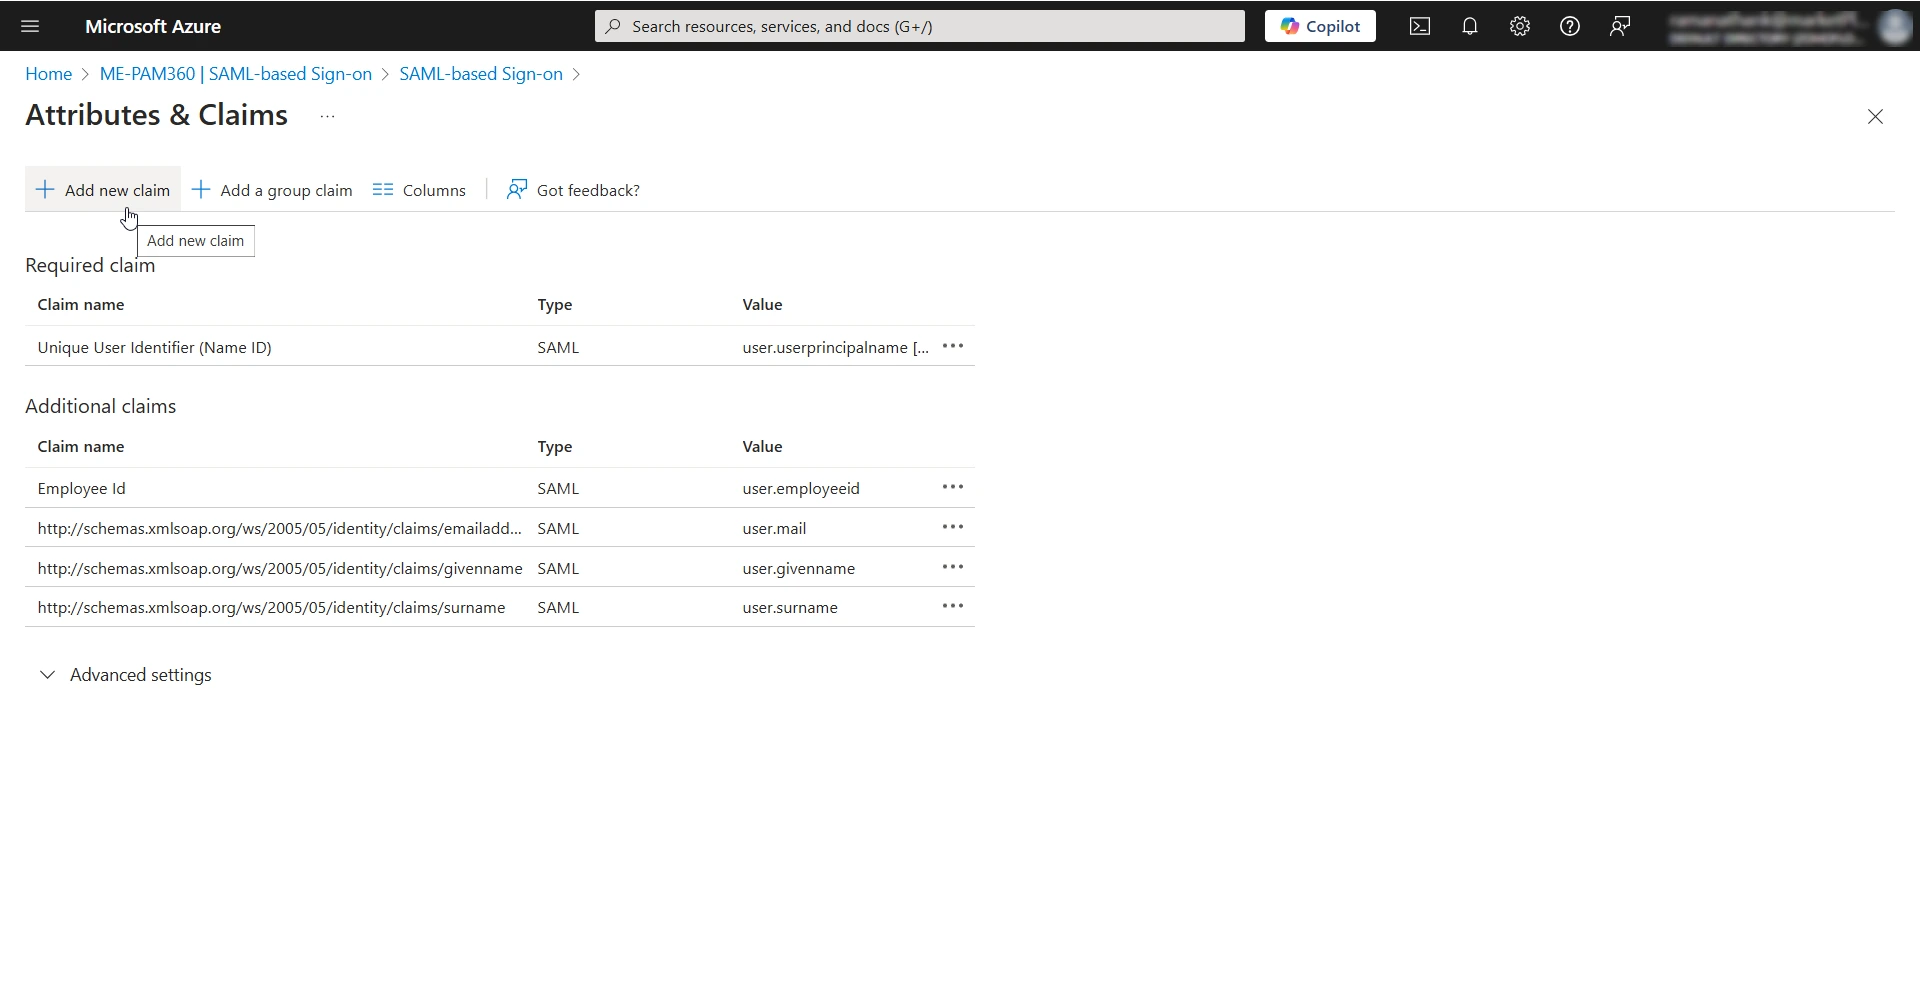
- On the Manage claim page, enter the following information:
- Name - Enter a name for the claim that you are creating. This name will help you uniquely identify this claim on the Attributes & Claims page.
- Source - Select the Attribute radio button.
- Source Attribute - Select the source attribute you wish to add as a claim. e.g., user.employeeid. This claim must match the PAM360 username for a seamless SAML Single Sign-On experience.
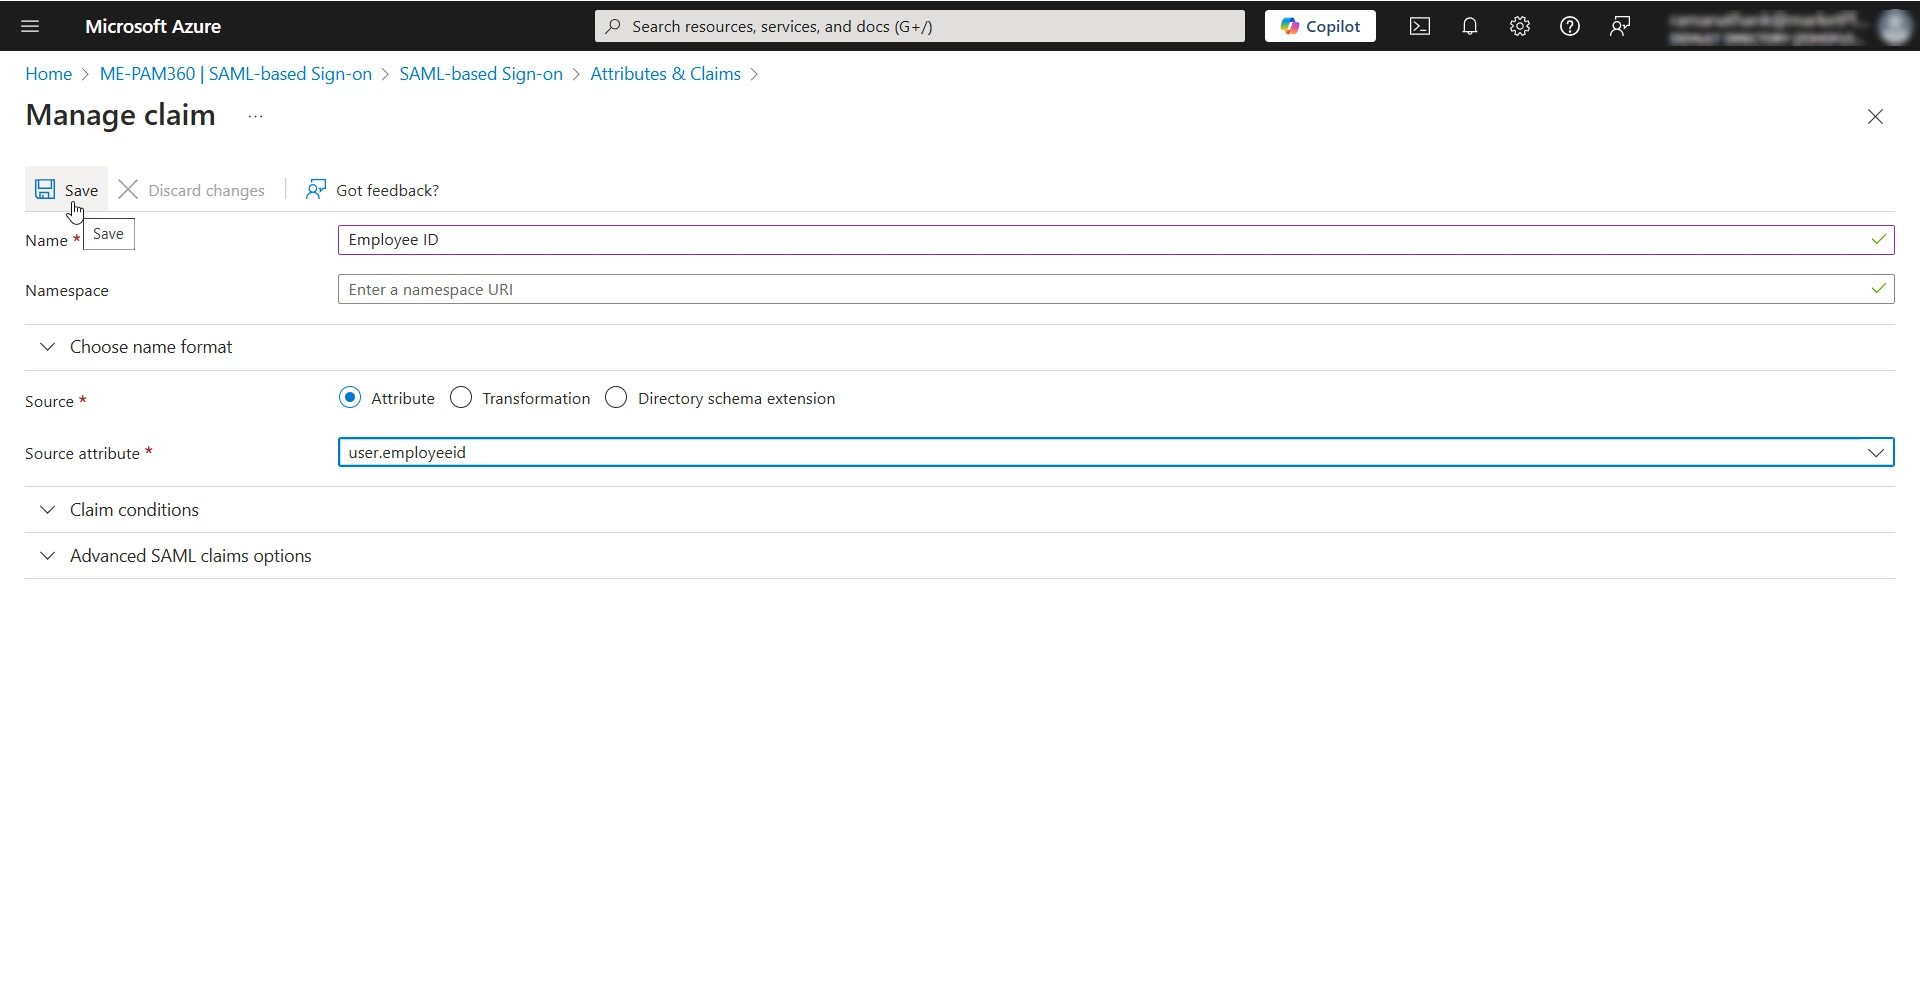
- Click the Save button on the top pane to save the configured claim successfully.
You can find the new claim under the Additional Claims section on the Attributes & Claims page.
Caution
- For users imported to PAM360 from the Microsoft Entra ID directory, the PAM360 usernames will be their corresponding principal names in the Azure portal.
- For users imported from Active Directory, you must add a new claim transformation on the Manage Claim page. Explore this link for the detailed steps to add a new claim that matches the PAM360 username for the AD users in your environment.
2.3.3 SAML Certificates
To allow Microsoft Entra ID to verify the Single Sign-On requests sent by PAM360, you must upload the PAM360's SP certificate on the Azure portal. Using the SP certificate, Entra ID can verify that the SAML requests are sent from a trusted SP. Follow these steps to enable verification:
- Click the Edit icon beside the Verification certificates section on the PAM360 Enterprise Application page.
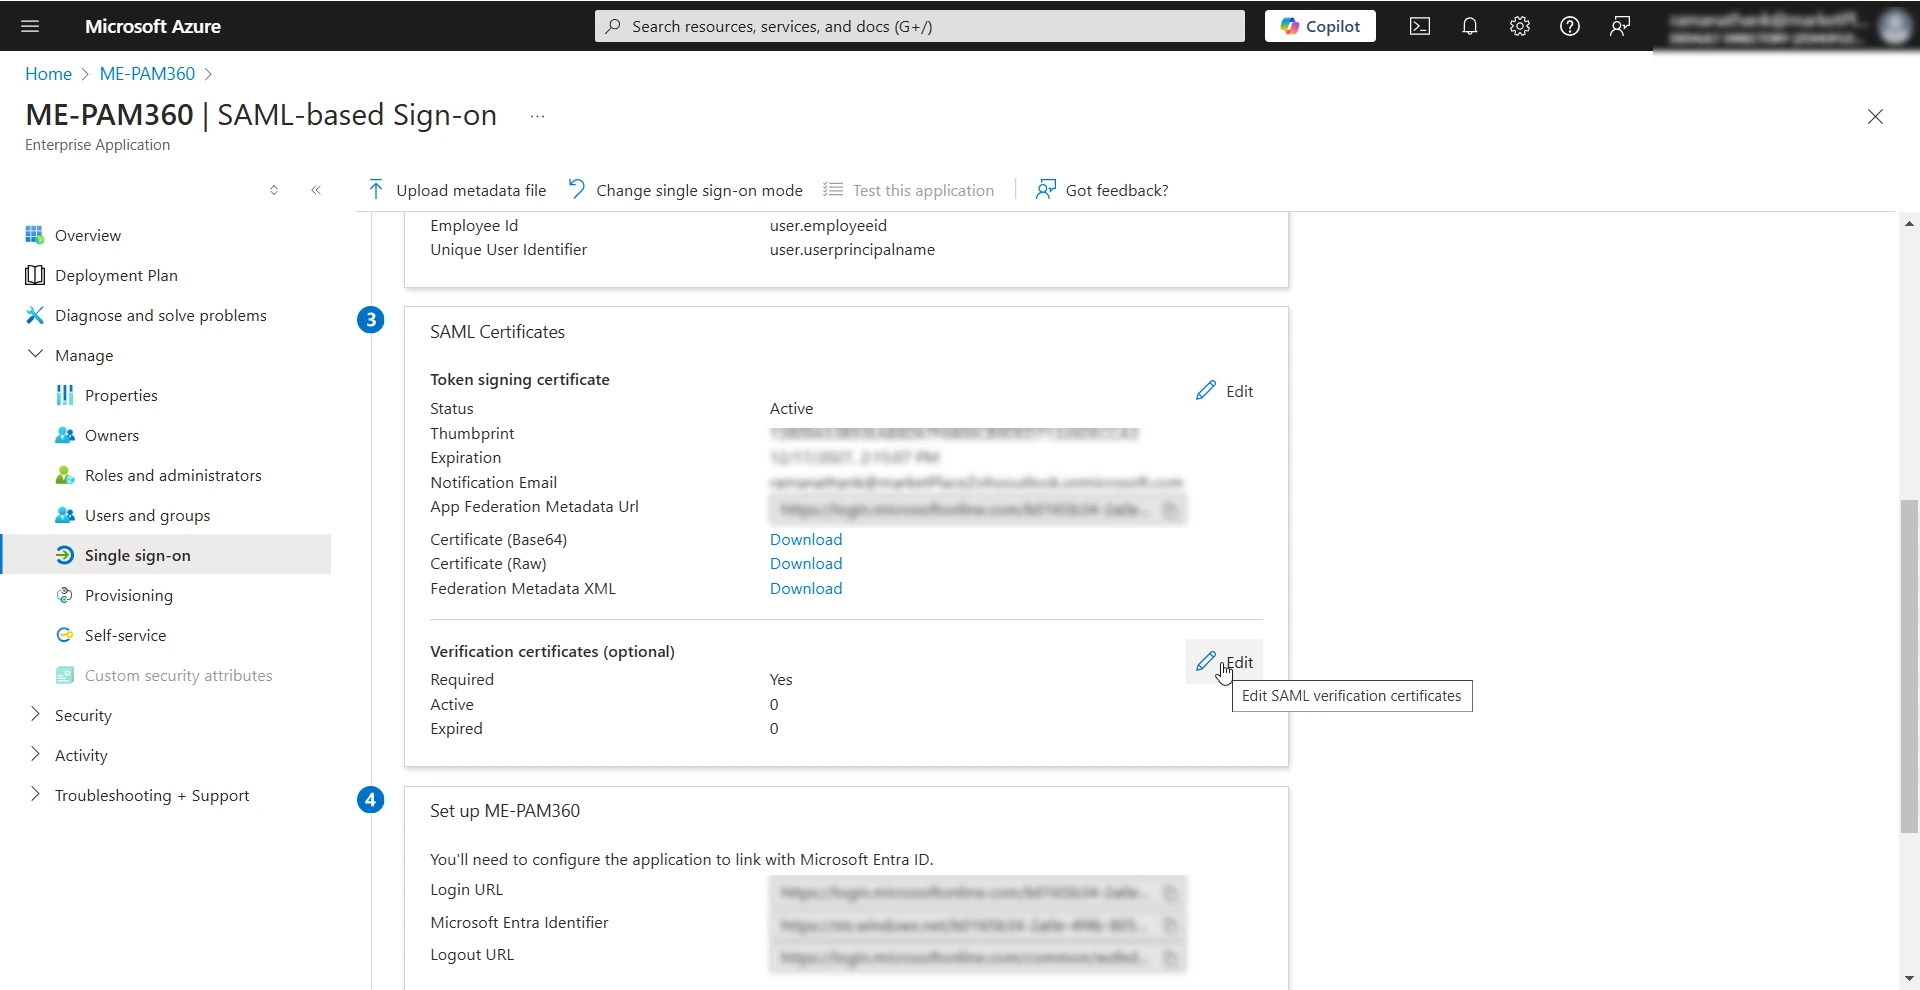
- In the Verification certificates window, enable the Require verification certificates checkbox to enable the Upload certificate option.
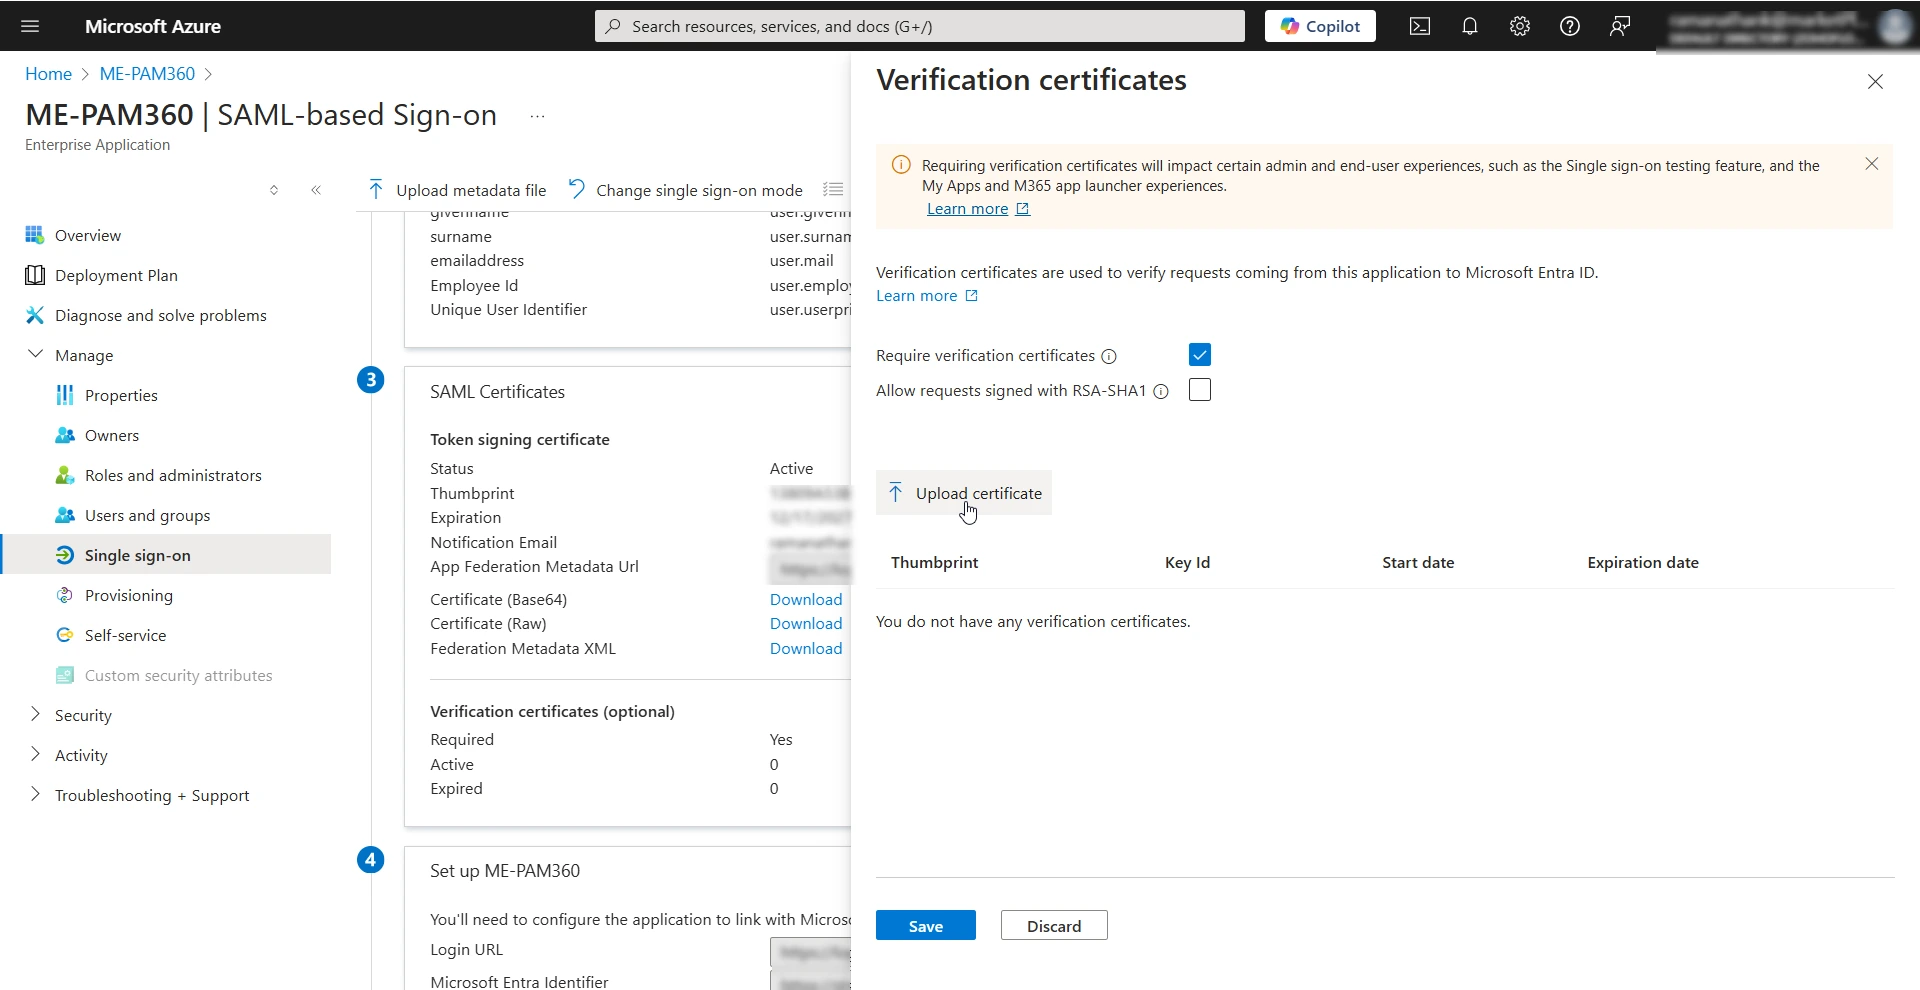
- Click the Upload certificate button and upload the PAM360 SP certificate from your machine.
- If you enable the Allow requests signed with RSA-SHA1 checkbox, then you must select SHA 1 as the Algorithm while configuring the SAML Properties during IdP configuration in PAM360.
- Click Save to save the configured changes.
Caution
If you wish to use the SHA256 algorithm, do not enable this checkbox. Select SHA256 from the Algorithm field under SAML Properties during the IdP configuration.
2.4 Configuring IdP Settings in PAM360
After configuring PAM360 as an SP in the Azure portal, you must configure Microsoft Entra ID as an IdP in PAM360 to establish it as a trusted entity. Access the PAM360 browser window and proceed with the IdP configuration starting from Step 2 - Configure Identity Provider Details. Explore this link for the detailed IdP configuration steps. Based on the provided steps, configure Entra ID as an IdP and configure the SAML properties on the PAM360 interface. To validate if the single sign-on works, click the Test button on the Test single sign-on with PAM360 window.
Caution
If you have users imported from Active Directory in your environment and wish to configure Microsoft Entra ID as the SAML SSO IdP for these users, explore this help document.
3. Steps to Enable MFA and Set up First Login for Microsoft Entra ID Users
Follow these steps to activate MFA for Microsoft Entra ID users in the Azure portal and to set up their first login.
3.1 Enabling MFA for Microsoft Entra ID Users
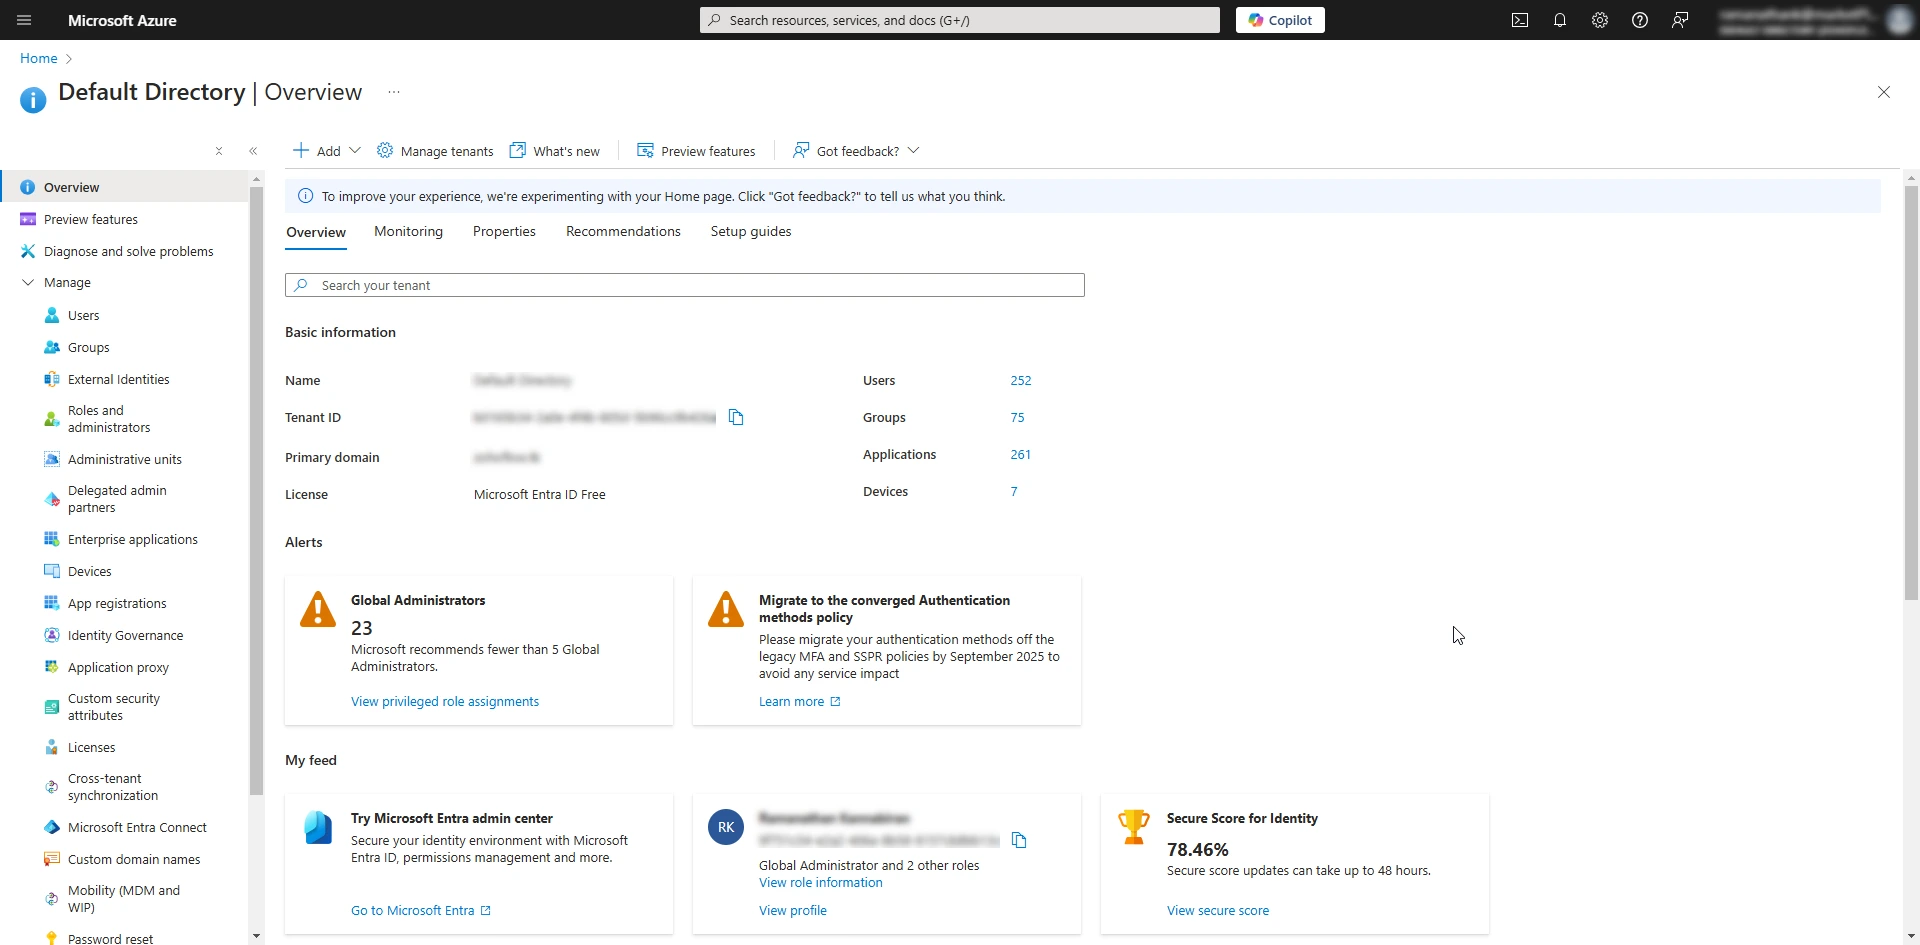
- Log in to the Azure portal.
- Select Microsoft Entra ID under the Azure services section on the Microsoft Azure home page.

- From the left pane, select Manage >> Users.
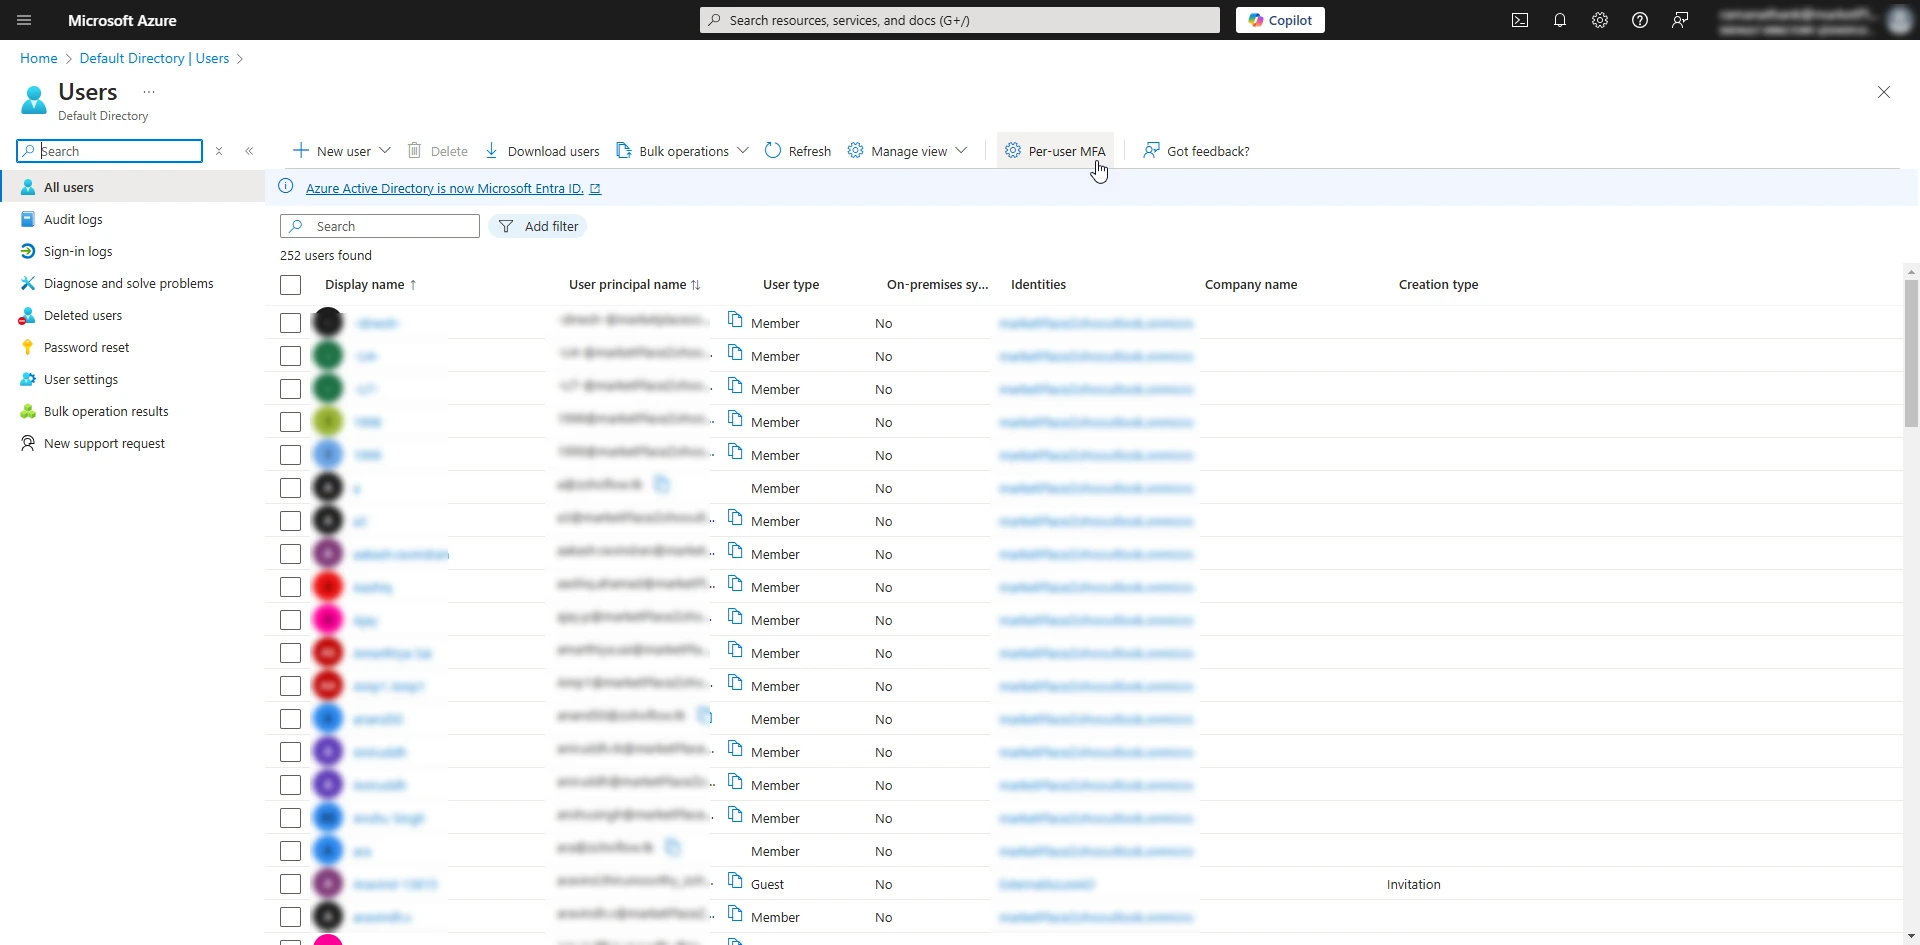
- Click the Per-user MFA option from the top pane on the Users page.
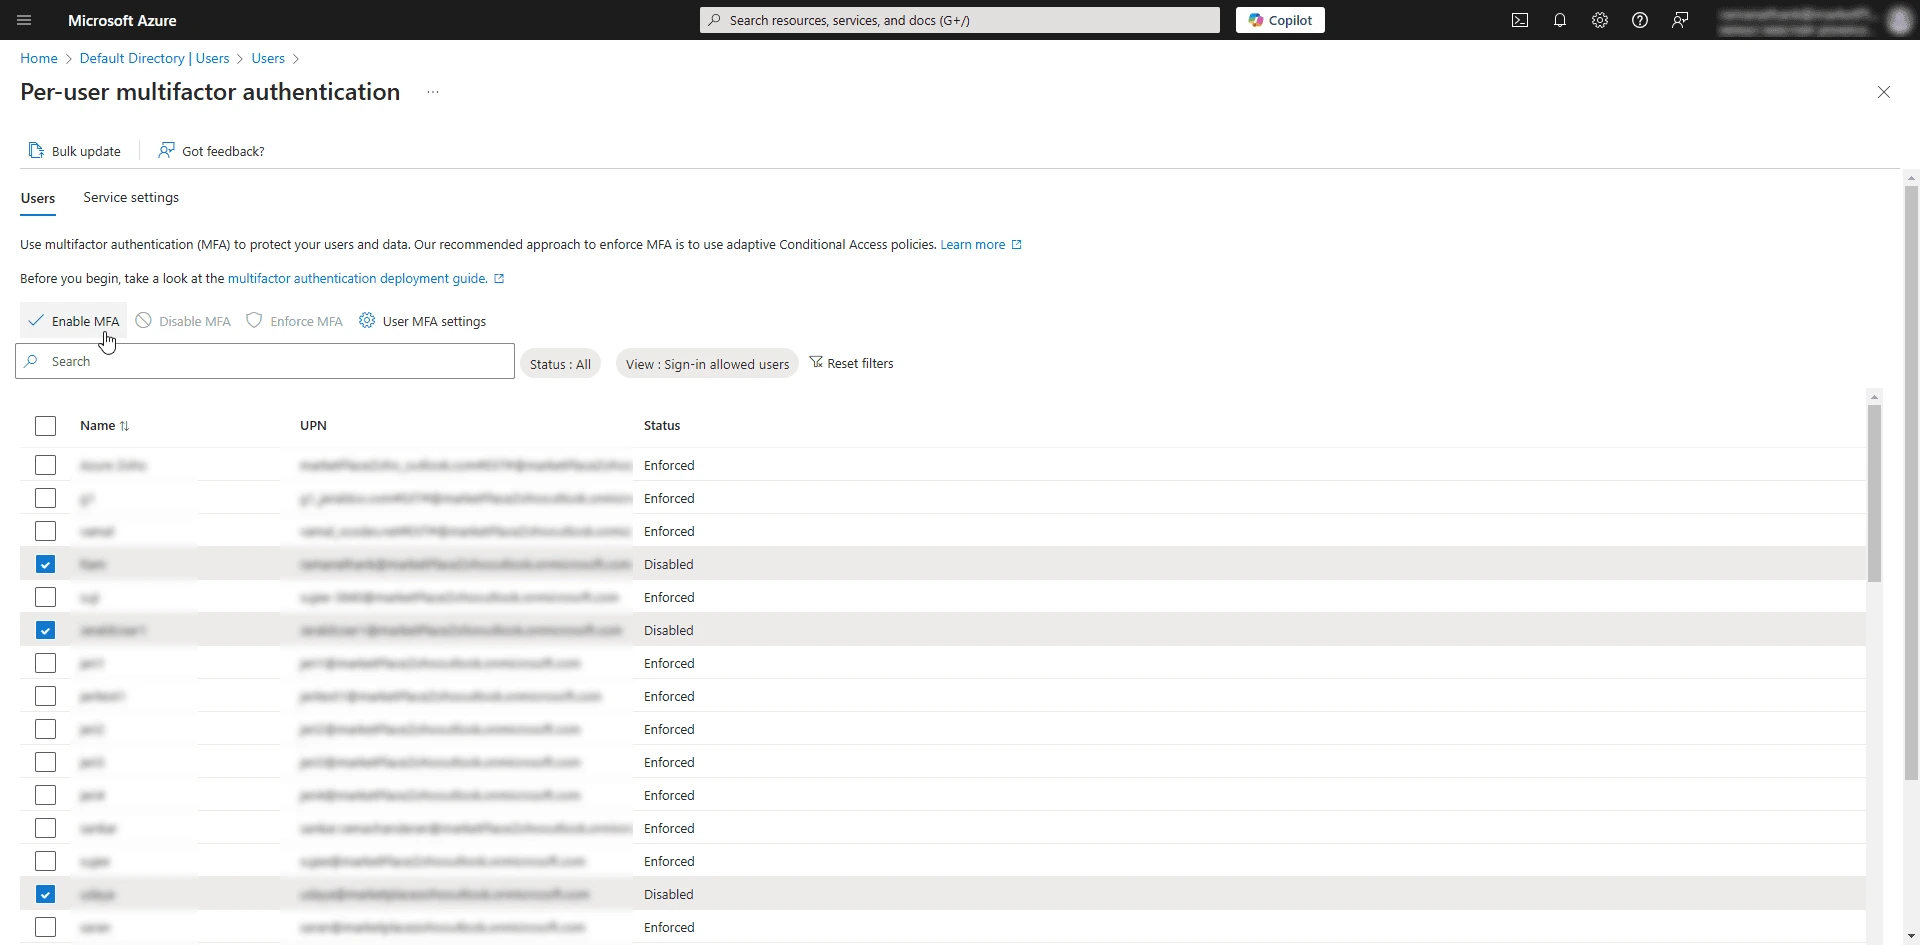
- On the Per-user multifactor authentication page, tick the checkbox beside the desired users for whom you wish to enable multi-factor authentication, and click the Enable option from the top pane.
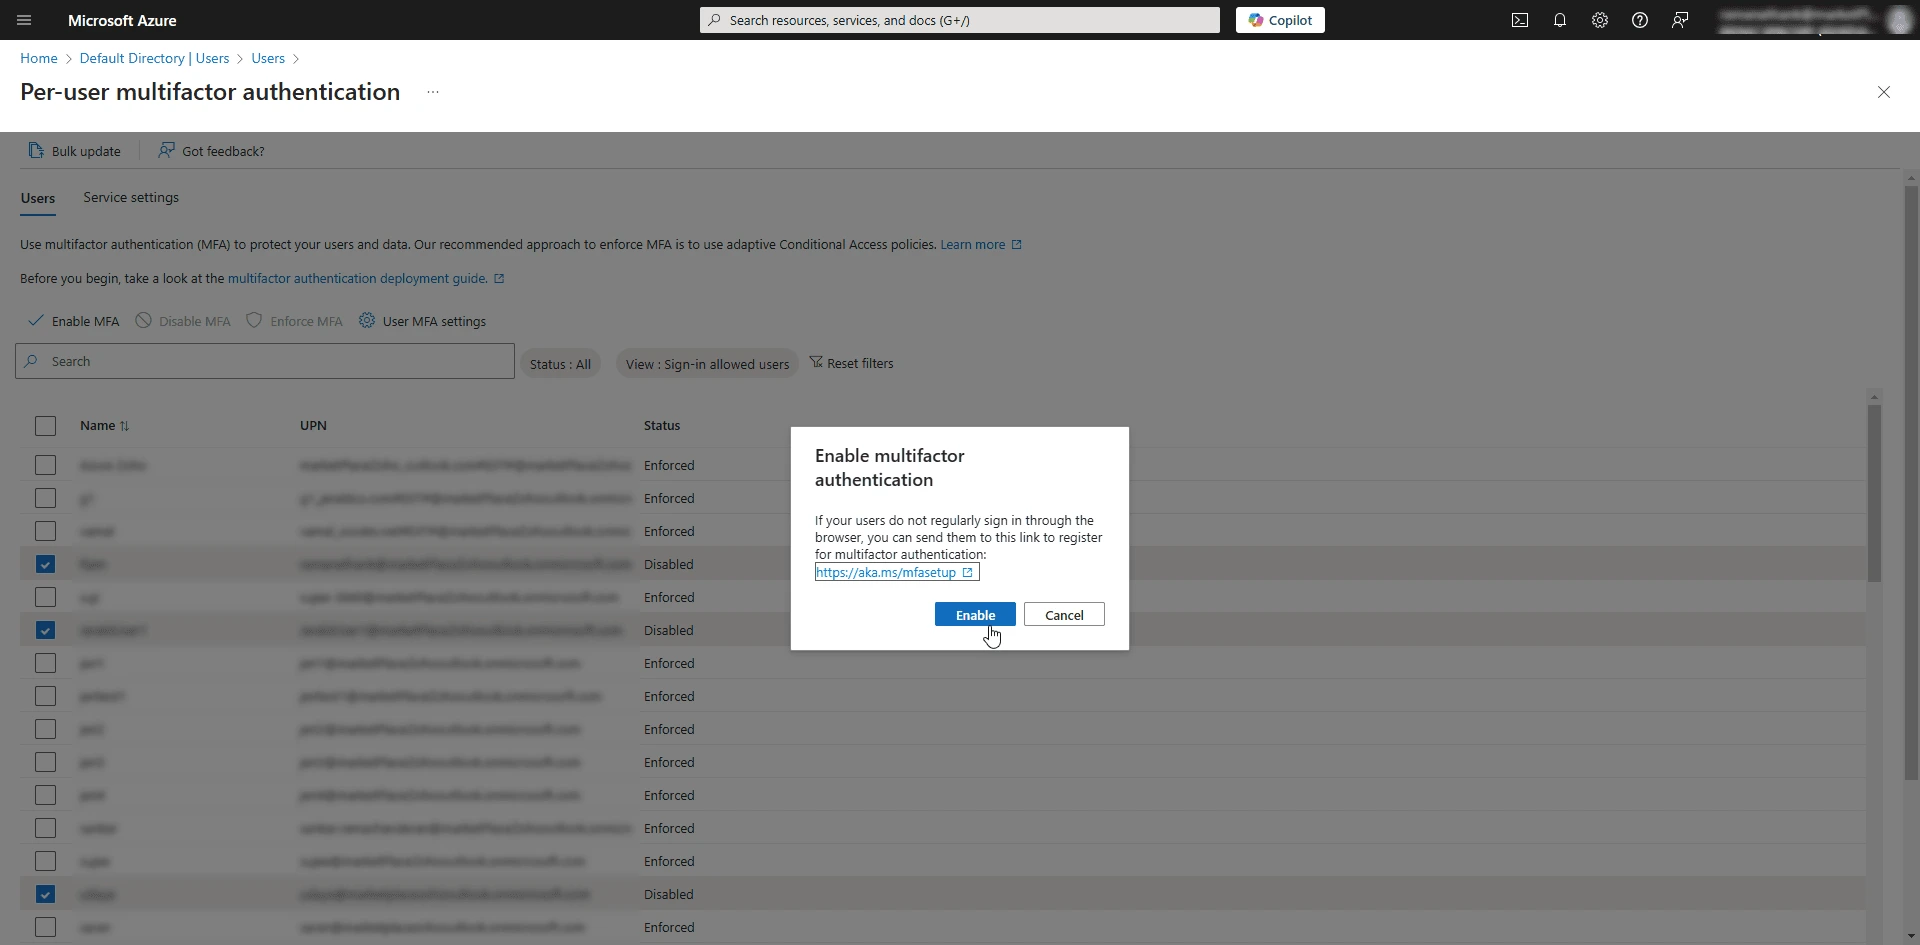
- On the Enable multifactor authentication pop-up window, click Enable to activate the multi-factor authentication for the selected users.
3.2 Setting Up First Login for the MFA-Enabled Entra ID Users
To set up first login for MFA-enabled Entra ID users, install the Microsoft Authenticator application on your mobile device for additional security requirements. Scan the QR code on the website to download the application from the Play Store or App Store and set up your Microsoft account. To set up the First Login for MFA-enabled Entra ID users, follow these steps
- Log in to the Azure portal.
- When you log into the Azure portal for the first time, you will be redirected to the Keep your account secure screen.
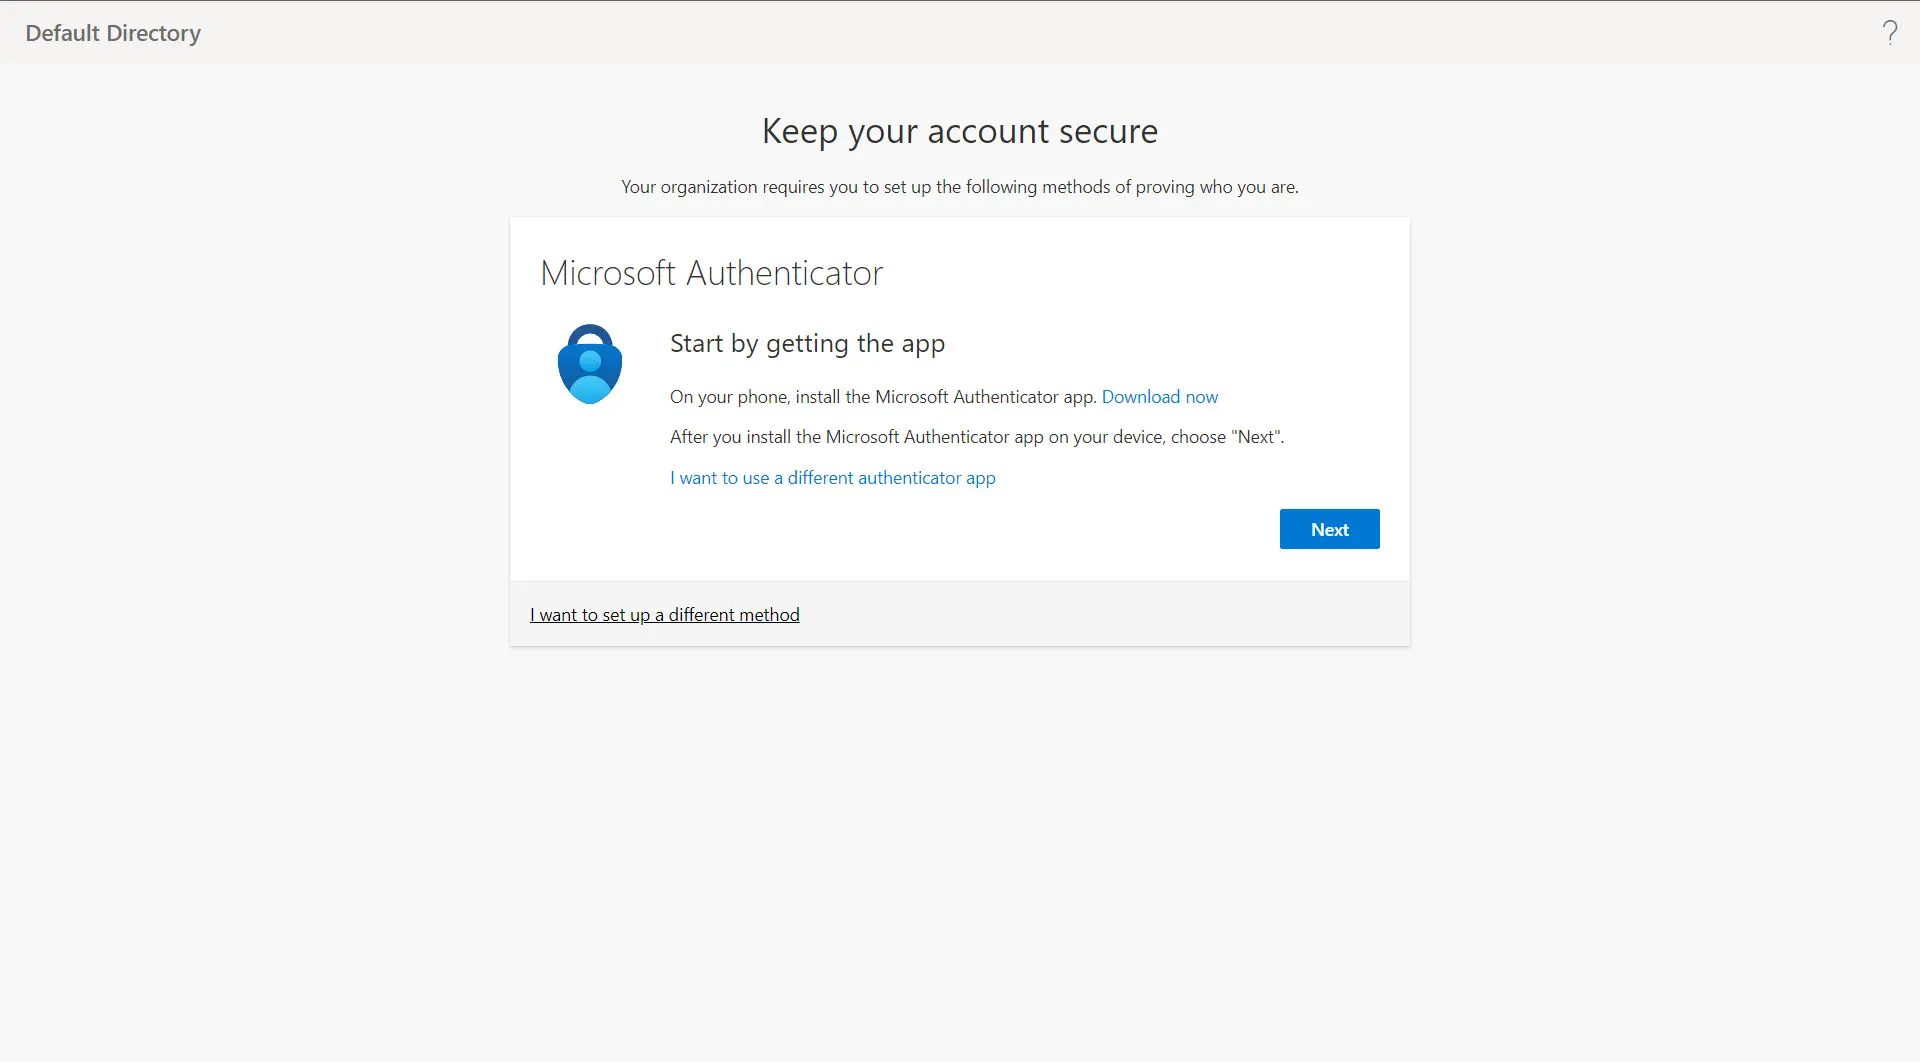
- Read the instructions displayed on the screen and click Next until you see the Scan the QR code option on the screen.
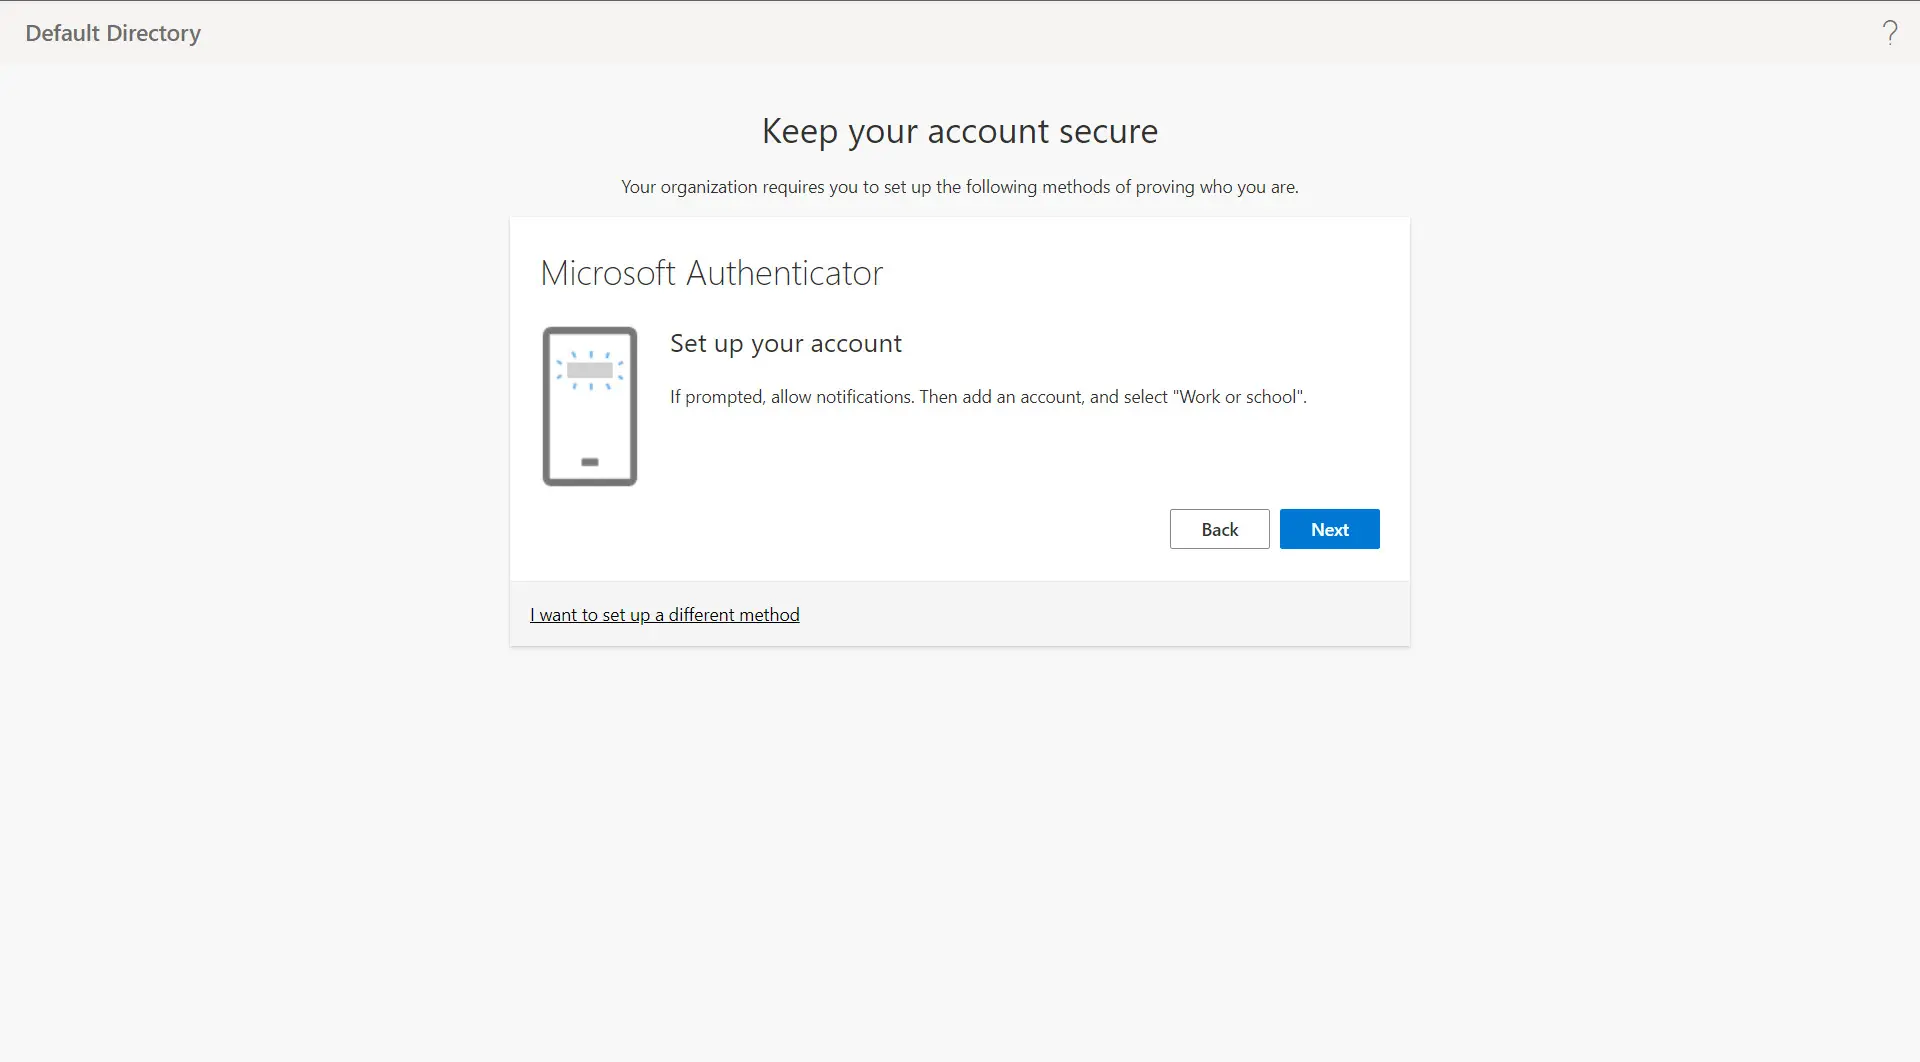
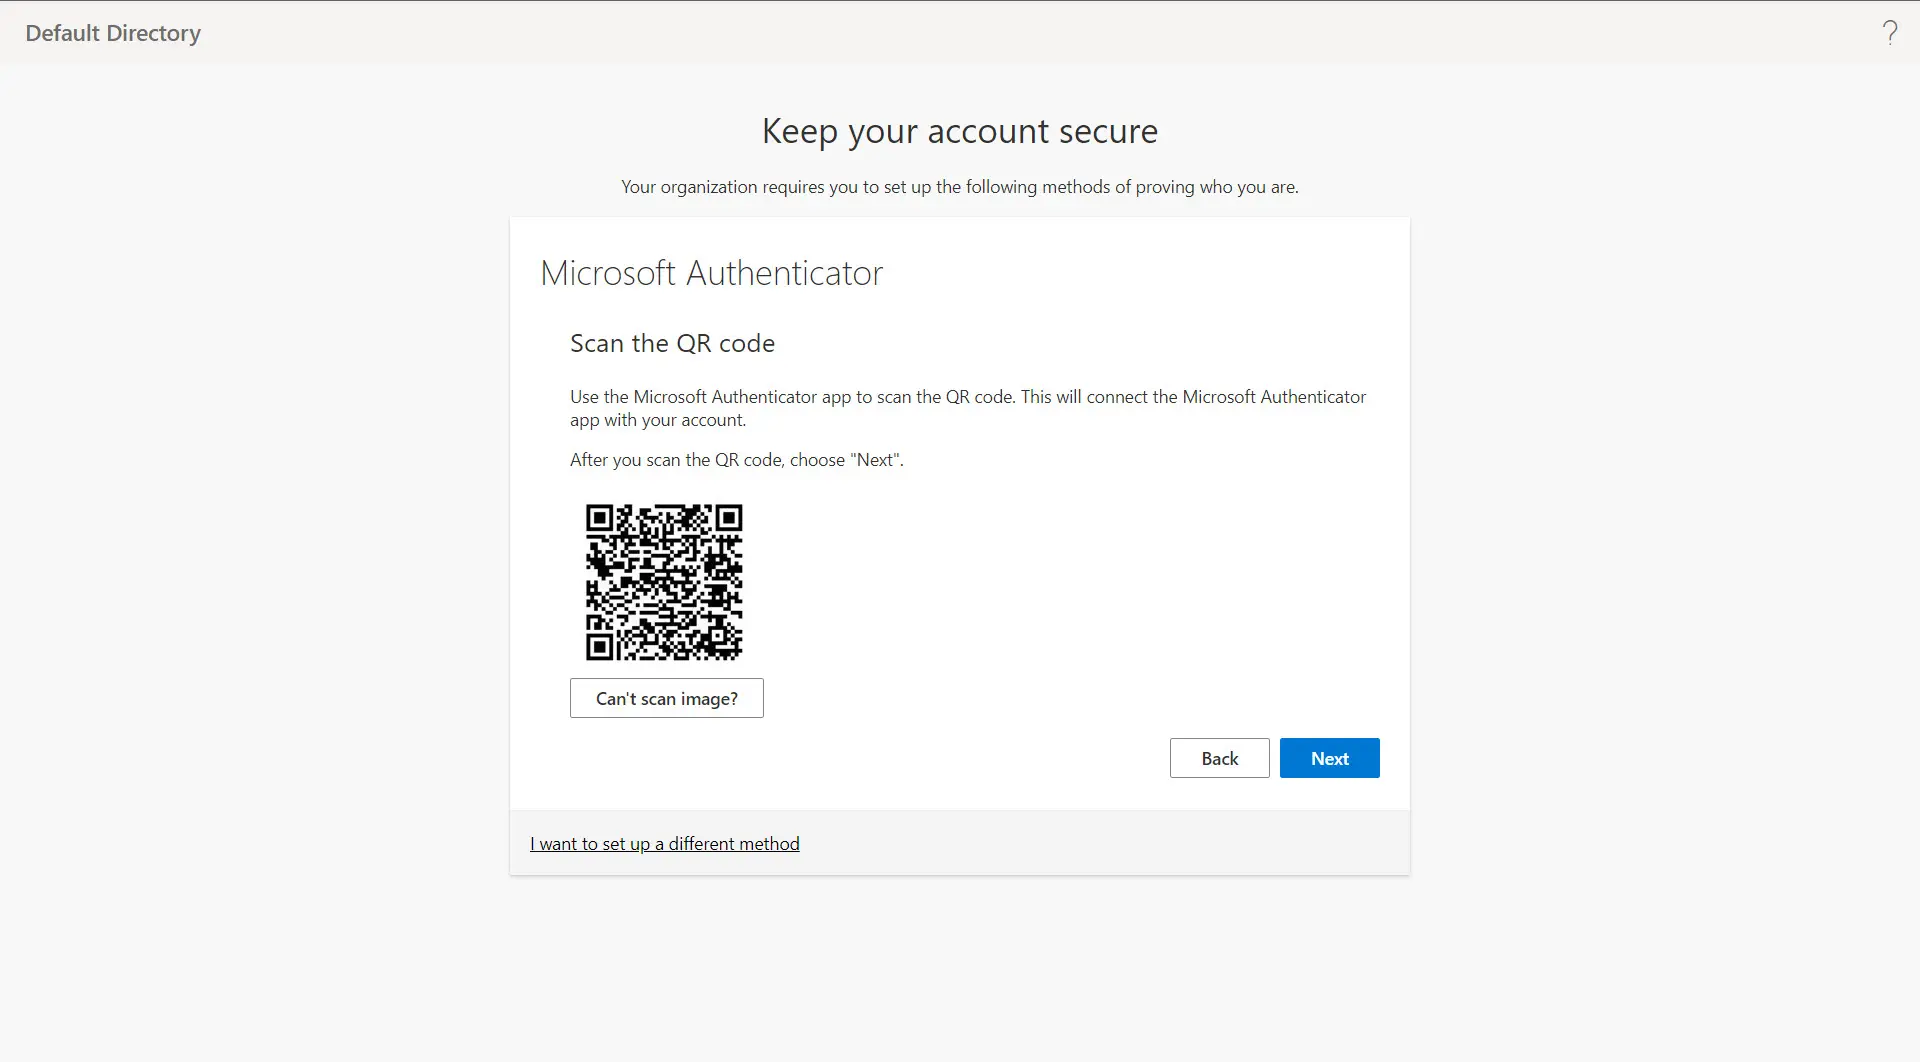
- Open the Microsoft Authenticator application on your mobile device, scan the QR code on your computer screen, and click Next.
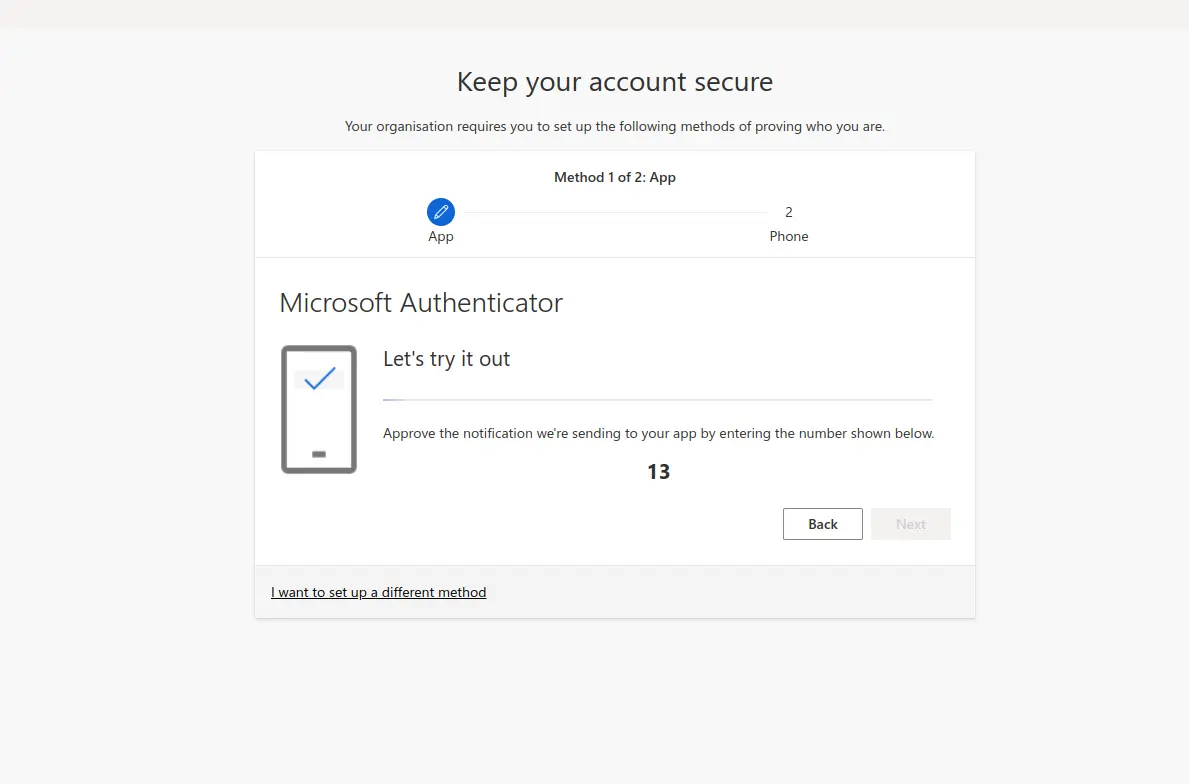
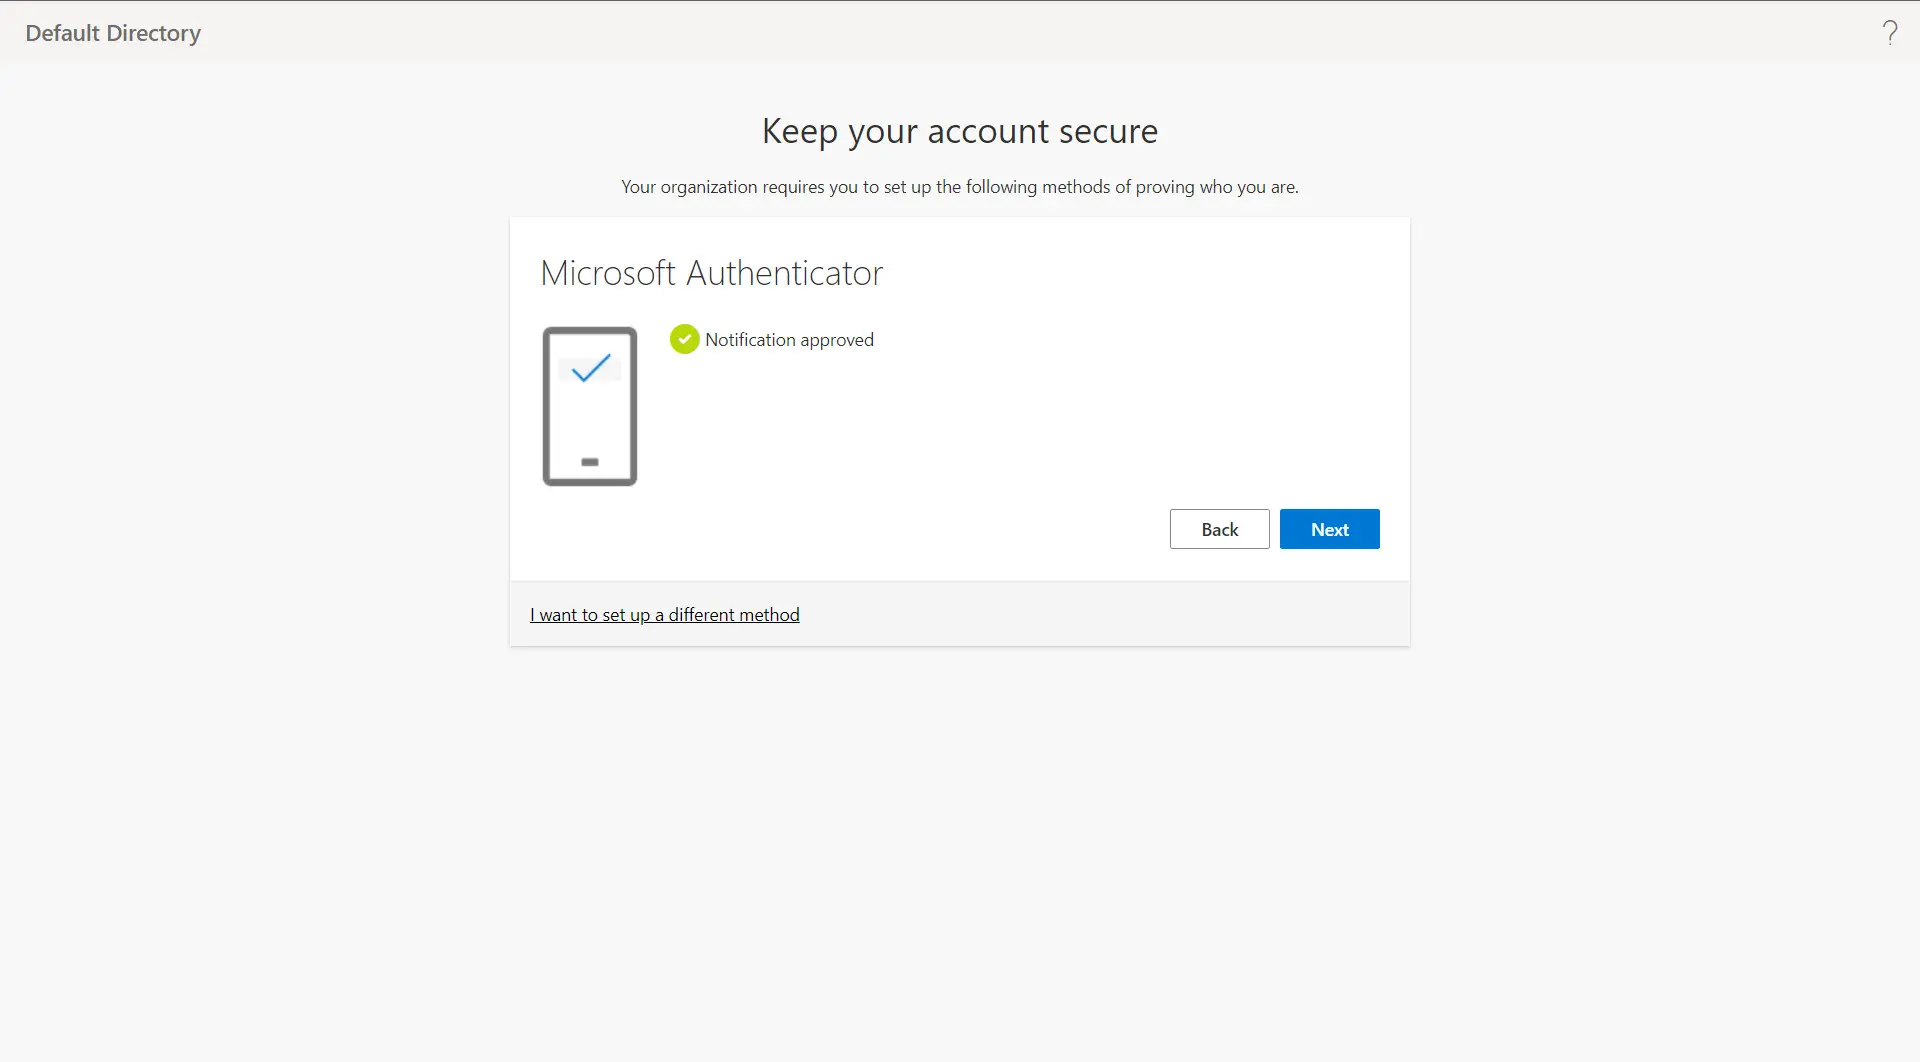
- Complete the two-factor authentication to approve the notification sent to your mobile, and click Next to continue.
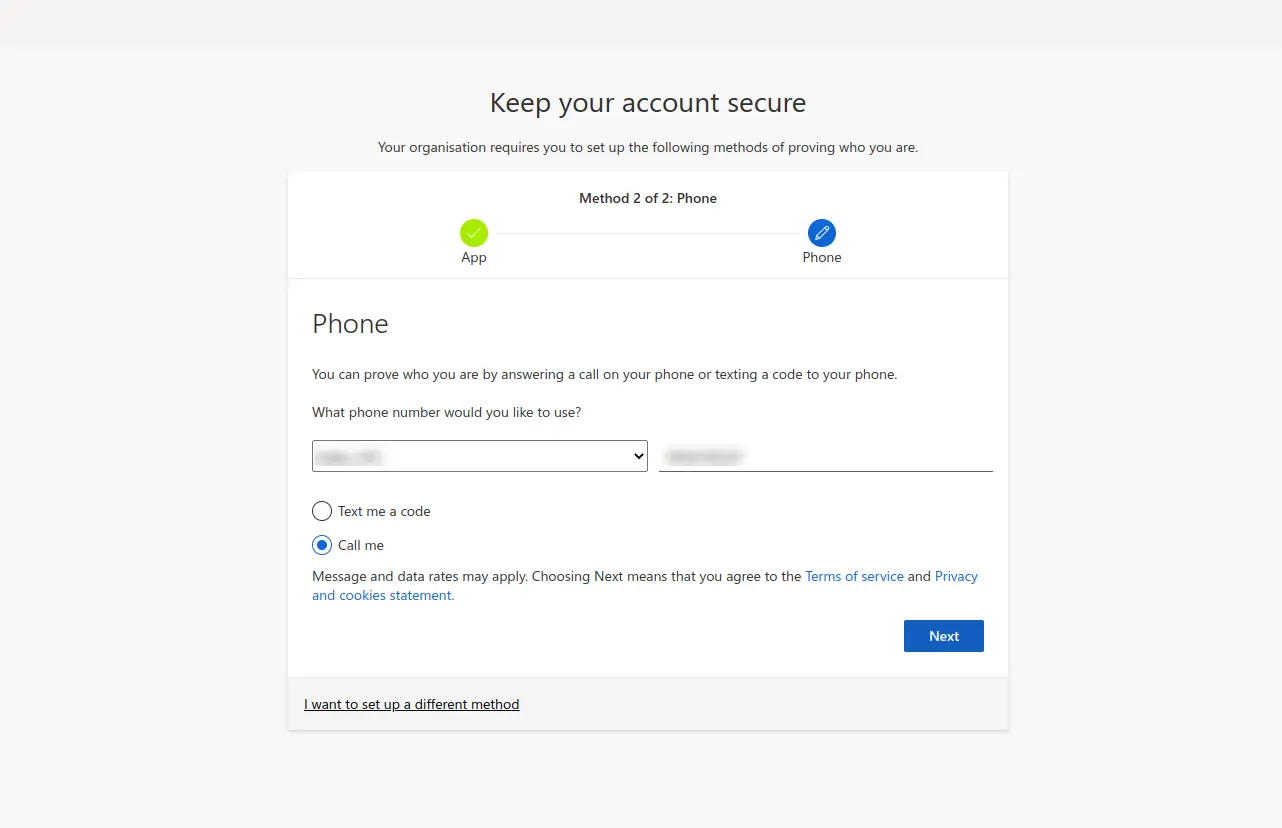
- In the following screen, enter your mobile number in the given field and choose between the Text me a code or Call me options to receive the verification code.
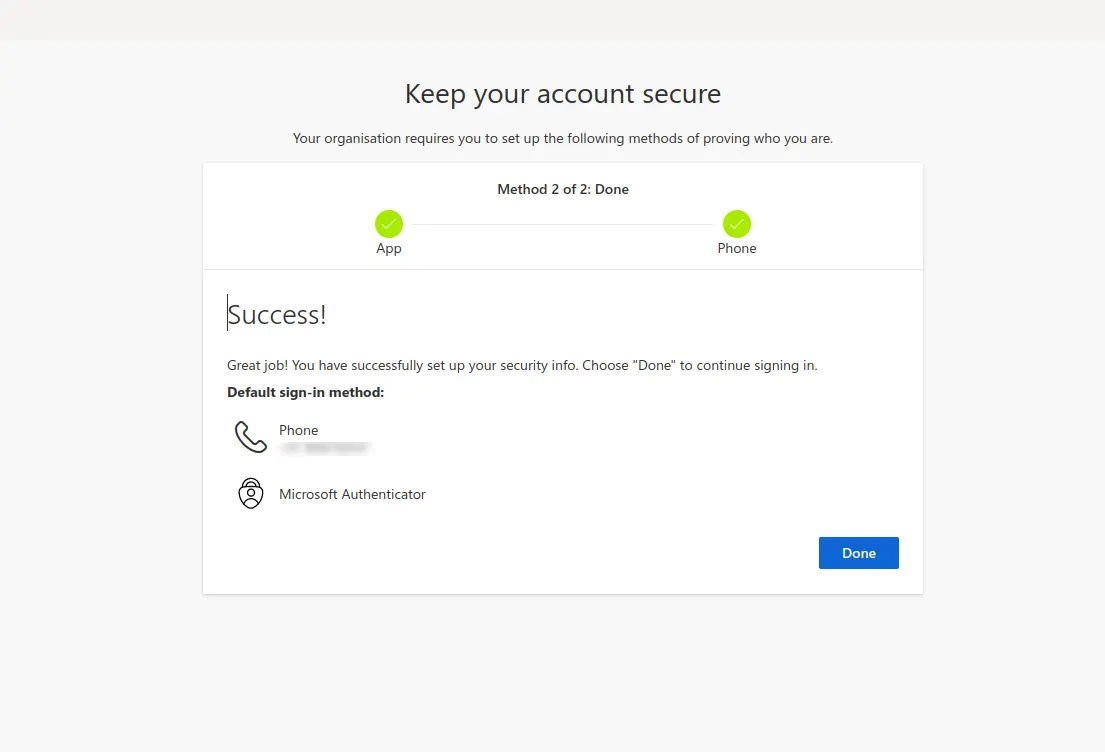
- Enter the verification code sent to your mobile device in the given field and click Next to complete the verification. You will see the Success screen. Click Done to continue. You will be prompted to update your password.
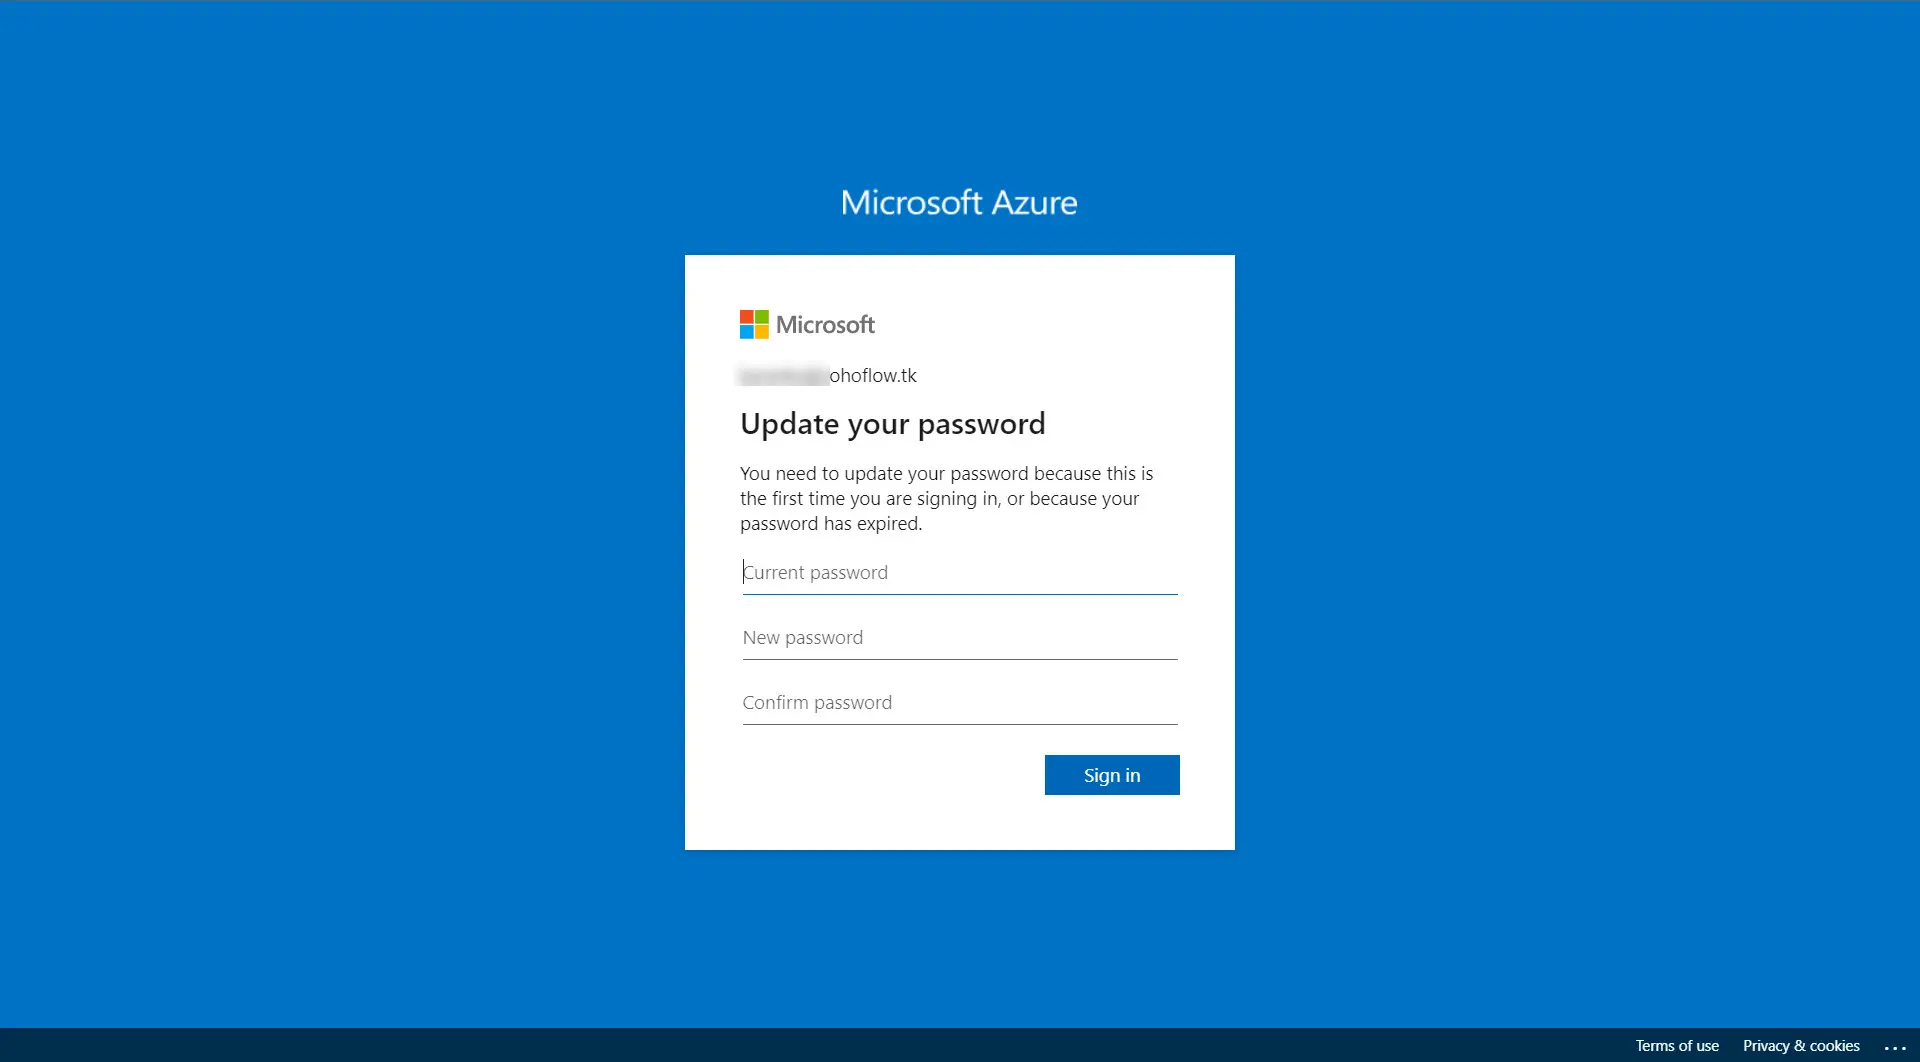
- In the Update your password window, enter your current and new passwords and click Sign in to log into the Entra ID portal. You have completed the first login setup for your Microsoft account.
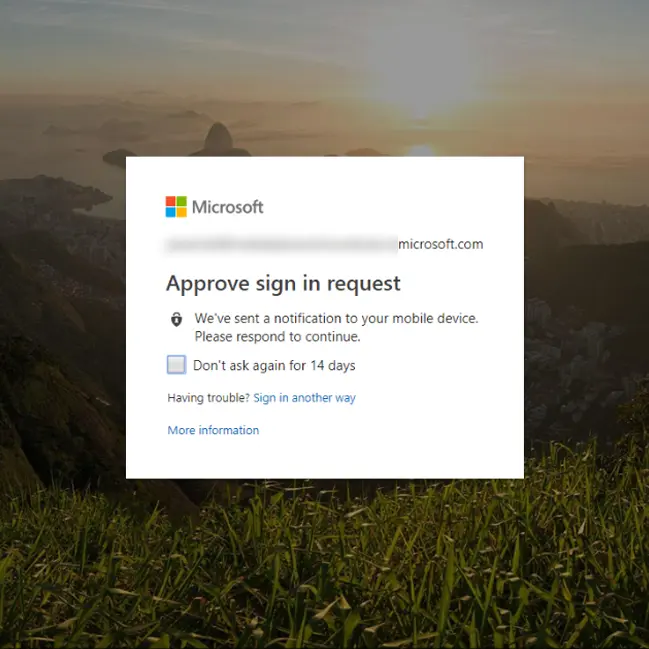
- You will get a notification on your mobile device to verify the authenticity of your login attempt. Approve the Sign-in request on your mobile device to access your Microsoft account.
4. Troubleshooting Tips
1. Error: AADSTS75011
Issue: PAM360 uses a password for SAML authentication, but some browsers, like Edge, may retain the previous session and attempt to use X509 certificates with Entra ID IdP. This can cause validation failures due to an AuthnRequest mismatch.
Solution: To prevent this, disable the use of AuthnRequest elements in Microsoft Entra ID:
- Log into your PAM360 account.
- Navigate to Admin >> SAML Single Sign-On.
- On the SAML SSO dashboard, click the PAM360 access URL for which you are facing this issue and click the Edit icon under the Actions column beside the configured IdP.
- In the Edit IdP Details window, switch to the SAML Properties tab and disable the Requested Authentication Context checkbox.
- Click Save to apply the changes.
2. Error: AADSTS750054
Issue: This error is displayed due to the incorrect SAML Single Sign-On configuration on the Azure portal.
Solution: To prevent this issue, update the valid SP details on the Sign On URL and Reply URL fields:
- Log in to the Azure portal and access the PAM360 Enterprise Application page.
- Click the Single sign-on option under the Manage section on the left pane.
- Click the Edit icon beside the Basic SAML Configuration section and update the following fields with valid input.
- Reply URL (Assertion Consumer Service URL) - Enter PAM360's Assertion Consumer Service (ACS) URL in this field. The ACS URL is the endpoint URL on PAM360, where Microsoft Entra ID will send the SAML responses, and it should be in the https://hostname:port/saml2 format.
- Sign on URL - Enter the PAM360's access URL in the format https://hostname:port in this field.
- Click the Save icon on the top pane to save the configured details.
Caution
If you have configured Microsoft Entra ID as an IdP for multiple server access URLs in your environment, then you must repeat this configuration change for all the server access URLs, i.e., PAM360 Enterprise Application.
3. Error: AADSTS7000218
Issue: SAML authentication failure due to the PAM360 enterprise application being created as a confidential client, preventing username/password authentication.
Solution: To prevent this issue, you should update the PAM360 Enterprise Application created on the Azure portal as a public client:
- Log in to the Azure portal and access the PAM360 Enterprise Application page.
- Click the Authentication option under the Manage section on the left pane.
- Change the Client Type from Web to Public client/Native.
- Select the Default Client Type as YES.
- Ensure required API permissions are granted and consent is given under the Permissions section.
Caution
If you have configured Microsoft Entra ID as an IdP for multiple server access URLs in your environment, then you must repeat this configuration change for all the server access URLs, i.e., PAM360 Enterprise Application.
4. Error: AADSTS75005
Issue: This issue is displayed because Microsoft Entra ID does not support the HTTPS REDIRECT binding protocol for SAML responses.
Solution: To prevent this issue, you should update the protocol binding as HTTPS POST on the SAML SSO Dashboard.
- Log into your PAM360 account.
- Navigate to Admin >> SAML Single Sign-On.
- On the SAML SSO dashboard, click the PAM360 access URL for which you are facing this issue and click the Edit icon under the Actions column beside the configured IdP.
- In the Edit Identity Provider Details window, switch to the SAML Properties tab and enable the Override AuthnRequest Binding checkbox and select the AuthnRequest Protocol Binding as HTTP POST from the available options.
- Click Save to apply the changes.
Caution
If you have configured Microsoft Entra ID as an IdP for multiple server access URLs in your environment, then you must repeat this configuration change for all the server access URLs, i.e., PAM360 Enterprise Application.
5. Error: ADSTS50105
Issue: The user lacks access to the PAM360 Enterprise Application in the Azure portal.
Solution: Ensure the user is assigned to the PAM360 enterprise application. The user must belong to an assigned group or should be assigned to the PAM360 enterprise application directly. Refer to the relevant help section for the detailed steps to assign users to the PAM360 enterprise application.
6. Error: [com.adventnet.passtrix.saml.SAMLResponseValidator]|[SEVERE]|[78]: SAML Signature could not be validated|
Issue: This issue is displayed because PAM360 is unable to verify the SAML signature.
Solution: To prevent this issue, verify the SP and IdP certificates configured on the Azure portal and PAM360, respectively. Ensure the serial numbers match and that the certificates are not expired.
7. Error: [com.adventnet.passtrix.saml.SAMLServlet]|[SEVERE]|[56]: No user with name XXXXX@yyyy.com configured | org.opensaml.xml.security.SecurityException: No user with the name XXXXX@yyyyy.com configured.
Issue: This issue occurs when the NameID Attribute sent by the IdP in the SAML assertion does not match the PAM360 username.
Solution: To prevent this issue, create a new user claim on the Microsoft Azure portal that aligns with the PAM360 username. Explore this link for more information about creating a new claim on the Azure portal.