Blocking SMBv1 in Windows
The Server message block(SMB) is a communication protocol following client-server model that enables shared access between devices such as printers and ports. Among the three versions of SMB (SMBv1, SMBv2, SMBv3), Microsoft recommends blocking SMBv1 protocol since networks are prone to malicious attacks due to the vulnerabilities found in SMBv1. The following is a detailed guide on how to block SMBv1 in windows.
- Navigate to start -> Control panel.
- Click on Windows Firewall/ Windows Defender firewall.
- Go to Advanced Settings.
- Right click on the Inbound rules button and cIick on the New Rule option.
- Now, select the Port option and click on Next.
- Specify the port as 445 under specific local ports.
- Select TCP and click on Next.
- Select the block the connection option and click on Next.
- Now, select the Domain, Private and Public options and click on Next.
- Provide a Name and Description and Click Finish.
- The TCP port 445 is now successfully blocked.
The SMBv1 protocol can be blocked by the following ways depending on the type of windows device being used:
- Open the Server Manager Dashboard of the server.
- Select the Add Roles and Features option.
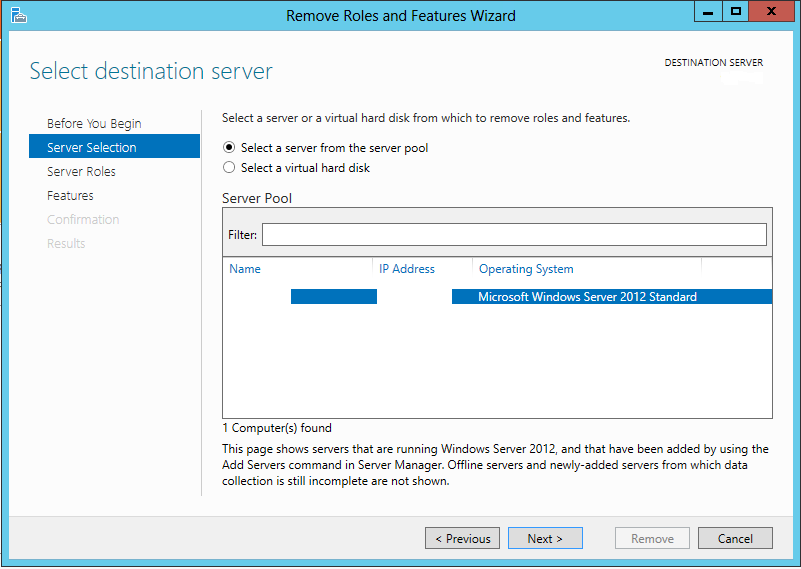
- Now click on Start the Remove Roles and Features Wizard, and click on Next.
- In the server pool tab under the Select destination server page, select the server from which the feature must be removed.

- Click on Next.
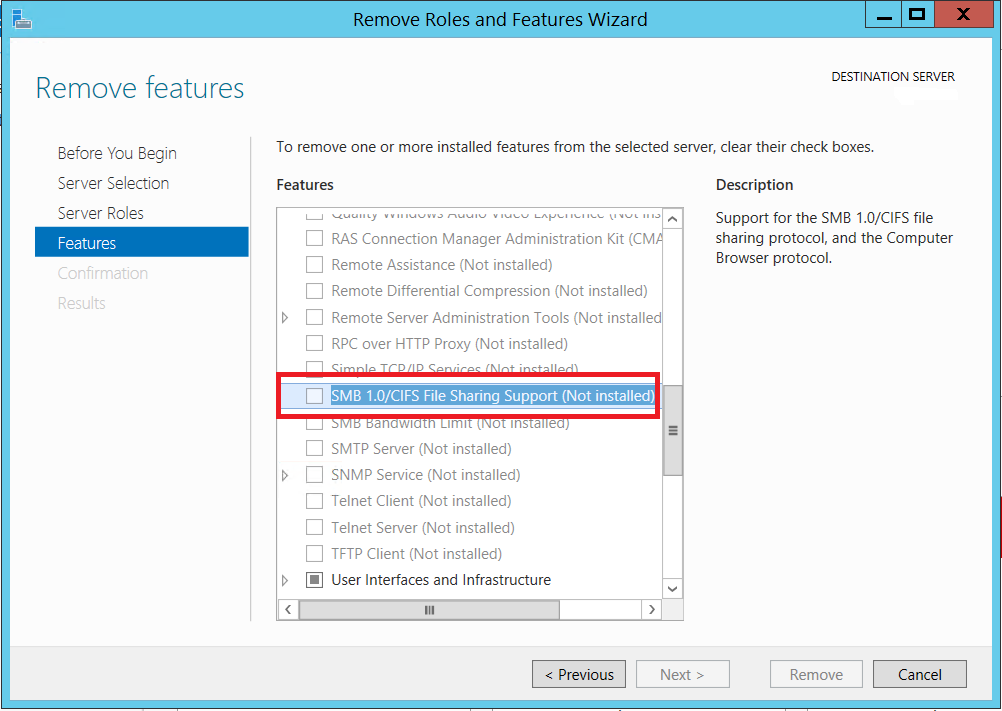
- In the Remove server roles page, click on Next.
- In the Remove features page, clear the check box for SMB 1.0/CIFS File Sharing Support and click on Next.

- In removal selections page, confirm that the feature is listed, and then select Remove.
- The SMBv1 protocol is now successfully blocked in your device.
- Navigate to start->Control panel.
- Under Control panel, select Programs and Features.
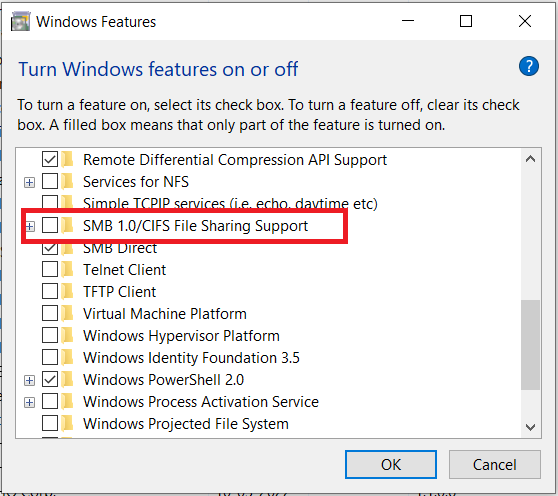
- Under the Control Panel Home section, select the Turn Windows features on or off to open the Windows features box.
- Scroll down the Windows Features box, clear the check box for SMB 1.0/CIFS File Sharing Support and click on OK.

- Open Windows PowerShell in Administrator mode.
- Use the below commands to enable SMBv1/SMBv2/SMBv3
- Set-SmbServerConfiguration -EnableSMB1Protocol $true
- Set-SmbServerConfiguration -EnableSMB2Protocol $true
- Use the below commands to disable SMBv1/SMBv2/SMBv3
- Set-SmbServerConfiguration -EnableSMB1Protocol $false
- Set-SmbServerConfiguration -EnableSMB2Protocol $false
- To check the status of SMBv1/SMBv2/SMBv3, kindly use the below commands.
- Get-SmbServerConfiguration | Select EnableSMB1Protocol
- Get-SmbServerConfiguration | Select EnableSMB2Protocol
Note:
- Blocking SMB will not affect WMI data collection in OpManager. However, kindly consult with your sysadmin before proceeding with the same.
- Since SMBv2 and SMBv3 protocols share the same stack, enabling or disabling SMBv2 will enable or disable SMBv3 too.
- You don't have to restart the machine after you run the Set-SMBServerConfiguration cmdlet.
To know more, kindly visit this page.
Thank you for your feedback!


