ServiceDesk Plus Integration
ManageEngine SupportCenter Plus integrates with ManageEngine ServiceDesk Plus, a web-based Help Desk and Asset Management software. If ServiceDesk Plus is installed in your network, you can automatically log trouble tickets from SupportCenter Plus.
Follow the steps given below to configure SDP Integration.
Step 1: Copy configuration files
-
Copy the 'sdpimpl.jar' file from "[SCP_Home]/actionplugins/sdp/lib" directory to "[SCP_Home]/server/default/lib" directory.
-
Copy the SDP.xml present in the "[SCP_Home]/actionplugins/sdp/conf" directory to "[SCP_Home]/server/default/conf" directory.
Step 2: Configure Request Action Menu and SDP.xml
- The menu options that have to be displayed in SCP request can be configured under can be configured under Admin --> Helpdesk Settings --> Menu Invocation.
-
SDP specific parameters and field mappings will be configured in the SDP.xml file.
NOTE: The actual implementation class file (SDPActionImplementation.java) is available under the [SCP_Home]\actionplugins\sdp\src\com\scp\sdp directory. You can modify the file as per your requirement, compile it and update the sdpimpl.jar file (update the jar file in [SCP_Home]\server\default\lib directory). Finally restart the server.
Setting Up Request Action Menu Configuration
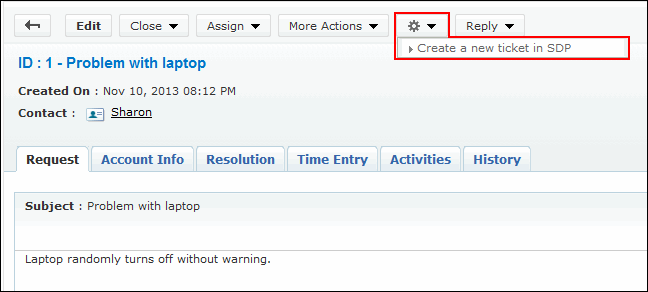
The Actions menu that has to be displayed in the Request Details page can be configured under Admin --> Helpdesk Settings --> Menu Invocation. [Refer "Menu Invocation" for more information.] After configuring the Actions menu, open a request in SCP, you will have the Actions menu  as shown below. By clicking on the Actions menu option, you can create tickets in SDP.
NOTE: While creating Action menu for SDP Integration (under Menu Invocation page), the 'Menu Name' specified should match the name of the menu (<menu name="SDPIntegration">) specified under SDP.xml file and the 'Executor Class' should be specified as "com.scp.sdp.SDPActionImplementation".

Setting Up SDP.xml Configuration
-
Open the SDP.xml file copied under "[SCP_Home]/server/default/conf" directory.
-
Specify the URL of the SDP instance on which you would like to create the ticket.
|
<url>http://[SDP_server]:[Port_Number]/sdpapi/request/</url> <!-- Specify the URL of SDP instance-->
<!-- Example, <url>http://mark-0462:8080/sdpapi/request/</url> -->
<apikey>[SDP_APIKEY]</apikey> <!-- Specify the api key of SDP-->
<!-- Example, <apikey>532DC9A3-C298-438B-8123-65CAD192E54A</apikey> -->
|
-
Map the SCP fields with SDP fields. The SDP field should be mentioned in <name></name> parameter. The SCP field should be mentioned in <value></value> parameter prefixed with $ symbol.
|
<param>
<name>requester</name> <!-- SDP field-->
<value>$contact</value> <!-- SCP field-->
</param>
<param>
<name>subject</name><!-- SDP field-->
<value>$subject</value> <!-- SCP field-->
<!-- Dynamic parameters can be specified by a $ prefix. In this case, the value for the variable will be taken from SCP and passed. -->
</param>
<param>
<name>description</name> <!-- SDP field-->
<value>$description</value> <!-- SCP field-->
</param>
<param>
<name>priority</name> <!-- SDP field-->
<value>$priority</value> <!-- SCP field-->
</param>
|
|
Note

|
- If any of the SDP fields mapped with SCP field is incorrect or is not available in SDP then an error message will be shown up in SCP when the Action menu is invoked.
- While sending multiple values, separate them with comma.
|
- Custom messages can be set upon success or failure invocation. These messages will be shown up in SupportCenter Plus interface when the Action menu is invoked.
|
<success>Ticket is created in SDP with Id : $workorderid</success>
<failure>Failed to integrate to SDP</failure>
|
- Handling response from SDP: SDP returns the response to SCP in XML format. Below is the sample response from SDP in XML format:
|
<?xml version="1.0" encoding="UTF-8"?>
<API version="1.0">
<response>
<operation name="ADD_REQUEST">
<result>
<statuscode>200</statuscode>
<status>Success</status>
<message>Request added successfully</message>
</result>
<Details>
<workoderid>397760</workorderid>
</Details>
<Details>
<parameter>
<name>workorderid</name>
<value>397760</value>
</parameter>
</Details>
</operation>
</response>
</API>
|
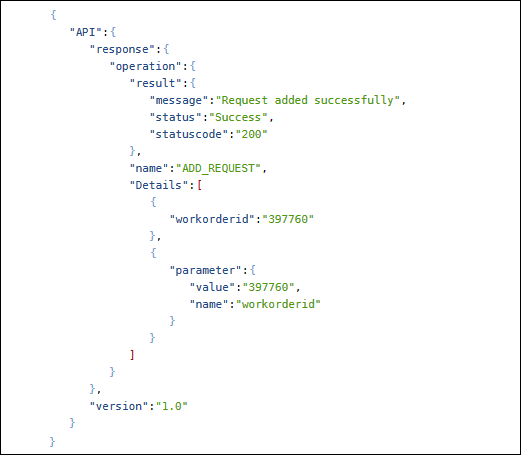
SCP internally constructs the JSON object with the response returned from SDP in XML format. A sample JSON object constructed by SCP is shown below.

-
To update SCP with the above JSON object, create additional field (For example, SDP_ID) in SCP under Admin --> Helpdesk Settings --> Request --> Additional Fields (See, Request - Additional Fields.) and include it in the Request template. And map the field with the JSON object as shown in the below table.
-
The response details can also to added as a note in SCP.
NOTE: If you are creating additional fields in SCP with a different name, then the same name should be reflected in this xml.
|
<response>
<param>
<!-- name indicates the SCP field that should be updated with the response returned from SDP -->
<name>SDP_ID</name> <!-- Specify the additional field created in SCP -->
<!-- value indicates the attribute in the return xml format received from SDP -->
<value>$workorderid</value> <!-- Specify the JSON object prefixed with $ symbol -->
</param>
<!-- If any note needs to be added at the end of the operation, then it needs to be specified here. -->
<notes>
<note>Ticket is created in SDP with Id: $workorderid</note>
</notes>
</response>
|
- Save SDP.xml file.
NOTE: Server restart is not required after editing and saving the SDP.xml file.
Create SDP ticket from SCP Request
Once the Request Actions Menu is configured under Admin module --> Helpdesk Settings --> Menu Invocation, you will find the Actions menu in the Request Details page. Click the Actions menu to invoke ticket creation in SDP.

A success message appears, stating that the ticket is created in SDP with workorder ID. The workoder ID is updated in the SDP_ID additional field.


