Problem Template
Problem templates are used to create forms with pre-populated data for logging problem requests in ServiceDesk Plus MSP. Templates save time and effort by allowing users to create problem requests quickly.
Benefits:
-
Raise problem requests instantly for frequently occurring problems.
-
Configure different templates to collect relevant data based on the type of problem request.
-
Pre-fill field values in problem template to automatically populate details while raising problem requests.
-
Divide the work involved into tasks.
Role Required: SDAdmin
Contents:
Create Problem Template
-
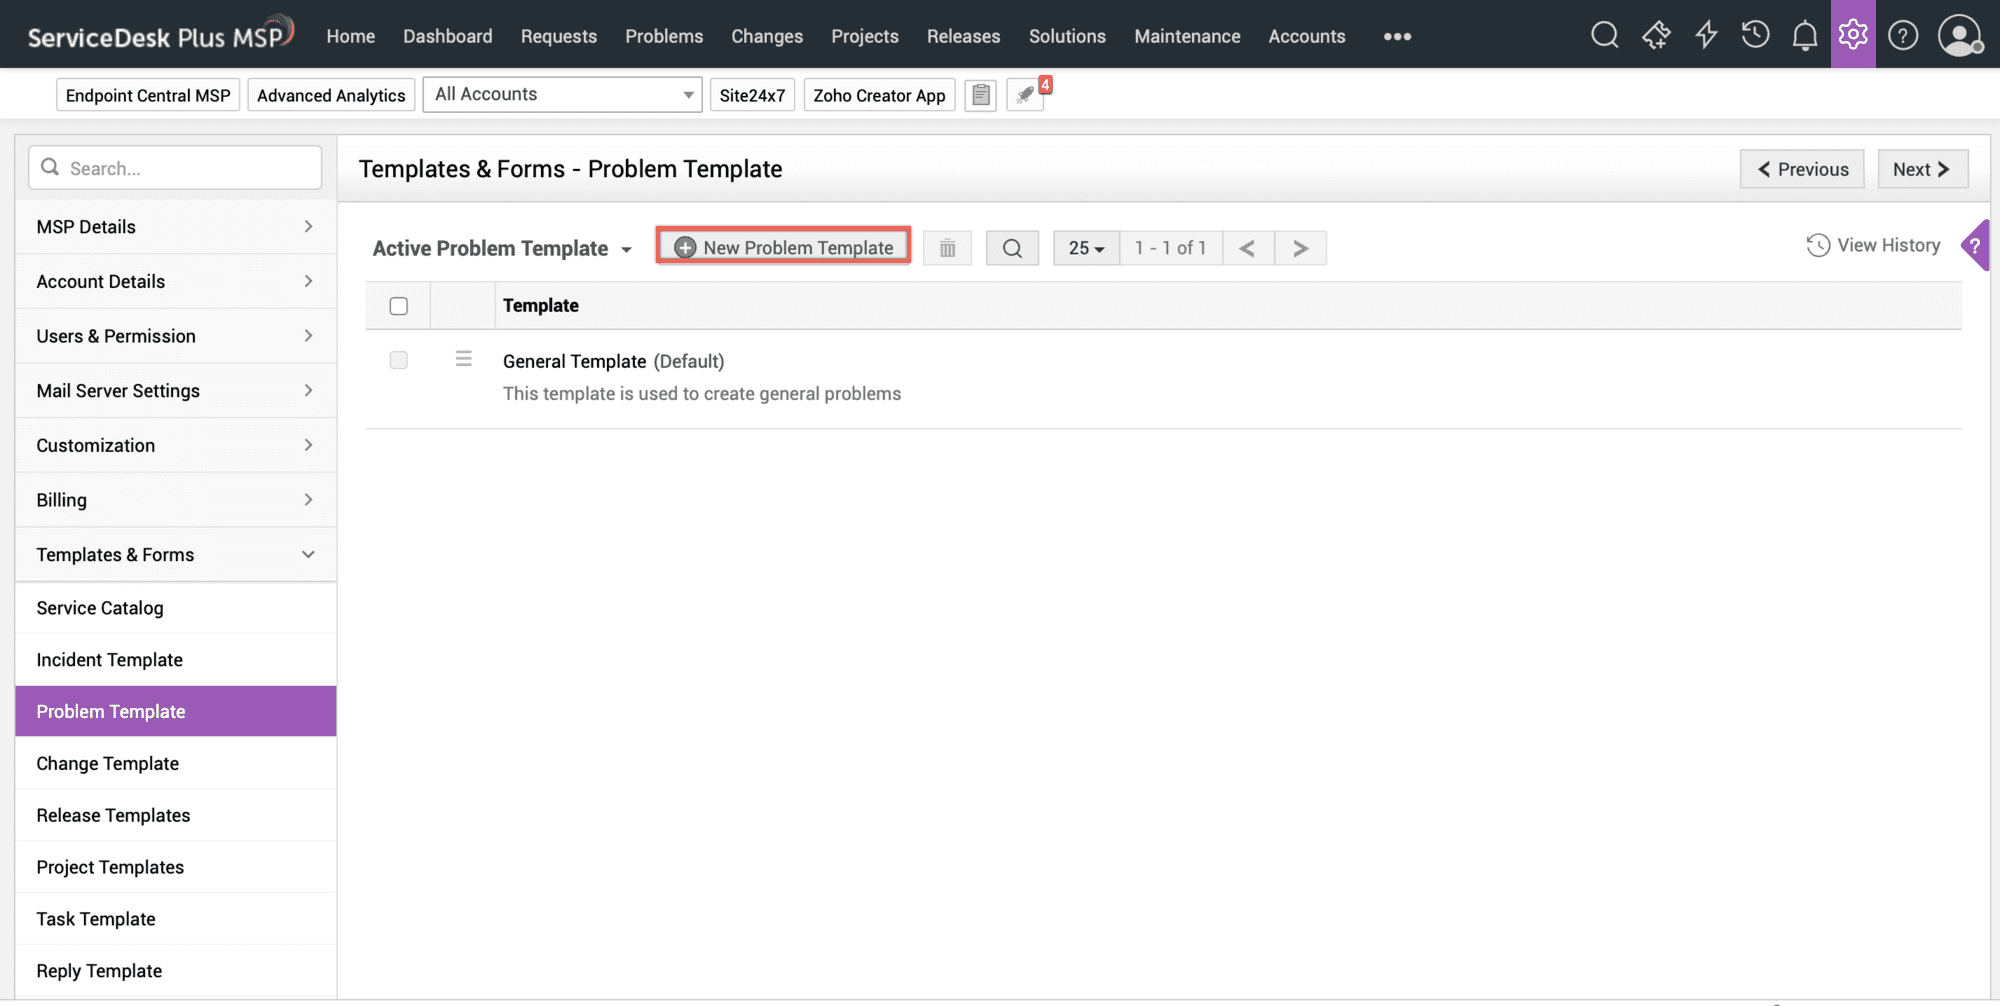
Go to Admin > Templates & Forms > Problem Templates.
-
Click New Problem Template.
Configure Template Details
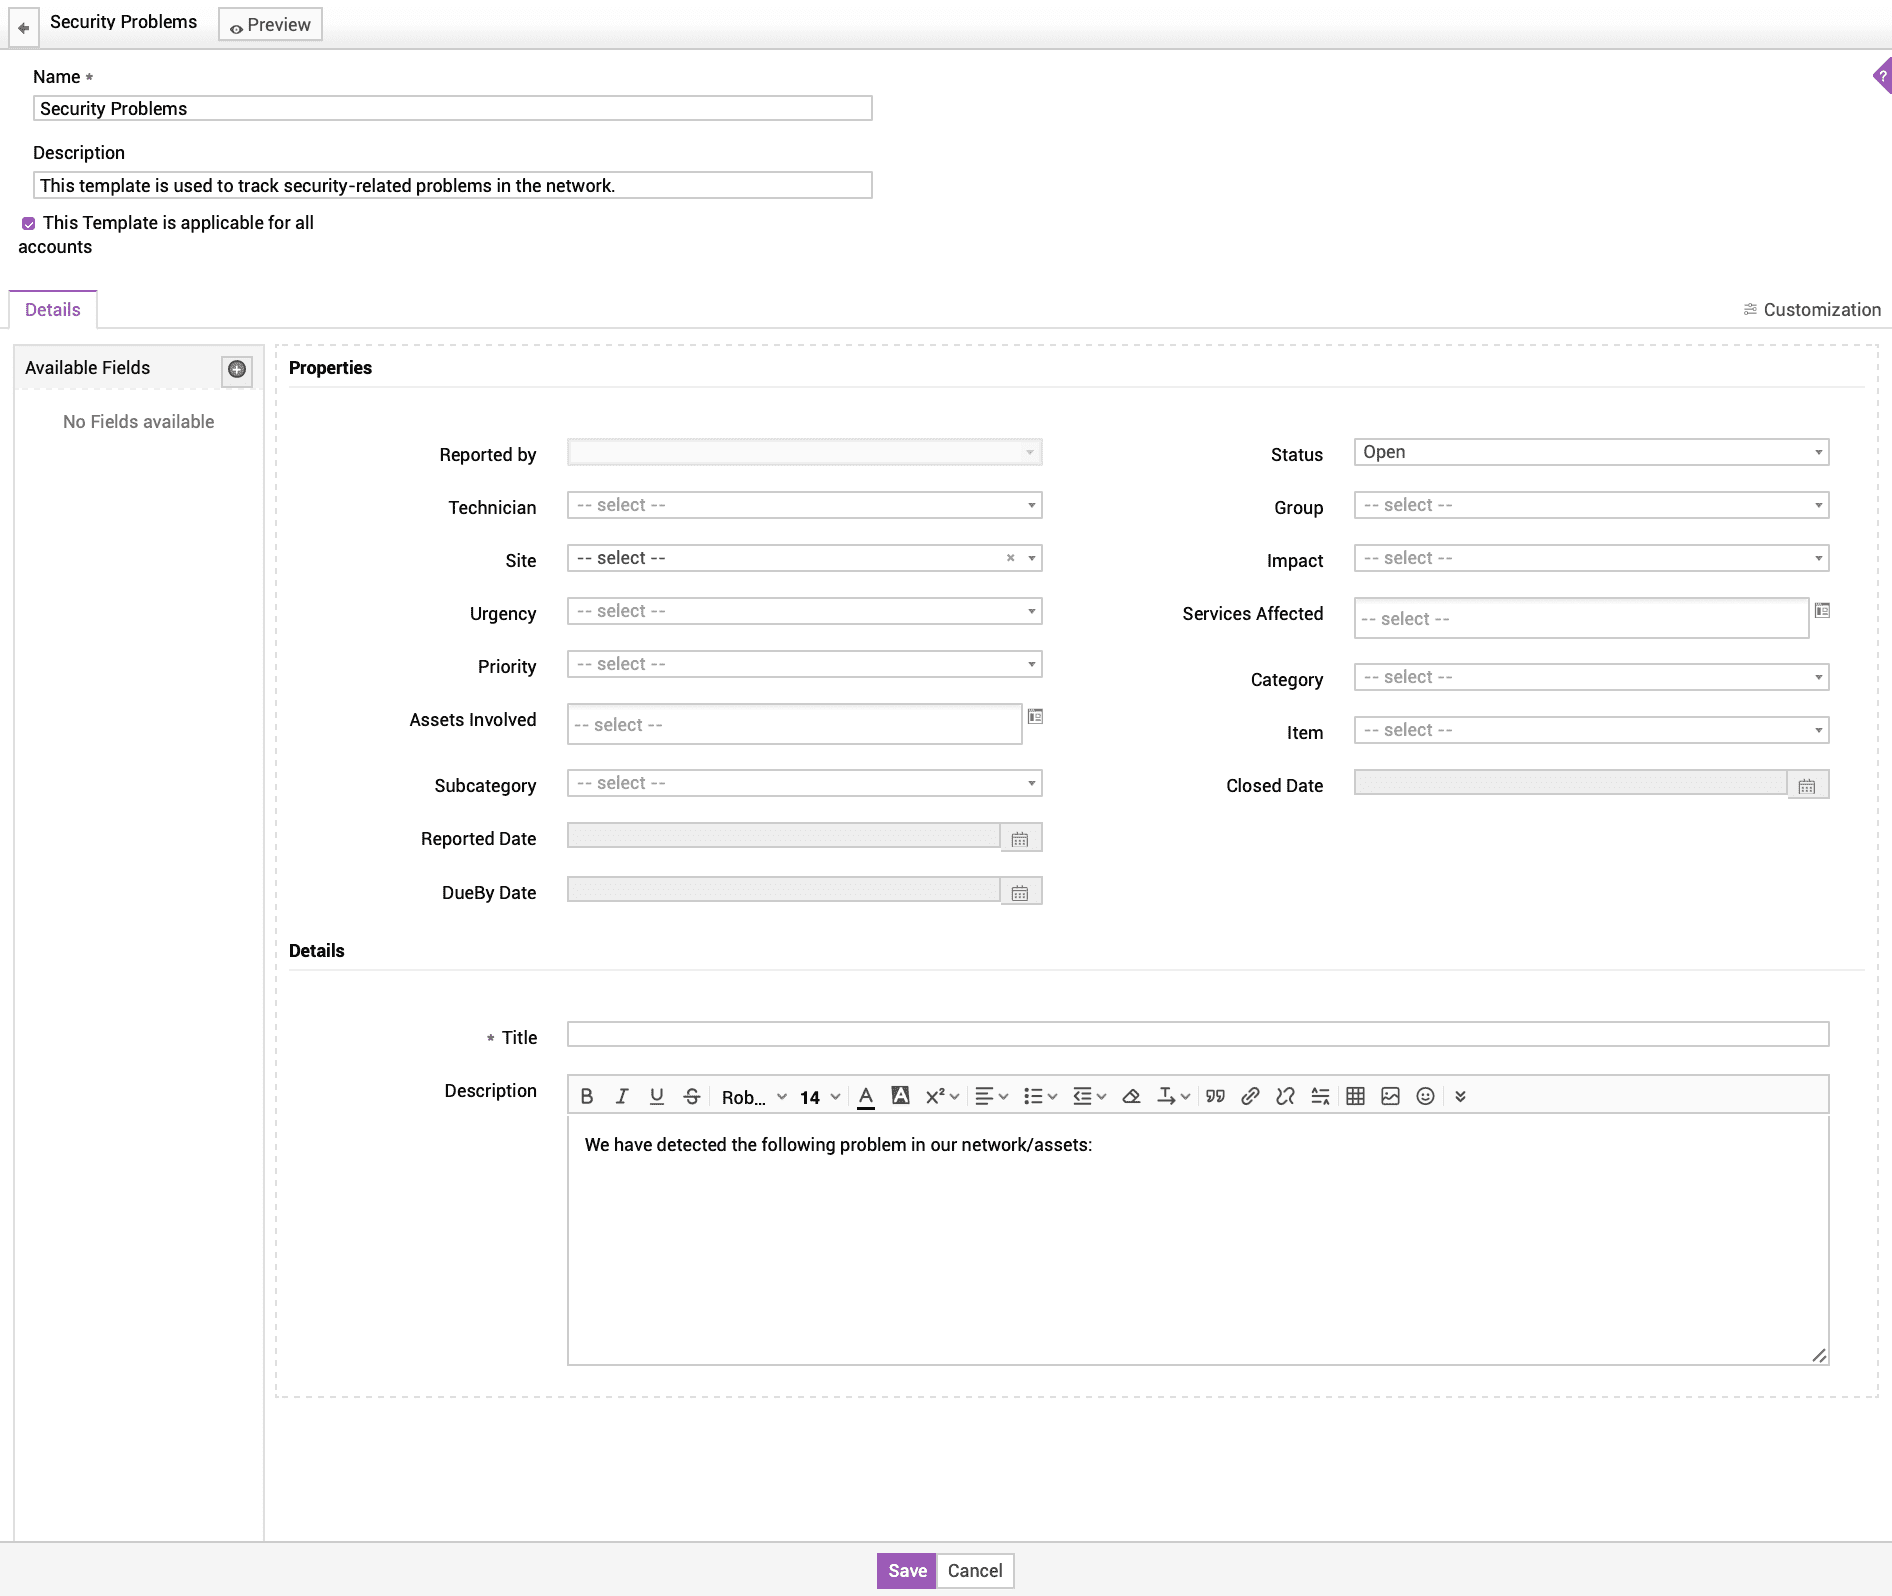
The template form comprises three sections: header, details (left pane), and canvas.
|
Header |
Provide basic details of the template.
Fields options will be listed based on to the chosen account(s).
|
|
Details (left pane) |
Contains default and additional fields configured in the application that are not used in the canvas. Drag fields to add them to the canvas. Click |
|
Canvas |
Contains fields to capture necessary problem information. Some of the fields are system-defined and cannot be removed. All other fields can be added/deleted. Further, you can define the field/section properties in the canvas.
|
Add Field/Section to Template
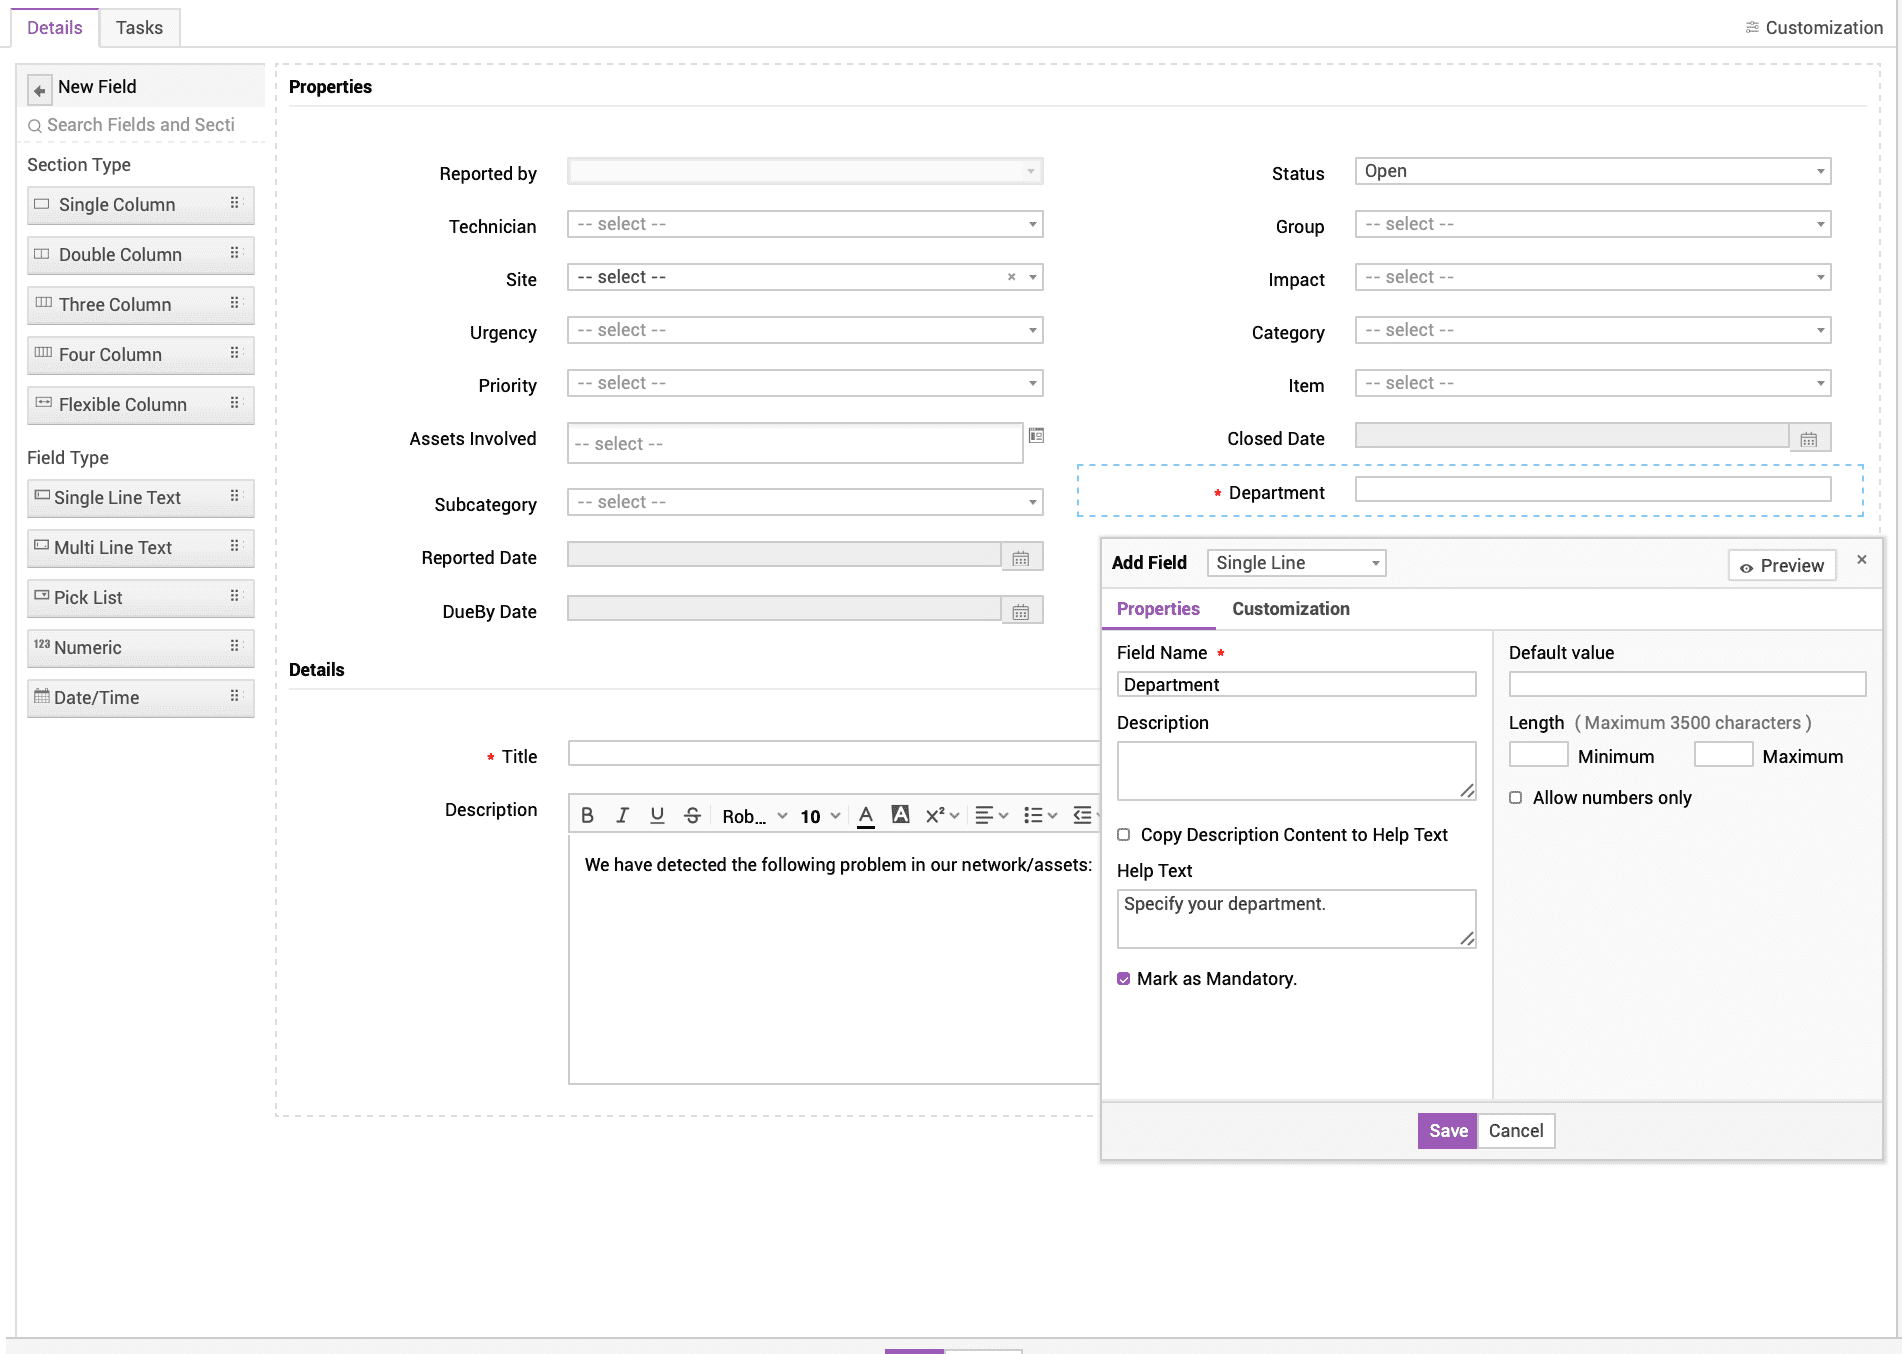
Fields are used to store information and organize the data displayed in a form.
-
In the left pane, click
 .
.
-
Drag a field type to the template canvas.
-
Based on the selected field type, the field properties vary. Click here to know how to configure different field types.
-
Provide Help Text to explain the field purpose to users while they create a problem using the template.
-
Mark the field as mandatory if needed.
-
You can customize the look of a field and section using the Customization tab.
-
Click Save.
Sections group fields logically making it easier for users to find problem details.
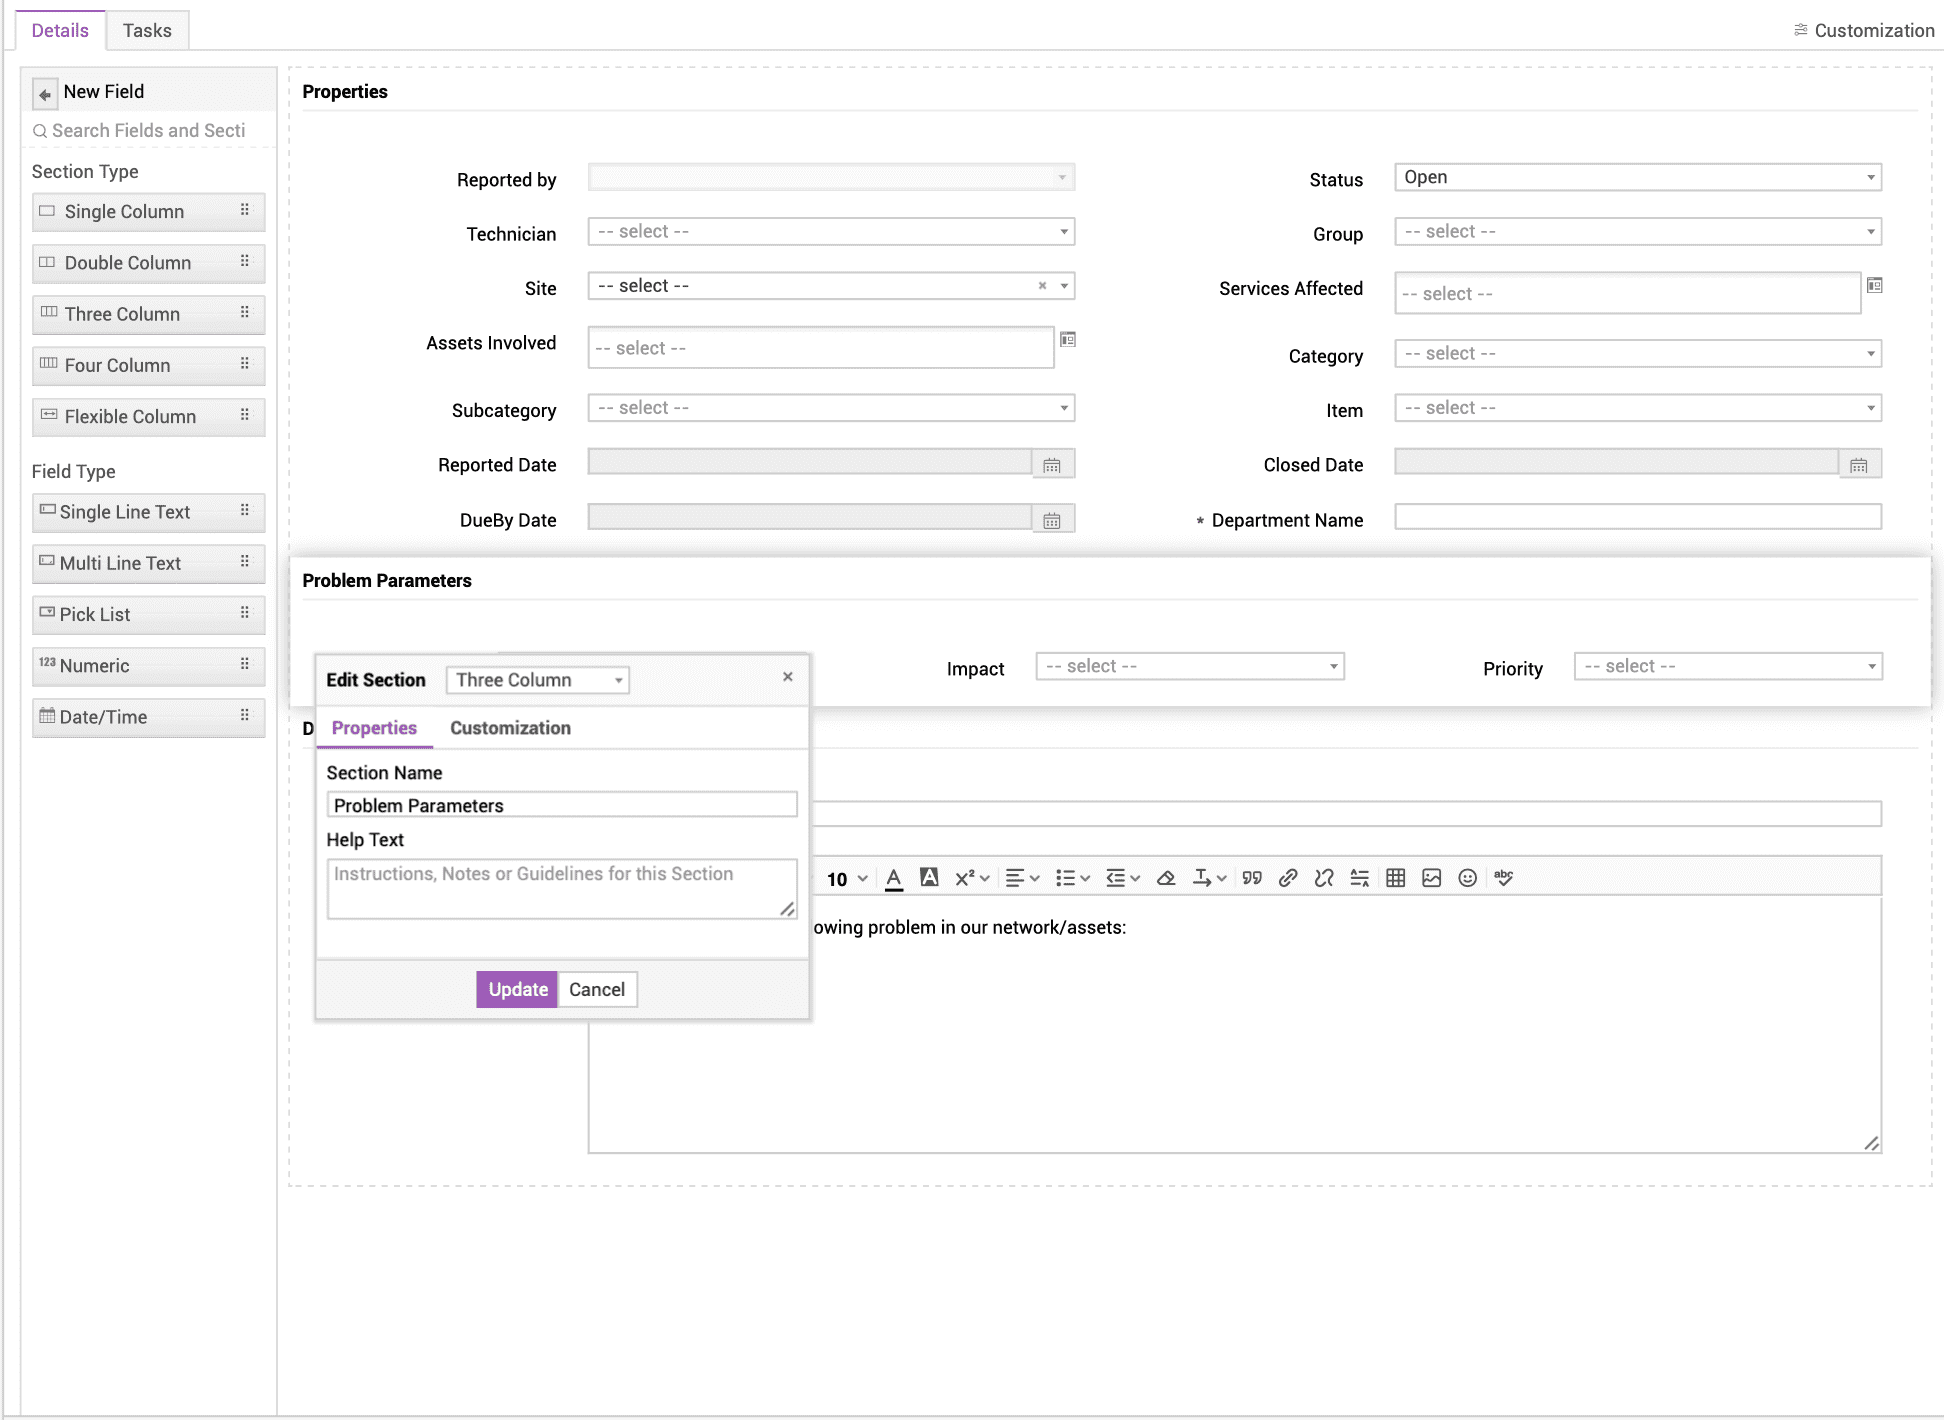
- Drag a section type to the template canvas. You can add sections of type single column, double column, three columns, four columns, and flexible column.
- Click
 to add section details.
 -
Provide a unique name to the section.
-
Add Help Text to explain the section purpose to users while they create a problem using the template.
-
You can modify the section type using the header drop-down.
-
You can customize the look of a section.
-
Click Save.
Flexible Columns: Add different column layouts within a single section. When a field is added, the existing fields auto-align to fit the flexible column's width. Hover over a field in flexible column to perform the following actions:
-
Adjust field width: Click
 or
or  to adjust the field width in the corresponding direction.
-
Justify field width: Click
 to justify the width of all fields in the corresponding row.
-
Add relative fields: Click
 and select the direction in which the field should be added. A field placeholder appears where you can drag and drop the required field.
-
Remove fields: Click
 to remove a field from the canvas. The remaining fields will auto-align to fit the flexible section's width.
You can add up to 12 fields in a flexible column row.

Form Customization
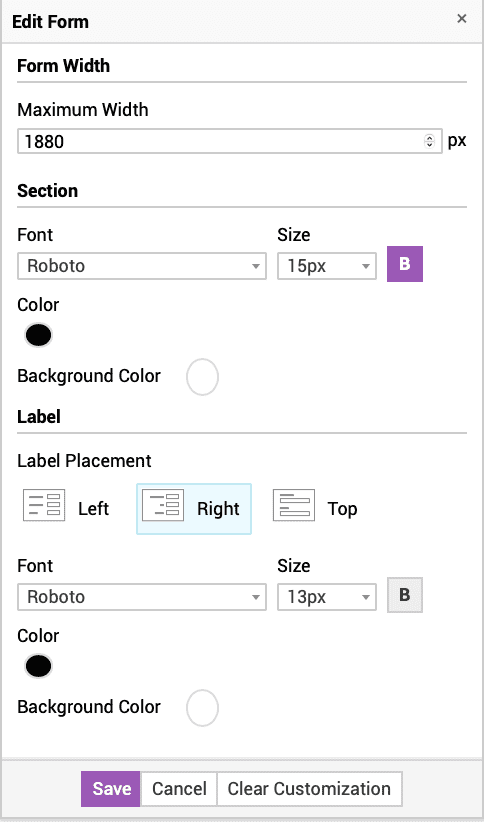
Problem templates can be customized using different fonts, font sizes, font colors, background colors, and label orientation. Form customization can be used to highlight important fields/sections and to improve the overall aesthetic.
Templates can be customized at three levels:
-
Template - Click Customization
 on the top right corner of the template. Template customizations will be applied to all sections and fields.
-
Section - Hover over a section and click
 . Go to the Customization tab to customize the section.
-
Field - Hover over a field and click
 . Go to the Customization tab to customize the field.
In the customization edit form for templates/sections/fields, you can configure:
- Sections (not applicable to field customization) - Change font, font size, and color, and the background color. You can also bold the titles.
- Labels - Change label placements to appear on the left, right, or top of the field box. You can also change the font, font size, color, and background color. Also bold the label if needed.
- Background Color - You can choose a background color for the template by clicking the
 icon.
icon.
After adding fields/sections and customizing the template, click Save. The form will reload and the Tasks tab will be displayed.
Associate Task Templates
You can associate task templates with a problem template to:
-
Standardize problem resolution process
-
Reduce time taken to understand the problem and decide on the resolution strategy.
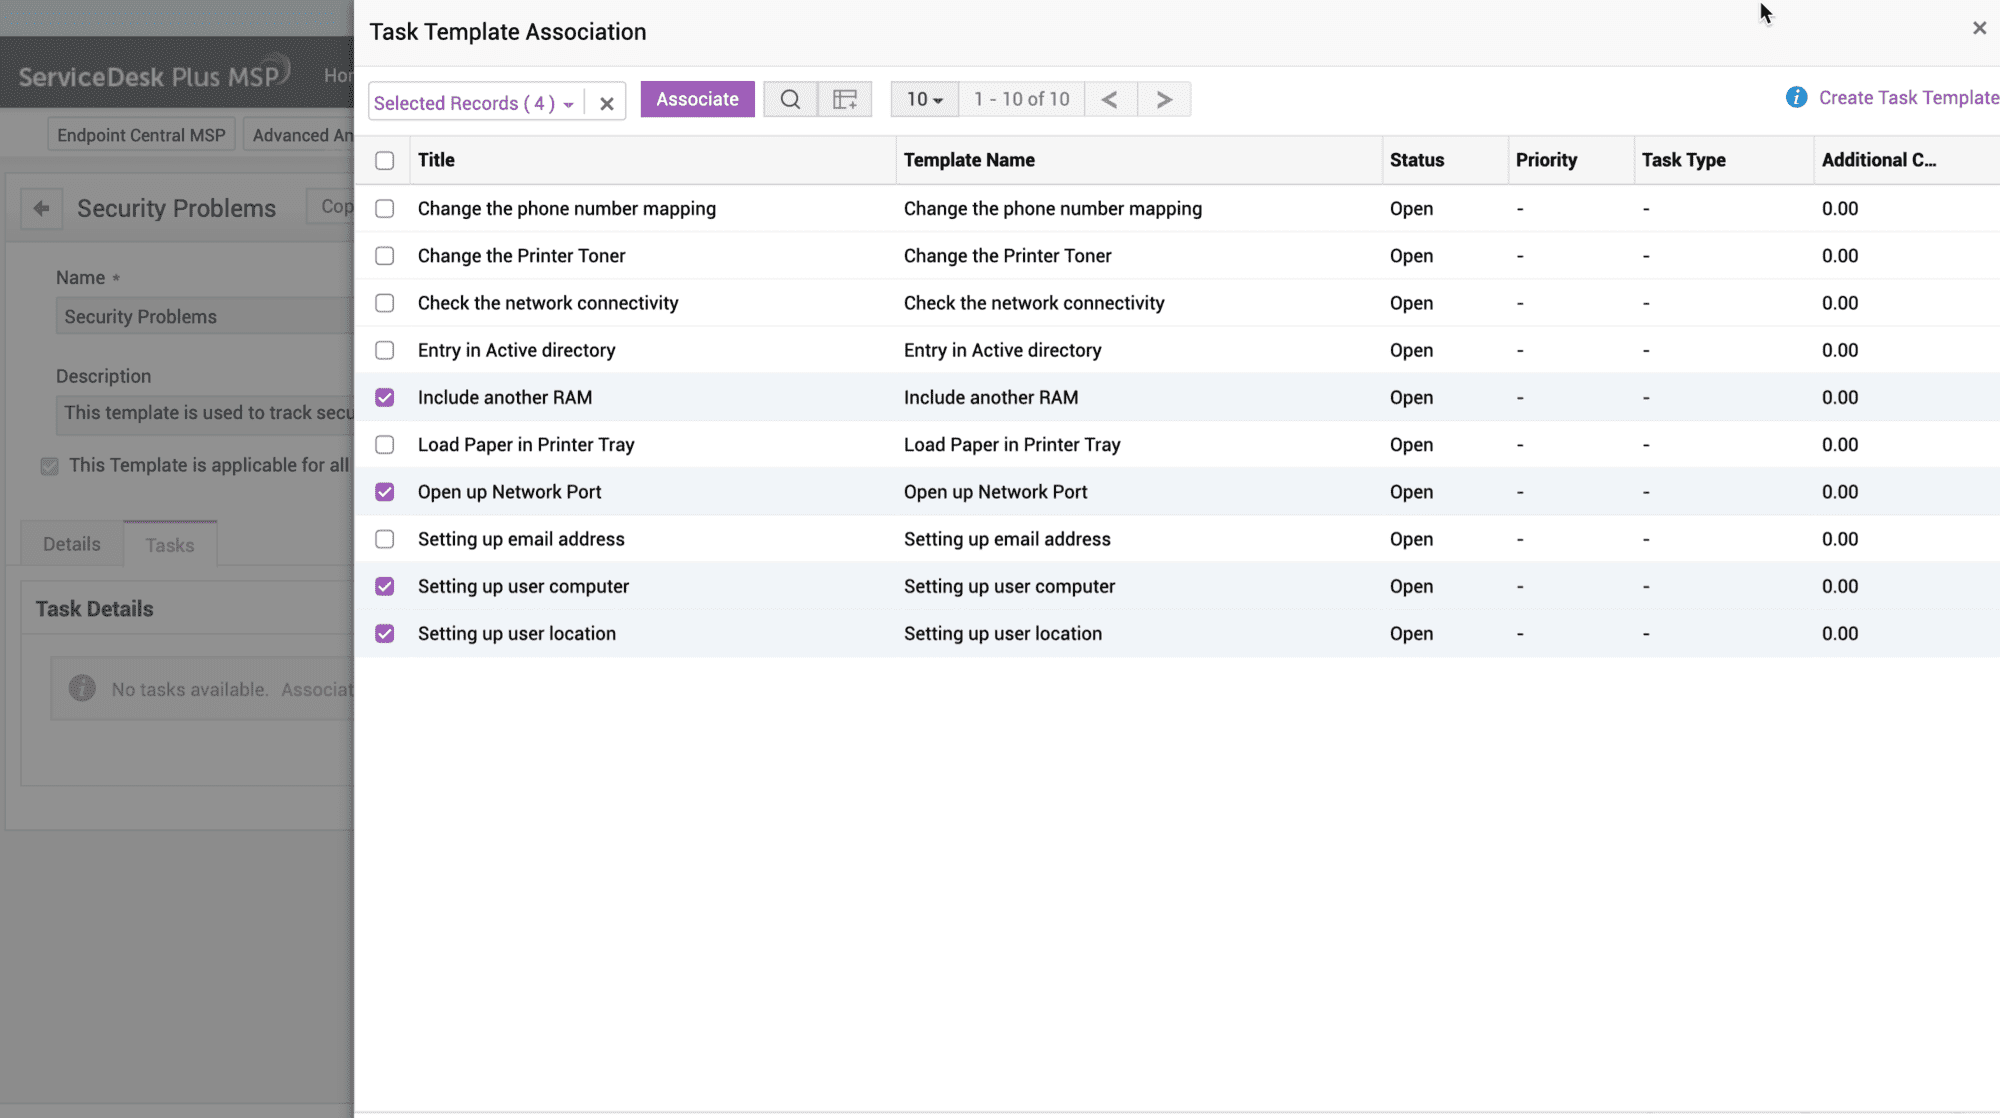
After saving the problem details, go to the Tasks tab to associate tasks to the problem template.
-
Click Associate to add a task from task templates.
-
From the list of task templates displayed, select the tasks to be associated.
-
Click Associate.
You can design task templates for the problem template by clicking Create Task Template. Refer to this page to learn how to configure a task template.
After adding task templates to a problem template, you can perform the following actions on the tasks:
-
Delete Tasks - Select the tasks to be dissociated and click.

-
Search Tasks - Click
 to perform a column search on the listed tasks.
-
Add/Remove Columns - Click
 to modify the columns present in the task list view.
-
Mark Dependency - Click Dependencies to go to the task dependency map where you can mark the parent and child tasks.
-
Organize Tasks - Organize the order of task execution using the Organize button.
Preview Template
Use the Preview button to see how the template would appear to technicians.

Copy Template
You can copy saved templates to reuse them.
-
Open the required template from the problem template list view.
-
Click Copy Template on the template header.
-
Enter a new name of the template and click Copy.
-
Open the copied template from the list view and make the necessary changes.

List View Actions
Problem templates created are itemized on the list view page. Use the filter drop-down on the page header to view the active/inactive problem templates in the list view.

You can manage them from the list view page and perform the following actions:
-
Edit/delete template - Click
 to edit or delete a template. To delete templates in bulk, select the required templates and click.
-
Set template as default - Set the frequently used template as default template by clicking
 .
.
-
Search templates - Click
 to search through templates.
-
Limit records displayed - Limit the number of records displayed in the list view by invoking the corresponding drop-down.
-
Reactivate template - In the Inactive Templates filter, click
 beside a template and select Mark as active.
Use Cases
1. Scenario: Create problem requests for the following frequently occurring problems by capturing relevant details in the problem form:
-
Network outage
-
Storage Issues
-
Applications crash
-
Print server connectivity
-
Internet issue (Wifi / LAN)
-
Barcode machine failure
-
Network files accessibility
Configuration: Create problem templates for each problem and configure additional fields specific to the problem in the relevant template.
|
Problem Template |
Additional Fields Added |
|
Network outage |
Network Name - Picklist |
|
Storage Issues |
Space required (in GB) - Number |
|
Application crash |
Application Crashed - Drop-down Error displayed (if any) - Single line Criticality - Picklist Issue faced - Multi-line Potential crisis - Multi-line |
|
Print server connectivity |
Printer Name - Picklist |
|
Internet issue (Wifi / LAN) |
Network Name - Picklist |
|
Barcode machine failure |
Machine Serial Number - Number |
|
Network files accessibility |
IP range - Single line Subnet details - Number |
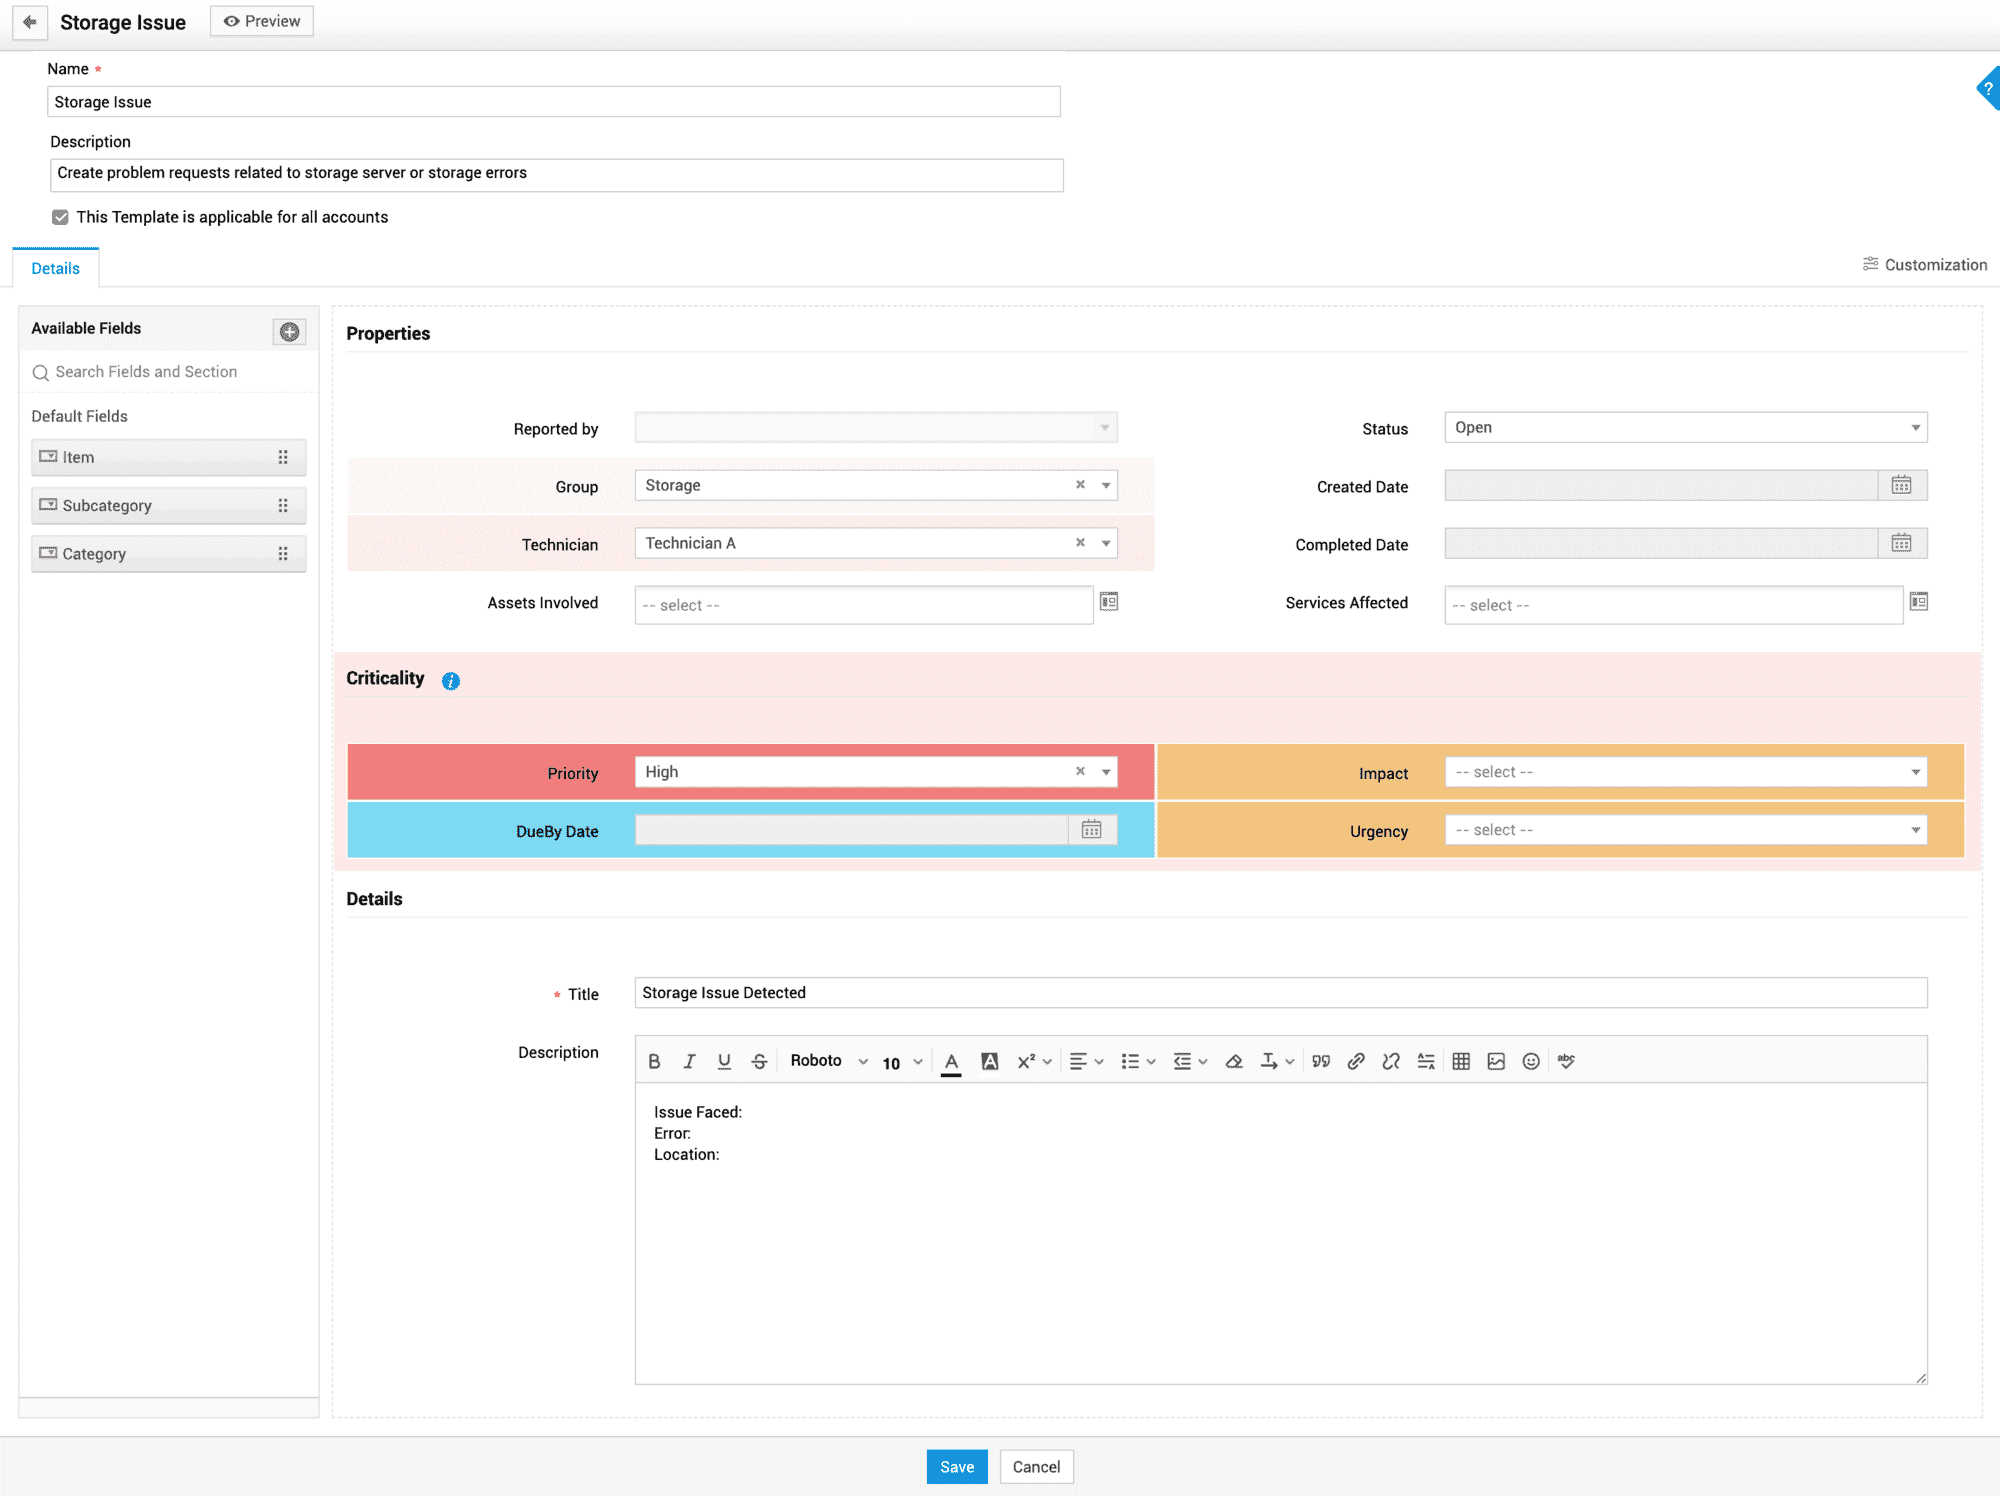
2. Scenario: Ensure storage-related problem requests are updated as high-priority and assigned to Technician A in Network support group. Highlight fields relating to the problem priority and impact.
Configuration:
-
Create a problem template named Storage Issue.
-
In the problem template, pre-select the following fields with default values.
-
Priority - High
-
Group - Storage
-
Technician - Technician A
-
Create the following sections and group fields as below:
|
Section |
Fields grouped in the Section |
|
Criticality |
|
|
Impacted Areas |
|
-
Edit the section details and under Customization tab, add background colors to the Criticality and Impacted Areas sections.
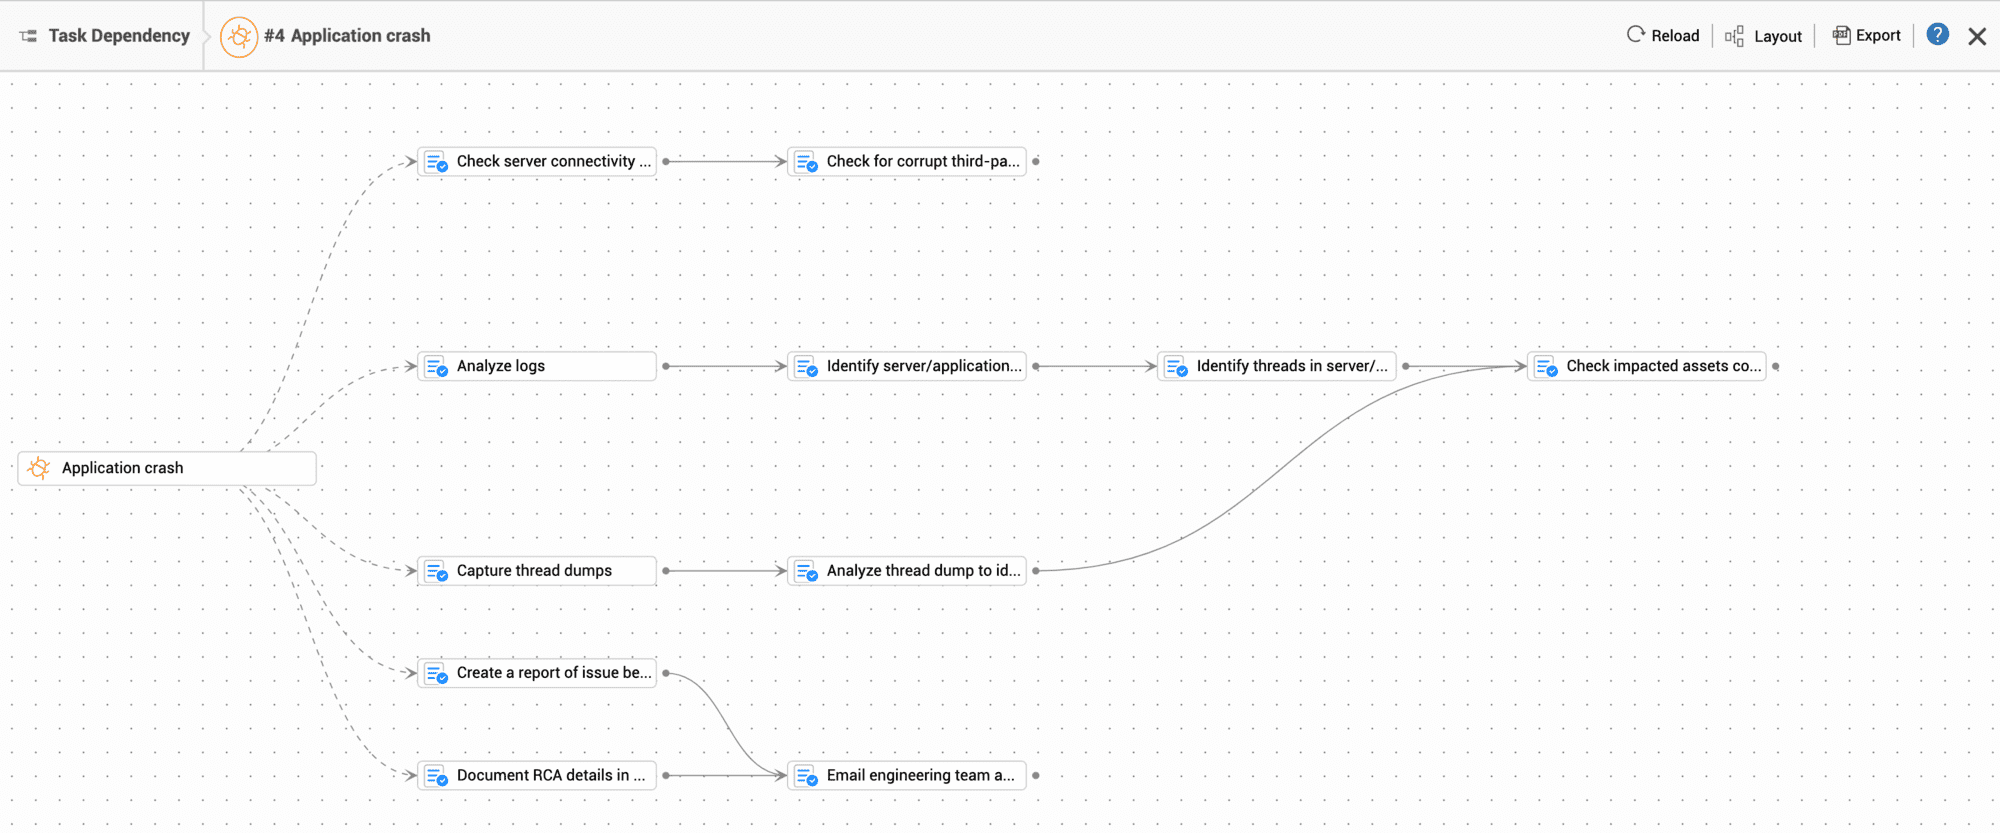
3. Scenario: Trigger repetitive tasks involved in RCA analysis automatically when a application crash problem is logged. Mark related tasks so that they are executed sequentially.
Configuration:
-
Create the following task templates under Admin > Templates & Forms > Task Templates:
-
Check server connectivity and health
-
Check for corrupt third-party PDBs in server
-
Analyze logs
-
Identify server/application processes that consume high computing power
-
Identify threads in server/application processes with increased computing power
-
Capture thread dumps
-
Analyze thread dump to identify code causing spike in CPU
-
Check impacted assets configuration records
-
Document RCA details in problem request
-
Create a report of issue behavior vs the expected behavior
-
Email engineering team and other stakeholders
-
In the Application crash problem template, go to Tasks tab and associate the task templates mentioned above with the problem template.
-
Click Dependencies. Link parent and child tasks as follows:
|
Parent Tasks |
Child Tasks |
|
|
Check server connectivity and health |
Check for corrupt third-party PDBs in server |
- |
|
Analyze logs |
Identify server/application processes that consume high computing power |
Check impacted assets configuration records |
|
Identify threads in server/application processes with increased computing power |
||
|
Capture thread dumps |
Analyze thread dump to identify code causing spike in CPU |
|
|
Document RCA details in problem request |
Email engineering team and other stakeholders |
- |
|
Create a report of issue behavior vs the expected behavior |
||
