Zia Bot Workflow
The Zia Bot workflow helps you define the various actions that must occur in response to specific user input or choices.
Using the Zia Bot workflow, you can easily define a directional workflow for the various actions that must be performed in response to user queries.
Role Required: SDAdmin
Defining the Zia Bot Workflow
- The Zia Bot workflow can be defined easily through a few drag and drop actions on a graphical user interface.
- Go to Admin > Zia Bot > Configure Zia Workflow
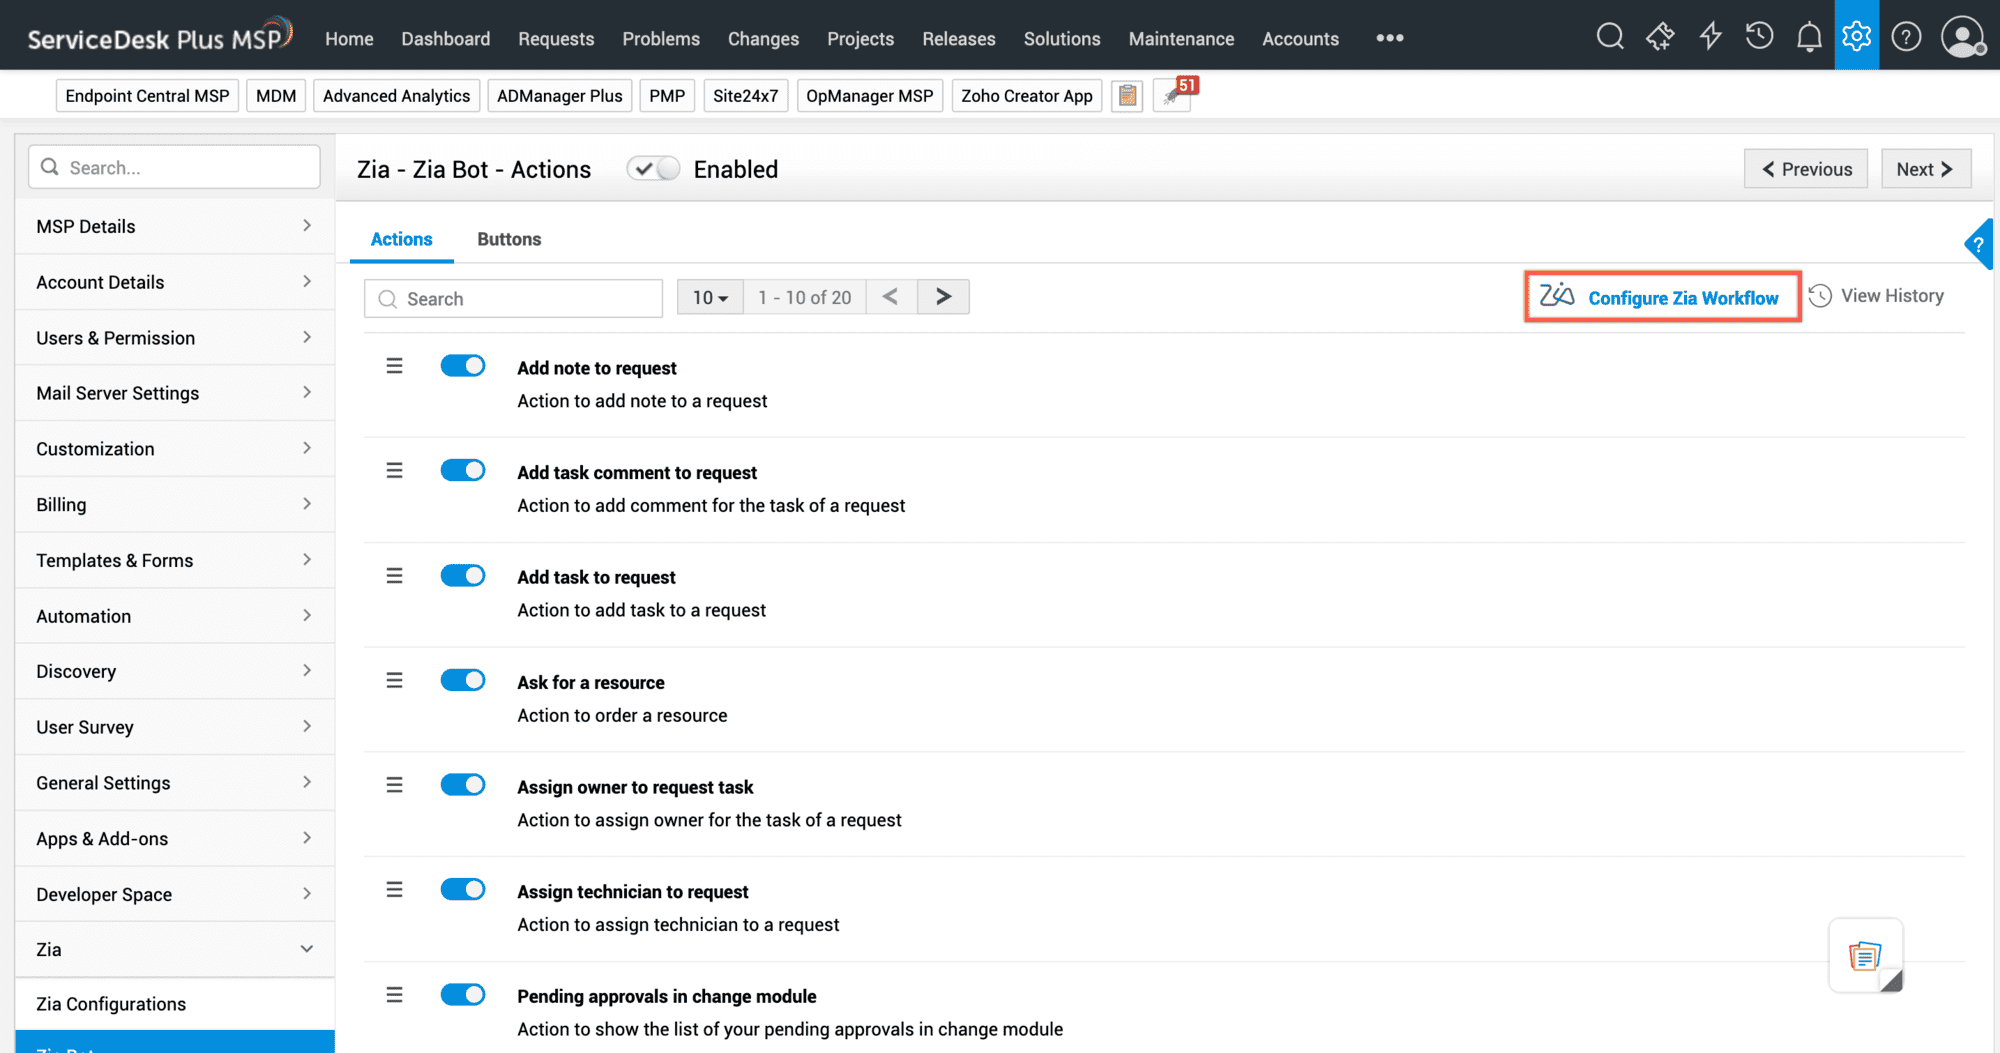
- The Zia Workflow configuration page opens a canvas for you to create a graphical workflow.
- You can either edit the nodes in the canvas according to your requirement or delete all nodes and create the workflow from scratch.
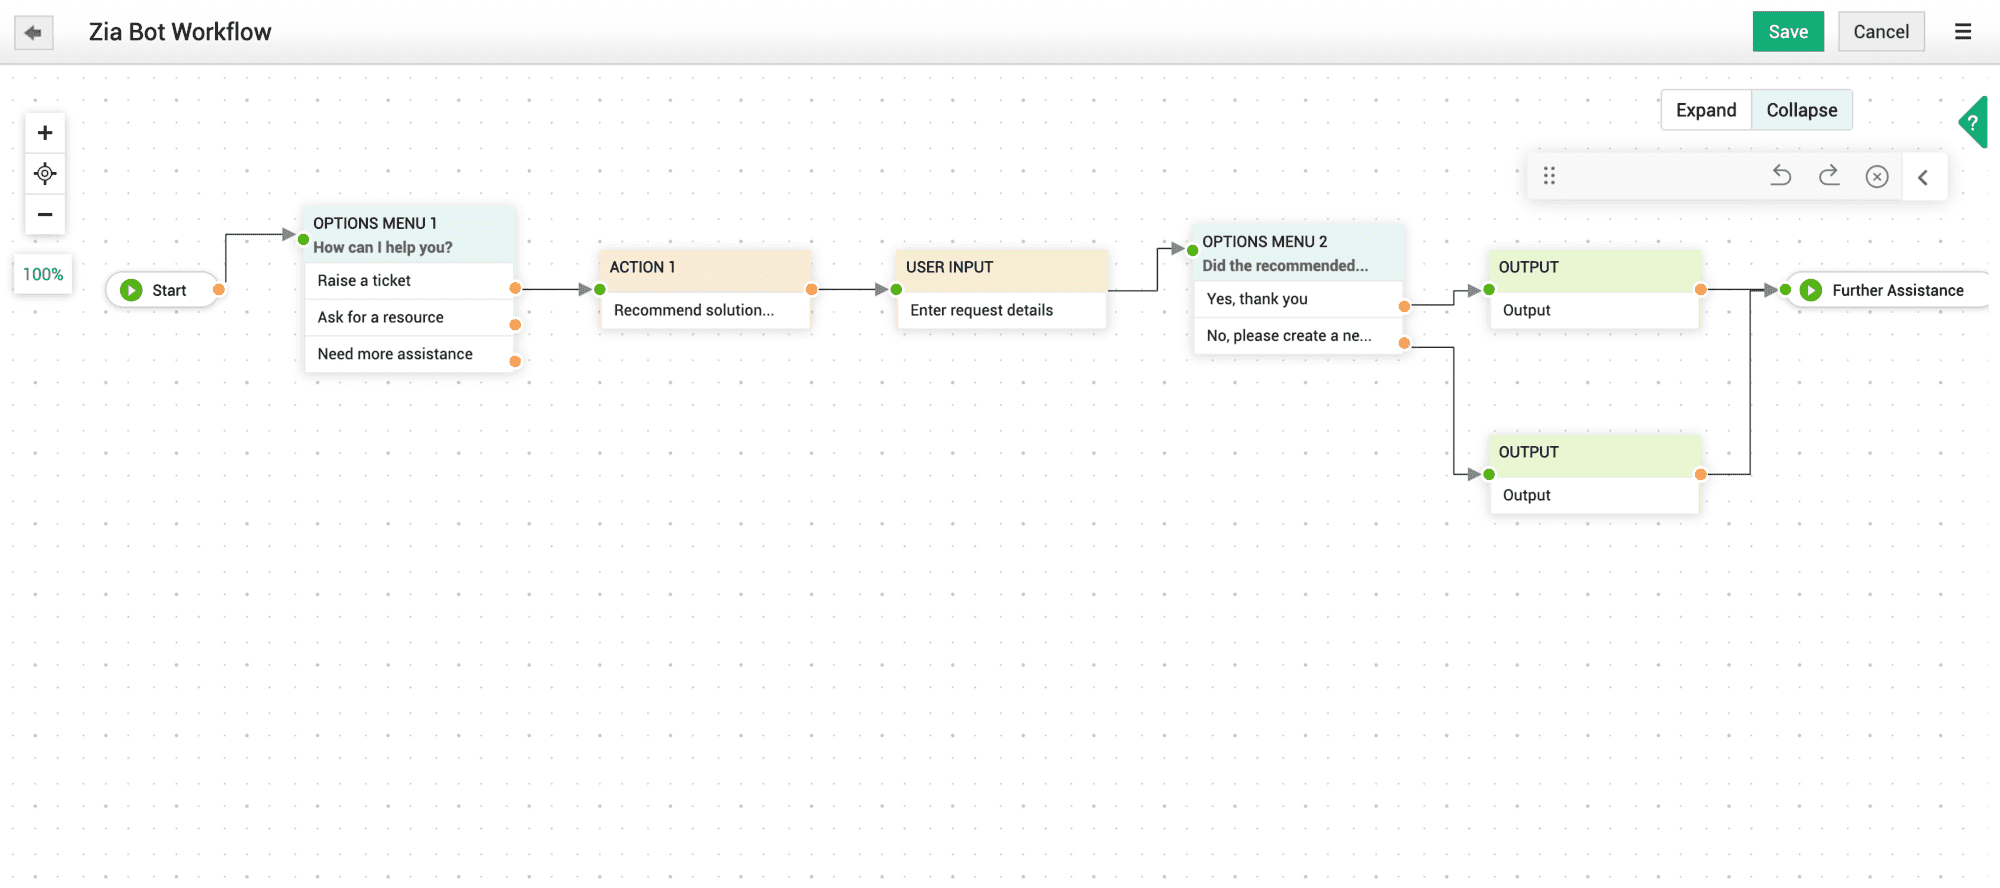
- There are two nodes that can be added by the user to create a workflow: Options Menu and Actions.
- Options Menu is the list of various options or choices that you can provide the customer. Each of these options or choices is also called a button.
- An Action is what happens in the application when a user chooses a button.

Adding an Options Menu
- To add an Options Menu,
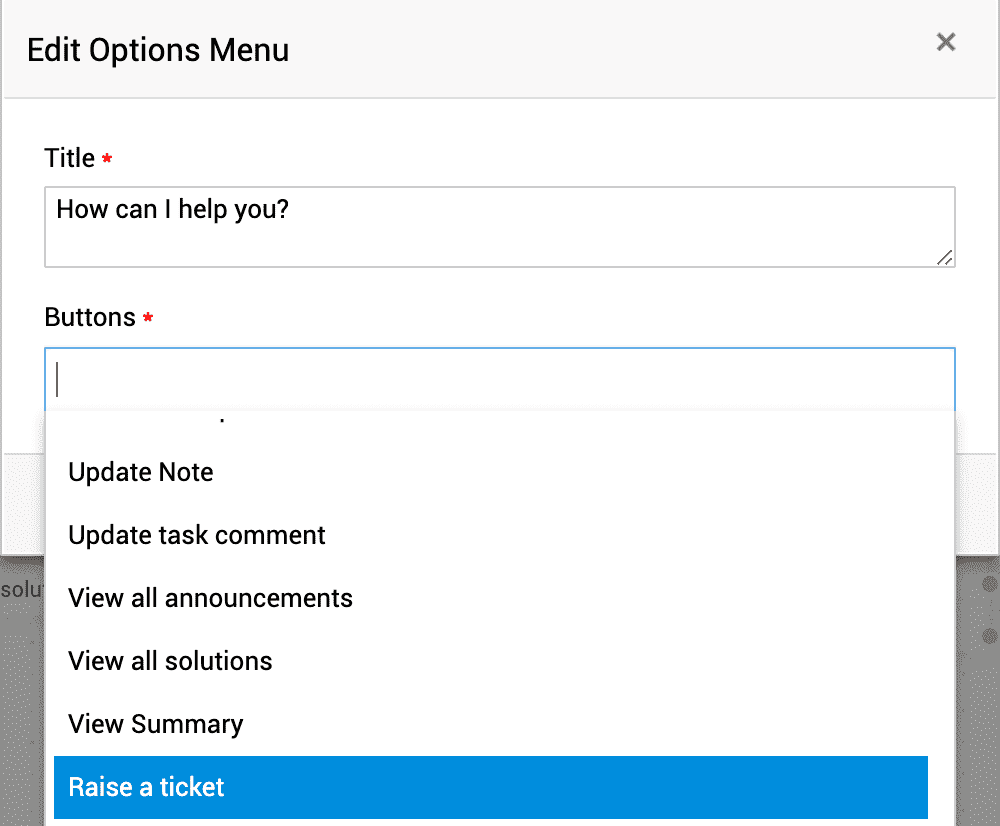
- Drag the Option Menu from the floating panel into the canvas
- Give it a Title.
- Select from the list of buttons available or create a new button.
- To add a new button, type the button name and press Enter.
Adding Actions
- Existing options menus come with predefined actions. You can view this simply by clicking on the button added to expand the view.
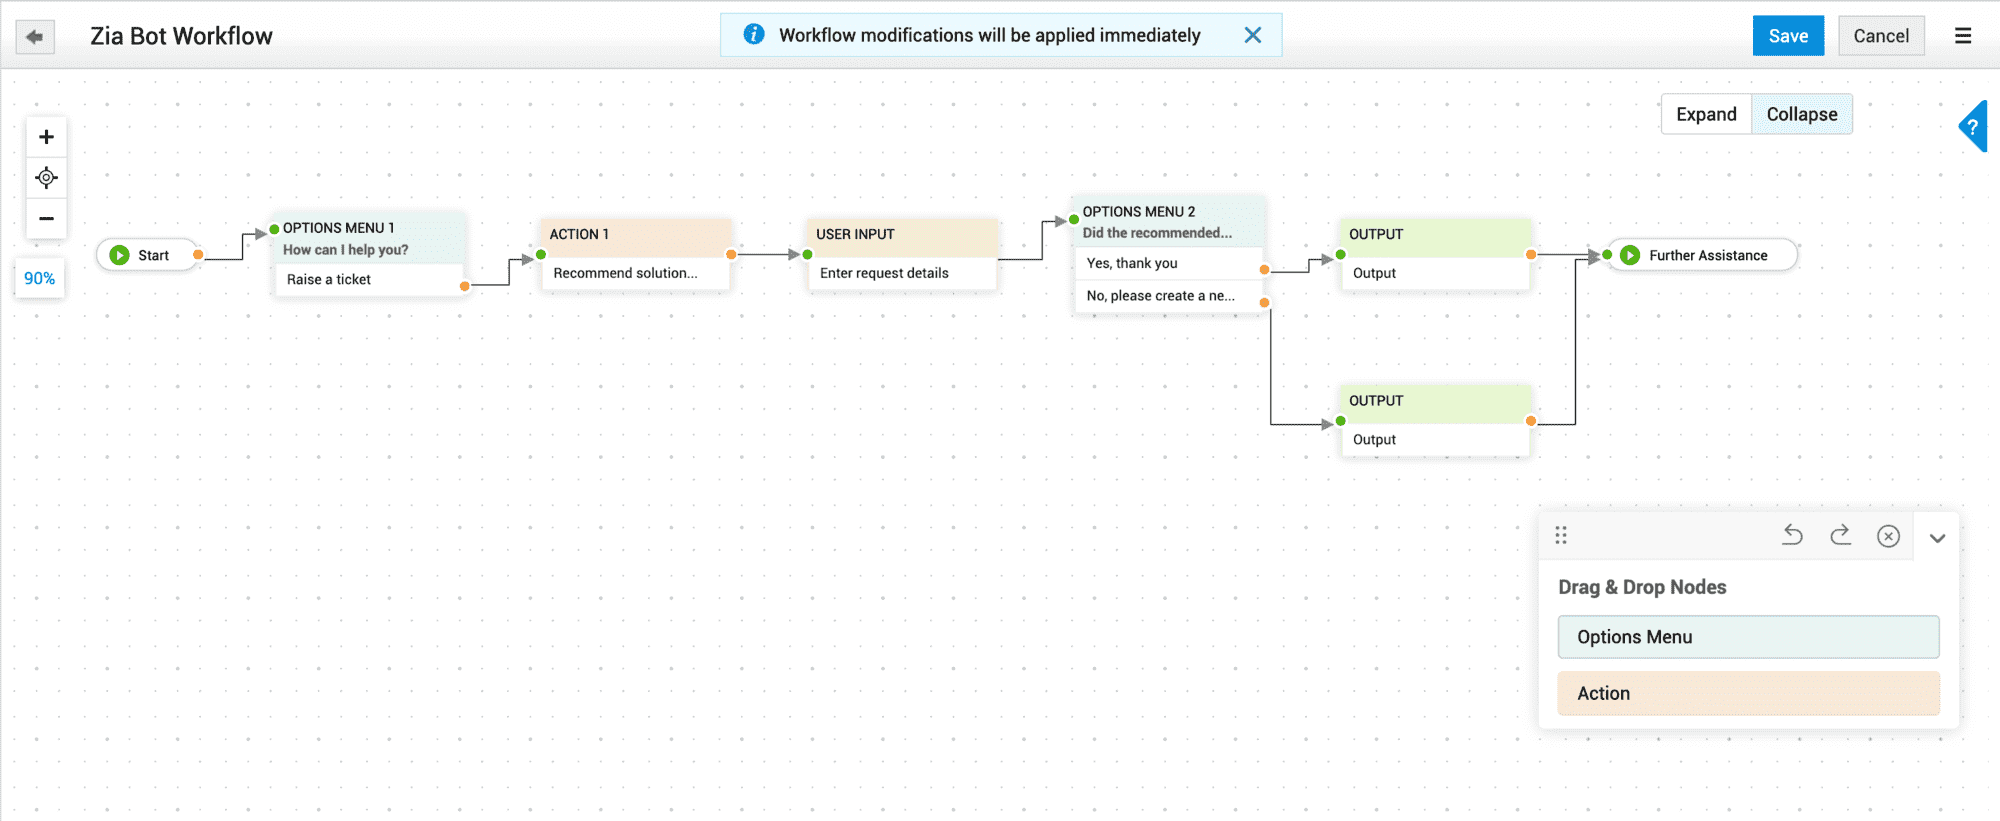
- However, when creating a new button, a custom action must be created and connected with an options menu.
- Click Save to complete the workflow.
Button > Action > User Input > Output Node > Further Assistance
For a button with action to be valid within the workflow, it must follow this sequence.
Creating a new custom action
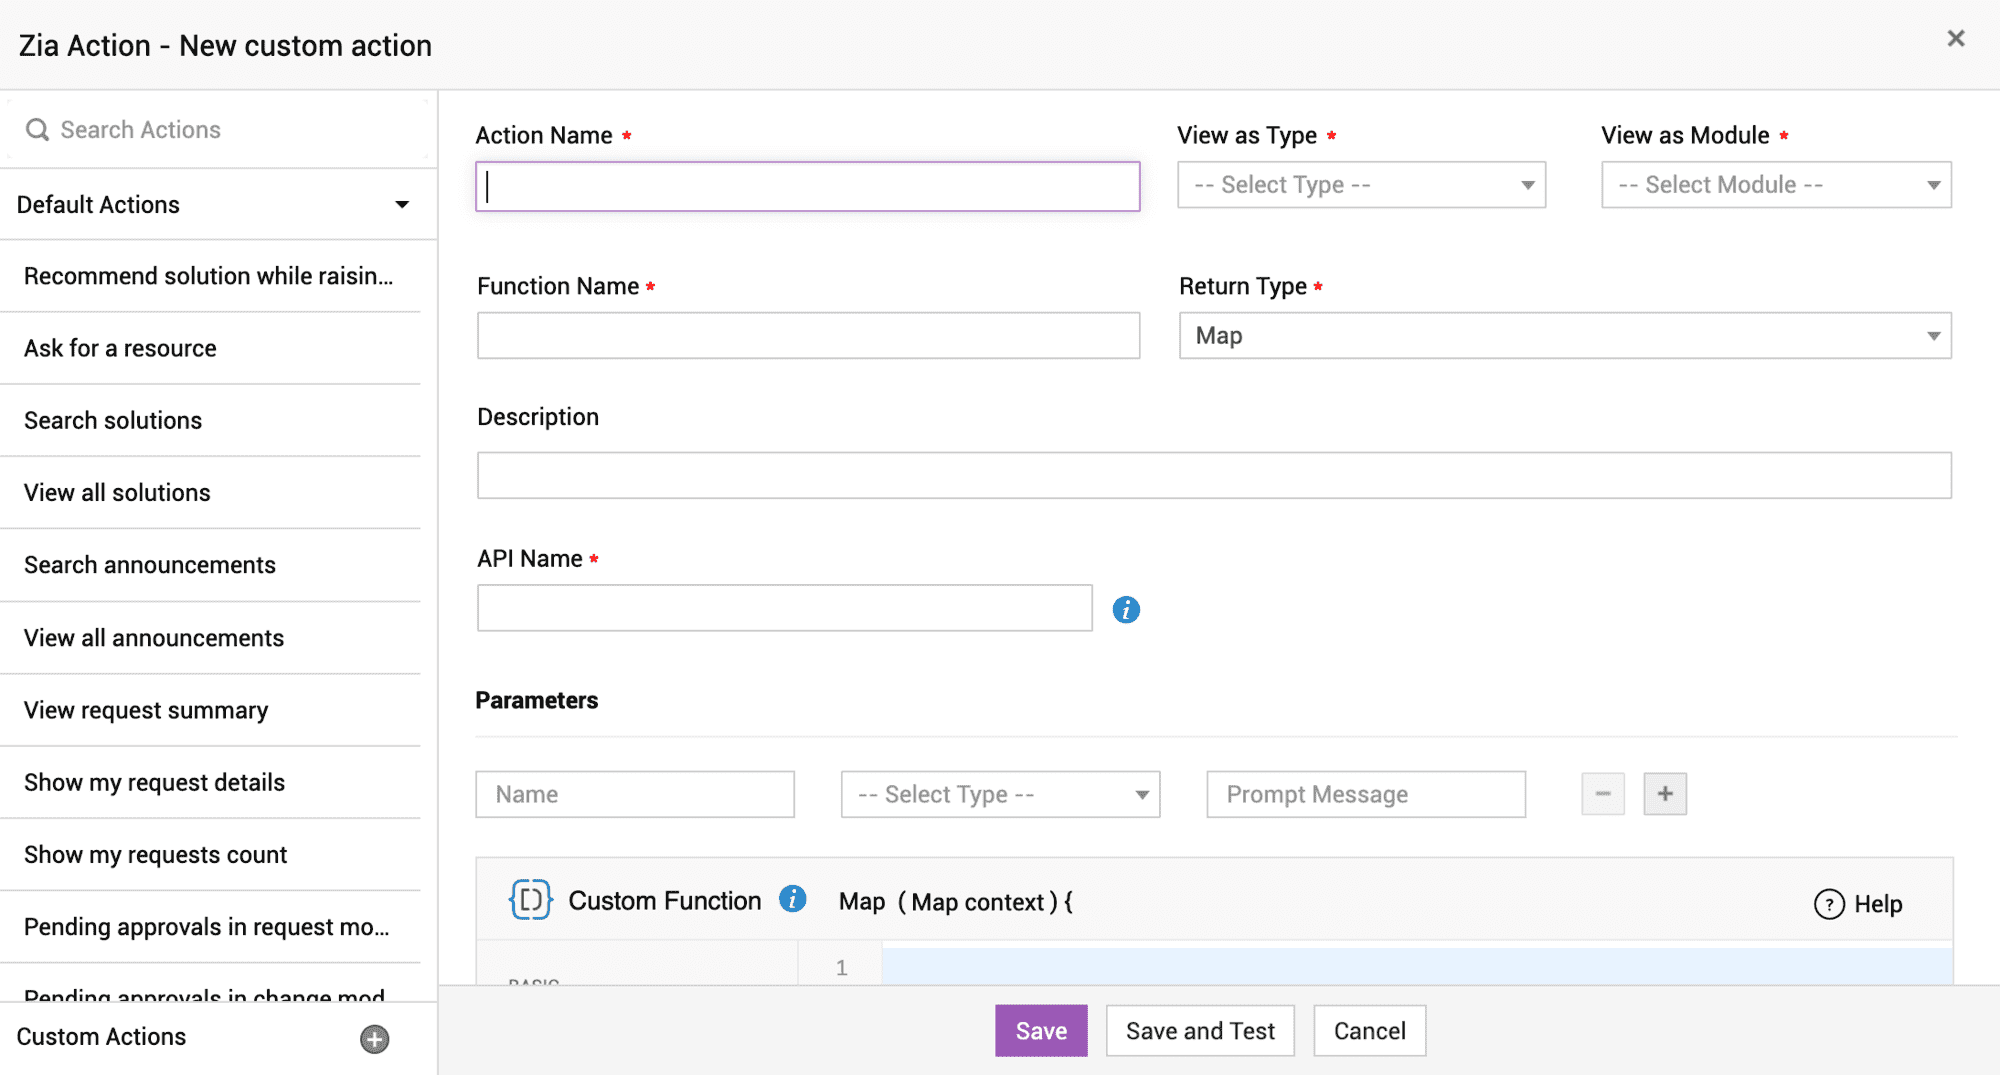
- Go to Actions > Custom Action or drag and drop the actions node from the floating panel.
- Click
 next to Custom actions and fill out the following fields:
| Field | Explanation |
| Action Name | Provide an appropriate name for the action so that it is easily identifiable. |
| View as type |
Under View as Type, select from List, Count, Summary, or Message. These are the various ways to display the message to the user. |
| View as Module | Select the required module from the drop-down. |
| Function name and return type | Provide the function name and select the return type from the drop-down. |
| Description | Provide a description that captures the need for this custom function. |
| API Name | Make sure you provide the complete API name of the function that is called and make sure it is unique and not used in any other custom functions. |
| Parameters | Before you proceed to define the custom function, add the required parameters. Use the + icon to add more parameters. |
| Custom Function | Define the custom function using Deluge Script Editor |
- Click Save or Save and Test to complete creating the custom function.
- Connect the newly created button to the custom action.
Note:
Only the validated workflows will be saved.
If your workflow is not saved, please check for the following:
- Invalid or unconnected Action or Options Menu nodes
- Invalid or incomplete connections for the buttons
- Invalid connectors
- Connector from a button's output, which is already connected to another node
- Connecting to an already connected node
Custom Action - Use Cases
Zia is an AI-powered chat bot within ServiceDesk Plus that helps optimize the efficiency of your help desk.
You can use Zia chat bot to offer instant customer support by answering questions and providing necessary information without any involvement of human agents.
Before you start configuring the workflow of the Zia Chat Bot, keep in mind the following:
Goal: Identify the goals of your chatbot. Determine the specific use cases and scenarios where Zia will be used. For example, in ServiceDesk Plus MSP, you can use Zia to track requests, view associated tasks, track contracts, view changes, and many more. Zia can also be configured to provide information on HR policies, employee benefits, office locations, can services, availability of conference rooms, and more.
Input Handling: Define the number of Options Menu or Buttons required to handle all the user inputs in order to detect user intent, extract the necessary information from the application, and display the required information to the user.
Configure Workflow: Design the workflow by mapping out the possible paths the conversation can take.
Response Generation: Based on user input, determine the appropriate responses the chatbot should provide.
Here are a few common use cases where you can use Zia Chat Bot within ServiceDesk Plus MSP:
Customer Support: Track Request Tasks
Requesters log several incidents or service requests in the help desk. After logging the requests, they may want to keep track of the requests or access any other request information.
Based on what the users require, Zia can provide the details without involving any technician.
So, before configuring the workflow, define the outline of the conversation path. In this case, the conversation path may flow as follows:
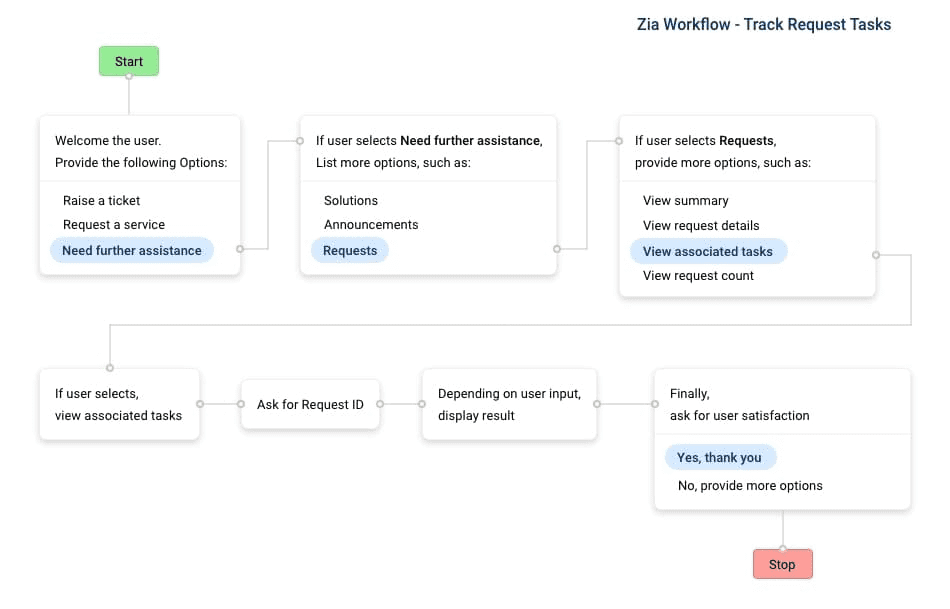
To configure this workflow, make sure you already have configured the following options menu, along with the buttons in the Zia Workflow canvas:
Note: The buttons can be created under the Options Menu after dragging them onto the canvas.
| S.No | Options Menu | Buttons |
| 1. | Welcome message <How can I help you?> |
|
| 2. | Display further options (user selects Need further assistance) |
|
| 3. | Display further options (if user selects Requests) |
|
| 4. | Display further options ( if user selects view associated tasks) |
|
| 5. | Finally, ask for user satisfaction |
|
The custom function used for this case is as follows:
response = invokeurl
[
url: "https://0457-08:8080/api/v3/requests/" + requestID + "/tasks"
type: GET
headers: {"TECHNICIAN_KEY":"A2EC2620-4A4A-491A-B720-78DDC70A4171"}
]
return response;
To configure the specific custom action, go to Admin > Custom Functions > Zia Functions
Display Change Details Based on Stage and Status
Requesters with specific permissions may wish to view the details of specific Change requests.
Based on what the users require in terms of stages and statuses of the Changes, Zia can provide the details without involving any technician.:
So, before configuring the workflow, define the outline of the conversation path. In this case, the conversation path may flow as follows:
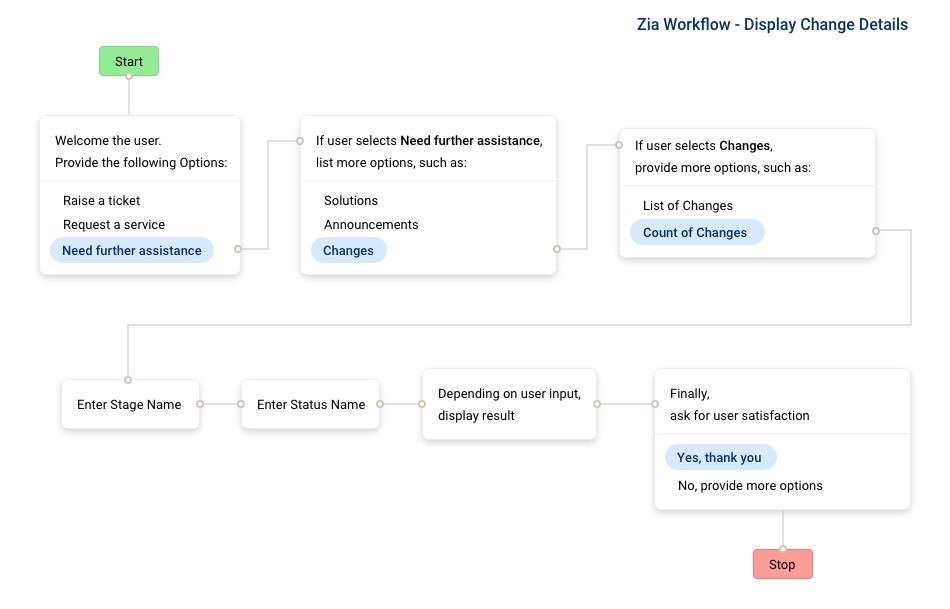
To configure this workflow, make sure you already have configured the following options menu, along with the buttons in the Zia Workflow canvas:
Note: The buttons can be created under the Options Menu after dragging them onto the canvas.
| S.No | Options Menu | Buttons |
| 1. | Welcome message <How can I help you?> |
|
| 2. | Display further options (user selects Need further assistance) |
|
| 3. | Display further options (if user selects Changes) |
|
| 4. | Display further options ( if user selects List/Count of Changes) |
|
| 5. | Finally, ask for user satisfaction |
|
The custom function used for this case is as follows:
input_data = { "list_info": { "search_criteria": [
{"field": "stage.name", "condition": "is", "value": stage},
{"field": "status.name", "condition": "is", "value": status, "logical_operator": "AND"} ] } };
response = invokeurl
[
url: "https://0457-08:8080/api/v3/changes"
type: GET
parameters: {"input_data": input_data}
headers: {"TECHNICIAN_KEY":"F987155A-6D24-4A66-BC9B-EDF58A3B0C4F"}
];
return response;
To configure the specific custom action, go to Admin > Custom Functions > Zia Functions

