Creating a New Contract
To create a new contract for asset,
-
Log in to the ServiceDesk Plus - MSP application using your user name and password.
-
Click the Contract tab in the header pane. This opens the contracts list view page.
-
Click the New Contract button in the contract index page. (OR)
Click Quick Actions link in the home page -> Click Contracts option under Create New. This opens the Add Contract form. This form has three major sections: Contract Details, Contract Rules, and Notification Rules.
 -
Select The Account Name for which the contract is to be created. This is mandatory field.
-
Specify a name for the contract in the Contract Name field. This is mandatory field.
-
Enter relevant Description for the contract in the respective text field.
-
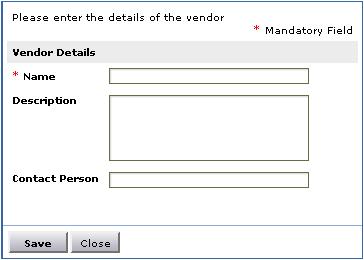
Select the Maintenance Vendor from the combo box listing all the vendor names available. This is mandatory field. If the vendor is not listed, then click Add New Vendor button beside the combo box. The Add New Vendor window pops up as shown below,

-
Specify the name of the vendor in the given field. This is mandatory field.
-
Enter a brief description about the vendor in the respective field.
-
Specify the Contact Person in the given field.
-
Click Save. The added vendor is selected and is displayed in the combo box. If you do not wish to add a new vendor then click Close.
-
In the Support field below it, enter the details regarding the kind of support that will be provided by the vendor to you.
-
You can add files that are related to the contract and are necessary to be maintained and referred to along with the contract information. Click Attach File button. The Attach File window pops up as shown below,

-
Click the Browse button to open the file selector window.
-
Select the file that you wish to add and click the Attach File button. The selected file is added and is displayed in the same window just below the file selection field. The total size of the attachments should not exceed 10 MB.
-
The attached file gets listed along with the File name and the size. The file can be deleted on clicking the Delete icon
 beside the file name.
-
In the Contract Rules section, you need to choose the assets that are to be maintained under this contract and mention the maintenance period and maintenance cost. Select the Assets that are covered under the contracts from the Maintained Assets list.
-
To add more resources to the list, click SelectResources for this contract link. This opens Select Resources page.
-
Specify the Resource Name or Product Type or Product in the search field.
-
Click Search button to get the result. Select the required resources by enabling the check box.
-
Click Add Items button to add the selected items.
-
Click View Resources>> button to view the selected resources.
-
Click Add Resources to Contract button to add resources to the Maintained Assets list.
-
Click Remove Selected Resources icon to remove selected resources from the list.
-
The Active period of the contract is a mandatory field where you need to enter the From and To date of the contract period. Choose the dates from the calender that can be invoked by clicking the
 icon.
icon. -
Enter the maintenance cost in terms of $ in the Maintenance Cost field.
-
Select the check box beside Enable Notification. This displays the notification rules information. Here you need to select the technician who needs to be notified about the expiry of the contract and how many days before the expiry, the notification needs to be sent.
-
Click Save.

